
Introduction
After starting our discussions into Text Analytics in Azure Machine Learning from the last article, we will be discussing the Named Entity Recognition control in Azure Machine Learning in this article.
Before this article, we have discussed multiple machine learning techniques such as Regression analysis, Classification Analysis, Clustering, Recommender Systems and Anomaly detection of Time Series in Azure Machine Learning by using different datasets. Further, we have discussed the basic cleaning techniques, feature selection techniques and Principal component analysis, Comparing Models and Cross-Validation and Hyper Tune parameters in this article series as data engineering techniques. In the first article on Text Analytics, we had a detailed discussion on Language detection and Preprocessing of text in order to organize data for better analytics.
We will be using last week’s techniques in order to build the case for Named Entity Recognition in this article.
What is Named Entity Recognition
Named Entity Recognition in Azure Machine Learning is used to identify the name of entities such as people, locations, and organizations, etc. The Named Entity Recognition control will provide where the particular entity exists as well as this technique will help us to understand the context of a text.
Data Set & Data preprocessing
To demonstrate the features of Named Entity Recognition control in Azure Machine Learning, we will be utilizing news data set that can be downloaded from https://data.world/credibilitycoalition/basic-november2018/workspace/intro . In this article, we have selected a complex and real-world data set rather than clean sample data set in order to demonstrate the features.
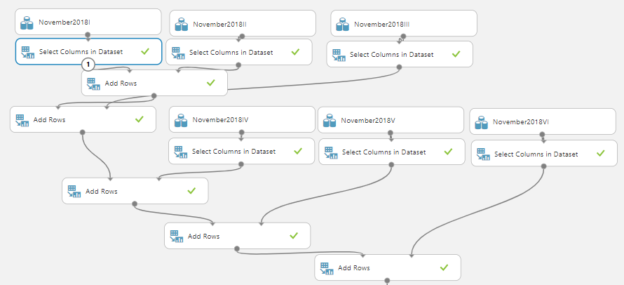
This data set has six different comma-separated value files (CSVs) and there have different columns. Since we want to merge all data, we need to use Add Rows control. However, before using the Add rows control, we have used Select Columns in Dataset control and selected only roject_id, report_id, report_title, media_content columns as you need to provide the same columns to the Add Rows control.
The following figure shows how the different datasets are merged to build a large data set.
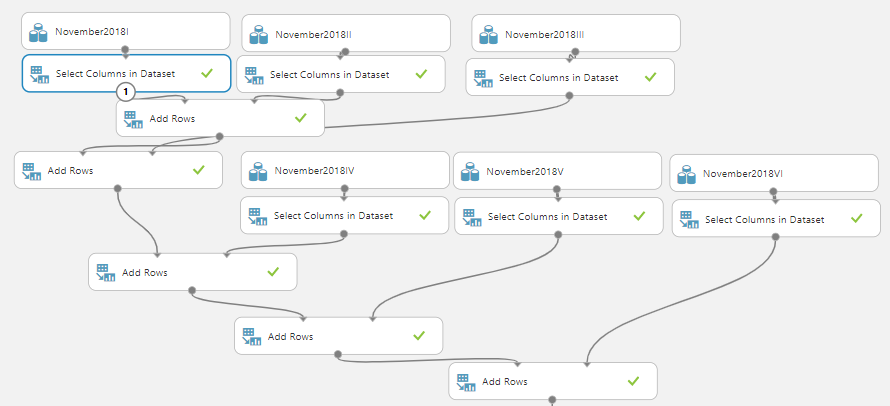
Though this looks a little complex, it is just a duplication of the same controls in order to merge six datasets. Then you will see the following is the final data set to identify different Entities.
After the dataset is ready, we need to apply standard Language techniques as we did in the previous article as shown in the below image.
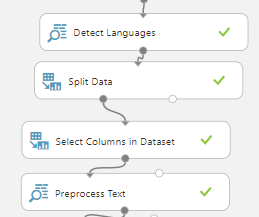
In the above controls, we have introduced Detect Languages control to filter other languages that are not English. Then the Split Data is used to filter on English text. Then we have removed other columns and used PreProcess Text control to clean the data by removing numbers, URLs and email addresses. Please note that these controls were discussed in detail in the last article.
Named Entity Recognition
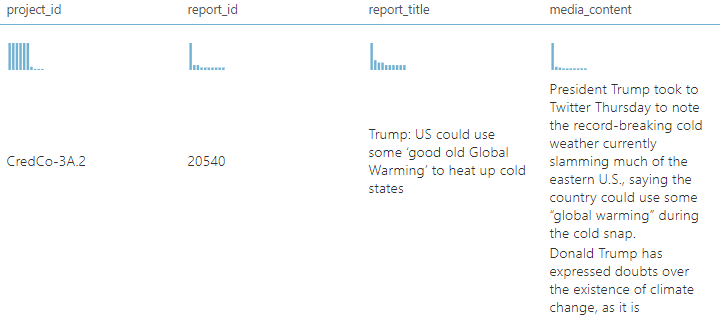
After data is cleaned, now it is time to include Named Entity Recognition control to identify entities. This control does not have any configuration and let’s see the output from this control.
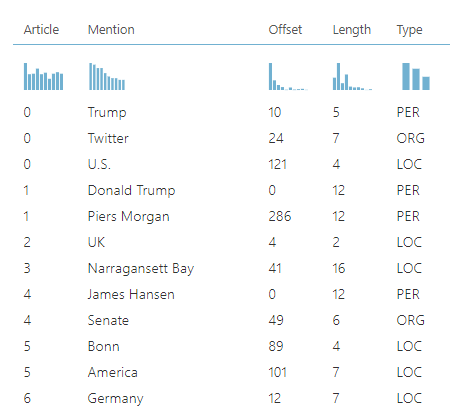
As shown in the above example, Named Entity Recognition has identified Trump, Twitter and U.S as entities as a person, an organization and location respectively. Apart from those entity properties, Article ID, Keyword length, and where this keyword exists in the document are also included in the above output.
Though the Named Entity Recognition is completed with that, few other implementations can be derived from the control in order to derive rich context into the text.
Implementation
Ideally, what we want to know is whether each news item is more relevant to a Person or Organization, or, Location. The following screenshot shows the control flow after the Named Entity Recognition control is used in the experiment in the Azure Machine Learning.
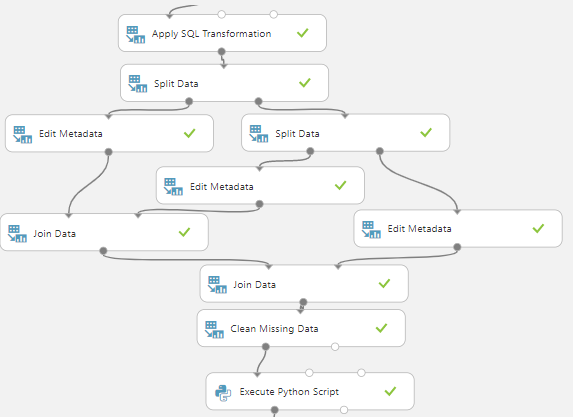
Let us discuss the above controls one by one. After the entities are identified, we need to aggregate the data through Apply SQL Transformation by using the following query.
|
1 2 3 |
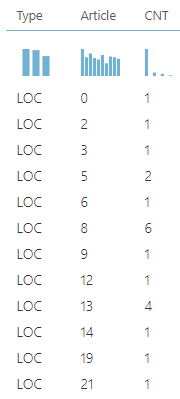
SELECT Type, Article, COUNT(*) CNT FROM t1 GROUP BY Type, Article |
The following image shows the output after the Apply SQL Transformation.
After the transformation is completed, the data stream is divided into three data streams are location, person and organization using three Split Data controls. Following are the formulas for the Split Data controls to divide the data.
\”Type” ^LOC
\”Type” ^PER
Then for each stream, separate Edit MetaData control is used to rename the columns to LOC, PER, ORG for better readability. Now, we need to join these data sets using Join Data control. Only two data streams can be joined from Join Data control. Therefore, to join three data streams, first, we need to join two data sets and then the next data stream to the previously joined data streams.
The following image shows the configuration of Join Data Control.
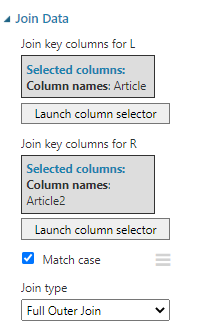
Article ID is used as the join columns in both sets. Since there can be articles that exist only in one data stream, we need to use Full Outer Join as the join type in the Join Data control. Once three data streams are joined with two join data controls, you will see the data set as follows.
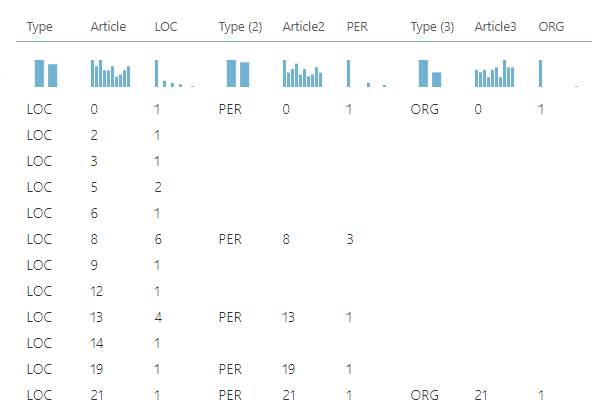
Then the Clean Missing Data control is used to clean the data so that empty values of LOC, PER, ORG, Type, Article, Type (2), Article2, Type (3), Article3 are replaced with zero values.
Then Execute Python script control is used to replace empty values of Article column with either with Article2 or Article3 columns. o
Following python script used to achieve the above-said purpose.
|
1 2 |
dataframe1.loc [dataframe1['Article2'] != 0,'Article'] = dataframe1['Article2'] dataframe1.loc [dataframe1['Article3'] != 0,'Article'] = dataframe1['Article3'] |
Then the unnecessary columns are removed from the Select Columns in Dataset control and the data set can be seen as follows.
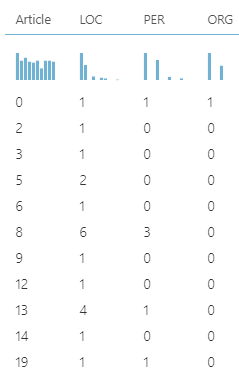
If you further analyze this dataset, you can view how entities are identified. For example, Article 8 has six location entities and three persona entities. After identifying the count for each entity, the next is to derive the relevant news type whether it is Person, Organization or Location.
This is achieved by following a set of controls in Azure Machine Learning.
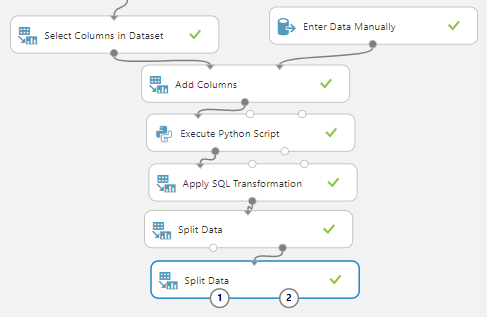
After removing unwanted columns by using the Select Columns in Dataset control, a new column is added to store the type of news that was identified by Named Entity Recognition. The Enter Data Manually control is used for this purpose.
Then the Execute Python Script control is used to define the type using the following python script.
|
1 2 3 |
dataframe1.loc [(dataframe1['LOC'] >= dataframe1['PER']) & (dataframe1['LOC'] >= dataframe1['ORG']) ,'Type'] = 'LOC' dataframe1.loc [(dataframe1['PER'] > dataframe1['LOC']) & (dataframe1['PER'] >= dataframe1['ORG']) ,'Type'] = 'PER' dataframe1.loc [(dataframe1['ORG'] > dataframe1['LOC']) & (dataframe1['ORG'] >= dataframe1['PER']) ,'Type'] = 'ORG' |
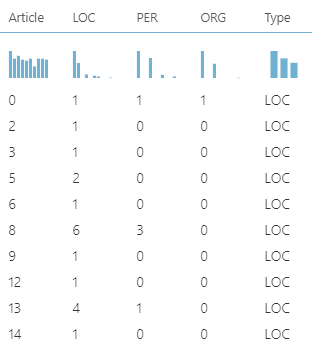
The following will be output after the execution of the Python script.
You can implement any rules in python script to define the type.
In order to display the Article in ascending order, Apply SQL Transformation control is used with the following query.
|
1 |
SELECT * FROM t1 ORDER BY by Article ASC; |
Next is to separate news types into different streams so that they can be analyzed separately using Split Data control which we did many times before. However, it is not possible to link the type with the original data which is a limitation in Azure Machine Learning Named Entity identification control.
- Note: The entire experiment for this control in Azure Machine Learning can be found at https://gallery.azure.ai/Experiment/Named-Entity-Recognition-News in the galley. You can modify the experiment to suit your environment
Conclusion
After processing basic cleaning techniques in Text Analytics in the last article, we looked at Named Entity Recognition in Azure Machine Learning from this article. This control will identify the entities in a text in three categories are Person, Location and Organization. This control will recognize the relevant entity with its position. Further, by using other controls in Azure Machine Learning such as Data Split, Join Data, Apply SQL Transformation, Execute Python Script, we can define the entity type for the content and can identify the context of the text. By using this control, we can examine twitter content and find out the trends in tweets as well.
References
Table of contents

View all posts by Dinesh Asanka
- Testing Type 2 Slowly Changing Dimensions in a Data Warehouse - May 30, 2022
- Incremental Data Extraction for ETL using Database Snapshots - January 10, 2022
- Use Replication to improve the ETL process in SQL Server - November 4, 2021