
In this article, you’ll learn the key skills that you need to copy tables between SQL Server instances including both on-premises and cloud SQL databases. In this article, I’ll walk-through several ways of copying a table(s) between SQL databases, helping you to see the benefits and trade-offs of each option.
Introduction
Before we begin the article, though, let’s go over the objectives of the article. We then move on to the overview of each module or methods. In this guide, we briefly discuss several aspects of SQL Server’s available built-in options, as well as show you a few PowerShell and 3rd party tools can be used to copy SQL tables between the databases and between the instances as well. At the beginning of each method, I’ve given you enough information that the following modules. We follow this module up with several modules, each of which is dedicated to specific methods.
Objectives:
- Introduction
-
Discuss various methods to copy tables
- Using .Net class library to copy tables with PowerShell
- Using Import-and-Export Wizard
- Using sqlpackage.exe – Extract and Publish method
- Using Generate Scripts wizard in SSMS ( SQL Server Management Studio)
- Using INSERT INTO SQL statement
- And more…
Get started
In SQL Server, copying tables between the databases of the same SQL instances are relatively easier than copying the data between the remote servers. To minimize the work-load on the production database, it is always recommended to restore the database from the backup to the new database and then use the best methods to copy the data to the target database. Again, this depends on the number of tables, size, and available space. If the size of the table(s) is more than 50% of the total size of the database than the backup-and-restore method is a recommended option.
In some cases, you might have to copy a few very large table(s), and then you may probably end-up in moving the table(s) to separate file-groups and perform a partial backup-and-restore method to copy the data. You can refer to the article Database Filegroup(s) and Piecemeal restores in SQL Server for more information.
You can also use third-party tools to perform an object level restore from a backup file.
SqlBulkCopy object class for Data copy with PowerShell
PowerShell is always my first choice for any administrative task. Net provides a SqlBulkCopy class library to bulk load the table(s) into the database.
You can refer to the article 6 methods to write PowerShell output to a SQL Server table to get more information about .Net class libraries.
PowerShell script
The following PoSH script creates a function named Get-SQLTable. The function has several mandatory parameters.
|
1 2 3 4 5 6 7 8 9 10 11 12 13 14 15 16 17 18 19 20 21 22 23 24 25 26 27 28 29 30 31 32 33 34 35 36 37 38 39 40 41 42 43 44 45 46 47 48 49 50 51 52 53 54 55 56 57 58 59 60 61 62 63 64 65 66 67 68 69 70 71 72 73 74 75 76 77 78 79 80 81 82 83 84 85 86 87 88 89 90 91 92 93 94 |
function Get-SQLTable { [CmdletBinding()] param( [Parameter(Mandatory=$true)] [string] $SourceSQLInstance, [Parameter(Mandatory=$true)] [string] $SourceDatabase, [Parameter(Mandatory=$true)] [string] $TargetSQLInstance, [Parameter(Mandatory=$true)] [string] $TargetDatabase, [Parameter(Mandatory=$true)] [string[]] $Tables, [Parameter(Mandatory=$false)] [int] $BulkCopyBatchSize = 10000, [Parameter(Mandatory=$false)] [int] $BulkCopyTimeout = 600 ) $sourceConnStr = "Data Source=$SourceSQLInstance;Initial Catalog=$SourceDatabase;Integrated Security=True;" $TargetConnStr = "Data Source=$TargetSQLInstance;Initial Catalog=$TargetDatabase;Integrated Security=True;" try { Import-Module -Name SQLServer write-host 'module loaded' $sourceSQLServer = New-Object Microsoft.SqlServer.Management.Smo.Server $SourceSQLInstance $sourceDB = $sourceSQLServer.Databases[$SourceDatabase] $sourceConn = New-Object System.Data.SqlClient.SQLConnection($sourceConnStr) $sourceConn.Open() foreach($table in $sourceDB.Tables) { $tableName = $table.Name $schemaName = $table.Schema $tableAndSchema = "$schemaName.$tableName" if ($Tables.Contains($tableAndSchema)) { $Tablescript = ($table.Script() | Out-String) $Tablescript Invoke-Sqlcmd ` -ServerInstance $TargetSQLInstance ` -Database $TargetDatabase ` -Query $Tablescript $sql = "SELECT * FROM $tableAndSchema" $sqlCommand = New-Object system.Data.SqlClient.SqlCommand($sql, $sourceConn) [System.Data.SqlClient.SqlDataReader] $sqlReader = $sqlCommand.ExecuteReader() $bulkCopy = New-Object Data.SqlClient.SqlBulkCopy($TargetConnStr, [System.Data.SqlClient.SqlBulkCopyOptions]::KeepIdentity) $bulkCopy.DestinationTableName = $tableAndSchema $bulkCopy.BulkCopyTimeOut = $BulkCopyTimeout $bulkCopy.BatchSize = $BulkCopyBatchSize $bulkCopy.WriteToServer($sqlReader) $sqlReader.Close() $bulkCopy.Close() } } $sourceConn.Close() } catch { [Exception]$ex = $_.Exception write-host $ex.Message } finally { #Return value if any } } |
The $tables array variable is used to assign the list of the table(s) to be copied to the target database
|
1 |
[string[]] $tables = @('dbo.OPERATION','dbo.OPERATION_DETAIL') |
Let us invoke the Get-SQLTable function with the below mentioned parameters to copy the tables from Adventureworks2016 database on ‘HQDBT01’ to Adentureworks2012 database on hqdbt01/sql2017’ instance.
|
1 |
Get-SQLTable -SourceSQLInstance hqdbt01 -SourceDatabase AdventureWorks2016 -TargetSQLInstance hqdbt01\sql2017 -TargetDatabase AdventureWorks2012 -Tables $tables -BulkCopyBatchSize 5000 |
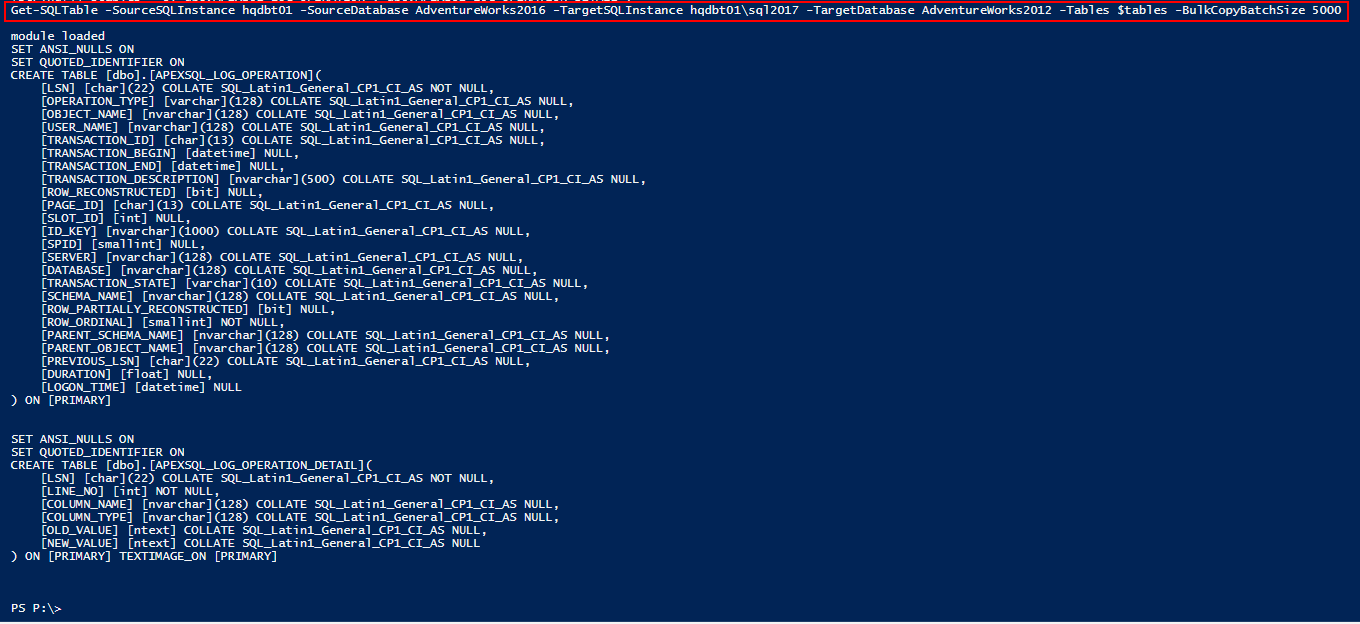
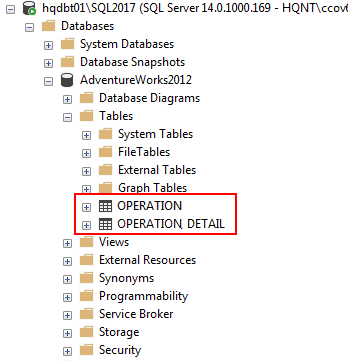
The output shows the tables OPERATION and OPERATION_DETAIL copied to the target instance.
SSMS Import-and-Export Wizard
Let’s take a look at the Import-and-Export Wizard. The interface is very similar to all other wizards, allow you to easily step through a process, and to execute the data copy process with writing very little or no code. To do that, we have very few options that we can do within the wizard. However, for this, for importing and exporting data from one source into another, this is really an excellent tool. If you want to do almost any kind of transformations, then you don’t want use this tool, you may need to use Visual Studio Data Tools (VSDT), and do a data flow.
So let’s get started. The first thing is to open Microsoft SQL Server Management Studio (SSMS). And we’re going use to AdventureWorks2016 database, and we’re going to move it over to another instance of SQL.
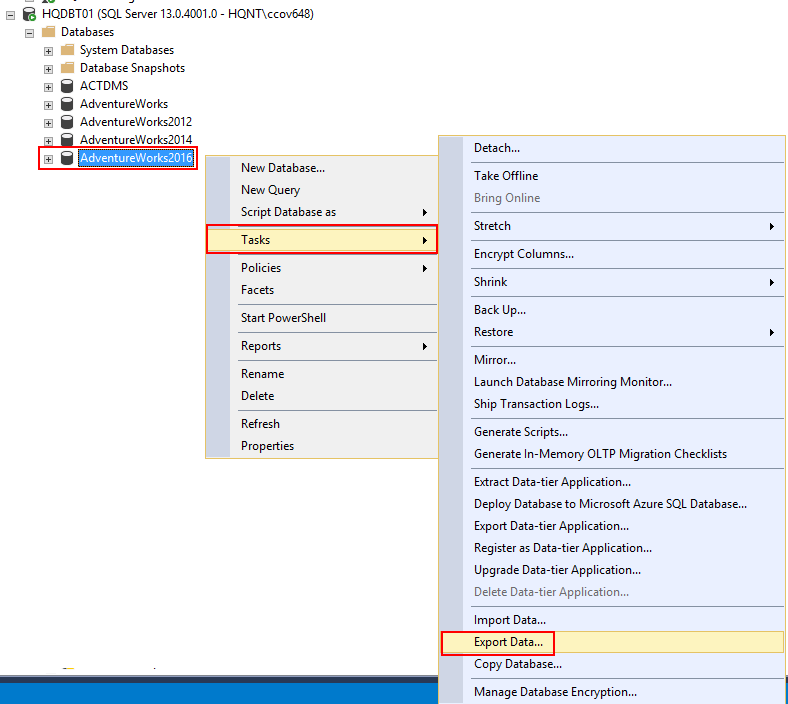
- Open the Object Explorer, locate the database, right-click and select Tasks and choose Export Data option.
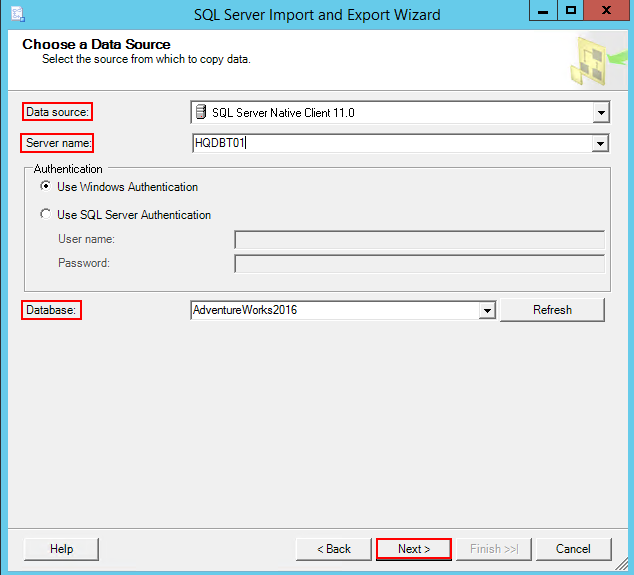
- Now the data source, if I pull this down, you’ll see the different sources that we can use. We’re going to use SQL Native Client 11.0, the SQL provider.
- Next, Server name, it is recommended practice to pull server name and database in the import and export wizard using the selection drop-down list.
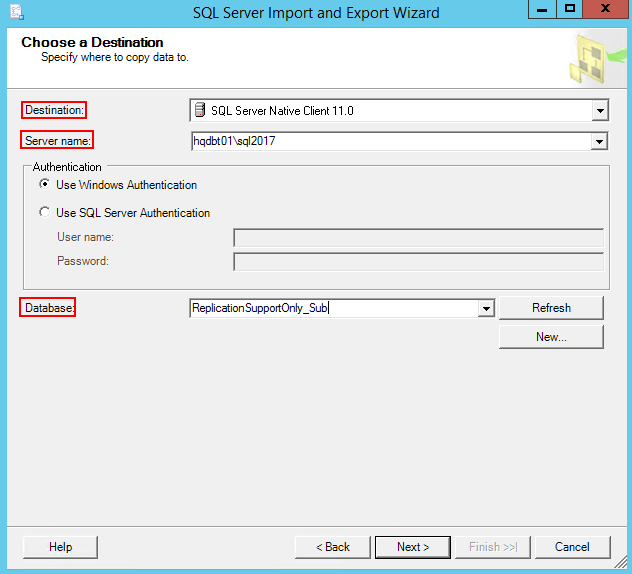
- Now the destination selection, again pull down SQL provider, Server name and Database from a drop-down list rather than typing it. And we’ll go Next
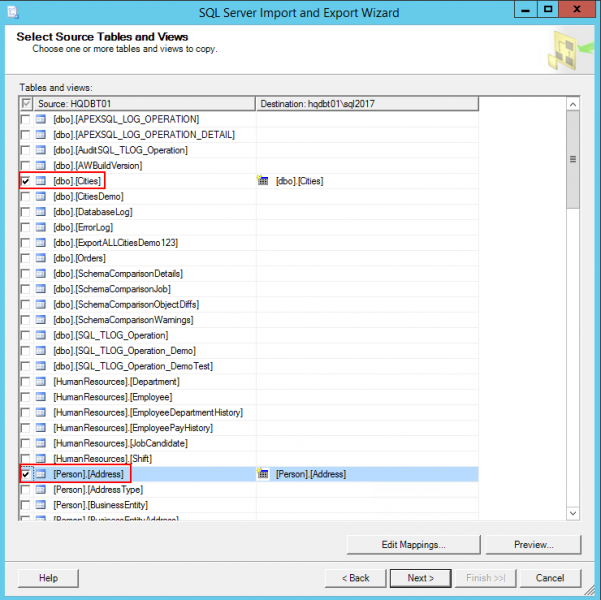
- In Select Source Tables and Views, select the objects to copy to the destination or you could write a query. But here we’re just going to copy the data. In this case, let’s bring in the dbo.Cities and Person.Address.
- Click Next
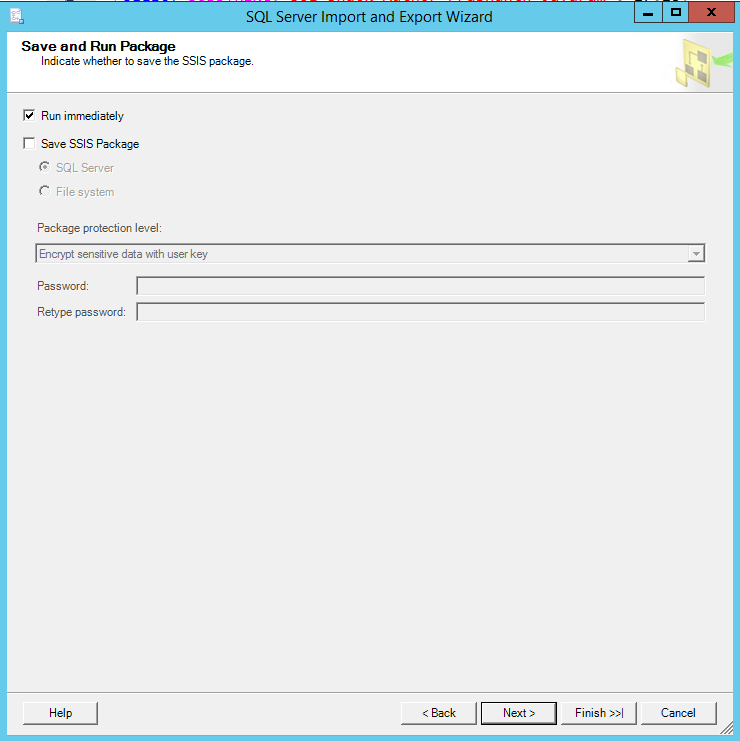
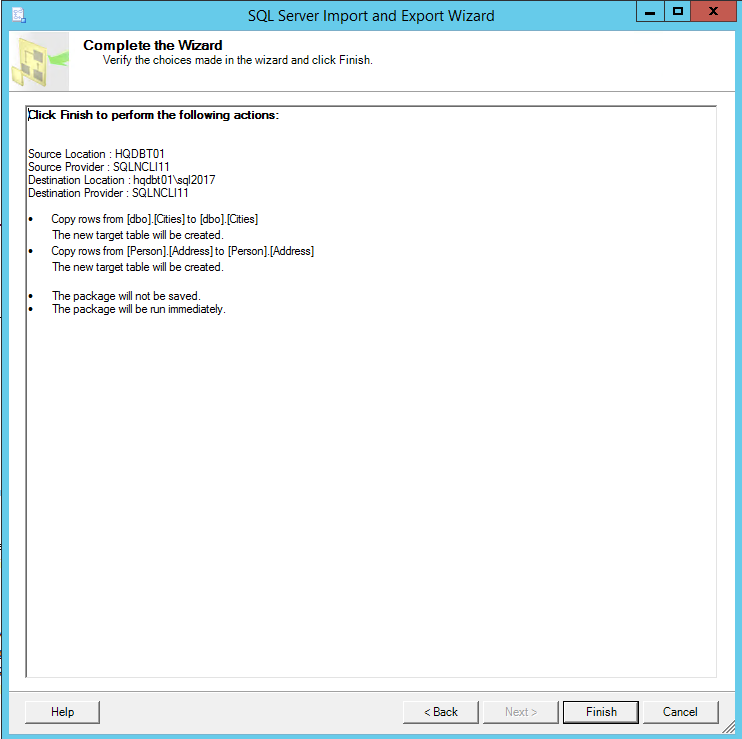
- We’re ready to run the copy job. Let us choose Run immediately and Click Next
- We can see a summary of the action that we are going to perform using the wizard
- Click Finish to execute the job steps.
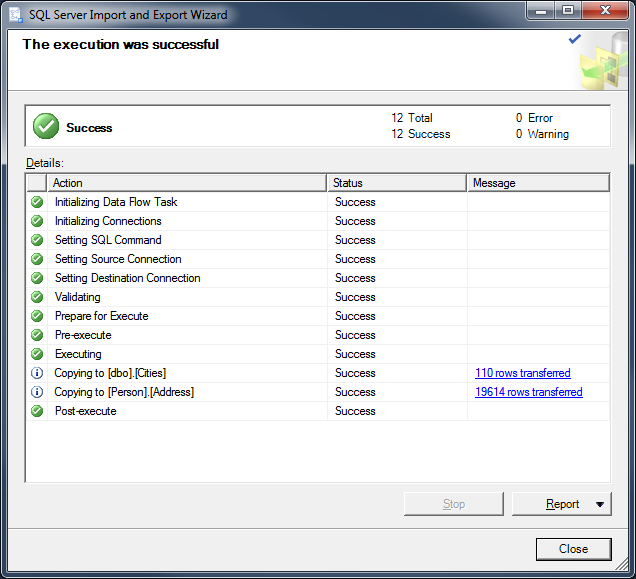
- After successful execution of the job, we can validate and review the output.
Using sqlpackage.exe – Extract and Publish method
Sqlpackage is command-line utility that automate “Schema-and-data” extraction process and publish the generated file into a target database. The SqlPackage.exe command-line utility is an in-house component of SQL Server Data Tools (SSDT).
You can refer to the articles Continuous Database Delivery (CD) using SQL Server Tools SqlPackage.exe and SqlPackage.exe – Automate SQL Server Database Restoration using bacpac with PowerShell or Batch techniques for more information.
Using Sqlpackage.exe, it’s possible to extract the schema-and-data, and then publish only those listed table(s) data. In the process, the objects such as Stored Procedures, Functions, etc are extracted into the .dacpac file, but they’re excluded when publishing the content into the target database.
It is possible to list the tables. On specifying individual tables, you need to first specify /p:ExtractAllTableData=False and then add /p:TableData property to specify each table in the form of Schema.Table.
The following example uses the property /p:TableData for three tables. You can see that the tables are referred in the form of dbo.orders.
/p:TableData=dbo.Orders
/p:TableData=Orders.Orders
/p:TableData=Person.Address
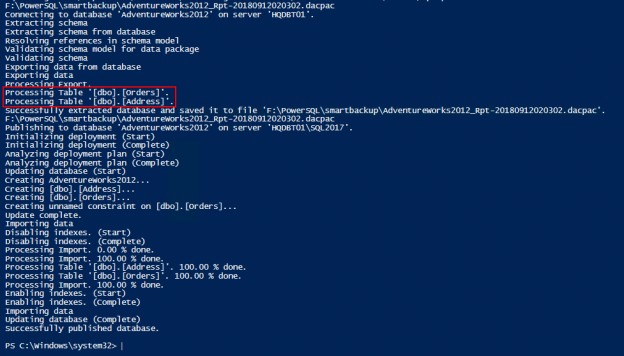
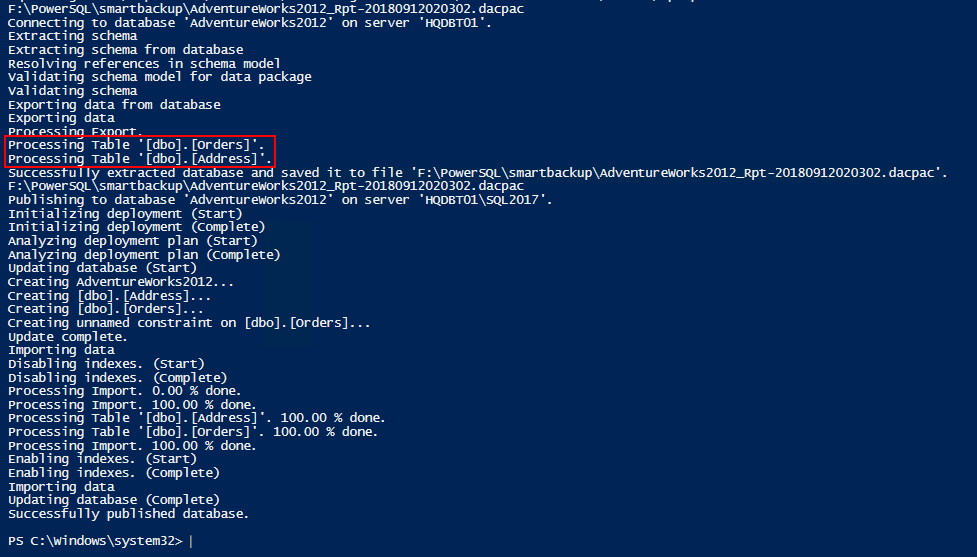
SqlPackage /Action:Extract /SourceDatabaseName:Adventureworks2016 /SourceServerName:HQDBT01 /TargetFile:F:\PowerSQL\smartbackup\AdventureWorks2016.dacpac /p:IgnoreExtendedProperties=True /p:ExtractAllTableData=FALSE /p:TableData=dbo.Cities /p:TableData=dbo.citiesDemo
Let’s prepare the script to automate the extract-and-publish process
- Set the ENVIRONMENT variable. The file may be found in other directories depend on the SSDT installation. In this case, SqlPackage.exe is found in C:\Program Files (x86)\Microsoft SQL Server\140\DAC\bin\ folder
-
Prepare the Input values
- Backup Directory
- Source Database
- Source SQL Server instance
- Target database
- Target SQL Server instance
- Run the SqlPackage.exe with an extract action on the source SQL instance
- Run T-SQL to find the existence of the target database
- Run the SqlPackage.exe with a publish action on the target SQL instance
|
1 2 3 4 5 6 7 8 9 10 11 12 13 14 15 16 17 18 19 20 21 22 23 24 25 26 27 28 29 30 31 32 33 34 35 36 37 38 39 40 41 42 43 44 45 46 47 48 49 50 51 52 53 54 55 56 57 58 59 60 61 62 63 64 |
# Environment PATH variable $Variables=$env:PATH #Check the path existence of the SqlPackage.exe and print its status IF (-not $Variables.Contains( "C:\Program Files (x86)\Microsoft SQL Server\140\DAC\bin")) { write-host "SQLPackage.exe path is not found, Update the environment variable" $ENV:PATH = $ENV:PATH + ";C:\Program Files (x86)\Microsoft SQL Server\140\DAC\bin;" } #the input parameters $BackupDirectory="F:\PowerSQL\smartbackup\" $DatabaseName="AdventureWorks2012" #Source SQL Server Instance $SourceServerName="HQDBT01" #target SQL Instance $TargetserverName="HQDBT01\SQL2017" #Prepare the target filename $dir = [io.path]::GetDirectoryName($BackupDirectory) #set the filename, the database should be a part of the filename $filename = "AdventureWorks2012_Rpt" #extension must be dacpac $ext = "dacpac" # Prepare FULL PATH $TargetFilePath = "$dirName\$filename-$(get-date -f yyyyMMddhhmmss).$ext" #print FULL file path $TargetFilePath #Run the SqlPackage tool to extract the data SqlPackage /Action:Extract /SourceDatabaseName:$DatabaseName /SourceServerName:$SourceServerName /TargetFile:$TargetFilePath /p:IgnoreExtendedProperties=True /p:ExtractAllTableData=FALSE /p:TableData=dbo.Orders /p:TableData=dbo.Address #Get the latest file in a given directory $NewestBacPacFile = Get-ChildItem -Path $dirName\$filename*.$ext | Sort-Object LastAccessTime -Descending | Select-Object -First 1 #print the latest bacfile name depending the name of the database $file="$NewestBacPacFile" $FILE #If exists then drop the database $dropTSQL= @" IF EXISTS (SELECT * FROM [sys].[databases] WHERE [name] = '$DatabaseName') DROP DATABASE $DatabaseName "@ #Using sqlcmd, execute the DropTSQL on the target instance. SQLCMD -S $TargetserverName -U SA -P Api1401$ -Q $dropTSQL #Publish the data in the target database using sqlpackage.exe SqlPackage.exe /a:publish /sf:$file /tsn:$TargetserverName /tdn:$DatabaseName /tu:SA /tp:Api1401$ |
Output:
In the output, you can see that the table dbo.orders and dbo.address tables are processed.
You can refer to the article SqlPackage.exe – Automate SQL Server Database Restoration using bacpac with PowerShell or Batch techniques for more information
Generate Scripts using SQL Server Management Studio
In this section, we’ll discuss another way to generate “schema and data” for SQL Server databases objects.
Let’s see the steps to generate a SQL Script that includes both “Schema and Data”
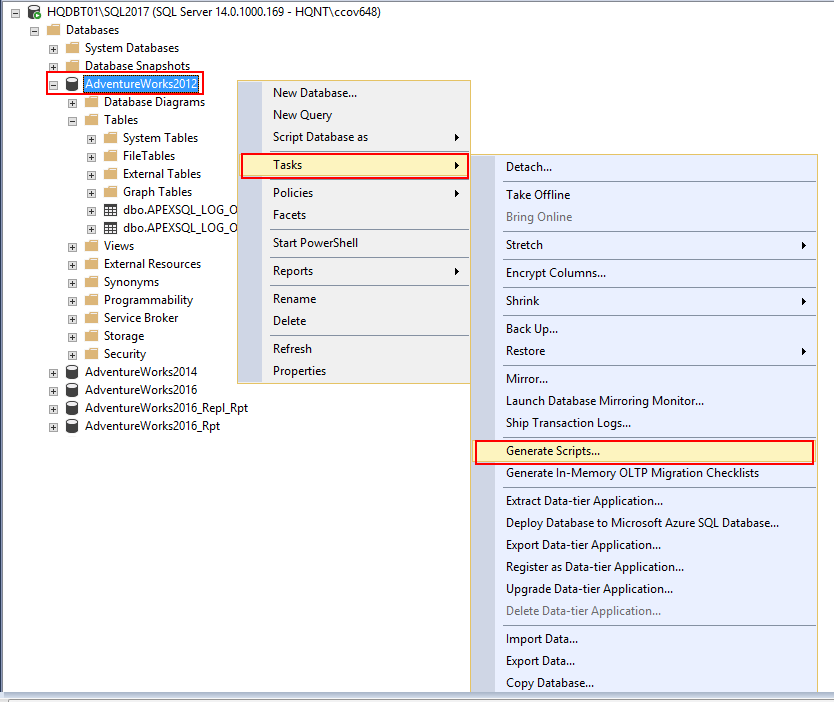
- Connect the SQL Server instance
- Open the Object Explorer and locate the database
-
Right-click the database, select Tasks, and then click on Generate Scripts…. After that, the Script Wizard opens. Click on “Next”.

-
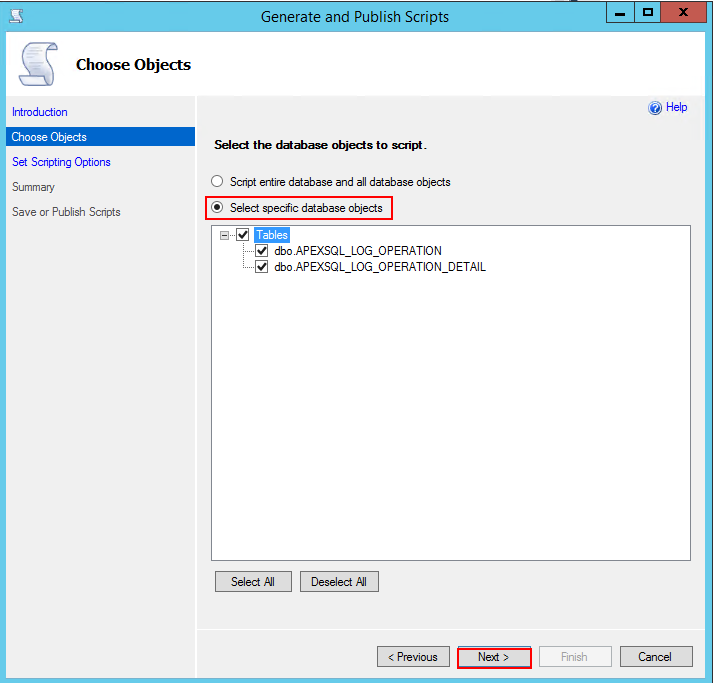
On Choose Object page, enable the Select specific database objects option. Select the intended objects and Click Next.
-
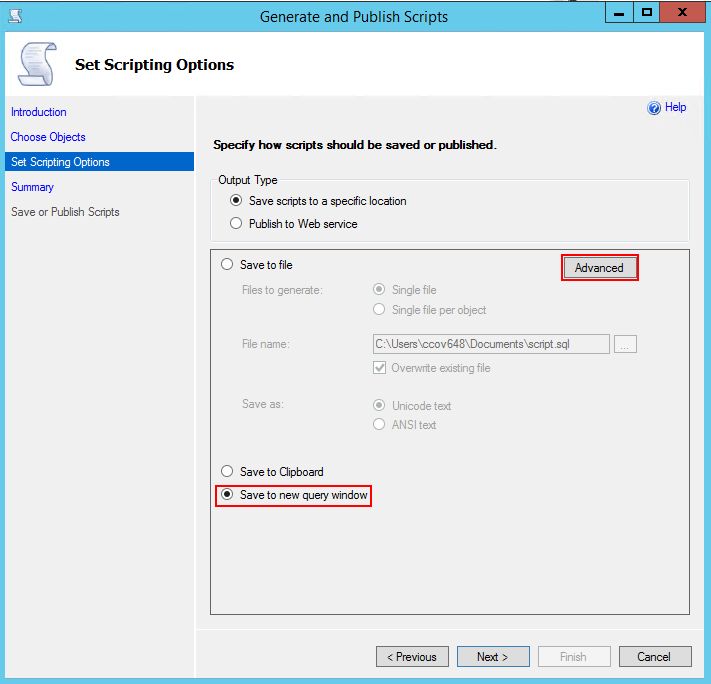
In Set Scripting Options, Select the Output Type and Click Advanced button. In this case, the output type re-directed to query window.
-
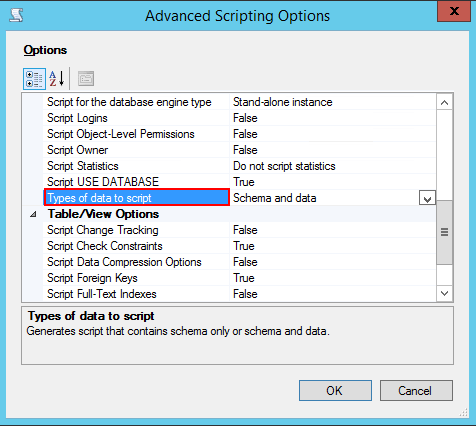
In the Advanced Scripting Options, select “Schema and Data” from the drop-down list and Click OK.
-
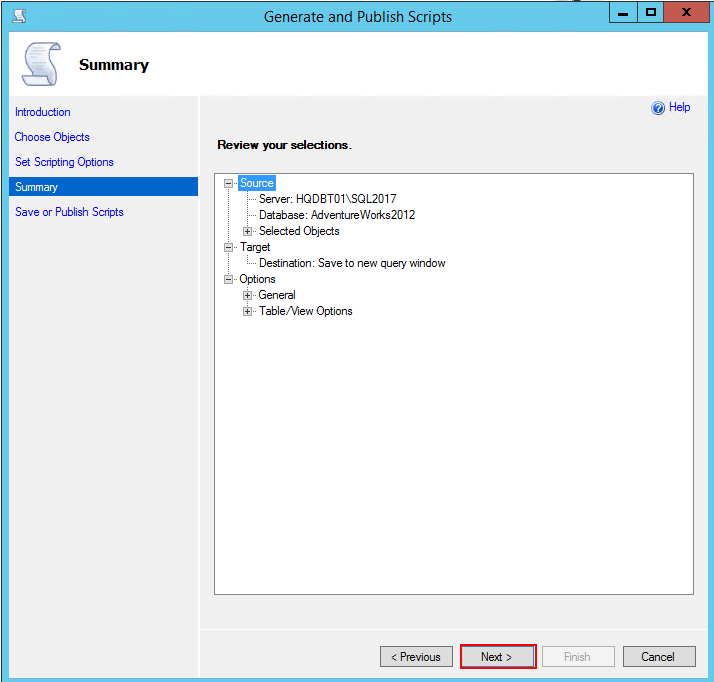
Next, the Summary page details the outlines of the entire process. Click Next
-
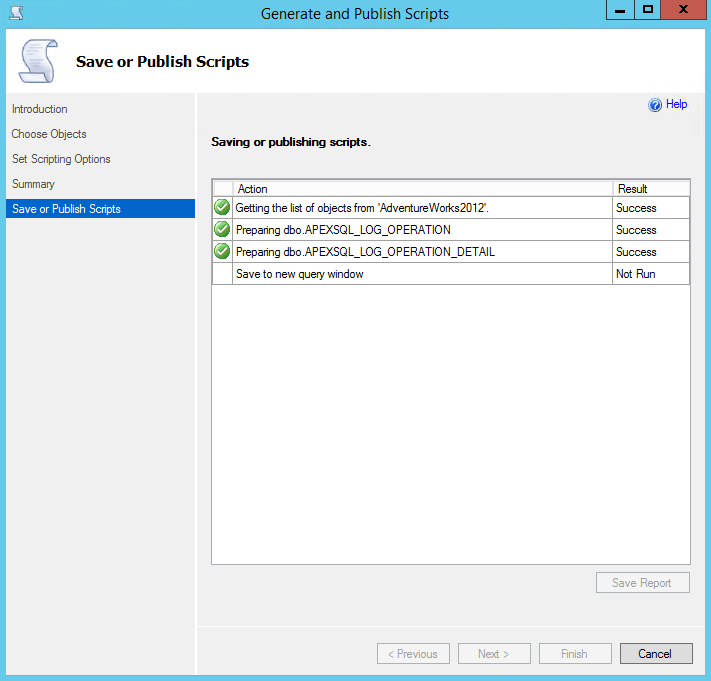
Now, Save or Publish Scripts page shows the progress of the entire process. You can monitor the status of the entire schema and data generation process.
INSERT INTO SQL
This is also an option to clone the table from database to another.
You can refer to the article Overview of the SQL Insert for more information.
Summary
So far, we’ve discussed various methods to copy the tables across SQL Server databases. It is evident that restoring a couple of tables from a backup can be time and space consuming process. It is up to your environment to follow any of the aforementioned steps to copy the tables in SQL Server. There is no standard/recommended way to copy a table between the databases but there are many possible approaches that you can use to fit your needs

My specialty lies in designing & implementing High availability solutions and cross-platform DB Migration. The technologies currently working on are SQL Server, PowerShell, Oracle and MongoDB.
View all posts by Prashanth Jayaram
- Stairway to SQL essentials - April 7, 2021
- A quick overview of database audit in SQL - January 28, 2021
- How to set up Azure Data Sync between Azure SQL databases and on-premises SQL Server - January 20, 2021