
This article gives you an overview of configuring the AWS Redshift cluster to use it from a locally installed IDE or tools.
Introduction
In my last article, Getting started with AWS Redshift, we saw how to create an AWS Redshift cluster. Though Redshift provides an in-console browser-based query editor interface, often it’s not sufficient for the regular day to day database development needs. The query editor interface is generally used for a quick preview style of checks or a sneak peek into the Redshift database. The standard practice is that developers and administrators use a locally installed tool or IDE (Integrated Development Environment) of choice installed on a local machine or a virtual machine on the cloud, from which they connect to the Redshift cluster endpoint. These IDEs generally are packed with a lot of features that support day to day needs of a developer or administrator to perform various actions on the Redshift cluster. In this article, we will explore the step-by-step process to configure a Redshift cluster in a way that we can connect to it using IDEs of choice. The following steps will assume that you have a working Redshift cluster and have the required administrative rights to operate on the cluster.
AWS Redshift IDEs
Several popular IDEs support working with Redshift like SQL Workbench, Aginity Pro for Redshift, Jetbrain’s DataGrip and many others. Redshift supports JDBC and ODBC interfaces as well as drivers using which one can connect to the redshift cluster. These drivers can be downloaded from here. If you are using an IDE that does not have out-of-box support for Redshift, you can install and configure these drivers in your IDE to work with Redshift. We would be using an IDE in this article that has out-of-box support for Redshift, so you would not need to perform this step of configuring the driver.
Aginity Pro for Redshift is one of the most popular IDEs that is used with Redshift, which can be downloaded and used freely for individual use from here. Download and install this IDE if you are using a Windows or Mac-based workstation, as it does not support Linux.
For users who are using a Linux based workstation, they can use other alternate IDEs like SQL Workbench, which is also available for free individual use, and can be downloaded from here. Install the IDE of your choice, as we would be using this IDE to connect to the AWS Redshift cluster once we have configured the cluster endpoint.

AWS Redshift Cluster Endpoint
Once the IDE is installed on the local machine, its time to configure the redshift cluster endpoint. Navigate to the Redshift dashboard, where you would find your cluster listed as shown below.
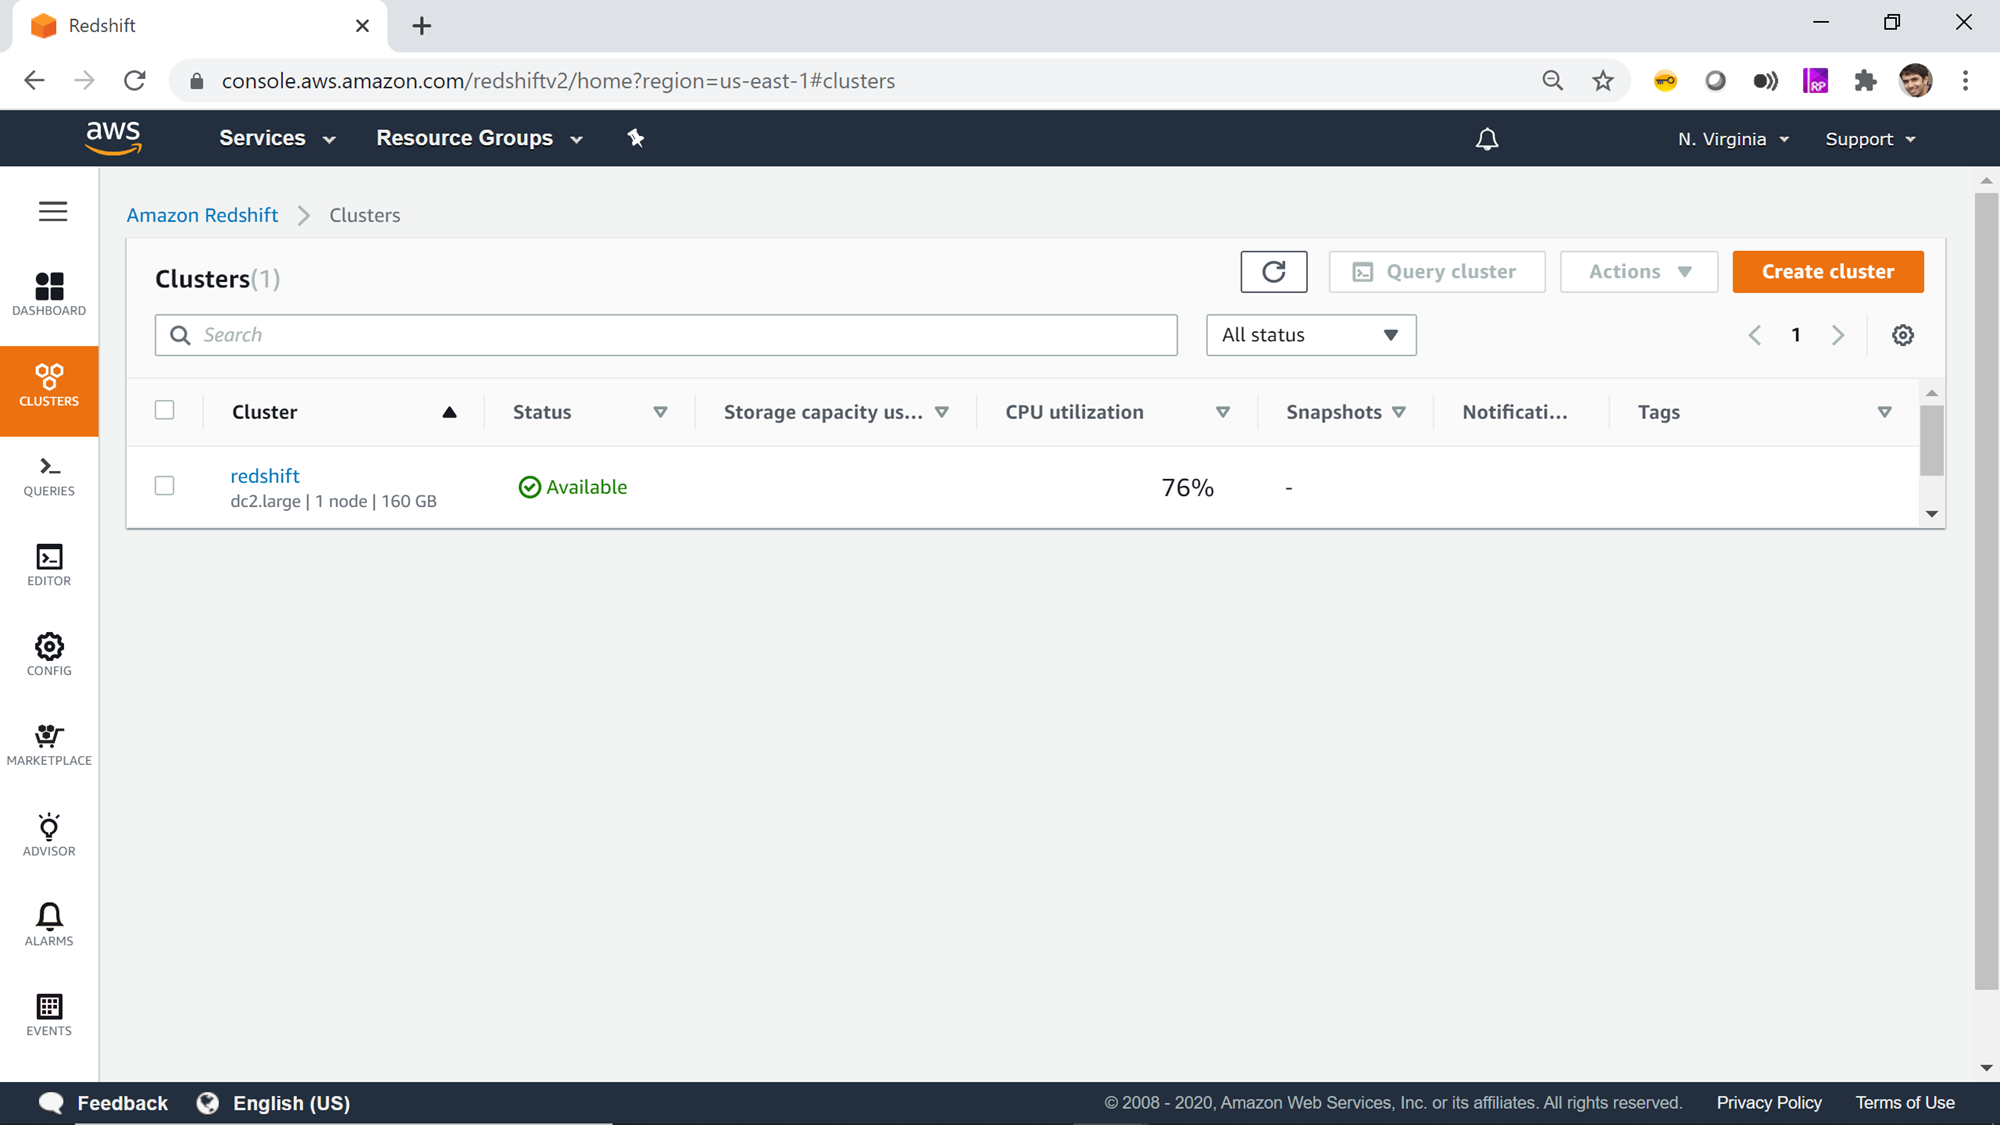
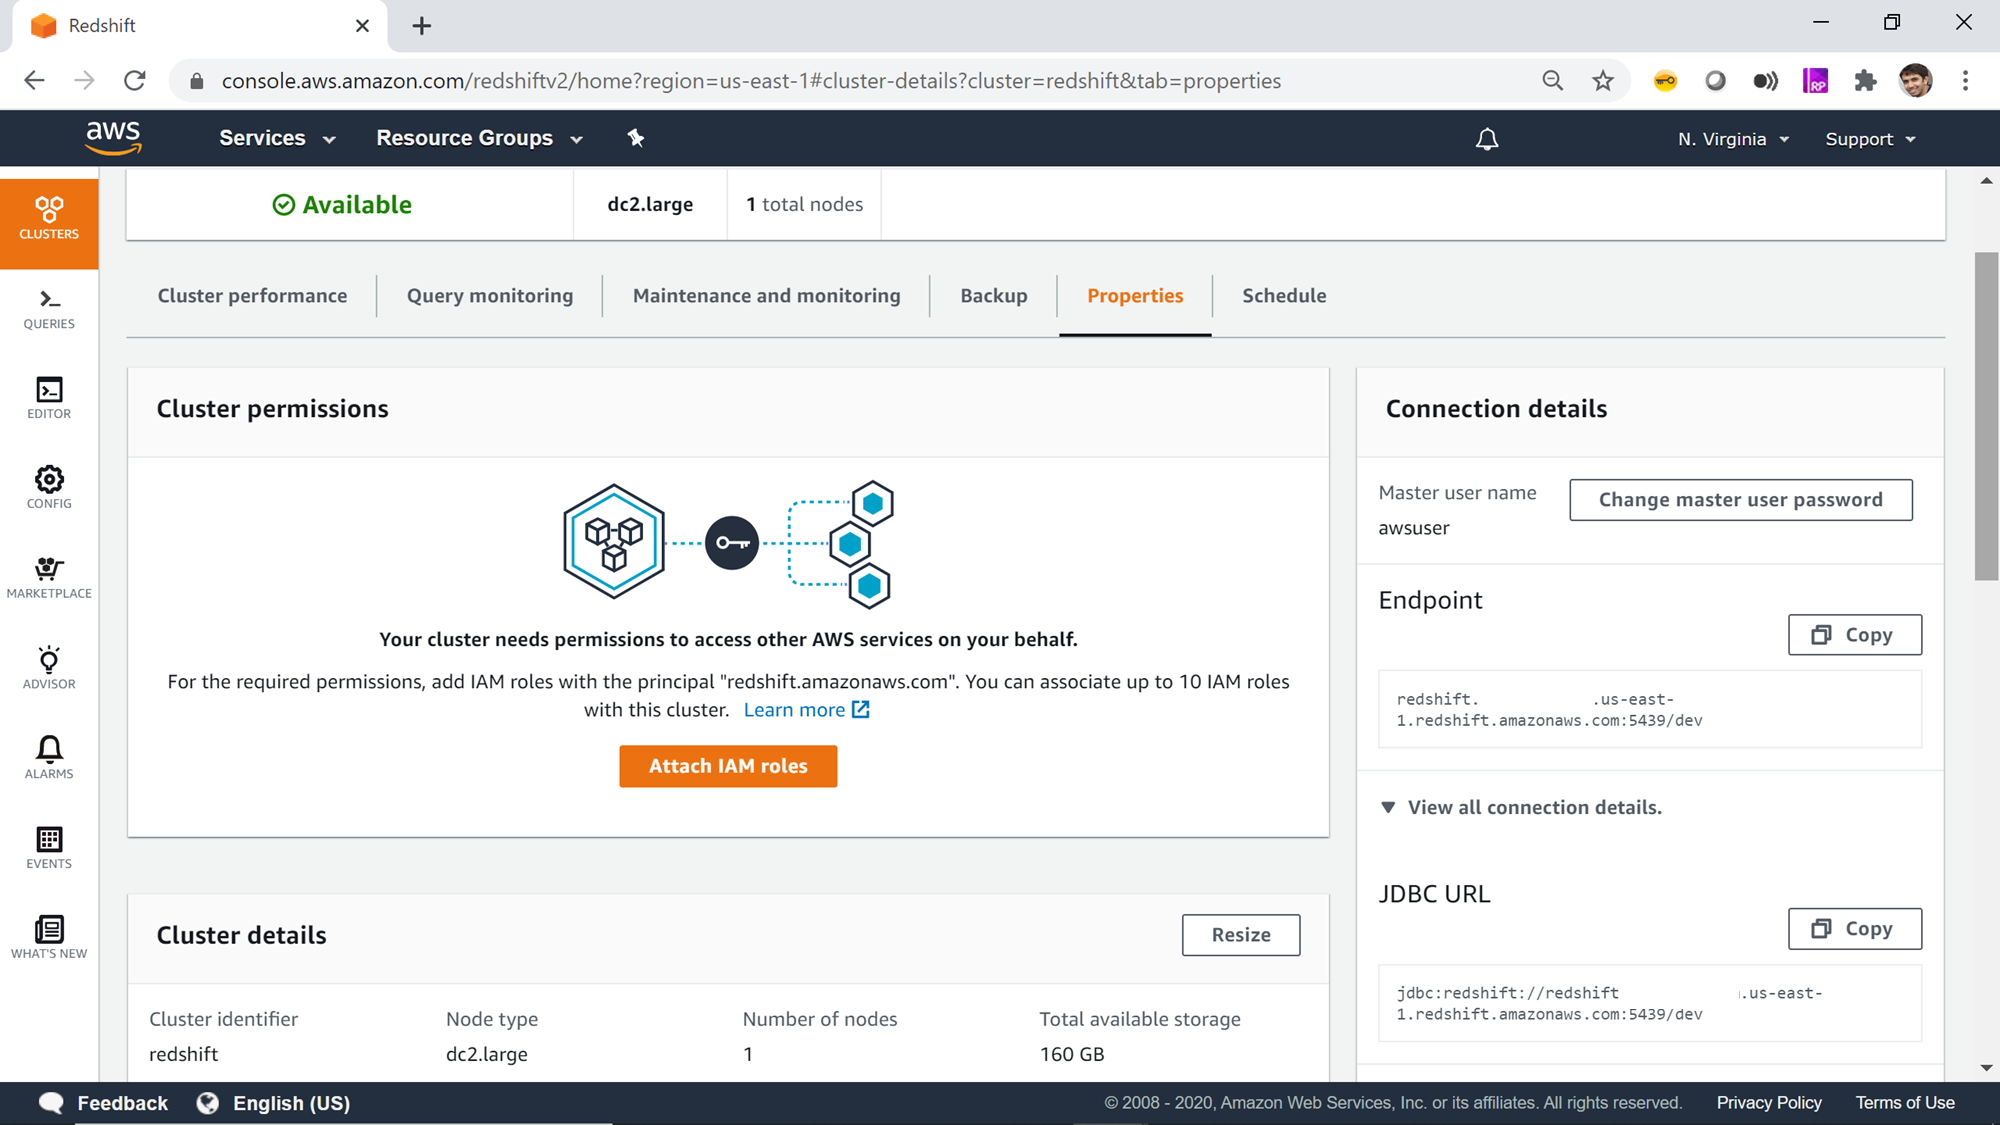
Open the Redshift cluster by clicking on the name of the cluster which will navigate you to the dashboard page of the selected cluster. Click on the Properties tab to explore the details of the cluster. On the left-hand side of the cluster, you would find the connection details like the cluster endpoint which is the address of the cluster and the JDBC connection string which you can use to connect to the cluster from the tools of your choice, as shown below.
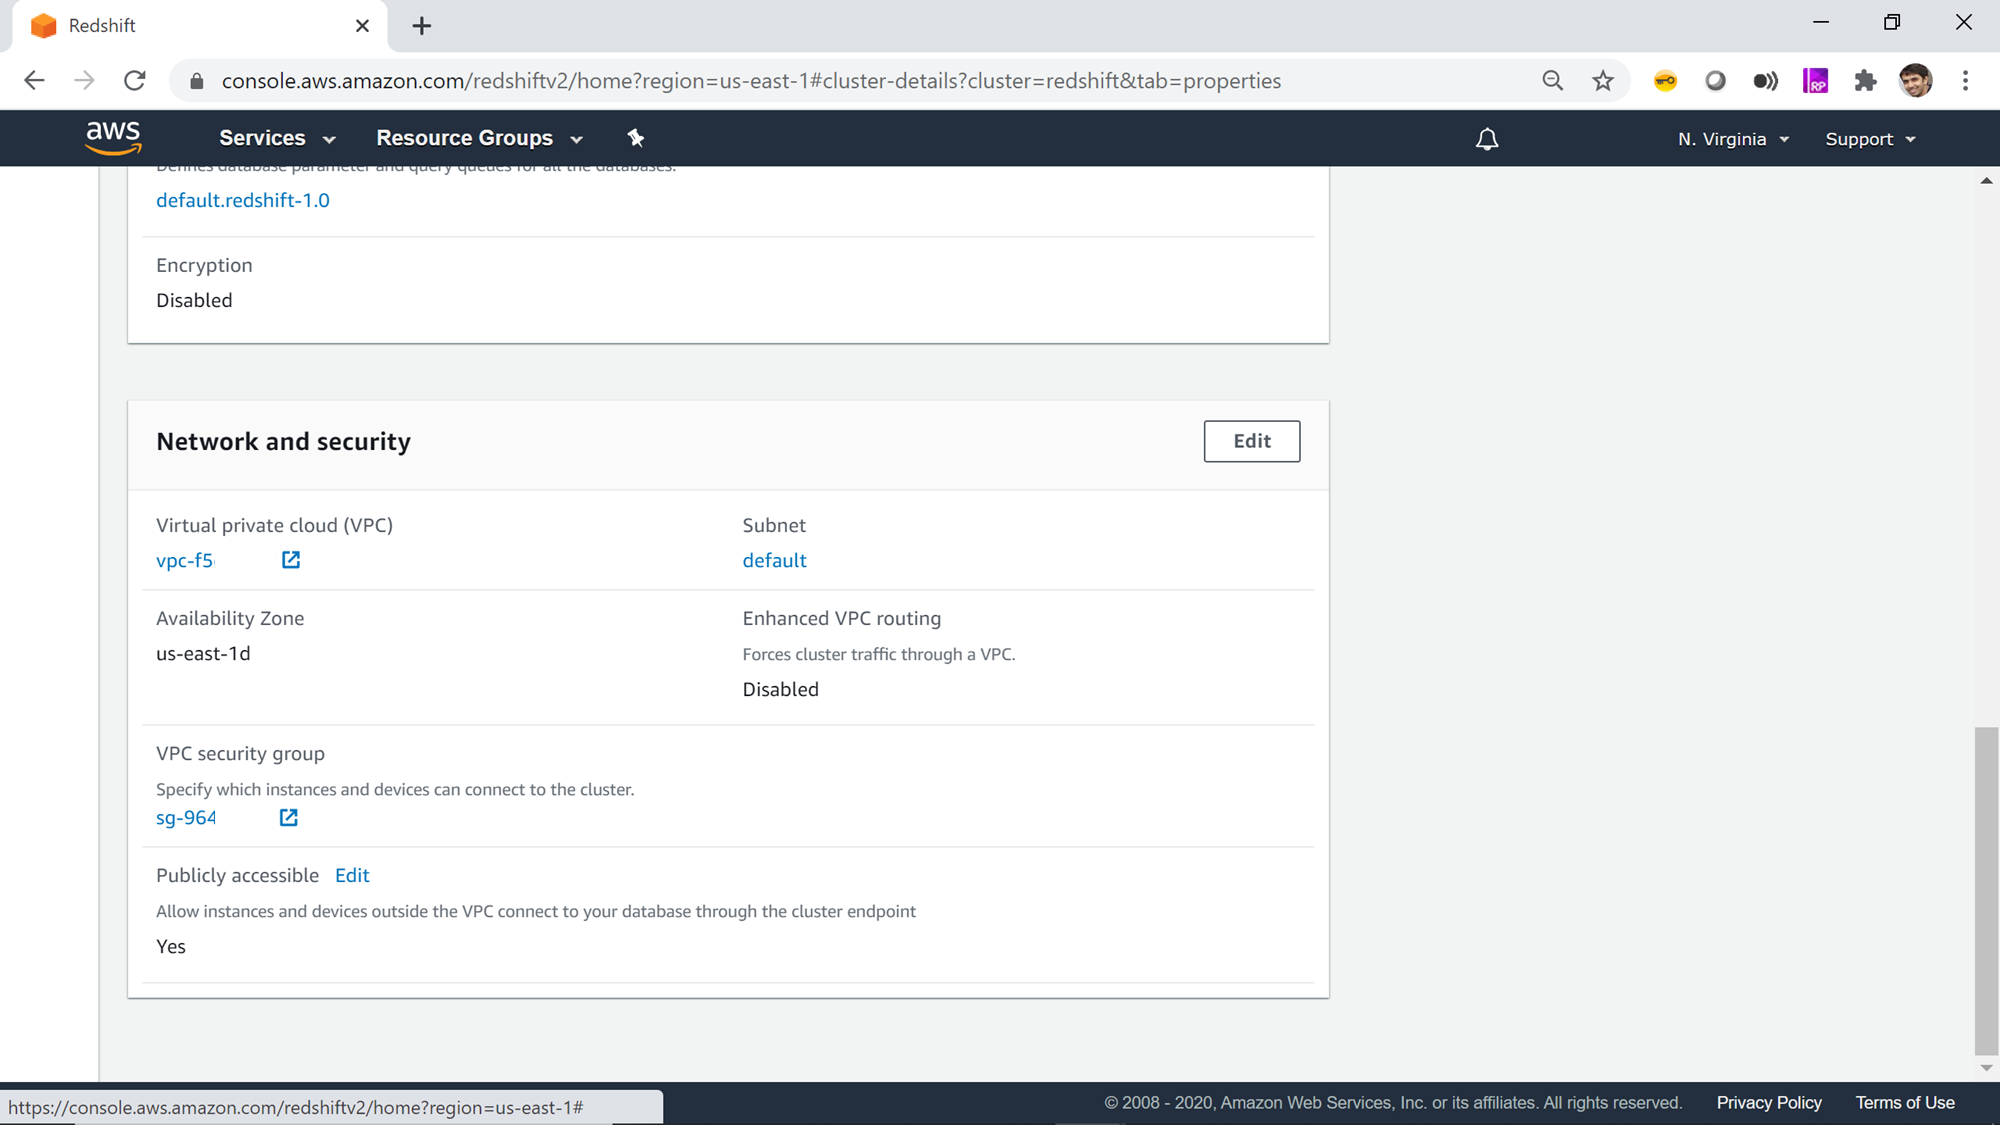
AWS Redshift Network Configuration
Scroll to the very bottom of the page and you would find a section titled Network and security. You would find the details like the VPC (Virtual Private Cloud) which is the network in which the redshift cluster is created, and the security group which contains the list of inbound and outbound rules to allow or deny traffic from and to the listed destinations. Click on the security group link, and that would navigate you to the security group page on the VPC service.
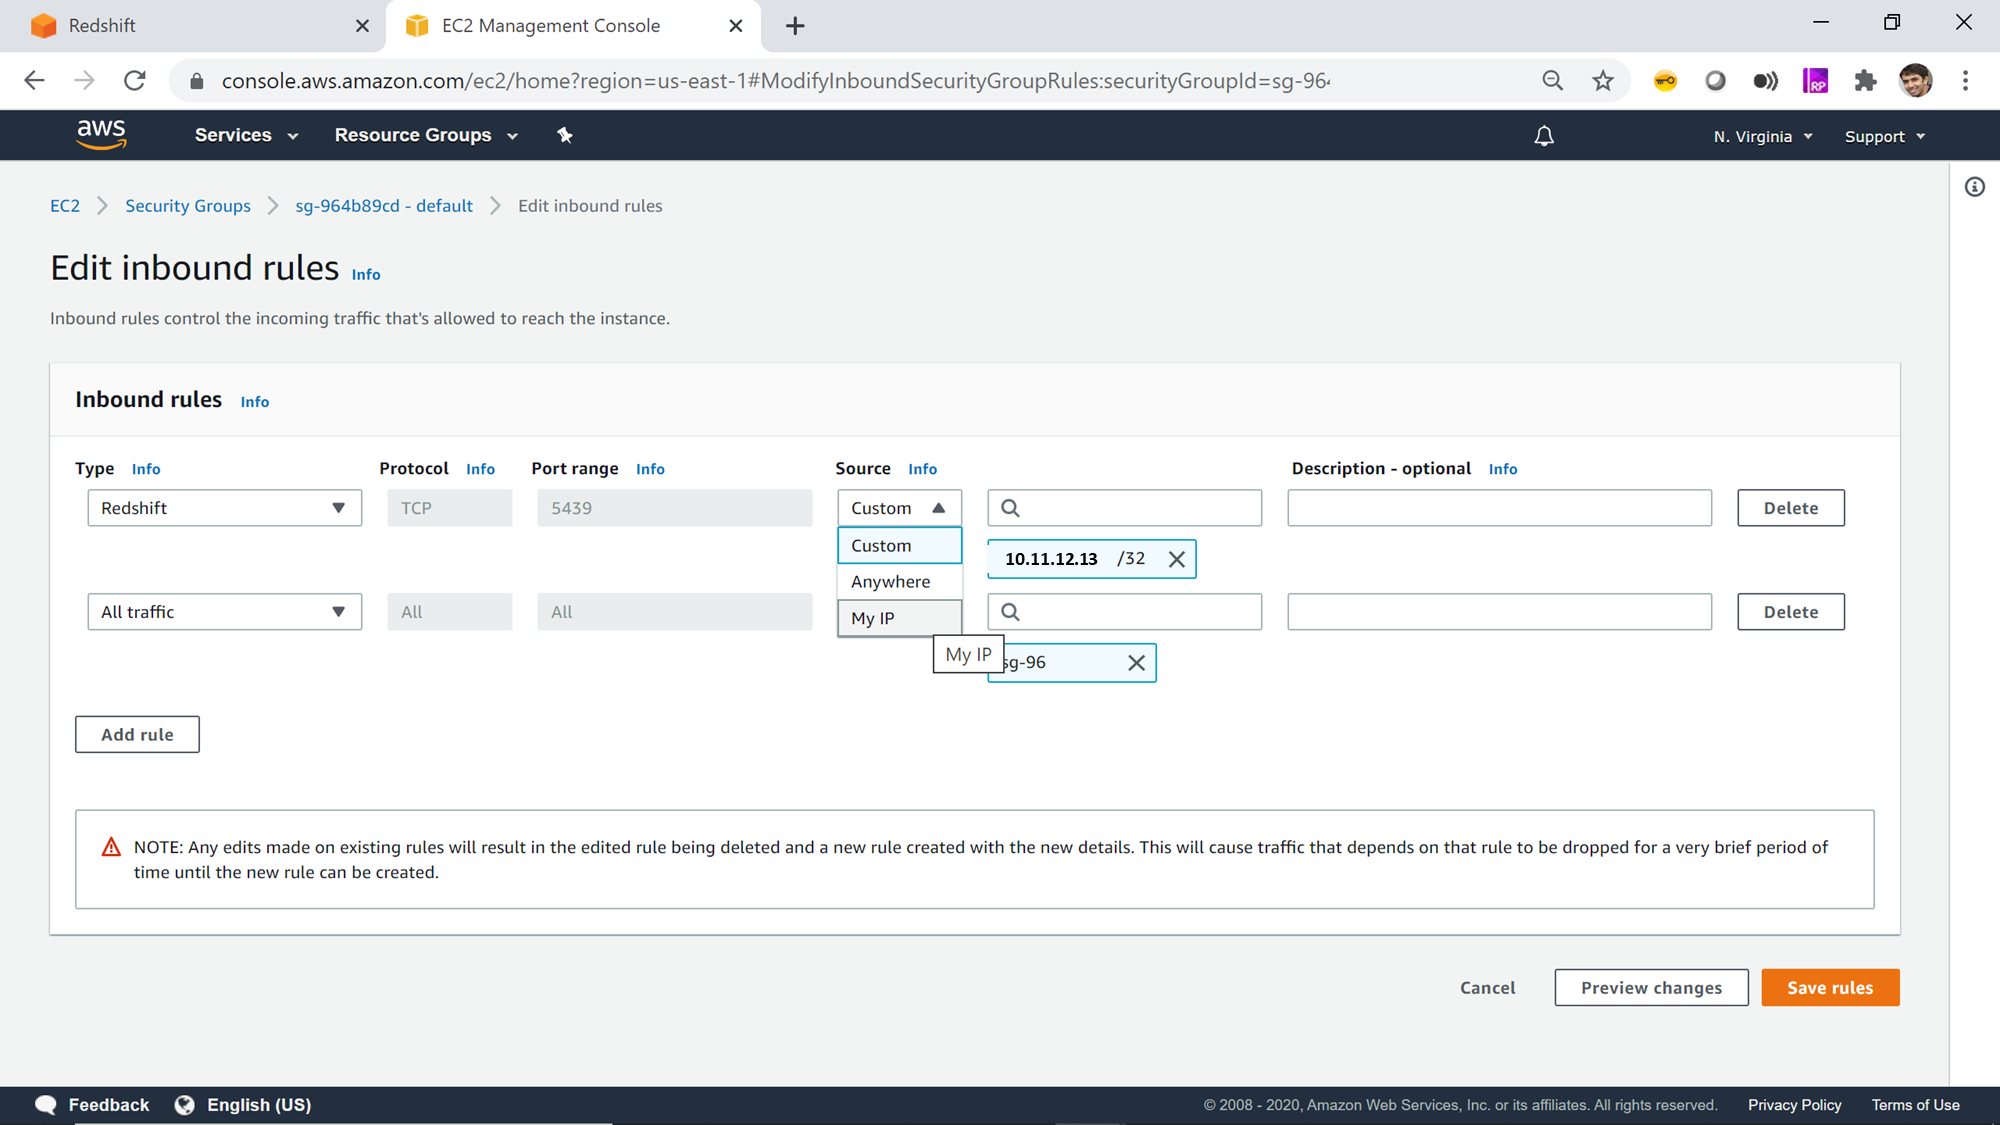
Once you are on the security group page, you would be able to see the details regarding inbound rules and outbound rules. We need to ensure that the security group allows incoming and outgoing traffic on the network in which the AWS Redshift cluster is hosted. If you are using the default security group and default VPC, the security group allows all outbound traffic, but allows inbound traffic only from the security group. We need to modify the inbound rule and add the rule to allow traffic on the port 5439 which is generally the default Redshift port. If you are using a non-default port, we need to open inbound traffic on that port.
Click on the inbound rule, and you would be able to see the rules as shown below. Click on Add Rule button, select Redshift in the port type. This will auto-select the protocol and port range options. In the source section, to add your local machine IP, you can click on MyIP which will add your IP address. If you want to add a network range or multiple addresses, you can do the same as well by using the Custom option. After the required IP address on which the IDE is installed is added to the inbound security rule, save the rules by clicking on the Save button. This completes the network configuration required to allow traffic from the machine on which the IDE is installed to the AWS Redshift cluster.
Creating an AWS Redshift Connection
Once the network configuration is completed, its time to make a connection to the Redshift cluster. It is assumed that Aginity Pro is installed, and this article will explain the steps to configure a connection using it. You can perform the same or similar steps on any other IDE as well that supports JDBC or Redshift in general.
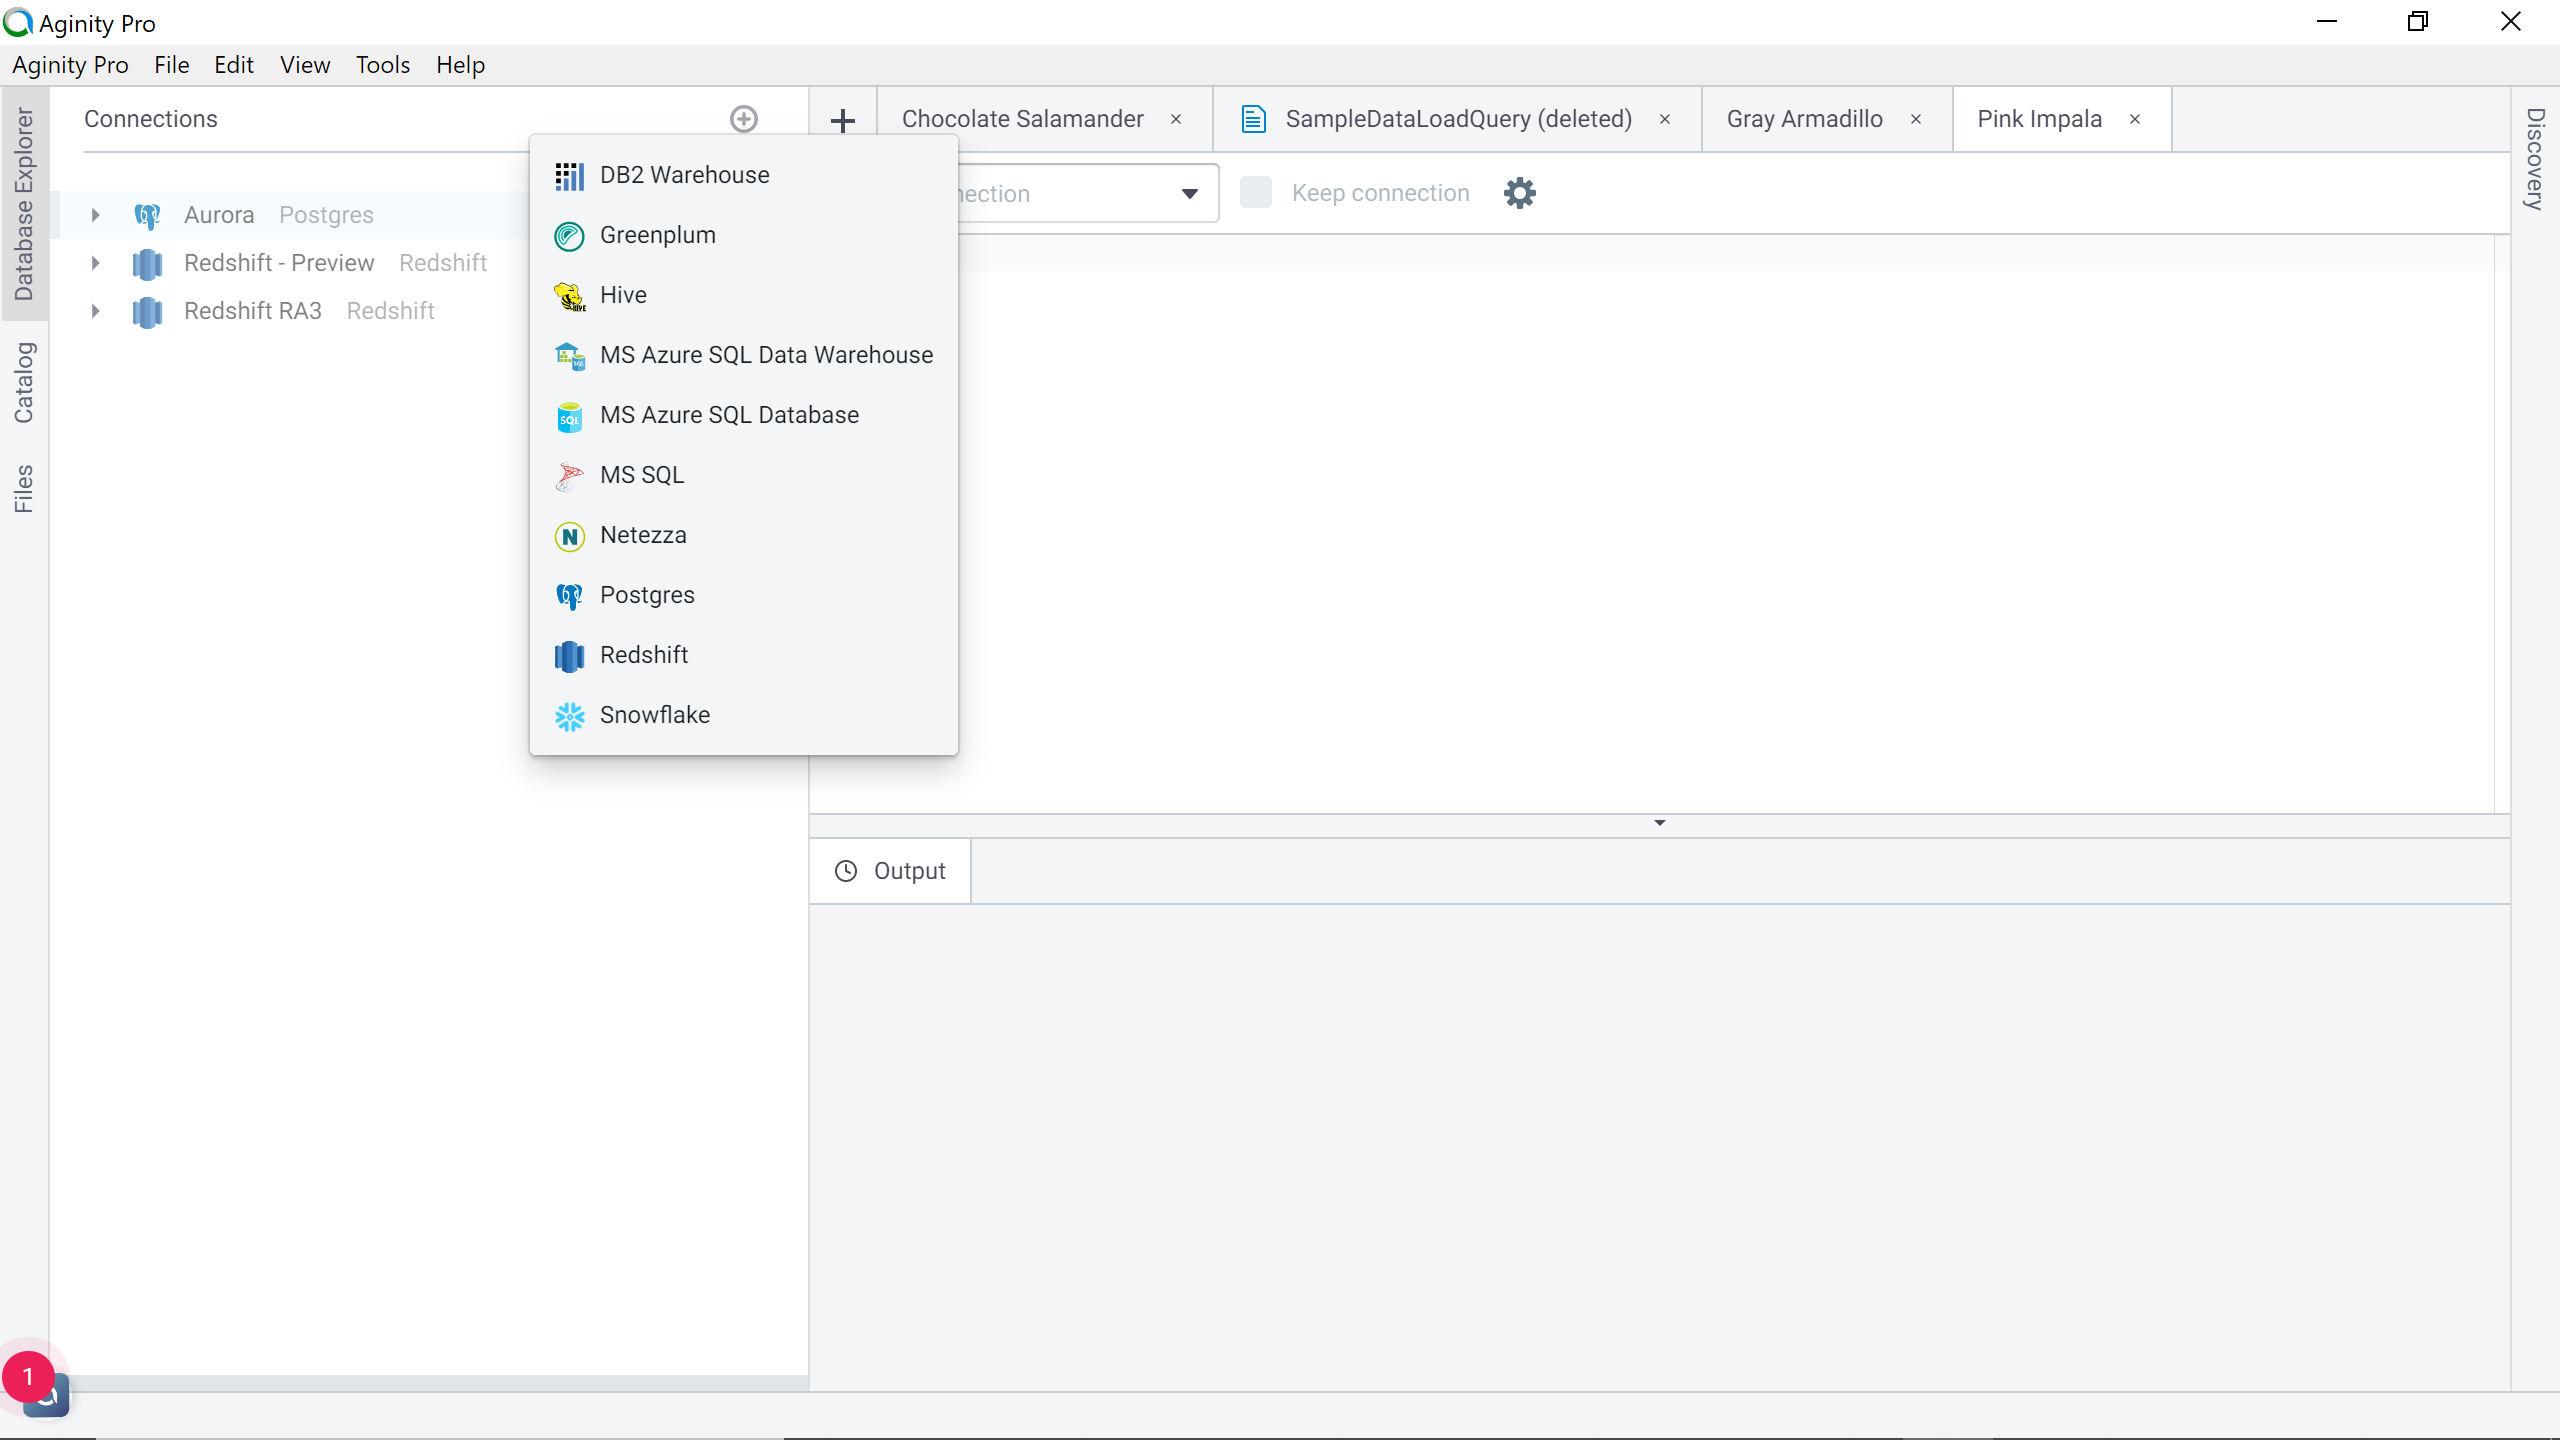
Open Aginity Pro and click on the plus icon in the Connections tab as shown below. It comes with a readily configured Redshift JDBC driver, so you do not need to configure it. You would find Redshift as one of the options in the supported data sources list. Once your connection is created, it would look as shown on the left-most side of the connections tab.
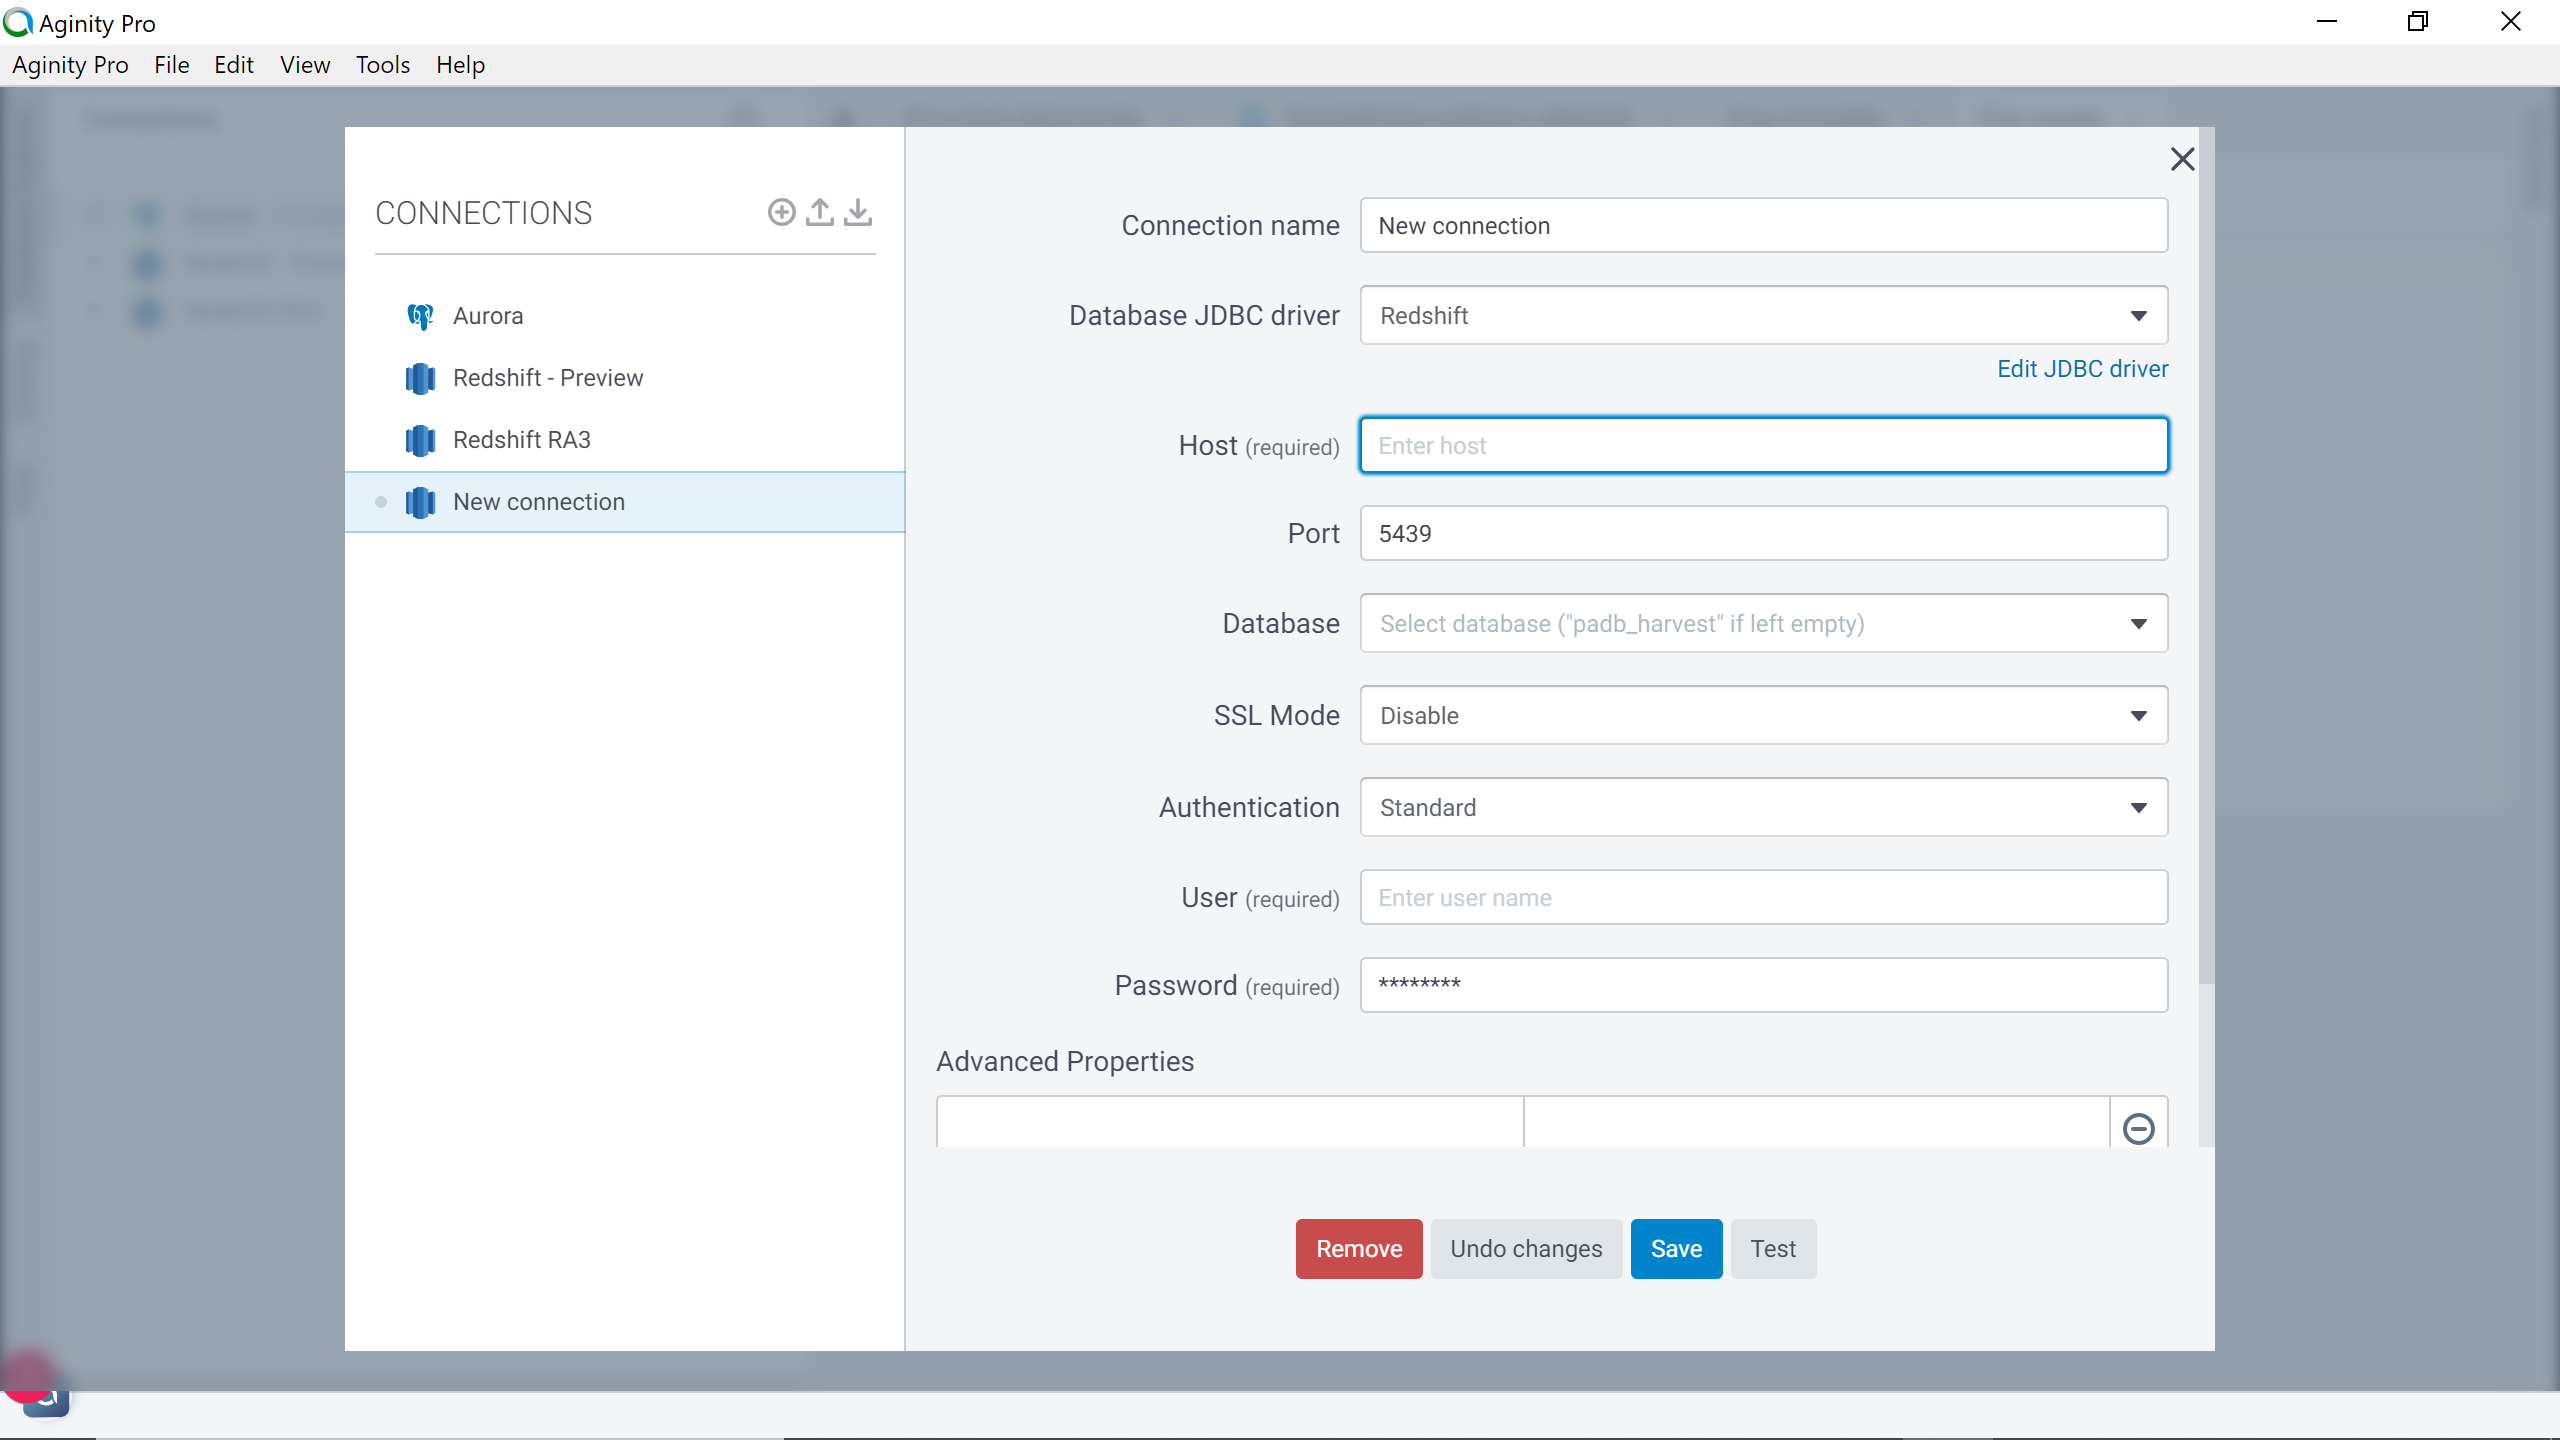
Click on Redshift and that would open the connection details tab as shown below. Provide a relevant connection name in the Connection Name box. In the host section, provide the AWS Redshift cluster endpoint from the properties tab of the cluster, which we saw earlier. Leave the port with the default value, unless you are using a non-default port, in which case you should change the value of the port being used. Select the database name as dev or whatever is the database that you intend to connect. Provide the user id and password using which you intend to connect to the cluster.
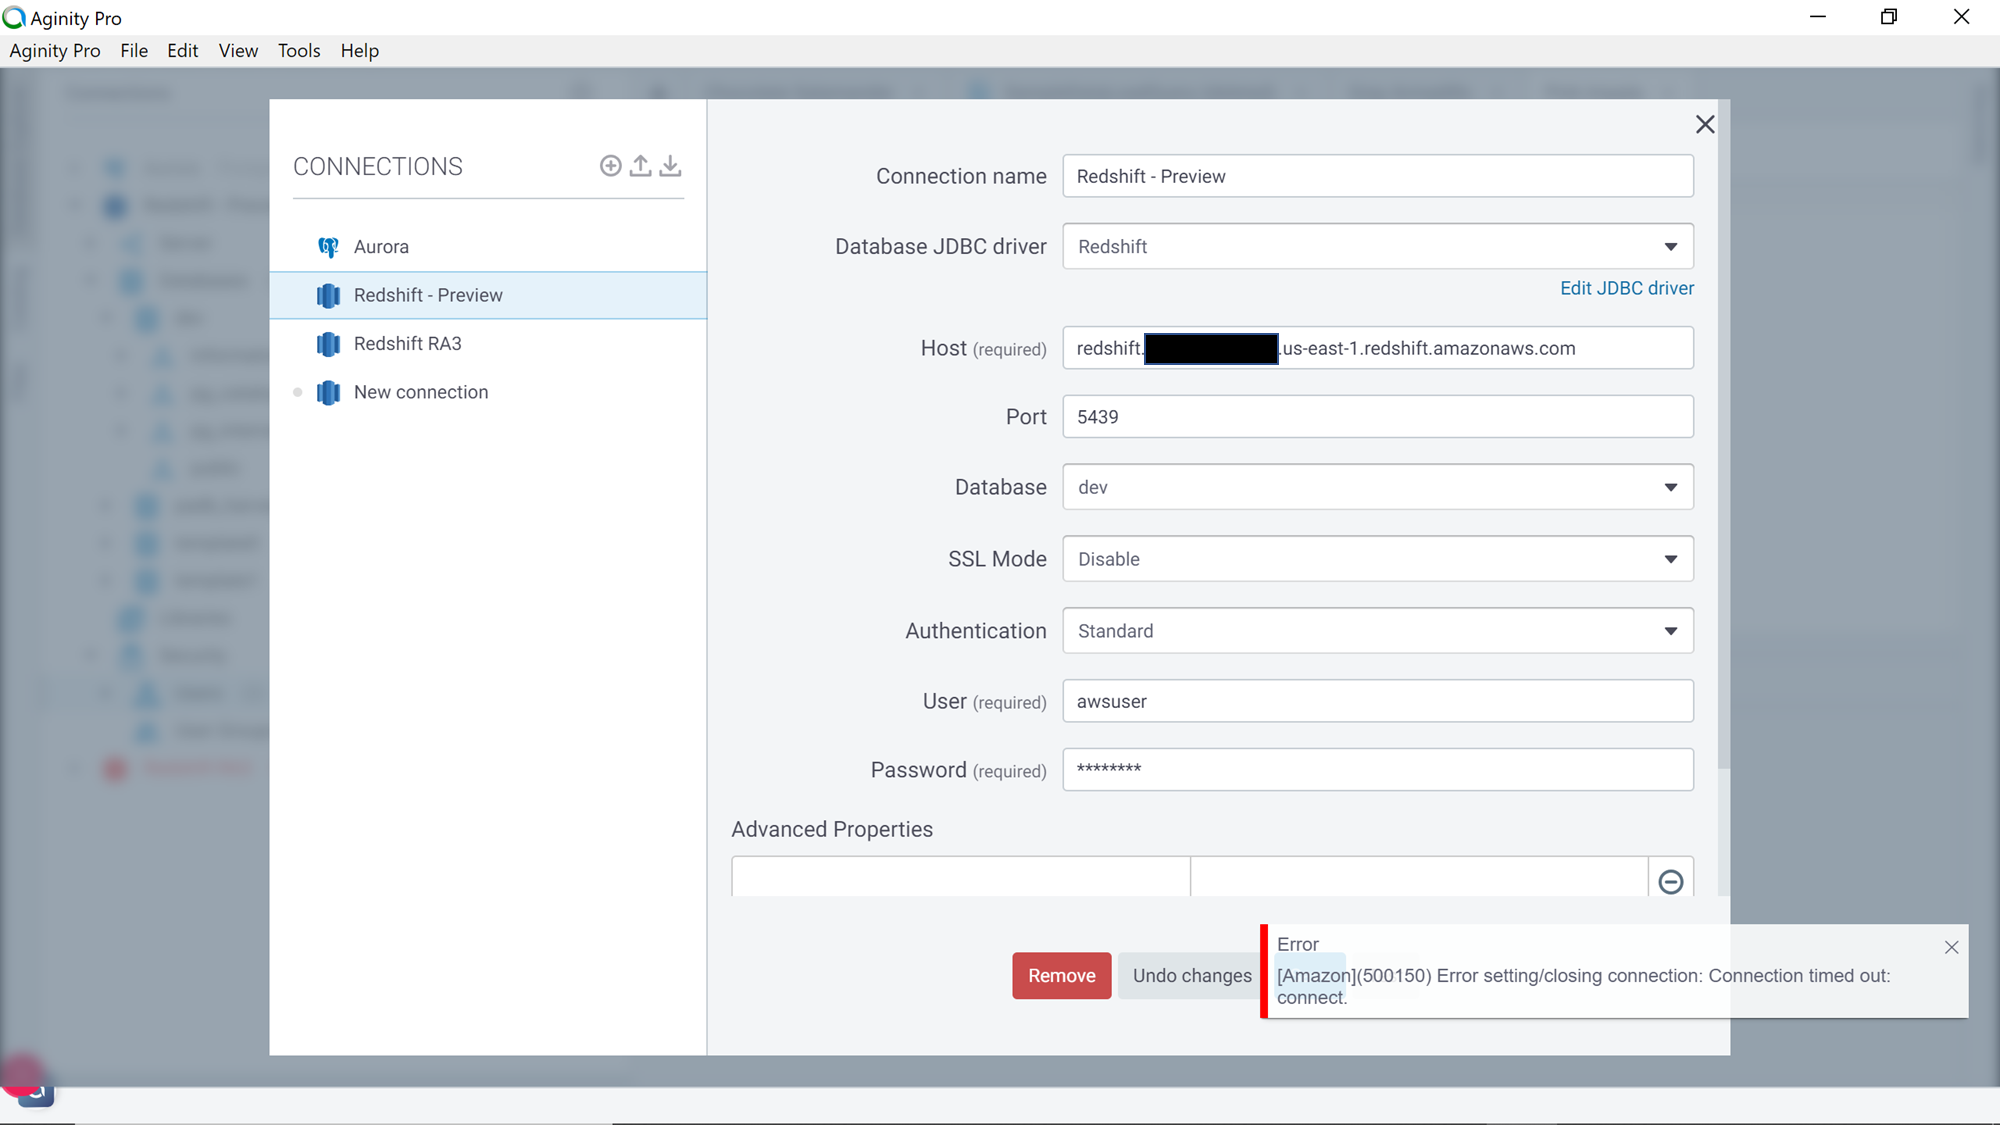
After filling up the connection details, click on the Test button to test the connectivity between the IDE and the cluster. If the network connectivity is not configured correctly, the connection initiated from IDE will not be able to reach or access the cluster. This would result in an error. If the network does not allow the traffic from your machine to reach the AWS Redshift cluster, the testing will result in an error as shown below.
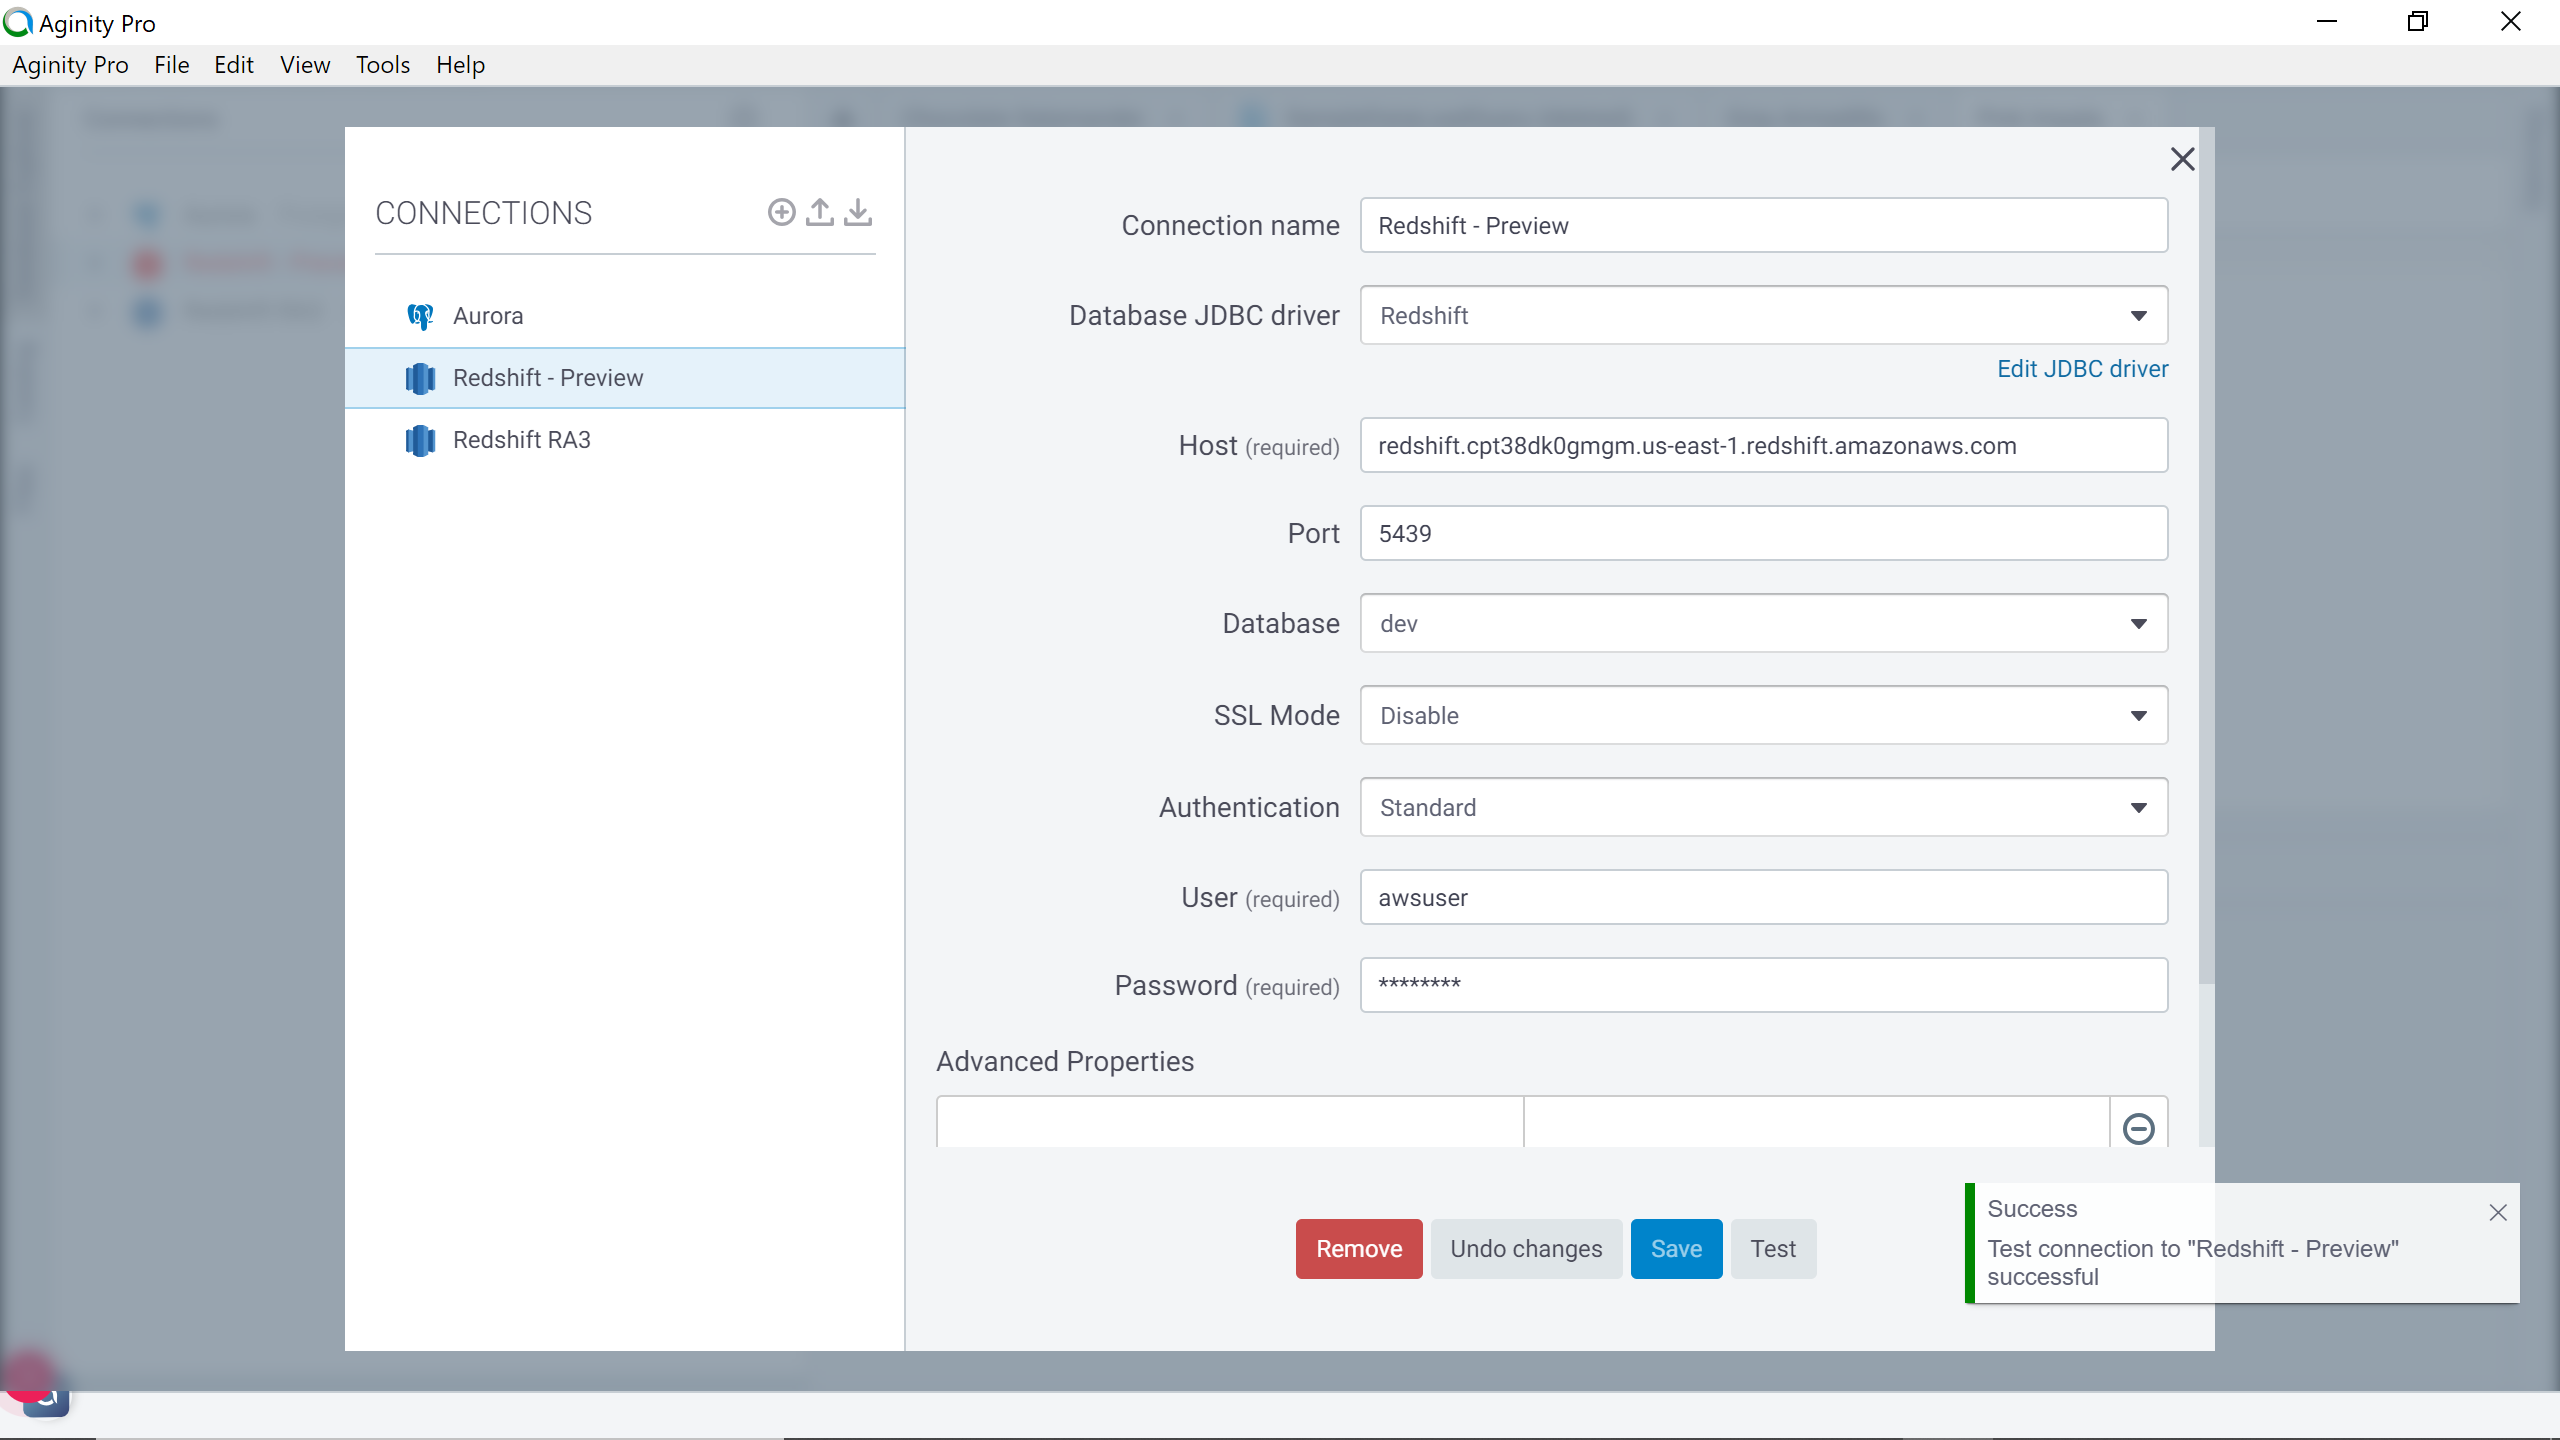
If the connectivity is successful, you would be shown a successful connection result as shown below. After the successful testing, you can be certain that the network connectivity between your machine and the cluster is working fine.
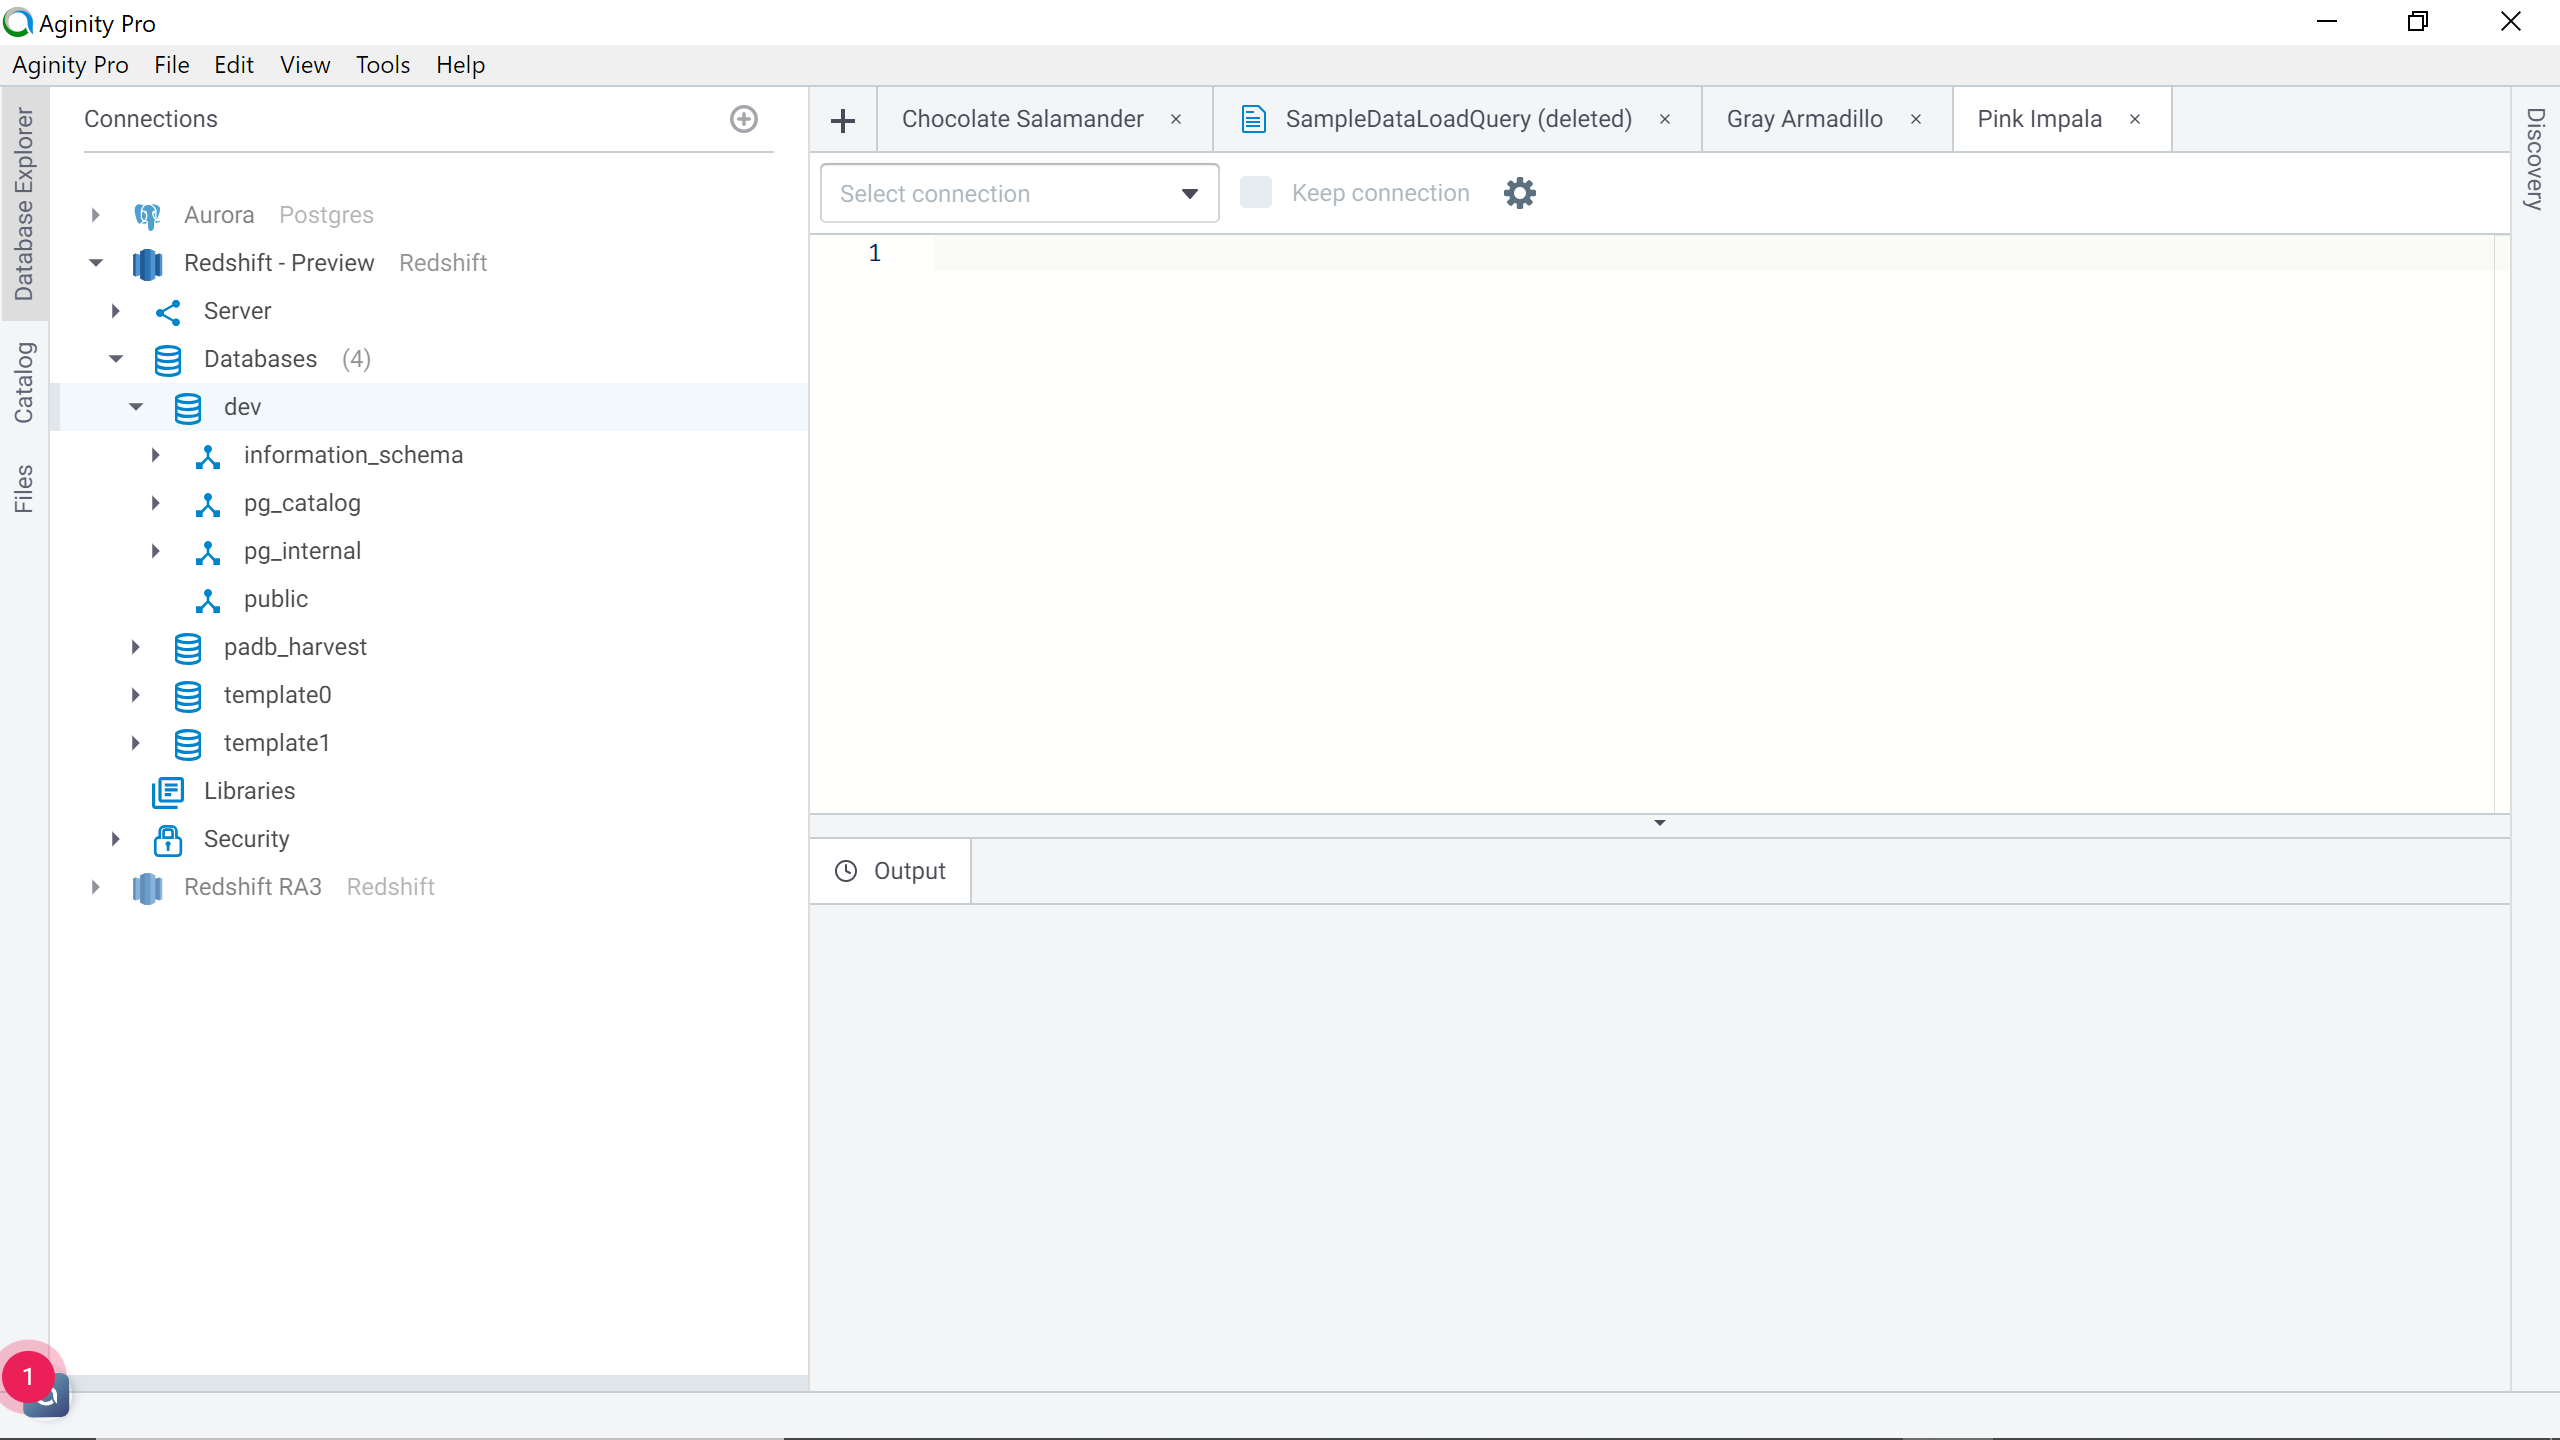
After a successful connection, you can save the connection and return to the main query interface window. You would find the connection listed in the connections pane window. Upon expanding this, you would find all the database objects listed under the selected database and schema as shown below. You can execute SQL queries from the query interface on the right side and the output results of the query execution would appear at the bottom of the query window.
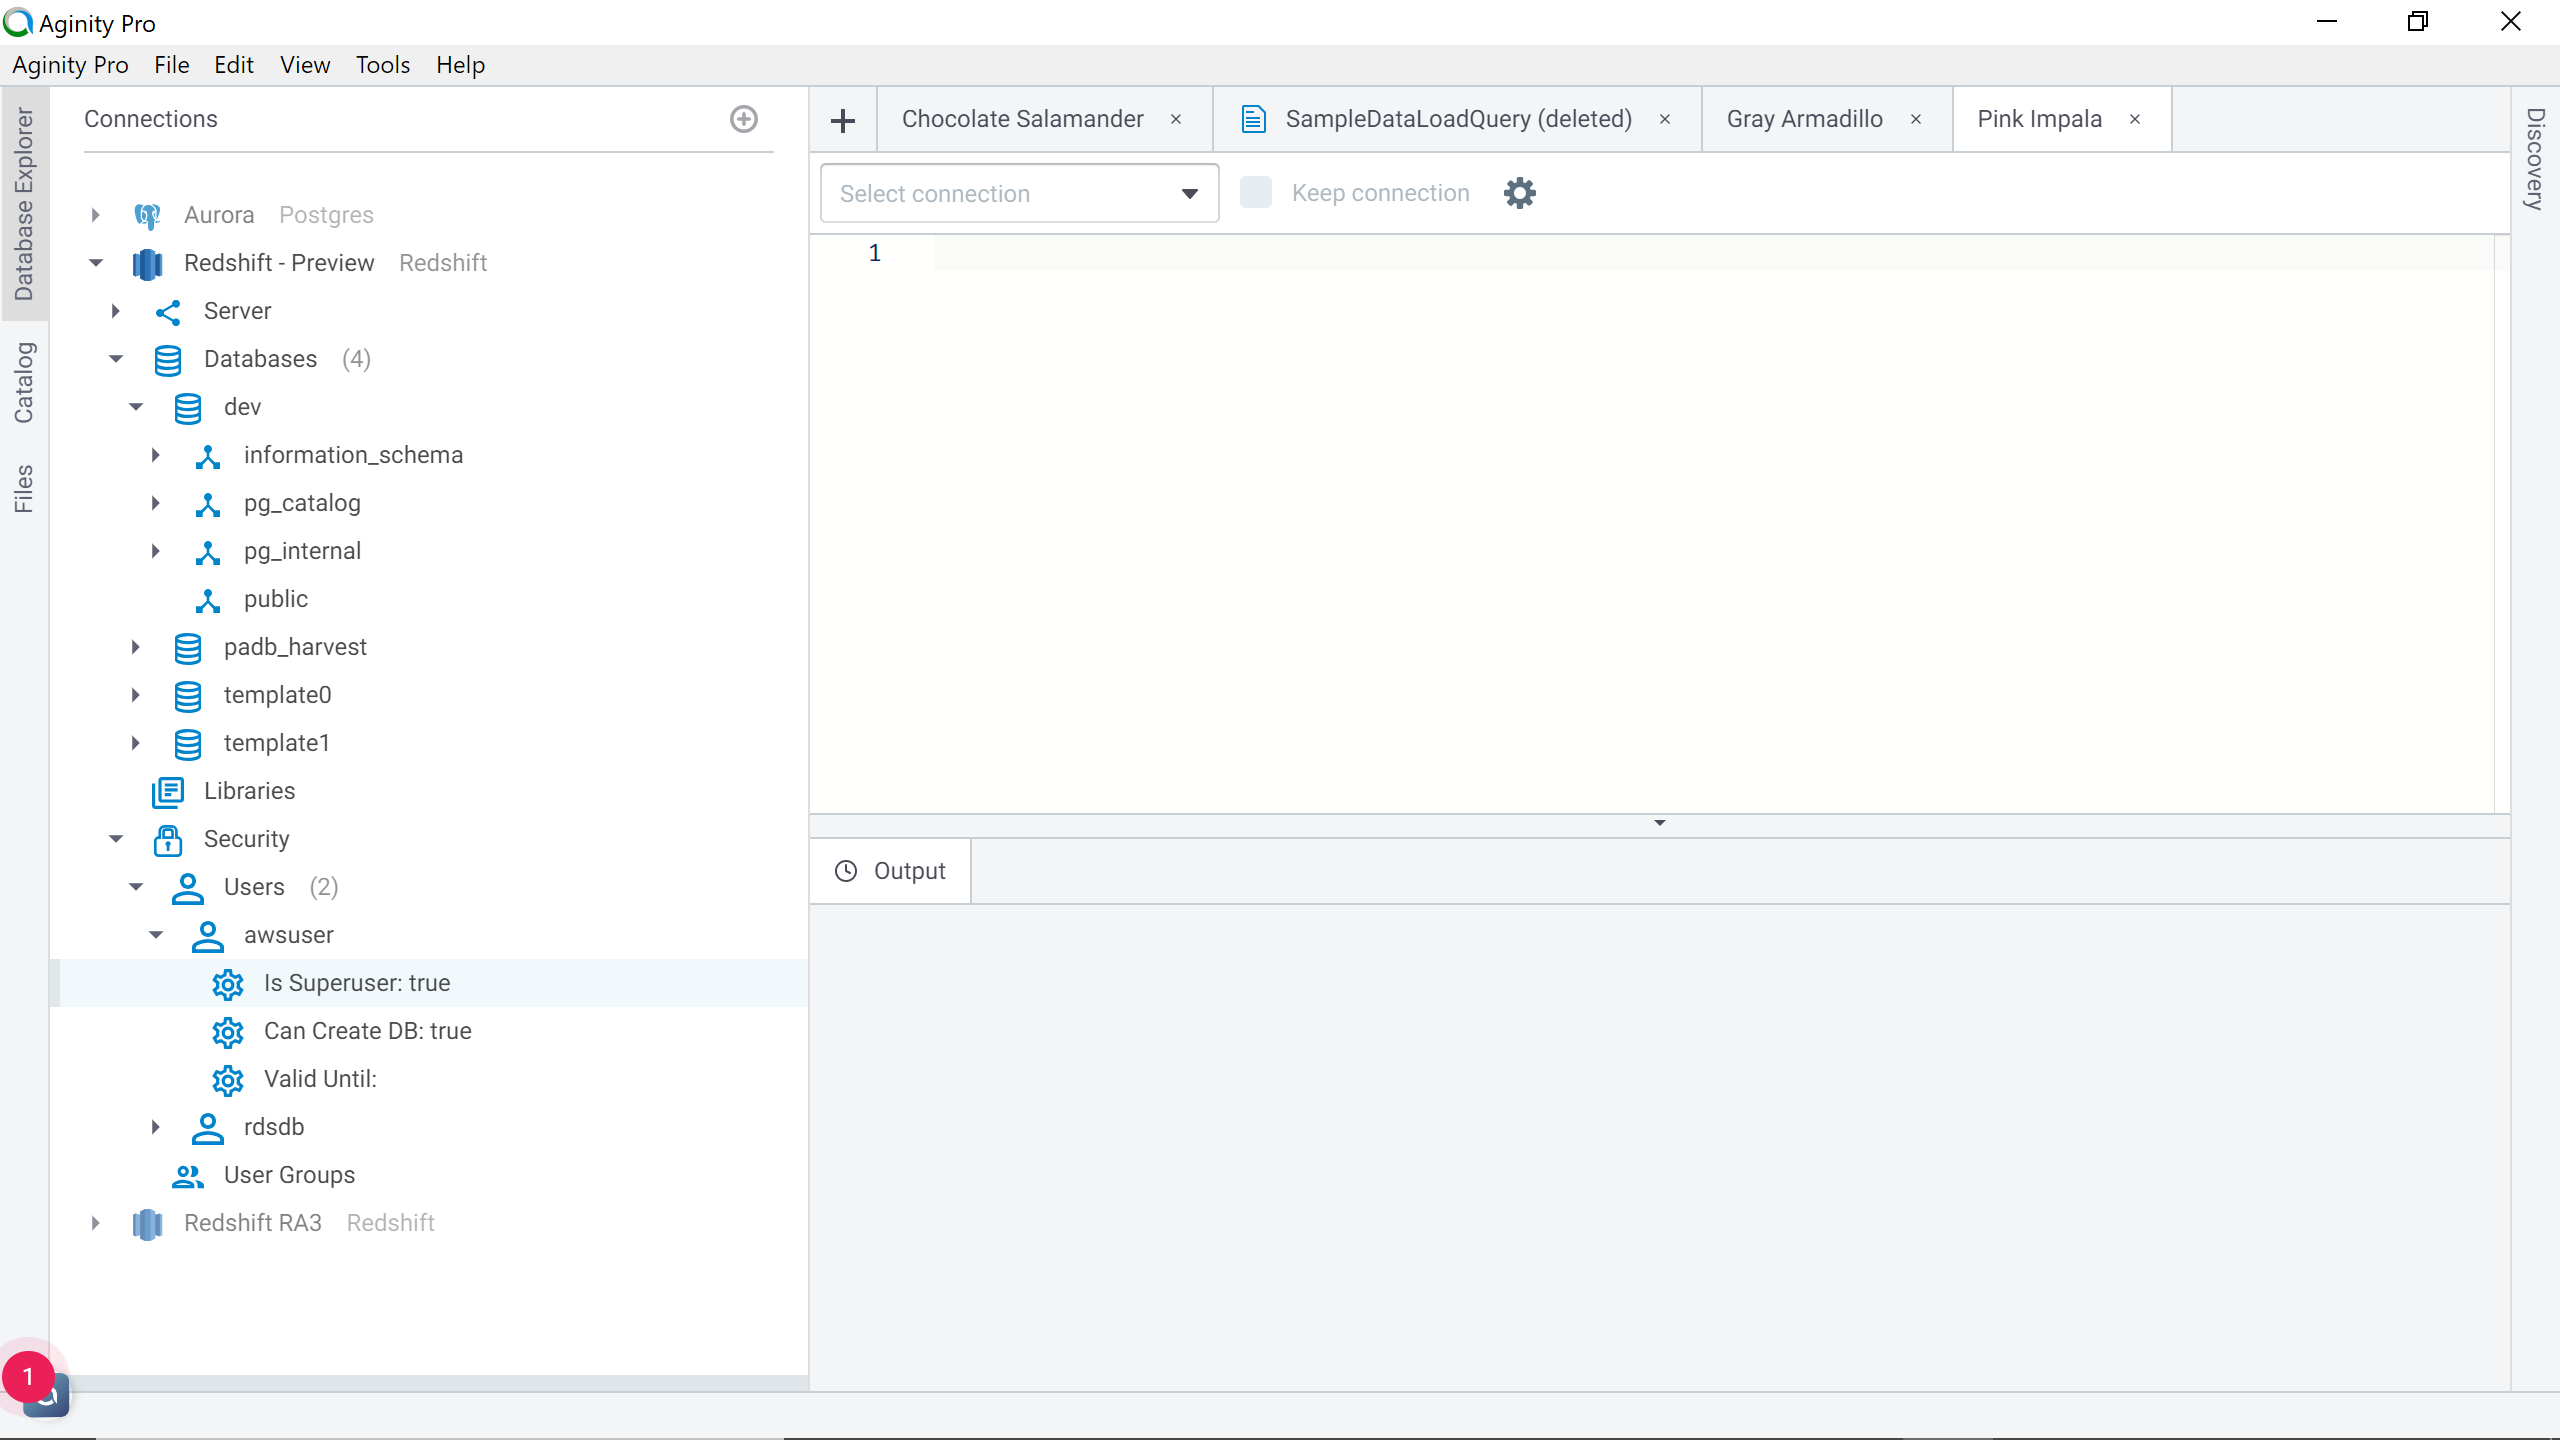
The user and user group related details and other database objects which can be used for administrative purposes can be found listed under the security node as shown below.
Once the connection is successfully established from IDE to the AWS Redshift cluster endpoint, developers and administrators can conveniently access Redshift from their local machine without the need of logging on to AWS Console every time.
Conclusion
In this article, we understood the process of installing IDEs on the local machine to conveniently access an AWS Redshift cluster. We configured the AWS network to allow traffic from the local machine to the Redshift cluster. And finally, after establishing a successful connection, we learned to open connections to the cluster from the IDE.
Table of contents

He has worked internationally with Fortune 500 clients in various sectors and is a passionate author.
View all posts by Rahul Mehta
- Finding Duplicates in SQL - February 7, 2024
- MySQL substring uses with examples - October 14, 2023
- MySQL group_concat() function overview - March 28, 2023