

This article gives an overview of configuring the redshift cluster to access AWS S3 as well as loading data into AWS Redshift.
Introduction
AWS or Amazon Redshift is a columnar data warehouse service that is generally used for massive data aggregation and parallel processing of large datasets on the AWS cloud. AWS S3, on the other hand, is considered as the storage layer of AWS Data Lake and can host the exabyte scale of data. Generally, data lands on on-premise sources using various mechanisms on data repositories like S3, from where it is transported to different data repositories like Amazon Redshift for use-case specific processing and consumption. In this article, we will learn how to load data from Amazon S3 to Amazon Redshift cluster using a command from Amazon Redshift.
AWS S3 and AWS Redshift Setup
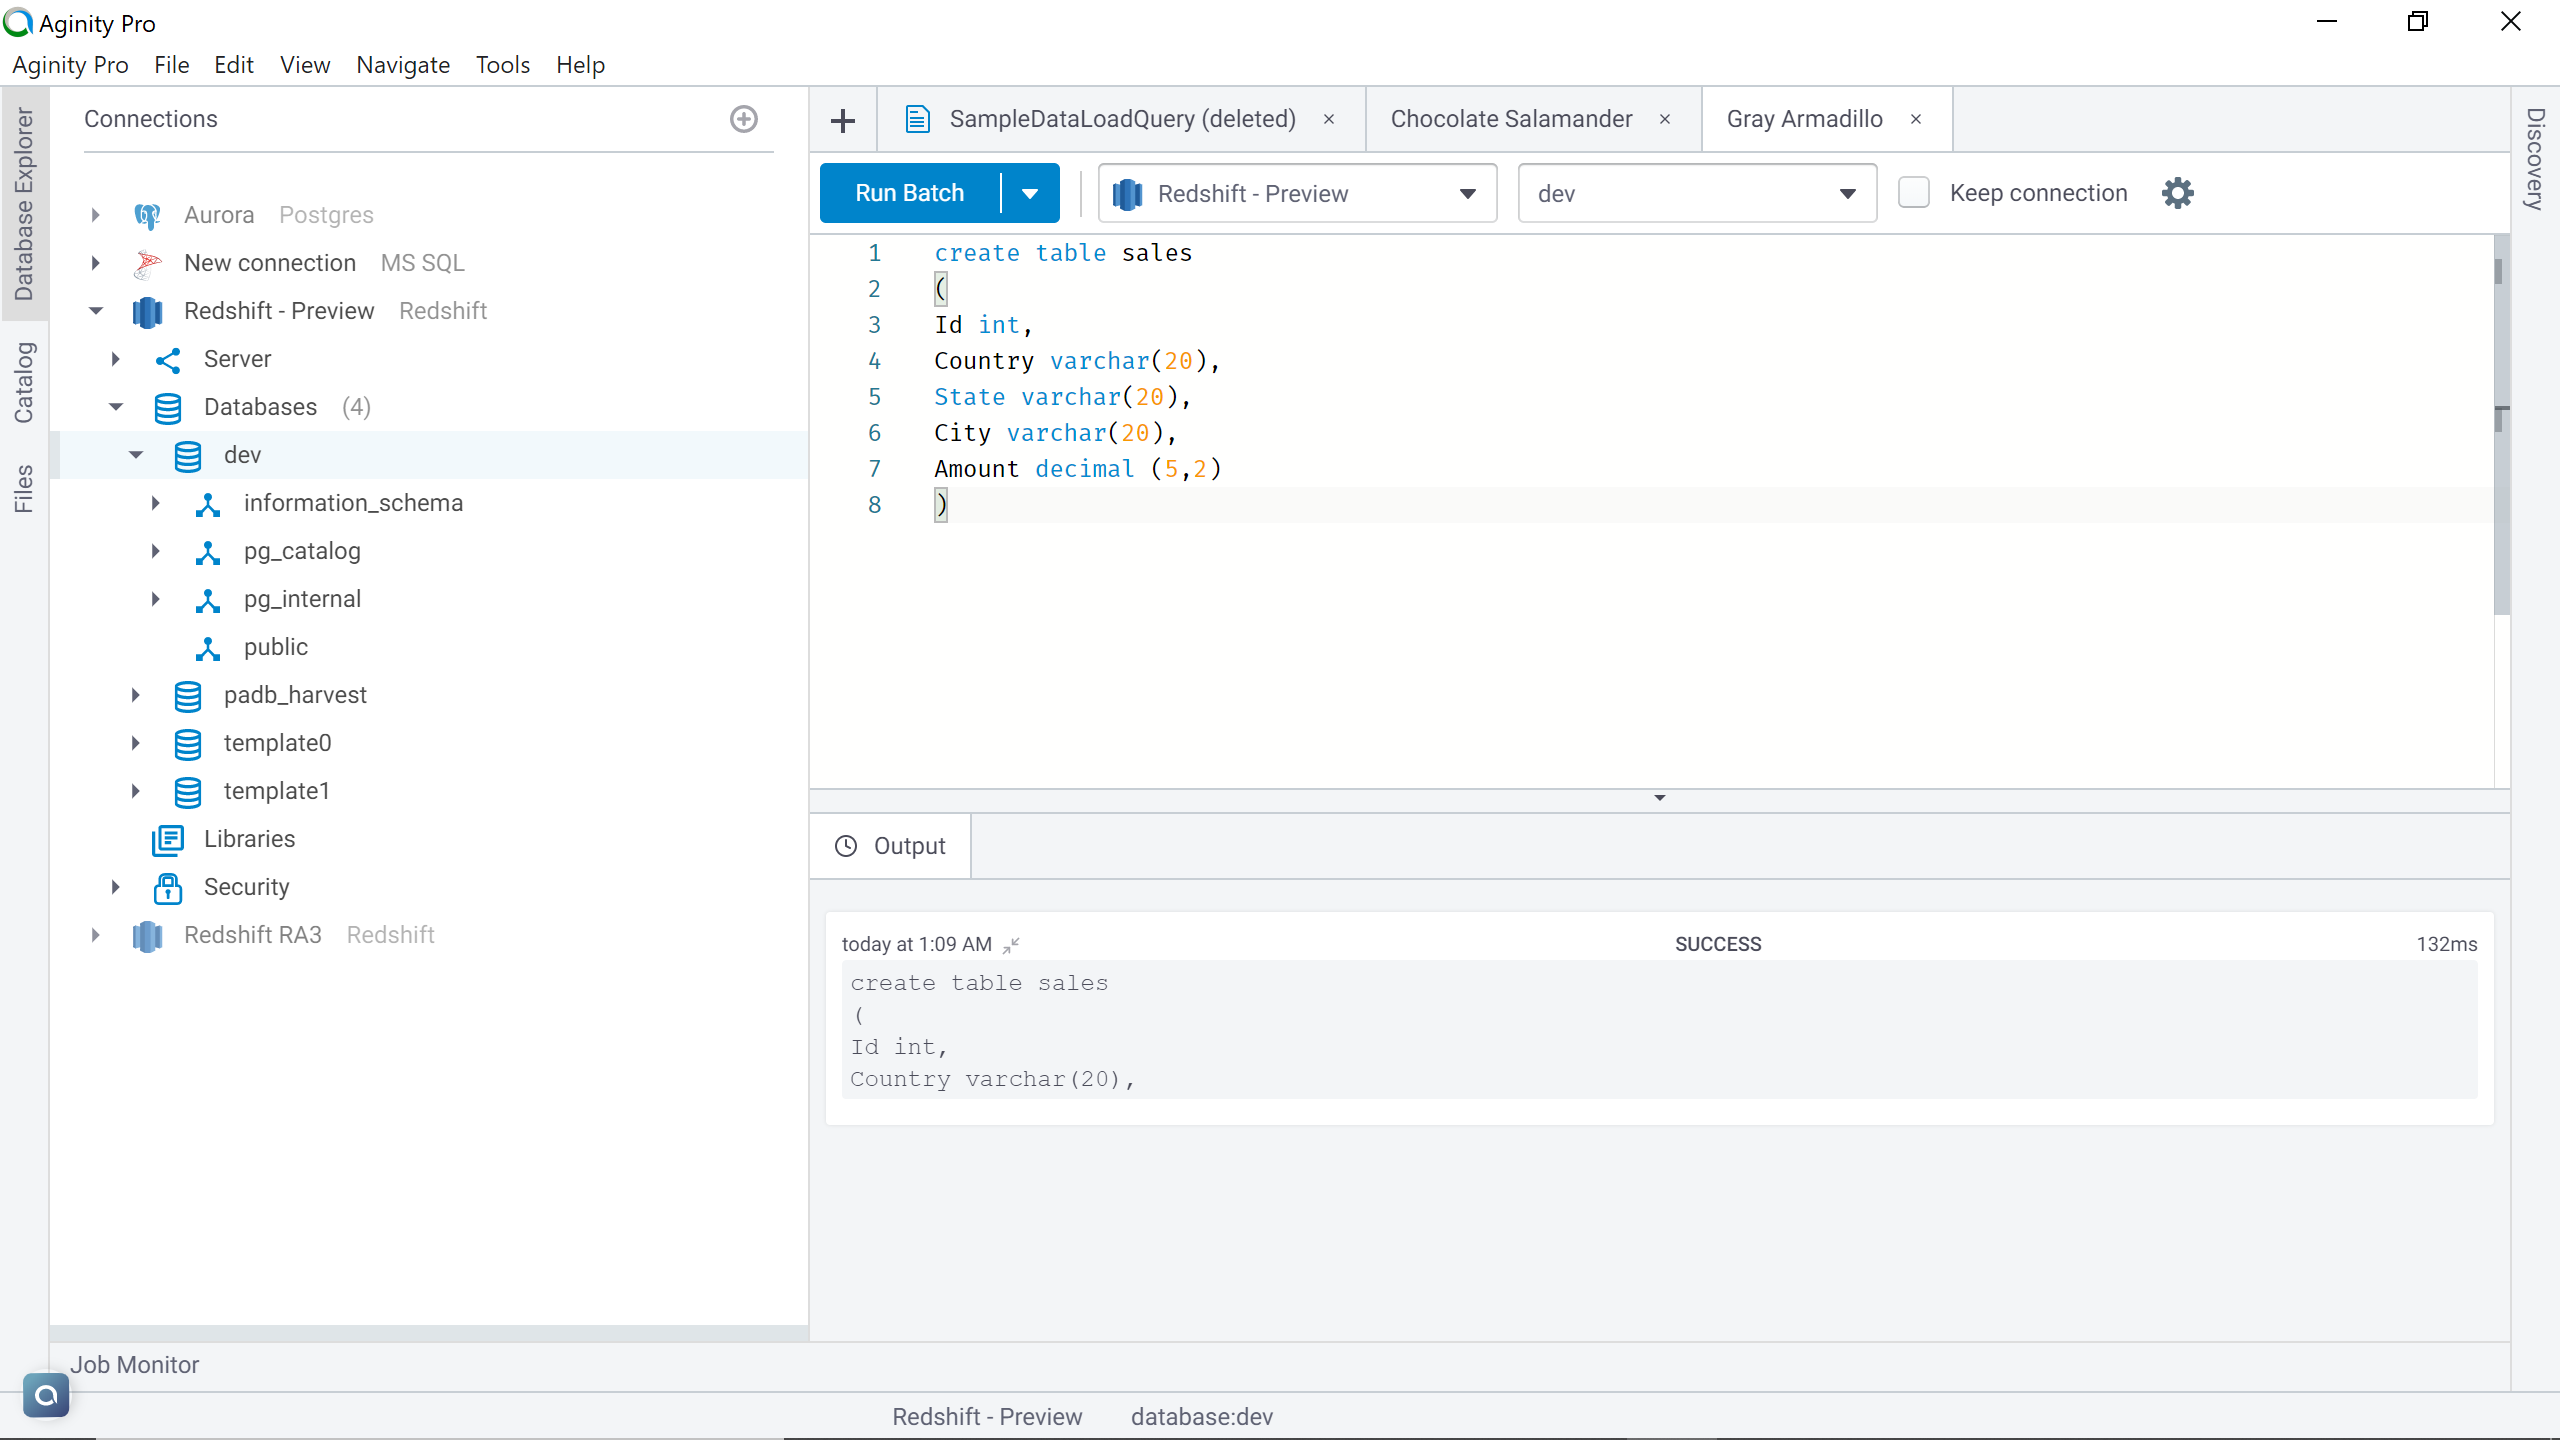
To start with our exercise, we need an AWS S3 bucket, an AWS Redshift cluster as well as a sample data file stored in the Amazon S3 bucket. We learned in my previous articles, Getting started with AWS Redshift and Access AWS Redshift from a locally installed IDE, how to create an AWS Redshift cluster and how to connect to the same using an IDE of choice. It’s recommended to set it up before proceeding with this exercise. Assuming that the setup is in place, we need to create a table in the redshift cluster, which will be used as the destination to copy the data from the Amazon S3 bucket, as shown below.
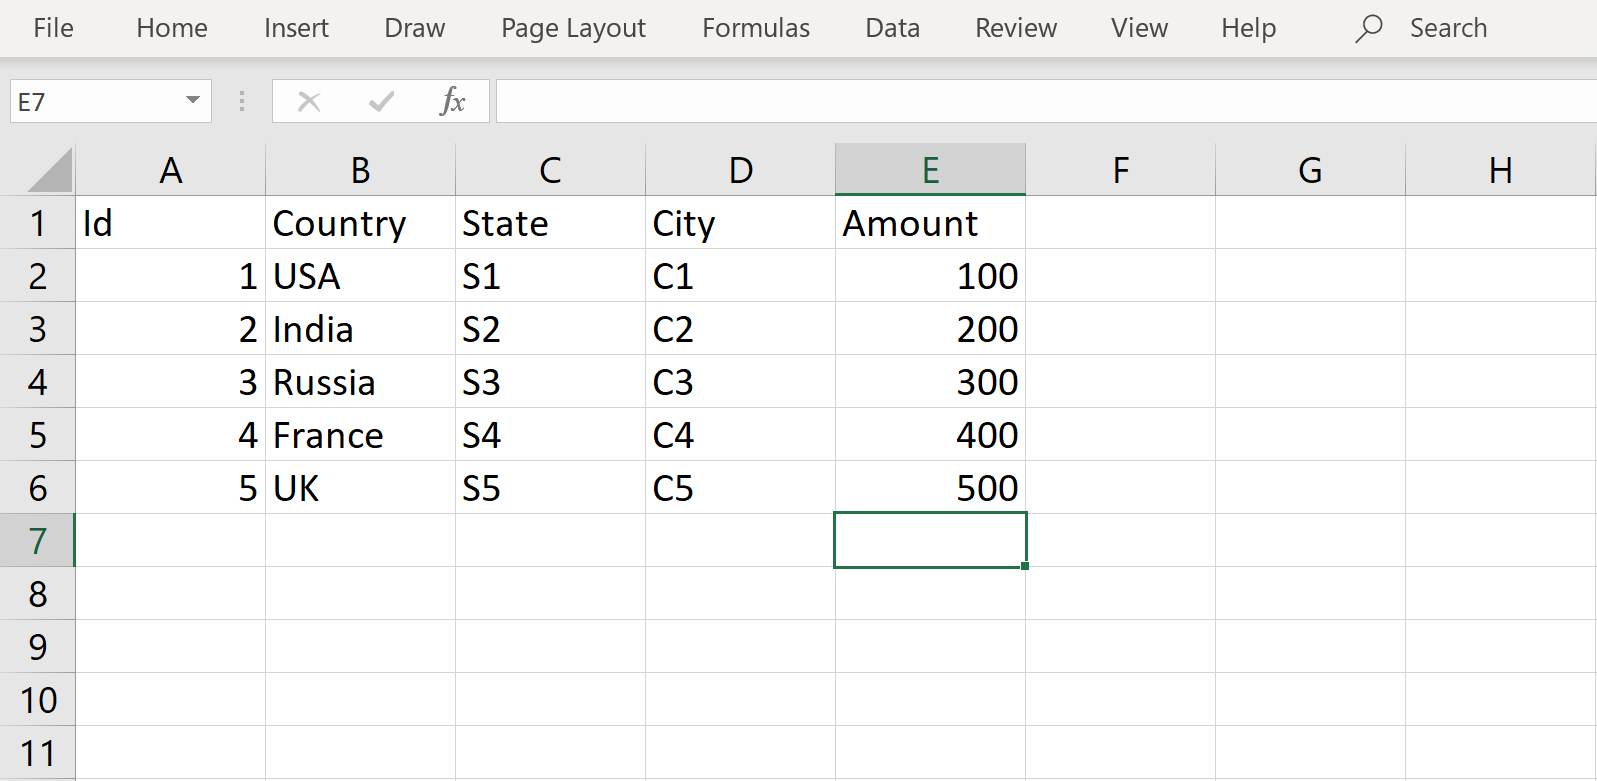
We intend to use a source file from which we would copy the data to the AWS Redshift cluster. Shown below is a sample file that has an identical schema to the table that we created in the previous step. We can have a different schema as well, but to keep the focus on the copying process instead of mapping or transformation techniques, the schema is kept identical here.
Once the file is created, upload the same to an AWS S3 bucket of choice as shown below. Here we have one additional file apart from the one we just uploaded just to demonstrate that we can load the desired file from a list of files that may be stored in the same bucket on Amazon S3.

Creating IAM Role for AWS Redshift
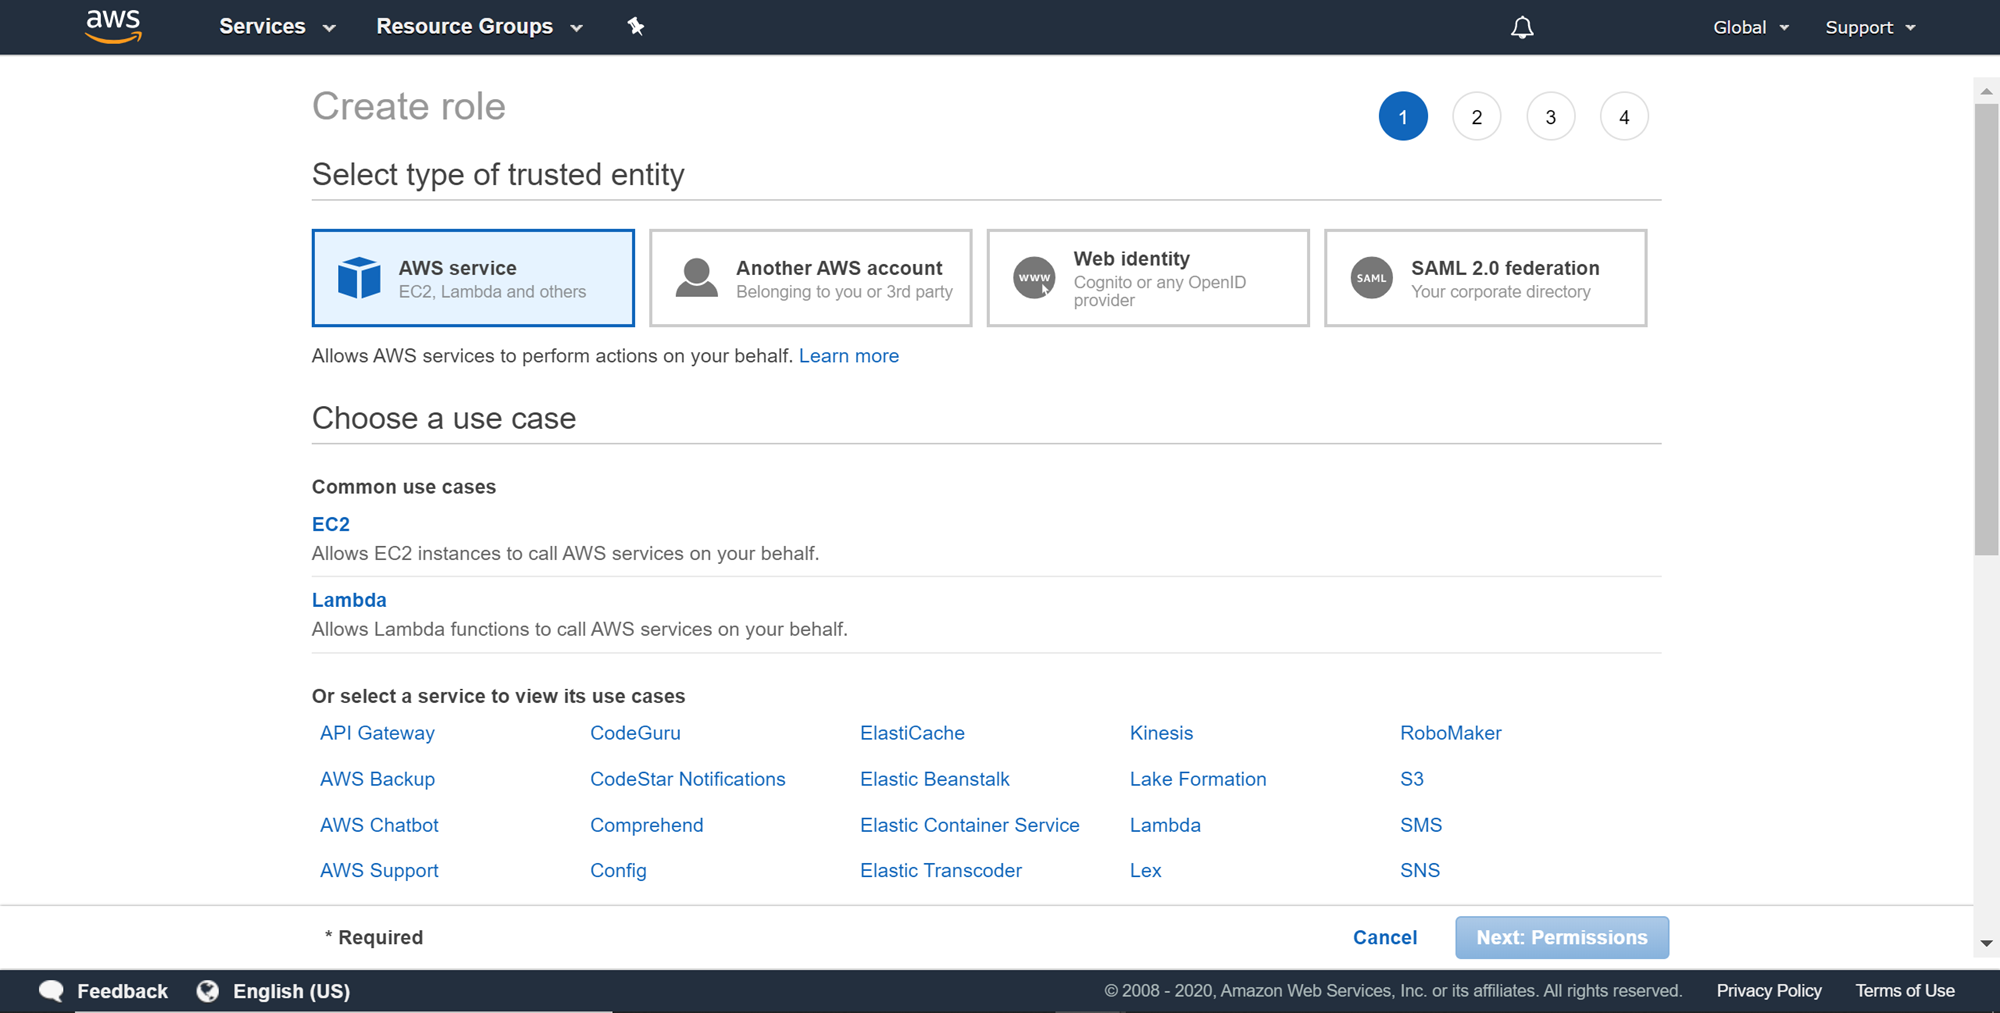
Now that we have the source and destination configured with the required data structure and sample data, we need to have an Identity and Access Management role that will enable Amazon Redshift to communicate with AWS S3 with the required permissions to access data stored in Amazon S3 bucket. Navigate to the IAM dashboard from the AWS Console, click on Roles options from the left-pane, and then click on Create Role. You would be presented with a page as shown below. Select AWS Service as the trusted entity for which we are going to create an IAM role.
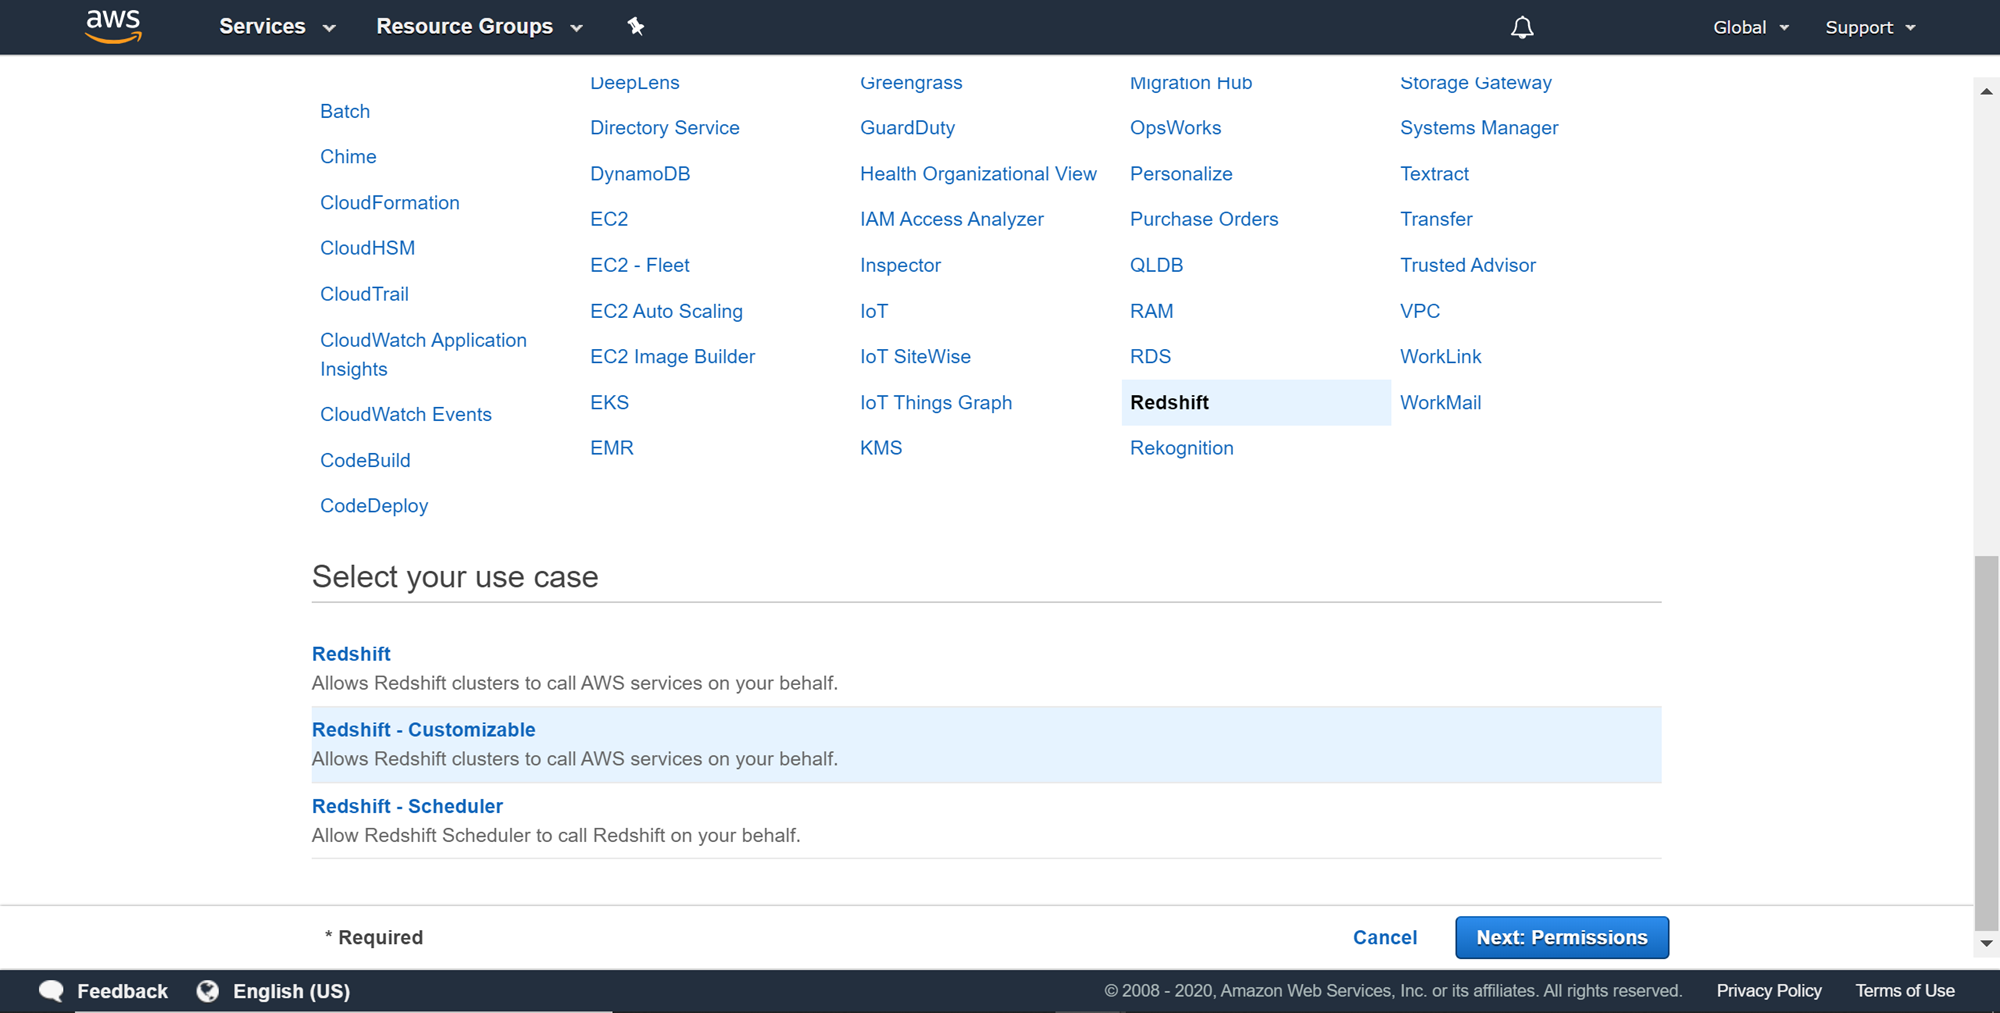
Scroll down and select Redshift as the use-case for which we are going to create an IAM role. Once you select Redshift from the list, you would be provided three options – redshift standard role, redshift customized role and redshift scheduler role. We want to be able to customize the redshift role, so select the one shown below and click on Next Permissions.
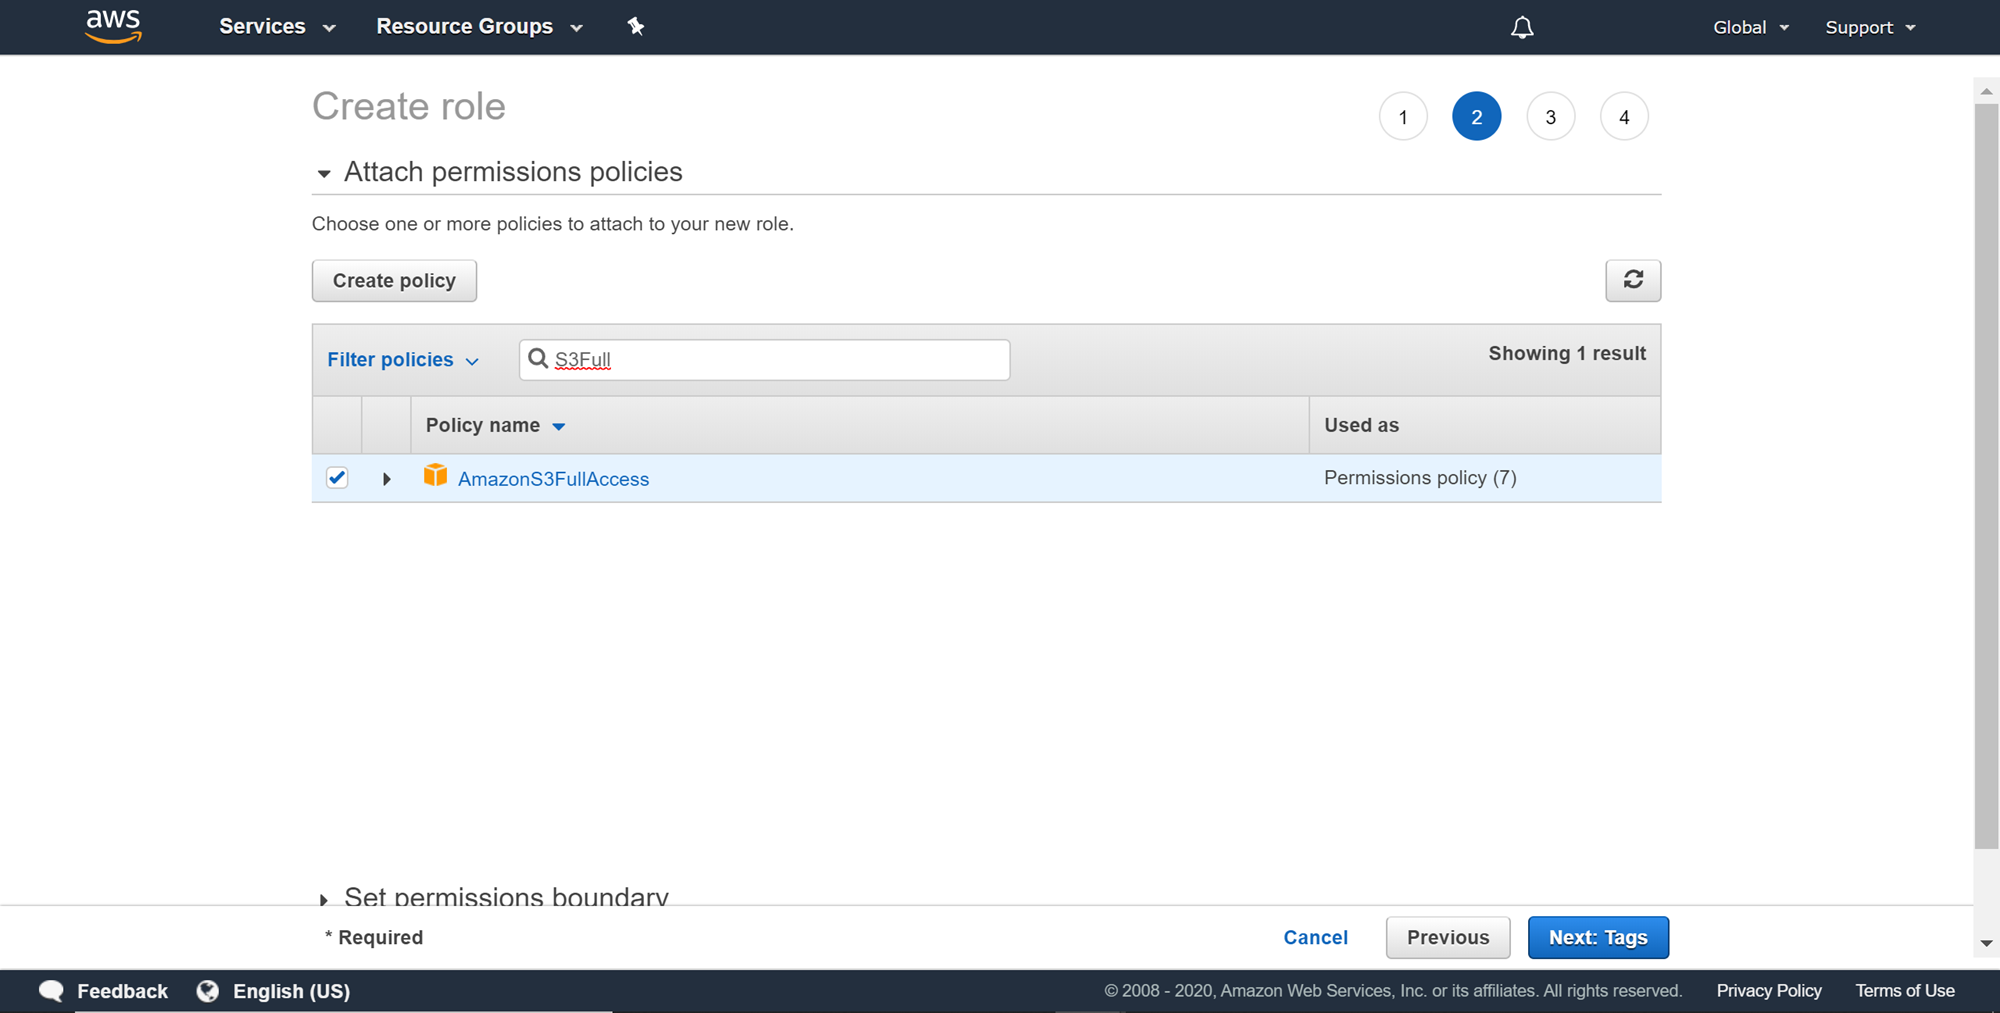
On this page, we need to attach the required built-in permissions on the AWS S3 service. Permissions that allow read-only access to Amazon S3 are sufficient, but in case if you want to export results back to a specific bucket on AWS S3, then you would need to write permissions as well. AmazonS3FullAccess gives administrator-level permissions on Amazon S3, which is not required but can ensure that you will always have all the permissions required on Amazon S3. After selecting the required permissions, click on Next Tags. Providing tags is optional, so you can provide tags if required and click on Next.
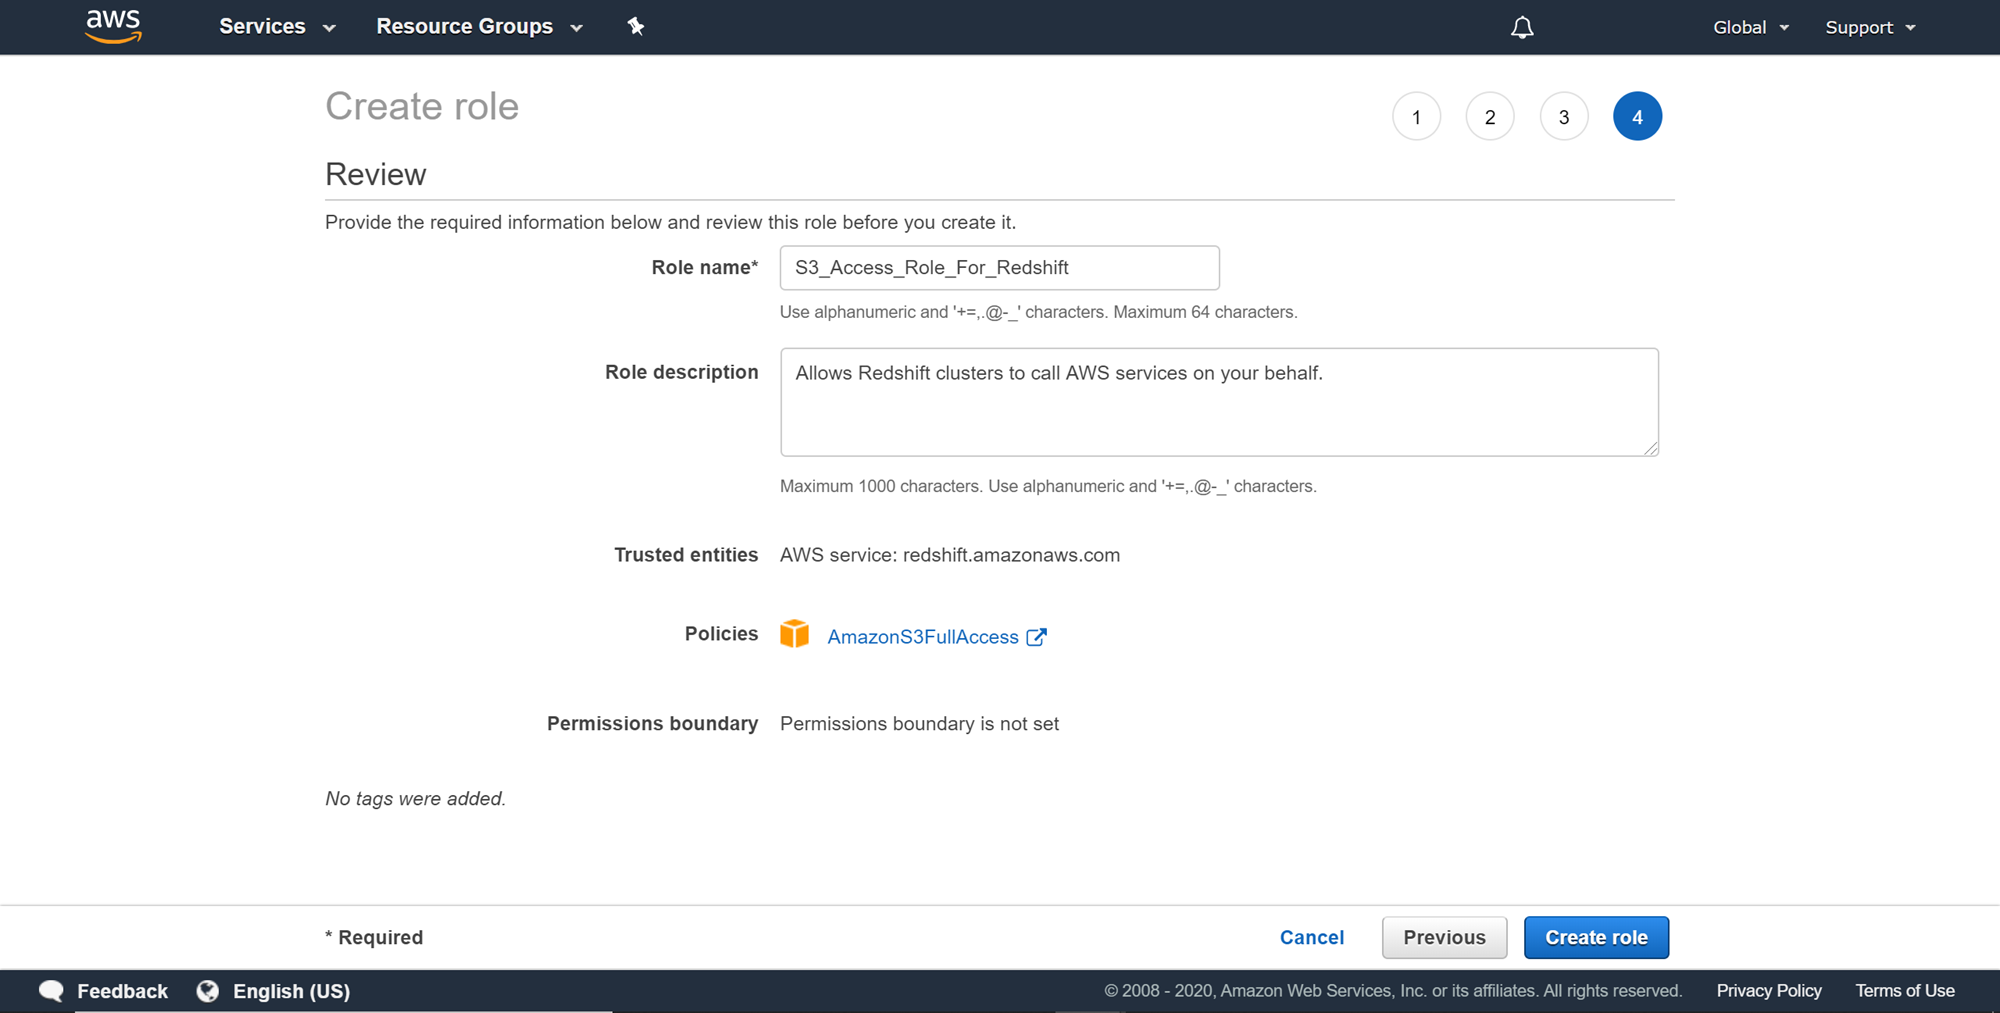
Once you are on the review page, you need to provide a role name for the role being created. Provide a role name and description and click on the Create role button.
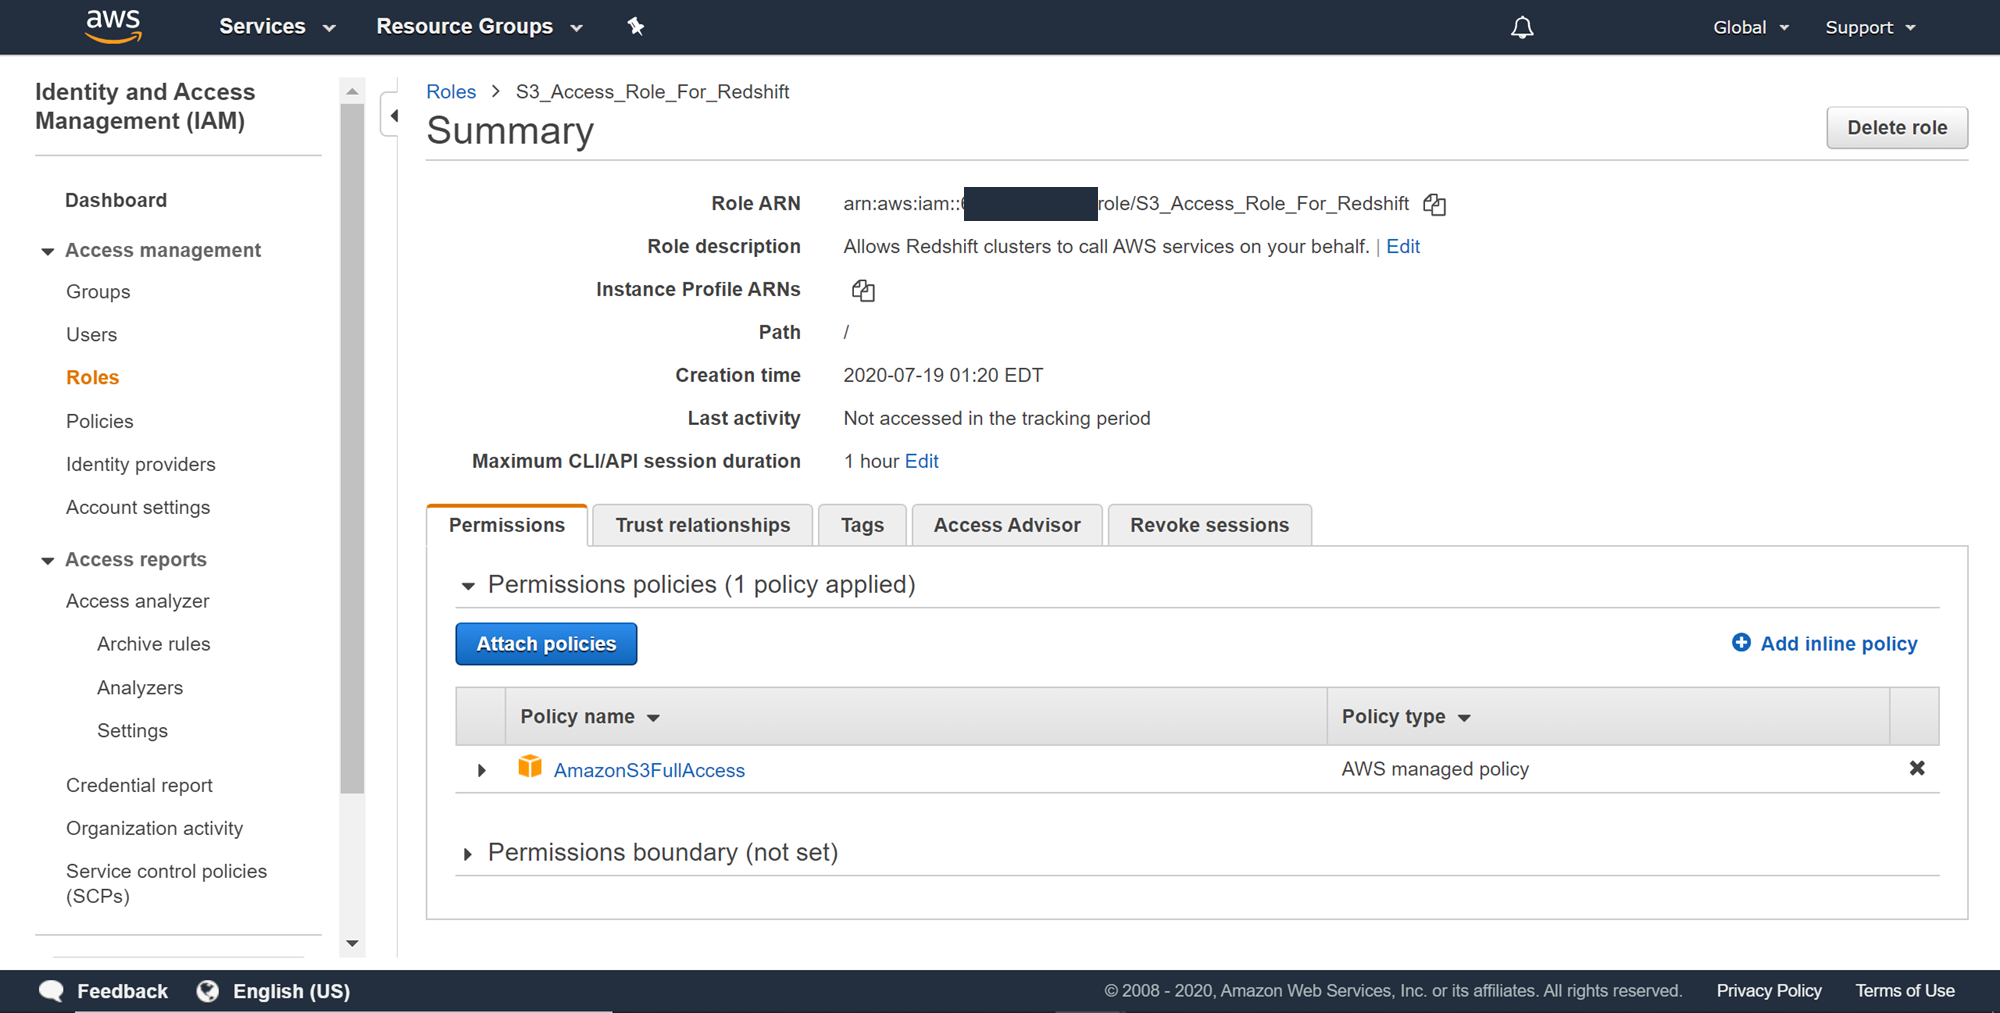
Once the role is created it would look as shown below. You can modify this role any time later as well to provide it more or lesser permissions as required. The ARN (Amazon Resource Name) would be required later to copy to data. So take a note of this and keep it handy.
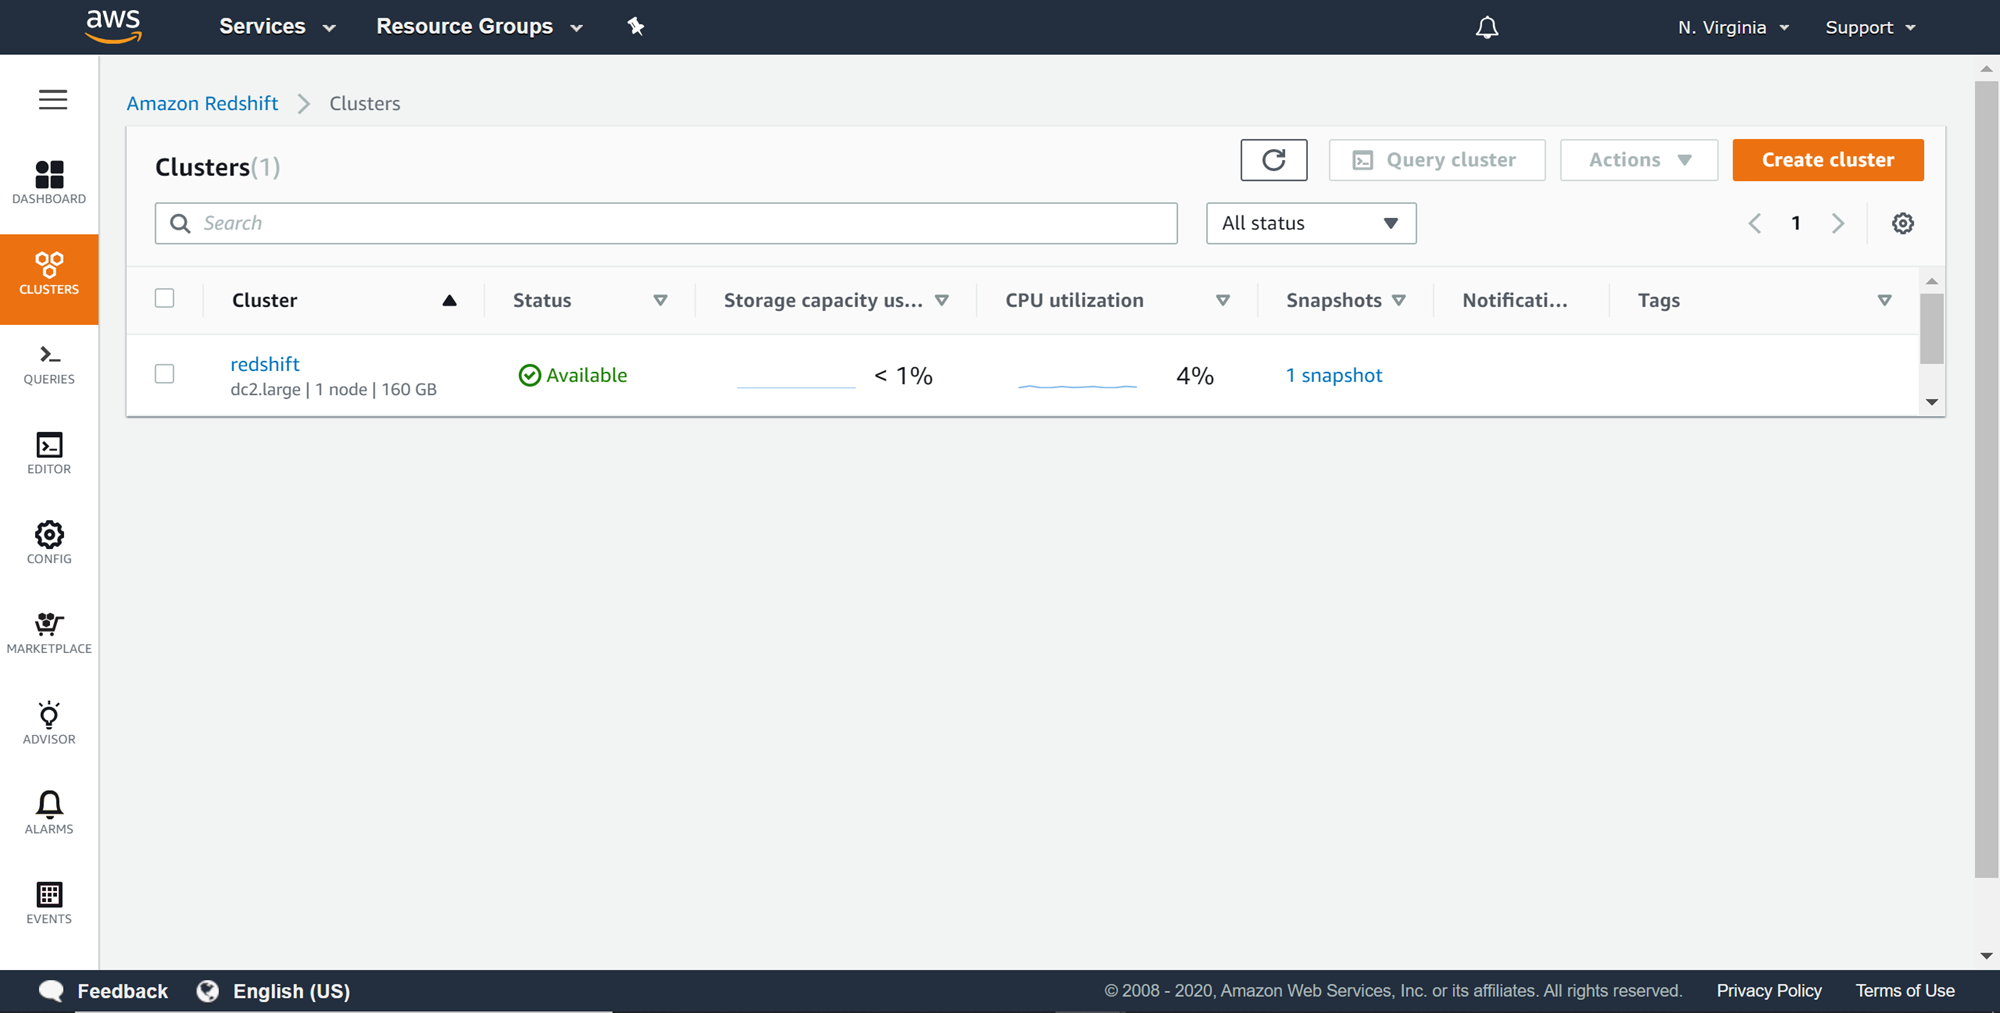
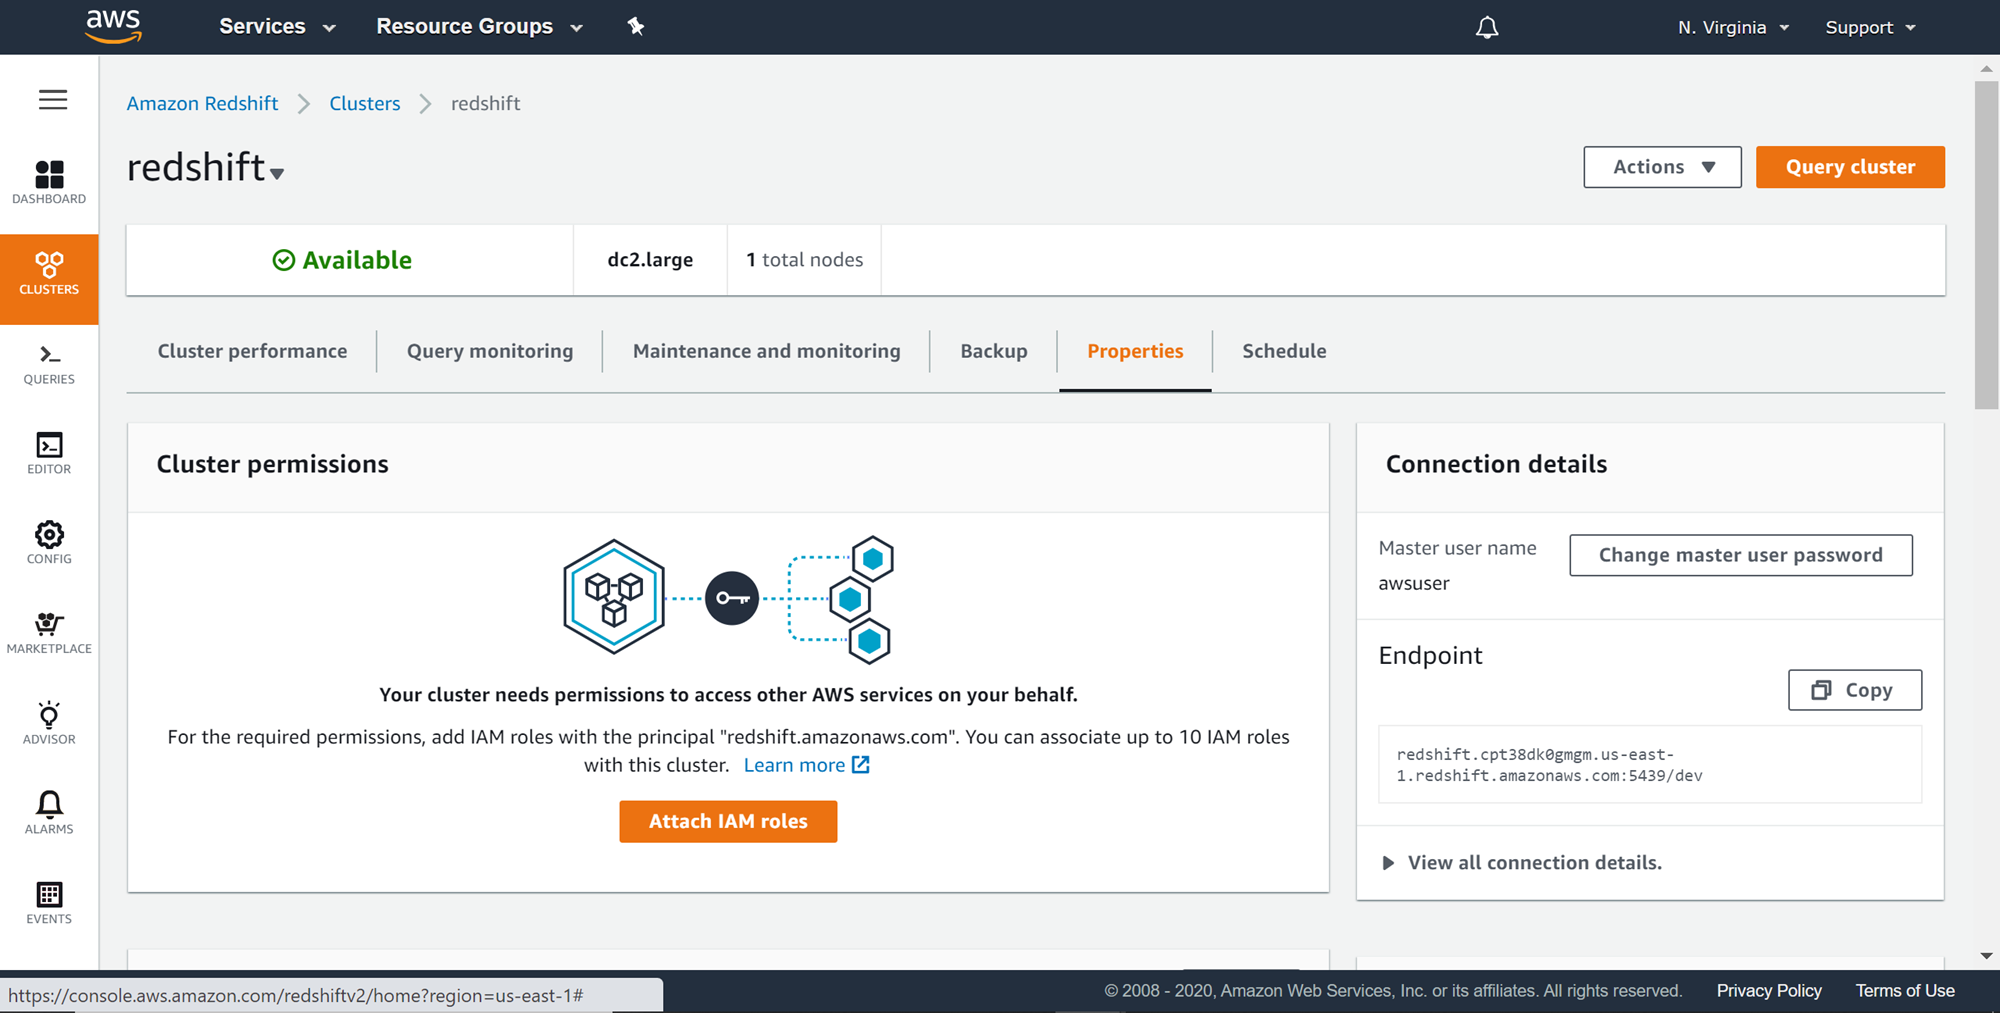
Navigate to your AWS Redshift service home page and click on the Cluster tab on the left pane. Assuming you have a working cluster, it would look as shown below.
Click on the cluster and navigate to the properties tab as shown below. It’s not time to associate the IAM role that we created earlier with the AWS Redshift cluster so that it can communicate with AWS S3. This is done from the cluster permissions section as shown below. Click on the Attach IAM role button.
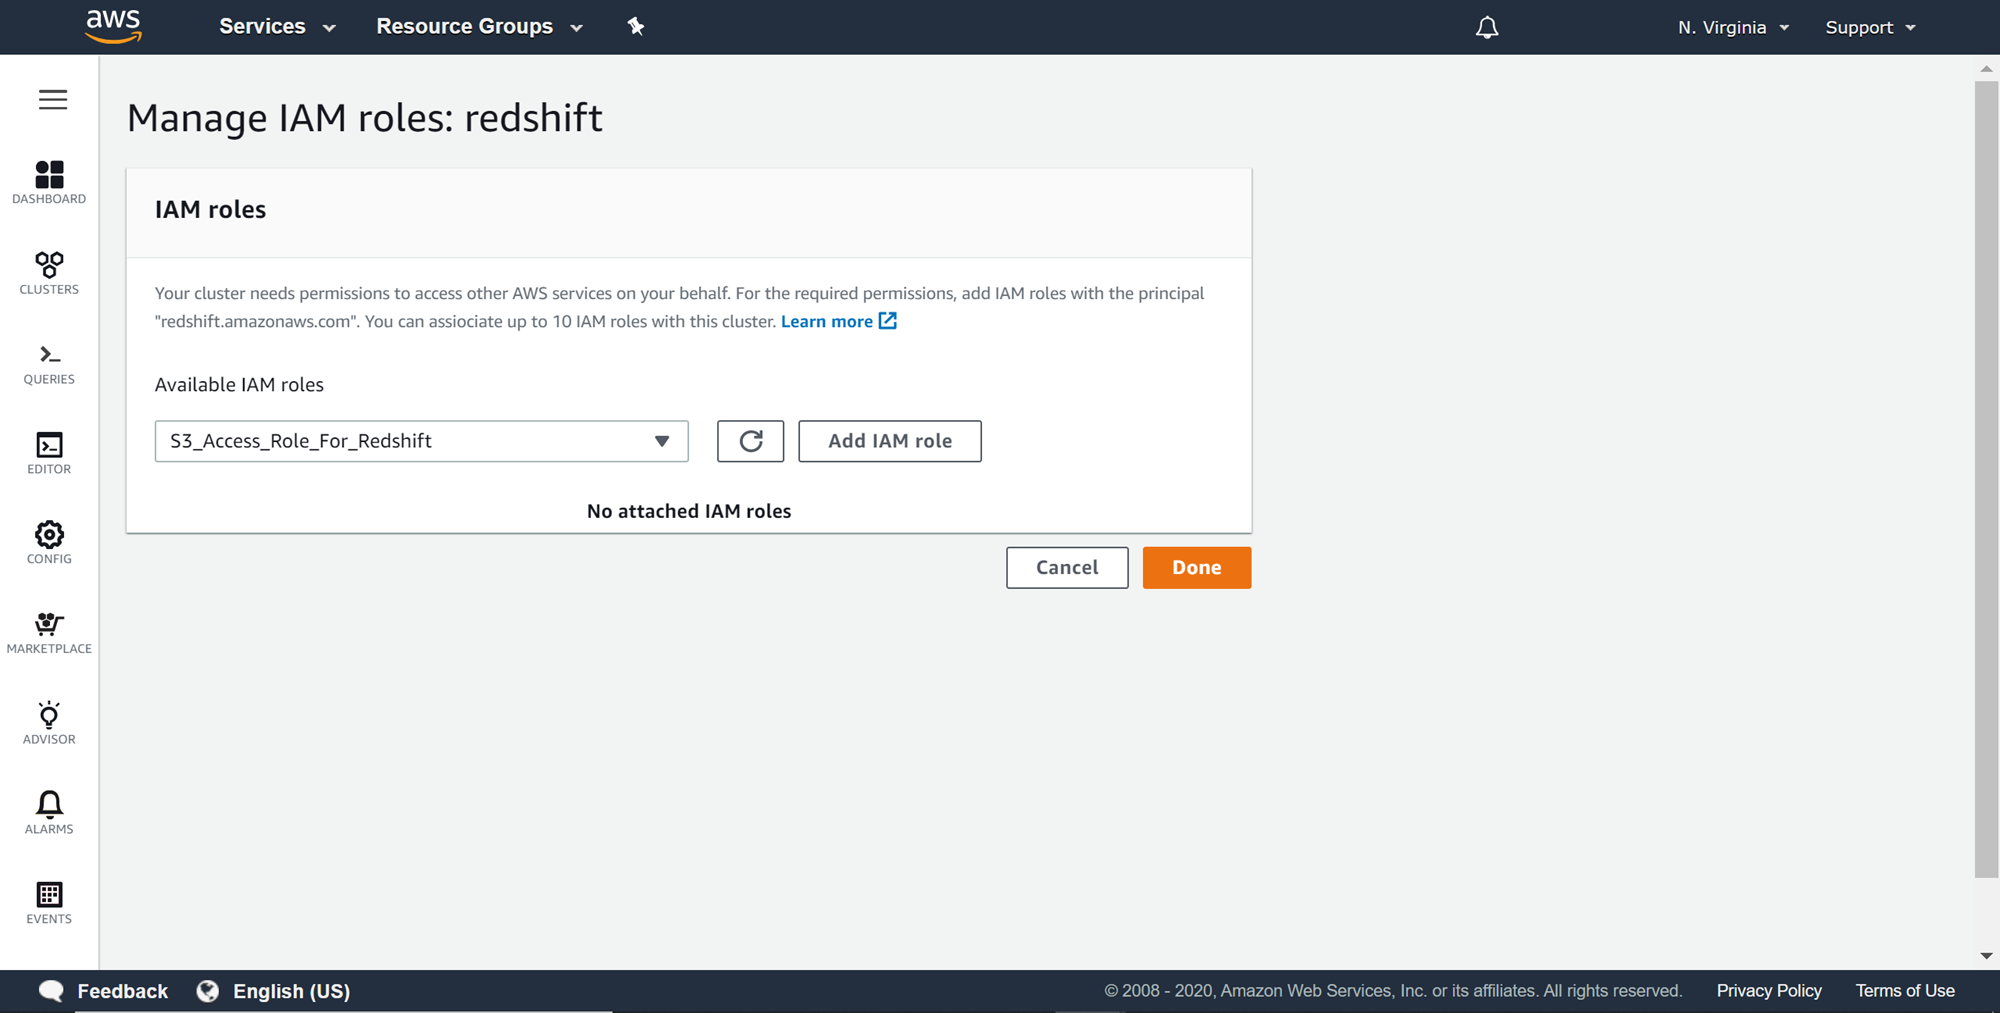
You would be presented with a page as shown below. Select the role from the dropdown that we just created and click on the Add IAM role. Once the role is added, select Done.
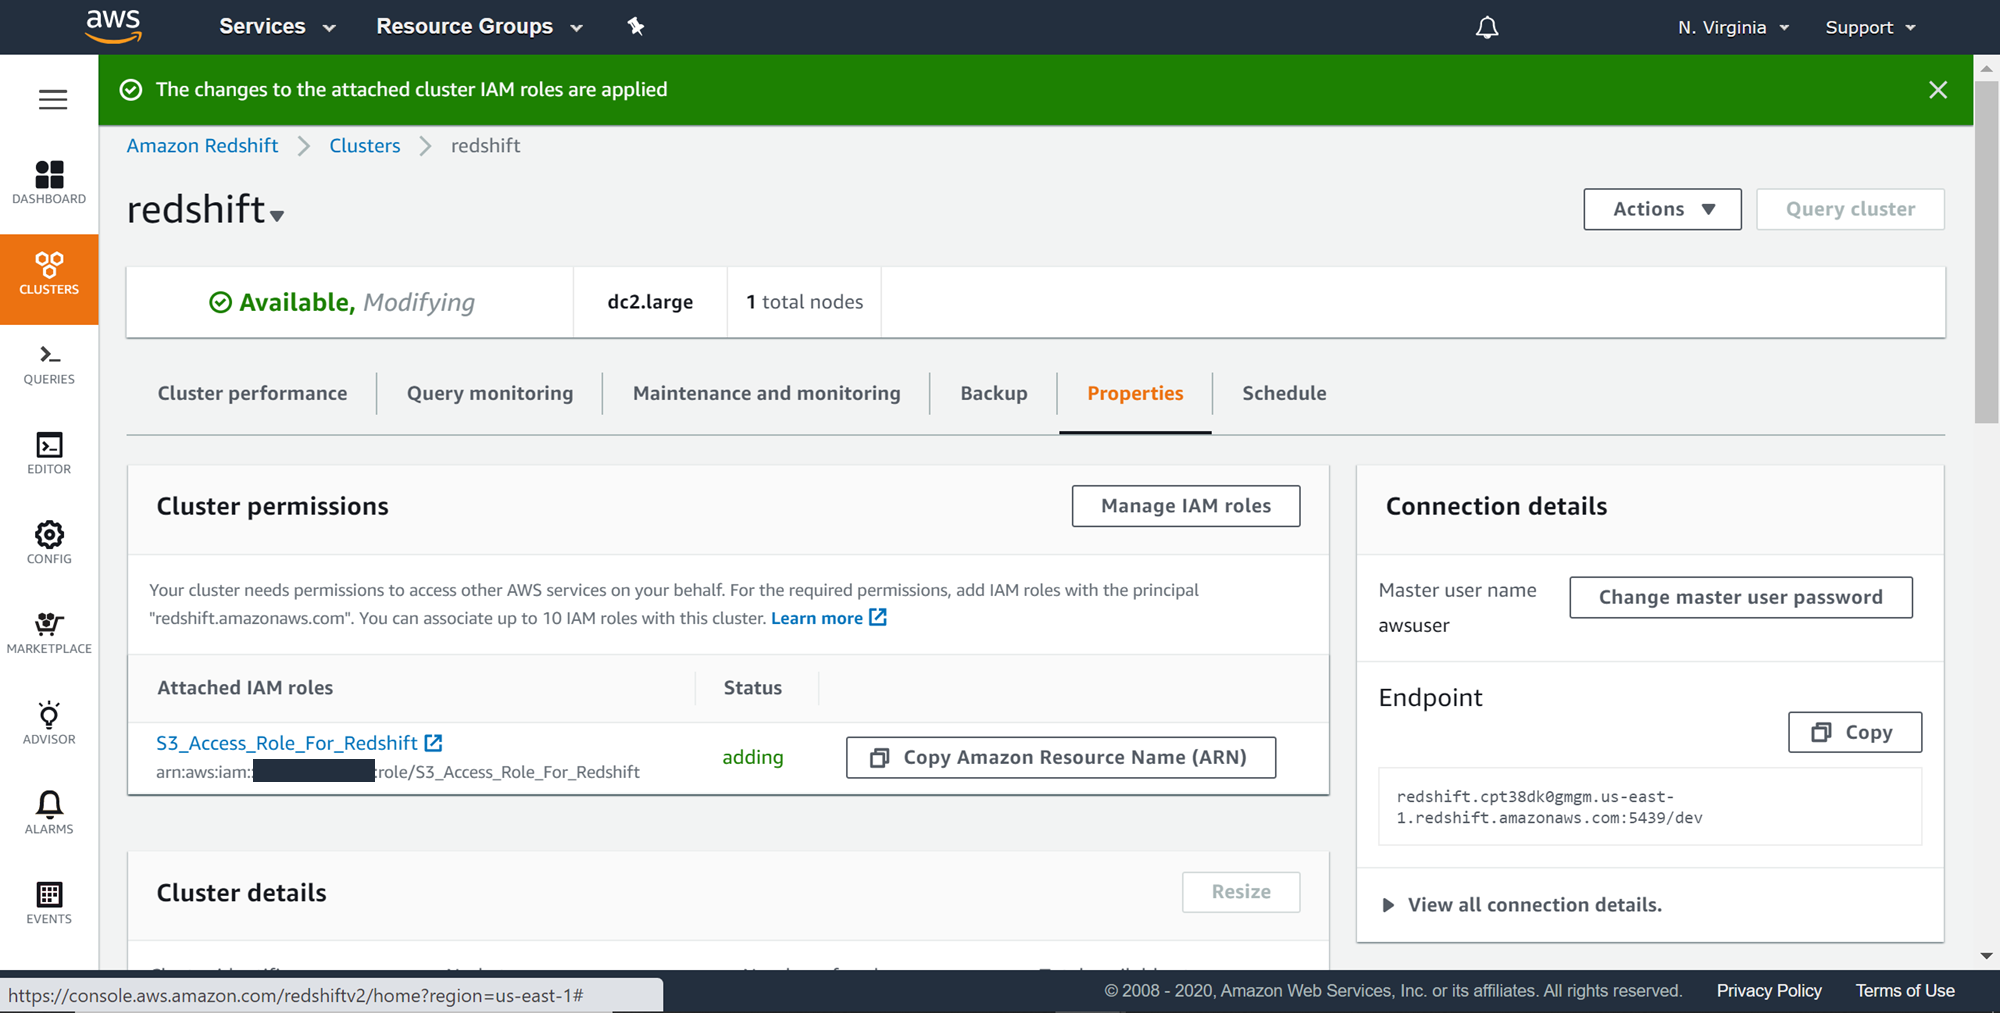
Once the role is successfully associated, you would be able to see the attached role in the cluster permissions list as shown below. This is a confirmation that now you would be able to use this role to communicate with other services for which this role is allowed.
AWS Redshift COPY command
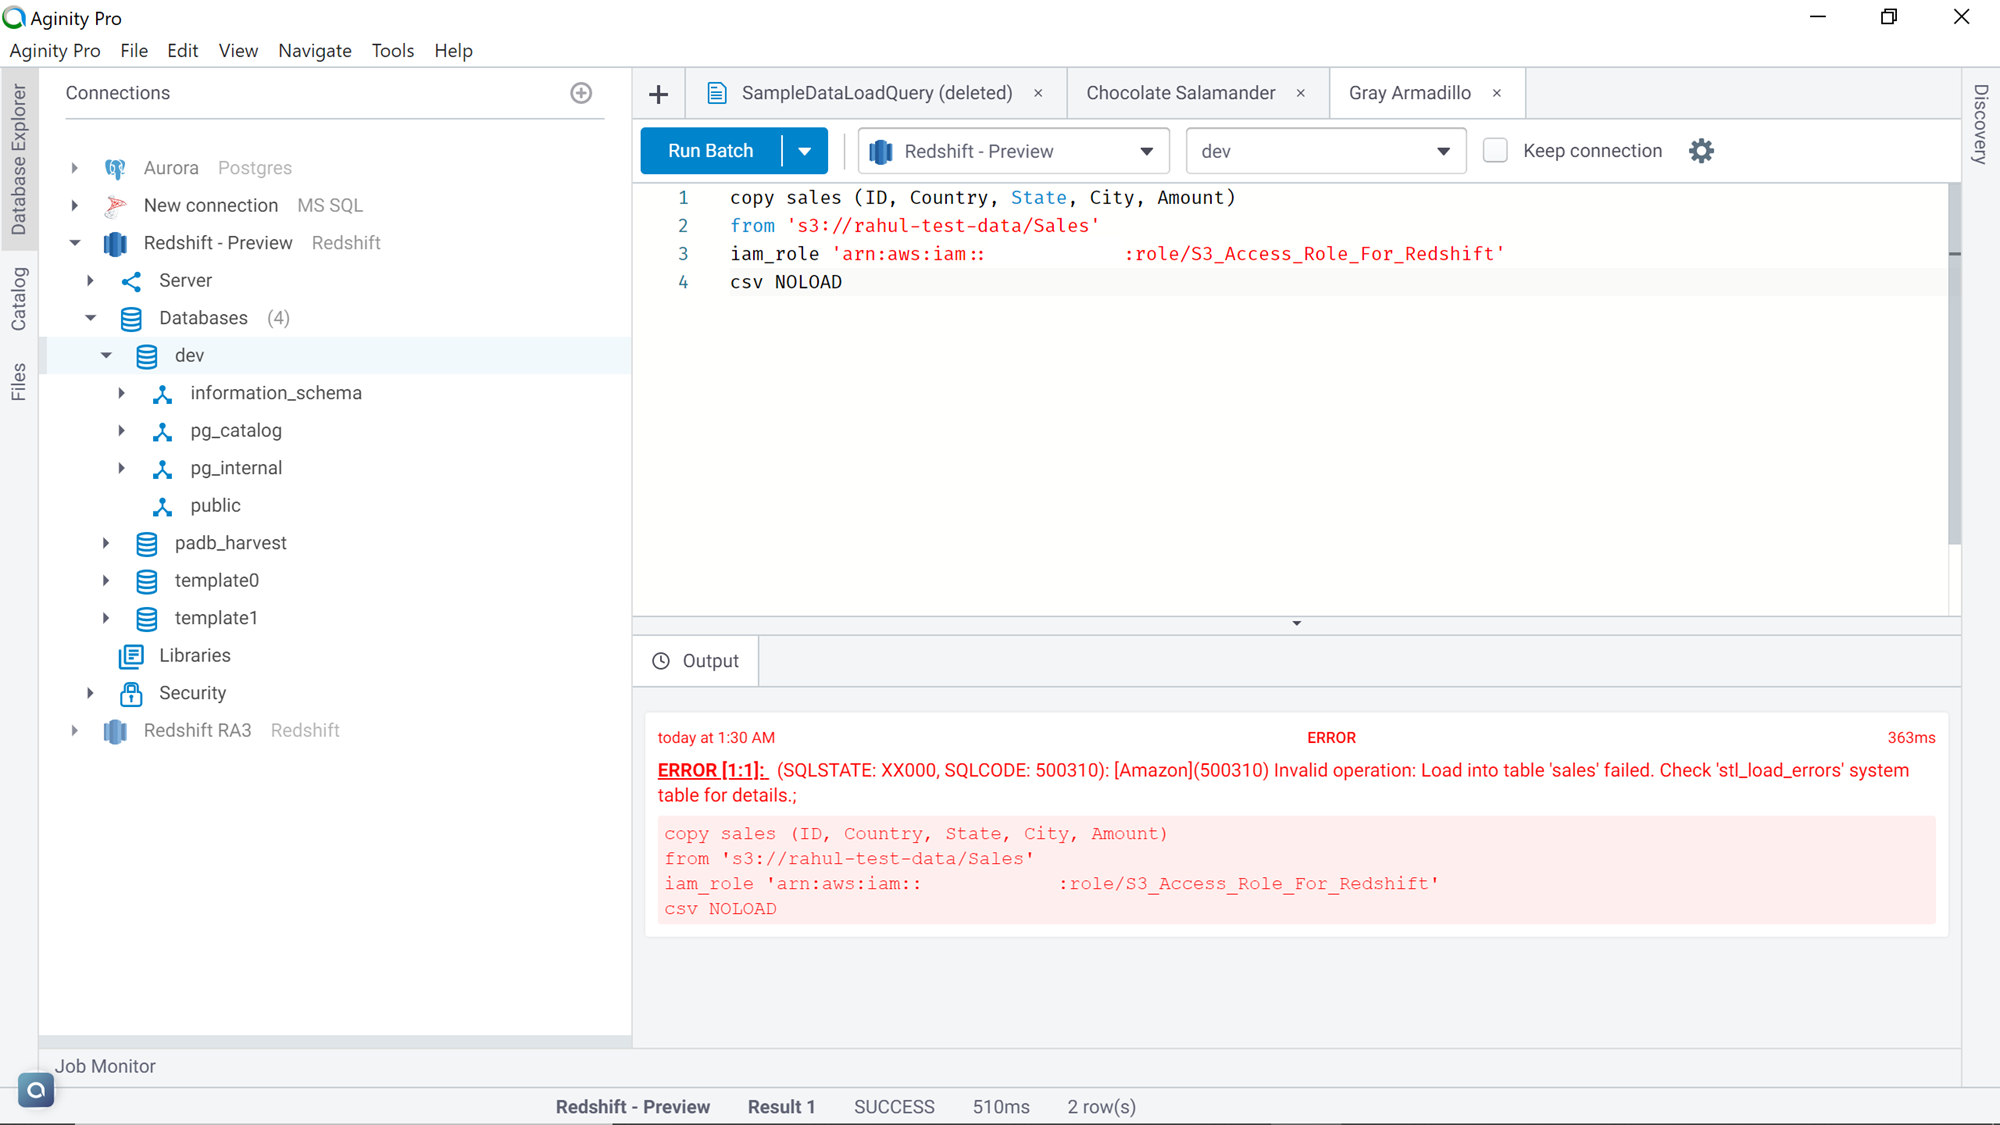
It’s now time to copy the data from the AWS S3 sample CSV file to the AWS Redshift table. Navigate to the editor that is connected to Amazon Redshift. One of the default methods to copy data in Amazon Redshift is the COPY command. This command provides various options to configure the copy process. We would look at the key ones that will allow us to copy the CSV file we have hosted on the Amazon S3 bucket. Type the following command in the query editor.
copy sales (ID, Country, State, City, Amount)
from ‘s3://rahul-test-data/Sales’
iam_role ‘arn:aws:iam::600774523433:role/S3_Access_Role_For_Redshift’
Csv NOLOAD
IGNOREHEADER 1
Let’s understand the options used in the command:
- The Copy is the name of the command
- [Sales] is the name of the table to which data is being copied
- From defines the address of the data repository
- IAM Role is the name of the role that will be used to communicate with the data repository
- CSV defines the type of data being read
- NOLOAD option specifies that only the data load should be simulated and checked whether the data load will go through if a load is attempted. This will help us verify failures before executing the load, so that we do not load partial data and then encounter a failure
Execute the command as shown below. You would find an error, which means that based on the command and configuration we have specified, the copy process would fail.
To understand the details of the error, let’s query the STL_LOAD_ERRORS table as shown below. If you scroll to the very right, you will find the error as shown below. The reason for this error is that the first record in our file is the column headers, which are textual in nature and won’t load in the ID datatype which has numerical data type for example.
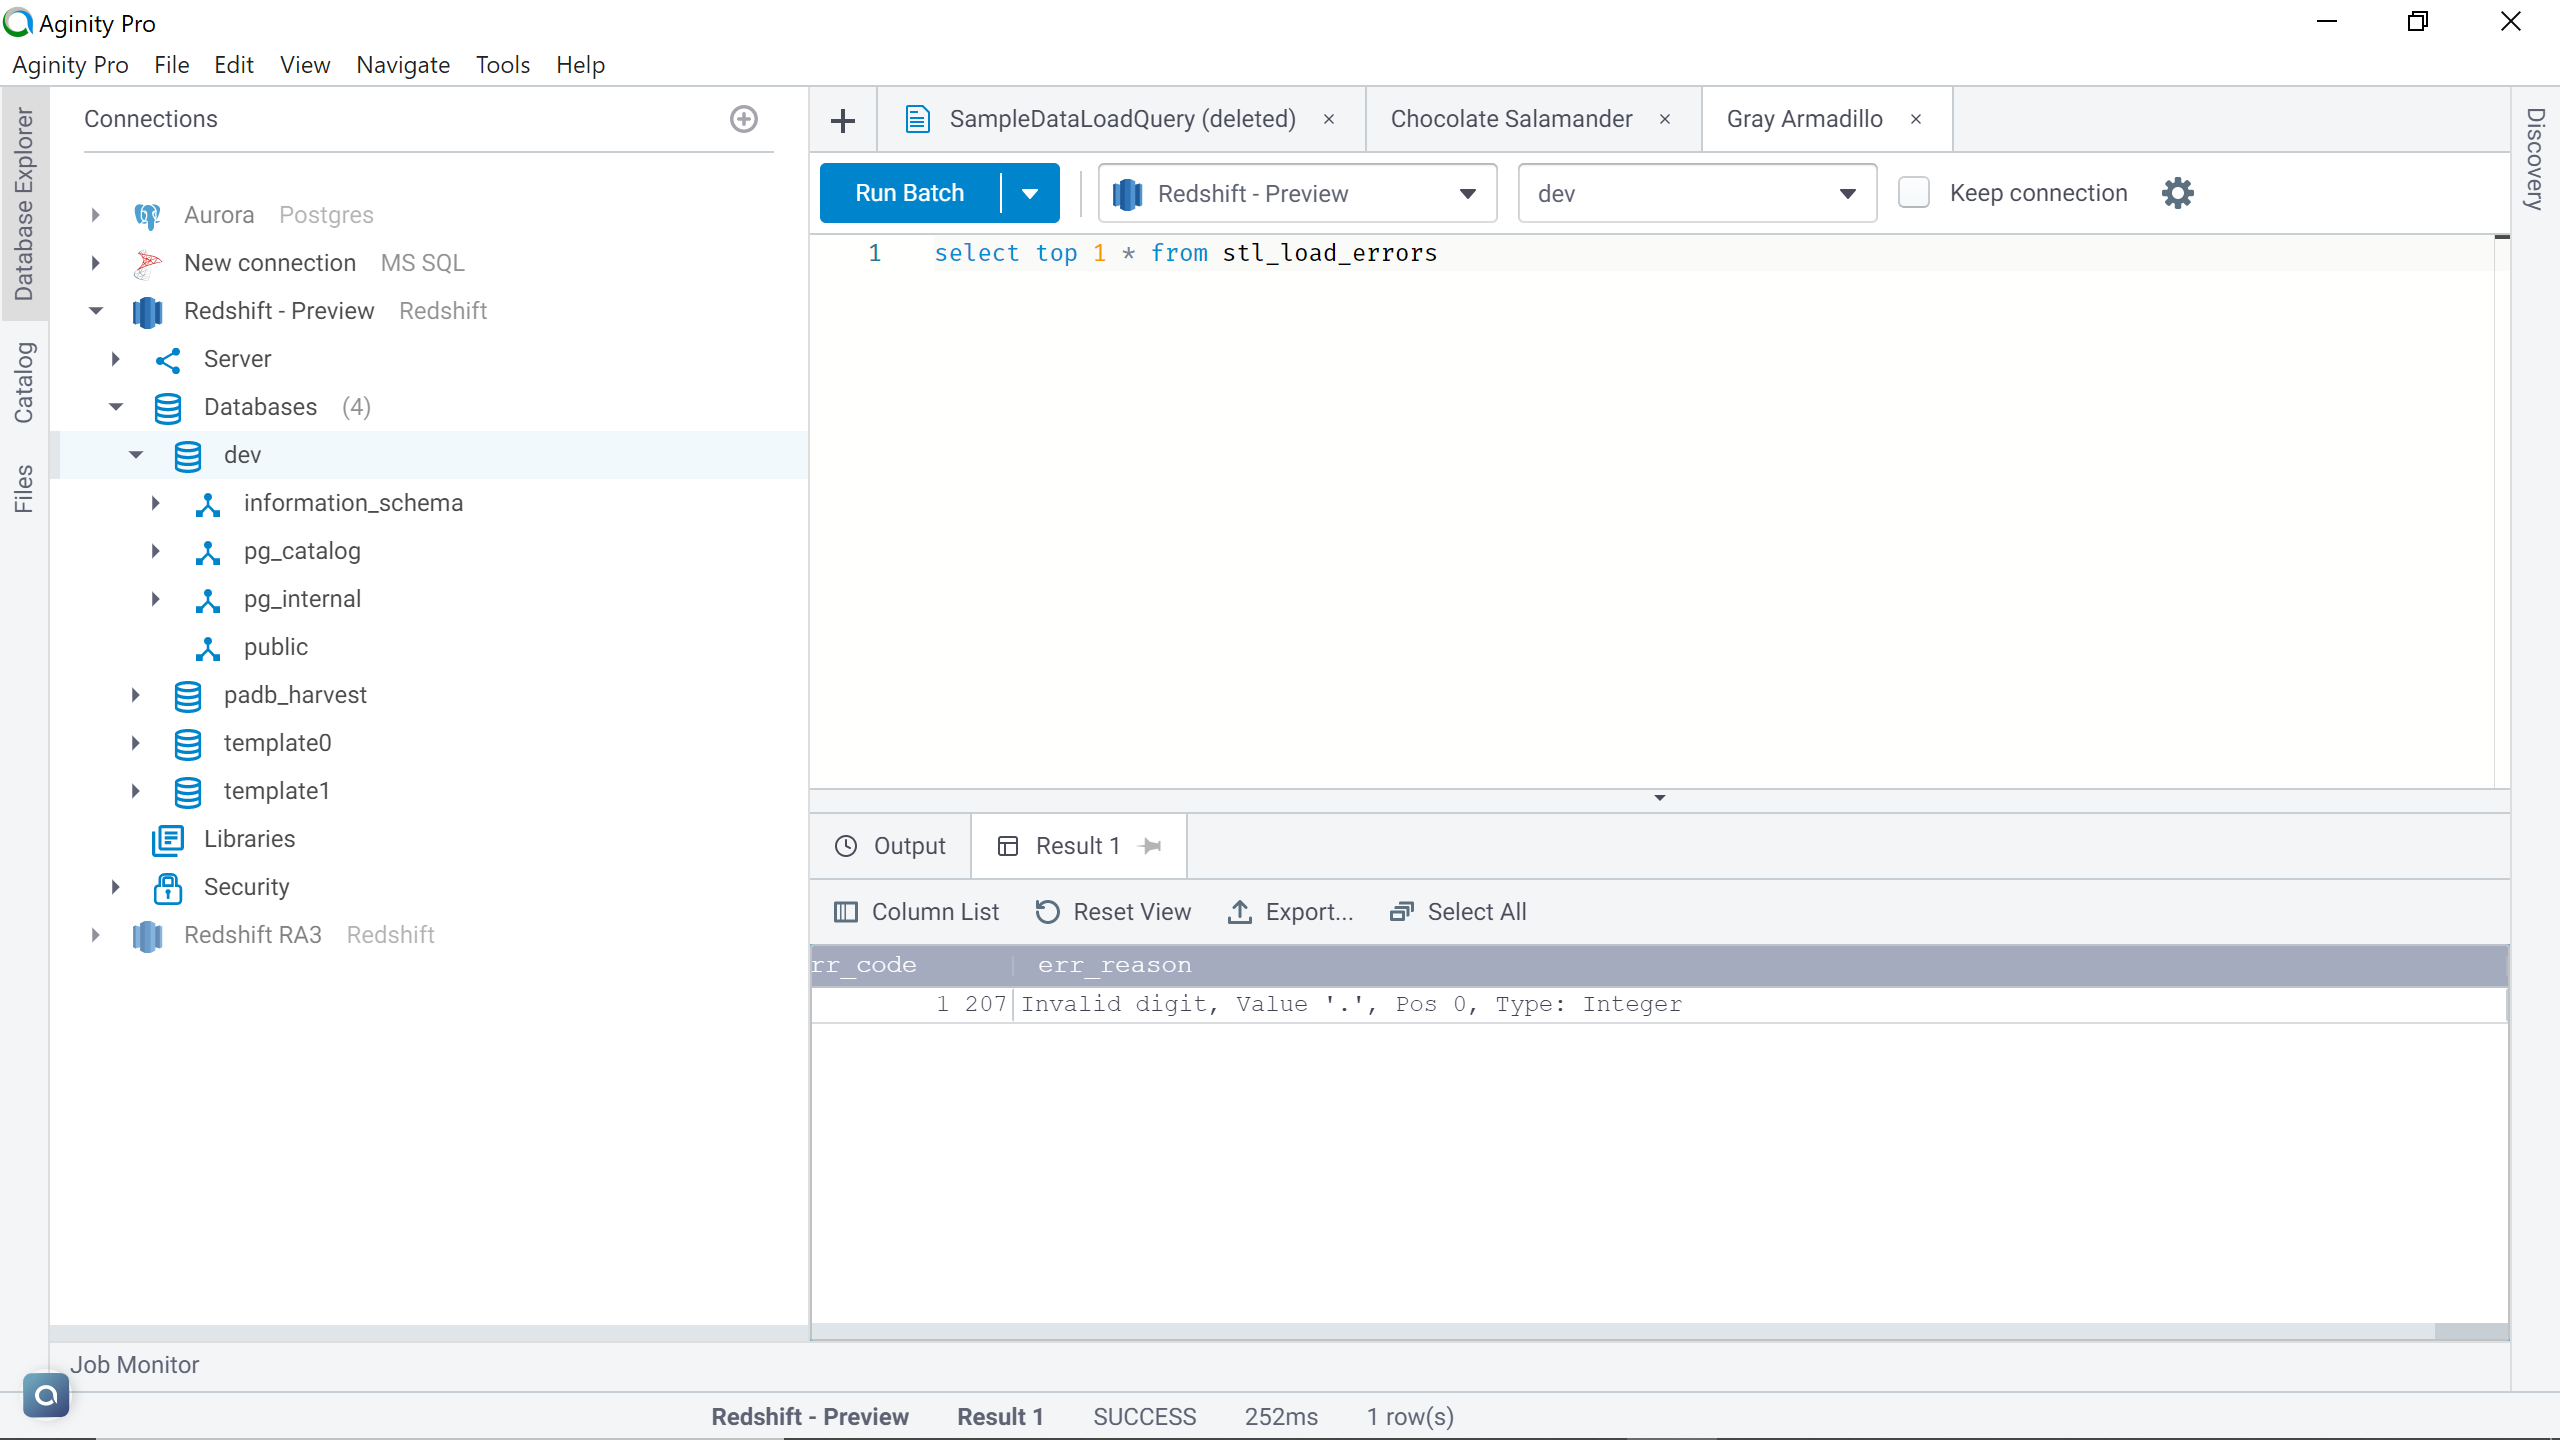
The solution for the same is that we need to add an additional parameter named IGNOREHEADER 1, which means that we are instructing the command to ignore the first record which is the column header. Execute the command and you would find the result as shown below. If you query the table, you will not find any records, the reason being the NOLOAD parameter.
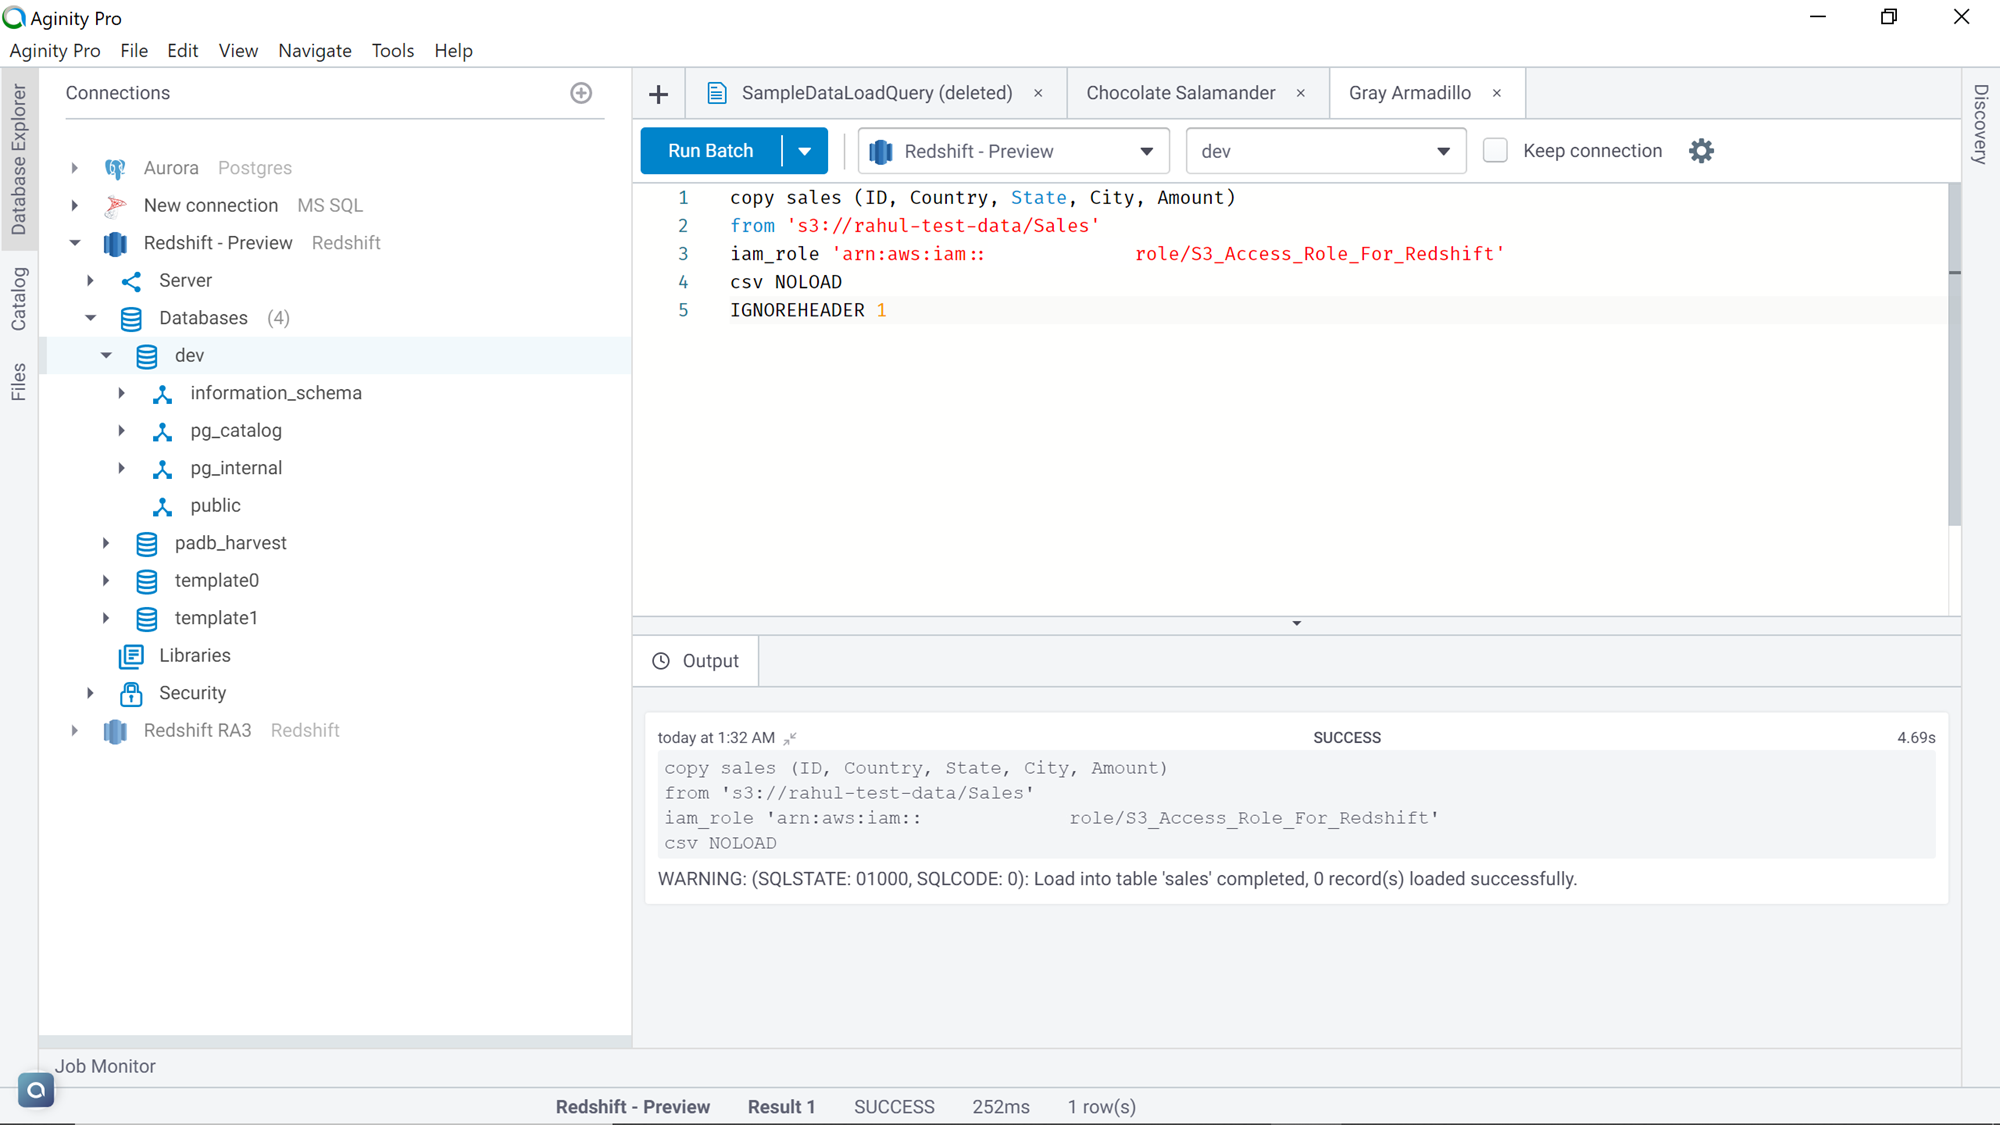
Remove the NOLOAD parameter and re-execute the command as shown below, and you will find all the records loaded in the table as shown below.
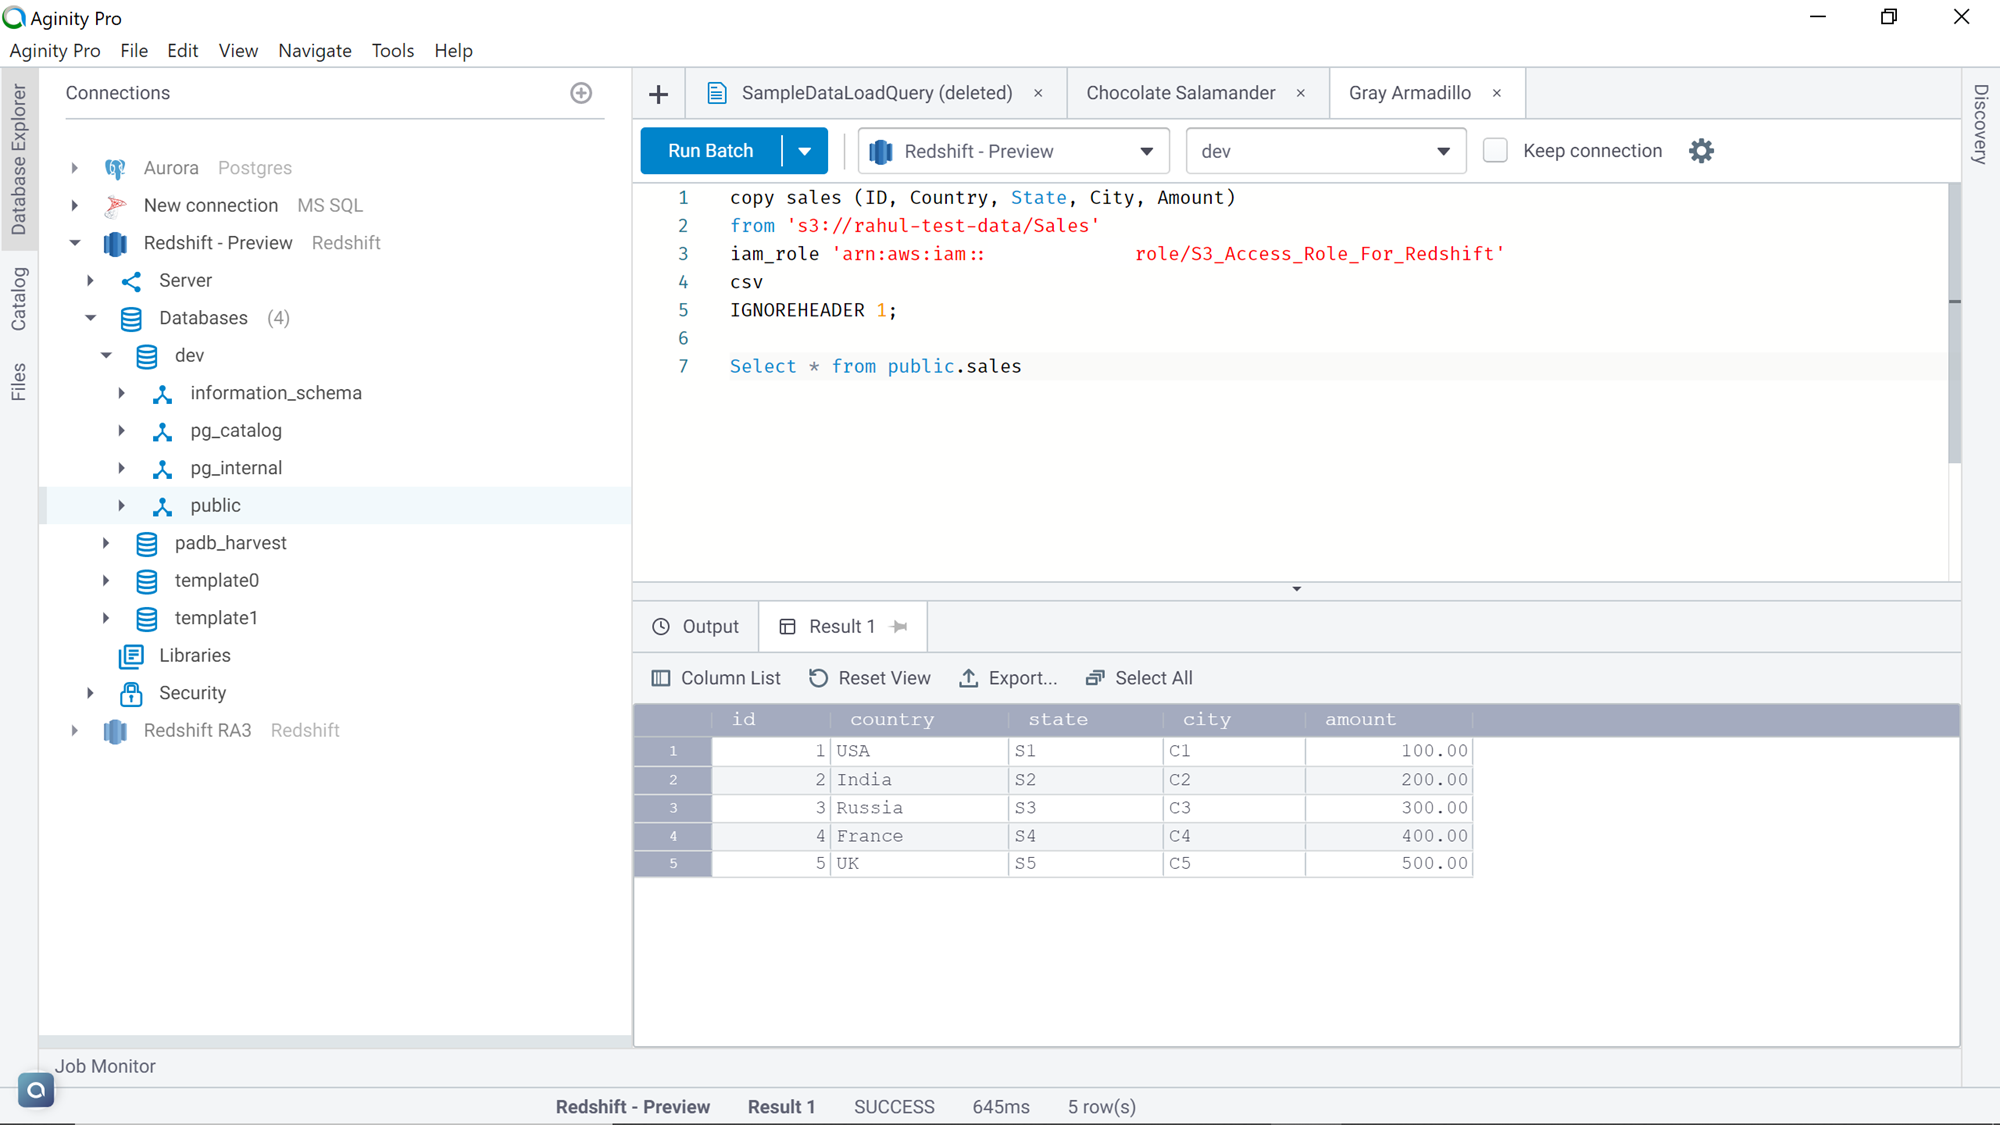
In this way, we can copy the data from an AWS S3 bucket to the AWS Redshift table using an IAM role with required permissions and pairing the COPY command with the right IAM role.
Conclusion
In this article, we learned how to create an IAM role for AWS Redshift, provide it required permissions to communicate with AWS S3, and load the desired data into Amazon Redshift tables using the COPY command. We also learned how to verify if a file has the right schema and data to load successfully into a redshift table by using different options of the COPY command.
Table of contents

He has worked internationally with Fortune 500 clients in various sectors and is a passionate author.
View all posts by Rahul Mehta
- Finding Duplicates in SQL - February 7, 2024
- MySQL substring uses with examples - October 14, 2023
- MySQL group_concat() function overview - March 28, 2023