

This article will walk you through the process of restoring dedicated SQL pools in Azure Synapse Analytics.
Introduction
Database or Data Warehouse administrators need to back-up and restore database and database on a frequent basis. Azure Synapse Analytics is the data warehousing offering on the Azure cloud platform. It offers different types of pools like serverless SQL pools, dedicated SQL pools, and Spark pools. The dedicated SQL pool comes with a local storage option and can be considered like a SQL Server database with the major difference that its capacity is managed by Azure as per the configuration selected by the user during the creation of the instance. As this pool offers local storage when significant data is ingested or modified, there is often a need to create a checkpoint so that in case there is a need to revert to any earlier state, one can use the checkpoint to do the same. In this article, we will learn how to achieve the same.
Creating a Restore Point
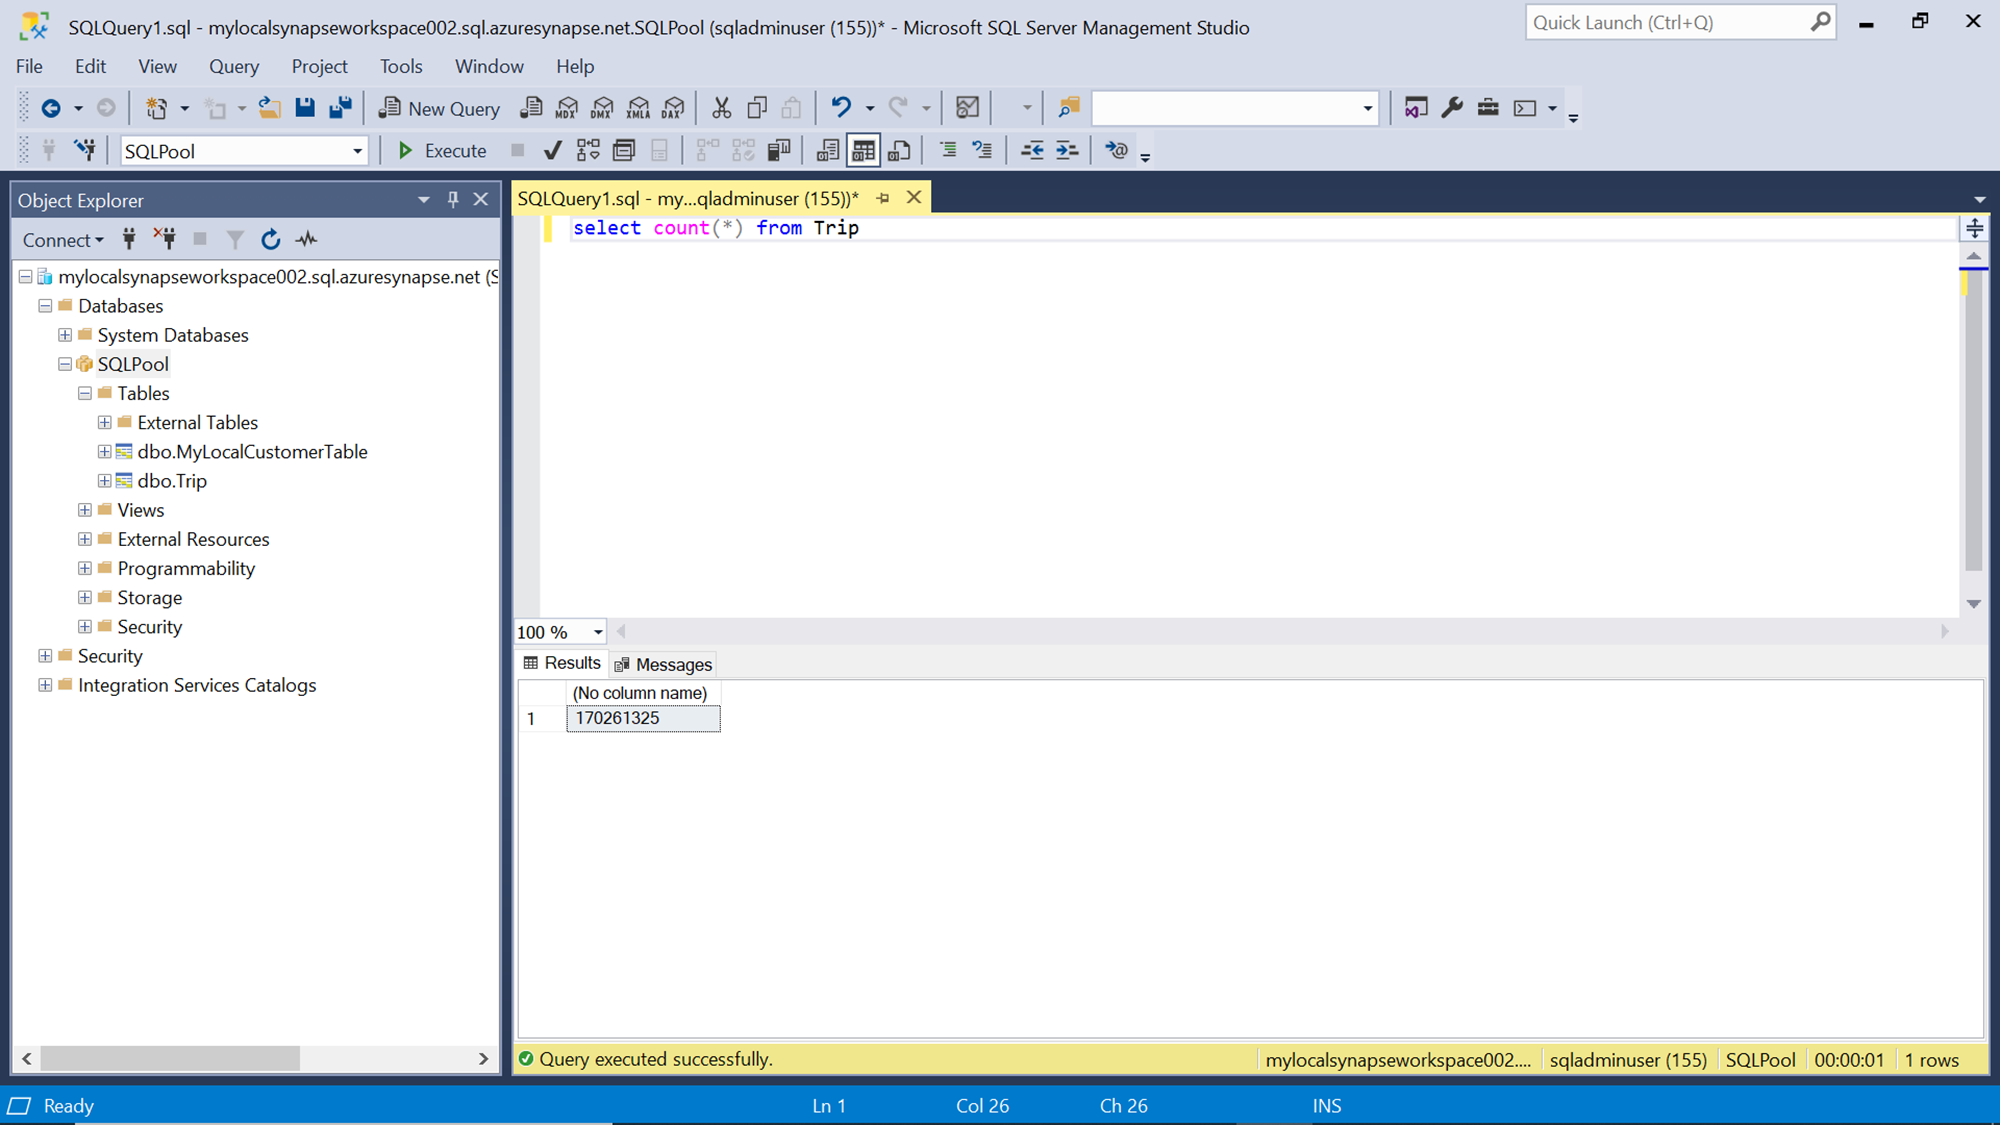
We need to simulate a situation where we have some significant ingested or modified data in the dedicated SQL pool. So, create any sample table in the dedicated SQL pool and ensure that there is significant data in the table. We can continue even without a large volume of data, the only impact it would make is that one won’t be able to assess or experience the delay that can be seen while restoring a data pool with large volumes of data. In this case, we have a sample table named Trip hosting a significant volume of records in it. The easiest way to visualize this is by using SSMS to connect to the dedicated SQL pool in Azure Synapse Analytics as shown below.
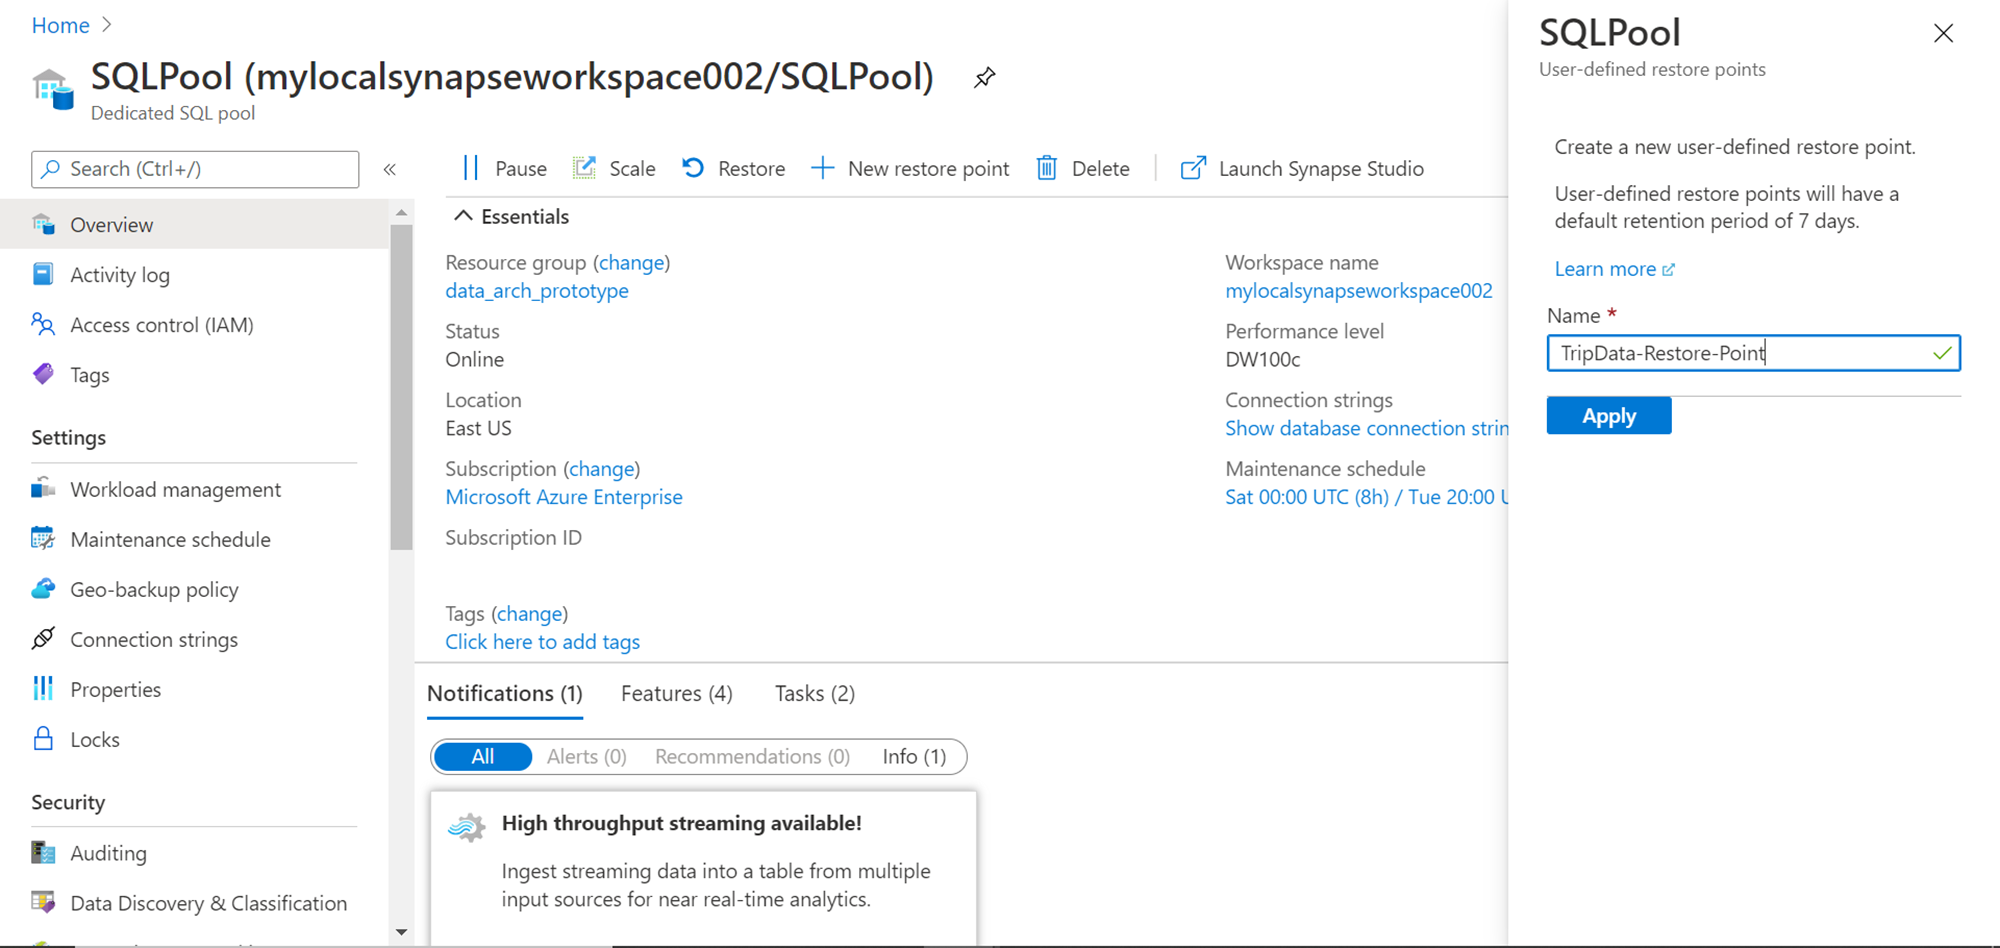
We need to create a checkpoint now so that in case if the state of the data hosted in the pool changes, then we can revert to this start by using the checkpoint. These checkpoints are called Restore points in Azure Synapse Analytics. Navigate to the Azure Synapse workspace and open the dedicated SQL pool. Once we are on the dashboard page, we can click on the New restore point link from the toolbar. This would open a pop-up window as shown below.
There are two types of restore points in Azure Synapse Analytics – automatic restore points and user-defined restore points. Azure Synapse Analytics will automatically keep on creating restore points every four to eight hours. These restore points are preserved and one can create new dedicated SQL pools using these restore points at any time. For use-cases where these restore points are not enough, and one needs more control on the exact timing of the restore point, one can create user-defined restore points. These restore points are retained by default for a maximum of seven days. We are creating a user-defined restore point in this case as we do not intend to wait for Azure Synapse Analytics to create an automated restored point on its schedule. So, provide the name of the restore point and click on the Apply button. This would initiate the creation of the restore point and in a short while the restore point would get created.
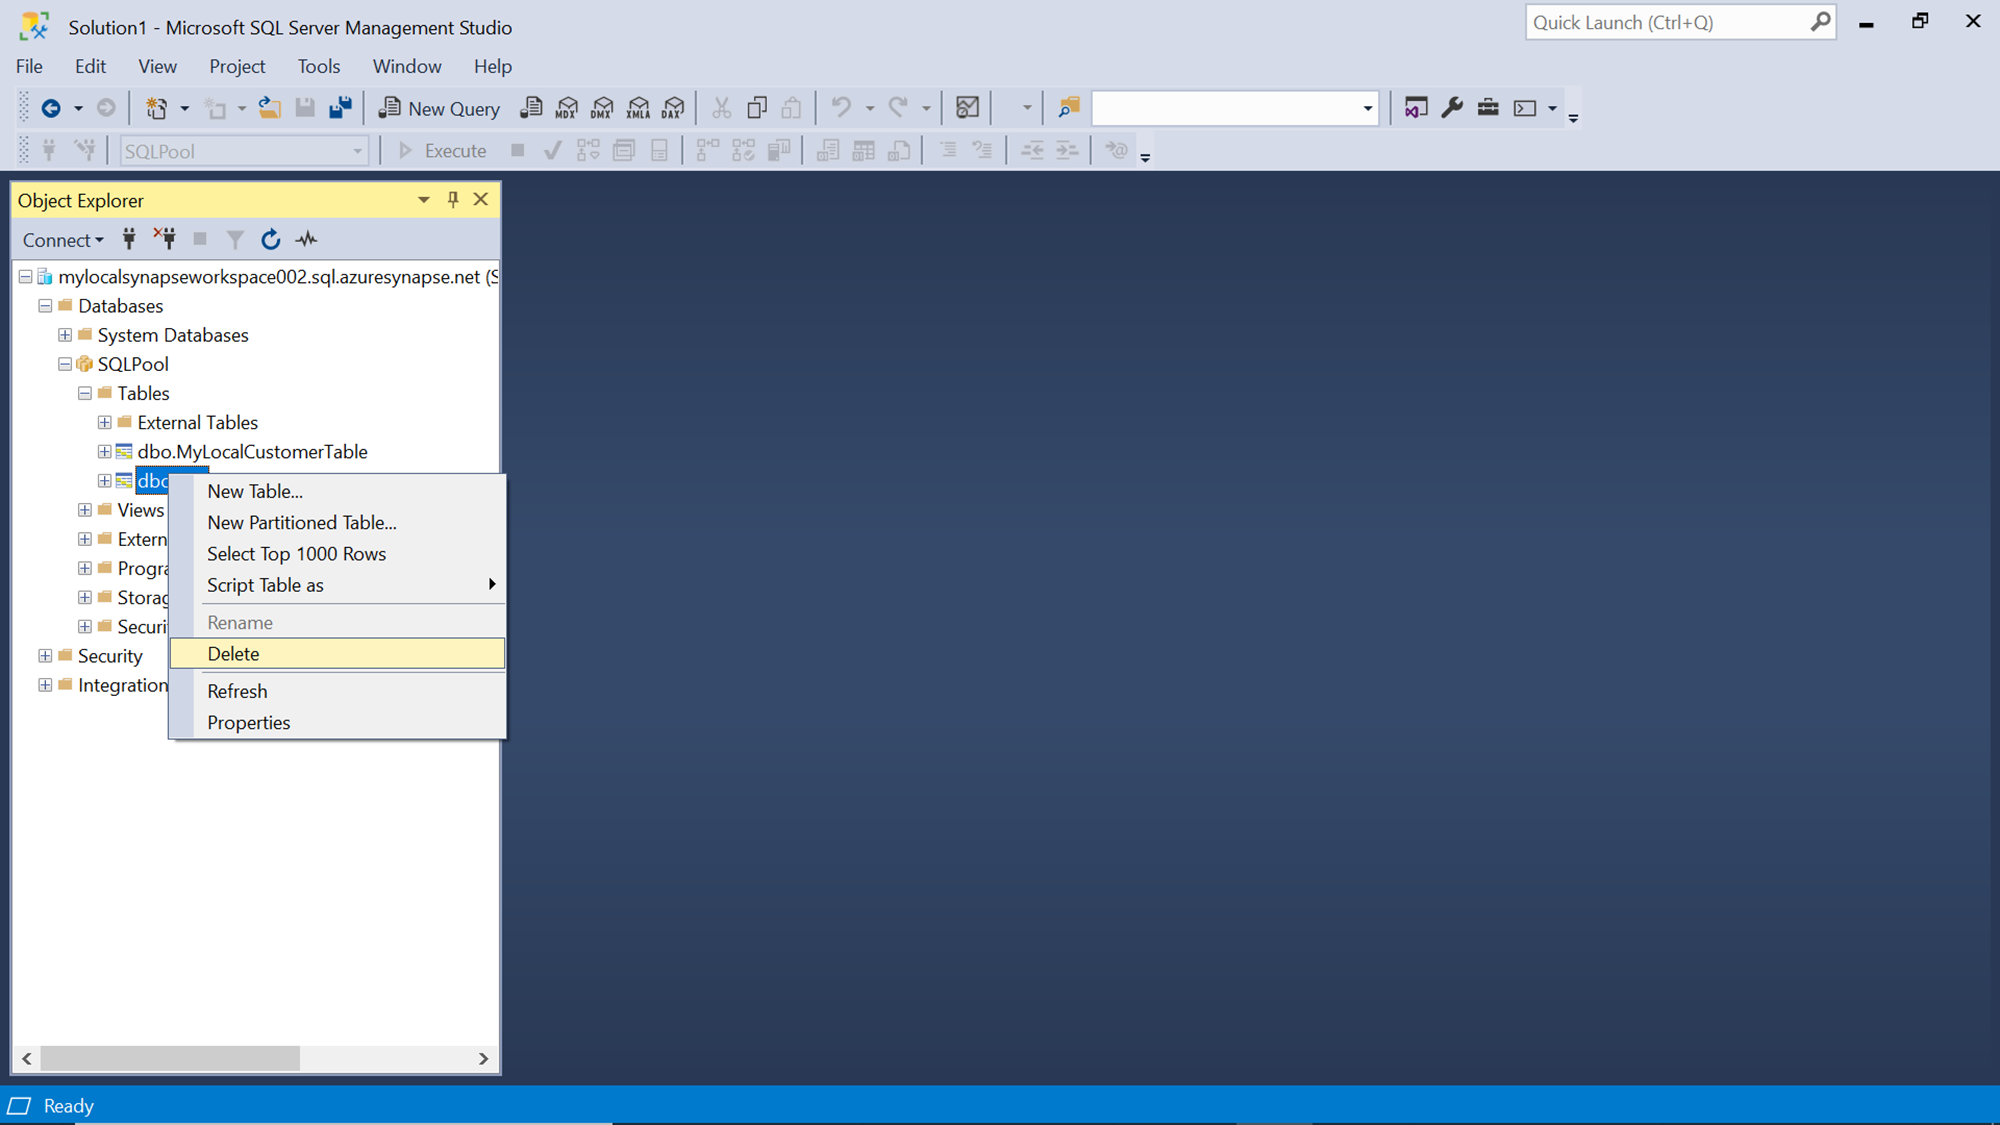
Now that our restore point is created, we need to make some significant changes in the dedicated SQL pool, just to simulate the situation where the state of the pool has changed after the restore point. An easy way to do this is to either update some data or database objects. In this case, here we are deleting the table in question. To do the same, navigate to SSMS, from the object explorer right-click the table and select the Delete menu option as shown below.
Restoring a dedicated SQL pool
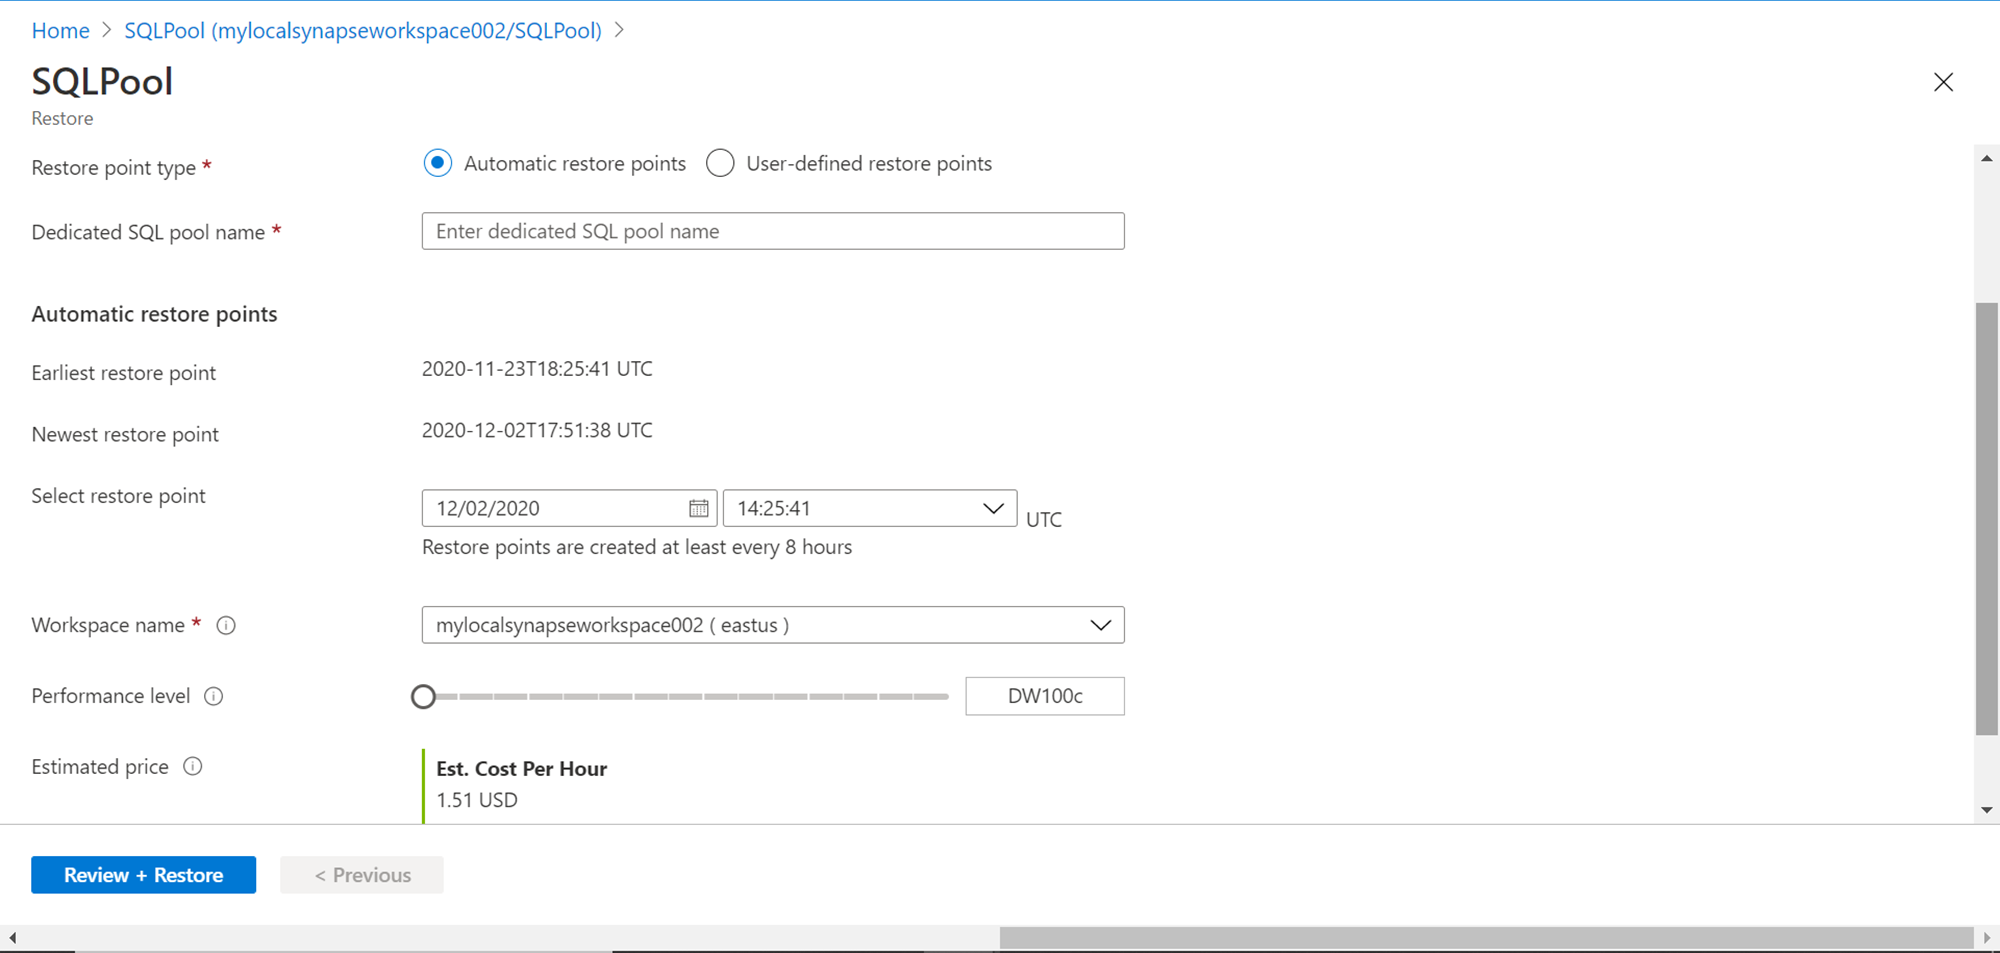
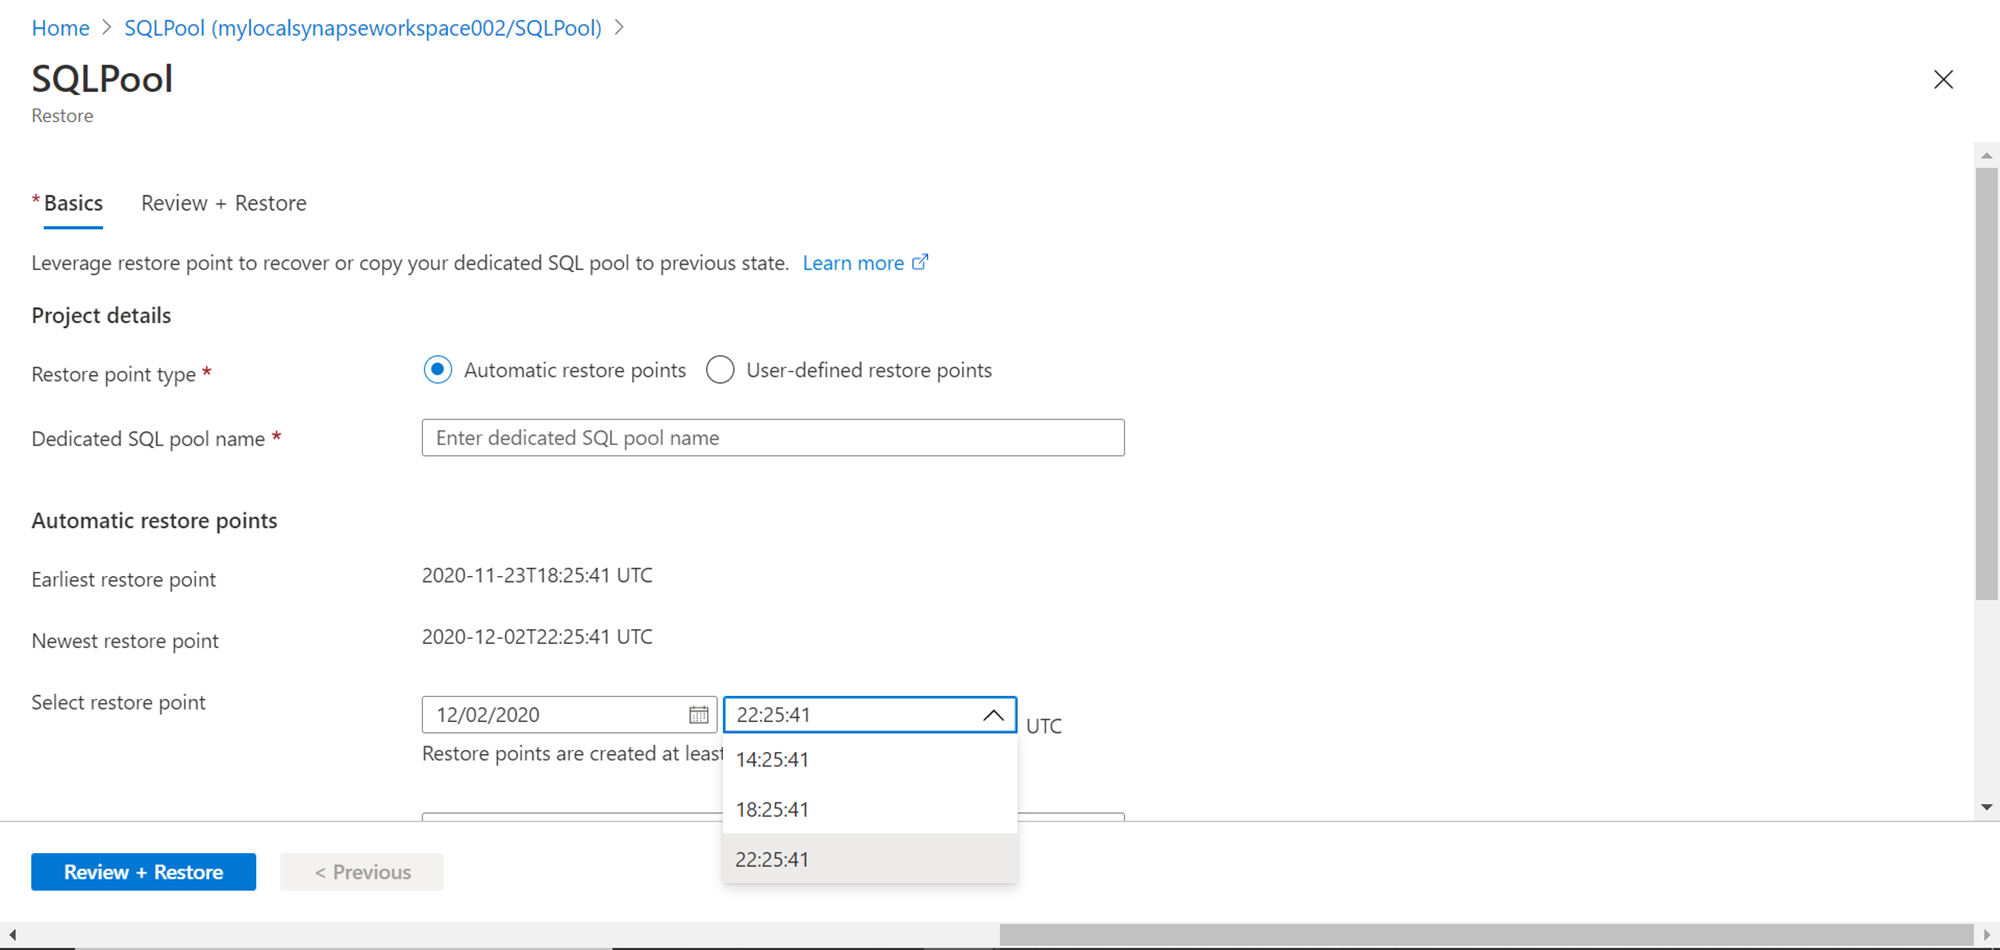
Let’s say that we need this table back as we need to access or retain this data. In this case, one way to get this database object i.e. table and the data in this database object back is by restoring the dedicated SQL pool as a new pool. To do the same, navigate to the Azure Synapse Analytics workspace account, open the dedicated SQL pool, and click on the Restore button from the toolbar. This would open a new screen as shown below. Here we need to select the details of the restore point to which we intend to restore the dedicated SQL pool.
The default selection is generally Automatic restore points. If we analyze the earliest restore point and newest restore point timings, it would show us the earliest and latest restore points. We have an option to select the date and time when the automatic restore points were created and we can restore the new SQL pool to that restore point. The new restore point can be created in a different workspace with a different performance level as well. We just need to provide the name of the restore point, select the desired restore point, configure the account as well as performance level, and then click on the Review button to create the dedicated SQL pool. But in this case, we do not intend to use automatic restore points. We intend to use the user-defined restore point that we created earlier.
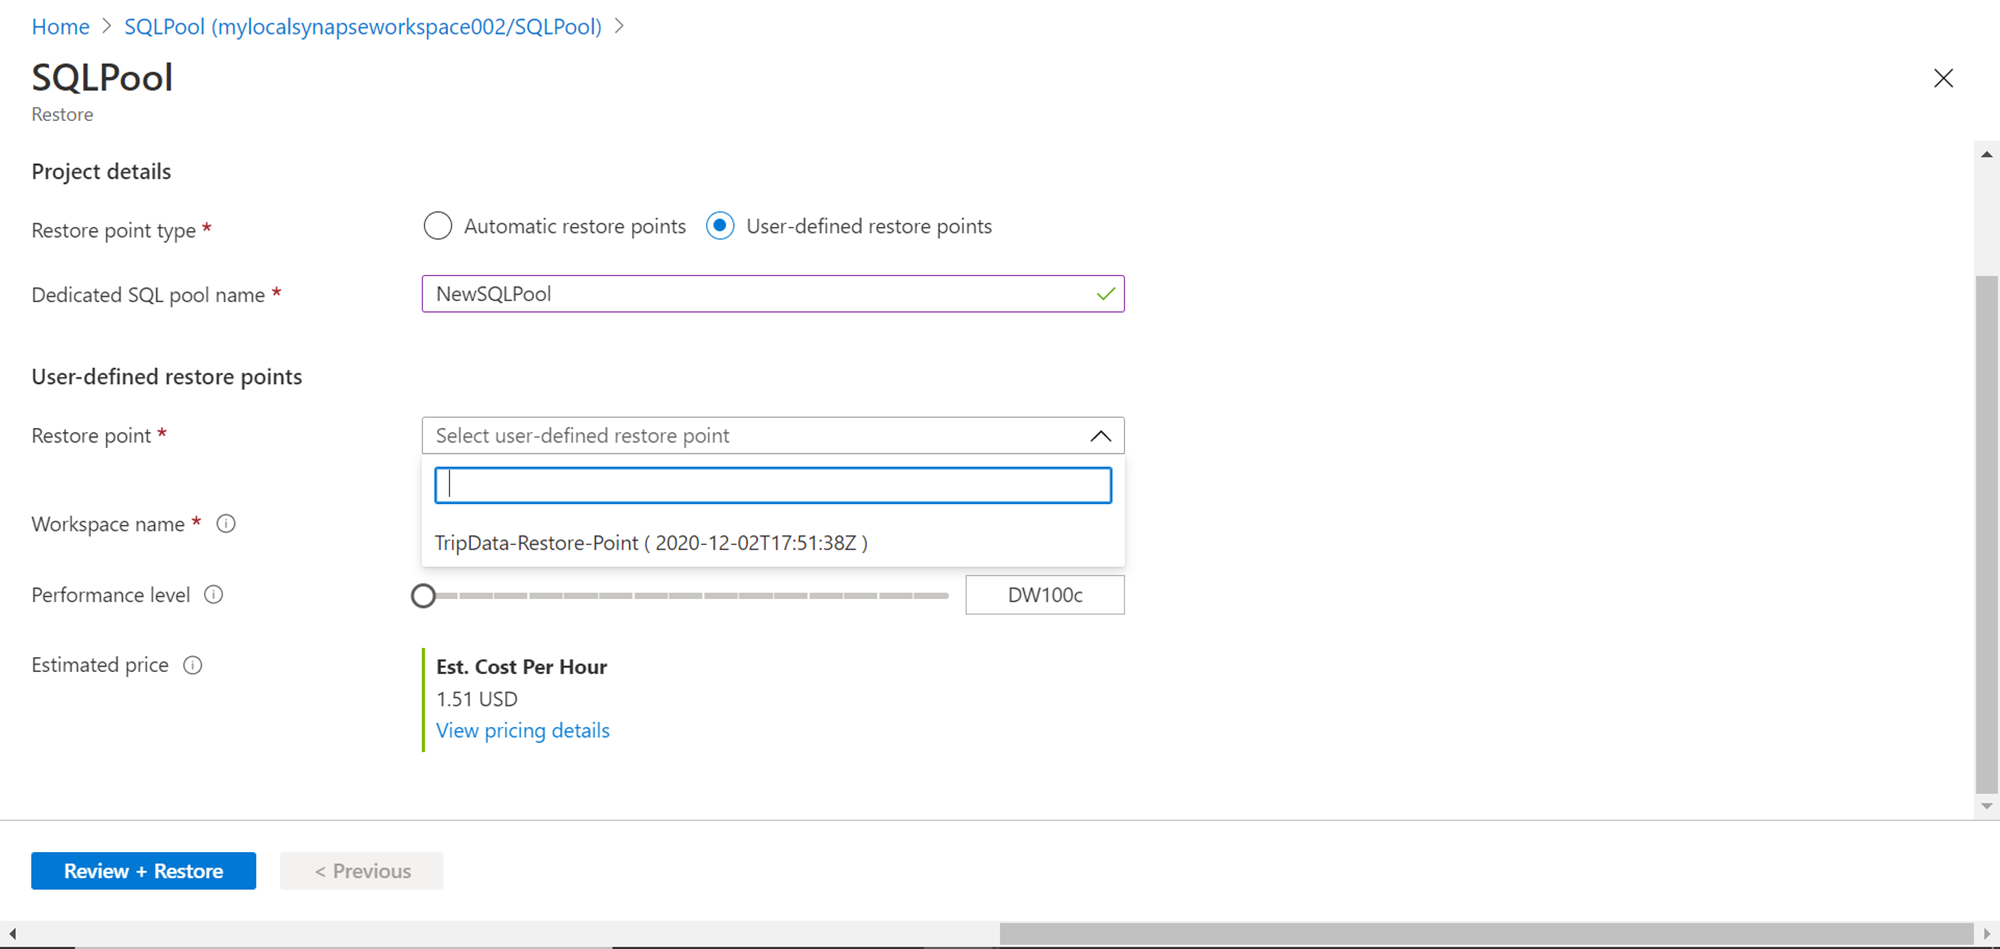
To select a user-defined restore point, select the restore point type as user-defined restore points. This would present the details as shown below. We firstly, need to provide the name of the new dedicated SQL pool that we intend to create. When we open the dropdown for the available user-defined restore points, we should be able to see the previously created user-defined restore point in the list. Select this restore point, provide the desired workspace account under which the new dedicated SQL pool should be restored, configure the desired performance level and click on the Review + Restore button.
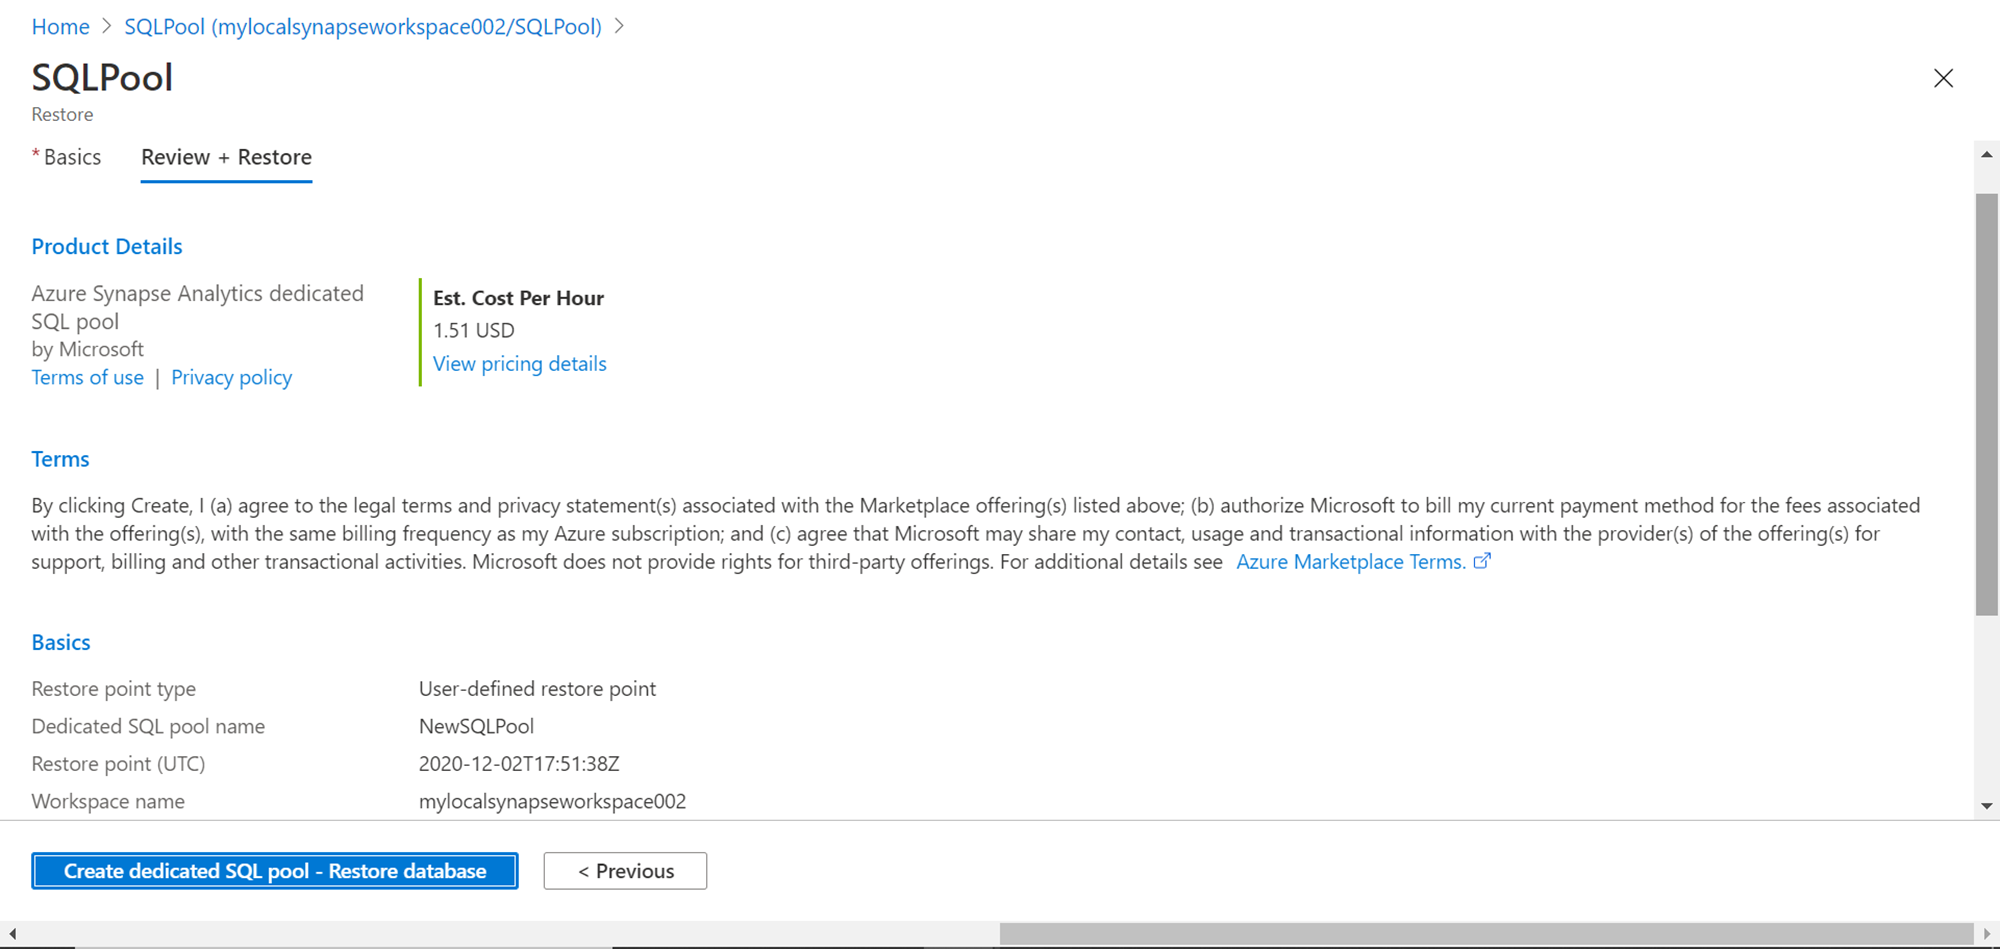
After clicking the button, the last step in the restoration process is reviewing the details as shown below. Post reviewing click on the Create dedicated SQL pool – Restore database button. This would initiate the restoration process.
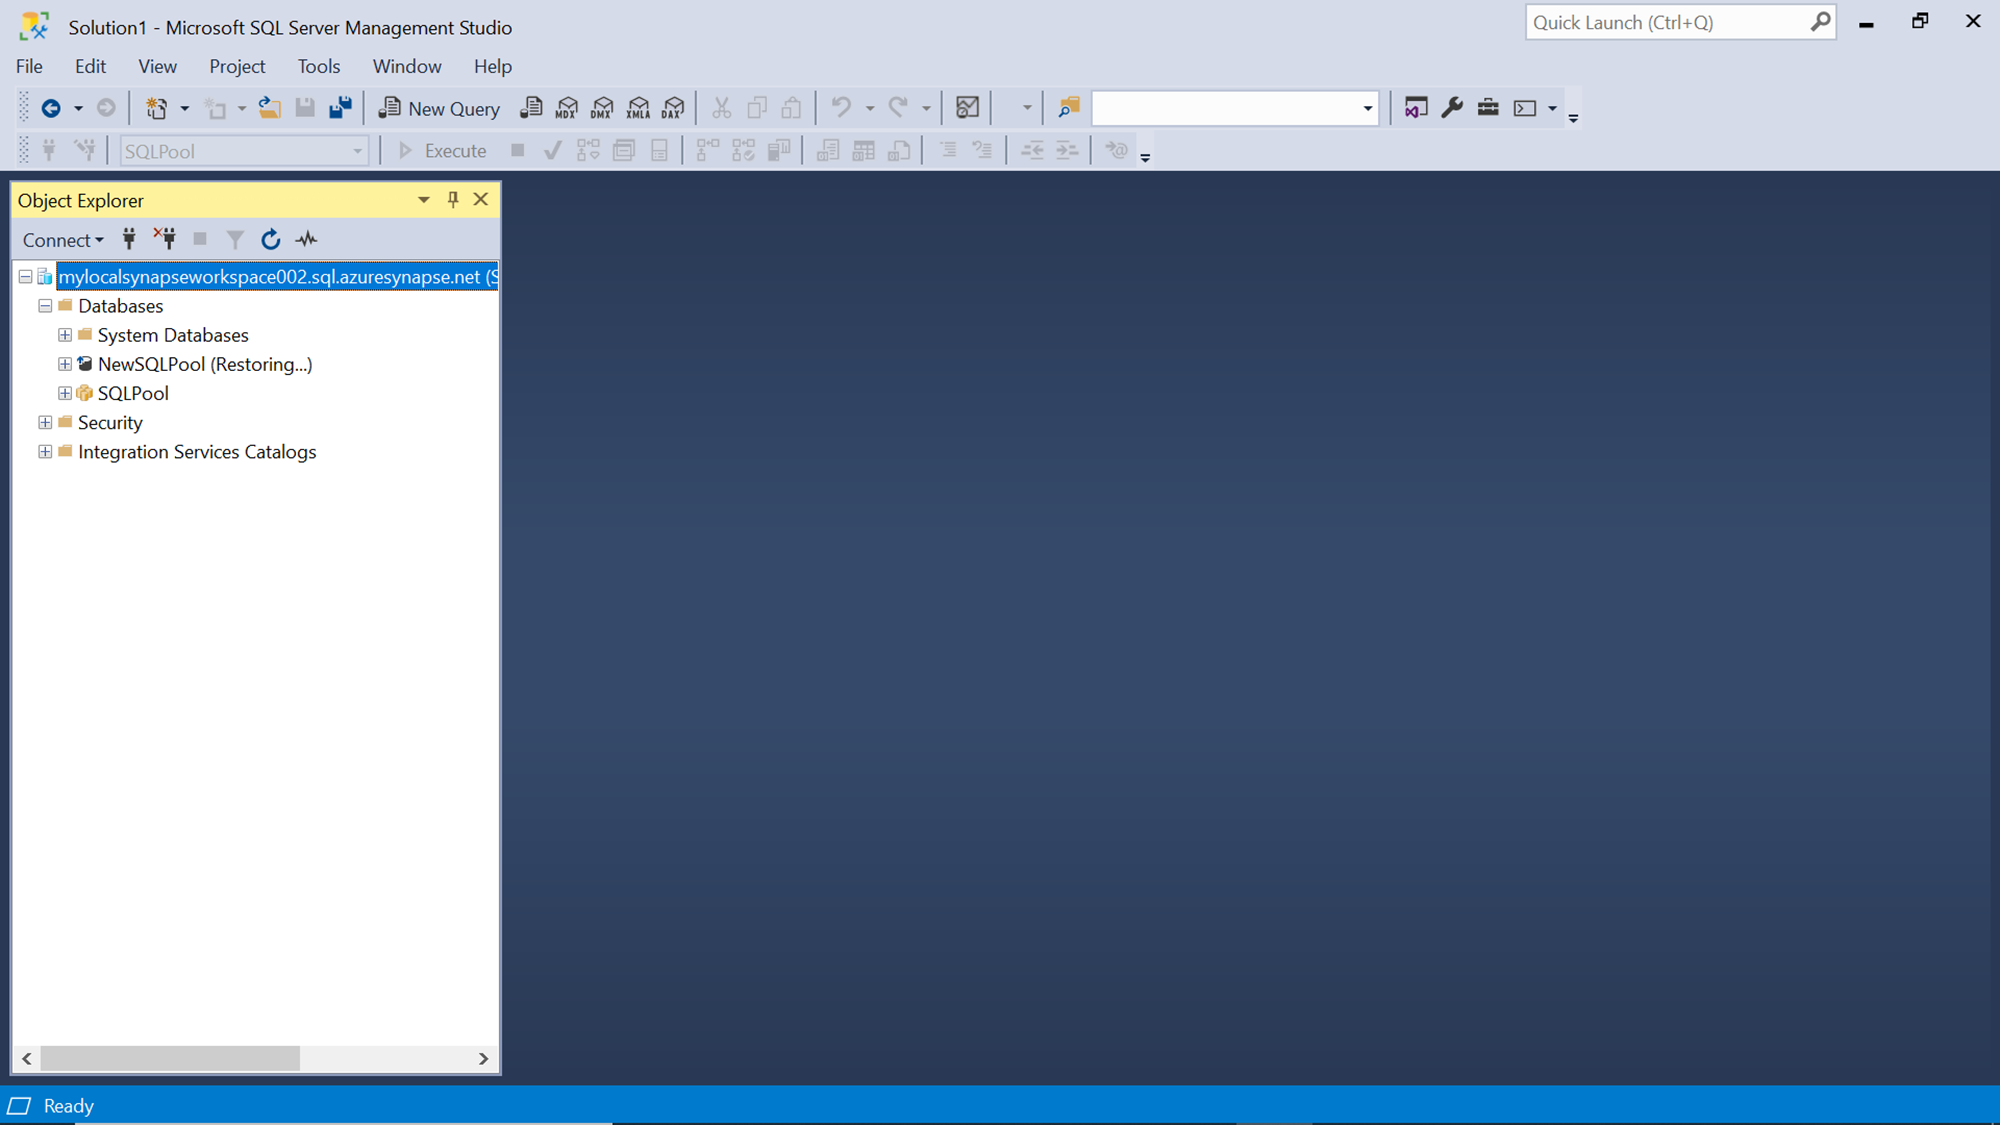
The restoration process can take a while depending upon the volume of data and database objects in the pool. To monitor the state of restoration, one can connect to the Azure Synapse Analytics workspace account too, and monitor the state of the newly created pool. Till the restoration is in progress, it would show the status of the dedicated SQL pool as restoring, as shown below.
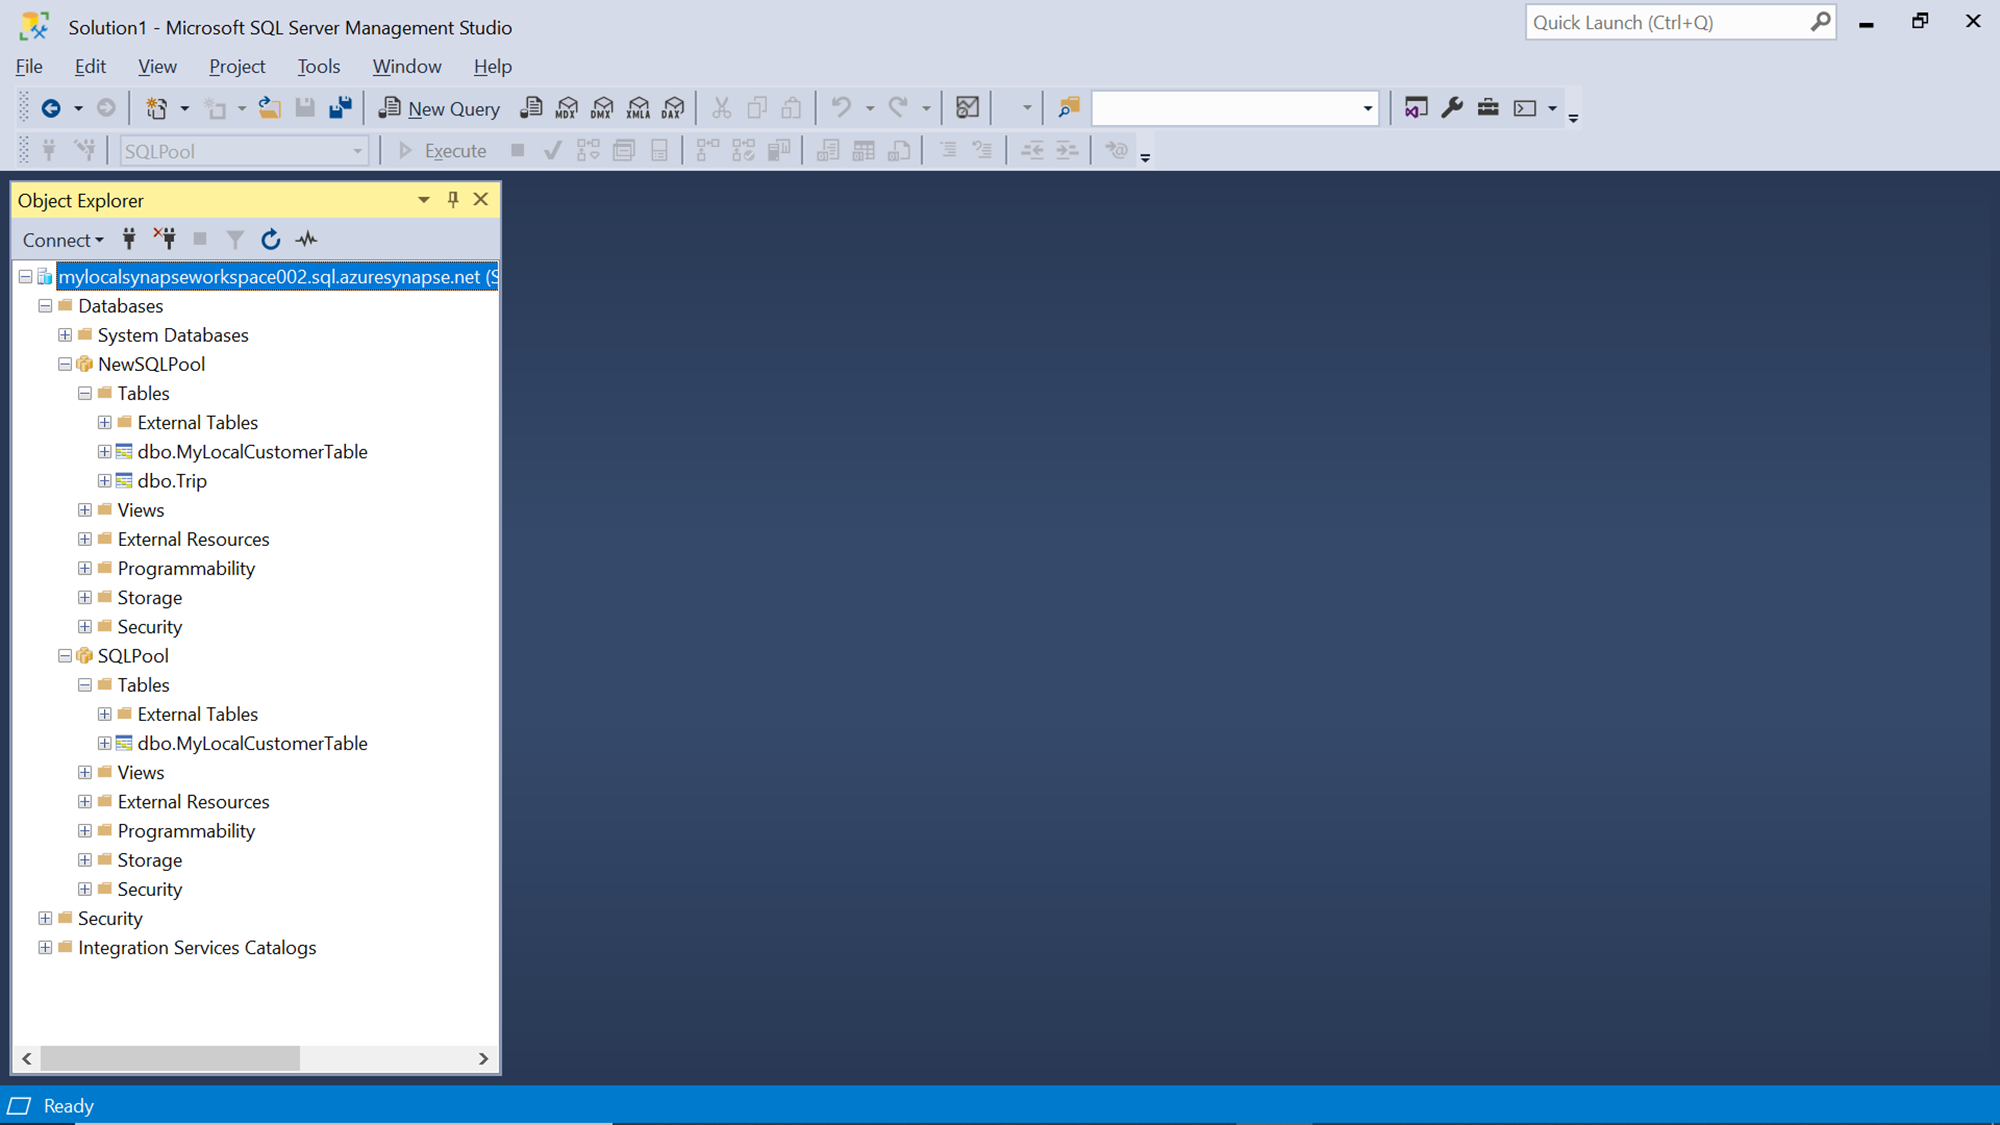
As soon as the new dedicated SQL pool is restored as a new pool, one can verify whether the new pool has the database objects that were present in the older dedicated SQL pool before the restore point was created. As shown below, the newly created pool has the table which we deleted in the older pool. This means that using the restore point, we can retrieve the data by creating a new dedicated pool out of the restore point.
As we learned earlier that Azure Synapse Analytics would create automatic restore points at regular intervals. After a couple of hours, if we check the automatic restore points, we would be able to see the list of all the available automatic restore points as shown below. These are created at four-hour intervals. So, after a week if this user-defined restore point is discarded automatically, we can still use the automatic restore point that is closest to the time before the table was deleted.
In this way, using a combination of automatic and user-defined restore points, one can restore the data and database objects to a historic state in a new dedicated SQL pool.
Conclusion
In this article, we started by creating sample data in an existing dedicated SQL pool. We created a user-defined restore point, make modifications to the database object in the SQL pool, and then restored the database object in a new pool by restoring from a user-defined restore point.
Table of contents
| Getting started with Azure Cosmos DB Serverless |
| Analyzing data hosted in Azure Cosmos DB with Notebooks |
| Analyze Azure Cosmos DB data using Azure Synapse Analytics |
| Restore dedicated SQL pools in Azure Synapse Analytics |
| Copy data into Azure Synapse Analytics using the COPY command |

He has worked internationally with Fortune 500 clients in various sectors and is a passionate author.
View all posts by Rahul Mehta
- Finding Duplicates in SQL - February 7, 2024
- MySQL substring uses with examples - October 14, 2023
- MySQL group_concat() function overview - March 28, 2023