

In Azure, the Import/Export operation of the Azure SQL database is a vital part of the database migration methods. It is important to choose the most viable option as per the database migration strategy and business requirements. In addition, the applications that are configured with Azure SQL PaaS databases, the migration specialist could decide and identify several common scenarios where Azure PaaS database are scripted, copied, migrated, moved or backed up.
Azure SQL database data ingestion or data egestion operation lists:
- To start the backup
- To create a snapshot of the database
- Export Azure SQL database to On-premise Server
- Copying a database between the database environments
- Migrate database from on premise to Azure PaaS database
- Maintain the integrity of the database state prior to making any changes to the database
- Make a database clone of a production database to non-production to troubleshoot and/or investigate for any performance issues
- Audit the database clone process
- This may be useful for taking personal backups to the specified site and import them whenever it’s needed
I have highlighted some reasons to export or import the database between on-premises to Azure SQL and Azure SQL to Azure SQL. In addition, there are other ways to copy the database. Sometimes, you may need faster and predictable import and/or export options, in such cases, consider the following options:
- Import or Export using PowerShell
- Import or Export to a BACPAC file using SQLPackage utility
- Import/Export to a BACPAC file using SQL Server Management Studio (SSMS)
Import or Export Azure SQL database using PowerShell
We will use the following steps to export the SQL database to Azure blob storage. Let us perform the export of the database to a bacpac file. We can further divide the export operation preparation into three groups:
First, we need to create a connection context. Type in Connect-AzAccount and enter the credentials to validate Multiple Factor Authenticate (MFA) and then list the Azure subscription and then set the Azure context using the following cmdlet.
|
1 |
Get-AzSubscription -SubscriptionName <SubscriptionName>| Set-AzContext |
- Note: It is mandatory to have at least a single database available in the Azure SQL instance to manage the export operation
Second, prepare the connection string—get the details of the Azure database and Azure SQL instance.
|
1 2 3 4 |
# Create a credential $AdminUser = 'myAzuredemp19' $AdminPassword = ConvertTo-SecureString –String 'SEDF7e%$#20' –AsPlainText -Force $Credential = New-Object –TypeName System.Management.Automation.PSCredential –ArgumentList $AdminUser, $AdminPassword |
Third, get the storage key and storage URI to write the data to the blob storage.
In this section, we use the Get-AzStorageAccountKey and New-AzStorageContext cmdlets to create a storage account. To retrieve the primary storage account key run the following command:
|
1 |
(Get-AzStorageAccountKey -Name $strorageAccountName -ResourceGroupName $ResourceGroupName)[0].value |
Next, I will retrieve the storage context using New-AzStorageContext.
|
1 2 |
$context=New-AzStorageContext -StorageAccountName $strorageAccountName -StorageAccountKey (Get-AzStorageAccountKey -Name $strorageAccountName -ResourceGroupName $ResourceGroupName)[0].value $container=Get-AzStorageContainer -Name $containername -Context $Context |
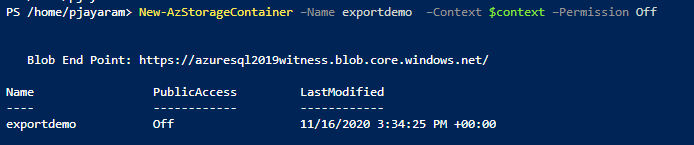
Now, get the unique reference identifier for blog storage using the following command:
|
1 |
$storageURI=$container.CloudBlobContainer.Uri.OriginalString+"/sqlagent.bacpac" |
Prepare export command
In this section, I will show you how to run the New-AzSqlDatabaseExport cmdlet to export the database to the target storage location
|
1 2 3 4 5 6 |
PS /home/pjayaram> $export=New-AzSqlDatabaseExport ` >> -ResourceGroupName $ResourceGroupName -ServerName $ServerName -DatabaseName $DatabaseName ` >> -AdministratorLogin $Credential.UserName -AdministratorLoginPassword $Credential.Password ` >> -StorageKeyType StorageAccessKey ` >> -StorageUri $storageURI ` >> -StorageKey (Get-AzStorageAccountKey -Name $strorageAccountName -ResourceGroupName $ResourceGroupName)[0].value |
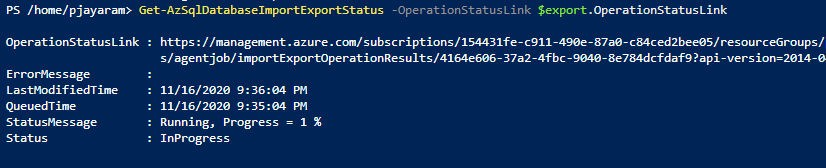
To get the status of the export operation, run the following command.
|
1 |
PS /home/pjayaram> Get-AzSqlDatabaseImportExportStatus -OperationStatusLink $export.OperationStatusLink |
- Note: You will notice an exception when starting an export operation using New-AzSqlDatabaseExport:
- Error Message: “Missing the required ‘networkIsolation’ parameters for ImportExport operation”
- The issue: With the current version Az.Sql module—the parameter networkIsolation is optional. But the parameter name is incorrect and it should be -UseNetworkIsolation
- Workaround: run the target the script with the older Az.Sql version using the module to 2.9.1. In order to that, first remove the module, install-module and import the module:
- Remove-Module –Name Az.Sql
- Install-Module -Name Az -RequiredVersion 2.9.1 -Force
- Import-Module –Name Az.Sql
Run the following command to list the version and export related cmdlets
|
1 |
PS /home/pjayaram>Get-Command *Export* -Module Az.Sql |

Import or Export to a BACPAC file using the SQLPackage utility
In this section, I will discuss a use-case where we connect to the Azure SQL database and export the database. In this sample, we will export the database to a file from an on-premise server. Let us run the following command. In order to do that browse the standard installation root path C:\Program Files (x86)\Microsoft SQL Server\130\DAC\bin folder to locate the sqlpackage.exe and run the following command.
I have discussed detailed use-cases in the article Continuous Database Delivery (CD) using SQL Server Tools SqlPackage.exe .
C:\Program Files (x86)\Microsoft SQL Server\130\DAC\bin>SqlPackage.exe /TargetFile:”D:\PS_Scripts\Prashanth\agenjob.bacpac” /Action:Extract /SourceServerName:”sqlagentjob.database.windows.net” /SourceDatabaseName:”agentjob” /SourceUser:”mydempuser2020″ /SourcePassword:”MKIu7*$%34e%15″
- Error Message:
Connecting to database ‘agentjob’ on server ‘sqltest.database.windows.net’.
Extracting schema
Extracting schema from database
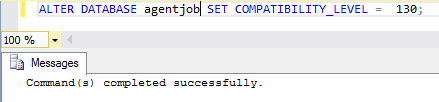
*** Error extracting database:The database compatibility level ’12’ is not within the supported range of 80 to 130
To resolve the above error, you need to connect to the Azure SQL instance and set the compatibility level of the database to 130.
Run the T-SQL to set the compatibility of the database to 130 and then run the sqlpackage.exe command.
|
1 |
ALTER DATABASE agentjob SET COMPATIBILITY_LEVEL = 130; |
Import/Export to a BACPAC file using SQL Server Management Studio (SSMS).
- Note: I have discussed and this method to migrate an on-premises SQL Server database to the Azure SQL database in the article Migrate an on-premises SQL Server database to an Azure SQL database
Run the BACPAC import or export directly using the Microsoft SQL Server Data-Tier Application Framework
Summary
In this article, you learned how to export and manage the Azure SQL database to blob storage using PowerShell. Using Azure PowerShell, you can use New-AzSqlDatabaseImport cmdlet to import a database; use New-AzDatabaseExport to export a database; To track the progress of import/export service, run the Get-AzSqlDatabaseImportExportStatus cmdlet.
Important points to consider when we perform export/import operation
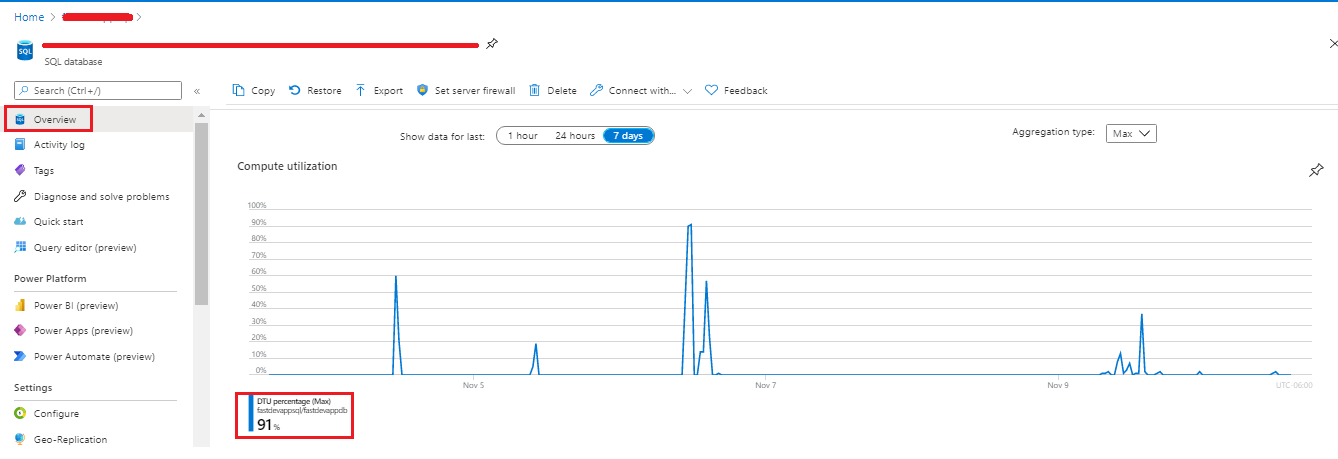
The service tiers play an important role in all the various available methods discussed in this article. For example, if we configure the database to use DTUs (Database Transaction Unit)—may see a throttling while import or export operation of the Azure SQL Database. In most cases, we design the database to consume a set of resources. It is as simple as locating the database and browsing the overview page of the Azure SQL database details the DTU usage statistics. In case, if the export or import operation is throttling, the first thing is to upgrade the underlying service tiers. As you know the scale up or scale down of Azure resource is an online operation, I would recommend to add more resources during the operation and scale it down to the earlier setting after the data ingress or egress is over.
Next scenario, you can experience a performance problem when the operation is initiated from an on-premises VM or run it from the client application tools such as sqlpackage or DAC from Azure VM in a different region. We always recommend it to run the VM within the same region. Otherwise, you may experience performance degradation during data operation due to network latency. Another point to consider is the size of the Azure SQL database. Sometimes, the latency is not an issue and you are meeting the aim is the utmost importance.
I observed that export, import on a small database is straightforward, and it may run seamlessly. However, the actual problem arises when we deal with exporting the huge tables. I recommend it to have a clustered index on the large tables. As the entire export operation carries out in a single transaction, the chances of failure are clearer without a proper underlying configuration. Browse Azure Portal to locate the database to go to the overview tab to understand more about compute usage.
The following table tells you the basic difference between Azure SQL database import/export vs Automatic backup.
|
Azure Import or Export |
Azure Automatic Backup |
|
|
Disaster Recovery solution |
No |
Yes |
|
Point-In-Time recovery |
No |
Yes |
|
Operational Overhead |
Yes |
No |
|
Transactional consistency |
No |
Yes |
|
Cost |
Yes |
No (It provides the backup storage equal to
|
|
Storage Account |
Yes |
Yes – LITR |
|
Backup |
Not automatic |
Yes – Automatic |
|
Restore |
Yes |
Yes |
|
Restore to onpremise |
Yes |
No |
|
Operation progress |
Yes |
No |
|
Custom backup |
Yes |
NA |
|
Frequency |
NA |
weekly full, daily differential, and
|
Script:
|
1 2 3 4 5 6 7 8 9 10 11 12 13 14 15 16 17 18 19 20 21 22 23 24 25 26 27 28 29 30 31 32 33 34 35 36 37 38 |
Param( [string][Parameter(Mandatory=$true)] $DatabaseName, [string][Parameter(Mandatory=$true)] $ResourceGroupName, [string][Parameter(Mandatory=$true)] $AdminUser, [string][Parameter(Mandatory=$true)] $AdminPassword, [string][Parameter(Mandatory=$true)] $ServerPassword, [string][Parameter(Mandatory=$true)] $StorageAccountName, [string][Parameter(Mandatory=$true)] $containerName ) Process{ # some code to get the storage info and credentials <# Create a credential $AdminUser = 'dummyaccount1234' $AdminPassword = ConvertTo-SecureString –String 'MyAzure%15' –AsPlainText -Force $Credential = New-Object –TypeName System.Management.Automation.PSCredential –ArgumentList $AdminUser, $AdminPassword $containername='exportdemo' $strorageAccountName='azuresql2019witness' $ResourceGroupName='myazure-sql-scus-rg' $DatabaseName='azuredemojob' $serverName='azuresqlserver' #> $context=New-AzStorageContext -StorageAccountName $strorageAccountName -StorageAccountKey (Get-AzStorageAccountKey -Name $strorageAccountName -ResourceGroupName $ResourceGroupName)[0].value $container=Get-AzStorageContainer -Name $containername -Context $Context $storageURI=$container.CloudBlobContainer.Uri.OriginalString+"/sqlagent.bacpac" $export=New-AzSqlDatabaseExport ` -ResourceGroupName $ResourceGroupName -ServerName $ServerName -DatabaseName $DatabaseName ` -AdministratorLogin $Credential.UserName -AdministratorLoginPassword $Credential.Password ` -StorageKeyType StorageAccessKey ` -StorageUri $storageURI ` -StorageKey (Get-AzStorageAccountKey -Name $strorageAccountName -ResourceGroupName $ResourceGroupName)[0].value Get-AzSqlDatabaseImportExportStatus -OperationStatusLink $export.OperationStatusLink } |
Table of contents

My specialty lies in designing & implementing High availability solutions and cross-platform DB Migration. The technologies currently working on are SQL Server, PowerShell, Oracle and MongoDB.
View all posts by Prashanth Jayaram
- Stairway to SQL essentials - April 7, 2021
- A quick overview of database audit in SQL - January 28, 2021
- How to set up Azure Data Sync between Azure SQL databases and on-premises SQL Server - January 20, 2021