
This article will explain the steps for importing and exporting data using the SQL Server Import and Export Wizard.
Depending on the options that are selected in the SQL Server Import and Export Wizard, some steps may be different than those described in this article.
For the purpose of this example, exporting data from the SQL Server database to an Excel file will be shown.
There are several ways to initiate the SQL Server Import and Export Wizard:
- Using the Start menu
- Using the Command prompt
- Using SQL Server Management Studio
- Using Visual Studio with SQL Server Data Tools
Start menu
In the Start menu, type the word Import or Export and choose one of the offered:
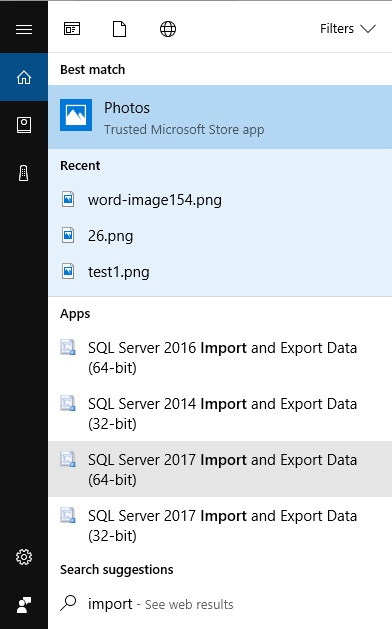
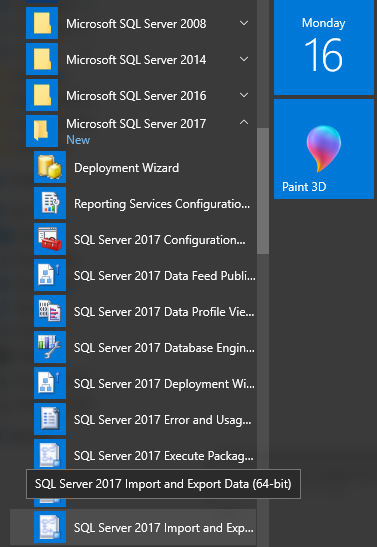
Or, in the Start menu under the Microsoft SQL Server 2017, choose one of the offered options:
- SQL Server 2017 Import and Export Data (32-bit)
- SQL Server 2017 Import and Export Data (64-bit)
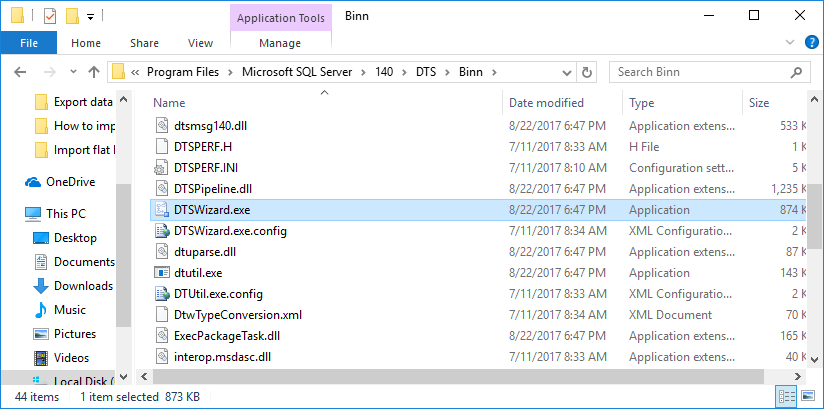
Command prompt
In the Command prompt, type the following: C:\Program Files\Microsoft SQL Server\140\DTS\Binn\ DTSWizard.exe for the 64-bit version:
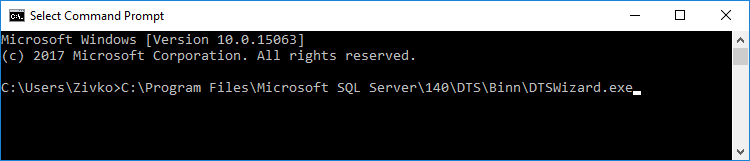
Or, type the following C:\Program Files (x86)\Microsoft SQL Server\140\DTS\Binn DTSWizard.exe for the 32-bit version.
Or, go to above mentioned locations and, from there, run DTSWizard.exe:
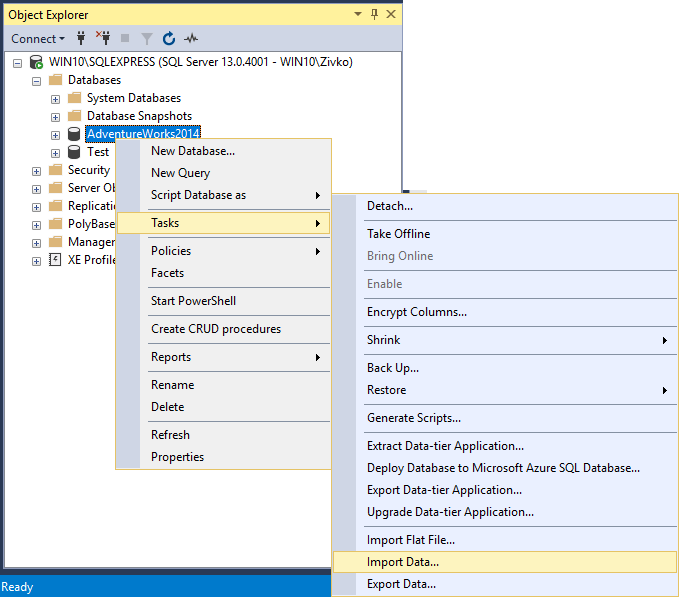
SQL Server Management Studio (SSMS)
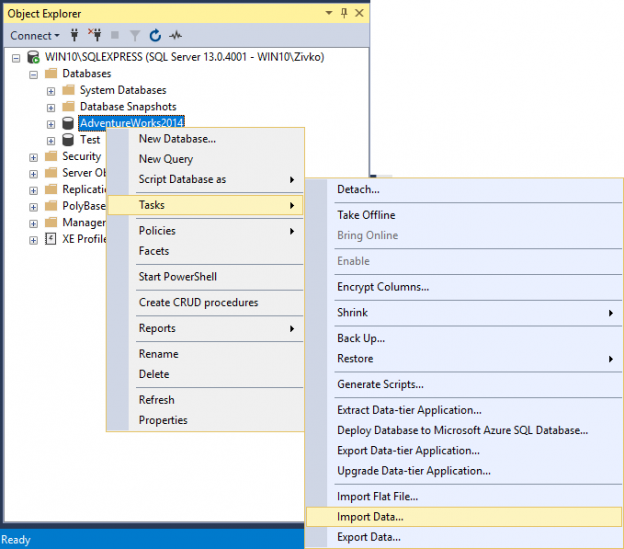
To start the SQL Server Import and Export Wizard using SSMS, go to Object Explorer, right click on a database for which want to export or import data; from the context menu under the Task sub-menu, choose the Import Data or Export Data option:
The latest version of SSMS can be downloaded from the Download SQL Server Management Studio (SSMS) page
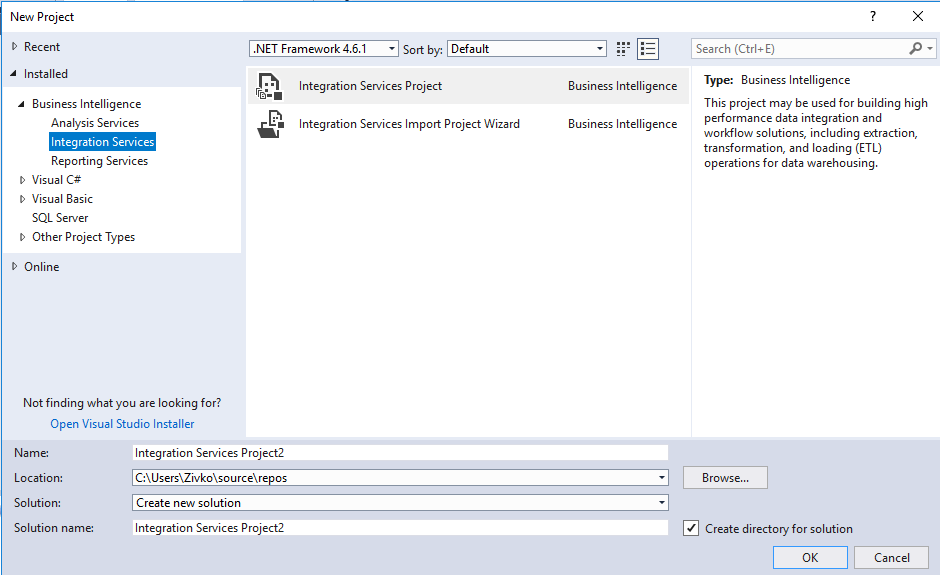
SQL Server Data Tools (SSDT)
Another way to launch the SQL Server Import and Export Wizard is by using SQL Server Data Tools (SSDT) via Visual Studio.
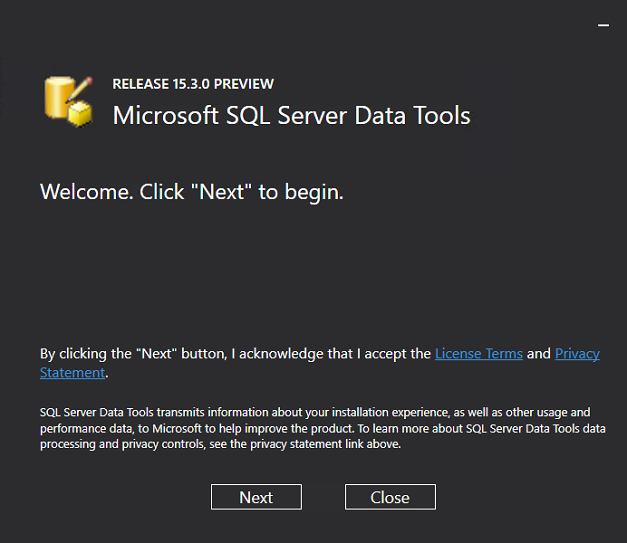
SQL Server Data Tools (SSDT) can be downloaded from the Download SQL Server Data Tools (SSDT) page:
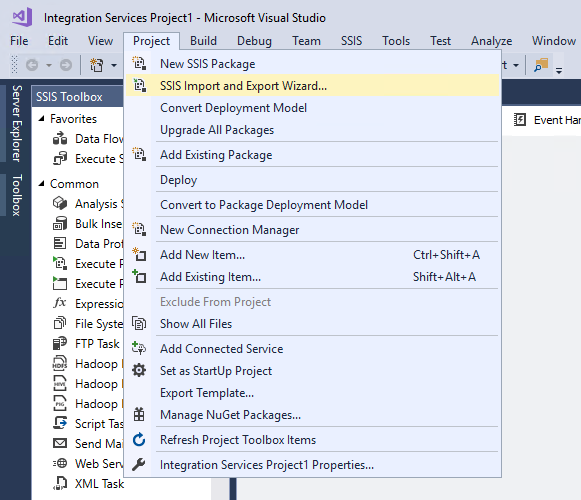
Under the Integration Services project:
Go to the Project menu and choose the SSIS Import and Export Wizard option:
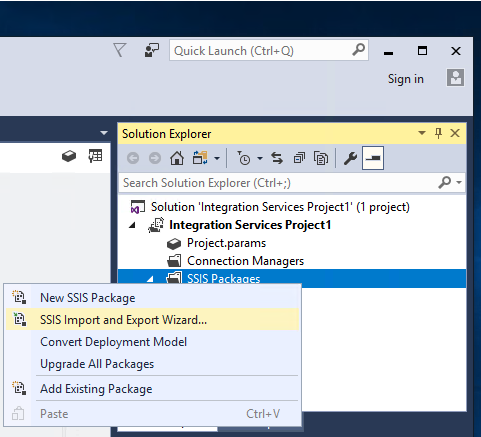
Or in Solution Explorer, right click the SSIS Packages folder and, from the context menu, choose the SSIS Import and Export Wizard option:
The common warning message that appears when using the SQL Server Import and Export Wizard is:
The operation could not be completed.
“ADDITIONAL INFORMATION:
The ‘Microsoft.ACE.OLEDB.12.0’ provider is not registered on the local machine. (System.Data)”
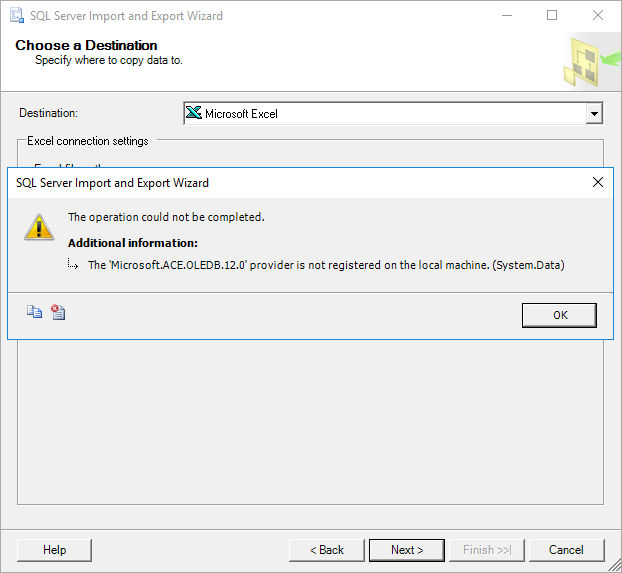
This happens because of the choice of the wrong version (32-bit or 64-bit) of the SQL Server Import and Export Wizard. For example, if exporting data from the 64-bit version of SQL Server and using the SQL Server Import and Export Wizard via SSMS which is 32-bit application and include 32-bit version of the SQL Server Import and Export Wizard and, because of that, the above warning message will appear. To resolve this, launch 64-bit version of the SQL Server Import and Export Wizard.
Bear in mind that SQL Server Data Tools (SSDT) is a 32-bit application, too.
Also, when the SQL Server Import and Export Wizard is used, make sure that you have adequate permissions, otherwise one of the following messages may appear:
More about necessary permissions in order to use the SQL Server Import and Export Wizard successfully can be found on this page
The SQL Server Import and Export Wizard uses SQL Server Integration Services (SSIS) to copy data. The SQL Server Import and Export Wizard creates an SSIS package in the memory while you set the options in the wizard. In the end, provide an option to save the SSIS package:
More about SSIS package can be found on the SQL Server Integration Services page.
After launching the SQL Server Import and Export Wizard Welcome page, the following will appear:
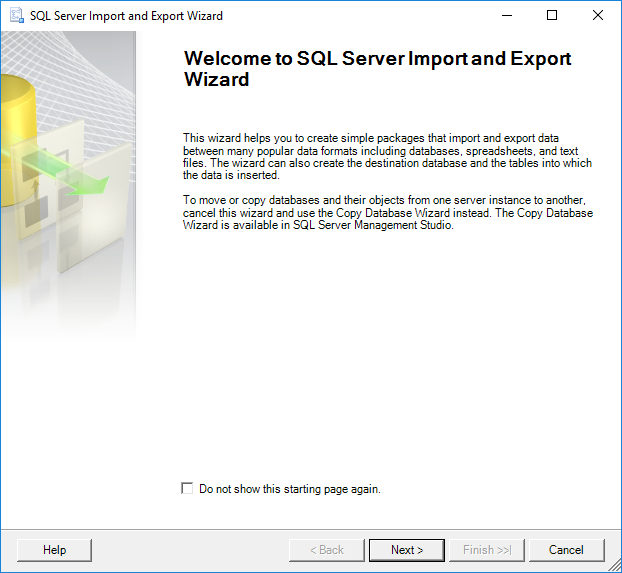
To prevent this page to appear next time when the SQL Server Import and Export Wizard is launched, check the Do not show this starting page again. checkbox.
To proceed, click the Next button, the Choose a Data Source page will be shown:
On this page, the info about data source and how to connect to the data source must be provided.
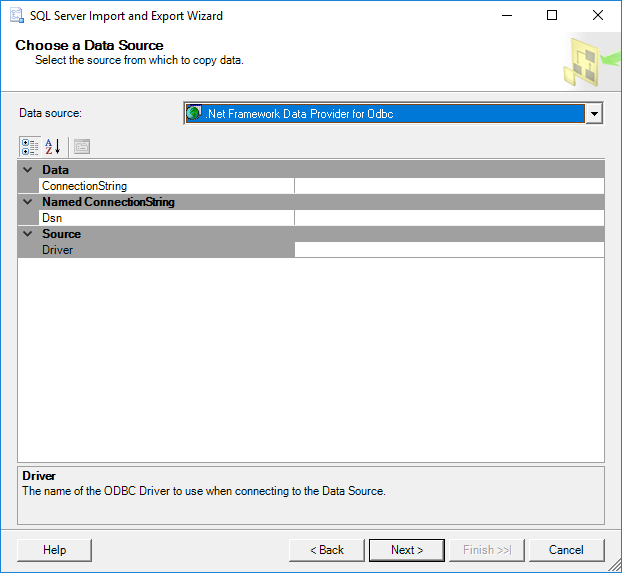
From the Data source combo box, select the data provider that will connect to the data source. The name of the data provider typically contains a name of the data source. For example, the data driver for connecting to SQL Server is SQL Server Native Client 11.0 or for connecting to the Excel files is Microsoft Excel etc.

The Data source combo box lists only the data providers that are installed on your machine. Also, if the 64-bit SQL Server Import and Export Wizard is used in the Data source combo box, won’t be listed installed 32-bit providers.
Pressing the F1 key from the keyboard while on any page of the SQL Server Import and Export Wizard will open the corresponding documentation for that page.
The same thing can be achieved by clicking the Help button on the SQL Server Import and Export Wizard pages:
Options that will be shown on the SQL Server Import and Export Wizard pages depend on the selected data source in the Data source combo box.
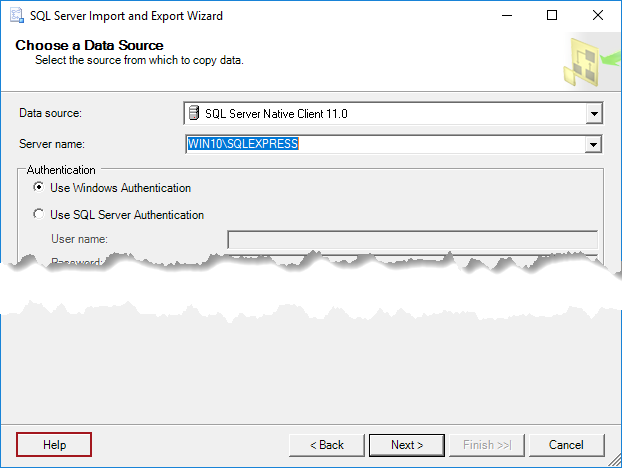
In our example, the SQL Server Native Client 11.0 provider will be used.
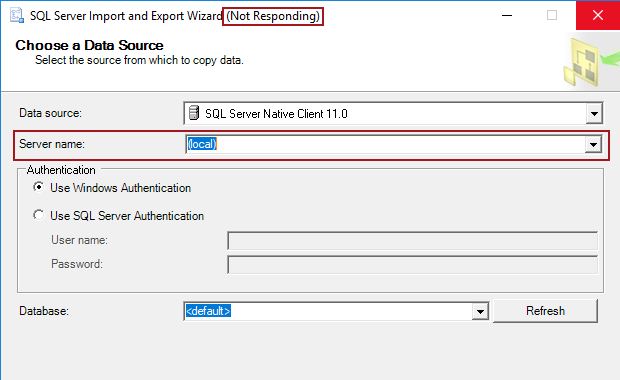
In the Server name combo box, select the SQL Server instance that contains the source data.
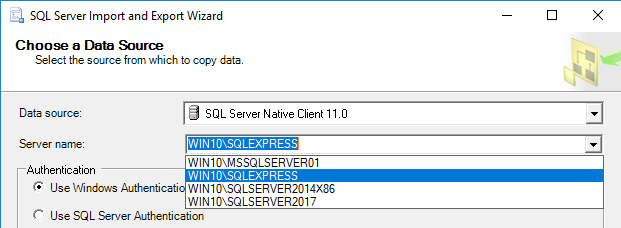
Note: If you are work with multiple servers or on a network, it is better to enter the name of the server instead to expand the combo box, because it may take a long time to list all available servers and it can cause the Not Responding state:
Under the Authentication part, choose how to connect to the data source, by using Windows or SQL Server authentication.
In the Database combo box, select a database from which want to export data:

When everything is set on the Choose a Data Source page, press the Next button to continue. The next page in the SQL Server Import and Export Wizard is the Choose a Destination page:
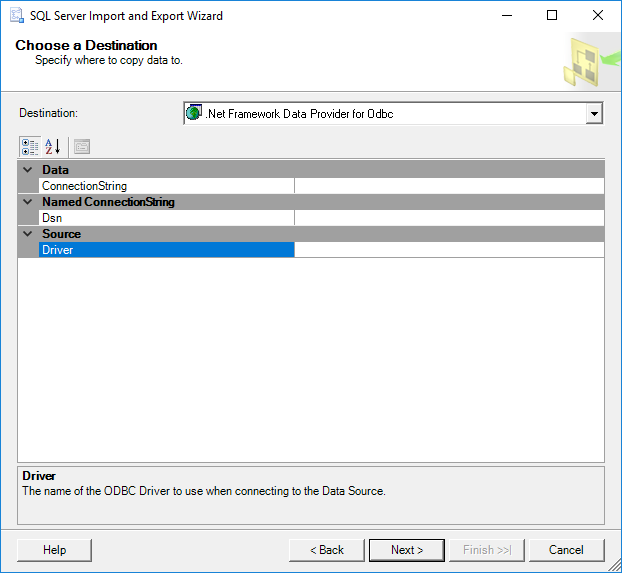
On this page, the information about where the data will be placed and how to connect to the destination must be provided.
To specify destination from the Destination combo box, select the provider that will import data to the destination.
A number of options that will be shown on this page depends of the selected provider in the Destination combo box.
For the purpose of this article, the Microsoft Excel provider will be selected in the Destination combo box for importing data to the Microsoft Excel file:
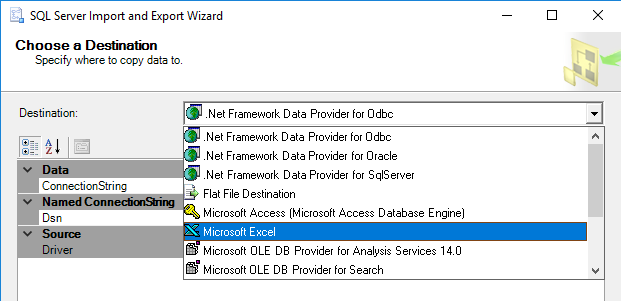
From the name of the provider, it can be determined which destination the provider is intended for. For example, the Microsoft Access (Microsoft Access Database Engine) provider is intended to import data to Microsoft Access, the .Net Farmworker Data Provider for Oracle is for importing the Oracle database, etc.
The Destination combo box lists only the data providers that are installed on your machine. Also, if the 64-bit SQL Server Import and Export Wizard is used in the Destination combo box won’t be listed installed 32-bit providers.
As soon as the provider is chosen in the Destination combo box, additional options for settings will appear.
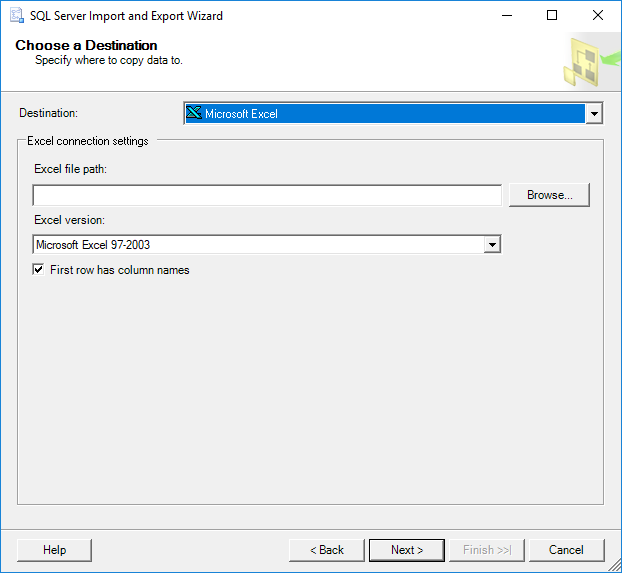
In the Excel file path box, type the destination to the Excel file, for example:
- For the destination on the local machine: C:\Users\Zivko\Desktop\ExportData.xlsx
- For the destination on the network: \\Example\Excel\ExportData.xlsx
Or use the Browse button on the Choose a Destination page to locate the Excel file:
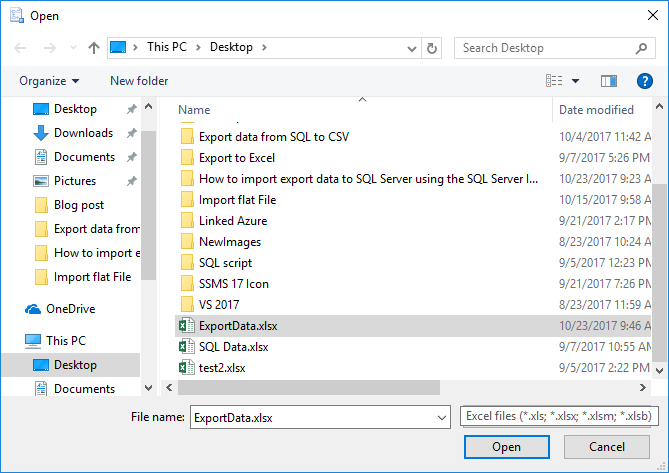
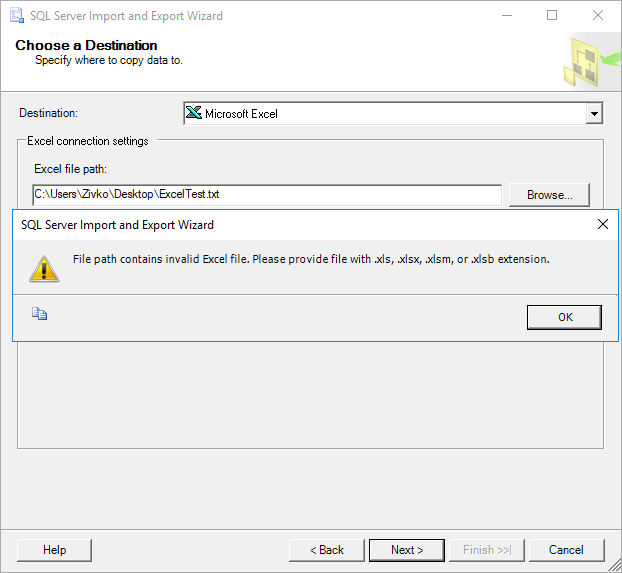
Using the Open dialog, other files rather than Excel can be selected, but when press the Next button on the Choose a Destination page, the following warning message will appear:
“File path contains invalid Excel file. Please provide file with .xls, .xlsx, .xlsm, or .xlsb extension.”
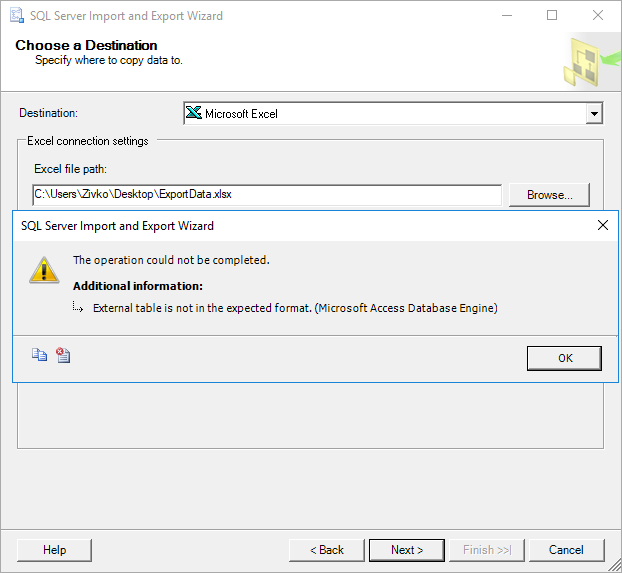
The SQL Server Import and Export Wizard does not support a password-protected Excel file. In case that password-protected Excel file is used, the similar warning message may appear:
“The operation could not be completed.
External table is not in the expected format. (Microsoft Access Database Engine)”
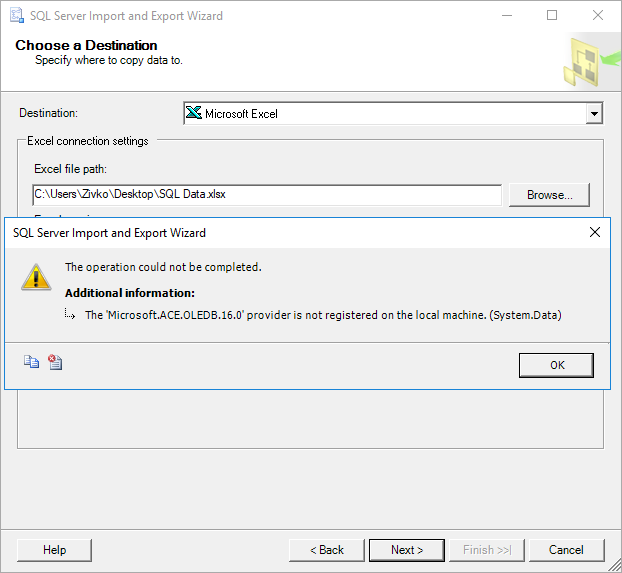
Under the Excel version combo box, choose the version of Excel for the Excel file.
In some cases, an additional file must be installed in order to successfully connect to the Excel file, otherwise, the following warning message may appear:
“The operation could not be completed.
The ‘Microsoft.ACE.OLEDB.16.0’ provider is not registered on the local machine. (System.Data)”
The next page in the SQL Server Import and Export Wizard is the Specify Table Copy or Query page:
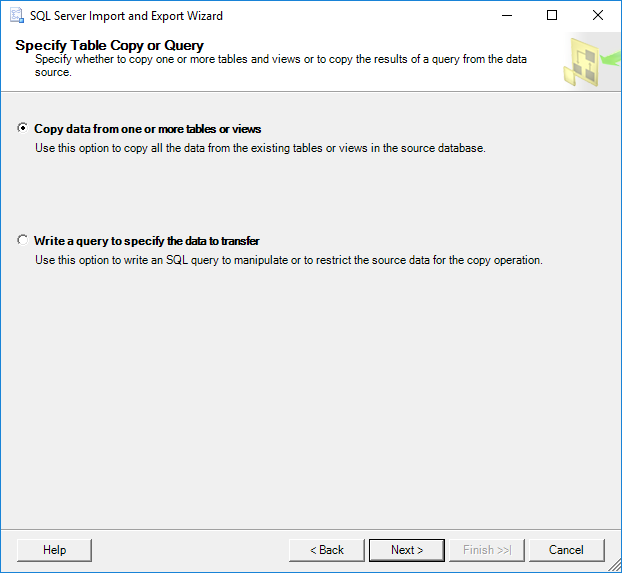
On this page, two radio buttons exist:
- Copy data from one or more tables or views
- Write a query to specify the data to transfer
The Copy data from one or more tables or views option is for copying all data from the existing tables or views in the source database.
The Write a query to specify the data to transfer option is for copying specific data from the source database by using a query.
To copy more than one database or database objects that are not tables and views, use the Copy Database Wizard instead of the SQL Server Import and Export Wizard.
Choose the Copy data from one or more tables or views or Write a query to specify the data to transfer radio button and click the Next button.
Copy data from one or more tables or views
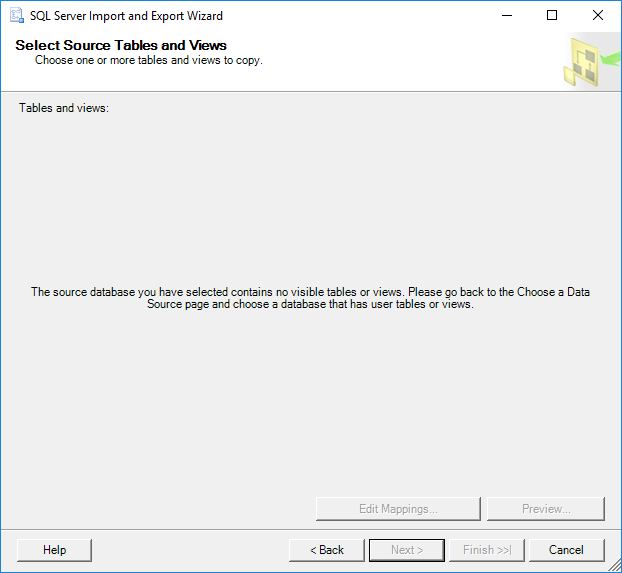
If the Copy data from one or more tables or views radio button is chosen, then, the next page in the SQL Server Import and Export Wizard will be the Select Source Tables and Views page:
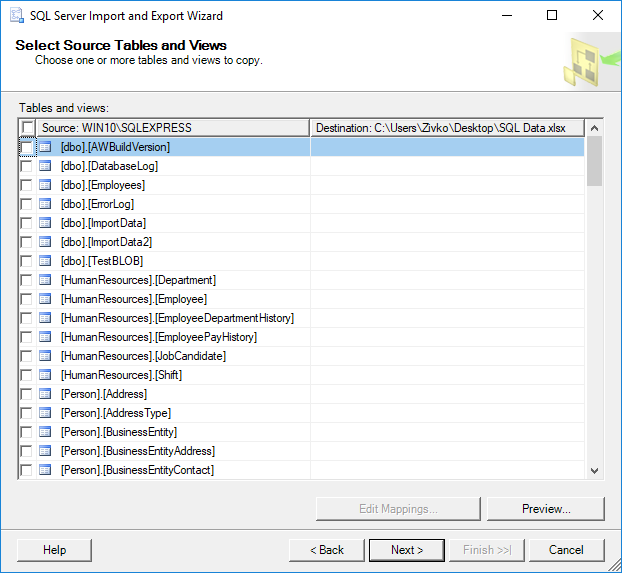
In the Tables and views grid under the Source column, all available views and tables from the AdventureWorks2014 database will be listed.
Use the check box next to the table/view to copy data from source to destination:
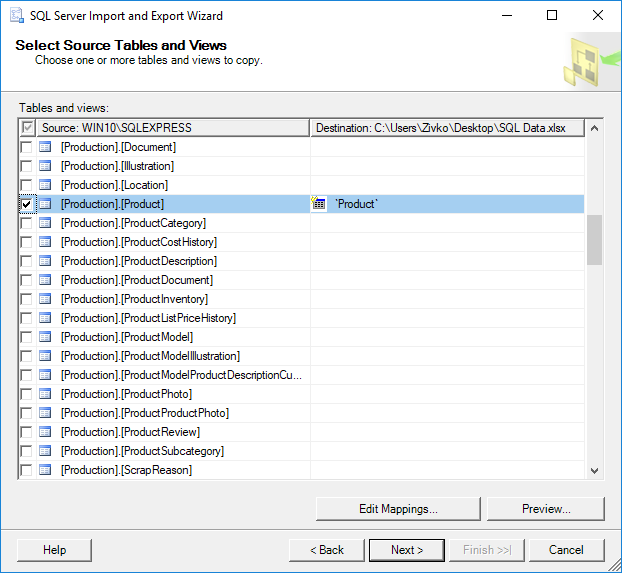
The name of the copied view/table in the Destination column can be changed by clicking on the name of the view/table:
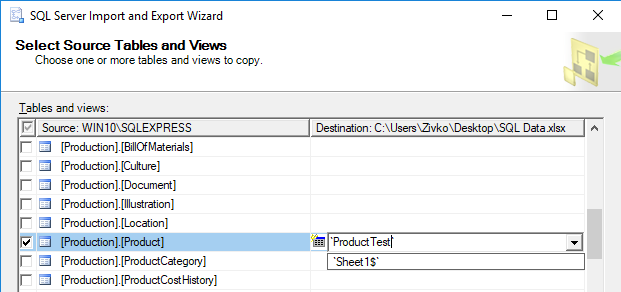
The name sets here will be used as the name of the worksheet in the Excel file:
By clicking the Edit Mappings button, the Column Mappings dialog will appear:
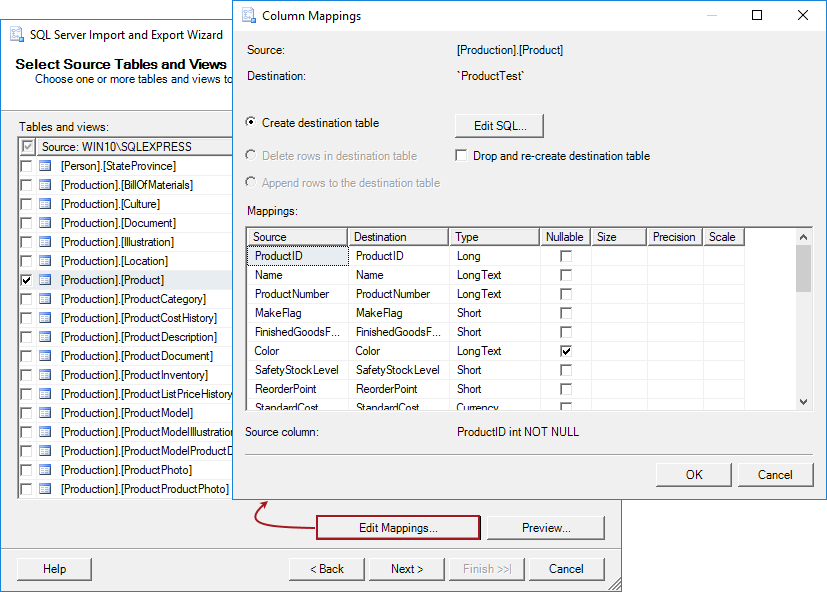
Here can be set additional options of how and which data will be exported.
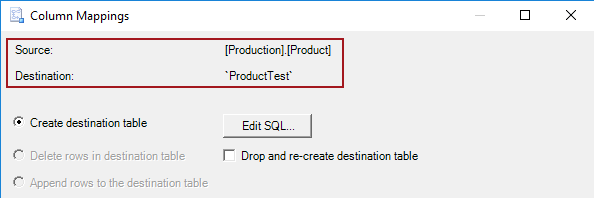
At the beginning of the Column Mappings dialog, under Source, the name of the source query, view, or table is shown. In Destination, the name of the destination view or table is shown:
The Create destination table option, if the destination table does not exist, creates a new destination table (e.g. ProductTest).
When clicking the Edit SQL button, the Create Table SQL Statement dialog will appear:
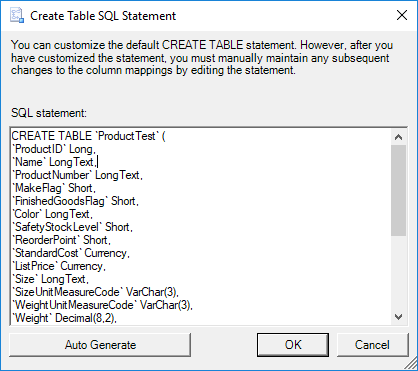
This box automatically generates the CREATE TABLE statement that can be modified/customized, more about this can be found on the Create Table SQL Statement page.
The Create destination table radio button and Edit SQL button are disabled if the destination name already exists:

If the destination name exists the Delete rows in destination table and Append rows to destination table radio buttons are enabled:
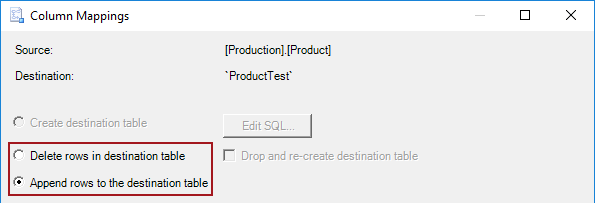
If the Delete rows in destination table radio button is selected, this will clear all data from the existing table/files before importing the new data.
If the Append rows to destination table radio button is selected, this will put the new data to the data that already exist to the destination table/file.
The Drop and re-create destination table checkbox is only enabled when the package that the SQL Server Import and Export Wizard creates is saved and then the package runes again.
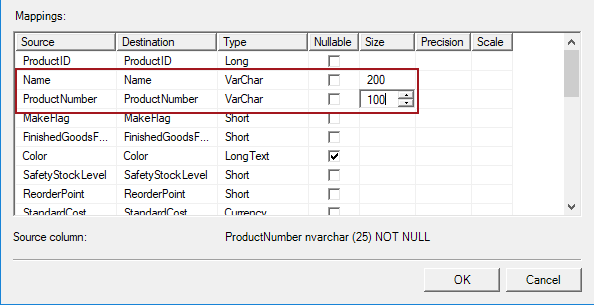
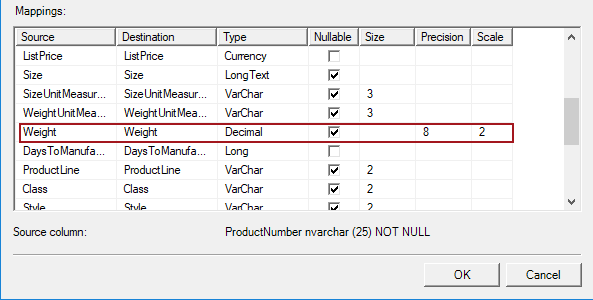
The Mappings section of the Column Mappings dialog shows the column of the data source and corresponding the columns in the destination:
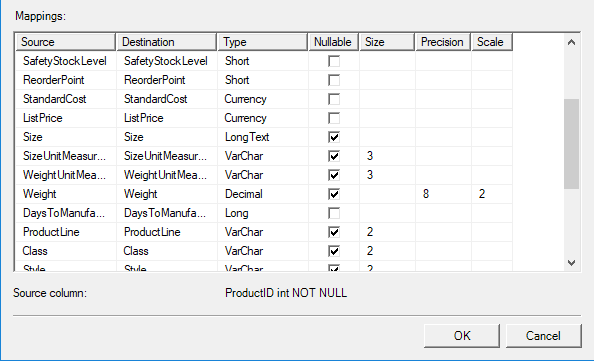
The Source column lists all columns from the source column.
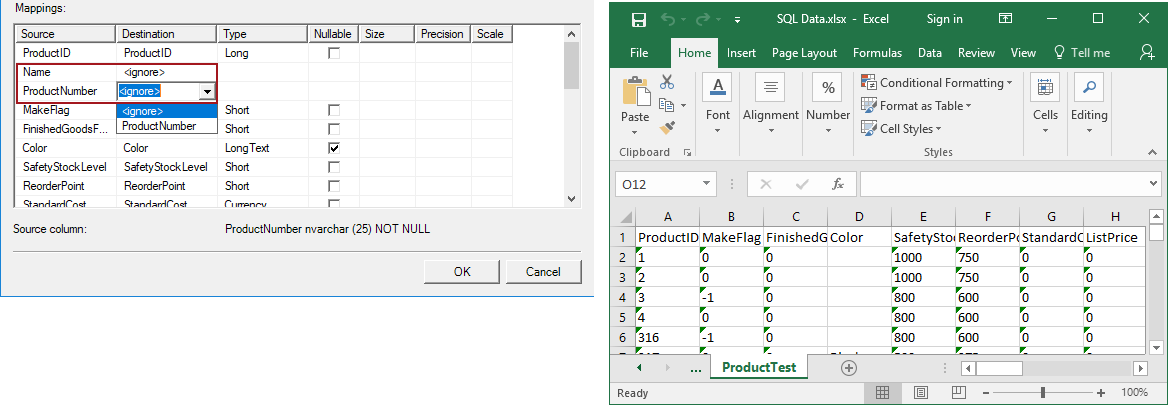
The Destination column lists the name of the mapped destination column. In this column, the column that you don’t want to import into destination file can be excluded by selecting the <ignore> item from the combo box:
The Type column shows the data type for the destination columns. The data type can be changed by selecting other type from the combo box:
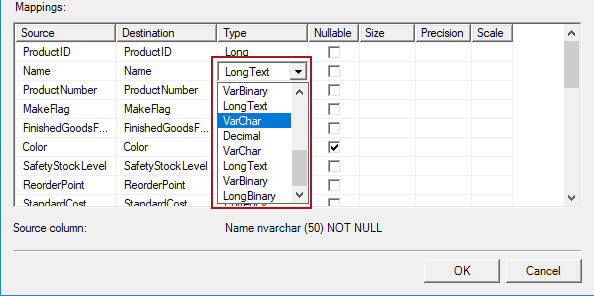
In the Nullable column, it can be specified whether the destination column allowed a null value or not.
In the Size column, the size of the destination column can be specified:
In the Precision column, the precision of the numeric data for the destination column can be specified, here can be set the number of the digits.
In the Scale column, the number of the decimal place for the numeric destination column can be set:
To preview data that will be copied to the destination, under the Select Source Tables and Views page, click the Preview button. This will open the Preview Data dialog box:
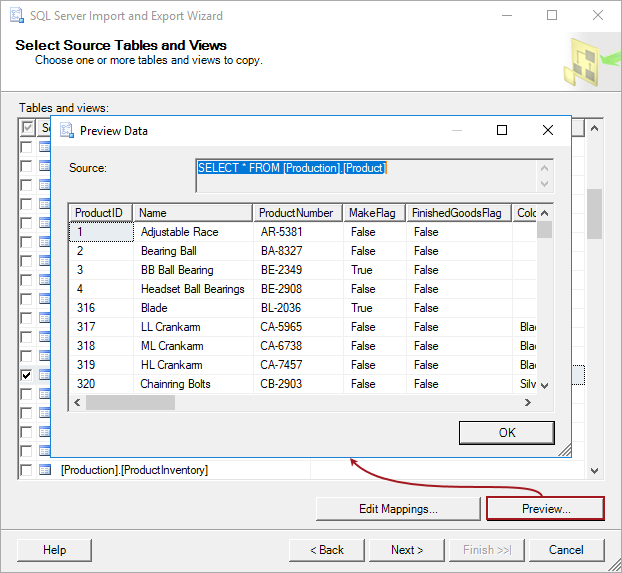
The Preview Data dialog box displays up to 200 rows of data from the data source.
Write a query to specify the data to transfer
If the Write a query to specify the data to transfer radio button is chosen on the Specify Table Copy or Query page of the SQL Server Import and Export Wizard, then the Provide a Source Query dialog box will appear:
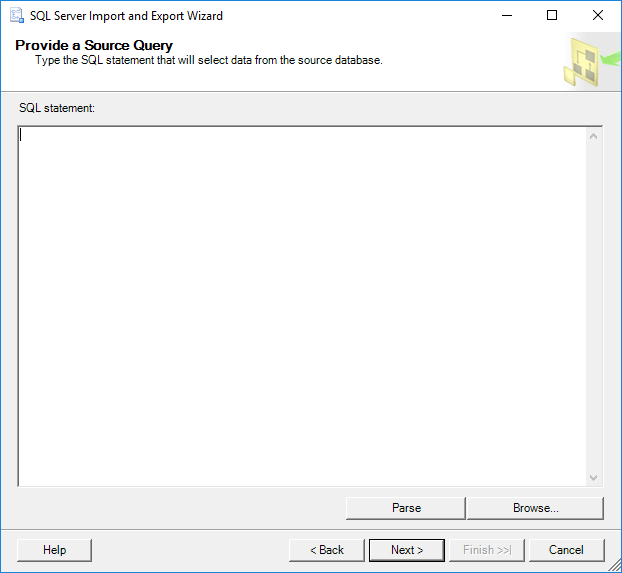
In this dialog, a query from the file can be written, pasted or loaded by clicking the Browse button, which selects source data to copy to the destination.
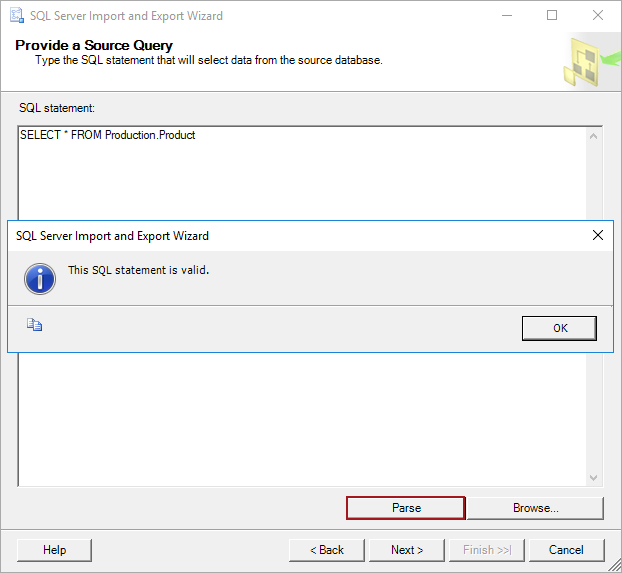
In the SQL statement editor, put the desired query and press the Parse button to check if the SQL statement is valid:
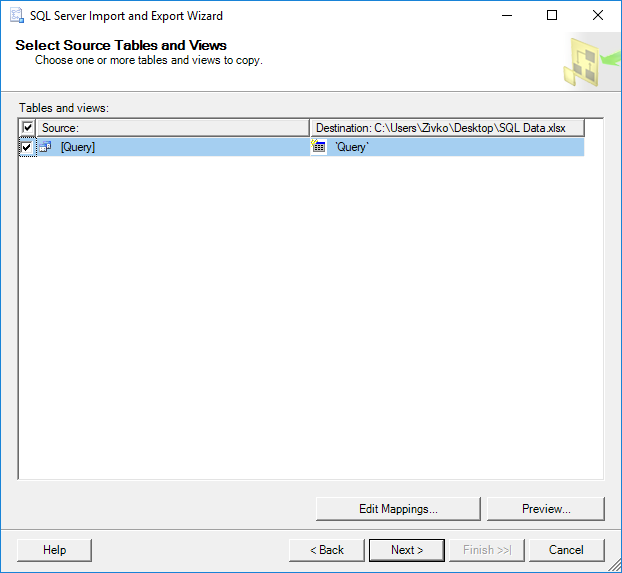
Now, when press the Next button, the Select Source Tables and Views page will appear; in the Tables and view grid the [Query] item that represents the query that is written in the Provide a Source Query page will be shown:
The next page of the SQL Server Import and Export Wizard is the Review Data Type Mapping page:
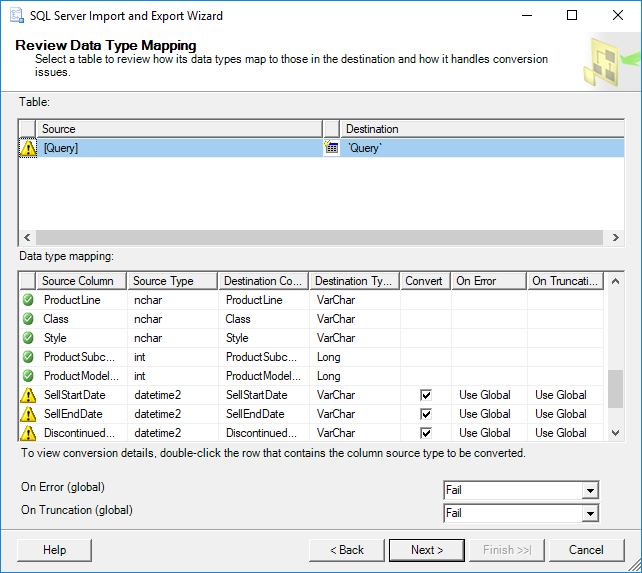
This page shows information about data type conversation that will be performed to make the source data compatible with the destination.
If a problem with data type conversation exists, the warning icon next to the data source in the Table list will appear and, in the Data type mapping list, the warning icons will appear next to the source columns which indicates that this conversation may cause a loss of data:
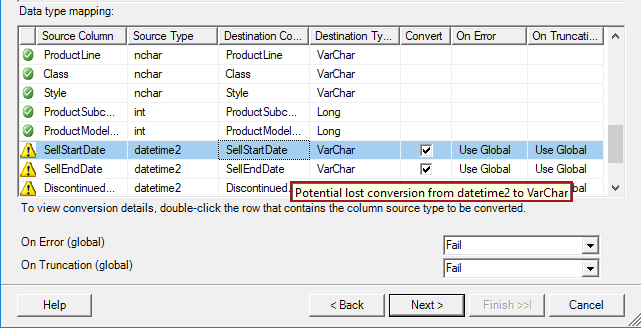
To view additional information about an individual column, double click on that column and the Column Conversion Details dialog will appear:
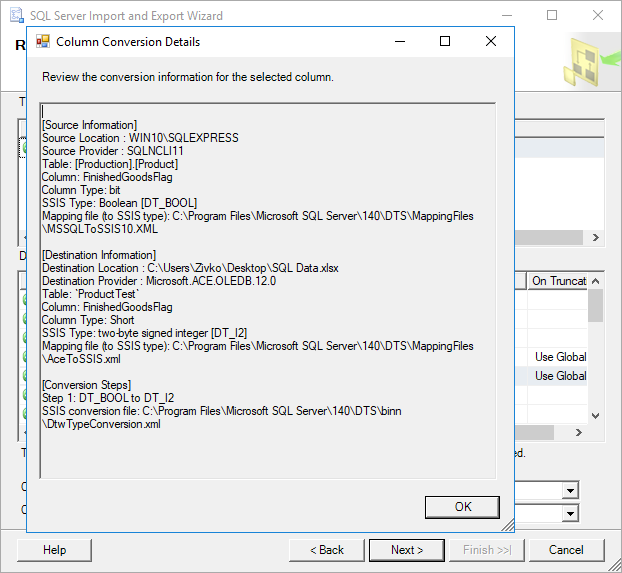
On this page, source and destination information will be shown as well as the data type of the source and destination column, conversion steps etc.
On the Review Data Type Mapping page, the data type cannot be changed, but it can be returned to the Select Source Tables and Views page by clicking the Back button. On the Select Source Tables and Views page, click the Edit Mappings button to open the Column Mappings dialog box and, from there, change the data type.
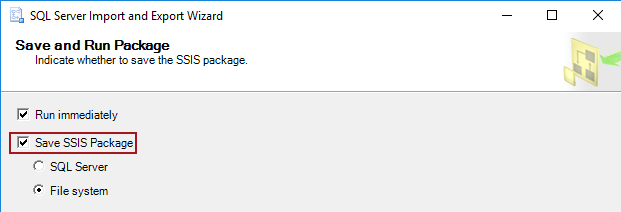
After the data source and destination are specified and configured, click the Next button. The SQL Server Import and Export Wizard shows the Save and Run Package page:
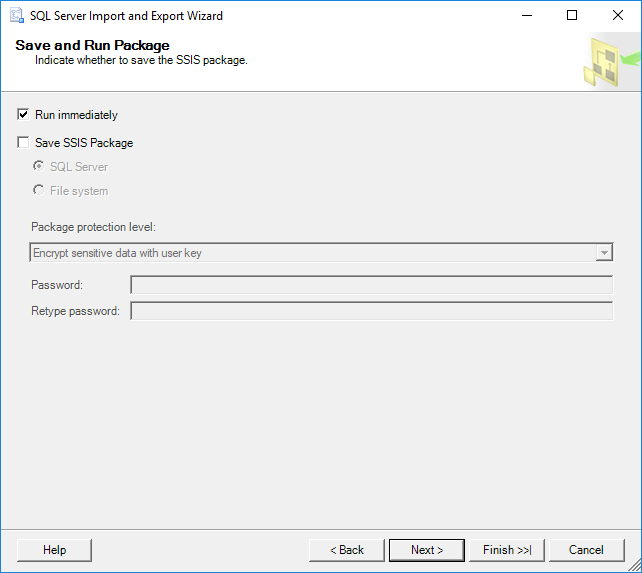
By default, the Run immediately option for the import and export data immediately is checked. To save the settings as the SSIS package, the Save SSIS Package check box needs to be checked.
If the Save SSIS Package check box is checked, additional page will be shown when clicking the Next button:

On the Save SSIS Package page, additional options for saving the SSIS package can be specified. More about these options can be found on the Save SSIS Package page.
The next page of the SQL Server Import and Export Wizard is the Complete the Wizard page:
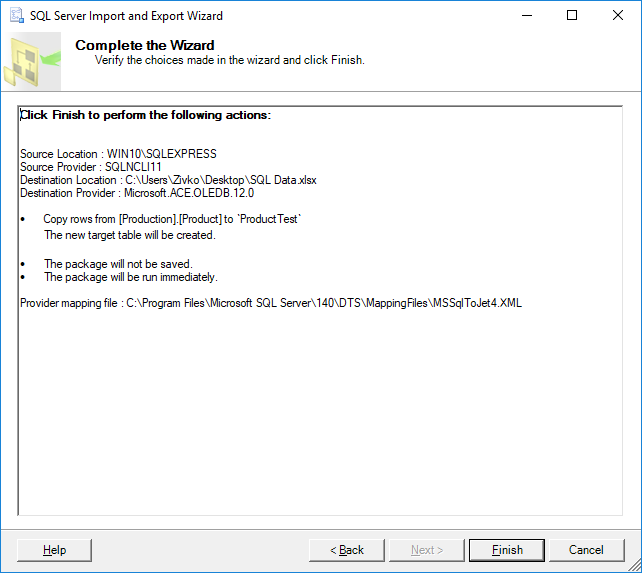
On this page, all choices that are made in this wizard will be shown. This page will show the following information:
- Data source location
- Destination location
- The data that to be copied
- Whether will be the package run immediately or saved etc.
To finalize the exporting process, click the Finish button. The SQL Server Import and Export Wizard will show the Performing Operation page:
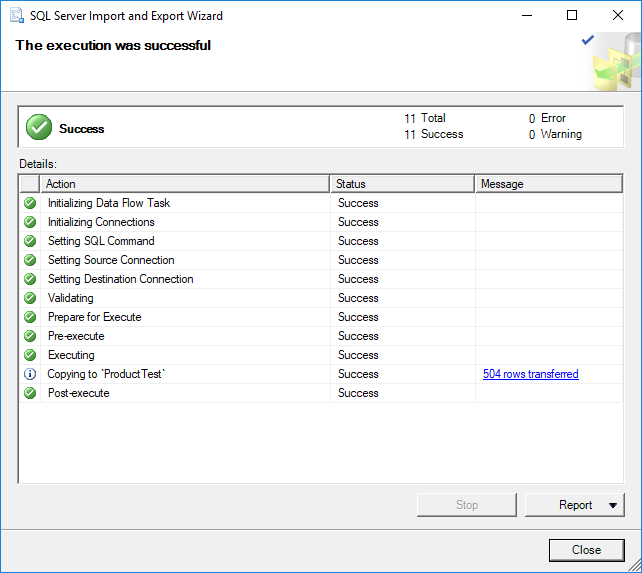
This page shows the state of the data has been successfully exported or some errors occurred during exporting data.
The Action column shows the steps of the operation.
The Status column shows if the step finished successfully or with an error.
The Message shows the informational or error messages for each step.
To get more information about the step click on the displayed item:
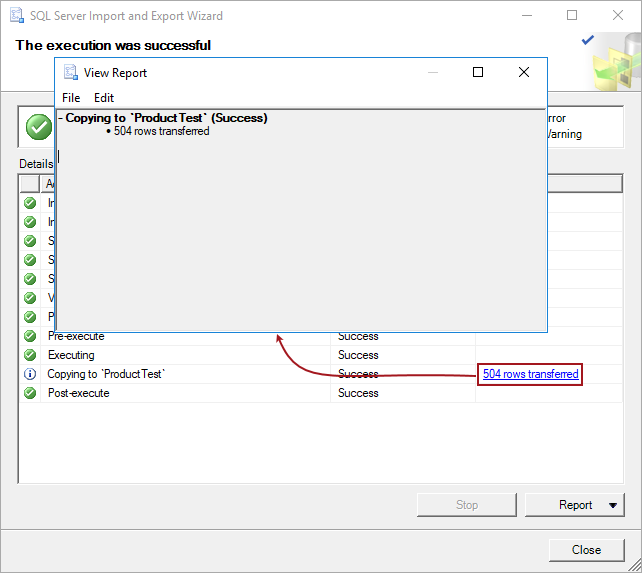
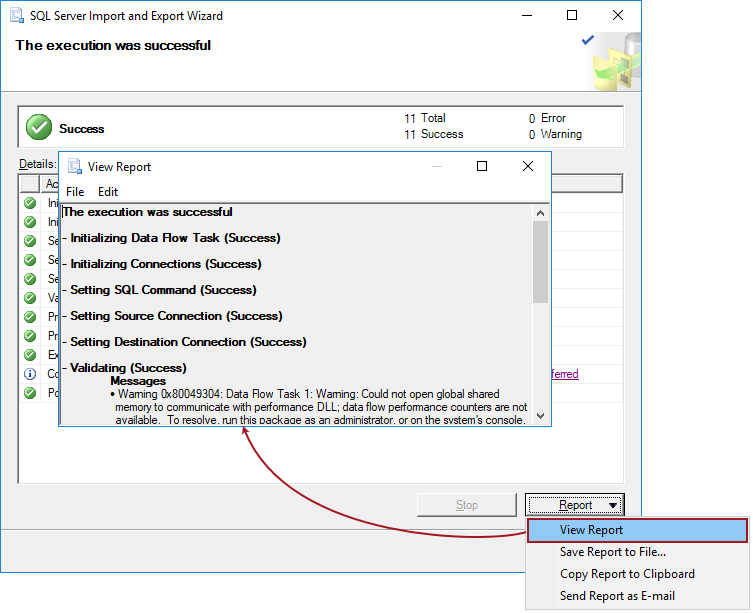
To view a report of the results, save the report, copy report or send the report vie e-mail, click the Report button and from the menu, choose a desired option:
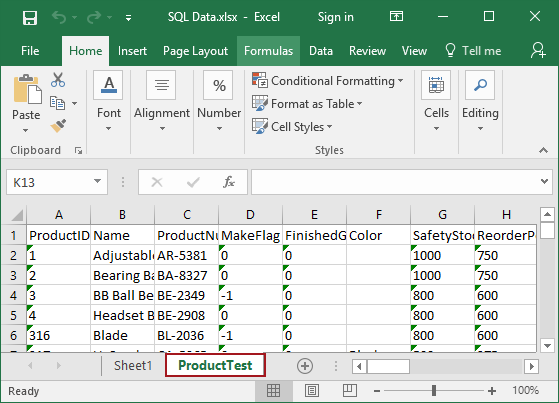
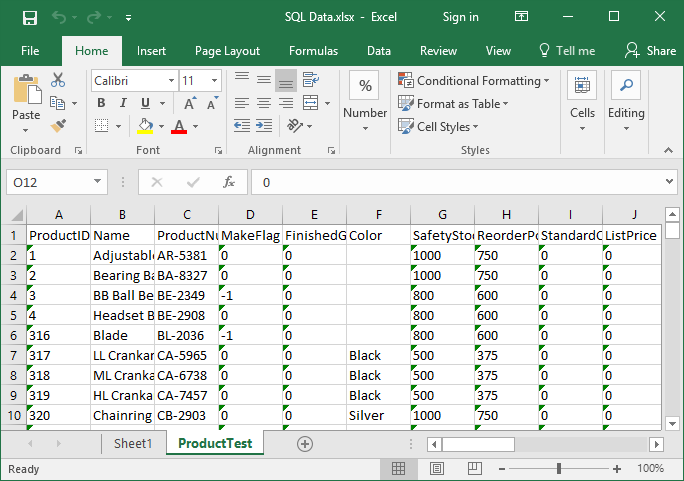
To verify that the SQL Server Import and Export Wizard successfully has exported data to the Excel file, find and open that Excel file, in our case that is the SQL Data.xlsx file:

He is a prolific author of authoritative content related to SQL Server including a number of “platinum” articles (top 1% in terms of popularity and engagement). His writing covers a range of topics on MySQL and SQL Server including remote/linked servers, import/export, LocalDB, SSMS, and more.
In his part-time, Zivko likes basketball, foosball (table-soccer), and rock music.
See more about Marko at LinkedIn
View all posts by Marko Zivkovic
- How to connect to a remote MySQL server using SSL on Ubuntu - April 28, 2020
- How to install MySQL on Ubuntu - March 10, 2020
- Using SSH keys to connect to a remote MySQL Server - November 28, 2019