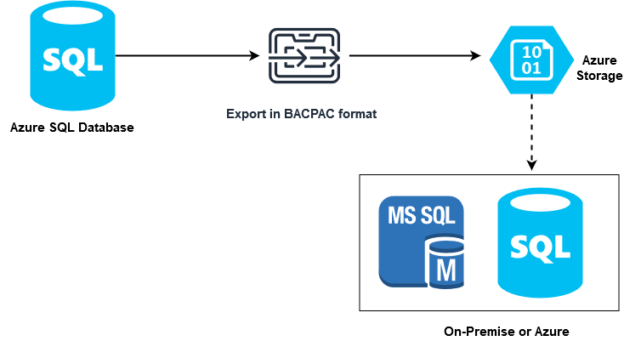
Azure SQL Database supports exporting schema and data in a compressed format BACPAC. We can store this BACPAC file into an Azure storage account. Later, this BACPAC file can help restore the Azure SQL database, and Azure managed SQL instance or on-premises SQL Server.
The below image shows the high-level workflow for database export for Azure SQL DB.
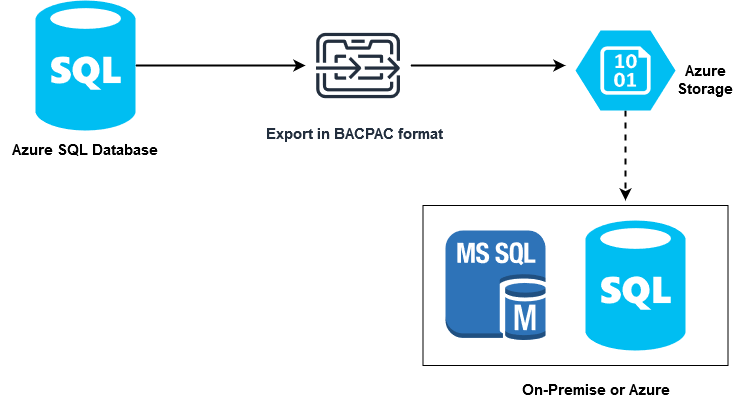
You can export the SQL database in the following ways:
- Using the Azure portal
- SQLPackage utility
- PowerShell scripts
- SQL Server Management Studio
- Azure CLI
Suppose you want to export your database regularly in the azure storage. If you follow the manual approach, it would be a tedious and repetitive task. Therefore, we should always look for automation opportunities.
In the previous articles of the Azure automation series, we looked at the following articles.
- Automate Pause and Resume of Azure Analysis Services
- Automation runbook to create a transactionally consistent copy of the Azure database
In this article, we use automation runbooks to do the following tasks.
- Export Azure SQL database to azure storage account at a specific schedule
- Remove the expired (older than 7 days) exports from the storage account automatically
Requirements
To work with this article, you need the following environment setup.
- Azure SQL Database: You require a running instance of the Azure database. You can refer to this article, Create Azure SQL Database using Azure PowerShell.
- Azure Automation Account: You require an automation account to create the import modules, create runbooks, publish and schedule them. Reference articles:
- Getting started with Azure Automation
- Automatic Stop and Start Azure Analysis Service
Create azure automation runbooks for export Azure SQL database
In the Azure portal, navigate to your automation account and create a new PowerShell Runbook. Here, I have created a runbook named [azureexportautomation].
Now, before we write the PowerShell script in the runbook, we do the following.
Create automation variables
We can define variables in two ways in the runbook.
-
Create mandatory parameters in the PowerShell script. In the article, Azure Automation: Create a database copy of Azure SQL Database, we defined a mandatory parameter for entering the new database name using the below script.
12345PARAM([Parameter(Mandatory=$true)][string]$NewDbName) - Define azure automation variables: If your input values remain the same, it is advisable to use automation variables. You can define a variable along with its value. Later, you can fetch the variable value directly in the script. It avoids you entering the value for each parameter repeatedly.
For this article, I have defined the following automation variables.
- sqlserver: It stores the azure server name
- database: It has an azure SQL DB name
- resourcegroupname: In this variable, we store the resource group for our azure database
- storageaccountname: Here, we store our Azure storage account name
- BlobStorageEndpoint: It is a unique namespace that has azure storage endpoint information
- BlobContainerName: It is the blob container name in your azure storage account
- accesskey: It stores the access key for connecting with a storage account
You can refer to the article, azure storage account for the configuration of a blob container.
You can get these values from your azure portal.
PowerShell script to connect with the Azure
In the initial part, we create an AzureLogin() function and specify the connection name as AzureRunAsConnection. It uses the cmdlet Get-AutomationConnection and Connect-AzAccount for connecting with azure resources using azure automation.
The Connect-AzAccount cmdlet is in Az.Accounts PowerShell module. If you have not imported it in the azure account, you can click on browse gallery, search module and import it.
|
1 2 3 4 5 6 7 8 9 10 11 12 13 14 15 16 17 18 19 20 21 22 23 24 25 26 27 |
function AzureLogin() { $connectionName = "AzureRunAsConnection" try { $servicePrincipalConnection = Get-AutomationConnection -Name $connectionName Write-Verbose "Logging in to Azure Portal" -Verbose Connect-AzAccount ` -ServicePrincipal ` -TenantId $servicePrincipalConnection.TenantId ` -ApplicationId $servicePrincipalConnection.ApplicationId ` -CertificateThumbprint $servicePrincipalConnection.CertificateThumbprint } catch { if (!$servicePrincipalConnection) { $ErrorMessage = "Specified Connection $connectionName is not correct, please validate." throw $ErrorMessage } else{ Write-Error -Message $_.Exception throw $_.Exception } } } AzureLogin |
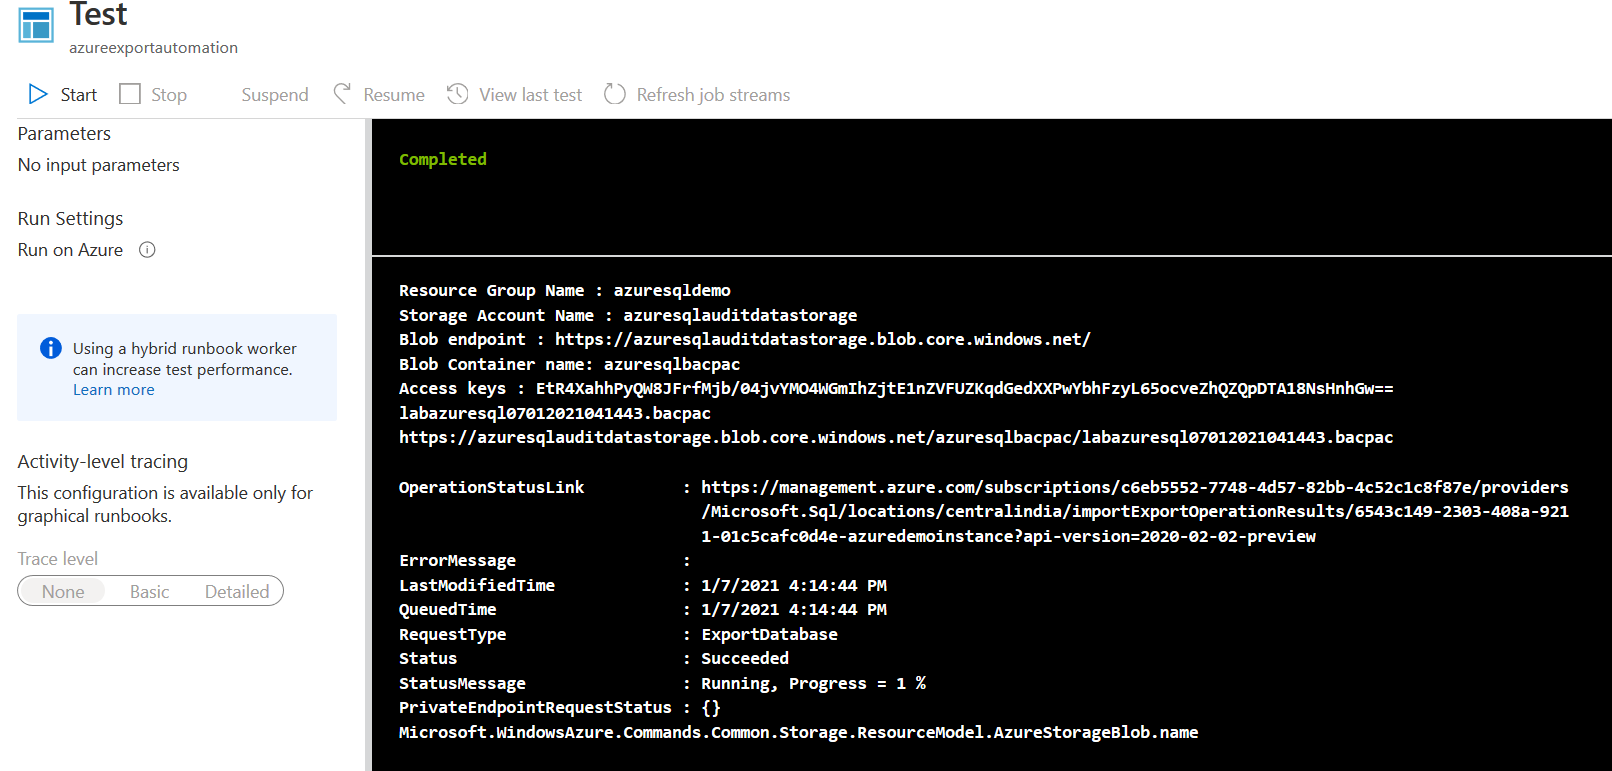
Let’s click on Test Pane before we move forward and validate that the PowerShell function is working accurately. It returns the environment details with your custom messages. It shows that the PowerShell function is working fine.
Fetch Azure automation variables values in the runbook script
In this step, we fetch automation variables and their values in the PowerShell script variables. To fetch the values, we use the cmdlet Get-AutomationVariable and fetch variables $SQLServerName, $database, $resourcegroupname, $storageaccountname, $BlobStorageEndpoint, $BlobContainerName and $accesskey.
|
1 2 3 4 5 6 7 8 9 10 11 12 13 14 15 16 17 18 19 20 |
$AzuredatabaseServerName = Get-AutomationVariable -Name "SqlServer" Write-output "Azure SQL Server: $AzuredatabaseServerName" $azuredatabaseName = Get-AutomationVariable -Name "Database" Write-output "Azure SQL Database: $azuredatabaseName" $resourceGroupName=Get-AutomationVariable -Name "resourcegroupname" Write-output "Resource Group Name : $resourceGroupName" $storageaccountname=Get-AutomationVariable -Name "storageaccountname" Write-output "Storage Account Name : $storageaccountname" $BlobStorageEndpoint=Get-AutomationVariable -Name "BlobStorageEndpoint" Write-output "Blob endpoint : $BlobStorageEndpoint" $blobContainerName=Get-AutomationVariable -Name "BlobContainerName" Write-output "Blob Container name: $blobContainerName" $storageKey=Get-AutomationVariable -Name "accesskey" Write-output "Access keys : $storageKey" |
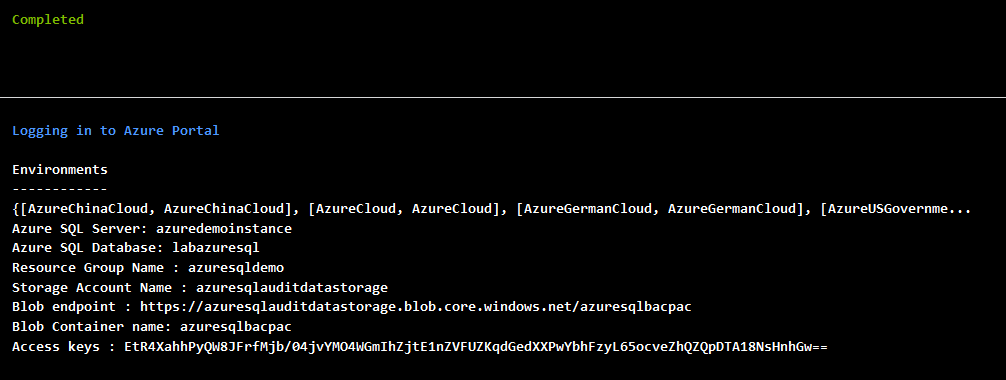
To check the values, we print the value of the variable using the write-output command. As shown below, it displays all variables values in the PowerShell script.
PowerShell script to export Azure SQL database into Azure storage container
In this central part of the script, we use PowerShell cmdlet to export the Azure SQL database into the azure storage container.
The below script does the following tasks.
-
First, we define the naming convention for the BACPAC export of the azure database. In this article, we define the export file format as AzureDBName.ddMMyyyyhhss.bacpac
12$bacpacFilename = $azuredatabaseName +(Get-Date).ToString("ddMMyyyyhhmmss") + ".bacpac" -
These BACPAC files will be stored in the blob container of the azure storage account. Therefore, we combine the azure blob storage endpoint, blob container name and BACPAC file name. The variable $bacpac defines the full path of the BACPAC file.
1$bacpac = $blobStorageEndpoint + $blobContainerName + "/" + $bacpacFilename -
To verify the export file name and path, we print them using the write-output command.
12Write-output "$bacpacFilename"Write-output "$bacpac" -
Here, we have hardcoded the azure SQL database username and password. Usually, you can use either the PowerShell script parameter or the automation variable for credentials. For SQL user password, we use ConvertTo-SecureString for converting plain text password into a secure string. The variable $SecurePassword stores this secure string.
123$databaseAdminPassword="India@123"$securePassword = ConvertTo-SecureString –String $databaseAdminPassword –AsPlainText -Force$databaseAdminUsername="sqladmin" -
For azure database export, we use cmdlet New-AzSqlDatabaseExport and specify the following parameters for its configurations.
- -ResourceGroupName: In this article, we have a resource group in the parameter $resourceGroupName, specify this variable for this
- -ServerName: It is the azure SQL server name. We specify parameter $AzuredatabaseServerName for its value
- -DatabaseName: It is the azure database name. We already have the database name in the $azuredatabaseName variable
- -StorageKeyType: In this article, we use access keys for connecting with the azure storage account. Therefore, we specify the value StorageAccessKey here
- -Storagekey: It is the access key for connecting with the storage account. Previously, we stored this access key in the parameter $storagekey, specify it in the script
- -Storageuri: In this parameter, we specify the full path of the BACPAC file. In my case, we already generated a BACPAC file path in the variable $bacpac
- -AdministratorLogin: It is the SQL admin user for the Azure SQL database
- -AdministatorLoginPassword: In this parameter, we cannot specify the simple text password for login. Therefore, we specify the secure string using the $securepassword parameter
123$exportRequest=New-AzSqlDatabaseExport -ResourceGroupName $resourceGroupName -ServerName $AzuredatabaseServerName -DatabaseName $azuredatabaseName `-StorageKeyType "StorageAccessKey" -StorageKey $storageKey `-StorageUri $bacpac -AdministratorLogin $databaseAdminUsername -AdministratorLoginPassword $securePassword
Check the status of Azure database export to Blob Storage
The database export might take longer depending upon your database size and storage. Therefore, we can use the cmdlet Get-AzSqlDatabaseImportExportStatus. It uses the $exportRequest variable’s operation status link and checks the status using a while loop. If the export operation is in progress, it sleeps for 10 seconds and checks for its status. It prints the status of the BACPAC file export.
|
1 2 3 4 5 6 7 |
$exportStatus = Get-AzSqlDatabaseImportExportStatus -OperationStatusLink $exportRequest.OperationStatusLink while ($exportStatus.Status -eq "InProgress") { Start-Sleep -s 10 $exportStatus = Get-AzSqlDatabaseImportExportStatus -OperationStatusLink $exportRequest.OperationStatusLink } $exportStatus |
Clear the old database exports from the Azure storage container
Suppose we want to remove all old database exports (BACPAC files) from the Azure storage container. We might have single or multiple BACPAC files in a container depending upon the frequency we take database exports.
Therefore, to remove the old blobs, we do the following things.
- Use the cmdlet New-AzStorageContext to create azure storage context. It requires storage account name ( $Storageaccountname) and storage access key ( $storagekey) to set storage context
- It uses another cmdlet Get-AzStorageBlob to get a list of blobs (BACPAC files) from the container
- Next, we use a foreach loop to remove the blobs using the Remove-AzStorageBlob PowerShell cmdlet. In this command, we specify storage context and blob container name parameters
|
1 2 3 4 5 6 7 8 9 |
$StorageContext = New-AzStorageContext -StorageAccountName $storageaccountname -StorageAccountKey $storageKey $blobs =Get-AzStorageBlob -Container $blobContainerName -Context $storageContext foreach ($blob in ($blobs)) { Write-output "$blob.name" Remove-AzStorageBlob -Blob $blob.Name -Container $blobContainerName -Context $storageContext } |
Note: This step requires cmdlets (New-AzStorageContext, Get-AzStorageBlob, Remove-AzStorageBlob) from the Az.Storage module. If you have not imported it earlier, you can browse the module gallery in the azure automation account and Import it.
Execute Runbooks using Test-Pane and verify the azure database export
We have completed the PowerShell script for exporting the Azure SQL database to blob storage. Here, before we execute the runbook, you can see a sample BACPAC file from my previous run.
Once we execute the script, it should remove this BACPAC file and place a new database export. In the runbook, click on Test-Pane and Start.
You can go to the Azure SQL database dashboard and activity log for viewing BACPAC export logs. As shown below, it shows status as Accepted > Started >Succeeded.
As shown below, It removed older database exports and created new export in a storage container.
Complete PowerShell script for azure database export
Previously, We have covered PowerShell script in small chunks. You can use the below script for preparing your runbook and configure it with your custom variables and parameters.
|
1 2 3 4 5 6 7 8 9 10 11 12 13 14 15 16 17 18 19 20 21 22 23 24 25 26 27 28 29 30 31 32 33 34 35 36 37 38 39 40 41 42 43 44 45 46 47 48 49 50 51 52 53 54 55 56 57 58 59 60 61 62 63 64 65 66 67 68 69 70 71 72 73 74 75 76 77 78 79 80 |
function AzureLogin() { $connectionName = "AzureRunAsConnection" try { $servicePrincipalConnection = Get-AutomationConnection -Name $connectionName Write-Verbose "Logging in to Azure Portal" -Verbose Connect-AzAccount ` -ServicePrincipal ` -TenantId $servicePrincipalConnection.TenantId ` -ApplicationId $servicePrincipalConnection.ApplicationId ` -CertificateThumbprint $servicePrincipalConnection.CertificateThumbprint } catch { if (!$servicePrincipalConnection) { $ErrorMessage = "Specified Connection $connectionName is not correct, please validate." throw $ErrorMessage } else{ Write-Error -Message $_.Exception throw $_.Exception } } } AzureLogin $AzuredatabaseServerName = Get-AutomationVariable -Name "SqlServer" Write-output "Azure SQL Server: $AzuredatabaseServerName" $azuredatabaseName = Get-AutomationVariable -Name "Database" Write-output "Azure SQL Database: $azuredatabaseName" $resourceGroupName=Get-AutomationVariable -Name "resourcegroupname" Write-output "Resource Group Name : $resourceGroupName" $storageaccountname=Get-AutomationVariable -Name "storageaccountname" Write-output "Storage Account Name : $storageaccountname" $BlobStorageEndpoint=Get-AutomationVariable -Name "BlobStorageEndpoint" Write-output "Blob endpoint : $BlobStorageEndpoint" $blobContainerName=Get-AutomationVariable -Name "BlobContainerName" Write-output "Blob Container name: $blobContainerName" $storageKey=Get-AutomationVariable -Name "accesskey" Write-output "Access keys : $storageKey" $bacpacFilename = $azuredatabaseName + (Get-Date).ToString("ddMMyyyyhhmmss") + ".bacpac" $bacpac = $blobStorageEndpoint + $blobContainerName + "/" + $bacpacFilename Write-output "$bacpacFilename" Write-output "$bacpac" $databaseAdminPassword="India@123" $securePassword = ConvertTo-SecureString –String $databaseAdminPassword –AsPlainText -Force $databaseAdminUsername="sqladmin" $exportRequest=New-AzSqlDatabaseExport -ResourceGroupName $resourceGroupName -ServerName $AzuredatabaseServerName -DatabaseName $azuredatabaseName ` -StorageKeyType "StorageAccessKey" -StorageKey $storageKey ` -StorageUri $bacpac -AdministratorLogin "sqladmin" -AdministratorLoginPassword $securePassword $exportStatus = Get-AzSqlDatabaseImportExportStatus -OperationStatusLink $exportRequest.OperationStatusLink while ($exportStatus.Status -eq "InProgress") { Start-Sleep -s 10 $exportStatus = Get-AzSqlDatabaseImportExportStatus -OperationStatusLink $exportRequest.OperationStatusLink } $exportStatus $StorageContext = New-AzStorageContext -StorageAccountName $storageaccountname -StorageAccountKey $storageKey $blobs =Get-AzStorageBlob -Container $blobContainerName -Context $storageContext foreach ($blob in ($blobs)) { Write-output "$blob.name" Remove-AzStorageBlob -Blob $blob.Name -Container $blobContainerName -Context $storageContext } |
Publish and schedule the runbook
Once you have tested the PowerShell script, publish the runbook and link it to an automation account schedule. It executes the runbook on its schedule, removes older exports from the storage container and takes a new database export.
Click on Publish.

In the runbook dashboard, its status changes to Published.
You can click on the Start button to execute this runbook.

While the runbook executes, its status is Running.
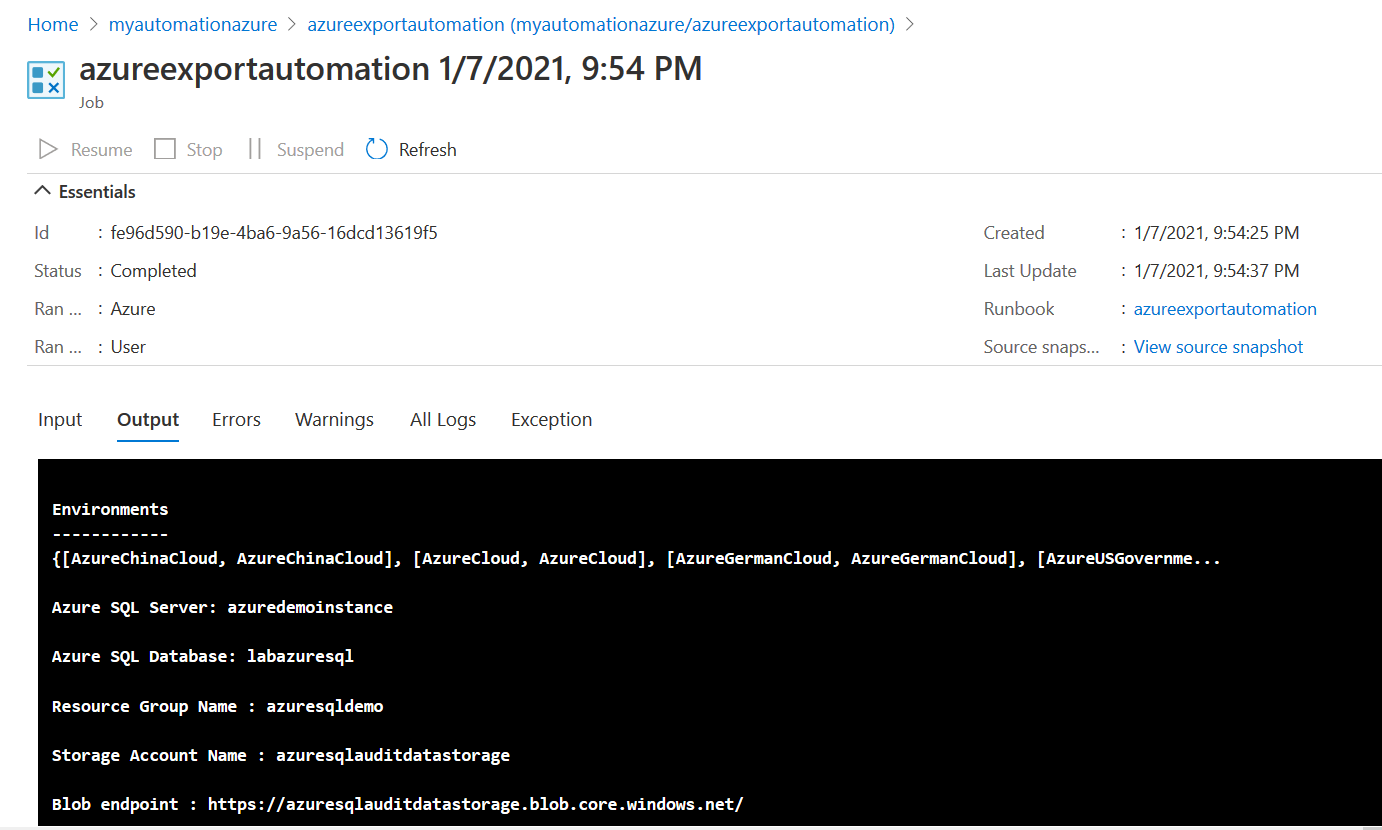
Once runbook execution completes, click on the Output tab and it displays custom outputs we specified in the script.
In the below image, we have a new SQL database export that is created by runbook execution.
Conclusion
This article explored the azure automation for exporting an Azure SQL Database into a storage container. The automation helps you schedule export at your convenience, and it does not require any manual intervention. You can use the BACPAC export in restoring the database on both on-premise and Azure SQL Server. If you plan to delete the azure database for cost-saving, you should export it for future reference.
Table of contents
- Understanding PostgreSQL SUBSTRING function - September 21, 2024
- How to install PostgreSQL on Ubuntu - July 13, 2023
- How to use the CROSSTAB function in PostgreSQL - February 17, 2023

