
In the previous articles of this series, we described the structure of the SQL Server tables and indexes, the main concepts that are used to describe the index and the basics and guidelines that are used to design the proper index. In this article, we will go through the operations that can be performed on the SQL Server indexes.
Creating Indexes
Before creating an index, it is better to follow the index design guidelines and best practices that are described in the previous article, to determine the columns that will participate in the index, the type of the created index, the suitable index options, such as the FillFactor or Sort in TempDB, and the storage location of that index.
A SQL Server index can be created using the CREATE INDEX T-SQL statement or from the New Index dialog box using the SQL Server Management Studio tool, by providing
- the index name,
- the index type,
- the uniqueness of the index key values,
- the name of the table on which the index will be created,
- list of columns that will participate in that index
- and different index options such as the FillFactor, Sort in TempDB, drop the existing similar indexes
- and the index filegroup and location
The CREATE INDEX T-SQL syntax below is used as a template to create a new SQL Server index. The absence of the UNIQUE option will not force the uniqueness of the index key values. In the unique index, no two rows are permitted to have the same index key value. If the type of the index is not specified in the CREATE INDEX T-SQL statement, a Non-Clustered index will be created.
|
1 2 3 4 5 6 7 |
CREATE [UNIQUE] [ CLUSTERED | NONCLUSTERED ] INDEX [index_name] ON [TableName] ( [Column1] ASC, [Column2] ASC ) ON PRIMARY WITH (PAD_INDEX = OFF, STATISTICS_NORECOMPUTE = OFF, SORT_IN_TEMPDB = OFF, DROP_EXISTING = OFF, ONLINE = OFF, ALLOW_ROW_LOCKS = ON, ALLOW_PAGE_LOCKS = ON) ON [PRIMARY] GO |
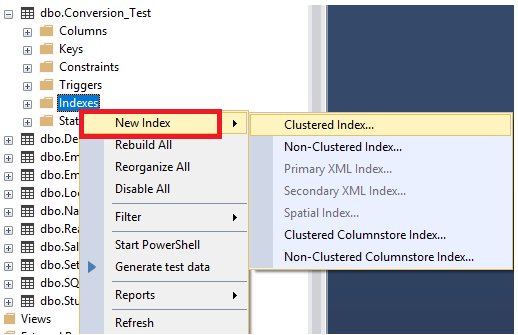
The same operation can be performed using SQL Server Management Studio, by browsing the table on which you need to create an index, right click on the Indexes node and choose New Index option, from which you can specify the type of the index to be created, as shown below:

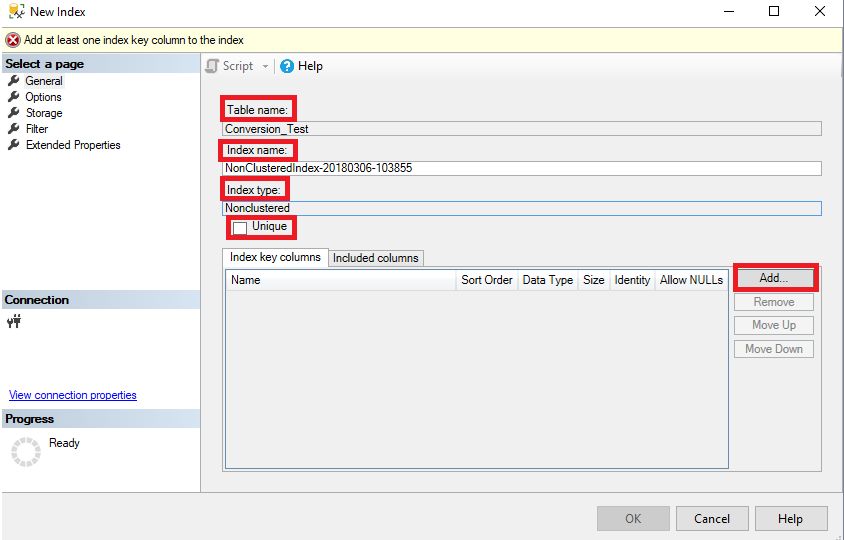
From the General tab of the displayed New Index dialog box, the name of the table will be filled automatically, with an editable suggested name of the index. The type of the index will be also filled automatically from the provided types list, with the ability to specify the uniqueness of that index and list of columns that will be added to that index and the order of each column, as shown clearly below:
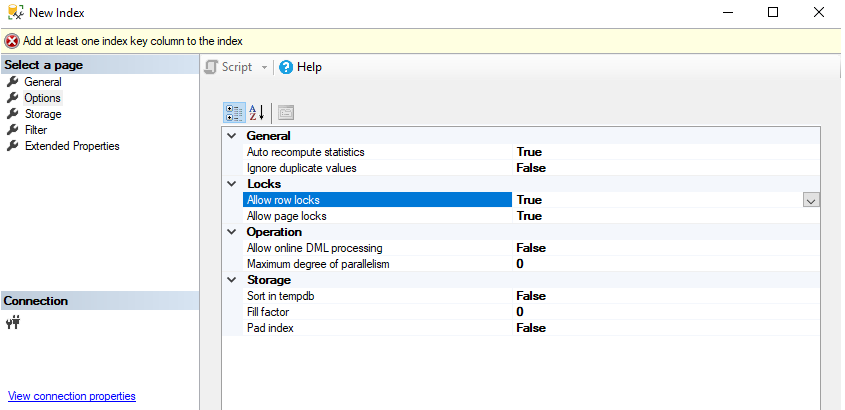
In the Options tab of the New Index dialog box, you can change the default values of the different index creation options, same as the ones specified in the WITH clause of the CREATE INDEX T-SQL statement, as shown below:
The storage location setting of the index, such as the filegroup and the partition schema in which the index will be stored, can be specified in the Storage tab of the New Index dialog box, as shown below:

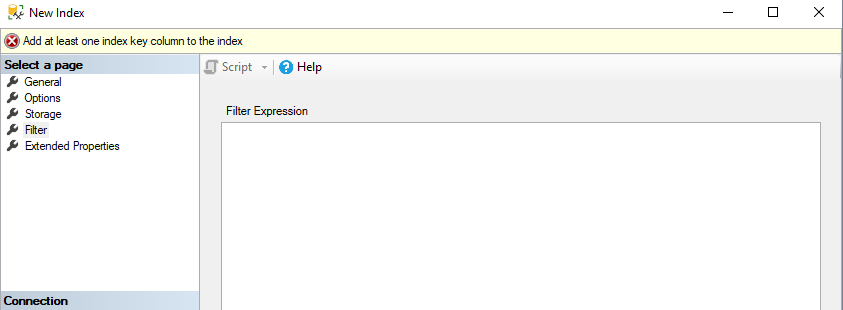
From the Filter tab of the New Index dialog box, you can specify the WHERE condition of the filtered index, to select the data to be stored in the created filtered index, as shown below:
SQL Server indexes can be also created indirectly by defining the PRIMARY KEY and the UNIQUE constraint within the CREATE TABLE or ALTER TABLE statements. SQL Server will create a unique clustered index to enforce the PRIMARY KEY constraint unless you already define a clustered index on that table. Recall that we cannot create more one clustered index on each table. A unique non-clustered index will be created automatically to enforce the UNIQUE constraint. You should be granted CONTROL or ALTER permission on the table in order to be able to can create an index.
Assume that we plan to create the below table that contains two columns, the ID column as PRIMARY KEY and the UNIQUE column STD_Name, using the CREATE Table T-SQL statement below:
|
1 2 3 4 5 6 |
USE SQLShackDemo GO CREATE TABLE IndexDemo ( ID INT IDENTITY (1,1) PRIMARY KEY, STD_Name NVARCHAR(50) NOT NULL UNIQUE ) |
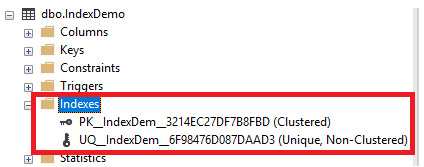
Checking the created table from the object explorer of the SQL Server Management Studio, you will see that, two new indexes will be created on that table automatically, without providing any CREATE INDEX statement. A Clustered index will be created to enforce the PRIMARY KEY constraint and a Unique Non-Clustered index will be created to enforce the UNIQUE constraint, as shown below:
Creating new indexes on large tables should be planned carefully, due to the performance impact of this process in a production environment. You need plan carefully starting with the clustered index creation, after that you can create the Non-clustered indexes over it.
Also, setting the ONLINE option to ON when you create the index will enable other data retrieving or modification processes on the underlying table to continue, preventing the index creation process from locking the table. On the other hand, the ONLINE index creation process will take longer time than the offline default index creation process.
Using the SORT_IN_TEMPDB option can also help in reducing the time required to create the index, taking into consideration that the tempdb is hosted on a separate disk drive than the user database.
SQL Server allows us to create up to one clustered index, 999 non-clustered indexes, 249 XML indexes, 249 Spatial indexes on each table. You can add up to 16 key columns per index, with maximum allowed size for index key record equal to 900 bytes. It is not allowed to add columns with image, ntext, text, varchar(max), nvarchar(max), varbinary(max), and xml datatypes to the index key. The number, record size and datatypes limitation of index key columns can be avoided by including Non-Key columns in the index, as we will see in details in the Designing Effective Non-clustered Index article.
Disabling Indexes
When you disable a SQL Server index, the definition, statistics and the data of that index will not be removed from the system catalog, but you will not be able to access that index. Disabling the Non-clustered index will prevent you from accessing that index only. On the other hand, disabling the clustered index will prevent you from accessing the underlying table’s data, until you drop or rebuild the index.
You may decide to disable an index temporarily for many purposes, such as troubleshooting a specific scenario, correcting a disk I/O error before rebuilding the index, or eliminating the temporary disk space required to store the old and new version of the index during the index rebuild process, where only 20 percent if the index size will be required for sorting the index data.
The SQL Server Engine disables database indexes that may contain an expression, database object or collation that could be changed or may conflict with a change in the upgrade process, automatically when an upgrade process to a new release or Service Pack for SQL Server is performed, and rebuilds it automatically once the upgrade process is completed successfully.
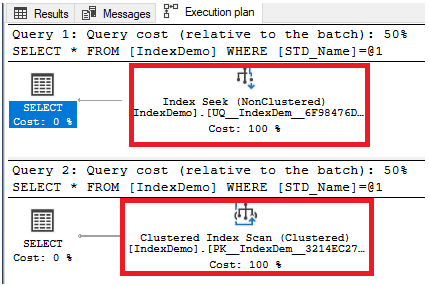
An index can be disabled manually using the ALTER INDEX DISABLE T-SQL statement. In the previously created IndexDemo table, if we plan to disable the Non-clustered index, that is used to enforce the uniqueness of the STD_Name column, using the ALTER INDEX DISABLE T-SQL statement, and check the execution plan of the below simple SELECT statement before and after disabling the index:
|
1 2 3 4 5 6 |
SELECT * FROM IndexDemo WHERE STD_Name ='CC' GO ALTER INDEX [UQ__IndexDem__6F98476D087DAAD3] ON [IndexDemo] DISABLE GO SELECT * FROM IndexDemo WHERE STD_Name ='CC' GO |
You will see that the SQL Server Engine performs an Index Seek on the Non-Clustered index to get the requested data in the first SELECT query. After disabling the Non-clustered index, the index is no longer accessible. So that, the SQL Server Engine performs an index scan on the clustered index, as shown clearly below:
If we try to disable the clustered index this time, using the ALTER INDEX DISABLE T-SQL statement, then try to run the same SELECT statement on that table:
|
1 2 3 4 |
ALTER INDEX [PK__IndexDem__3214EC27DF7B8FBD] ON [IndexDemo] DISABLE GO SELECT * FROM IndexDemo WHERE STD_Name ='CC' GO |
The SELECT query will fail, showing that the table is no longer accessible after disabling the clustered index on the table, as shown in the error message below:

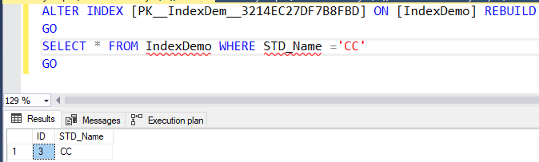
The disabled index can be enabled again by rebuilding the index using the ALTER INDEX REBUILD T-SQL statement or creating the index again using the CREATE INDEX T-SQL statement with the DROP_EXISTING option equal to ON. If we manage to enable the clustered index on the demo table again using the ALTER INDEX REBUILD T-SQL statement below, then trying to run the same SELECT statement:
|
1 2 3 4 |
ALTER INDEX [PK__IndexDem__3214EC27DF7B8FBD] ON [IndexDemo] REBUILD GO SELECT * FROM IndexDemo WHERE STD_Name ='CC' GO |
You will see that you are able now to access that table and retrieve the requested data, as shown below:
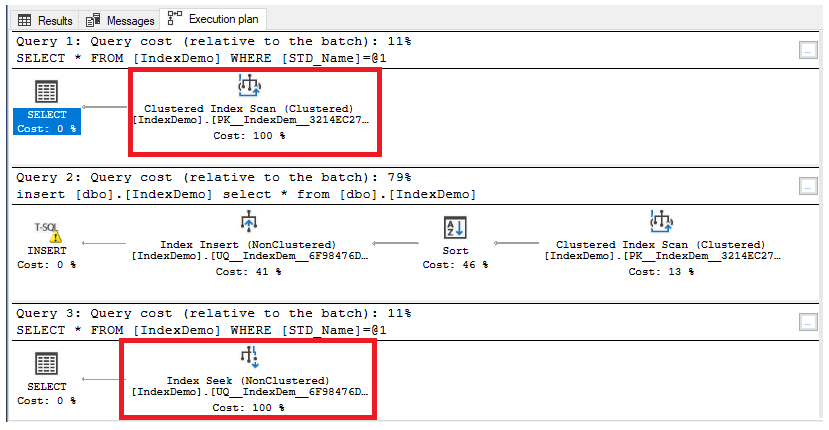
Also, enabling the Non-clustered index, using the CREATE INDEX WITH DROP_EXISTING T-SQL statement below:
|
1 2 3 4 5 6 |
SELECT * FROM IndexDemo WHERE STD_Name ='CC' GO CREATE UNIQUE INDEX [UQ__IndexDem__6F98476D087DAAD3] ON [IndexDemo] (STD_Name) WITH (DROP_EXISTING =ON) GO SELECT * FROM IndexDemo WHERE STD_Name ='CC' GO |
You will see that the SQL Server Engine seeks that index directly after enabling it, compared with scanning the clustered index before enabling the Non-clustered index, as shown below:
Renaming Indexes
It is better to follow a standard naming convention when creating the SQL Server indexes, to understand the purpose of that index from the index name. You can specify the type of the index, the name of the table on which the index is created and the name of the columns that participate in that index, in the index name to make it meaningful and unique at the table level. For existing indexes, you can replace the current index name with a new name that follows your company naming convention policy. Renaming the index will not affect the index structure or rebuild it, it will just change the name of that index.
For example, when you create a PRIMARY KEY or UNIQUE constraints, SQL Server will create a related index automatically to enforce that constraint, providing a long name that contains the type of that constraint, the table name and a unique GUID value as shown in the previous example.
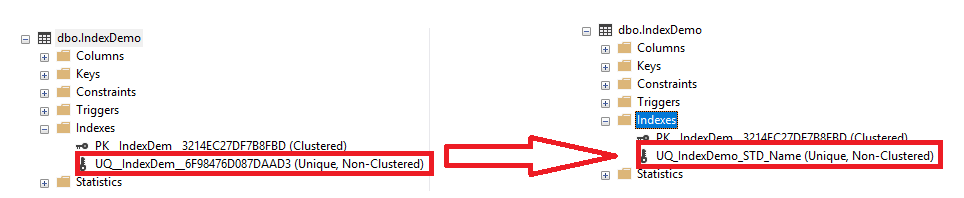
The sp_rename system procedure can be used to change the name of the index, by providing the old index name and the new index name. The below T-SQL statement is used to change the name of the automatically created Non-clustered index to follow our naming convention:
|
1 |
EXEC sp_rename N'IndexDemo.UQ__IndexDem__6F98476D087DAAD3', N'UQ_IndexDemo_STD_Name', N'INDEX'; |
The new name can be checked from the Indexes node of the target table using the SQL Server Management Studio, as shown below:
Dropping Indexes
As describe the SQL Server index, always remember that it is a double-edged sword that can negatively affect system performance in cases when the index is badly designed. If it is found that an index is badly designed, or it is no longer needed, you will need to drop that index from the database table and reclaim the disk space consumed by the index to be used by another database objects. Dropping the table or view will also drop all indexes created on that database object.
Dropping the clustered index will take extra time and temporary disk space. This is due to the fact that, all the data stored in the leaf level of the clustered index will be stored in an unordered heap table. In addition, all Non-clustered indexes will be rebuilt to replace the clustered index keys with row pointers to the heap table. You can also perform an online drop for the clustered index, with the ability to override the default database MAXDOP value for the current clustered index drop query only. In this case, other user queries that use the underlying table will not be blocked by the DROP INDEX operation.
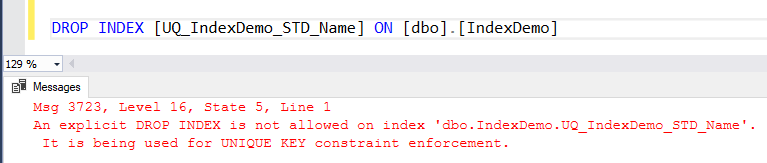
An index can be dropped easily using the DROP INDEX T-SQL statement, by providing the index name and the name of the table on which the index is created, as shown below:
|
1 |
DROP INDEX [UQ_IndexDemo_STD_Name] ON [dbo].[IndexDemo] |
For manually created indexes, the DROP INDEX will be useful to drop the index. But for the indexes that are created automatically to enforce the PRIMARY KEY and UNIQUE constraints, you will not be able to drop it unless you drop the constraint that created the index. If you try to run the previous DROP INDEX statement to drop the index created to enforce the UNIQUE key constraint, the statement will fail, showing that the index is used for the UNIQUE KEY constraint, as shown below:
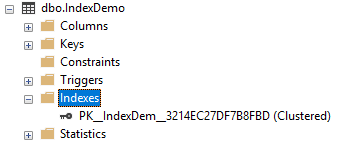
To drop the previous index, we should drop the parent constraint, using the ALTER TABLE DROP CONSTRAINT T-SQL statement below:
|
1 |
ALTER TABLE [dbo].[IndexDemo] DROP CONSTRAINT [UQ_IndexDemo_STD_Name] |
That will drop the index automatically as shown below:
Setting Index Options
When you create or rebuild an index, there is a number of index options to be considered and set. These options include:
- PAD_INDEX: Used to apply the free space percentage specified by FillFactor to the index intermediate level pages during index creation.
- FILLFACTOR: Used to set the percentage of free space that the SQL Server Engine will leave in the leaf level of each index page during the index creation. FillFactor should be an integer value from 0 to 100, with 0 or 100 is the default value, in which the pages will be filled completely during the index creation.
- SORT_IN_TEMPDB: Specifies whether the intermediate sort results, generated during index creation, will be stored in tempdb.
- IGNORE_DUP_KEY: Specifies if an error message will be shown when duplicate key values are inserted into the unique index.
- STATISTICS_NORECOMPUTE: Determines if the outdated index distribution statistics will be recomputed automatically.
- DROP_EXISTING: Specifies that the named existing index will be dropped and recreated again.
- ONLINE: Specifies whether the underlying tables are accessible for queries and data modification during the index operation.
- ALLOW_ROW_LOCKS: Determines whether row locks are allowed to access the index data.
- ALLOW_PAGE_LOCKS: Determines whether page locks are allowed to access the index data.
- MAXDOP: Used to limit the maximum number of processors used in a parallel plan execution of the index operation.
- DATA_COMPRESSION: Specifies the data compression level for the specified index, partition number, or range of partitions, with NONE, ROW, and PAGE values.
You can view the current values of these options for a specific index by querying the sys.indexes catalog view, using the SELECT statement below:
|
1 2 3 4 |
SELECT * FROM sys.indexes WHERE name = N'PK__IndexDem__3214EC27DF7B8FBD'; GO |
A snapshot of the returned result will be like:

The below CREATE INDEX query is used to create a new index on the demo table, with a customized value for the FillFactor option, applying the FillFactor value to the intermediate level pages, as shown below:
|
1 2 3 |
CREATE INDEX IX_IndexDemo_STDName ON [dbo].[IndexDemo] (STD_Name) WITH (PAD_INDEX=ON, FILLFACTOR=90) |
The following ALTER INDEX query is used to rebuild the index, allowing the Row lock type during the index rebuild process:
|
1 2 3 |
ALTER INDEX IX_IndexDemo_STDName ON [dbo].[IndexDemo] REBUILD WITH (ALLOW_ROW_LOCKS=ON) |
You can also use the SET clause with the ALTER INDEX statement to set the ALLOW_PAGE_LOCKS, ALLOW_ROW_LOCKS, IGNORE_DUP_KEY and STATISTICS_NORECOMPUTE options without the need to rebuild the index, as in the ALTER INDEX statement below:
|
1 2 3 |
ALTER INDEX IX_IndexDemo_STDName ON [dbo].[IndexDemo] SET (ALLOW_PAGE_LOCKS=ON) |
Remember that the ALTER INDEX T-SQL statement cannot be used to change the structure or participating columns of the index, it just allows you to Rebuild, Reorganize or SET the different index options.
Until this point, we show deeply most of the operations that can be performed on the SQL Server indexes. In the next articles in this series, we will describe how to design a useful and effective clustered index. Stay tuned!
Table of contents

He is a Microsoft Certified Solution Expert in Data Management and Analytics, Microsoft Certified Solution Associate in SQL Database Administration and Development, Azure Developer Associate and Microsoft Certified Trainer.
Also, he is contributing with his SQL tips in many blogs.
View all posts by Ahmad Yaseen
- Azure Data Factory Interview Questions and Answers - February 11, 2021
- How to monitor Azure Data Factory - January 15, 2021
- Using Source Control in Azure Data Factory - January 12, 2021