
In this article, we will talk briefly about data quality in SQL Server. Then, we will give a brief overview of the Melissa Data Quality for SQL Server Integration Services (SSIS), and we will demonstrate the components available in the community edition.
Introduction
In general, data quality is the level of how much data fits its serving context. Enhancing the data quality is very critical since poor quality leads to inaccurate reporting and results in wrong decisions and inevitably economic damages. For this reason, each data management system provided a bunch of tools used to improve the data quality level.
For SQL Server, many technologies can be used to enhance data quality:
SQL Server Data Quality Services (DQS)
Data Quality Services is a knowledge-driven data quality feature developed by Microsoft and released in SQL Server 2012. It can be installed from the SQL Server installation, and it provides different services, such as building a knowledge base, data de-duplication, standardization.
To learn more about this feature, you can refer to the following articles:
- How to clean data using Data Quality Services and SQL Server Integration Services
- How to use SQL Server Data Quality Services to ensure the correct aggregation of data
- How to clean Master Data Services data using Data Quality Services in SQL Server
Using the well-known Microsoft SSIS Components
SQL Server Integration Services provides a bunch of components that can be used to assess and enhance data quality. These operations can be performed at the control flow level, such as data profiling and validation, or the data flow level using fuzzy lookups, conditional splits, derived columns, script component, and others.
Writing SQL Statements
One of the most popular data cleaning approaches is implementing your own logic using SQL statements, which is known as data wrangling. SQL Server provided a bunch of system functions that can be used to improve data quality.
Using third-party components
One of the most beautiful things in the Visual Studio IDE is that it is allowed to develop third-party components and integrate them within Microsoft products such as SSIS. Many companies developed third-party SSIS components such as CDATA, Kingwaysoft, and COZYROC.
Regarding data quality, one of the most popular products in the market is Melissa data quality components for SQL Server.
Melissa Data Quality for SQL Server
Melissa data quality tools are a set of SSIS components that are used to clean and enrich data during the data transfer or integration process. Two editions are available:
- Enterprise edition: Commercial, contains a wide variety of data quality components and online services
- Community edition: Free, but only a few components are available (check the link above)
In this article, we will be talking about the community edition, and we will briefly illustrate its components.
Download Melissa data quality community edition
To download the Melissa data quality community edition, you should navigate to the SQL Server editions page. Then, request a demo by filling the form located on the left side of the page. And make sure to select the community edition.
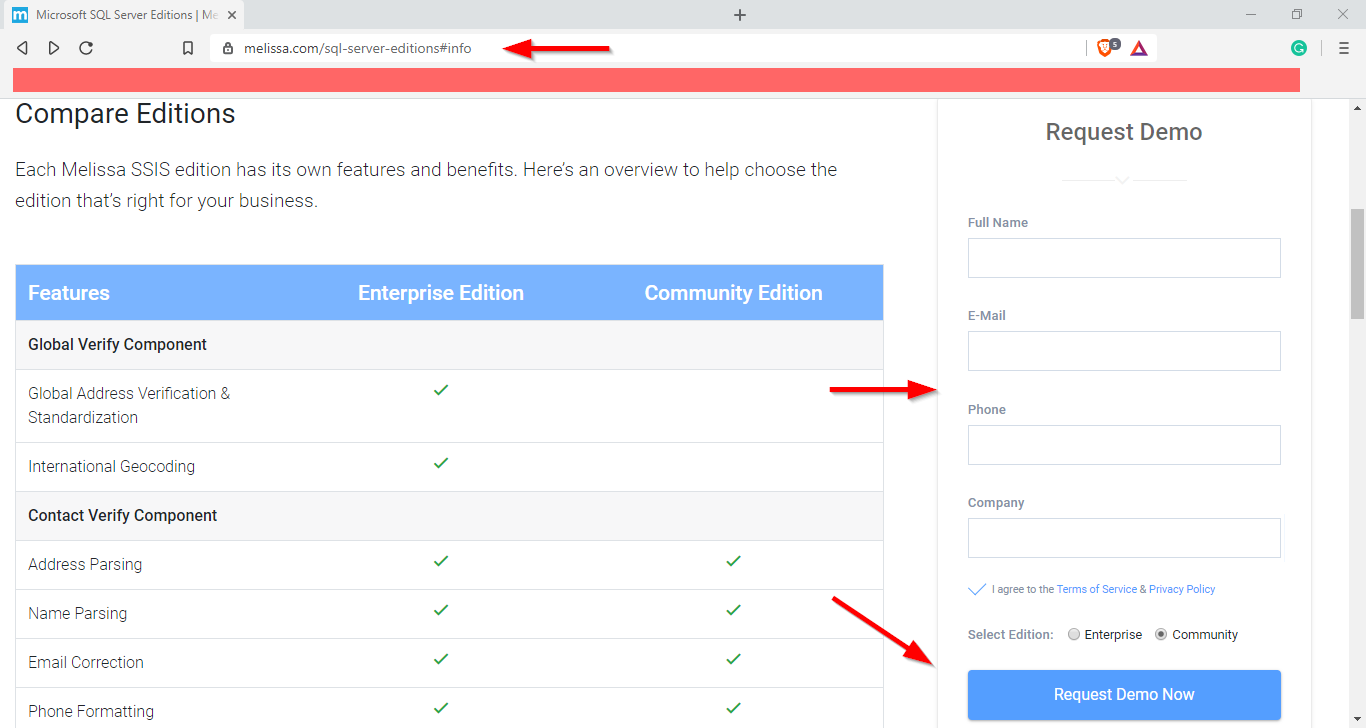
Figure 1 – SQL Server editions page
After requesting the demo, you will receive an email that contains a link for the web installer with a community license key.
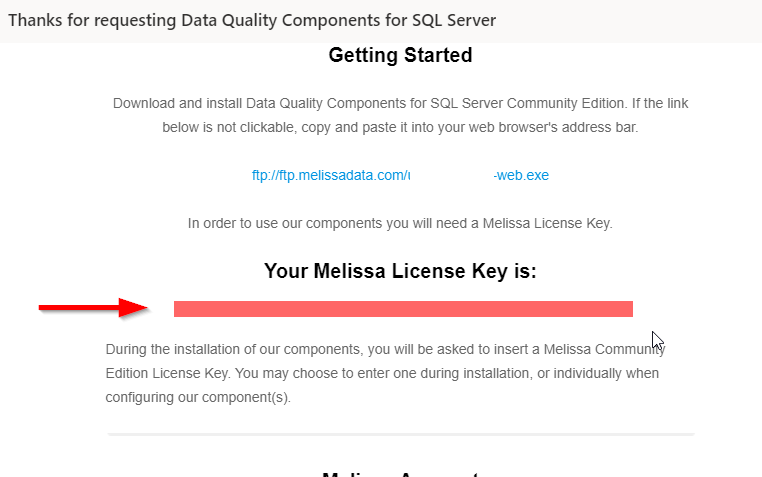
Figure 2 – Received email
Now, you should download the web installer from the link you received. When finished, you should enter the Melissa license key during installation.
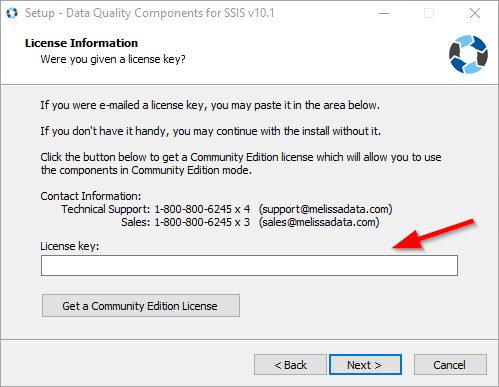
Figure 3 – License information request during installation
When the installation is done, the Melissa data quality components should appear within the SSIS toolbox (data flow level).
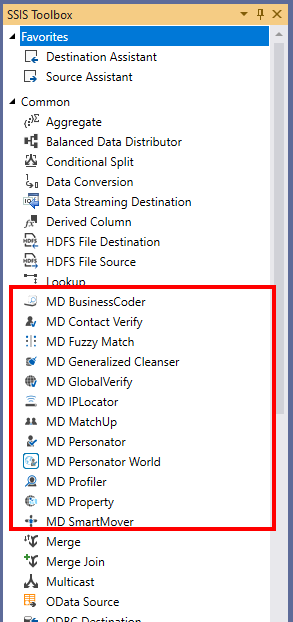
Figure 4 – Melissa data quality components within SSIS toolbox
If you add any of those components to the data flow, you will see the following notification every time you will try to open its editor.
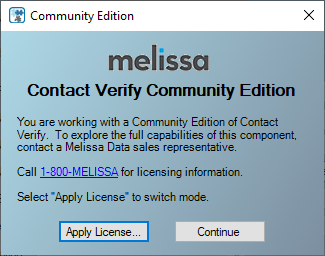
Figure 5 – Community edition notification
As mentioned in the Melissa SQL Server editions page, few features are available in the community edition:
- Contact Verify component: Only address parsing, name parsing, email correction, and phone formatting operations can be performed
- Profiler: Max 50000 records limit
- MatchUp: Max 50000 records limit
Note: to run examples, we exported a flat-file from AdventureWorks2017 database, using the following SQL Statement:
|
1 2 3 4 5 6 7 8 9 10 11 12 13 14 15 16 17 18 19 |
SELECT [BusinessEntityID] ,[Title] ,[FirstName] ,[MiddleName] ,[LastName] ,[Suffix] ,REPLACE(LTRIM(RTRIM(ISNULL([FirstName],'') + ' ' + ISNULL([MiddleName],'') + ' ' + ISNULL([LastName],''))),' ',' ') as [Name] ,[JobTitle] ,[PhoneNumber] ,[PhoneNumberType] ,[EmailAddress] + '.' as [EmailAddress] ,[EmailPromotion] ,[AddressLine1] ,[AddressLine2] ,[City] ,[StateProvinceName] ,[PostalCode] ,[CountryRegionName] FROM [AdventureWorks2017].[HumanResources].[vEmployee] |
Note: We concatenated first, middle and last name to test the name parser. Besides, we added a “.” at the end of the email address to test the email correction feature.
Contact Verify Component
As mentioned before, there are only four features of the contact verify component available in the community edition:
- Name parsing: This feature is used to split a full name filed into first, middle, and last name fields. Also, it extracts additional information as title, prefix, and suffix. In the community edition, we are able only to extract the last name
- Address parsing: This feature is used to extract additional information from the address field, such as the street name, suffix, mailbox name, and others
- Phone formatting: This feature is used to change the phone number formatting
- Email correction: This feature is used to remove meaningless characters from an email address
To test this component, we create a new SSIS project and add the following components:
- Flat File Connection Manager: used to establish a connection with the flat file we generated from the AdventureWorks2017 database
- OLE DB Connection Manager: used to establish a connection with Tempdb (we will use it as destination)
- Data flow task: where we will add the following components:
- Flat File Source: read from the flat file connection manager
- MD Contact Verify: Melissa contact verify component
- OLE DB Destination: where data will be loaded
To configure the Contact Verify component, first, we have to specify the Melissa data directory. In the Contact Verify editor, go to “File > Advanced Configuration”.
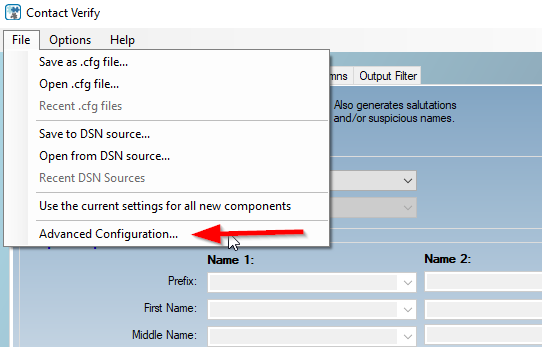
Figure 6 – Opening advanced configuration
Make sure that the data file path is set to “C:\Program Files\Melissa DATA\SQT\Data”, which is the default data file path.
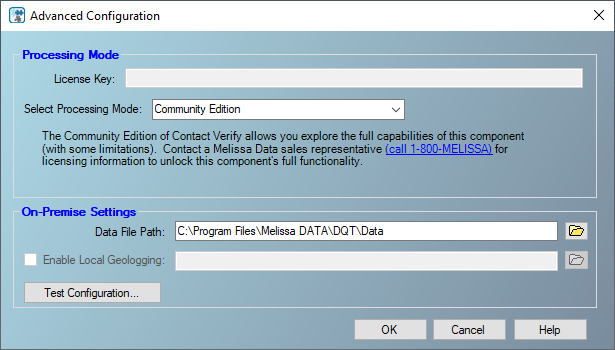
Figure 7 – Advanced configuration form
Now, we will first configure the name parsing feature. In the contact verify editor, we select open the “Name” tab page. Then, we should specify the input Name column and the output Last name column, as shown in the image below.
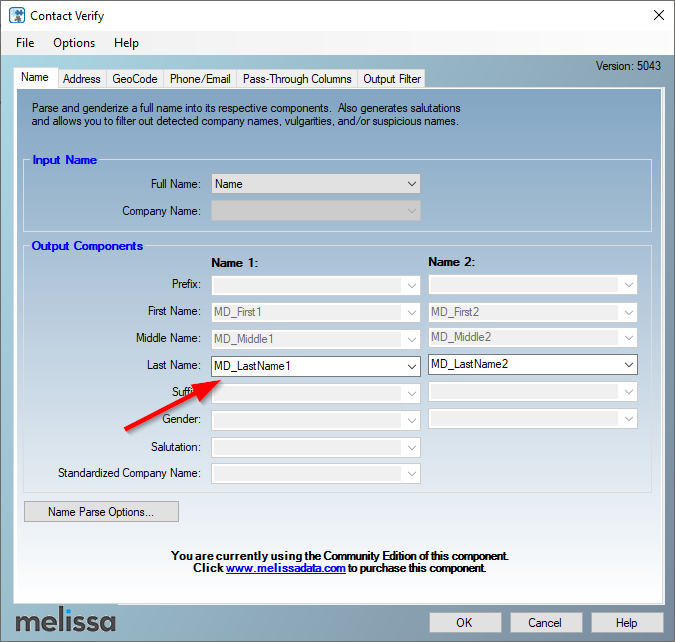
Figure 8 – Name parsing
Note that even first name and middle name output column are specified by default, they will not generate any data in the community edition. Besides, “Name 2” columns generate data if two names exist in the name field.
Next, we should select the “Address” tab page to configure address parsing. Then, we should specify all available input columns, as shown in the image below.

Figure 9 – Address parsing input columns
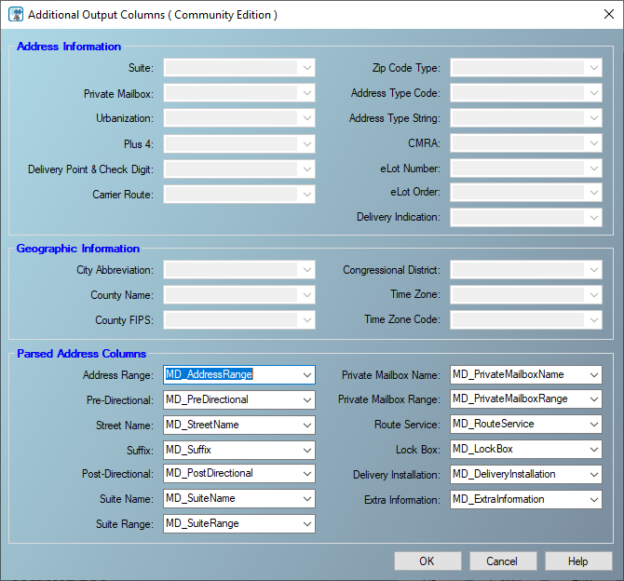
Now, we should press on the “Additional Output Columns” button to specify the output columns generated.

Figure 10 – Parsed address columns
You will note that all properties related to the enterprise edition are disabled.
Next, we must select the “Phone/Email” tab page to configure the phone formatting and the email correction feature. As shown below, we should specify the input phone and email columns, the output columns, and the desired phone format.
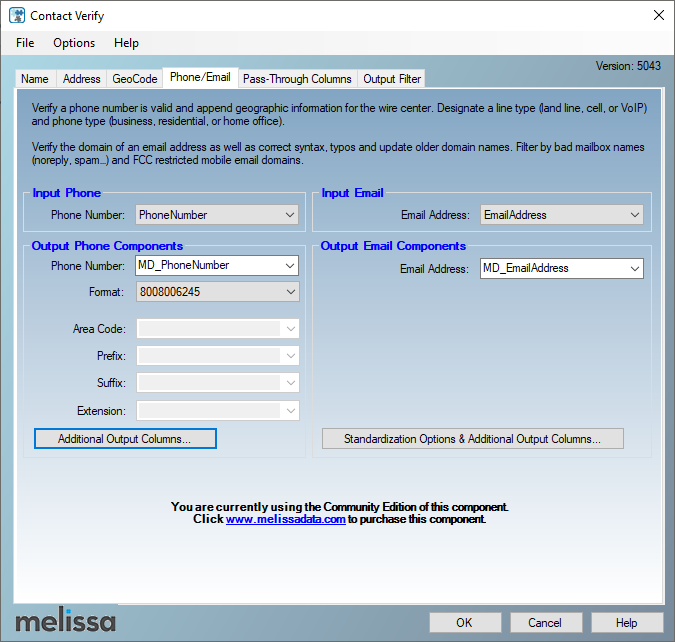
Figure 11 – Phone/Email configuration
Next, we must select the “Pass-Through Columns” tab page, to specify what are the columns in the input buffer we need to add to the output buffer.
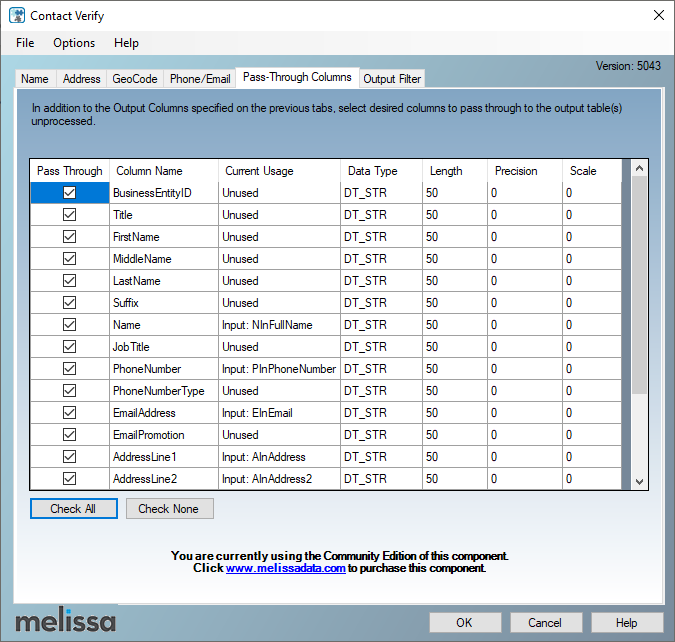
Figure 12 – Pass-through columns
The Contact Verify component allows adding conditional filters to the generated output, which is not supported in the community edition. You can check that in the “Output filter” tab page, where you can only change the output name.
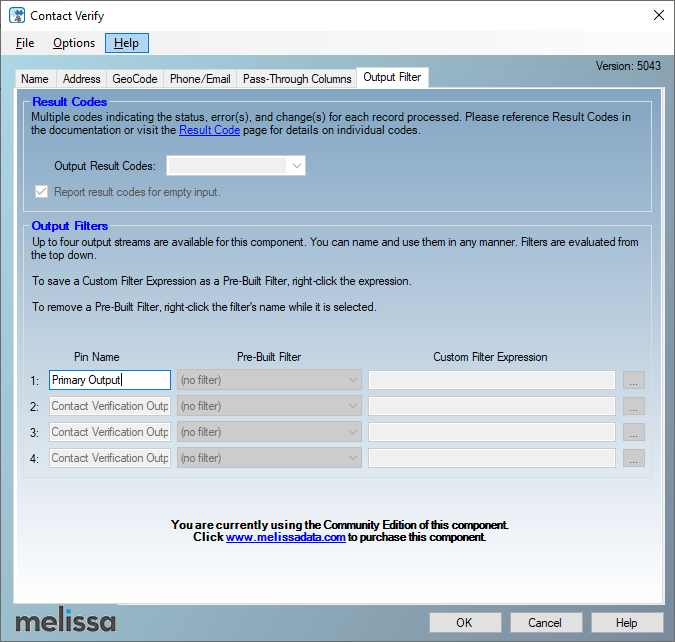
Figure 13 – Output filter
After configuring the MD Contact Verify component, we create a new destination table from the OLE DB destination component using by clicking on the “New” button.
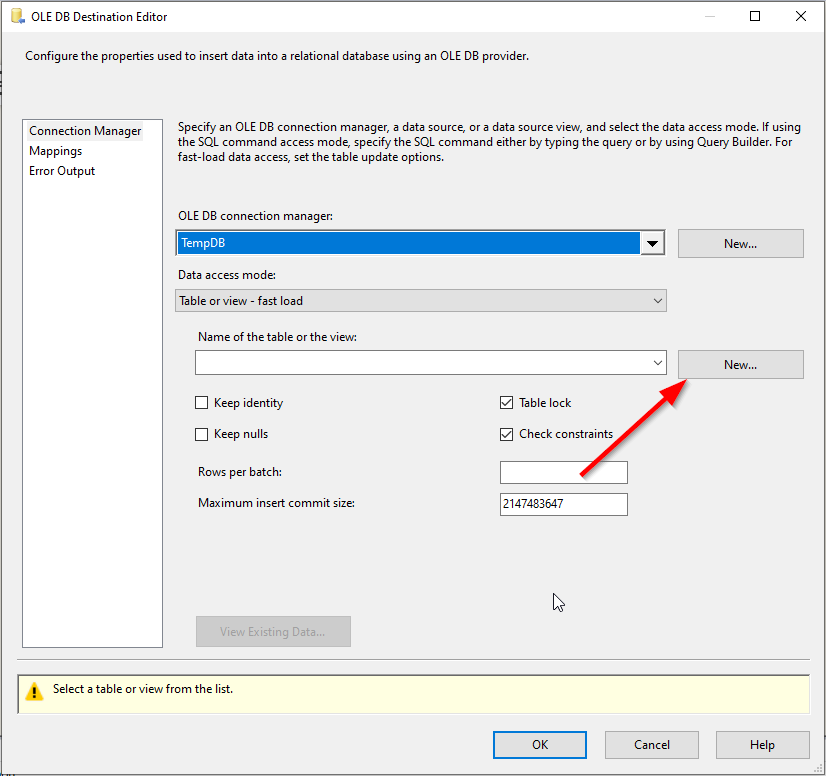
Figure 14 – Creating a new destination table
In the end, the data flow task should look like the following:

Figure 15 – Data flow task
After executing the package, we can see the component impact from the result table, as shown in the following screenshots:
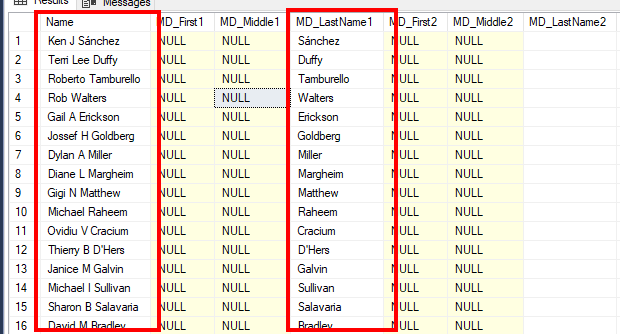
Figure 16 – Name parsing result
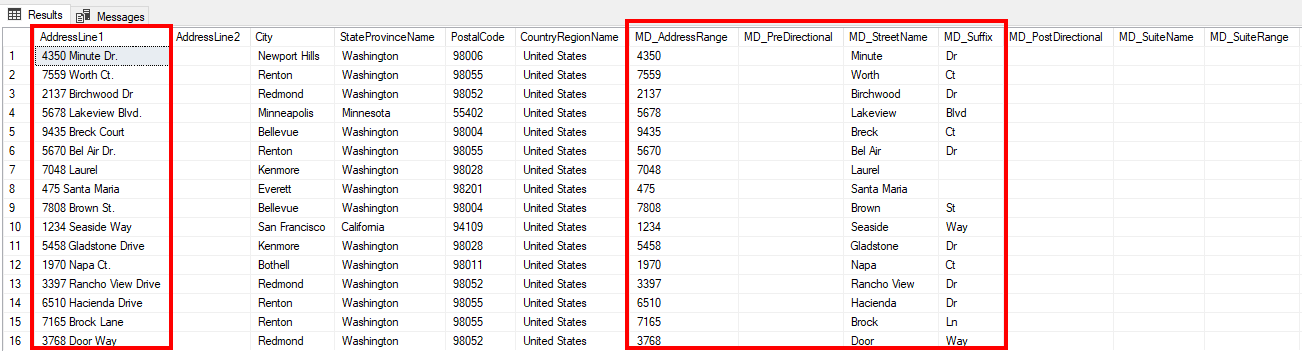
Figure 17 – Address parsing result
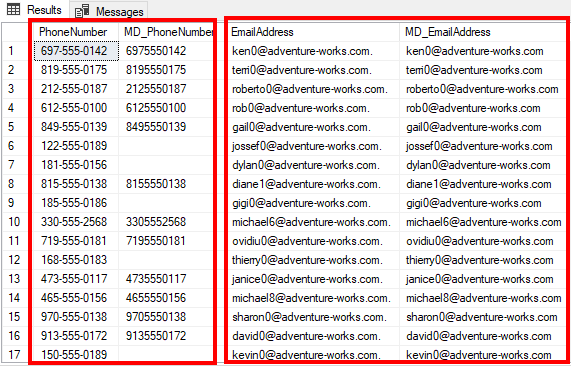
Figure 18 – Phone formatting and email correction result
Profiler component
The second Melissa data quality component is MD Profiler. It is a data profiling component similar to the SSIS data profiling task. This component is simple; you should select the input, pass-through, and result columns. And each profile data is generated within a separate output, as shown in the screenshots below. Besides, you can perform some analysis on how the data processing is complete and save the profile to an external file.
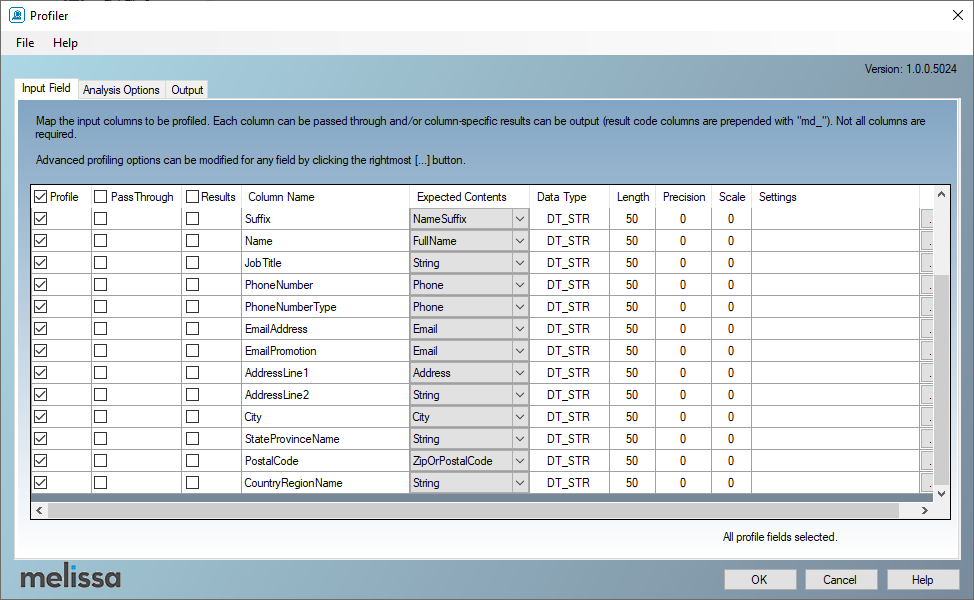
Figure 19 – Select input columns
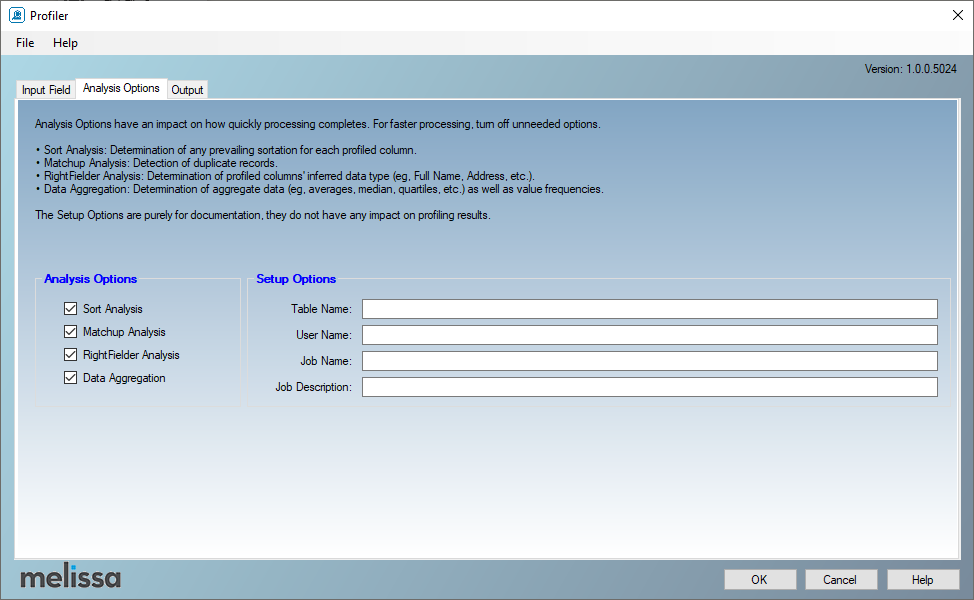
Figure 20 – Select needed analysis
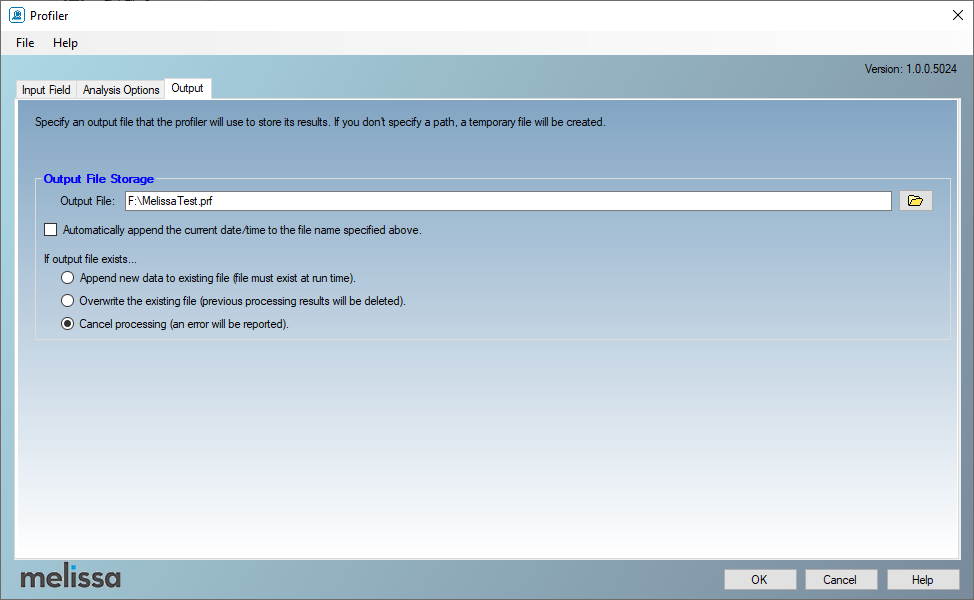
Figure 21 – Configure profile output

Figure 22 – The generated data profile outputs
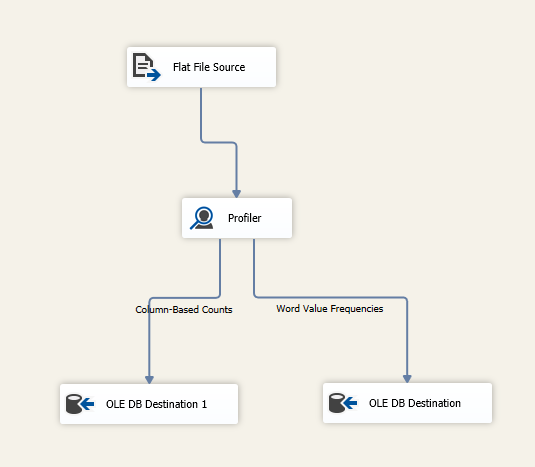
Figure 23 – Linking profile output to a destination
Even if this component is mentioned within the available features of the community edition. It still not working correctly since it may not accept a community License key.
Matchup component
The third Melissa data quality free component is the Matchup component. This component is similar to the SSIS lookup transformation but with a de-duplication feature. De-duplication is performed based on match codes ruleset. In the community edition, only nine-match codes are available.
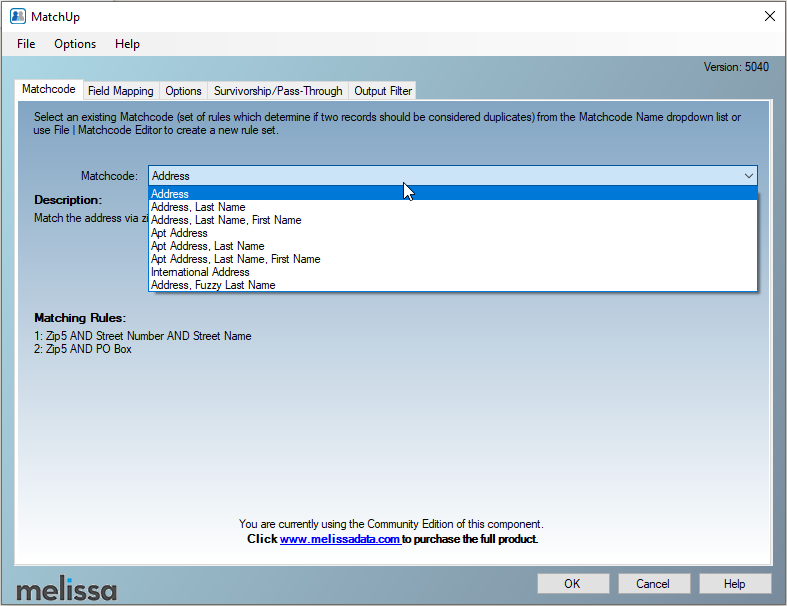
Figure 24 – Available Matchcode
To perform lookups, you should add a data source and link it to the Lookup component input as shown below.

Figure 25 – Selecting Matchup component input type
Conclusion
In this article, we talked briefly about data quality and how to improve it in SQL Server Integration Services (SSIS). We illustrated the Community edition of Melissa data quality and demonstrated the available components; Contact Verify was fully explained while we didn’t provide much information on Profiler and Matchup since they need a separate article. Based on the demonstration, community edition is only used for demonstration while we should buy the enterprise edition since it contains much more powerful tools that we may need at the enterprise level.

Besides working with SQL Server, he worked with different data technologies such as NoSQL databases, Hadoop, Apache Spark. He is a MongoDB, Neo4j, and ArangoDB certified professional.
On the academic level, Hadi holds two master's degrees in computer science and business computing. Currently, he is a Ph.D. candidate in data science focusing on Big Data quality assessment techniques.
Hadi really enjoys learning new things everyday and sharing his knowledge. You can reach him on his personal website.
View all posts by Hadi Fadlallah
- An overview of SQL Server monitoring tools - December 12, 2023
- Different methods for monitoring MongoDB databases - June 14, 2023
- Learn SQL: Insert multiple rows commands - March 6, 2023