

In this article we are going to talk about Static Data Masking, a new feature for the SQL Databases in SSMS. Static Data Masking feature previously was available only for the Azure SQL DB.
Database administrators are responsible for database security and compliance issues. In a normal workflow, we used to have multiple environments for applications such as Production, Staging, UAT, Dev, and Sandbox. It is a regular task for the DBA to refresh the lower (staging, test, UAT etc.) environments with a backup of the production database backup. Sometimes we need to share the database backup with the external vendors as well. The database may contain critical information such as Personally Identifiable Information (PII data) such as email address, contact information, national id number etc. We might have other sensitive information such as bank account number, credit card number, CVV etc. which we do not want anyone to access. We need to be compliant with GDPR, PCI, and SOX regulatory compliance as well.
If we restore the database to lower environment, all of the data gets transferred to the lower environment which put our critical data at a risk since we do not have security or encryption enabled at that level. It may be a requirement to mask or shuffle the data prior to a database restore.
Consider the below example, where our production database has sensitive credit card information and we have performed a database restore to dev, UAT and sandbox environment.

You can see here that data is transferred to all environments, which makes our data accessible to a large audience and at risk too.
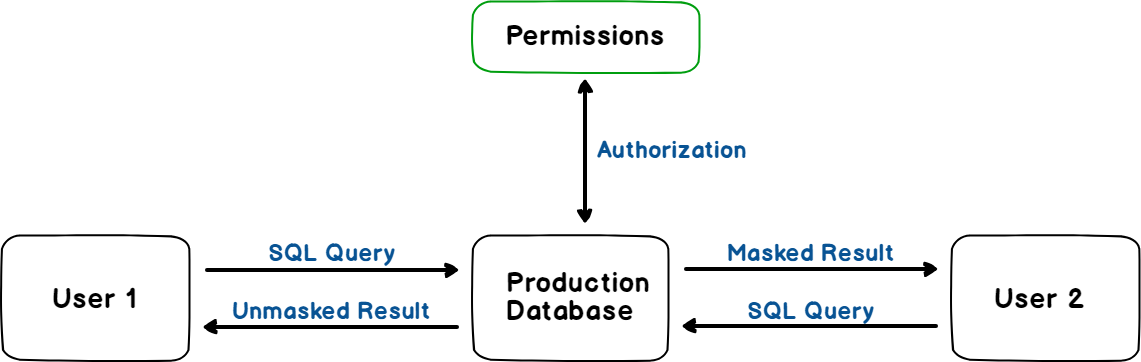
In SQL Server 2016, we come across a new solution ‘Dynamic Data Masking’ to prevent unauthorized users to access the defined sensitive information. We need to define curtails rules to mask the data. When any user request for the data, SQL Server checks his access and if he is not having necessary permission, he gets masked data. In this process, there are no changes in the source data. But this does not satisfy our case described above.
SSMS 18.0 contains the Static Data Masking feature for the SQL Databases. Previously it was available for the Azure SQL DB only. Static data masking creates a copy of the database and applies the data transformation rules on it. We can backup this masked database to lower environments so that sensitive data is not transferred to the other end. We can use this features for the databases since SQL Server 2012.
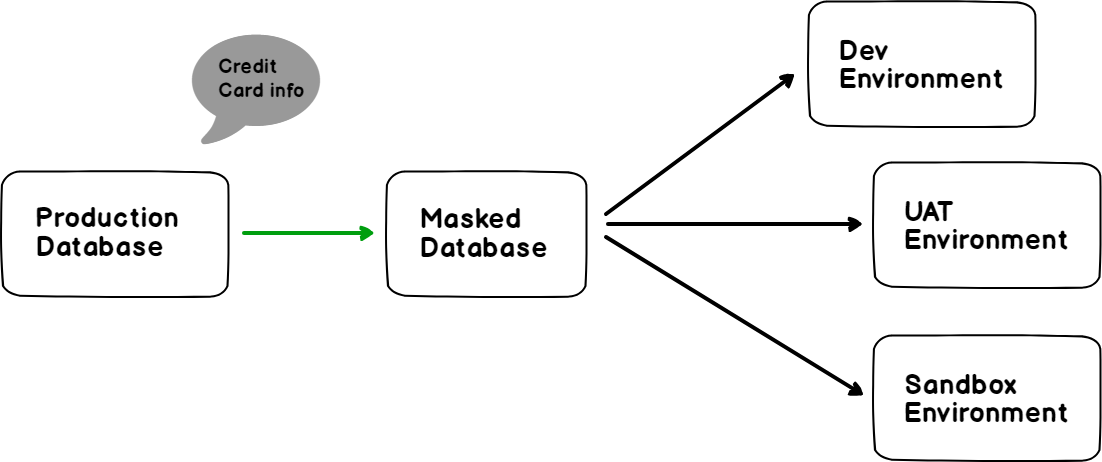
In the above diagram, we can see that there is no sensitive data information is transferred to the other environments using the static data masking.
We can use the Static Data Masking for the various purpose as below
- Preparing database environments other than production
- Database development
- Database troubleshooting
- Sharing data with third-party vendors
Worked example
Let us understand static data masking using an example.
First, create a database ‘StaticDemo’ along with the table. Insert sample data into it using the below query. This table contains DOB, Email address and the credit card no which we want to mask using this feature. To create the example, see the script in Appendix A
Right click on the database name -> Tasks-> Mask Database (Preview)
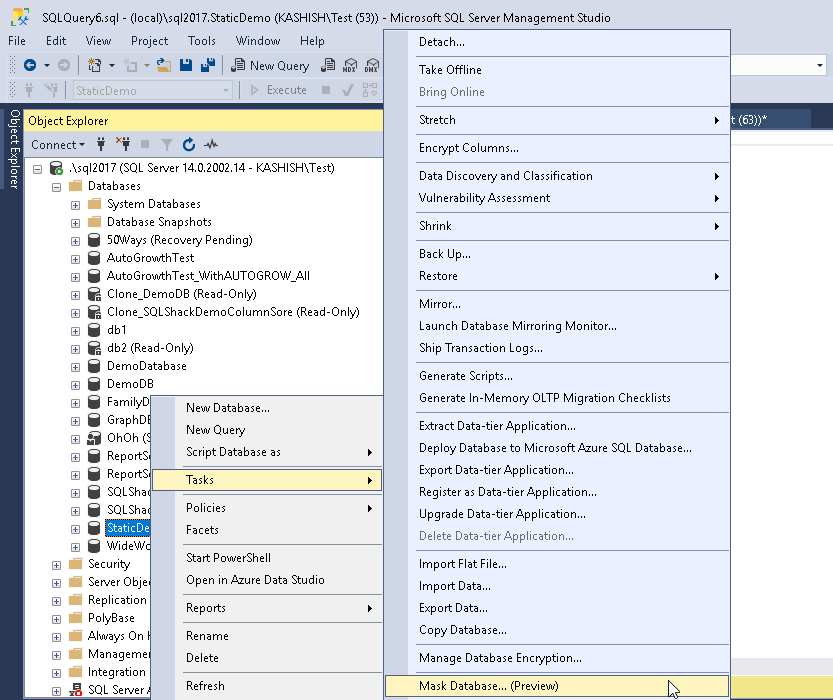
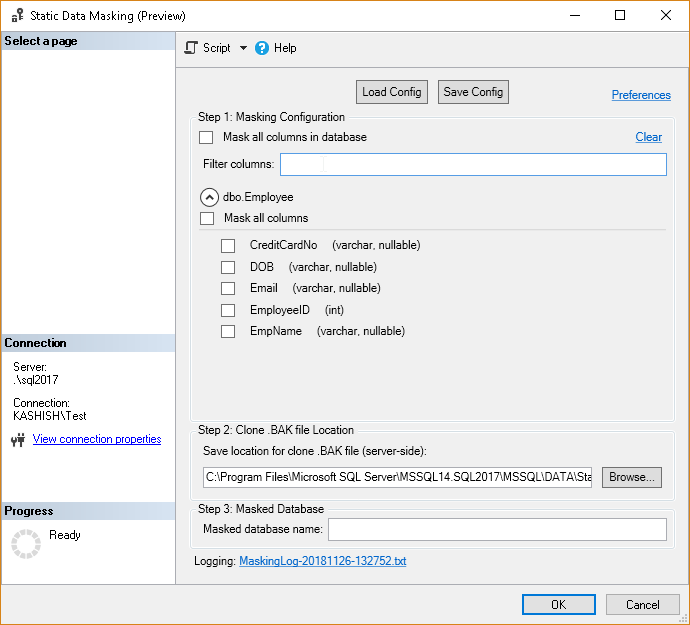
This launches the Static Data Masking (Preview) wizard as shown here.
In this wizard, you can see Step1: Masking Configuration. Under ‘Masking Configuration’ we can either choose to mask all columns in the database. Ideally, we do not want to mask all columns of the database.
Below this, we can filter columns as well. We can see all tables eligible for this under the filtered columns as well…
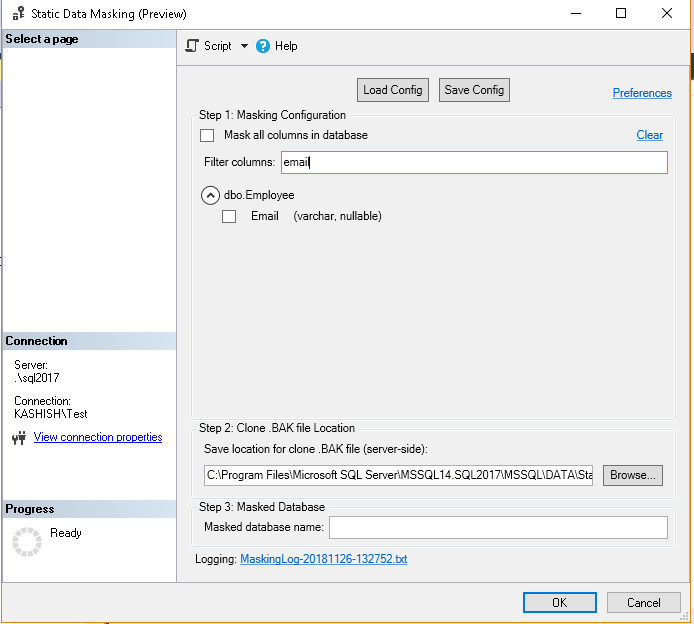
In the filtered columns, we can do an inline search that means as soon as we write something in the text box, we get tables containing columns with those names. For example, in below image, we type email and it gives the table and that column details.
If we select all columns for this table, we can see the error for the columns which are not suitable for this data masking. We can see here that identity columns are not eligible for the static data masking.

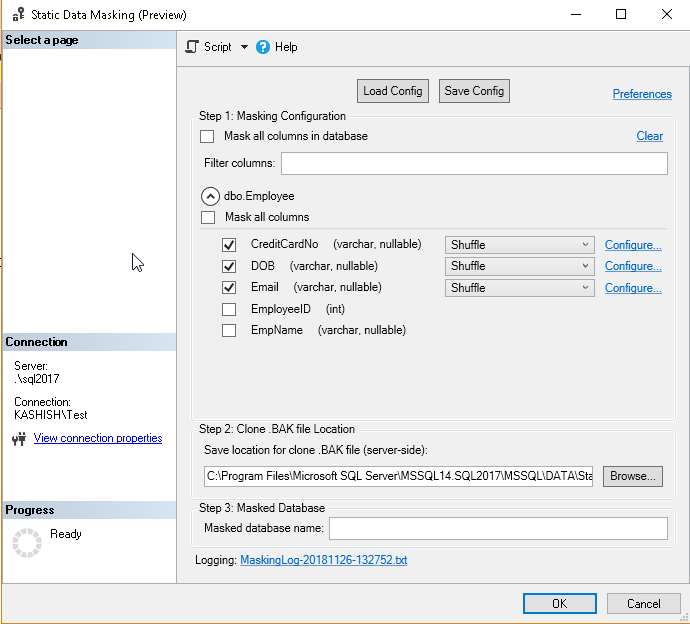
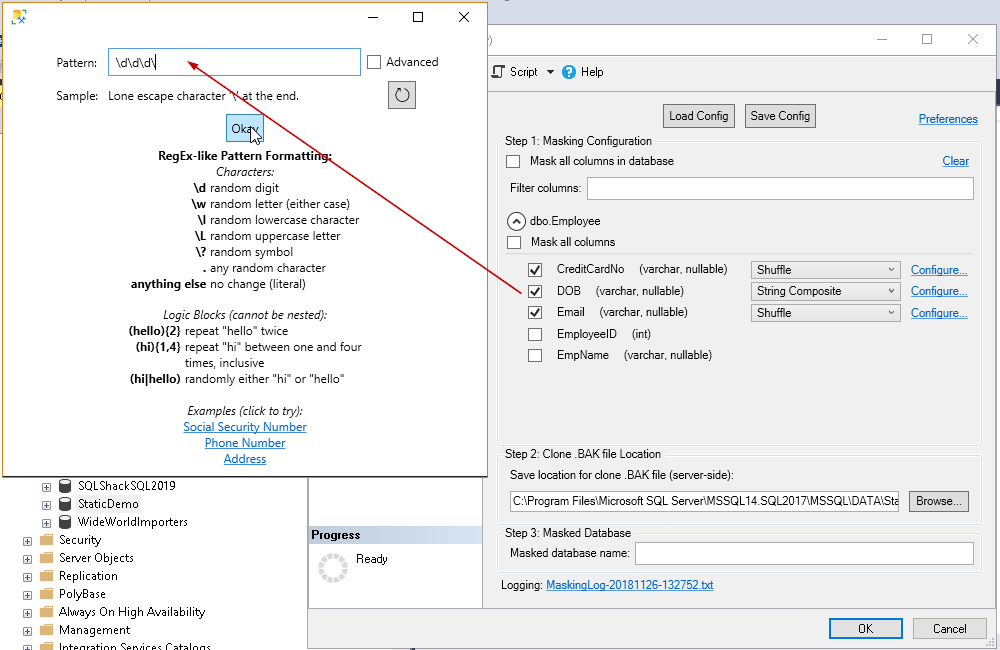
Now, just select the columns on which we want to apply static data masking. We can see that for all the selected columns, it shows the actions as ‘shuffle’ and there is a configure option against each column selected.
There are 5 masking functions available.
- Null: it replaces the data for that particular column with NULL values
- Single Value masking: in this masking, we specify a single value and that value will be copied to all data rows for a particular column
- Shuffle: In this masking function, values are shuffled to new rows
- Group Shuffle: in this shuffle, it binds several columns together in a shuffling group
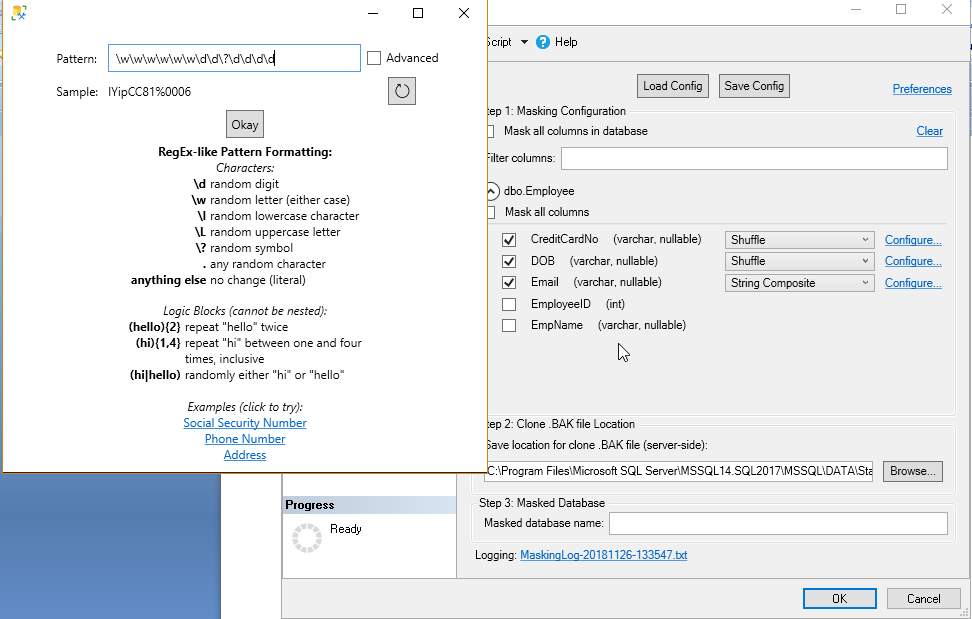
- String Composite: we define string format and values will be replaced as per the specified string
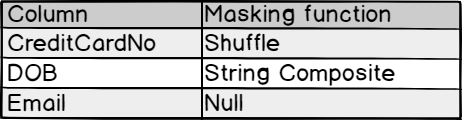
By default, it selects for the shuffle masking function. We can change it from the drop-down list. Let us change it as below for our data
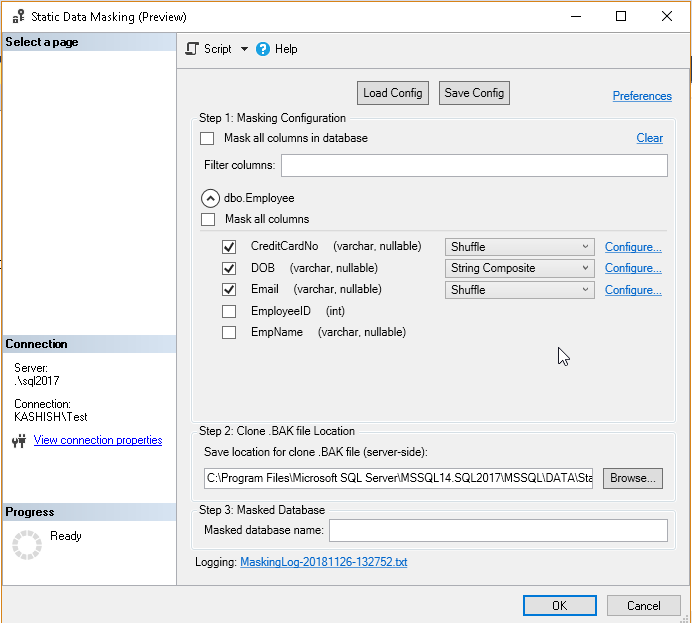
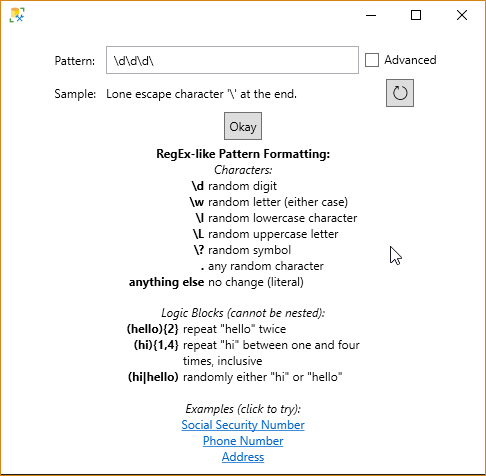
For the string composite, we need to define the string format. To do so, click on the configure and it opens up the pop-up screen.
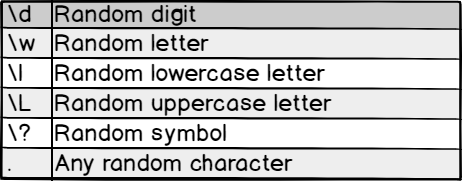
Let us define the string and click on ‘OK’. I will leave an extra ‘\’ here to see how it behaves during the static data masking activity.
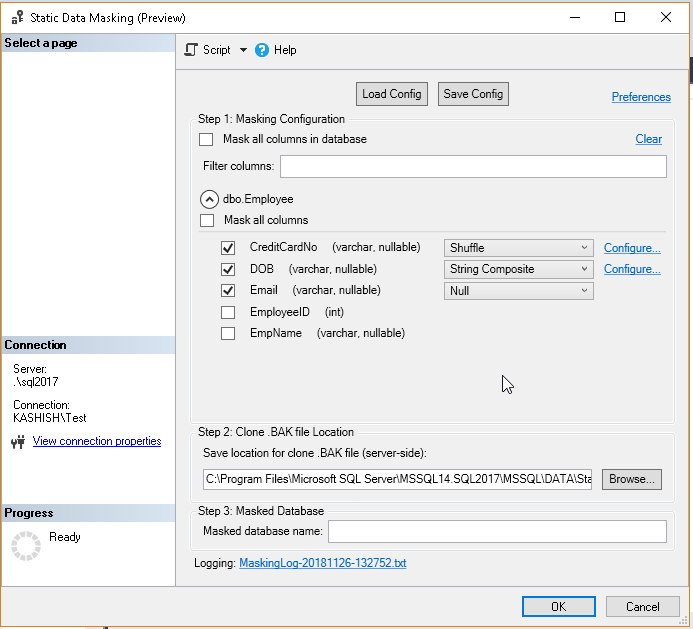
In step 2, we can choose the save the backup location for the clone .bak file. By default, it is the default location set up at the instance level, however, we can change the location here as per our requirement.
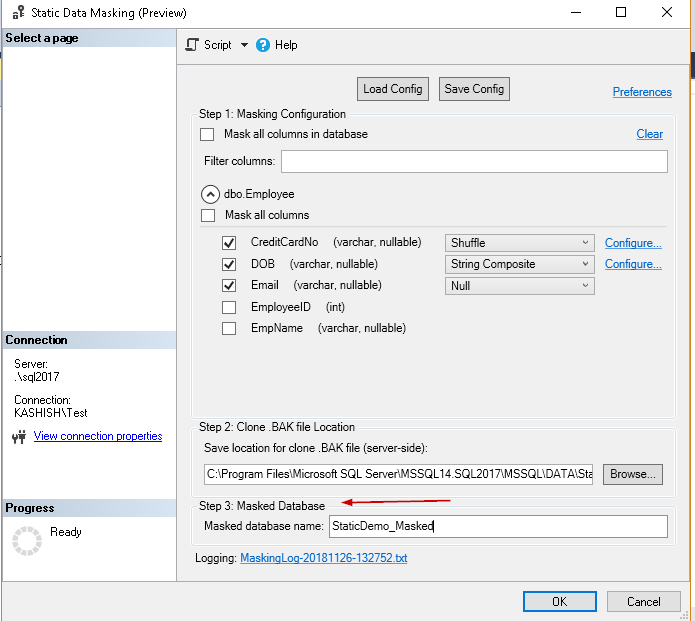
Next step is to specify the name of the masked database in the text box shown below.
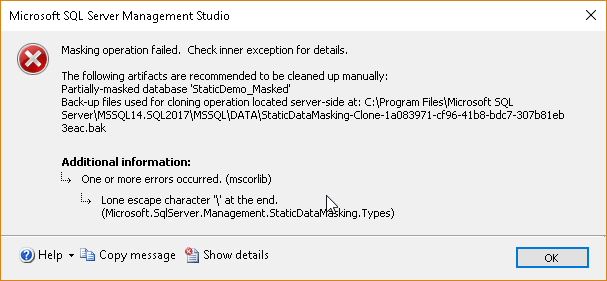
Let us click on to start the static data masking process. We get the below error message
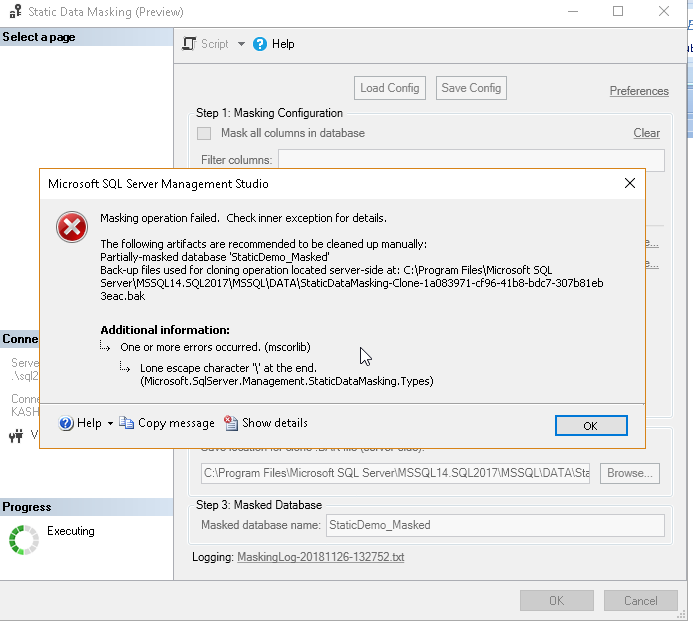
Let me explain the error message.
It asks to remove the below artifacts manually.
-
Partially masked database ‘StaticDemo_Masked’

-
Backup file used for cloning operation location at ‘…’


I generated this error intentionally to give you more understanding. I have performed this static data masking for this database prior as well for testing purpose, so it asks us to remove that masked databases along with the backup file used for cloning operation manually.
- Long escape character ‘\’ at the end:
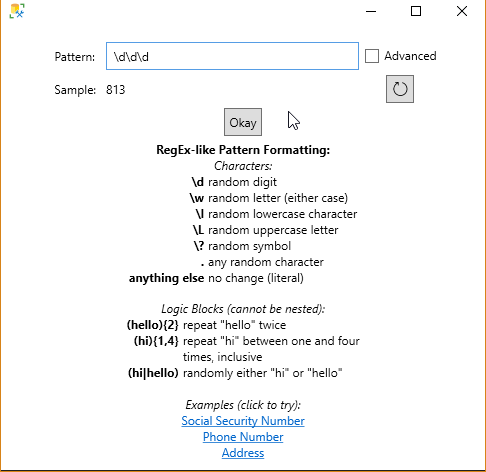
This is due to the ‘\’ placed during the string masking function for the DOB column. Therefore, go to configure option against the DOB column and remove the ‘\’ at the end.
After removing the ‘\’ character, we can see sample value as well below the pattern.
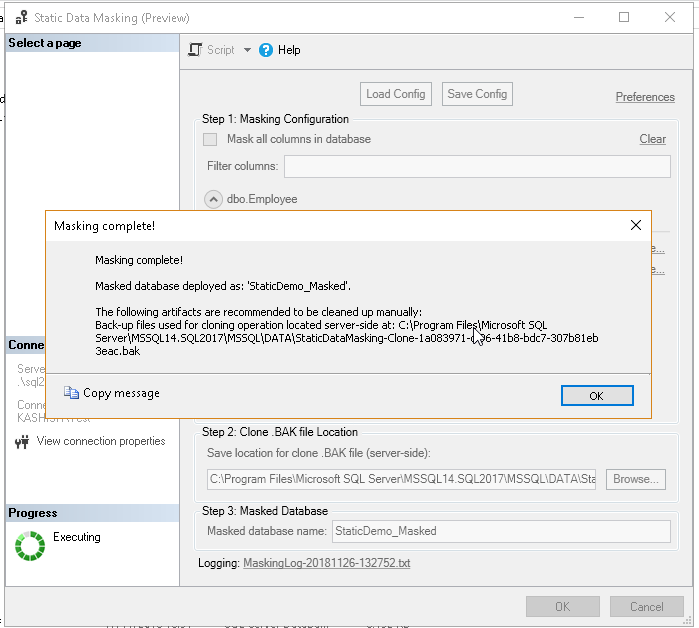
Let go back and click on Ok to apply the static data masking. We can see the message ‘Masking complete’.
We also get a message to clean up the backup file used for the cloning operation.
Let us view the table on both the Original database and the masked database.
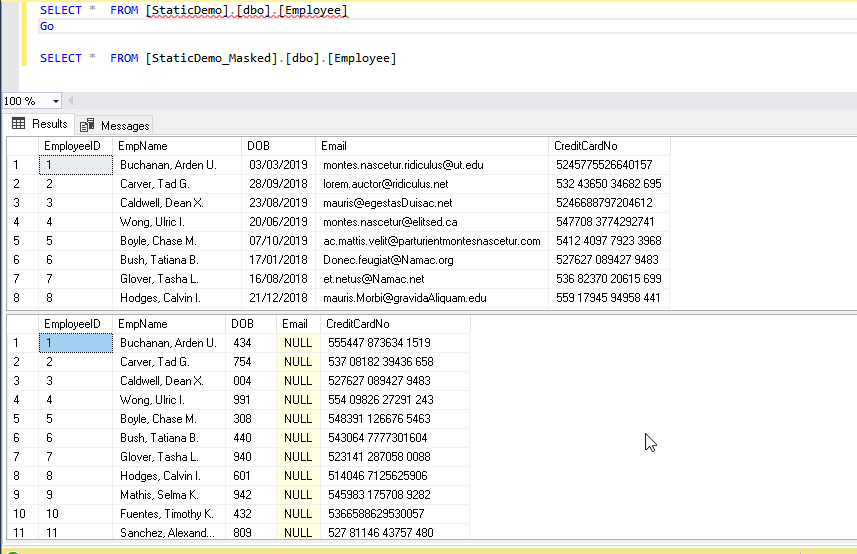
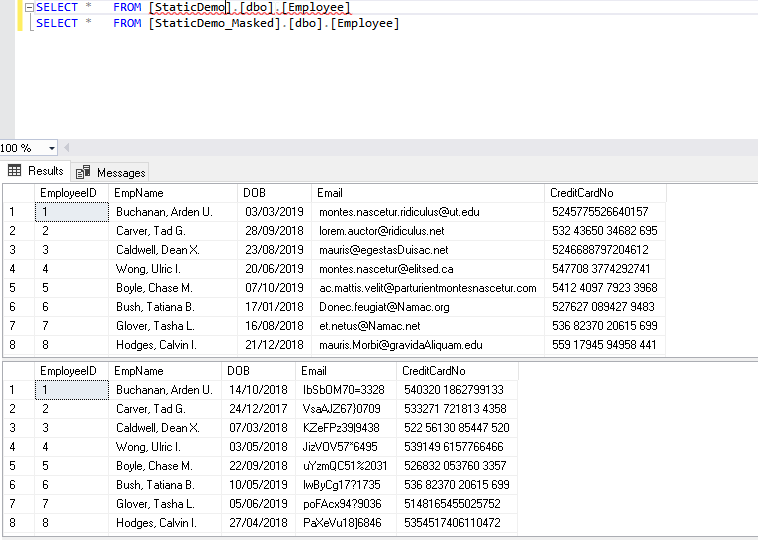
You can notice the difference, in the data, for the column on which we applied the static data masking functions. We can change and apply the static data masking function as per our requirements. For example, let me change the Email to below function.
And we can see the difference in the masked database.
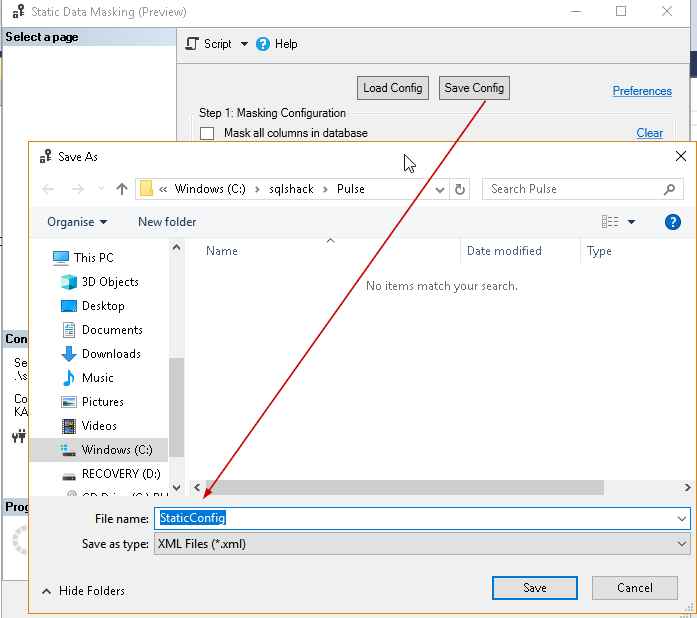
Configuration options:
We can save the masking configuration to an XML file. This XML file can be used later to apply the masking functions directly without doing configuration again. Click on the ‘Save Config’ and provide a location along with filename to save it. We can use ‘load config’ to load an existing configuration XML file.
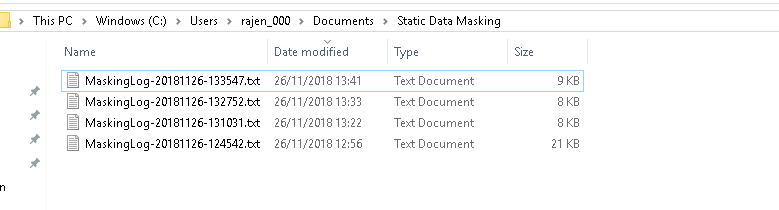
Masking log:
‘Static Data Masking’ creates a log file inside the document folder. We can see the log file name for that particular operation at the bottom of the configuration wizard

In the document folder, there is a folder ‘Static Data Masking’ and we can see several log file. However, each log file shows one operation of the data masking activity.
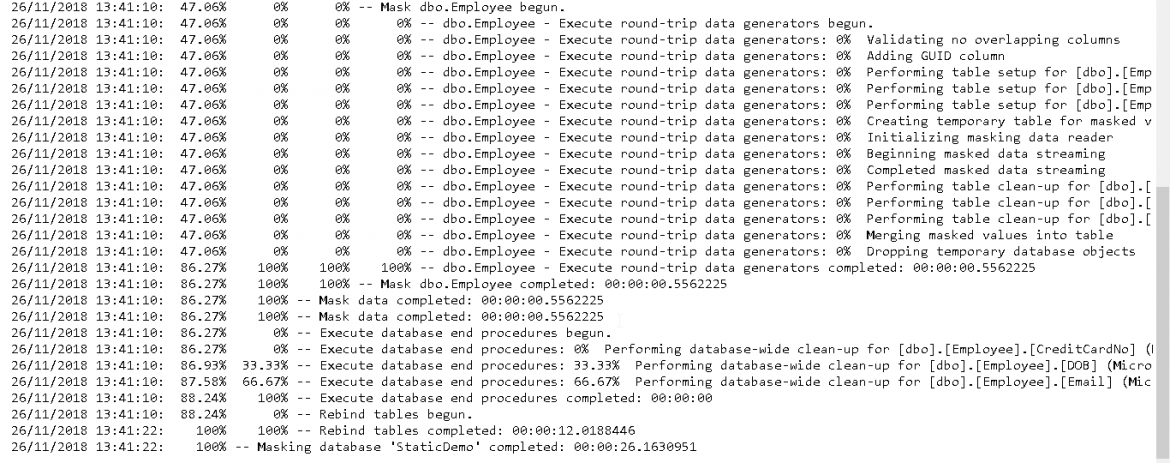
Open the log file and we can see the detailed progress of the operation. In the screenshot, we can see high-level operation below.
- Begin database clone
- Backup Original database
- Create a new database from the database backup.
- Fetch and adjust Database schema, column lengths
- Applies masking for the specified table and columns
- Bring Clone database online

Note:
We cannot revert up to the original state in the masked static database, however, we do not apply changes in the original database.
Conclusion:
Static data masking is a useful feature for the database administrator to protect the sensitive information in the database. We can easily mask databases and use that copy to restore the database on the other database environments.
Appendix A
|
1 2 3 4 5 6 7 8 9 10 11 12 13 14 15 16 17 18 19 20 21 22 23 24 25 26 27 28 29 30 31 32 33 34 35 36 37 38 39 40 41 42 43 44 45 46 47 48 49 50 51 52 53 54 55 56 57 58 59 60 61 62 63 64 65 66 67 68 69 70 71 72 73 74 75 76 77 78 79 80 81 82 83 84 85 86 87 88 89 90 91 92 93 94 95 96 97 98 99 100 101 102 103 104 105 106 107 108 109 110 111 112 113 114 115 116 117 118 119 120 121 122 123 124 125 126 127 128 129 130 131 132 133 134 135 136 137 138 139 140 141 142 143 144 145 146 147 148 149 150 151 152 153 154 155 156 157 158 159 160 161 162 163 164 165 166 167 168 169 170 171 172 173 174 175 176 177 178 179 180 181 182 183 184 185 186 187 188 189 190 191 192 193 194 195 196 197 198 199 200 201 202 203 204 205 206 207 208 209 210 211 212 213 214 215 216 217 218 219 220 221 222 223 |
Use USE [StaticDemo] Go IF EXISTS(SELECT 1 FROM sys.tables WHERE object_id = OBJECT_ID('Employee')) BEGIN; DROP TABLE [Employee]; END; GO CREATE TABLE [Employee] ( [EmployeeID] INTEGER NOT NULL IDENTITY(1, 1), [EmpName] VARCHAR(255) NULL, [DOB] VARCHAR(255), [Email] VARCHAR(255) NULL, [CreditCardNo] VARCHAR(255) NULL, PRIMARY KEY ([EmployeeID]) ); GO USE [StaticDemo] GO SET IDENTITY_INSERT [dbo].[Employee] ON GO INSERT [dbo].[Employee] ([EmployeeID], [EmpName], [DOB], [Email], [CreditCardNo]) VALUES (1, N'Buchanan, Arden U.', N'03/03/2019', N'montes.nascetur.ridiculus@ut.edu', N'5245775526640157') GO INSERT [dbo].[Employee] ([EmployeeID], [EmpName], [DOB], [Email], [CreditCardNo]) VALUES (2, N'Carver, Tad G.', N'28/09/2018', N'lorem.auctor@ridiculus.net', N'532 43650 34682 695') GO INSERT [dbo].[Employee] ([EmployeeID], [EmpName], [DOB], [Email], [CreditCardNo]) VALUES (3, N'Caldwell, Dean X.', N'23/08/2019', N'mauris@egestasDuisac.net', N'5246688797204612') GO INSERT [dbo].[Employee] ([EmployeeID], [EmpName], [DOB], [Email], [CreditCardNo]) VALUES (4, N'Wong, Ulric I.', N'20/06/2019', N'montes.nascetur@elitsed.ca', N'547708 3774292741') GO INSERT [dbo].[Employee] ([EmployeeID], [EmpName], [DOB], [Email], [CreditCardNo]) VALUES (5, N'Boyle, Chase M.', N'07/10/2019', N'ac.mattis.velit@parturientmontesnascetur.com', N'5412 4097 7923 3968') GO INSERT [dbo].[Employee] ([EmployeeID], [EmpName], [DOB], [Email], [CreditCardNo]) VALUES (6, N'Bush, Tatiana B.', N'17/01/2018', N'Donec.feugiat@Namac.org', N'527627 089427 9483') GO INSERT [dbo].[Employee] ([EmployeeID], [EmpName], [DOB], [Email], [CreditCardNo]) VALUES (7, N'Glover, Tasha L.', N'16/08/2018', N'et.netus@Namac.net', N'536 82370 20615 699') GO INSERT [dbo].[Employee] ([EmployeeID], [EmpName], [DOB], [Email], [CreditCardNo]) VALUES (8, N'Hodges, Calvin I.', N'21/12/2018', N'mauris.Morbi@gravidaAliquam.edu', N'559 17945 94958 441') GO INSERT [dbo].[Employee] ([EmployeeID], [EmpName], [DOB], [Email], [CreditCardNo]) VALUES (9, N'Mathis, Selma K.', N'16/11/2019', N'magna.Suspendisse@turpisvitaepurus.edu', N'5228441867682248') GO INSERT [dbo].[Employee] ([EmployeeID], [EmpName], [DOB], [Email], [CreditCardNo]) VALUES (10, N'Fuentes, Timothy K.', N'27/09/2019', N'posuere.vulputate@tempusloremfringilla.edu', N'5346056688214018') GO INSERT [dbo].[Employee] ([EmployeeID], [EmpName], [DOB], [Email], [CreditCardNo]) VALUES (11, N'Sanchez, Alexander B.', N'01/09/2019', N'libero.lacus.varius@loremfringillaornare.co.uk', N'5521582922069592') GO INSERT [dbo].[Employee] ([EmployeeID], [EmpName], [DOB], [Email], [CreditCardNo]) VALUES (12, N'Blackburn, Chandler W.', N'19/11/2019', N'convallis@Vestibulumut.net', N'532795 698123 1366') GO INSERT [dbo].[Employee] ([EmployeeID], [EmpName], [DOB], [Email], [CreditCardNo]) VALUES (13, N'Pugh, Craig I.', N'26/04/2018', N'tincidunt.neque.vitae@elitpede.edu', N'549 21386 03141 377') GO INSERT [dbo].[Employee] ([EmployeeID], [EmpName], [DOB], [Email], [CreditCardNo]) VALUES (14, N'Burks, Wylie Y.', N'07/06/2019', N'faucibus.ut@vitaenibhDonec.co.uk', N'5424 9213 5956 2216') GO INSERT [dbo].[Employee] ([EmployeeID], [EmpName], [DOB], [Email], [CreditCardNo]) VALUES (15, N'Charles, Leonard Y.', N'30/04/2019', N'Aliquam.vulputate.ullamcorper@pede.edu', N'542874 997111 6384') GO INSERT [dbo].[Employee] ([EmployeeID], [EmpName], [DOB], [Email], [CreditCardNo]) VALUES (16, N'Alvarado, Ezekiel U.', N'19/06/2019', N'sit.amet.ante@ligulaAenean.ca', N'5194535164124752') GO INSERT [dbo].[Employee] ([EmployeeID], [EmpName], [DOB], [Email], [CreditCardNo]) VALUES (17, N'Davis, Alice Y.', N'15/02/2018', N'semper.rutrum@liberoDonec.net', N'5575 5555 9300 3350') GO INSERT [dbo].[Employee] ([EmployeeID], [EmpName], [DOB], [Email], [CreditCardNo]) VALUES (18, N'Gomez, Kirby T.', N'16/10/2018', N'pellentesque.eget@magnaa.com', N'527612 285968 0850') GO INSERT [dbo].[Employee] ([EmployeeID], [EmpName], [DOB], [Email], [CreditCardNo]) VALUES (19, N'Morrison, Whilemina R.', N'09/05/2019', N'Quisque.tincidunt@anteblandit.co.uk', N'5474808598088096') GO INSERT [dbo].[Employee] ([EmployeeID], [EmpName], [DOB], [Email], [CreditCardNo]) VALUES (20, N'Holden, Lucius B.', N'09/01/2019', N'ac.arcu@idante.co.uk', N'548391 126676 5463') GO INSERT [dbo].[Employee] ([EmployeeID], [EmpName], [DOB], [Email], [CreditCardNo]) VALUES (21, N'Campos, Sebastian V.', N'25/06/2018', N'imperdiet.ullamcorper@Phasellus.com', N'5354517406110472') GO INSERT [dbo].[Employee] ([EmployeeID], [EmpName], [DOB], [Email], [CreditCardNo]) VALUES (22, N'Roberts, Derek O.', N'21/07/2019', N'egestas@ridiculusmusDonec.com', N'5448881645595598') GO INSERT [dbo].[Employee] ([EmployeeID], [EmpName], [DOB], [Email], [CreditCardNo]) VALUES (23, N'Cantu, Rhiannon A.', N'28/07/2019', N'leo.Vivamus@et.ca', N'535 55813 46994 584') GO INSERT [dbo].[Employee] ([EmployeeID], [EmpName], [DOB], [Email], [CreditCardNo]) VALUES (24, N'Peters, Wendy H.', N'24/08/2019', N'nibh.Phasellus@arcuvelquam.net', N'547045 1220456052') GO INSERT [dbo].[Employee] ([EmployeeID], [EmpName], [DOB], [Email], [CreditCardNo]) VALUES (25, N'Dean, Ulla S.', N'23/12/2017', N'Quisque.fringilla@venenatisvelfaucibus.net', N'525 54236 67705 334') GO INSERT [dbo].[Employee] ([EmployeeID], [EmpName], [DOB], [Email], [CreditCardNo]) VALUES (26, N'Hunt, Jameson Q.', N'06/07/2018', N'consectetuer.adipiscing@parturientmontes.net', N'5505261570780350') GO INSERT [dbo].[Employee] ([EmployeeID], [EmpName], [DOB], [Email], [CreditCardNo]) VALUES (27, N'Tyson, Raphael M.', N'30/11/2018', N'porttitor.tellus.non@fames.co.uk', N'555 89458 10660 069') GO INSERT [dbo].[Employee] ([EmployeeID], [EmpName], [DOB], [Email], [CreditCardNo]) VALUES (28, N'Harding, Cullen T.', N'19/05/2019', N'Suspendisse.ac@nullaat.net', N'5430 7406 7098 3253') GO INSERT [dbo].[Employee] ([EmployeeID], [EmpName], [DOB], [Email], [CreditCardNo]) VALUES (29, N'Barton, Christopher C.', N'26/02/2019', N'sodales@aliquamadipiscinglacus.net', N'522424 0049547475') GO INSERT [dbo].[Employee] ([EmployeeID], [EmpName], [DOB], [Email], [CreditCardNo]) VALUES (30, N'Lyons, Vladimir N.', N'09/11/2018', N'in.cursus.et@et.org', N'5365 5380 2045 1446') GO INSERT [dbo].[Employee] ([EmployeeID], [EmpName], [DOB], [Email], [CreditCardNo]) VALUES (31, N'Chang, Kelly G.', N'08/10/2018', N'risus.Nunc.ac@tinciduntnunc.co.uk', N'537 08182 39436 658') GO INSERT [dbo].[Employee] ([EmployeeID], [EmpName], [DOB], [Email], [CreditCardNo]) VALUES (32, N'Moody, Branden J.', N'17/05/2018', N'consequat@justoeuarcu.edu', N'533271 721813 4358') GO INSERT [dbo].[Employee] ([EmployeeID], [EmpName], [DOB], [Email], [CreditCardNo]) VALUES (33, N'Hodge, Stone H.', N'27/02/2018', N'odio.semper@sagittisDuisgravida.net', N'526832 053760 3357') GO INSERT [dbo].[Employee] ([EmployeeID], [EmpName], [DOB], [Email], [CreditCardNo]) VALUES (34, N'Conley, Claudia A.', N'18/06/2019', N'natoque@ametornarelectus.com', N'5257752452733327') GO INSERT [dbo].[Employee] ([EmployeeID], [EmpName], [DOB], [Email], [CreditCardNo]) VALUES (35, N'Landry, Quinn H.', N'07/07/2019', N'Curabitur.consequat@feugiatLoremipsum.ca', N'5574656001233356') GO INSERT [dbo].[Employee] ([EmployeeID], [EmpName], [DOB], [Email], [CreditCardNo]) VALUES (36, N'Anthony, Sonya T.', N'09/08/2019', N'ligula.Aliquam@tempus.co.uk', N'5148165455025752') GO INSERT [dbo].[Employee] ([EmployeeID], [EmpName], [DOB], [Email], [CreditCardNo]) VALUES (37, N'Norris, Ingrid K.', N'08/03/2019', N'risus@convallisconvallisdolor.edu', N'541434 518297 8047') GO INSERT [dbo].[Employee] ([EmployeeID], [EmpName], [DOB], [Email], [CreditCardNo]) VALUES (38, N'Wilkins, Arden Q.', N'29/03/2018', N'Etiam.ligula.tortor@risusvarius.org', N'518394 8051131595') GO INSERT [dbo].[Employee] ([EmployeeID], [EmpName], [DOB], [Email], [CreditCardNo]) VALUES (39, N'Mcfadden, Renee M.', N'05/06/2019', N'In.nec@vestibulummassa.net', N'5229812555358607') GO INSERT [dbo].[Employee] ([EmployeeID], [EmpName], [DOB], [Email], [CreditCardNo]) VALUES (40, N'Whitaker, Brynne A.', N'11/12/2017', N'rutrum.lorem@fringillaestMauris.edu', N'549384 3874921345') GO INSERT [dbo].[Employee] ([EmployeeID], [EmpName], [DOB], [Email], [CreditCardNo]) VALUES (41, N'Nixon, Hilda V.', N'14/10/2018', N'adipiscing@sociis.ca', N'524265 908384 0249') GO INSERT [dbo].[Employee] ([EmployeeID], [EmpName], [DOB], [Email], [CreditCardNo]) VALUES (42, N'Petersen, Brooke H.', N'02/11/2019', N'libero.Integer.in@eros.net', N'5393792909312403') GO INSERT [dbo].[Employee] ([EmployeeID], [EmpName], [DOB], [Email], [CreditCardNo]) VALUES (43, N'Mccall, Hall O.', N'06/12/2017', N'lobortis@loremauctorquis.co.uk', N'5449 4354 6280 8607') GO INSERT [dbo].[Employee] ([EmployeeID], [EmpName], [DOB], [Email], [CreditCardNo]) VALUES (44, N'Owens, Vladimir W.', N'02/11/2019', N'urna.Nullam@Sed.com', N'5177 3665 3992 5140') GO INSERT [dbo].[Employee] ([EmployeeID], [EmpName], [DOB], [Email], [CreditCardNo]) VALUES (45, N'Page, Barry Q.', N'18/06/2019', N'neque@quama.org', N'543064 7777301604') GO INSERT [dbo].[Employee] ([EmployeeID], [EmpName], [DOB], [Email], [CreditCardNo]) VALUES (46, N'Reynolds, Unity P.', N'19/05/2018', N'sodales.at.velit@odiovelest.com', N'554 09826 27291 243') GO INSERT [dbo].[Employee] ([EmployeeID], [EmpName], [DOB], [Email], [CreditCardNo]) VALUES (47, N'Bray, Wilma P.', N'15/04/2018', N'vitae.odio@Aliquam.edu', N'531884 0402511963') GO INSERT [dbo].[Employee] ([EmployeeID], [EmpName], [DOB], [Email], [CreditCardNo]) VALUES (48, N'Bender, Ann J.', N'05/07/2018', N'Curae@Nunc.edu', N'539149 6157766466') GO INSERT [dbo].[Employee] ([EmployeeID], [EmpName], [DOB], [Email], [CreditCardNo]) VALUES (49, N'Ford, Colby L.', N'25/07/2018', N'Duis.risus@cursusNunc.org', N'529489 914591 9055') GO INSERT [dbo].[Employee] ([EmployeeID], [EmpName], [DOB], [Email], [CreditCardNo]) VALUES (50, N'Rose, Yoko S.', N'18/10/2019', N'lorem.ut@eratvel.net', N'512436 282655 2329') GO INSERT [dbo].[Employee] ([EmployeeID], [EmpName], [DOB], [Email], [CreditCardNo]) VALUES (51, N'Barnett, Hector M.', N'07/03/2018', N'posuere.vulputate.lacus@velnislQuisque.co.uk', N'5323724082733191') GO INSERT [dbo].[Employee] ([EmployeeID], [EmpName], [DOB], [Email], [CreditCardNo]) VALUES (52, N'Bass, Walker Y.', N'11/12/2017', N'non.magna.Nam@in.com', N'5125996694947225') GO INSERT [dbo].[Employee] ([EmployeeID], [EmpName], [DOB], [Email], [CreditCardNo]) VALUES (53, N'Hopkins, Iola U.', N'19/06/2018', N'consequat.enim@pretiumnequeMorbi.net', N'5303 2948 9560 5923') GO INSERT [dbo].[Employee] ([EmployeeID], [EmpName], [DOB], [Email], [CreditCardNo]) VALUES (54, N'Baldwin, Henry F.', N'26/09/2019', N'interdum.feugiat@duisemper.com', N'5366588629530057') GO INSERT [dbo].[Employee] ([EmployeeID], [EmpName], [DOB], [Email], [CreditCardNo]) VALUES (55, N'Hood, Dieter H.', N'08/11/2018', N'vestibulum.nec@Namconsequatdolor.edu', N'5343 6475 2631 7766') GO INSERT [dbo].[Employee] ([EmployeeID], [EmpName], [DOB], [Email], [CreditCardNo]) VALUES (56, N'Baxter, Linda W.', N'06/05/2018', N'enim.Nunc.ut@ullamcorper.org', N'555447 873634 1519') GO INSERT [dbo].[Employee] ([EmployeeID], [EmpName], [DOB], [Email], [CreditCardNo]) VALUES (57, N'Dickerson, Damian N.', N'01/03/2019', N'arcu.Curabitur@Aenean.edu', N'525290 100682 8118') GO INSERT [dbo].[Employee] ([EmployeeID], [EmpName], [DOB], [Email], [CreditCardNo]) VALUES (58, N'Giles, Marvin Q.', N'18/08/2018', N'Sed.nulla.ante@Sed.org', N'5314024247063589') GO INSERT [dbo].[Employee] ([EmployeeID], [EmpName], [DOB], [Email], [CreditCardNo]) VALUES (59, N'Hart, Gloria S.', N'10/09/2019', N'egestas.a.dui@nibh.net', N'533773 458018 7638') GO INSERT [dbo].[Employee] ([EmployeeID], [EmpName], [DOB], [Email], [CreditCardNo]) VALUES (60, N'Mercer, Chava C.', N'29/10/2018', N'Vivamus.nisi.Mauris@consectetuer.com', N'5267242797077877') GO INSERT [dbo].[Employee] ([EmployeeID], [EmpName], [DOB], [Email], [CreditCardNo]) VALUES (61, N'Gutierrez, Zenaida O.', N'03/05/2018', N'at@luctus.edu', N'533823 980645 1148') GO INSERT [dbo].[Employee] ([EmployeeID], [EmpName], [DOB], [Email], [CreditCardNo]) VALUES (62, N'Rowland, Kuame R.', N'17/12/2018', N'pharetra@urnajusto.net', N'5550473610425243') GO INSERT [dbo].[Employee] ([EmployeeID], [EmpName], [DOB], [Email], [CreditCardNo]) VALUES (63, N'Sandoval, Macon R.', N'01/11/2018', N'vehicula.risus.Nulla@maurisrhoncusid.ca', N'540320 1862799133') GO INSERT [dbo].[Employee] ([EmployeeID], [EmpName], [DOB], [Email], [CreditCardNo]) VALUES (64, N'Buchanan, Valentine L.', N'20/06/2018', N'penatibus.et@mattisornare.edu', N'5320584446775707') GO INSERT [dbo].[Employee] ([EmployeeID], [EmpName], [DOB], [Email], [CreditCardNo]) VALUES (65, N'Mclaughlin, Leilani F.', N'27/11/2018', N'sollicitudin.adipiscing@idnuncinterdum.com', N'543 69175 11155 580') GO INSERT [dbo].[Employee] ([EmployeeID], [EmpName], [DOB], [Email], [CreditCardNo]) VALUES (66, N'Martin, Troy W.', N'20/12/2017', N'ultrices.sit.amet@Nuncut.com', N'527 41178 74192 552') GO INSERT [dbo].[Employee] ([EmployeeID], [EmpName], [DOB], [Email], [CreditCardNo]) VALUES (67, N'Hyde, Cyrus M.', N'18/05/2018', N'sagittis.semper.Nam@pedePraesenteu.org', N'521 54245 03430 706') GO INSERT [dbo].[Employee] ([EmployeeID], [EmpName], [DOB], [Email], [CreditCardNo]) VALUES (68, N'Houston, Shellie V.', N'08/09/2018', N'a.tortor@lectuspede.ca', N'514046 7125625906') GO INSERT [dbo].[Employee] ([EmployeeID], [EmpName], [DOB], [Email], [CreditCardNo]) VALUES (69, N'Lane, Lev N.', N'13/02/2018', N'Sed.eu@sed.org', N'5225433269768363') GO INSERT [dbo].[Employee] ([EmployeeID], [EmpName], [DOB], [Email], [CreditCardNo]) VALUES (70, N'Duffy, Sasha M.', N'20/10/2018', N'velit@Fuscemi.co.uk', N'5339 4286 1856 4169') GO INSERT [dbo].[Employee] ([EmployeeID], [EmpName], [DOB], [Email], [CreditCardNo]) VALUES (71, N'Adkins, Derek Q.', N'25/11/2018', N'mus.Proin.vel@sitametorci.co.uk', N'539667 7760415410') GO INSERT [dbo].[Employee] ([EmployeeID], [EmpName], [DOB], [Email], [CreditCardNo]) VALUES (72, N'Salinas, Burton R.', N'28/12/2017', N'Integer.vulputate@Mauriseu.ca', N'543676 8514183685') GO INSERT [dbo].[Employee] ([EmployeeID], [EmpName], [DOB], [Email], [CreditCardNo]) VALUES (73, N'Vazquez, Fletcher A.', N'25/09/2018', N'congue@ultricessitamet.net', N'524435 8831269094') GO INSERT [dbo].[Employee] ([EmployeeID], [EmpName], [DOB], [Email], [CreditCardNo]) VALUES (74, N'Glass, Felicia J.', N'14/02/2019', N'arcu.Vestibulum.ante@Duisrisus.org', N'533387 135360 0514') GO INSERT [dbo].[Employee] ([EmployeeID], [EmpName], [DOB], [Email], [CreditCardNo]) VALUES (75, N'Freeman, Murphy N.', N'13/10/2019', N'lobortis.ultrices@dictumeuplacerat.org', N'527 81146 43757 480') GO INSERT [dbo].[Employee] ([EmployeeID], [EmpName], [DOB], [Email], [CreditCardNo]) VALUES (76, N'Tran, Mercedes I.', N'21/11/2019', N'in@arcueu.org', N'5124269795801134') GO INSERT [dbo].[Employee] ([EmployeeID], [EmpName], [DOB], [Email], [CreditCardNo]) VALUES (77, N'Reeves, Keelie X.', N'10/05/2019', N'eu.nulla.at@molestieSed.co.uk', N'5203678866041194') GO INSERT [dbo].[Employee] ([EmployeeID], [EmpName], [DOB], [Email], [CreditCardNo]) VALUES (78, N'Maddox, Clarke W.', N'31/08/2019', N'dolor.quam@atlacus.com', N'545738 0967570147') GO INSERT [dbo].[Employee] ([EmployeeID], [EmpName], [DOB], [Email], [CreditCardNo]) VALUES (79, N'Rollins, Anika T.', N'05/06/2019', N'dui@FuscefeugiatLorem.co.uk', N'5495 9631 7754 4558') GO INSERT [dbo].[Employee] ([EmployeeID], [EmpName], [DOB], [Email], [CreditCardNo]) VALUES (80, N'Blackwell, Galvin K.', N'05/05/2018', N'sodales@eratVivamusnisi.edu', N'5329686891198607') GO INSERT [dbo].[Employee] ([EmployeeID], [EmpName], [DOB], [Email], [CreditCardNo]) VALUES (81, N'Carroll, Rajah P.', N'08/11/2019', N'in.consectetuer@ridiculusmus.net', N'523141 287058 0088') GO INSERT [dbo].[Employee] ([EmployeeID], [EmpName], [DOB], [Email], [CreditCardNo]) VALUES (82, N'Walsh, Dean G.', N'29/11/2017', N'euismod@Fuscefermentumfermentum.net', N'5102 4092 0585 1081') GO INSERT [dbo].[Employee] ([EmployeeID], [EmpName], [DOB], [Email], [CreditCardNo]) VALUES (83, N'Castaneda, Mollie J.', N'25/02/2018', N'malesuada.vel.venenatis@egetvarius.net', N'528749 0594475671') GO INSERT [dbo].[Employee] ([EmployeeID], [EmpName], [DOB], [Email], [CreditCardNo]) VALUES (84, N'Molina, Cullen F.', N'22/09/2018', N'sapien.molestie@malesuadafames.co.uk', N'540486 818801 5367') GO INSERT [dbo].[Employee] ([EmployeeID], [EmpName], [DOB], [Email], [CreditCardNo]) VALUES (85, N'Johns, Tana P.', N'05/10/2019', N'eros.nec@egestasSed.co.uk', N'532560 361102 4314') GO INSERT [dbo].[Employee] ([EmployeeID], [EmpName], [DOB], [Email], [CreditCardNo]) VALUES (86, N'Dominguez, Madonna K.', N'11/01/2018', N'tristique.pellentesque.tellus@Sednec.edu', N'5140945496209228') GO INSERT [dbo].[Employee] ([EmployeeID], [EmpName], [DOB], [Email], [CreditCardNo]) VALUES (87, N'Blanchard, Caldwell Z.', N'26/07/2019', N'laoreet.ipsum@sitamet.co.uk', N'535977 4081766525') GO INSERT [dbo].[Employee] ([EmployeeID], [EmpName], [DOB], [Email], [CreditCardNo]) VALUES (88, N'Horne, Matthew V.', N'17/10/2019', N'tempor@Proin.edu', N'5145008412588038') GO INSERT [dbo].[Employee] ([EmployeeID], [EmpName], [DOB], [Email], [CreditCardNo]) VALUES (89, N'Madden, Sigourney F.', N'01/06/2018', N'sed.sem@eleifendnon.com', N'5325330604541316') GO INSERT [dbo].[Employee] ([EmployeeID], [EmpName], [DOB], [Email], [CreditCardNo]) VALUES (90, N'Riley, Hoyt X.', N'08/05/2018', N'velit.in.aliquet@laoreetposuereenim.org', N'514961 8684833197') GO INSERT [dbo].[Employee] ([EmployeeID], [EmpName], [DOB], [Email], [CreditCardNo]) VALUES (91, N'Cash, Steven Y.', N'01/02/2019', N'nec.quam@vitae.edu', N'522 56130 85447 520') GO INSERT [dbo].[Employee] ([EmployeeID], [EmpName], [DOB], [Email], [CreditCardNo]) VALUES (92, N'Gallegos, Kaseem K.', N'24/12/2017', N'elit.fermentum@tellusnon.net', N'5272 0388 5279 7323') GO INSERT [dbo].[Employee] ([EmployeeID], [EmpName], [DOB], [Email], [CreditCardNo]) VALUES (93, N'Hale, Kenneth S.', N'12/08/2019', N'sit.amet@placerataugueSed.ca', N'546264 2263958257') GO INSERT [dbo].[Employee] ([EmployeeID], [EmpName], [DOB], [Email], [CreditCardNo]) VALUES (94, N'Browning, Suki H.', N'27/04/2018', N'In.tincidunt.congue@Fuscemilorem.org', N'545983 175708 9282') GO INSERT [dbo].[Employee] ([EmployeeID], [EmpName], [DOB], [Email], [CreditCardNo]) VALUES (95, N'Osborne, Maile K.', N'23/06/2018', N'fringilla.est.Mauris@ligulaNullam.com', N'5583760808921244') GO INSERT [dbo].[Employee] ([EmployeeID], [EmpName], [DOB], [Email], [CreditCardNo]) VALUES (96, N'Whitley, Davis P.', N'31/01/2019', N'tincidunt.tempus@duiCras.co.uk', N'546009 6552392268') GO INSERT [dbo].[Employee] ([EmployeeID], [EmpName], [DOB], [Email], [CreditCardNo]) VALUES (97, N'Morin, Igor P.', N'04/06/2018', N'Nunc@sempereratin.co.uk', N'514336 8731704811') GO INSERT [dbo].[Employee] ([EmployeeID], [EmpName], [DOB], [Email], [CreditCardNo]) VALUES (98, N'Hart, Rina R.', N'17/06/2018', N'sit@aliquameuaccumsan.net', N'546188 436953 7632') GO INSERT [dbo].[Employee] ([EmployeeID], [EmpName], [DOB], [Email], [CreditCardNo]) VALUES (99, N'Mccormick, Amal K.', N'15/10/2019', N'Cum.sociis.natoque@Sedpharetra.edu', N'5145 0523 0519 3704') GO INSERT [dbo].[Employee] ([EmployeeID], [EmpName], [DOB], [Email], [CreditCardNo]) VALUES (100, N'Garrison, Halla K.', N'09/01/2019', N'euismod.urna@accumsansedfacilisis.co.uk', N'559463 0705979628') GO SET IDENTITY_INSERT [dbo].[Employee] OFF GO |

I am the author of the book "DP-300 Administering Relational Database on Microsoft Azure". I published more than 650 technical articles on MSSQLTips, SQLShack, Quest, CodingSight, and SeveralNines.
I am the creator of one of the biggest free online collections of articles on a single topic, with his 50-part series on SQL Server Always On Availability Groups.
Based on my contribution to the SQL Server community, I have been recognized as the prestigious Best Author of the Year continuously in 2019, 2020, and 2021 (2nd Rank) at SQLShack and the MSSQLTIPS champions award in 2020.
Personal Blog: https://www.dbblogger.com
I am always interested in new challenges so if you need consulting help, reach me at rajendra.gupta16@gmail.com
View all posts by Rajendra Gupta
- Understanding PostgreSQL SUBSTRING function - September 21, 2024
- How to install PostgreSQL on Ubuntu - July 13, 2023
- How to use the CROSSTAB function in PostgreSQL - February 17, 2023