
Introduction
A year or so ago, I worked for an online web grocery software house located in the northern United States. At that time I had my ‘baptismal’ exposure to ‘genuinely dirty data’. Granted most of the data entry was done manually and many times from offshore. The point being that I could not fathom just how many ways there were to spell the brand name of a major cereal manufacturer. Why is this such an issue? The answer is fairly straight forward. Imagine the scenario that you are trying to ascertain the dollar value of breakfast cereals sold in the country from the local supermarket standpoint all the way up to national sales. Imagine this utilizing a SQL Server Multi-dimensional cube. The ‘eagle – eyed’ reader will recognize that the results will not aggregate correctly should our aggregation attributes have a plethora of different ways of being spelt.
Yes, we (as other firms) manually fixed the data anomalies, however these anomalies tendered to rear their ugly heads with each new data load.
Enter, Data Quality Services and SQL Server Integration Services and THIS is what we are going to discuss.
A final note, in the preparation of this article I felt it necessary to give the reader unfamiliar with the Data Quality Services product, a high level understanding of the processes involved in creating a workable ‘model’. Should you be familiar with Data Quality Services, feel free to skip ahead to the SQL Server Integration Services section below.
Getting Started
For the sake of simplicity, in our little example, we shall be working only with the manufacturers of certain products. Naturally data errors crop up in a plethora of data fields, however I believe in the adage of keeping things as simple as possible, in a paper of this sort.
Our first task will be to get the current data cleaned up AND THEN make it possible for Data Quality Services to ‘use its magic’ to clean up new data (on its own) going forward. This requires the construction of a ‘Knowledge Base’ and a ‘Data Quality Services Project’.
We shall then create a SQL Server Integration Services package which will be run daily to place correct data into our database and send bad data to our Business Analysts and Data Stewards to be fixed/corrected for the next day’s run.
Installing Data Quality Services
Data Quality Services is available to the Business Intelligence and Enterprise versions of SQL Server 2012 and SQL Server 2014. Should you wish to experiment with the product, it is also available via the Developer Edition. The important point being to let the SQL Server installation process know that you wish to install Data Quality Services (DQS) when you install your SQL Server instance.
You thought that you were finished, right? Think again! We must now physically install the server portion on our instance. Simply select Programs, SQL Server 2012, Data Quality Services, and Data Quality Server Installer. The process executes in a command window and once complete you are ready to go. (See the screen dump below).
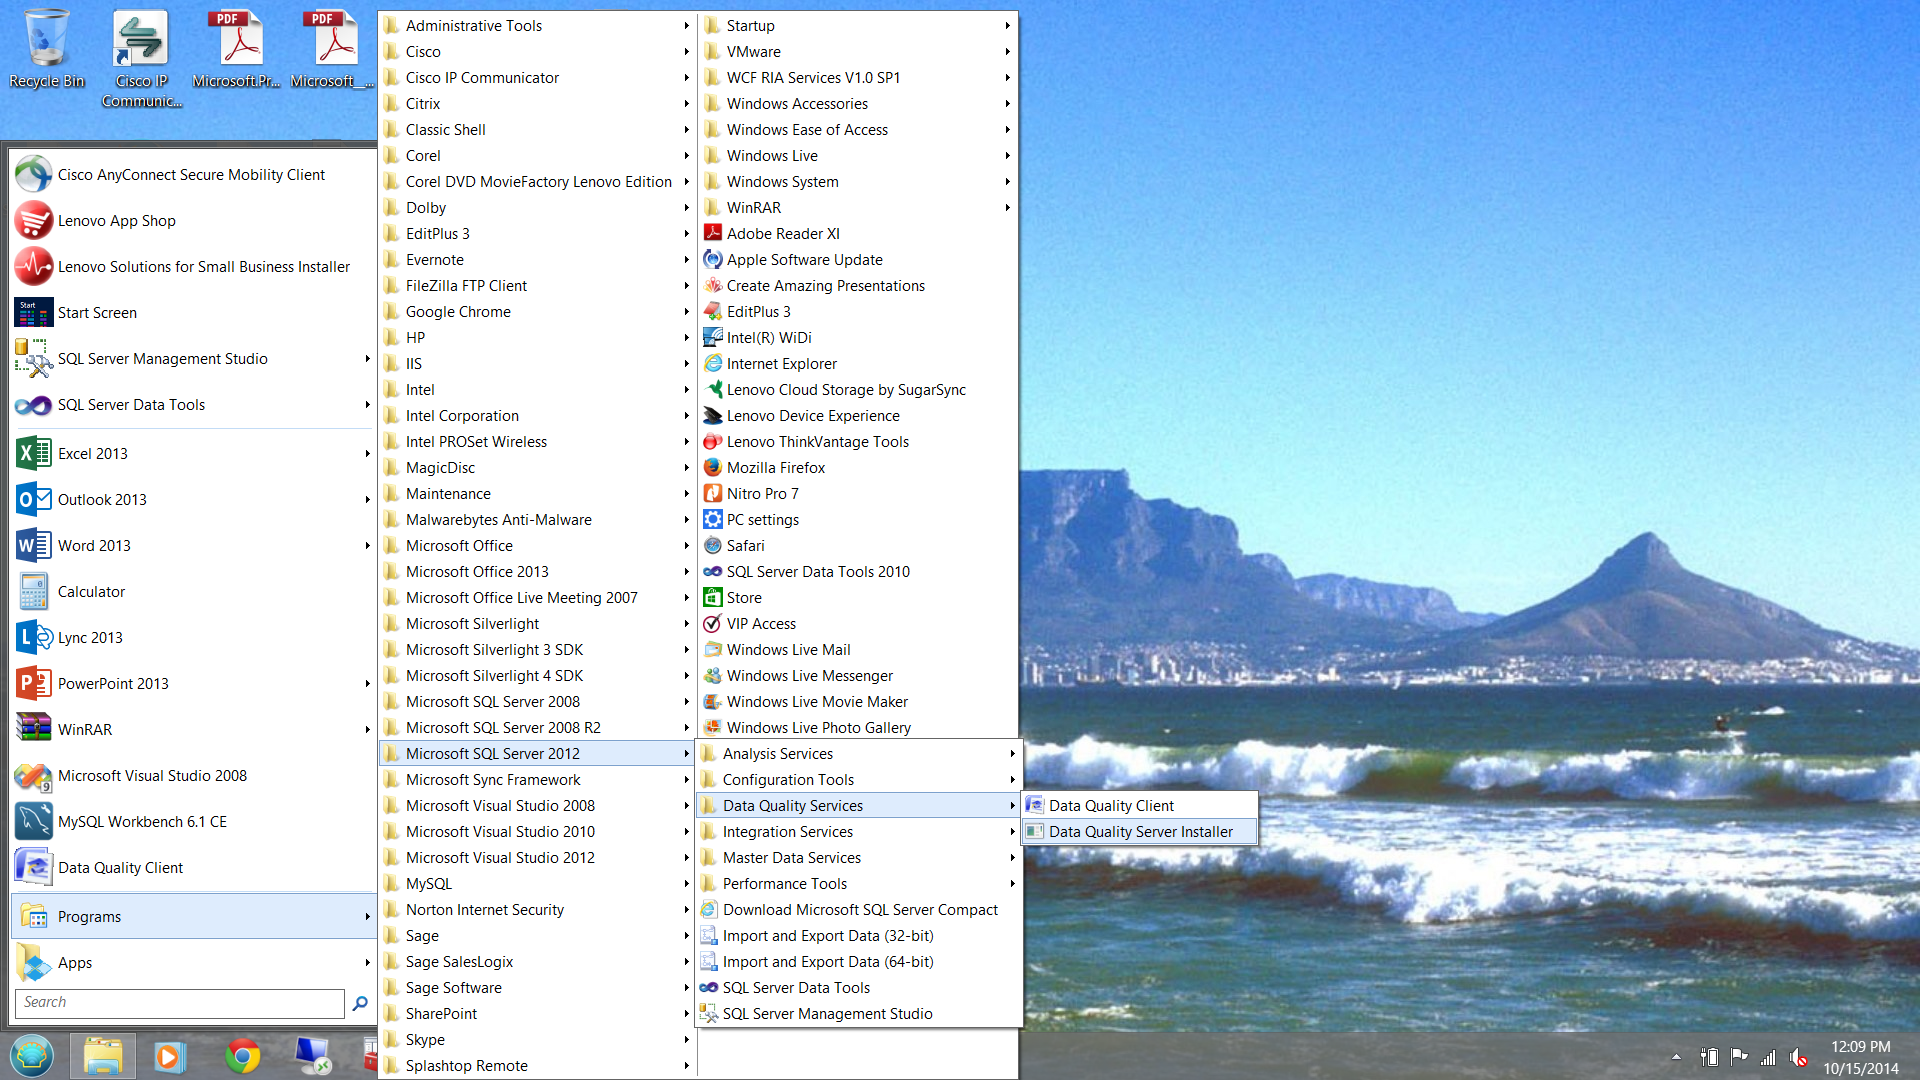
We now call upon the Data Quality Service client and begin our journey.

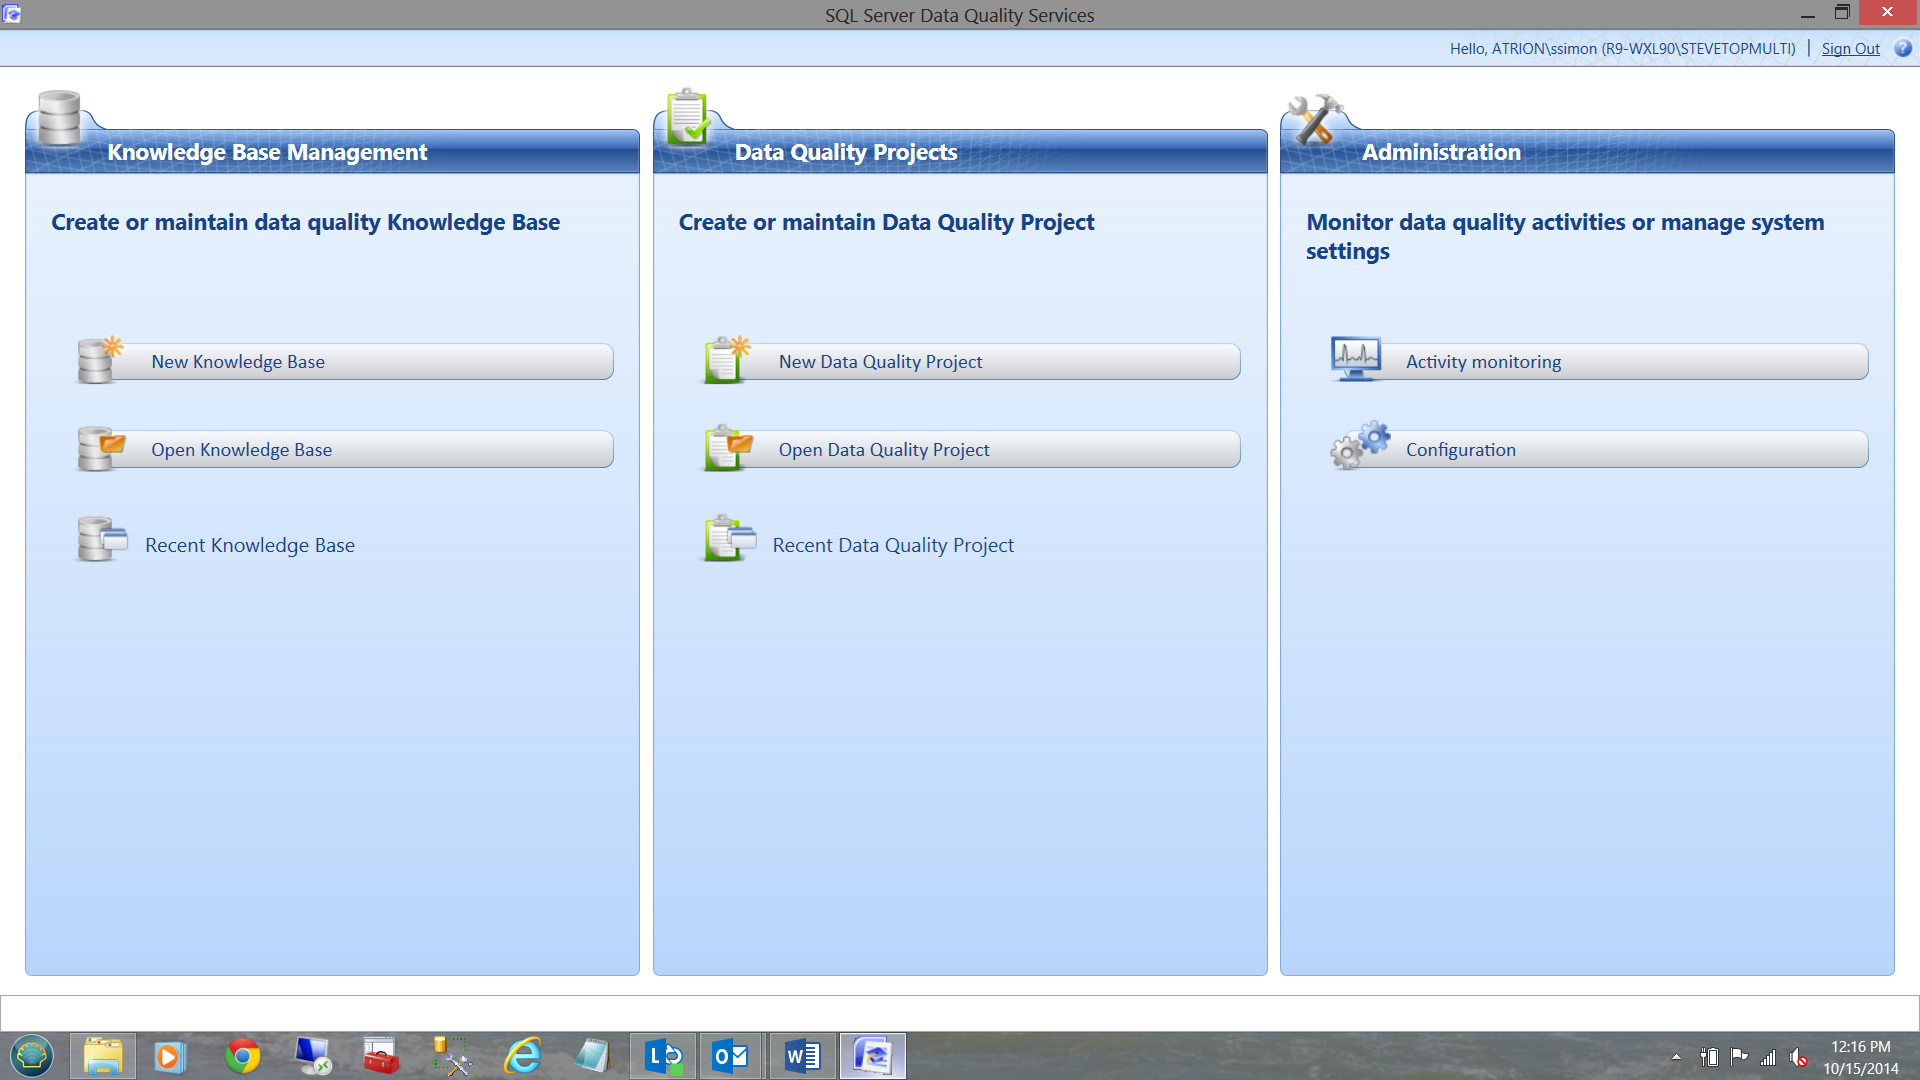
After having selected the ‘Data Quality Client’, the work screen that we shall be using for this portion of the paper, will appear (See below).
Constructing our first Knowledge Base (the first of three steps to create our knowledge base)
In order for Data Quality Services to understand a bit about our data AND to use that knowledge about our data on future loads, we must build/construct a ‘Knowledge Base’. Please note that once complete, a Knowledge Base is similar to a .NET object and therefore can be ‘inherited’ in any subsequent new knowledge base.
N.B. The results of the activities that we shall be performing below will be ‘stored’ in a special SQL Server Database called DQS_MAIN, which is created by the Data Quality Services server installation.
Let us get going!
I first click the ‘New Knowledge Base’ Option from the left hand menu. (See above)
The following screen appears:
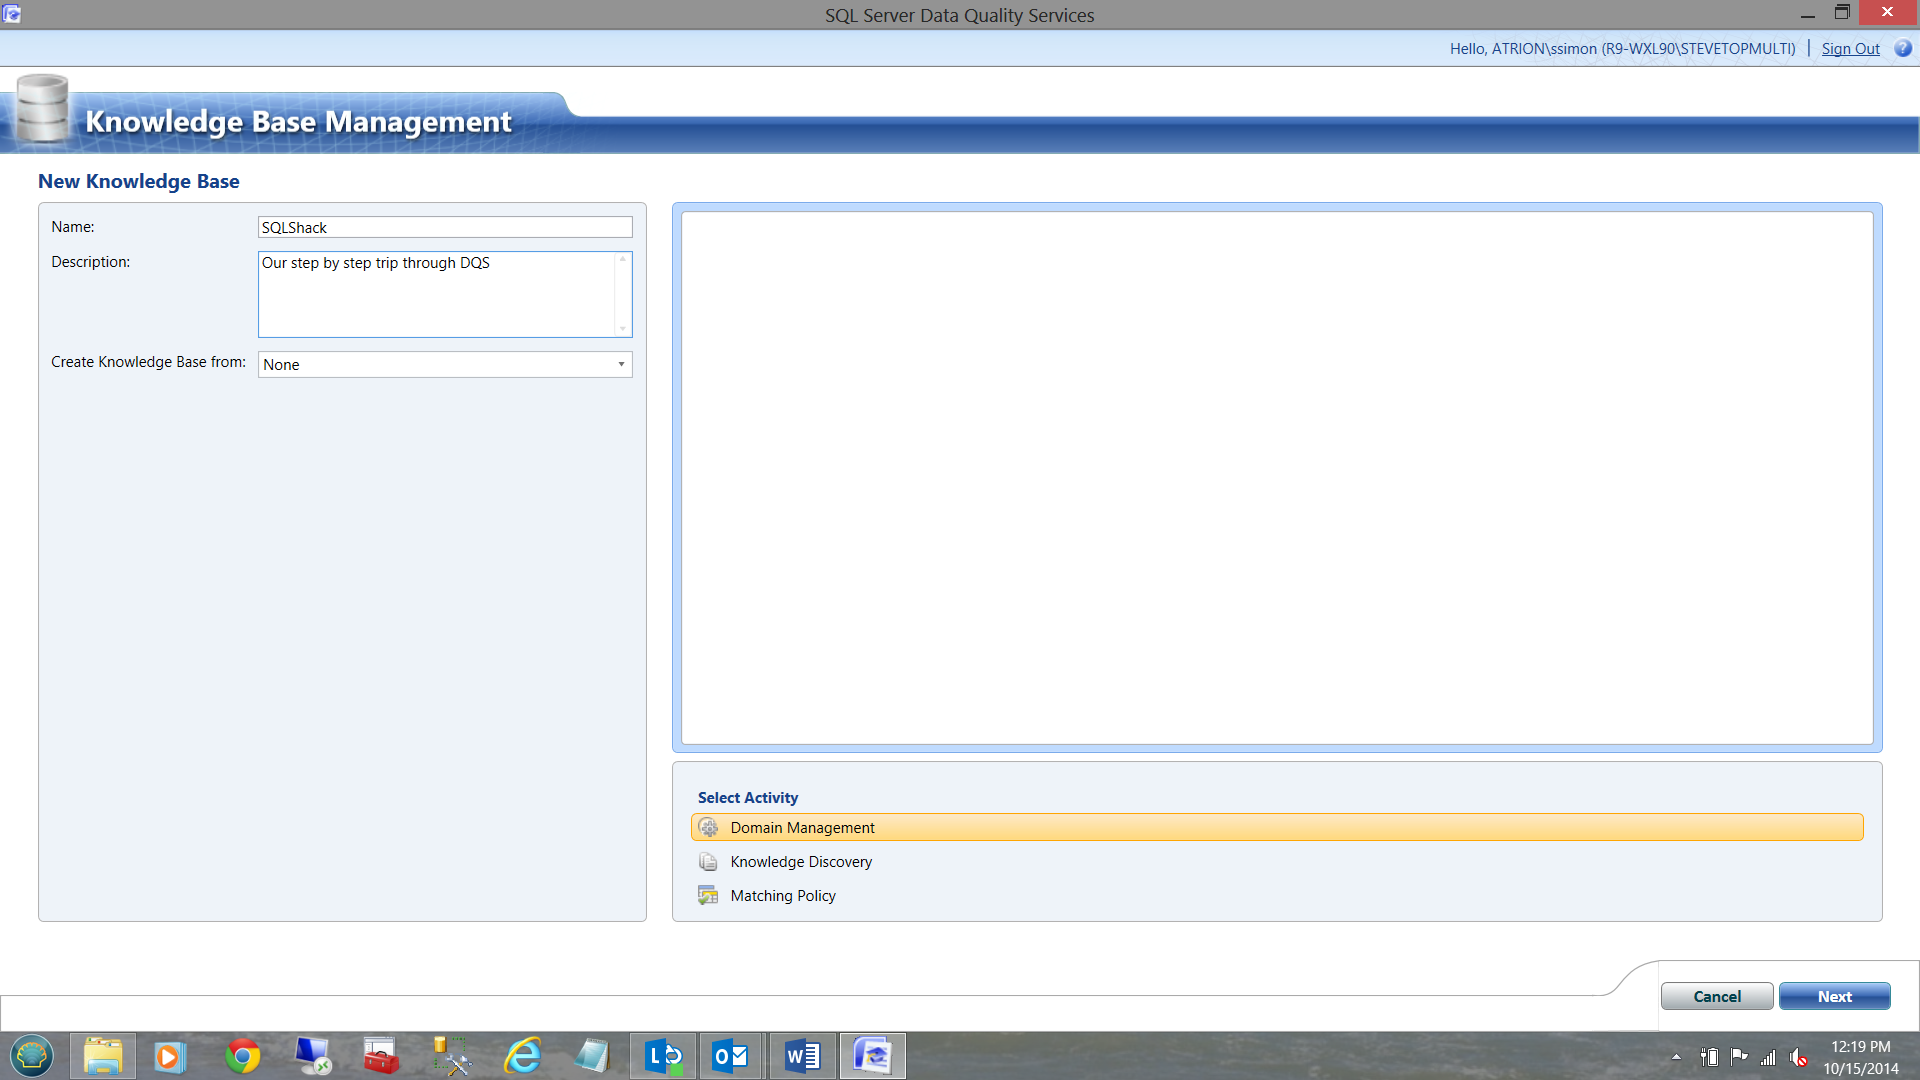
I have taken the liberty of naming the Knowledge Base and simply click on ‘Next’.
We first wish to create a Domain. This domain will contain all of our Manufacturer related data.
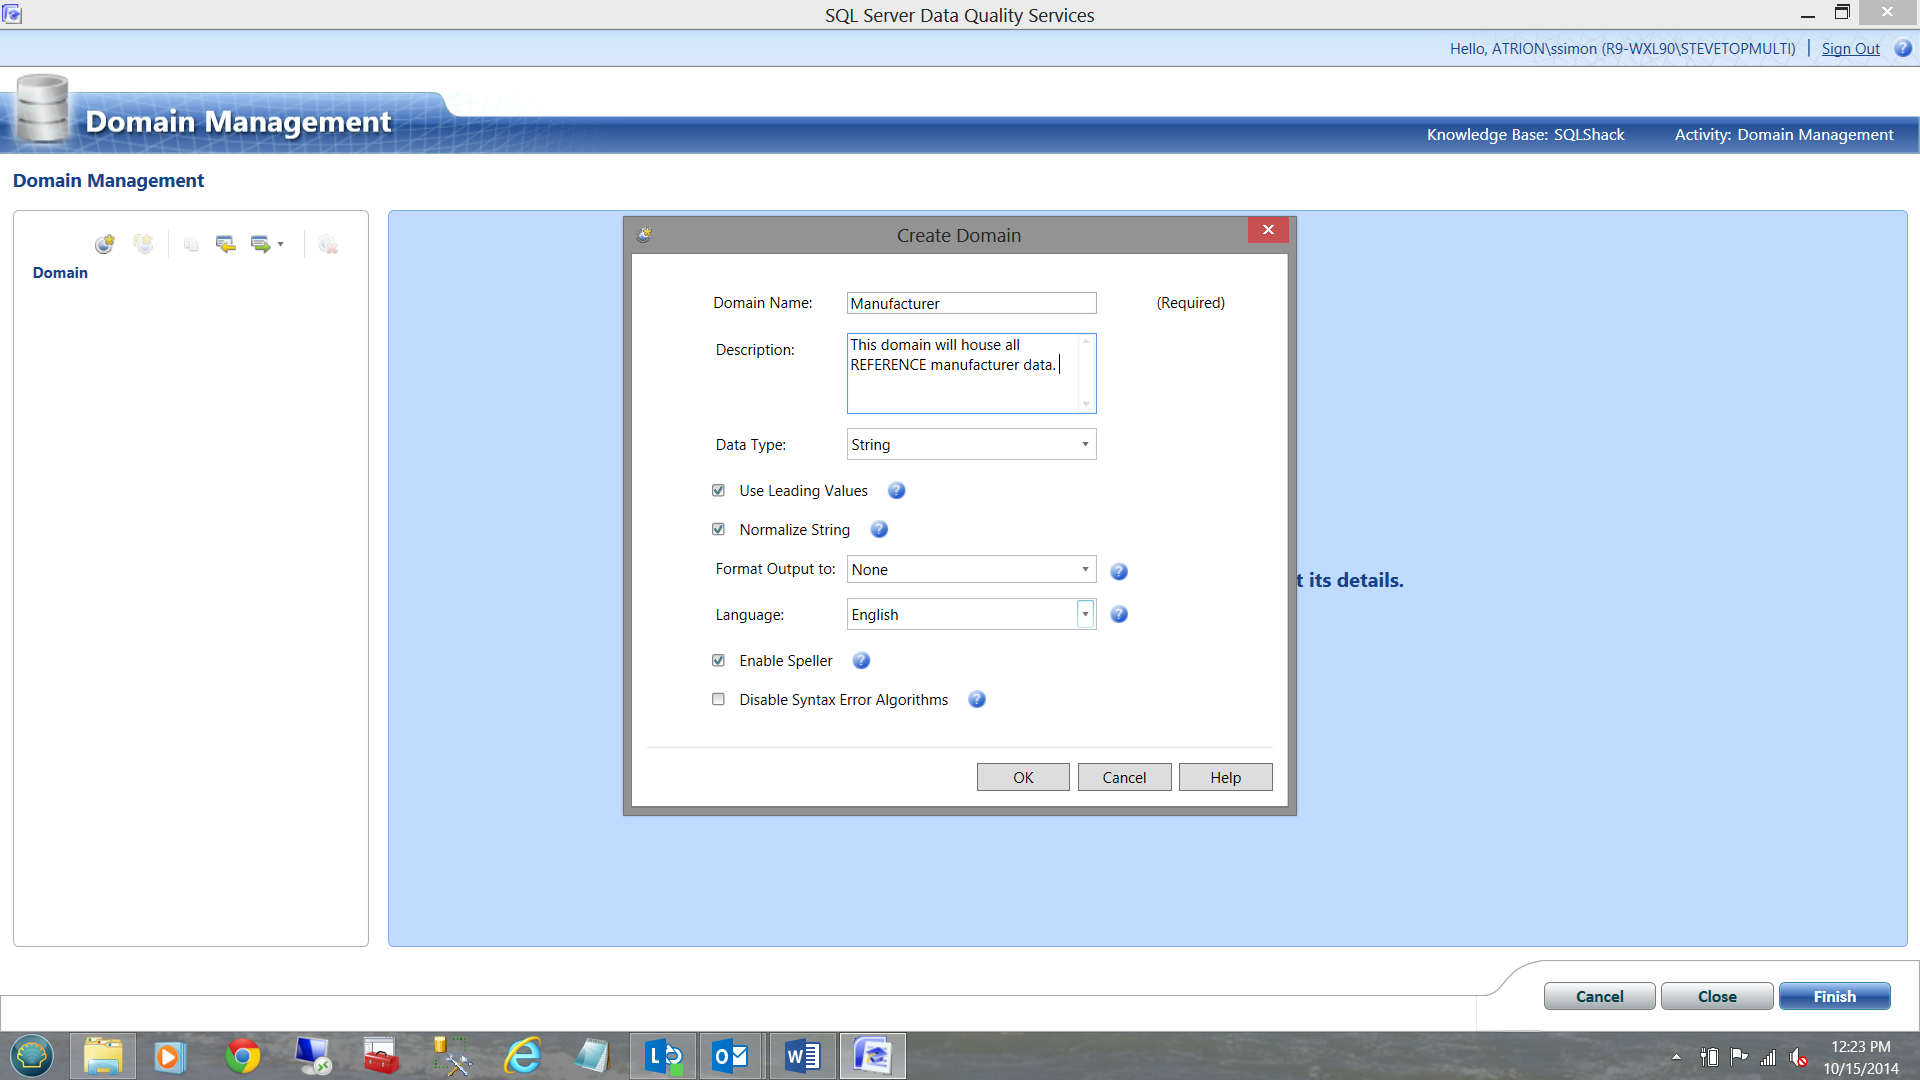
I now click OK to accept and the following screen is brought into view.
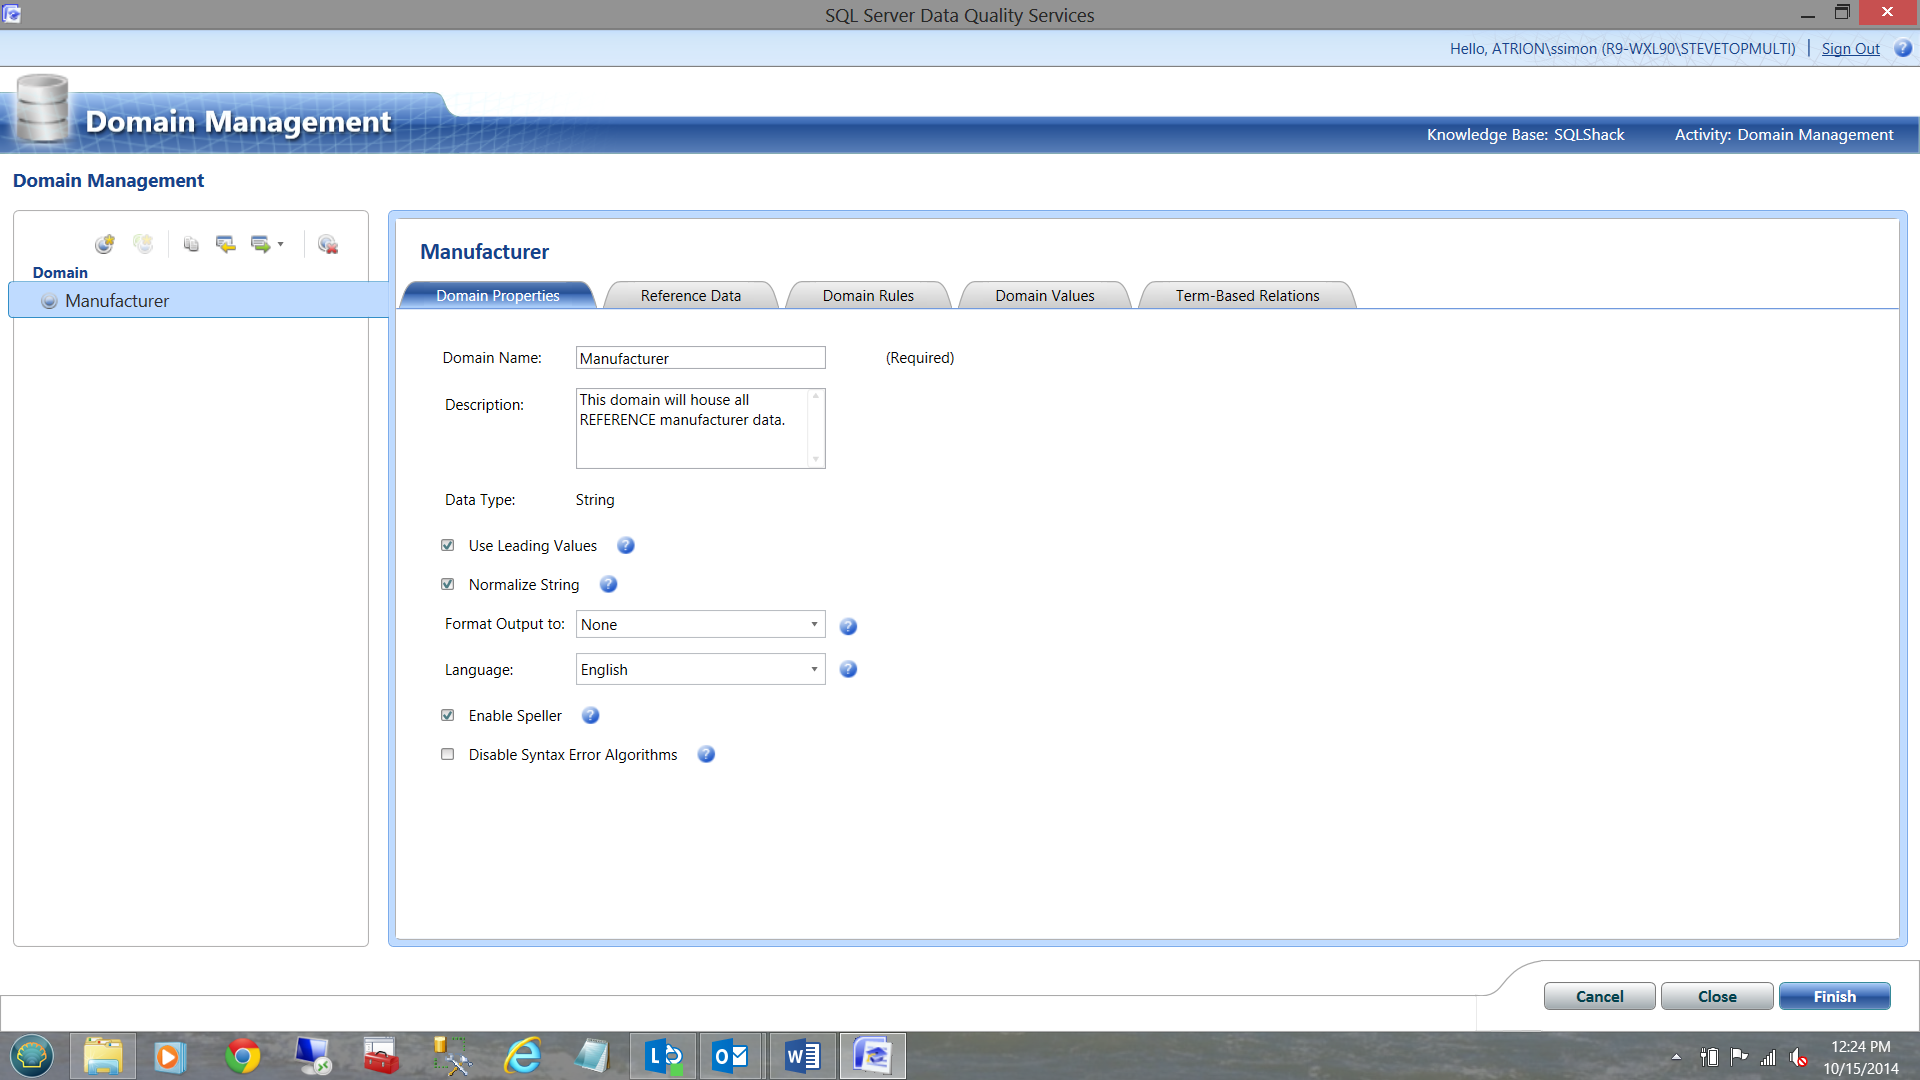
‘Training’ our knowledge base OR let the Fun Begin!!
The astute reader will note that there are 5 main tabs in the screen dump above. The ‘Domain Properties’ tab is shown.
We shall not be discussing the ‘Reference Data’ tab, however it is used to link to the cloud to obtain reference data such as telephone numbers, street addresses etc. from third party vendors.
As with any process we must ensure that we have a clean set manufacturer data as our ‘Master’ manufacturer list. Often this takes a few days to construct.
Although we shall be looking at manufacturers, in reality one would really want to include ‘products’, financial data etc.
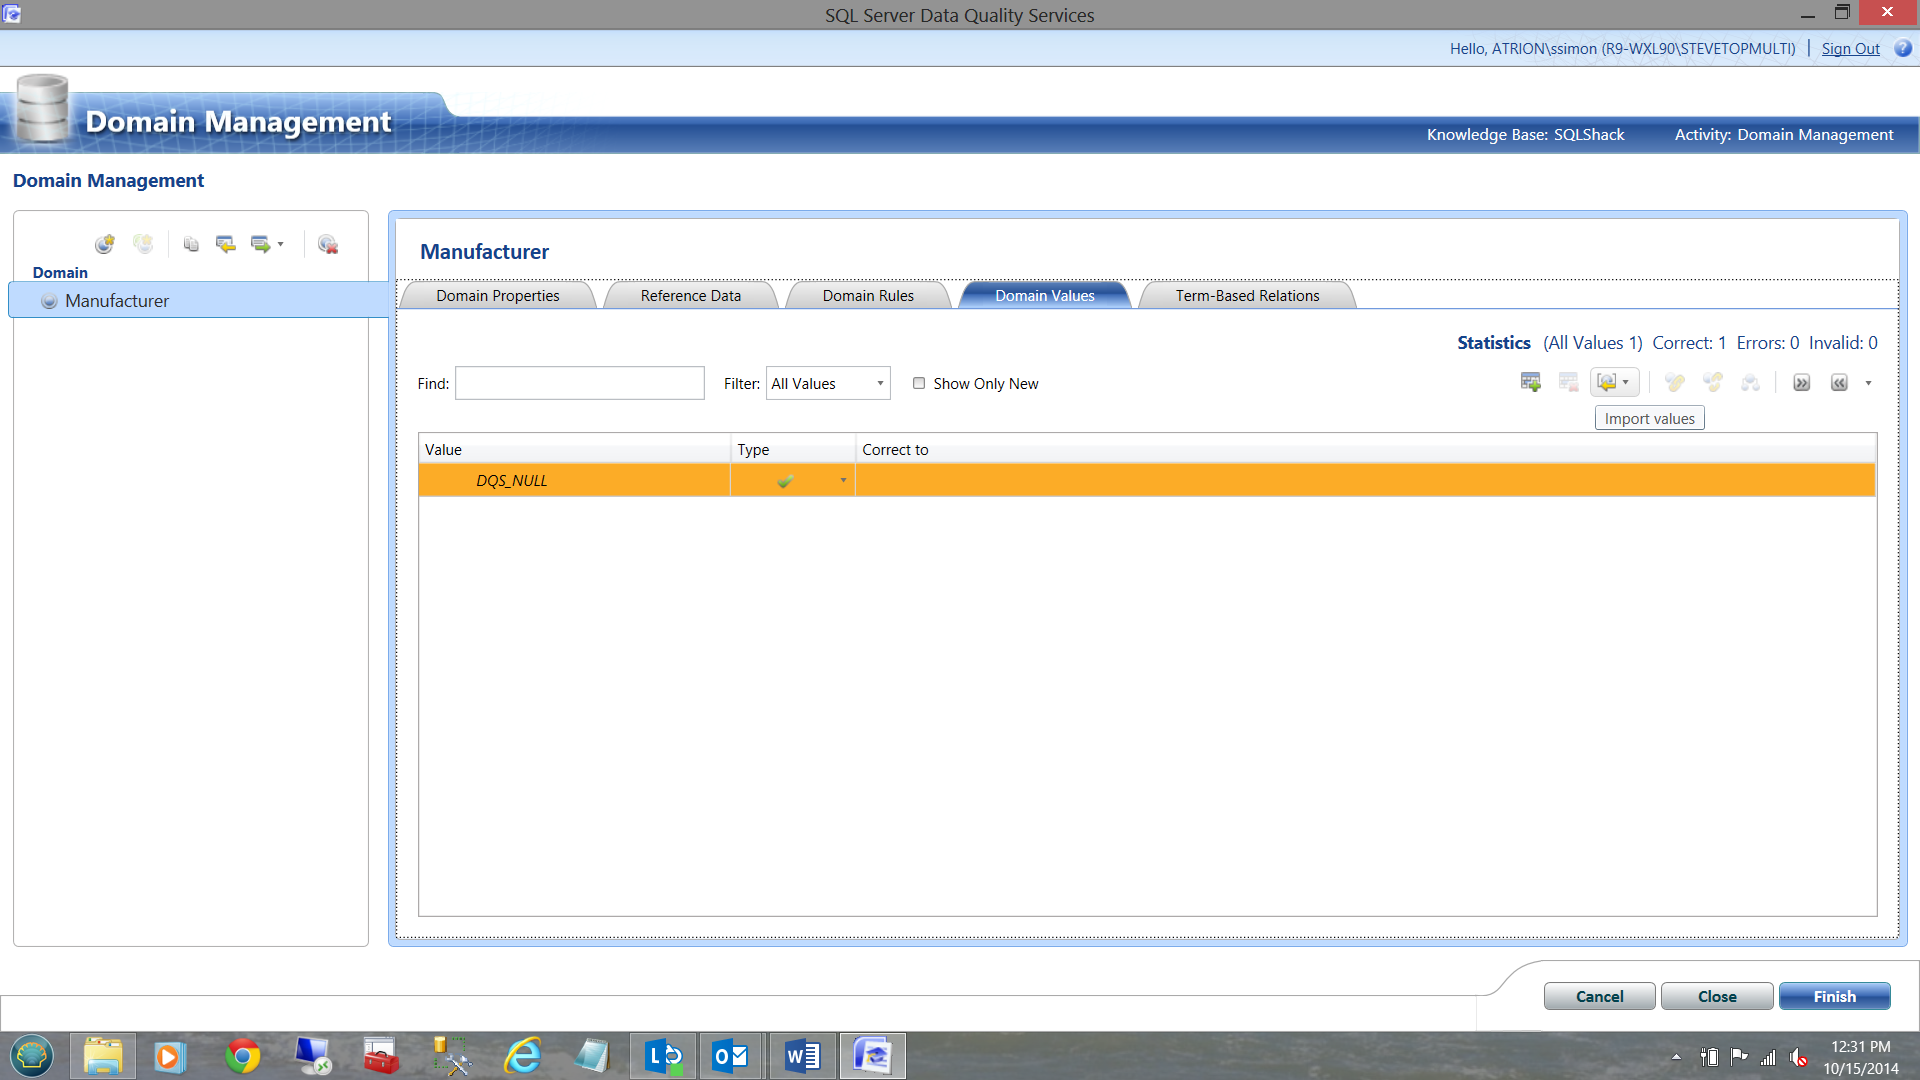
Loading our master Manufacturer data
To load our master list we select the ‘Domain Values’ tab and select ‘Import Values’ (See below).
The plot now thickens!!! The name of the product is ‘SQL Server’ however, guess what!!! The data for our master list must be in a spreadsheet as YOU CANNOT load our master data from a SQL Server table. Go figure!! As a BTW, this point has been raised with Microsoft.
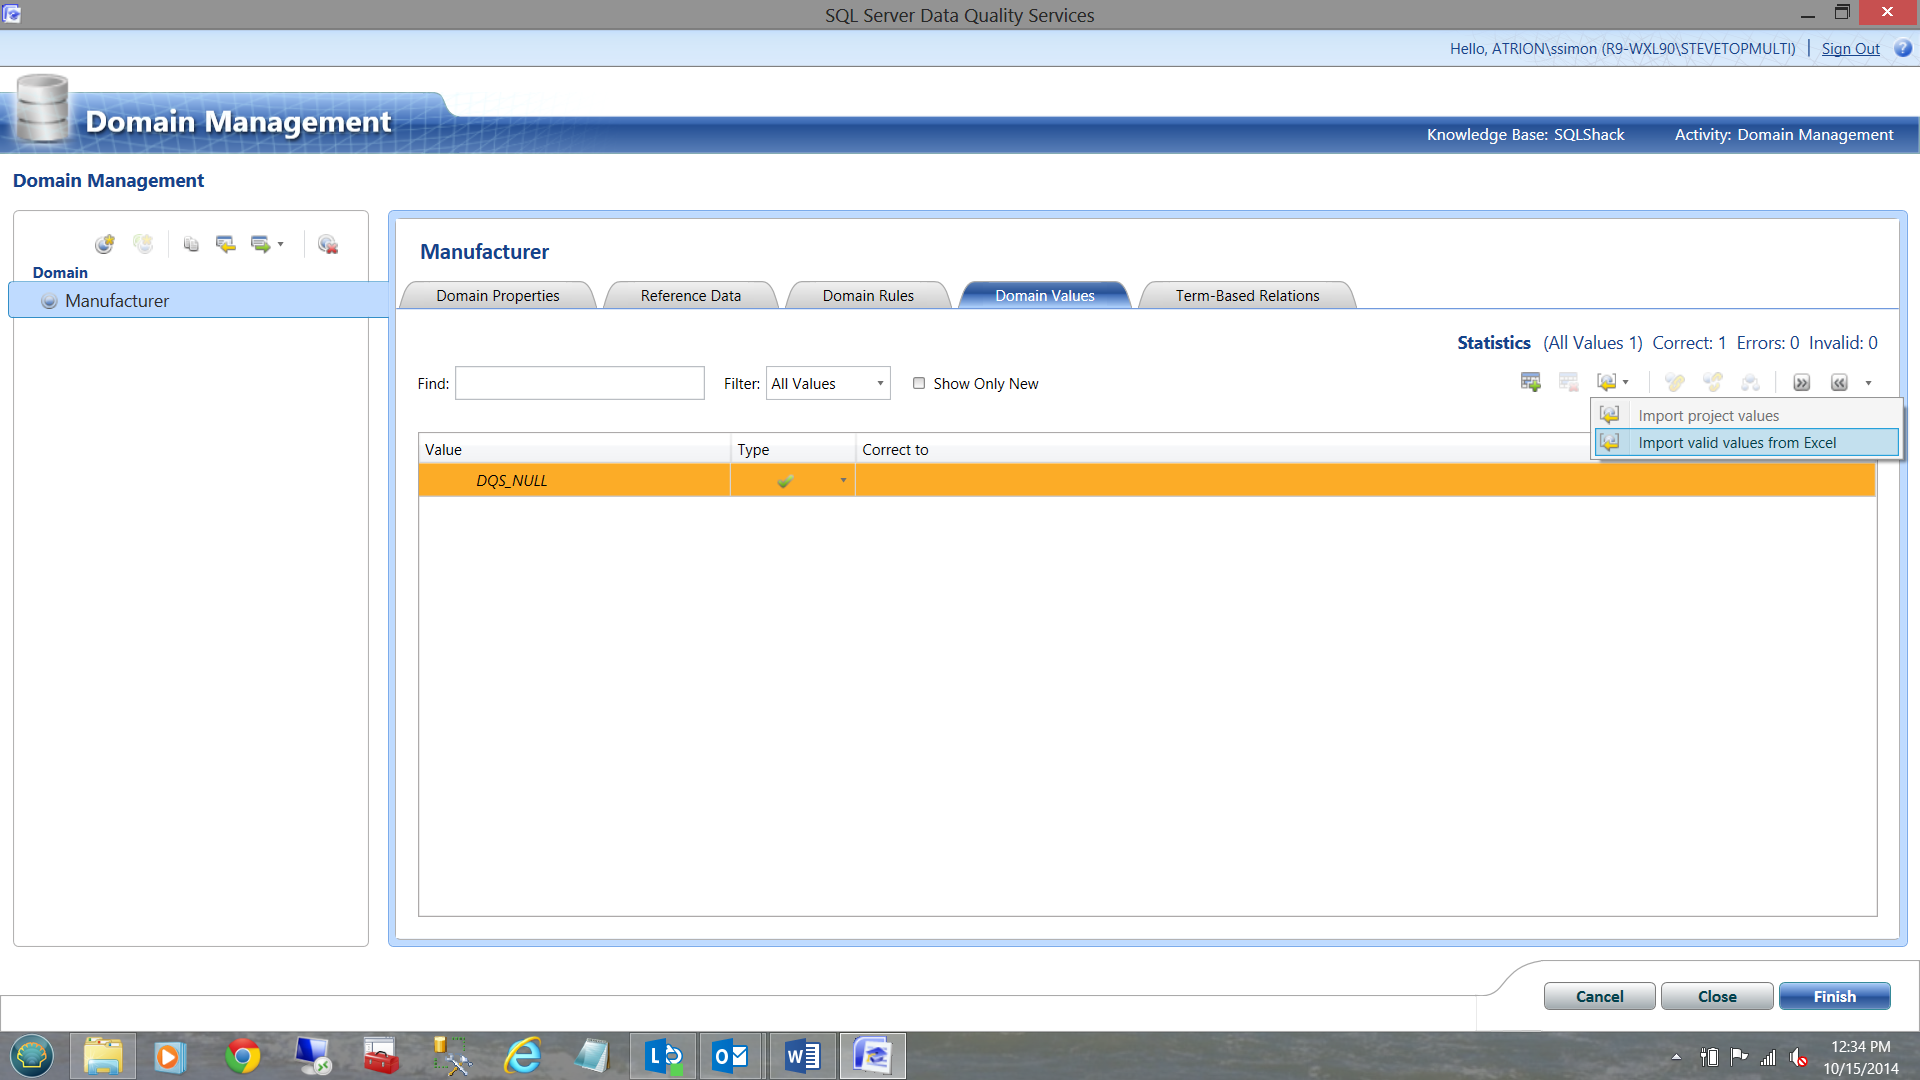
I point to my master list and import the values. (See the screen dumps below)
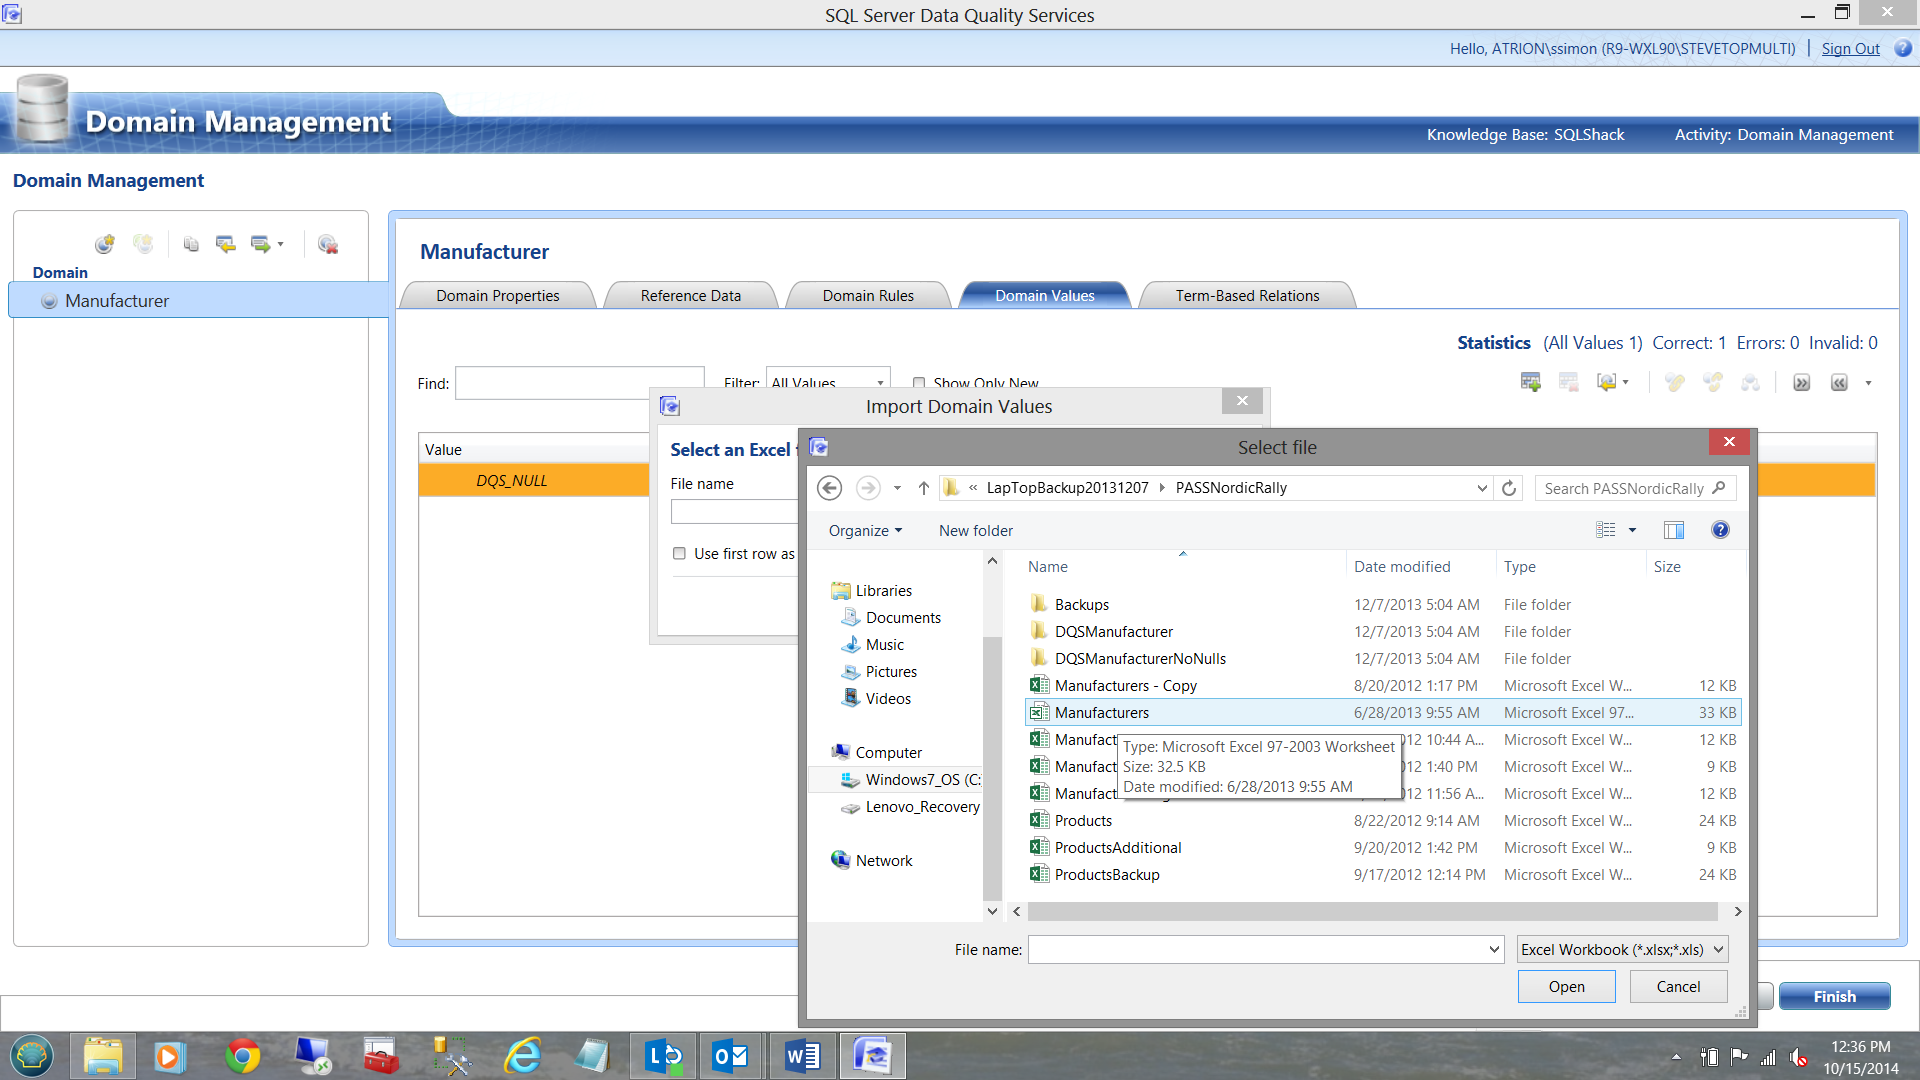
I then indicate that the first row of the spreadsheet does contains the header.
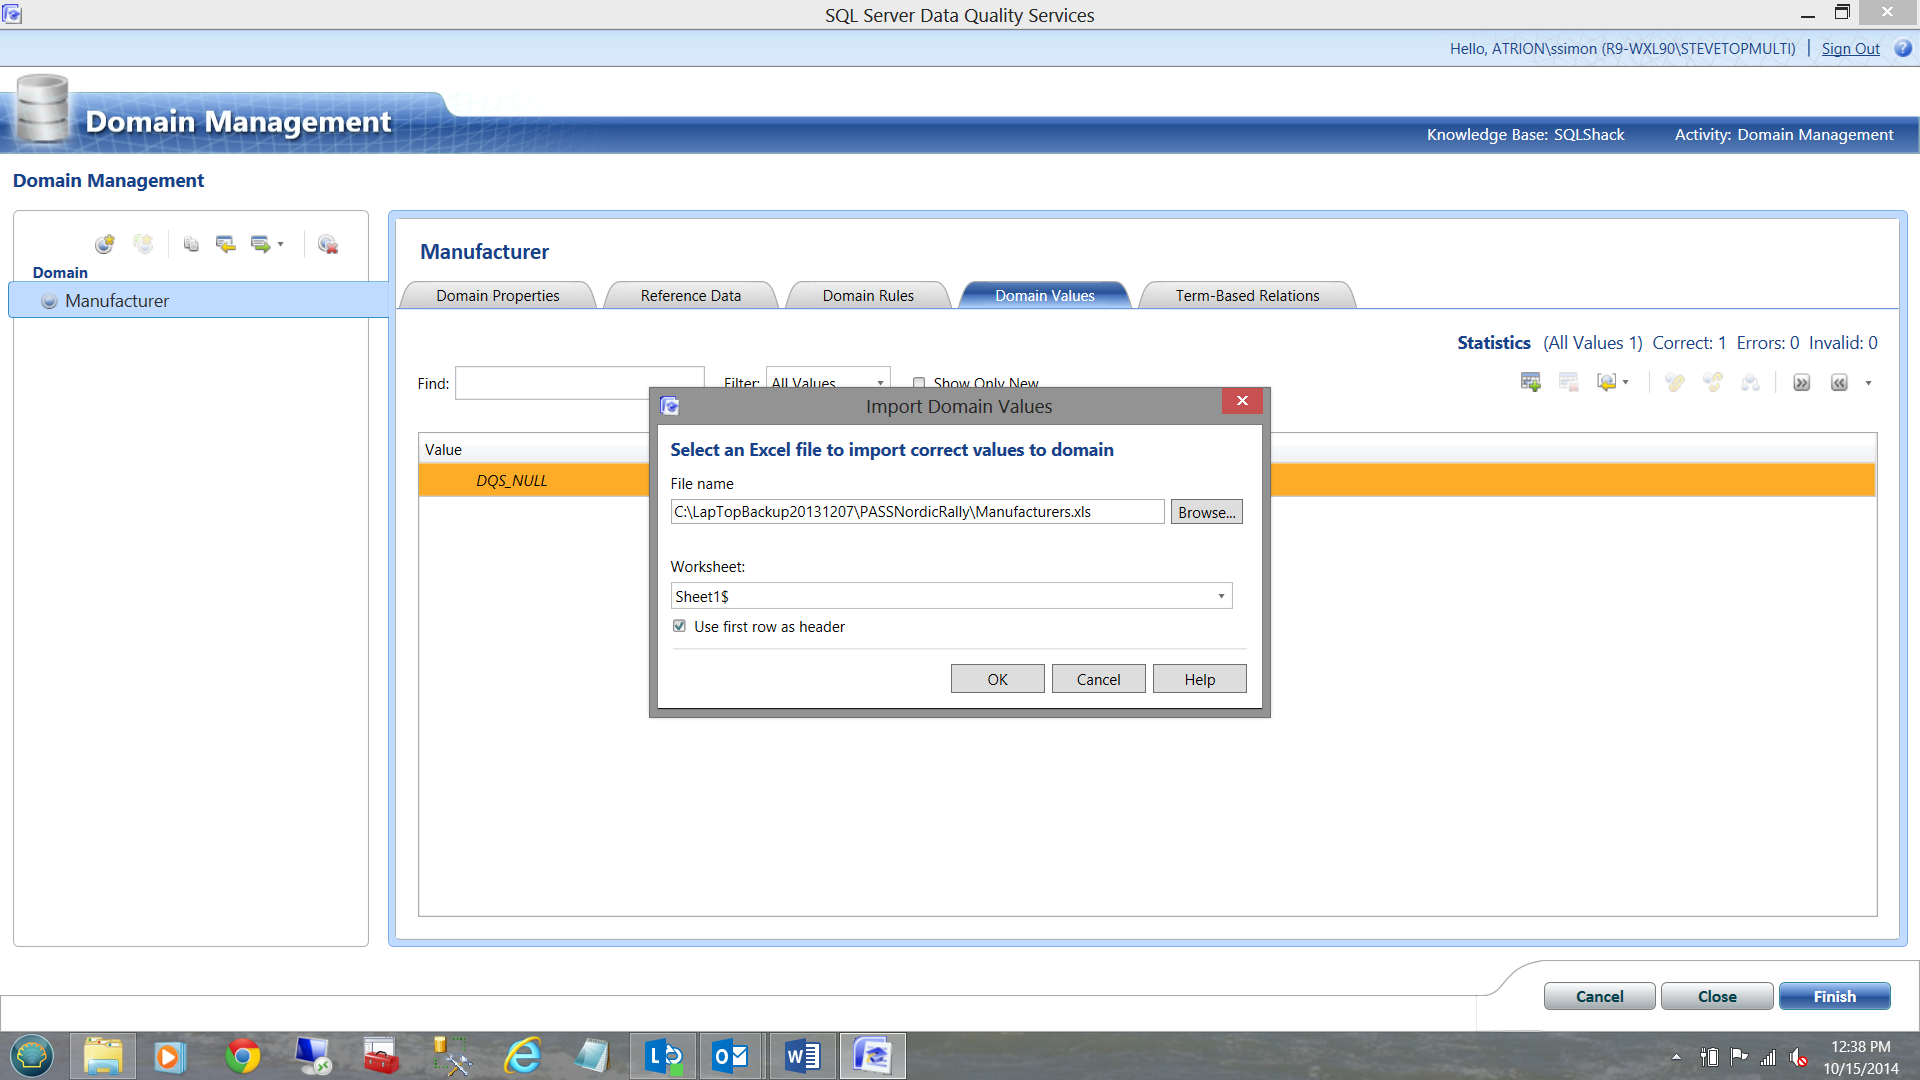
..and click OK.
Here is our master list of data (which is not all that clean as we shall now see).
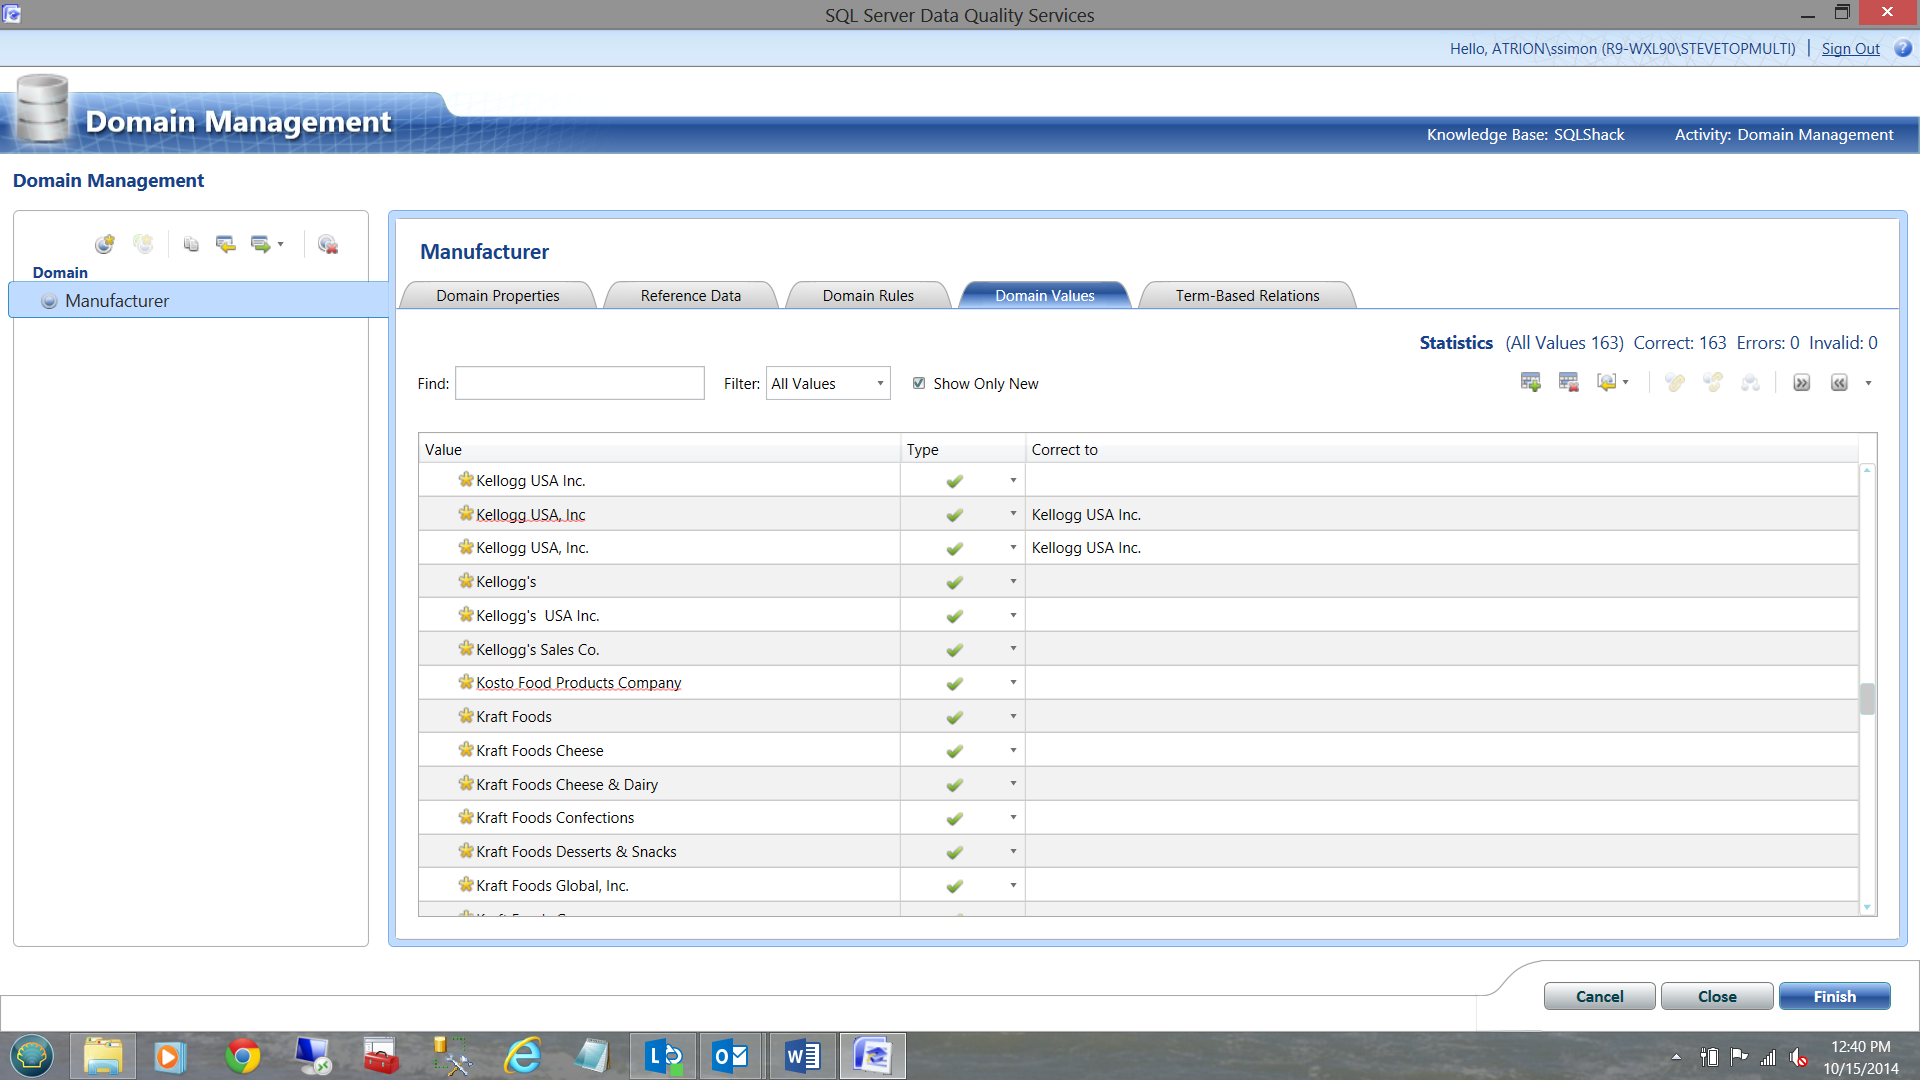
Our data from fifty million meters
Note how many ways the word ‘Kellogg’s’ has been spelt (See above). We need to ‘tell’ Data Quality Services (hence forward referred to as DQS) the correct spelling for ‘Kellogg’s’. This may be different from country to country. In the current example, we shall accept the correct spelling of ‘Kellogg’s’ to be Kellogg USA Inc. We click on the Kellogg’s USA Inc (fifth from the top) in the ‘corrected to’ column and with the control key depressed, highlight the 5th row Kellogg row and then highlight the remaining Kellogg entries.
We then right click and from the context menu we select ‘Set as synonyms’ and our work here is done. The important point being that the myriad ways that Kellogg has been spelt WILL BE CORRECTED and LEARNT by the system, going forward (See the screen dump below).
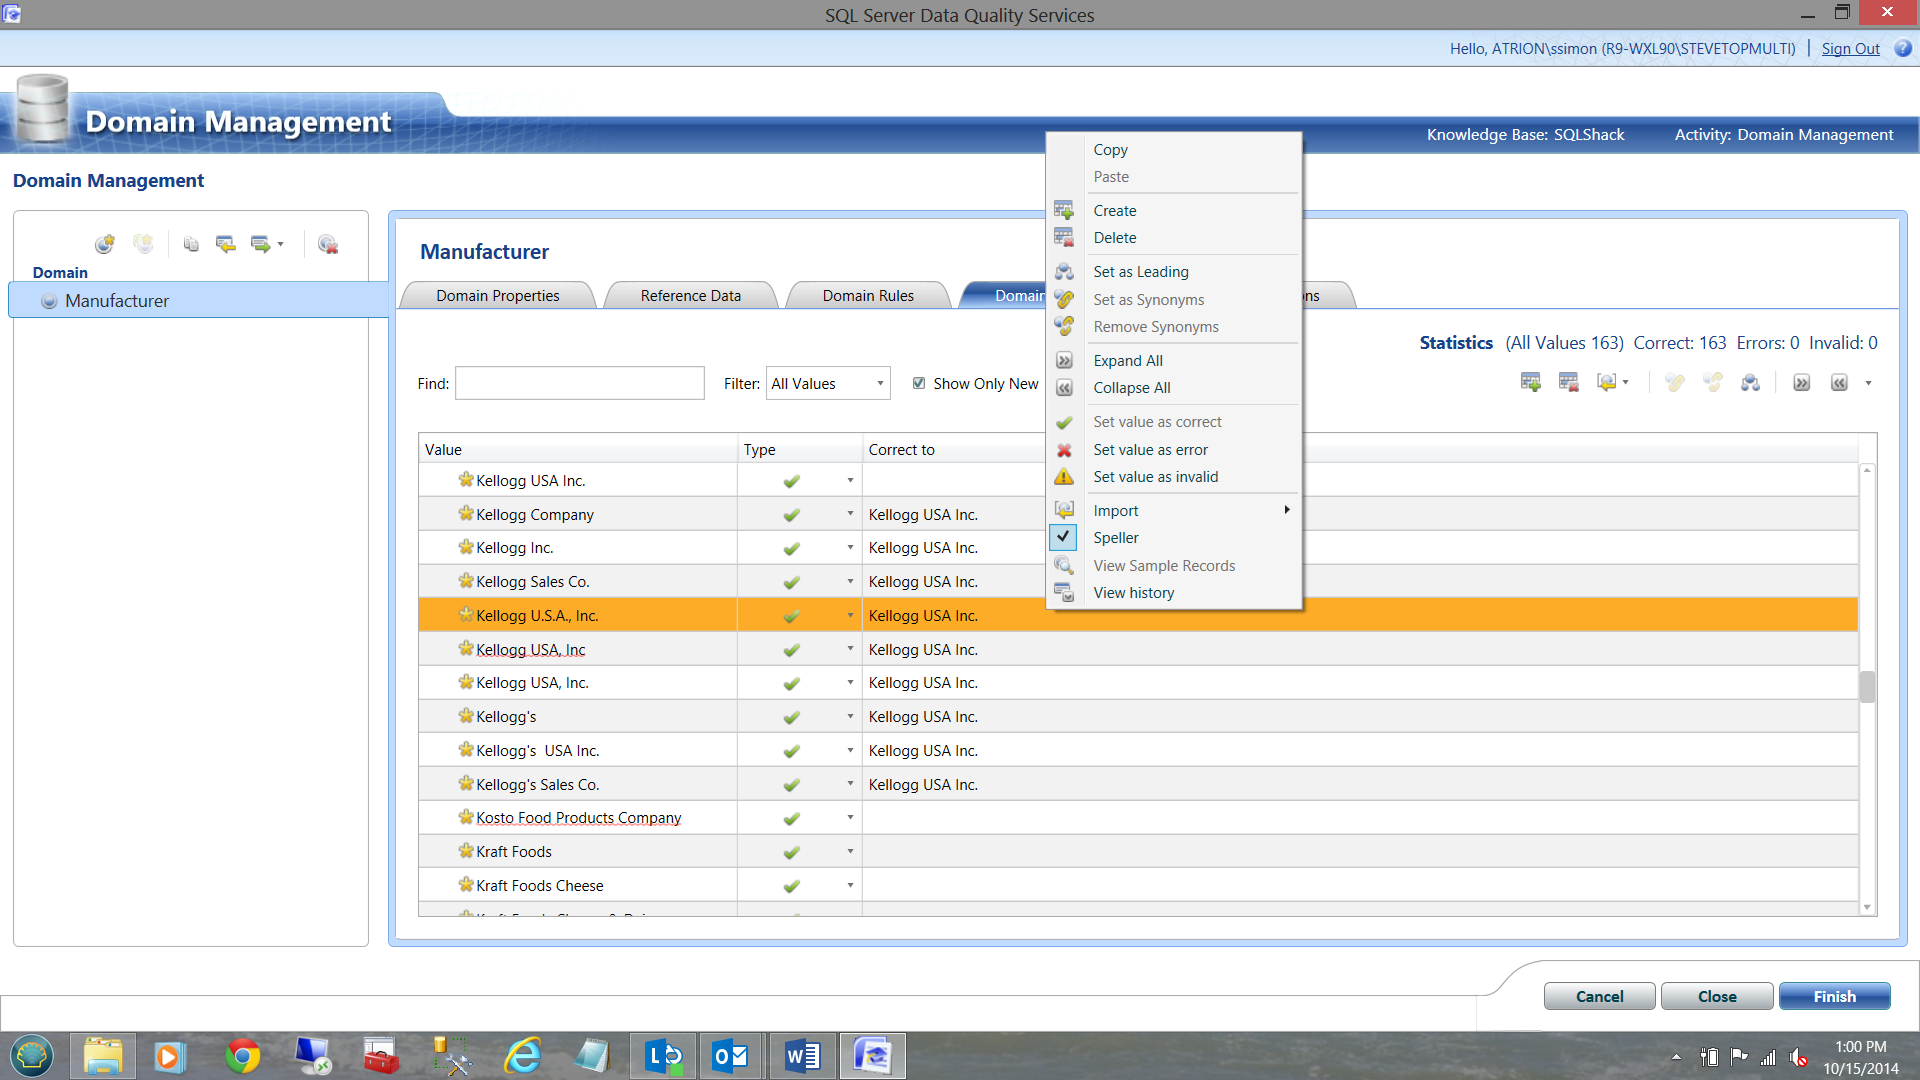
The cleansing of additional manufacturers would then ensue.
Term-Based Rules
The fifth of the tabs on our screen above, is our ‘Term-Based Rules’ and it is meant to change record fields ‘globally’ from one value to another. This is often based upon special and / or enterprise based rules.
Personally, I do not like the use of ‘co.’ for the abbreviation ‘company’. I prefer the usage of the British abbreviation ‘coy.’. This is the place to ensure that ALL “co’s” are changed to ‘coy’s.
I add a relationship. (See below)
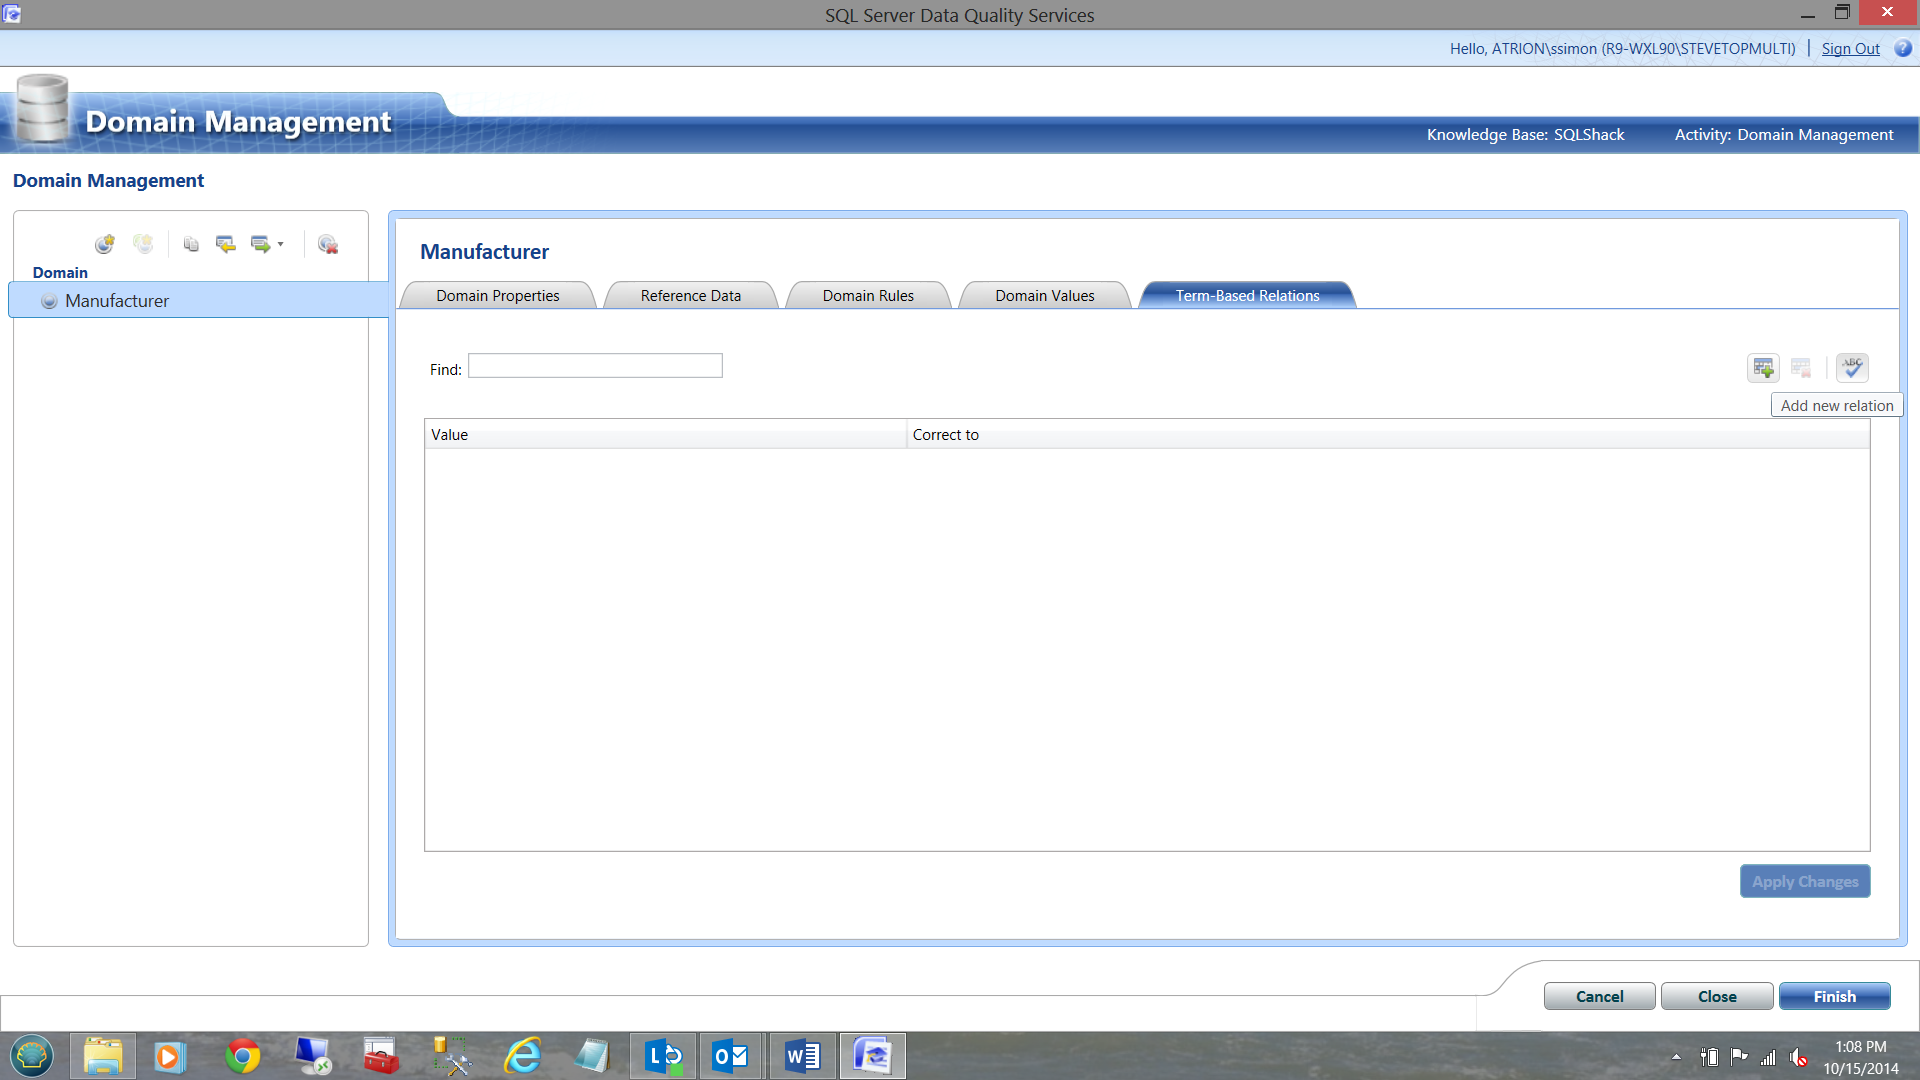
I add my ‘co.’ -> to ‘coy.’
In your situation, you will probably have more rules that YOU wish to apply.
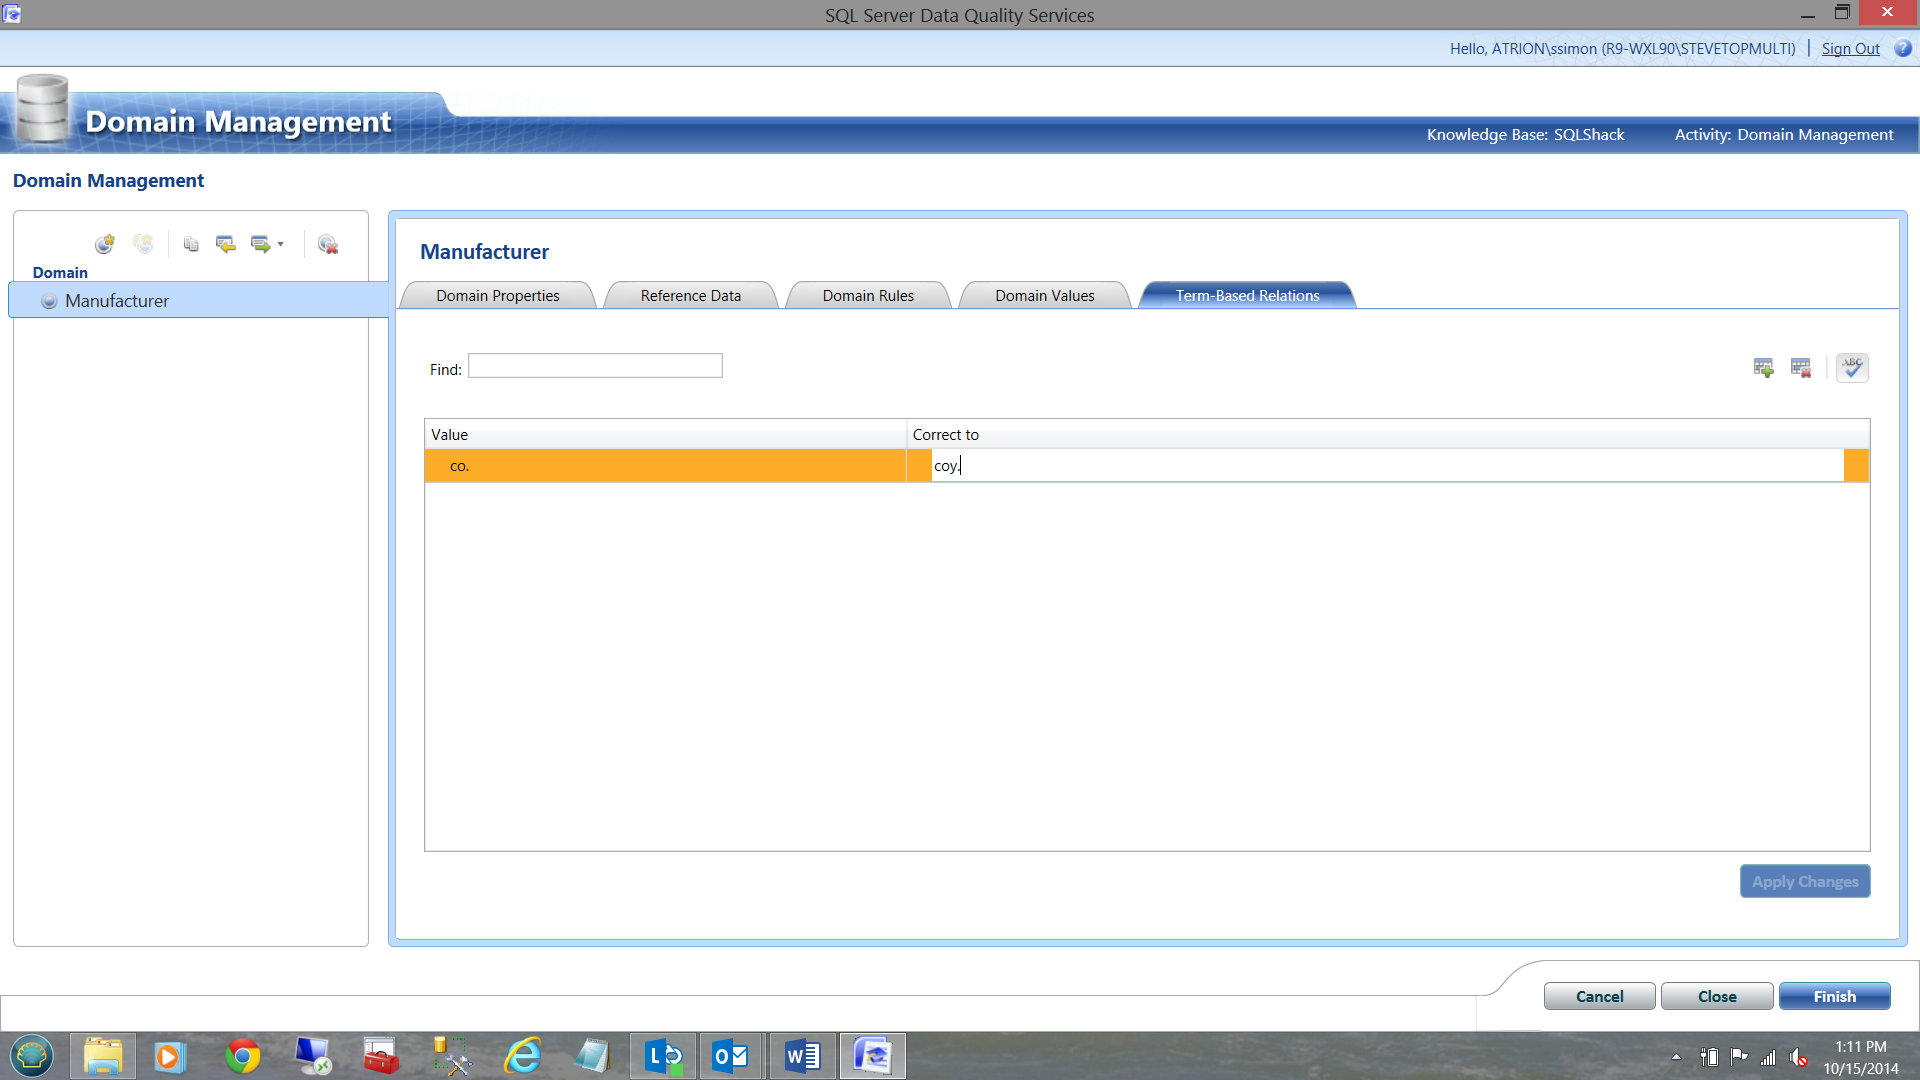
I then apply the changes. We shall see how this plays a part in the big scheme of things in a few minutes.
Domain Rules either affirm correctness or indicate data errors
Domain rules (the third tab) are slightly different and more down to the ‘grain of the wood’. As an example, ‘odd ball’ characters, white characters (from copying and pasting), slashes etc. that you wish to be invalidate and have fixed by an Analyst.
Data rows containing any of these characters need to be flagged and sent to the business analyst to be checked and rectified. In the case of the ‘Term-Based Rule’ we KNEW what should replace any instance of a value. In the case of ‘Domain Rules’ we do not what to expect.
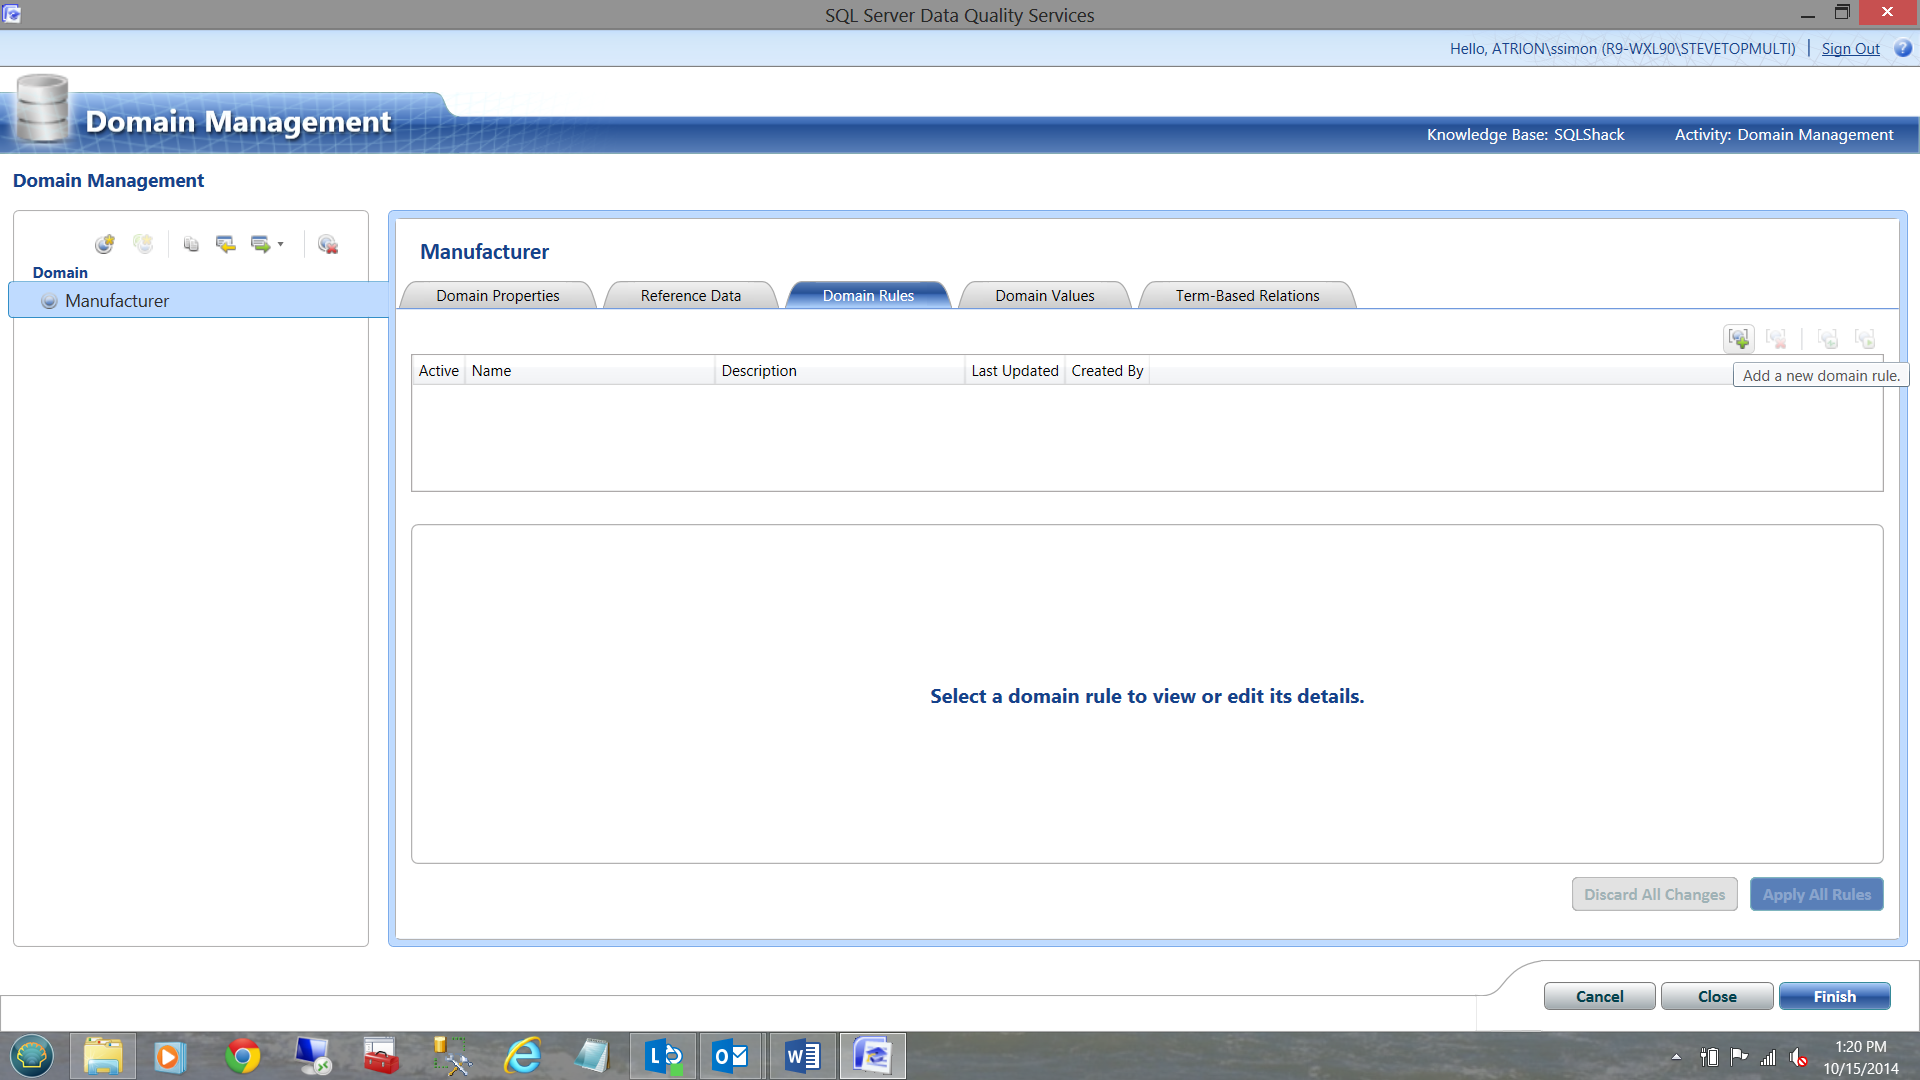
Let us now look at a rule that I created for our project. I add a new rule (see below)
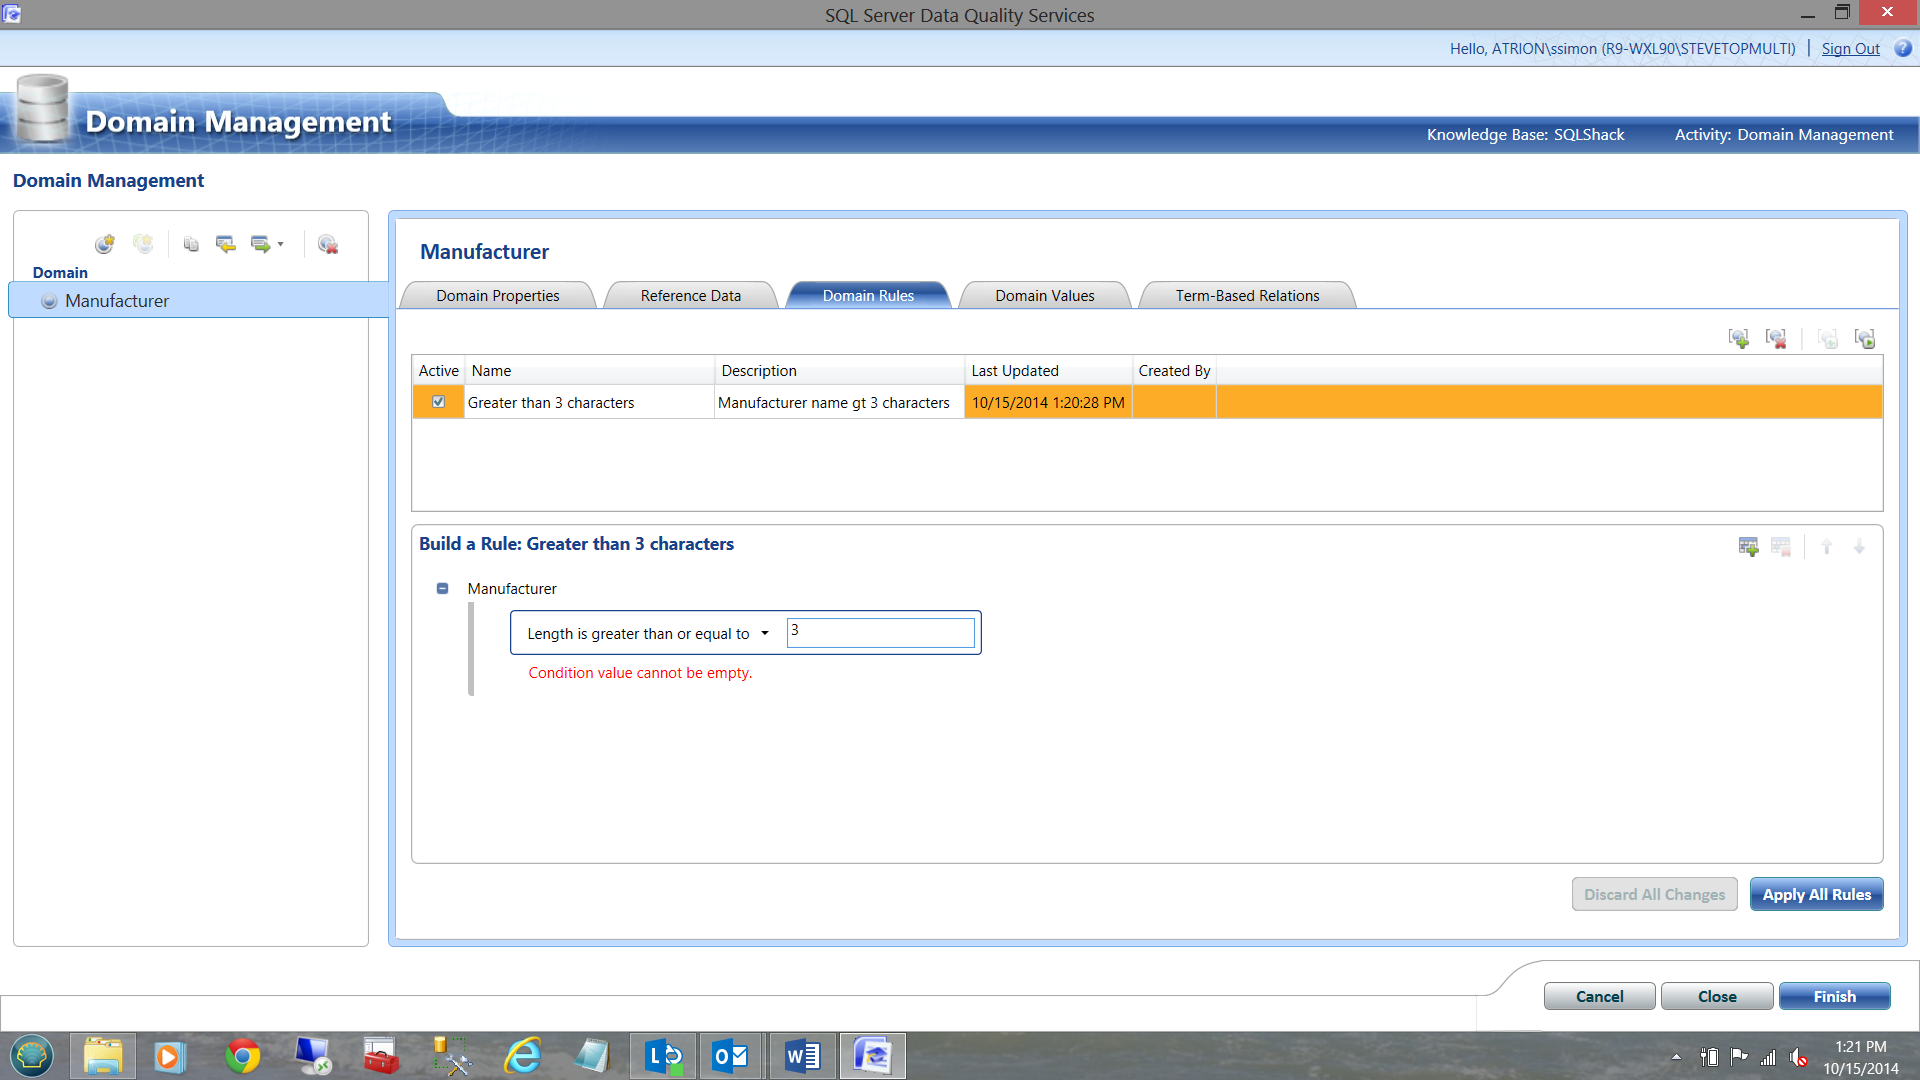
In this case, I wish to check that the name of the manufacturer is greater than three characters. If it is less than three characters, there is surely an error.
I now wish to add one further clause that states that if a slash is found within the manufacturer name, that this record be marked as ‘Invalid’.
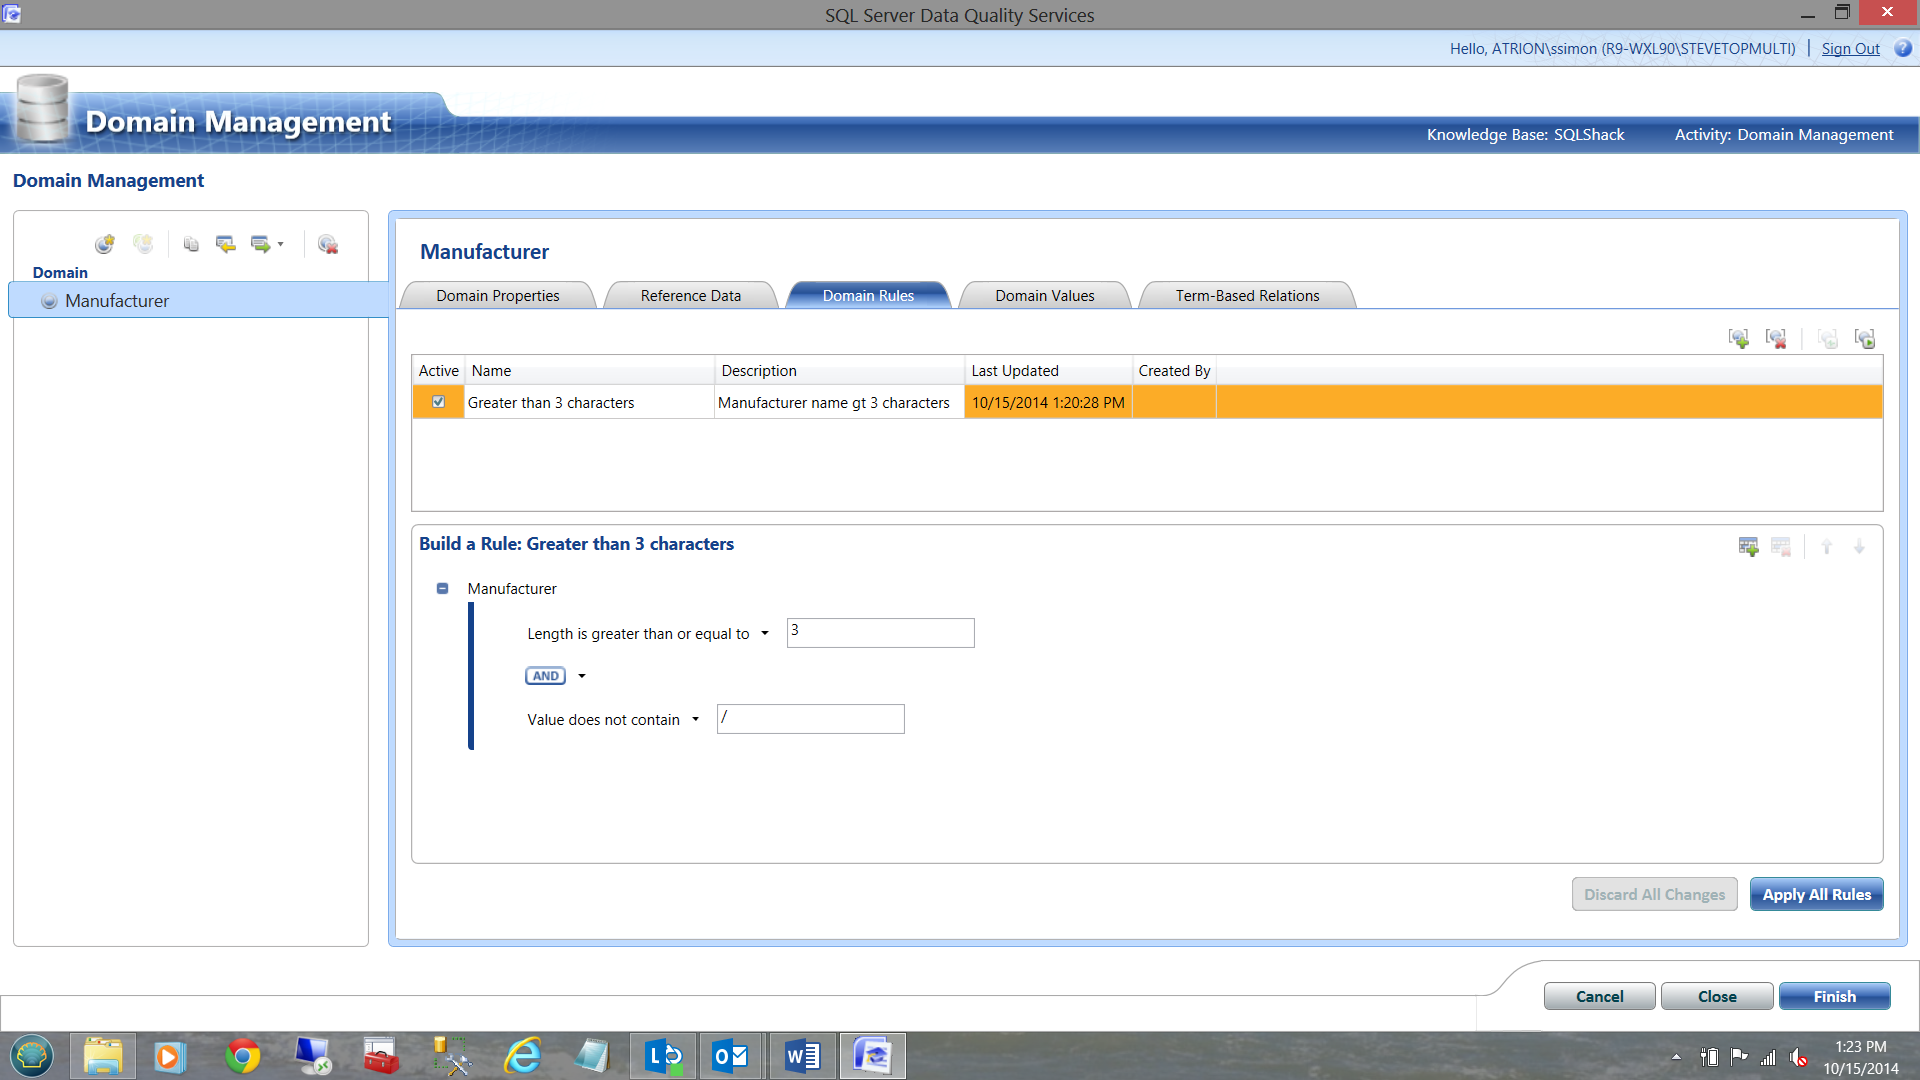
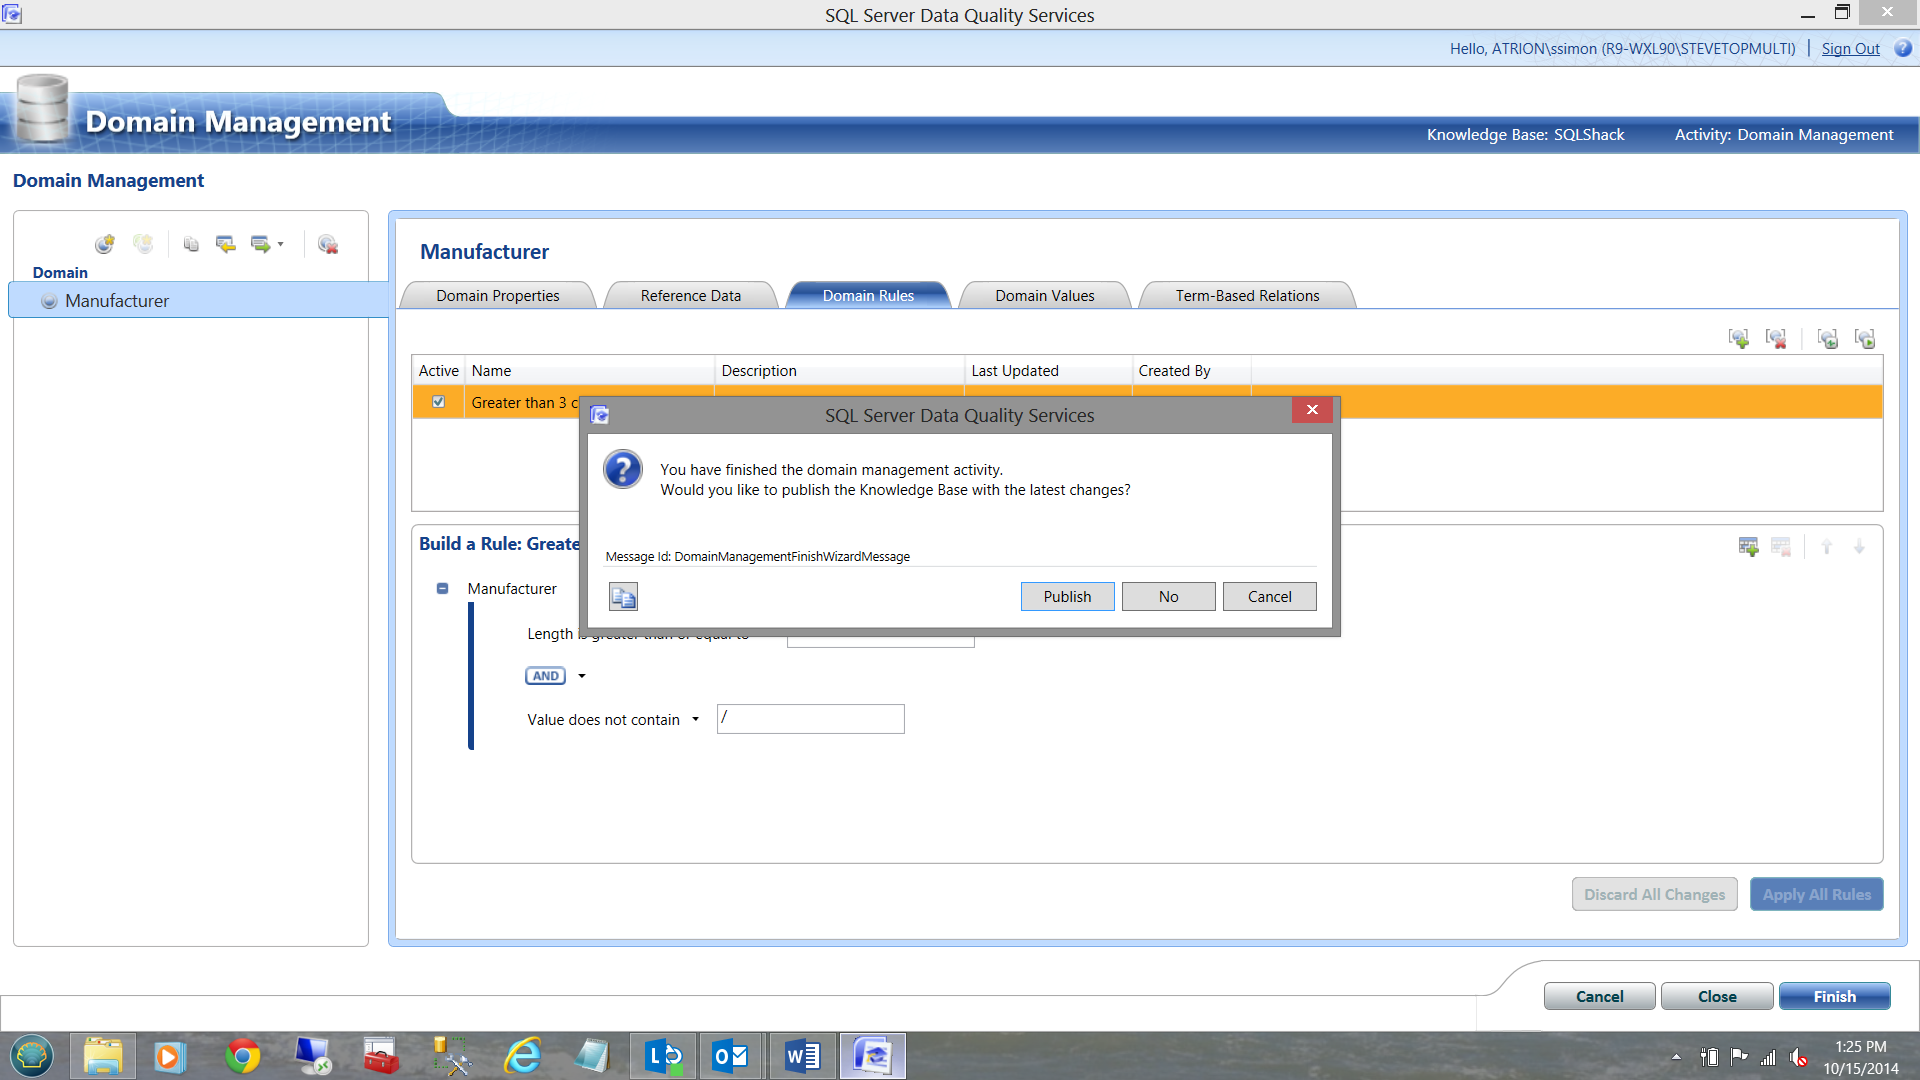
I now click ‘apply all rules’, and then finish.
I am then asked if I wish to ‘publish the knowledge base’, to which I answer, ‘Publish’.
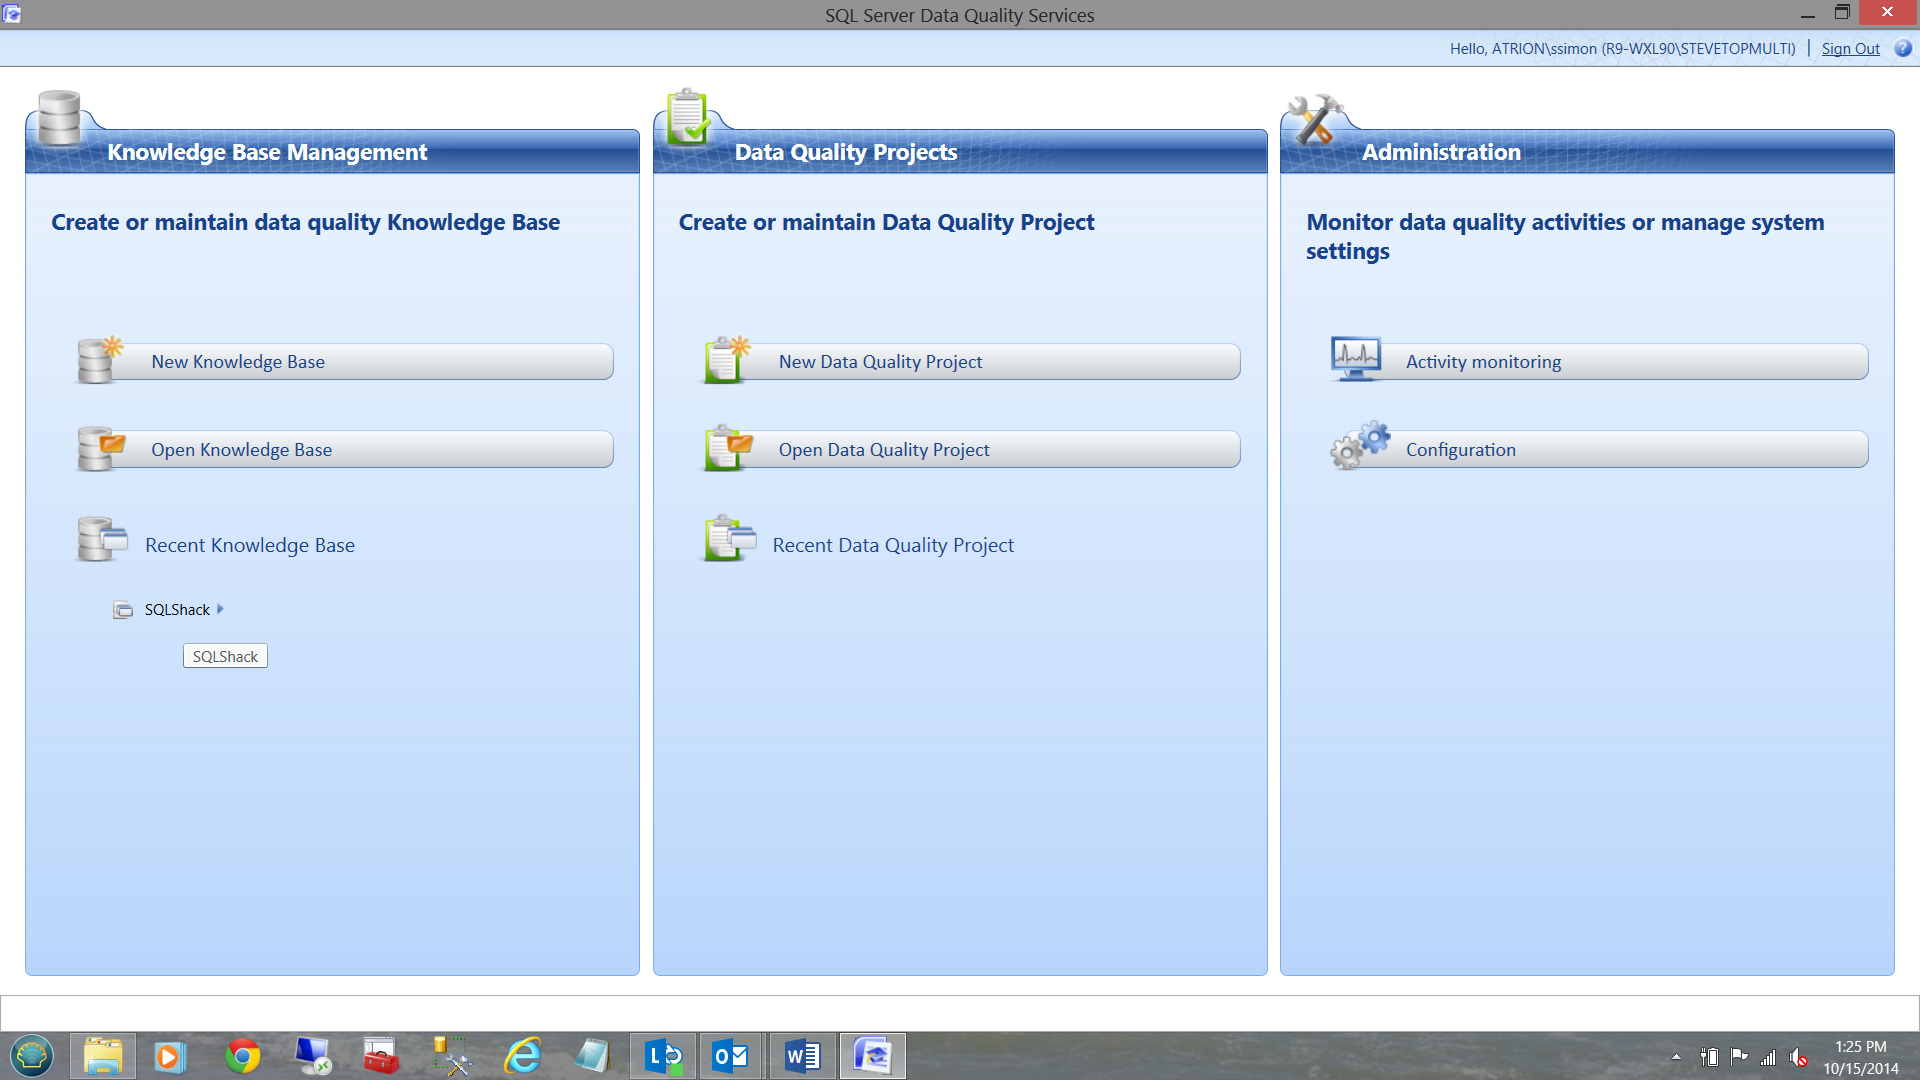
You will then be returned to the Main work screen. You will note that the SQL Shack Knowledge base may be seen on the left. See below.
Knowledge Discovery (the second of three steps to create our knowledge base)
Having entered our master list and having rectified a few anomalies, we are in a position to look at additional data as it comes in. We now wish to look at the accuracy statistics that our model generates against NEW DATA.
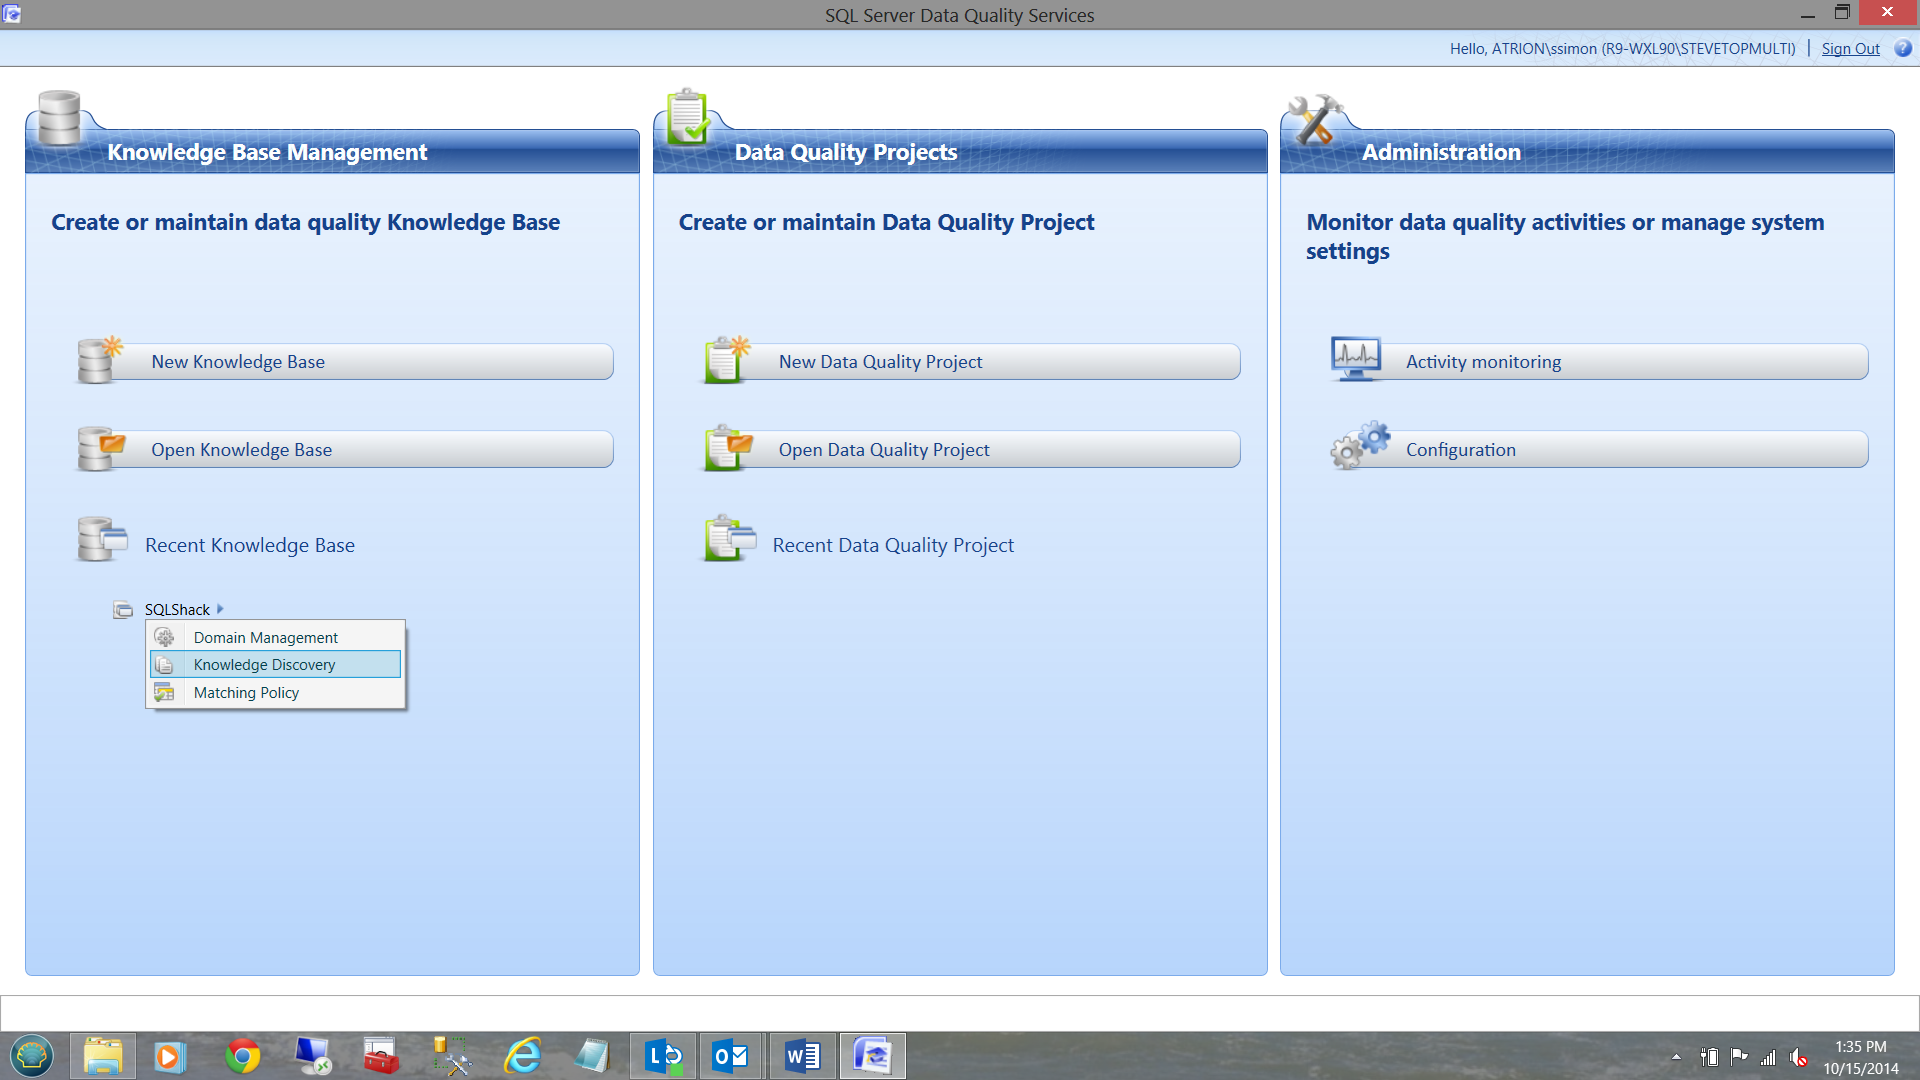
This is where ‘Knowledge Discovery’ comes into play.
I click on the arrow next to our SQL Shack knowledge base and select ‘Knowledge Discovery’.
Glory be!! We are now able to select our new data from a SQL Server Table.
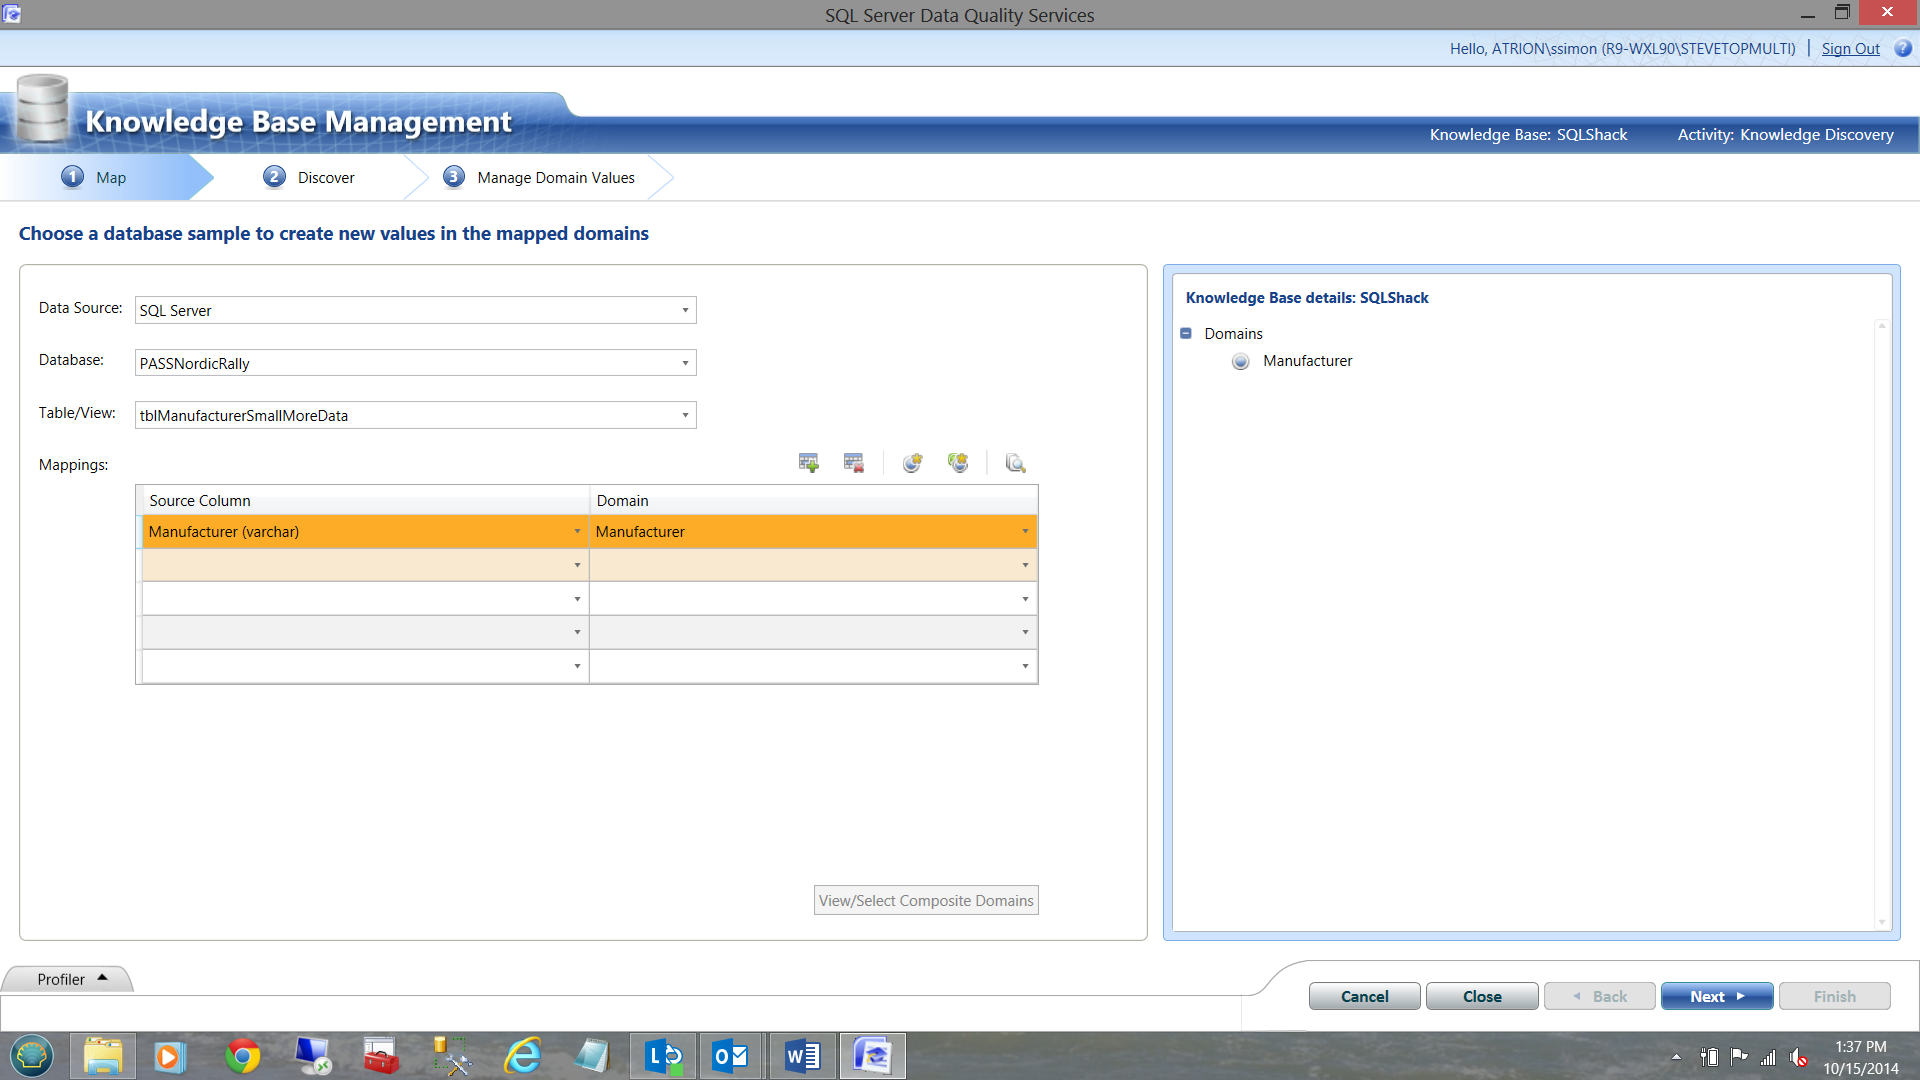
As a BTW, in our wonderful world new Manufacturer data is loaded daily into a special SQL Server table. It is this table that we shall be using.
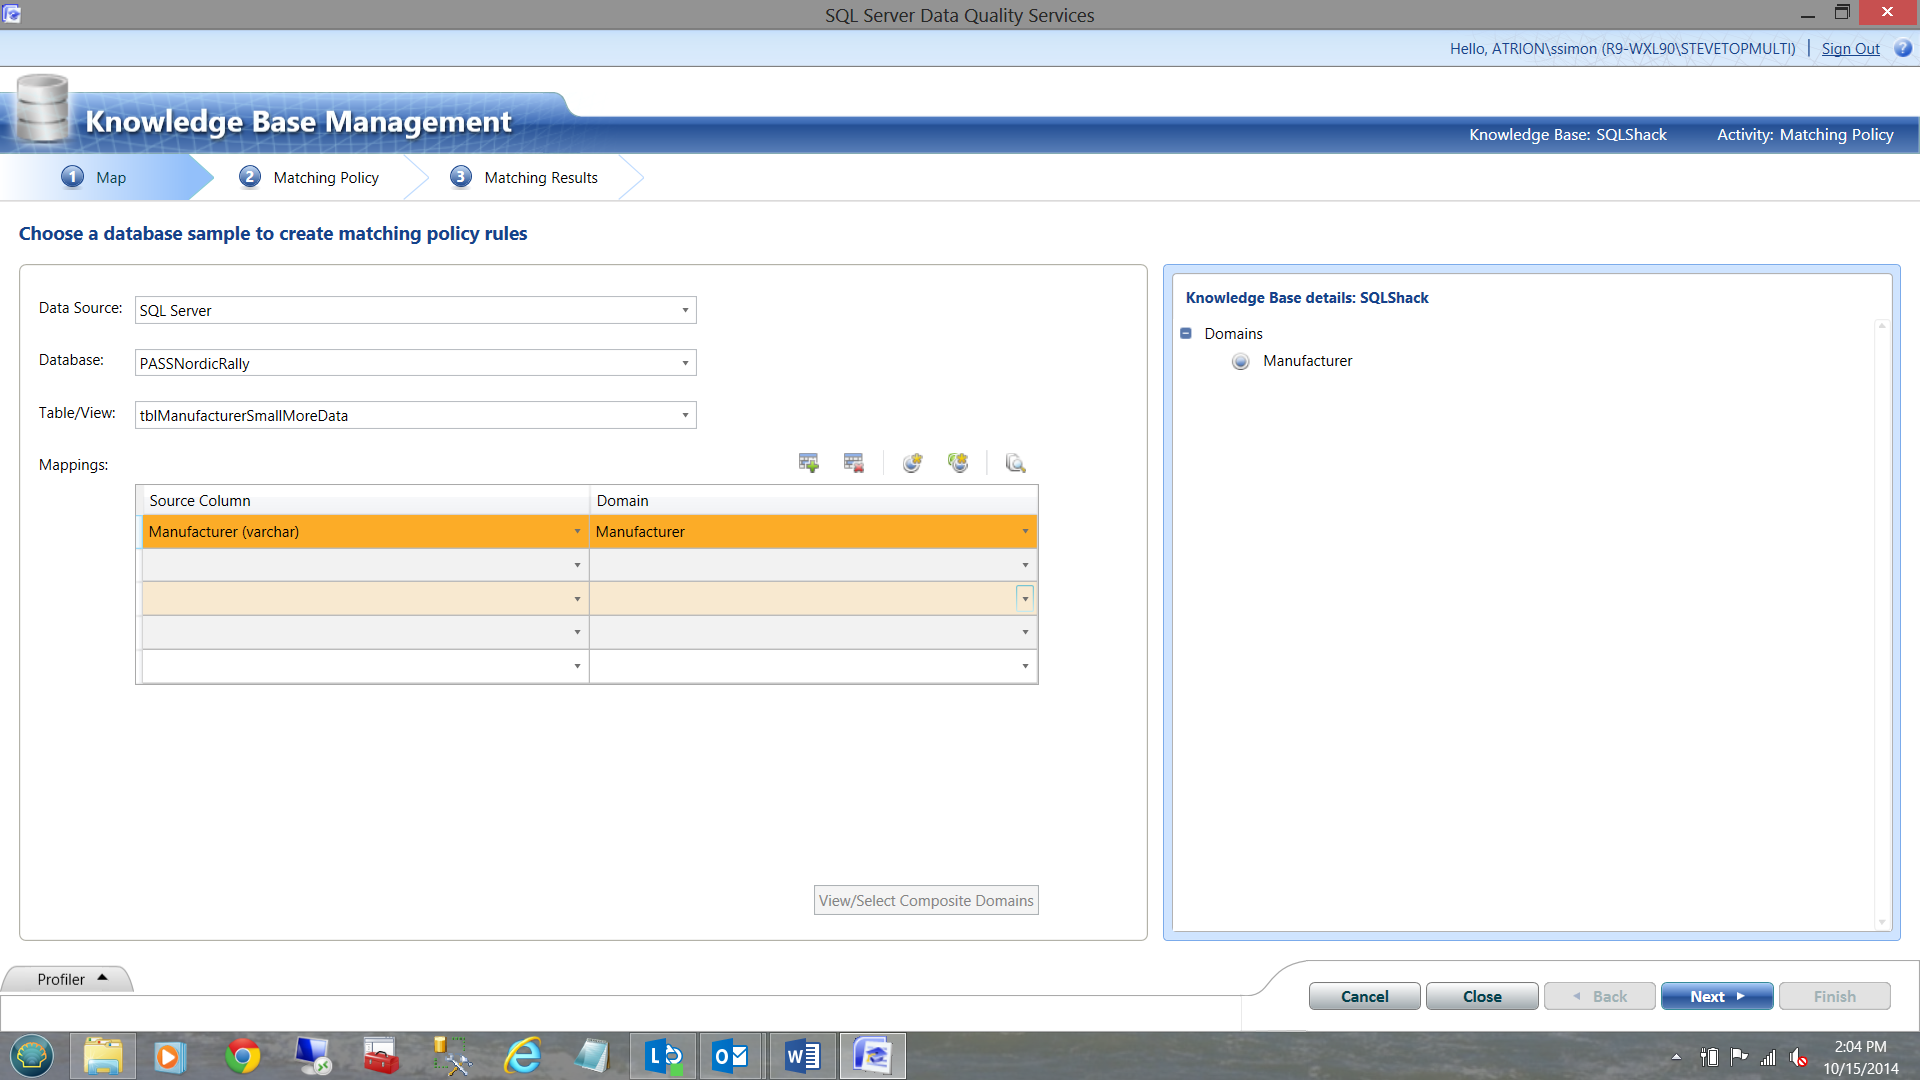
Note that the manufacturer in the left orange highlighted box comes from the our SQL Server Manufacturer table (Source Column) AND THAT the Domain value of Manufacturer comes for the process that we just completed above and is displayed in the box to the right.
Click next.
Performing data discovery analysis on the selected data source
Having clicked next, the following screen appears.
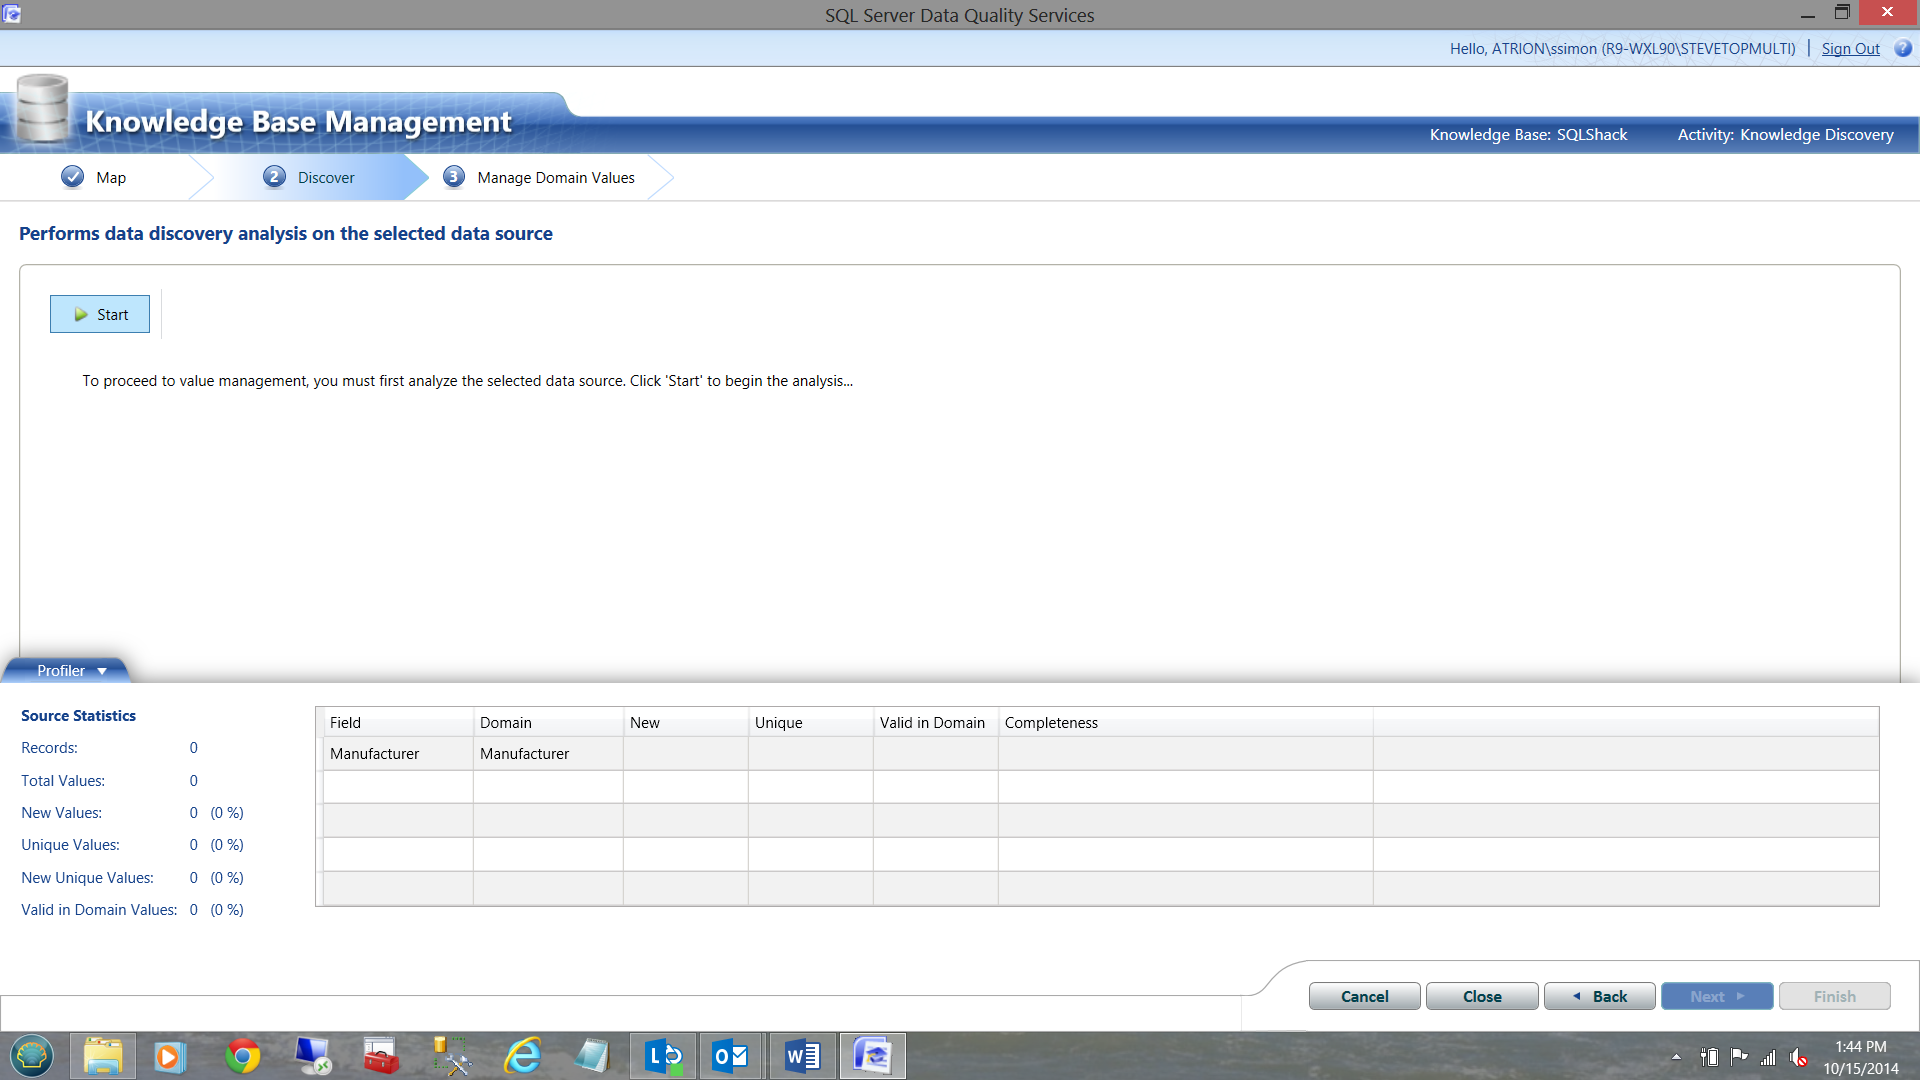
We are now in the position to start analyzing our data.
We click ‘Start’.
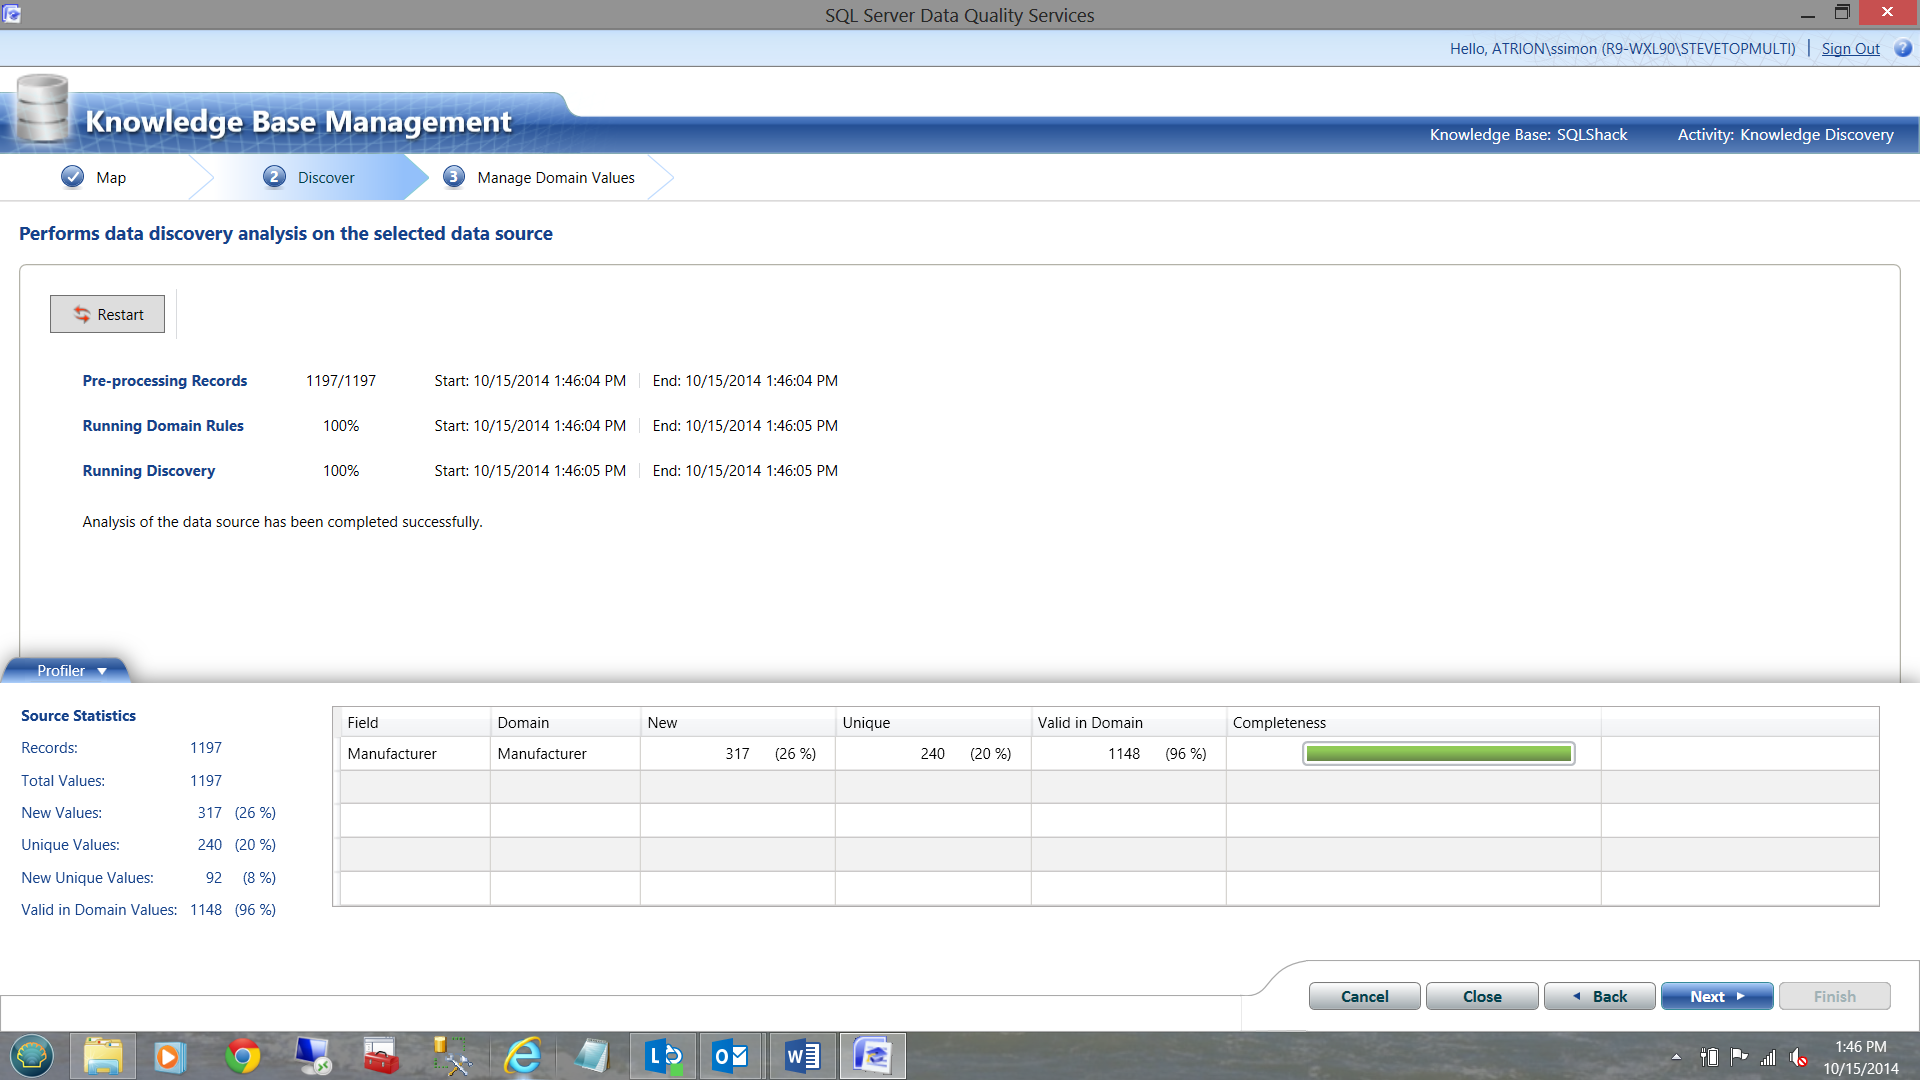
Note that the process statistics are very informative. DQS has found 317 records that are NEW. This naturally implies that our ‘master list’ is missing a few records. We shall see how this comes into play within a few minutes.
Click next.
You have the power!!!!!
The following screen is brought up.
Note that DQS has found a few problems in the NEW incoming data (e.g. Chas Freihofer) RELATIVE to our master list. DQS has marked them as ‘incorrect’ HOWEVER DQS was INTELLIGENT enough to provide an alternate value (originating from our master list). In many ways it is similar to a ‘Spell check’ HOWEVER a spell check CANNOT learn whereas DQS actually learns with time.
As always, you have the option to accept the spelling on the left OR to let DQS fix the value for you as recommended in the ‘Correct to’ column.
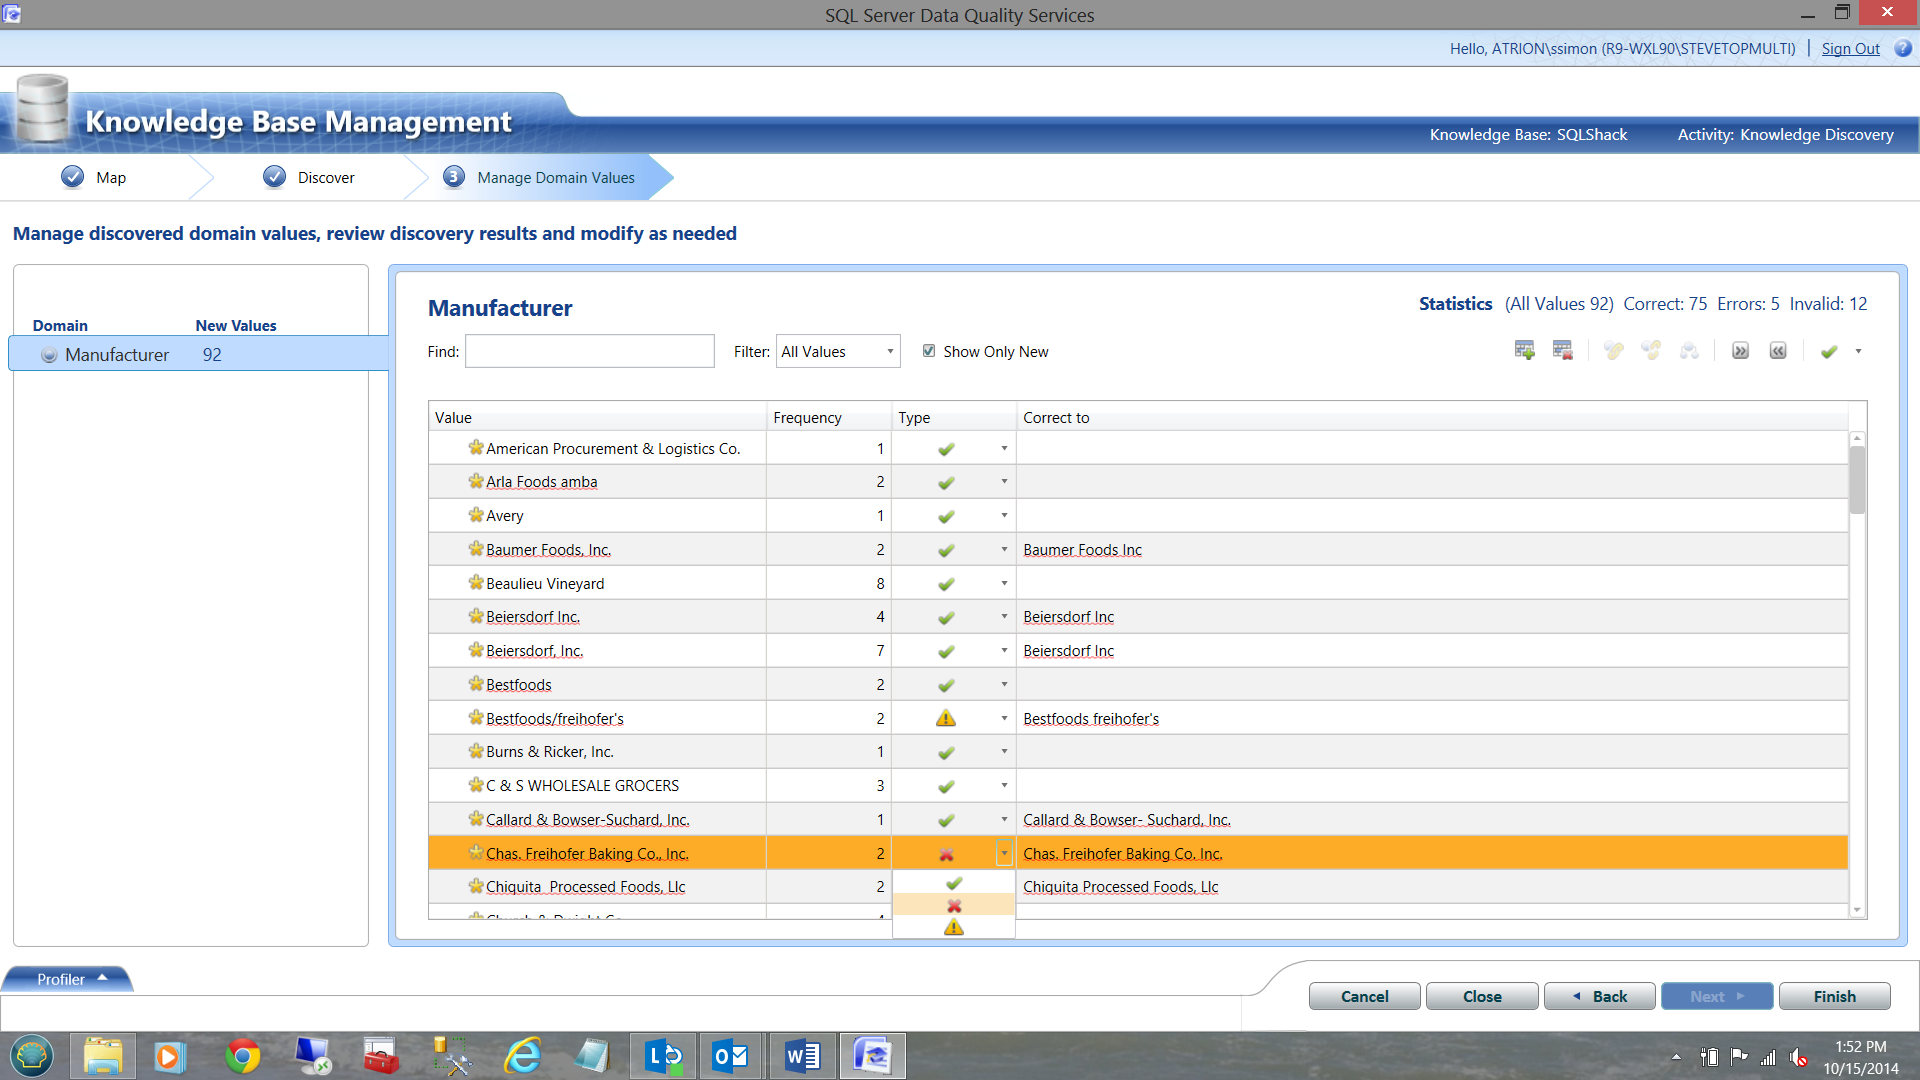
Leaving the type as ‘X’ permits DQS to use its own suggestion. Clicking the ‘check mark’ tells DQS, “no it is correct as is” and invalid ‘!’ is a half way between the two and is virtually saying ‘ I do not know’, or it has found a slash in the name OR that the name is less than three characters long.
One also has the option of doing a manual correction.
At this point the astute reader is saying to themselves, why must I still have to correct values? I thought that this product was the panacea of data cleansing.
The truth be said, DQS learn from each interaction, and manual data correction should be required less and less with time. After all, at this point, DQS has found 75 correct records, 5 Errors and 12 Invalid records ALL in one pass (see the statistics in the top right portion of the Manufacturer box).
We now click ‘Finish’.
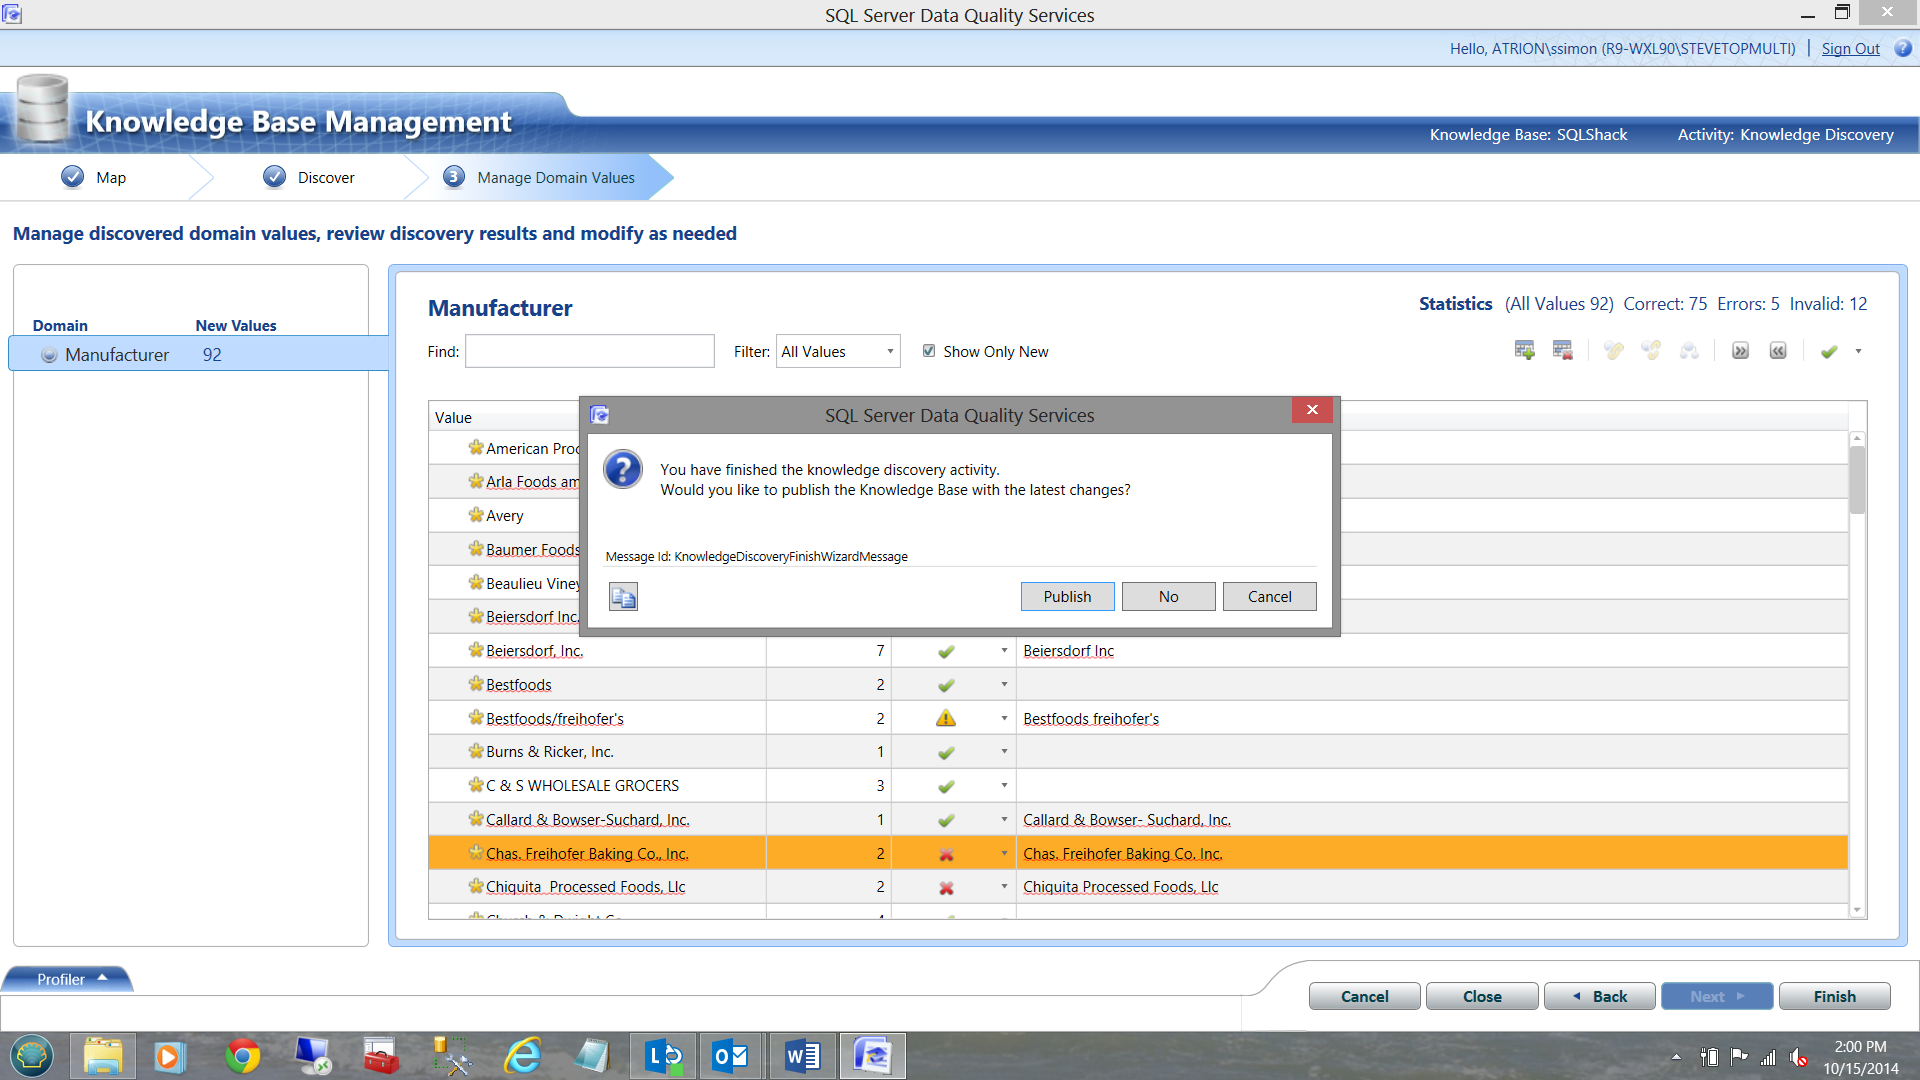
Once again we publish our results.
Matching Policy (the third of three steps to create our knowledge base)
Matching policy is a critical part of the data cleansing process as it defines the percentage ‘certainty’ required to either declare that a manufacturer is correctly defined or that is incorrectly defined. In short this process looks at the DQS statistics for our data and tells us what it (DQS) considers valid.
We select the ‘Matching Policy’ tab as shown below:

The following screen appears and using the same table, we define our relationships (see below).
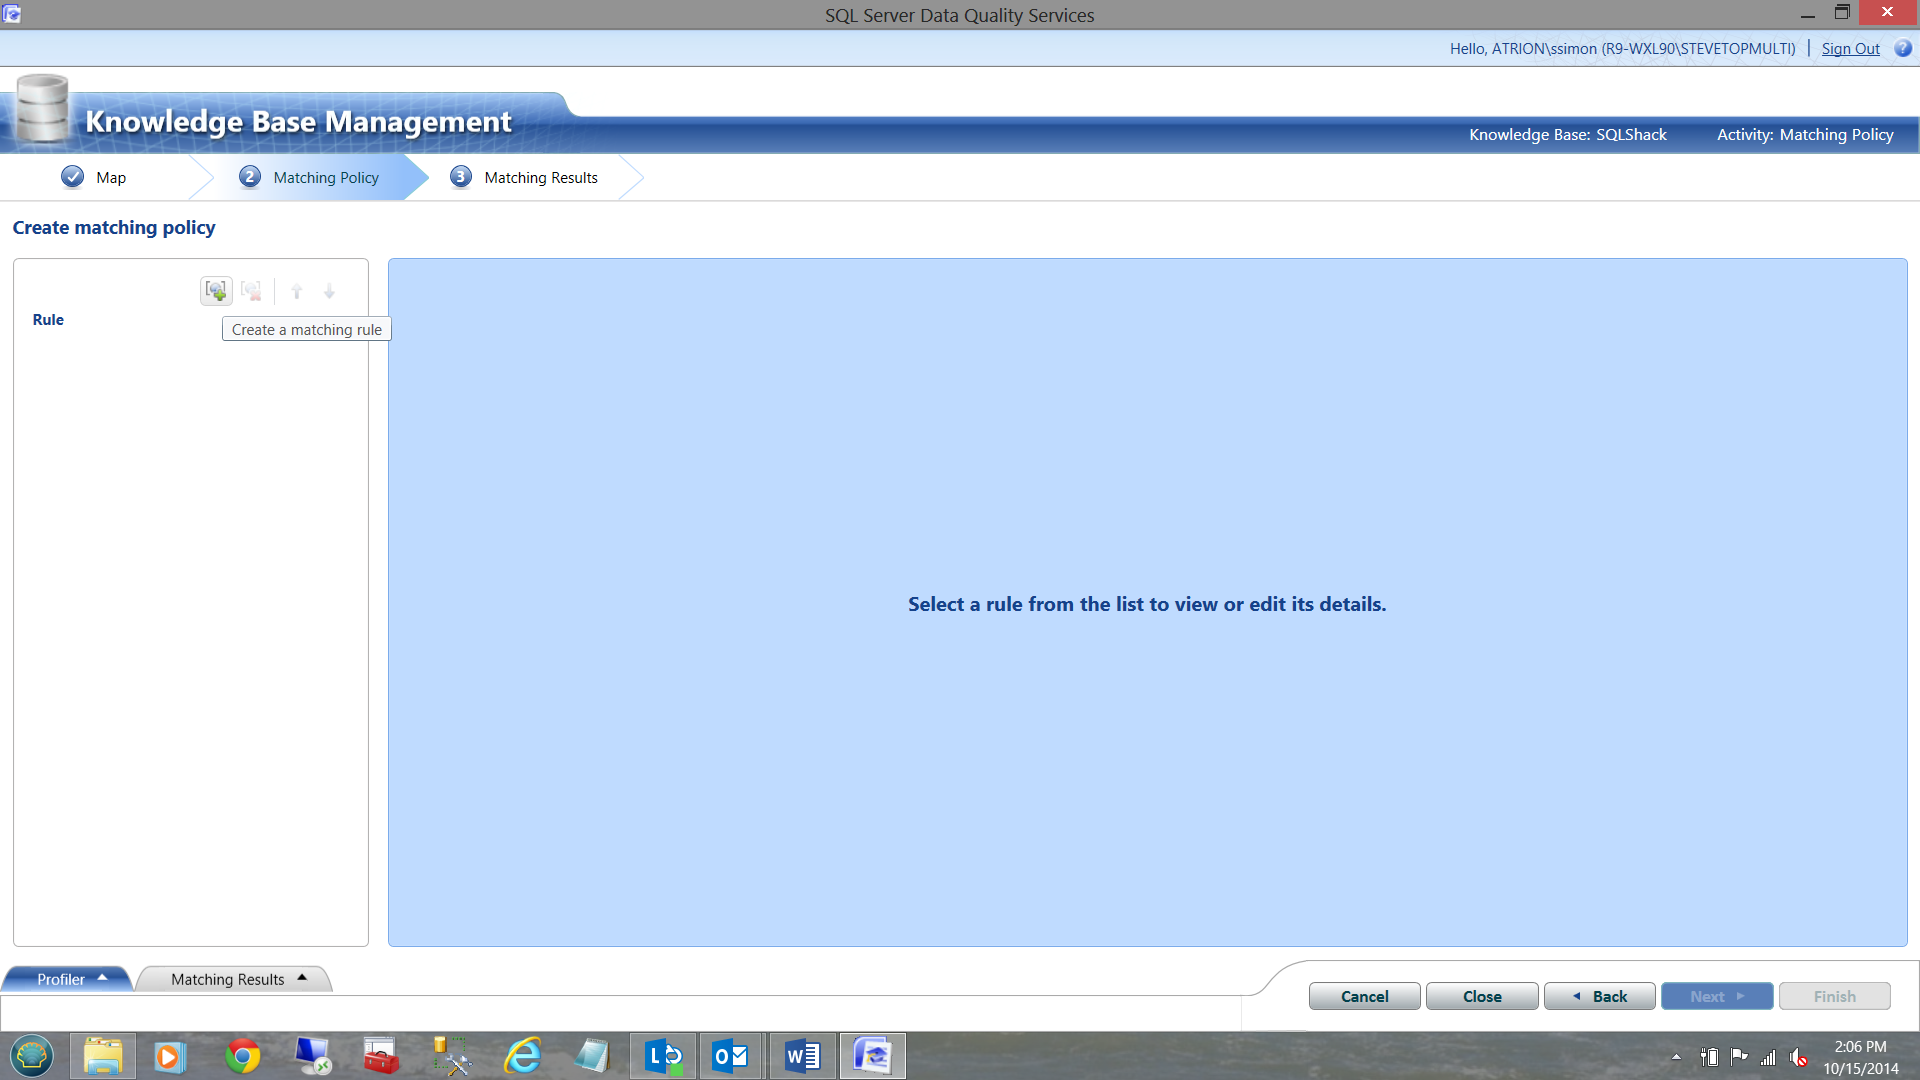
We then click ‘Next’ to create a matching rule. We select the ‘Create a matching rule’ option.
We need to add a ‘Domain Element’ (see below)
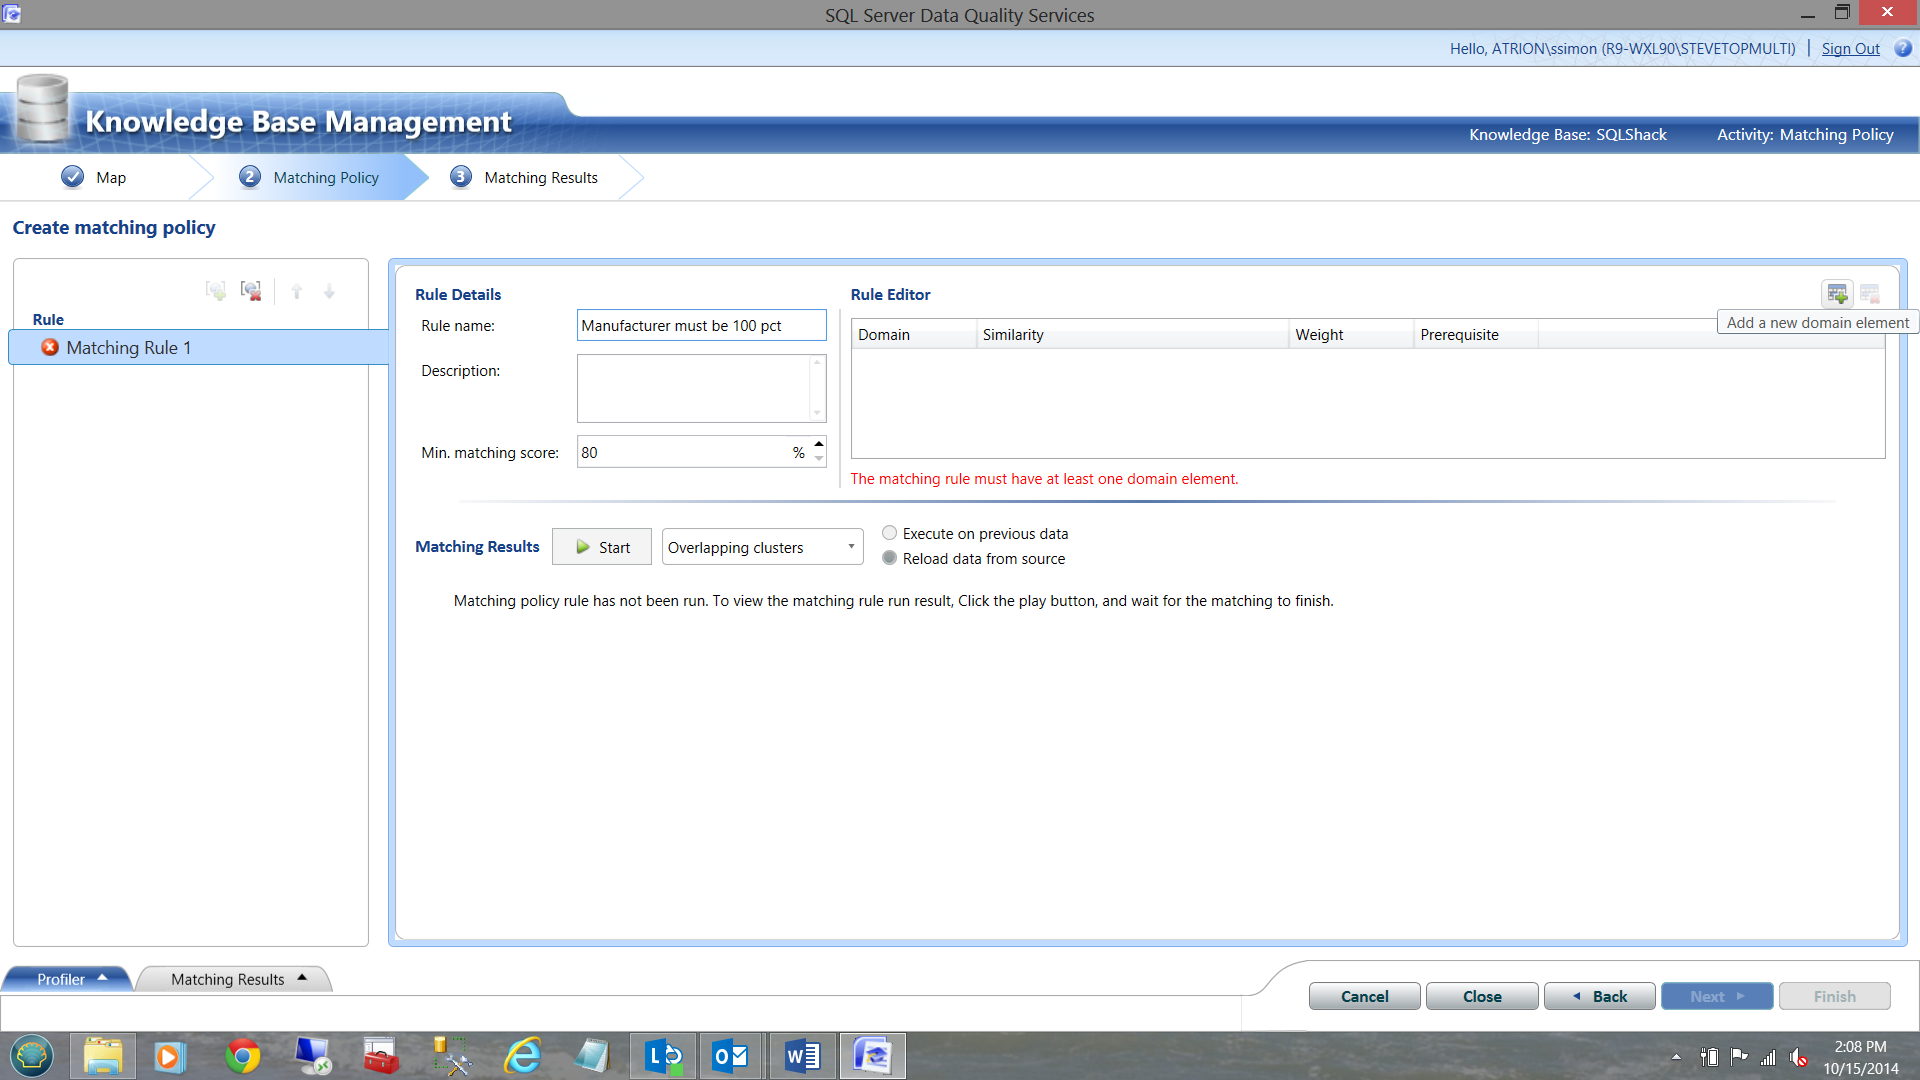
This element will be used as a guideline to ascertain ‘manufacturer’ validity and correctness.
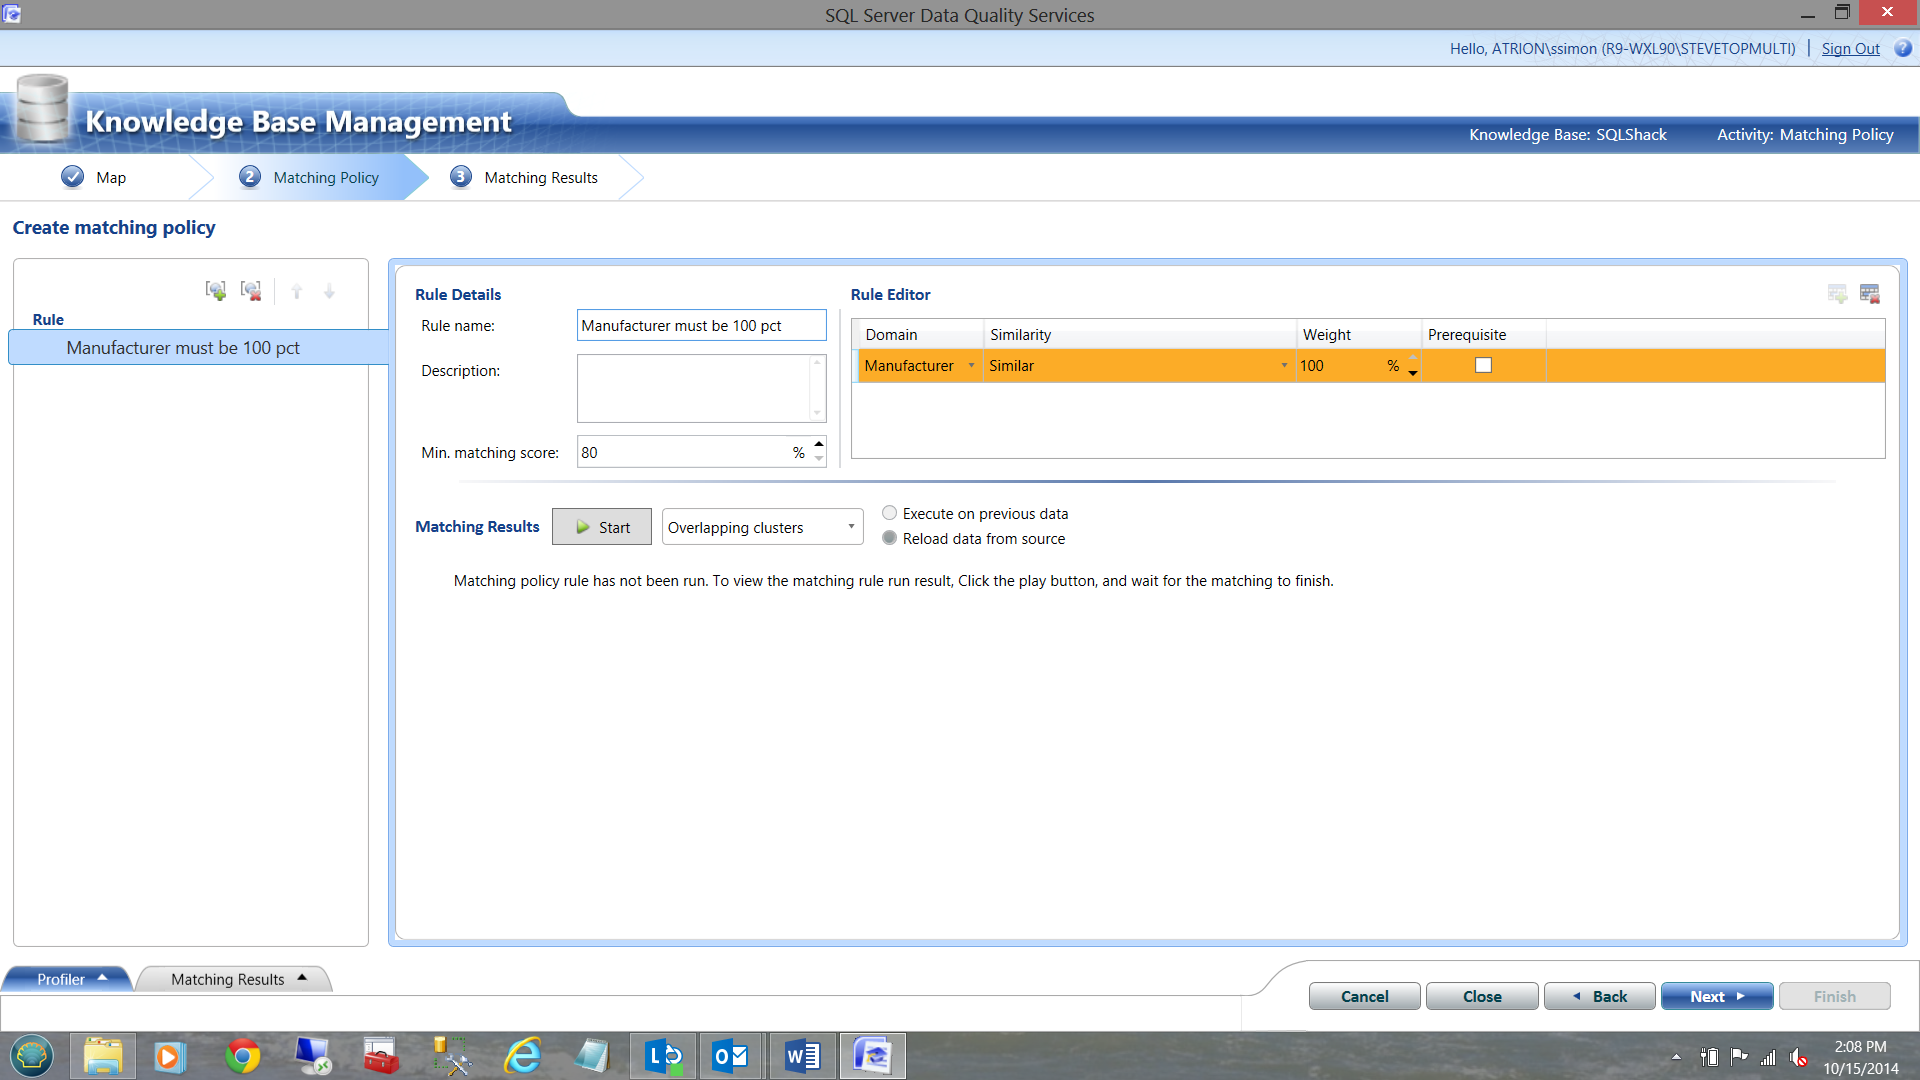
Under normal circumstances, we would not be using only ‘Manufacturer’ exclusively but rather ‘Manufacturer’, ‘Product’ etc.
It should be noted that one can weight correctness on any of these attributes to any percentage, however the total must amount to 100%.
As we are looking solely at ‘Manufacturer’, the results must be 100% correct for a match, otherwise the record will be deemed questionable.
We now click next.
Let us now look at the matching results to see how our NEW data compares with our master list. DQS found ‘matches’ for the following manufacturers.

Further, it could not find matches for the following items.
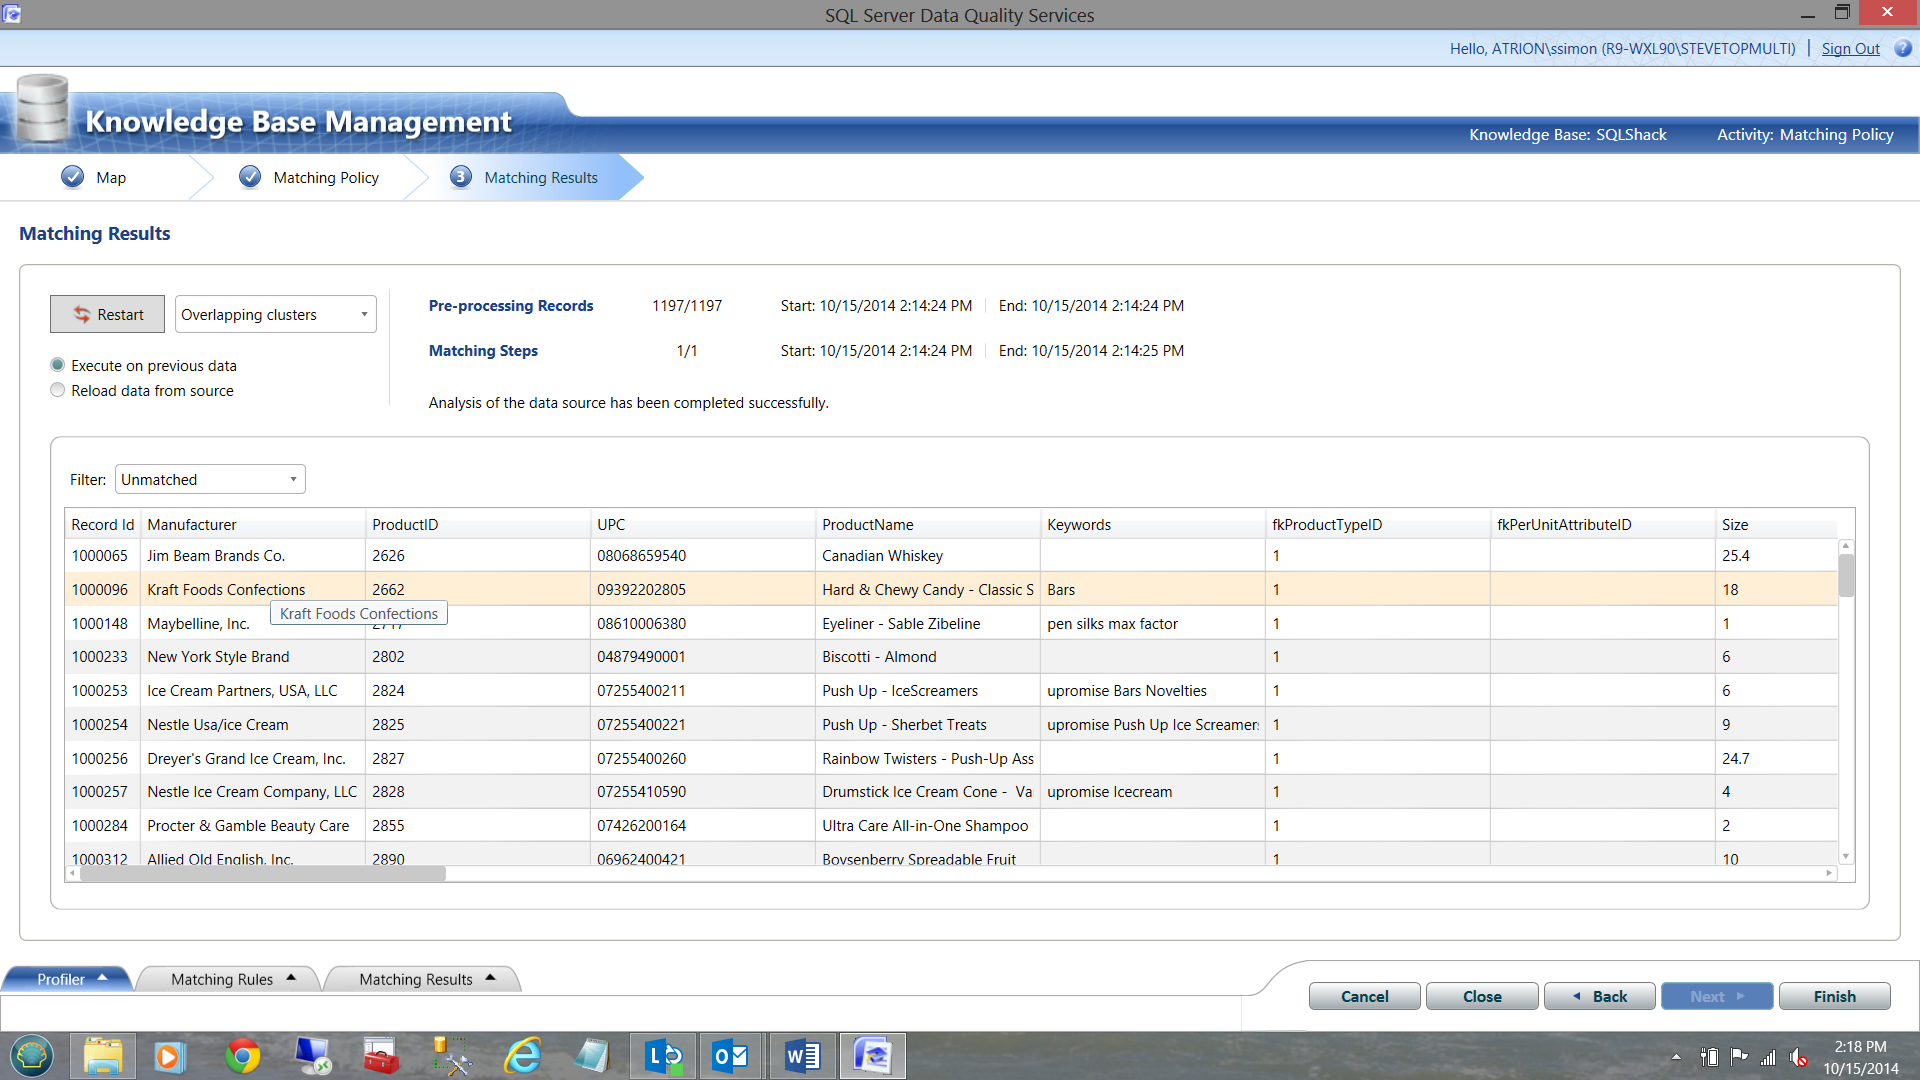
One possible reason for a non-match was mentioned above in that there were numerous items in the SQL Server table that were NOT in the master list.
We now click ‘Finish’ publish.
Talk is cheap, but money buys the lunch!
Having quickly run through the preparations to evaluate our data and to train our knowledge base, it is now time to utilize our knowledge base against our production data or for that matter, new incoming data.
To do this we must create a new ‘Data Quality Project’.
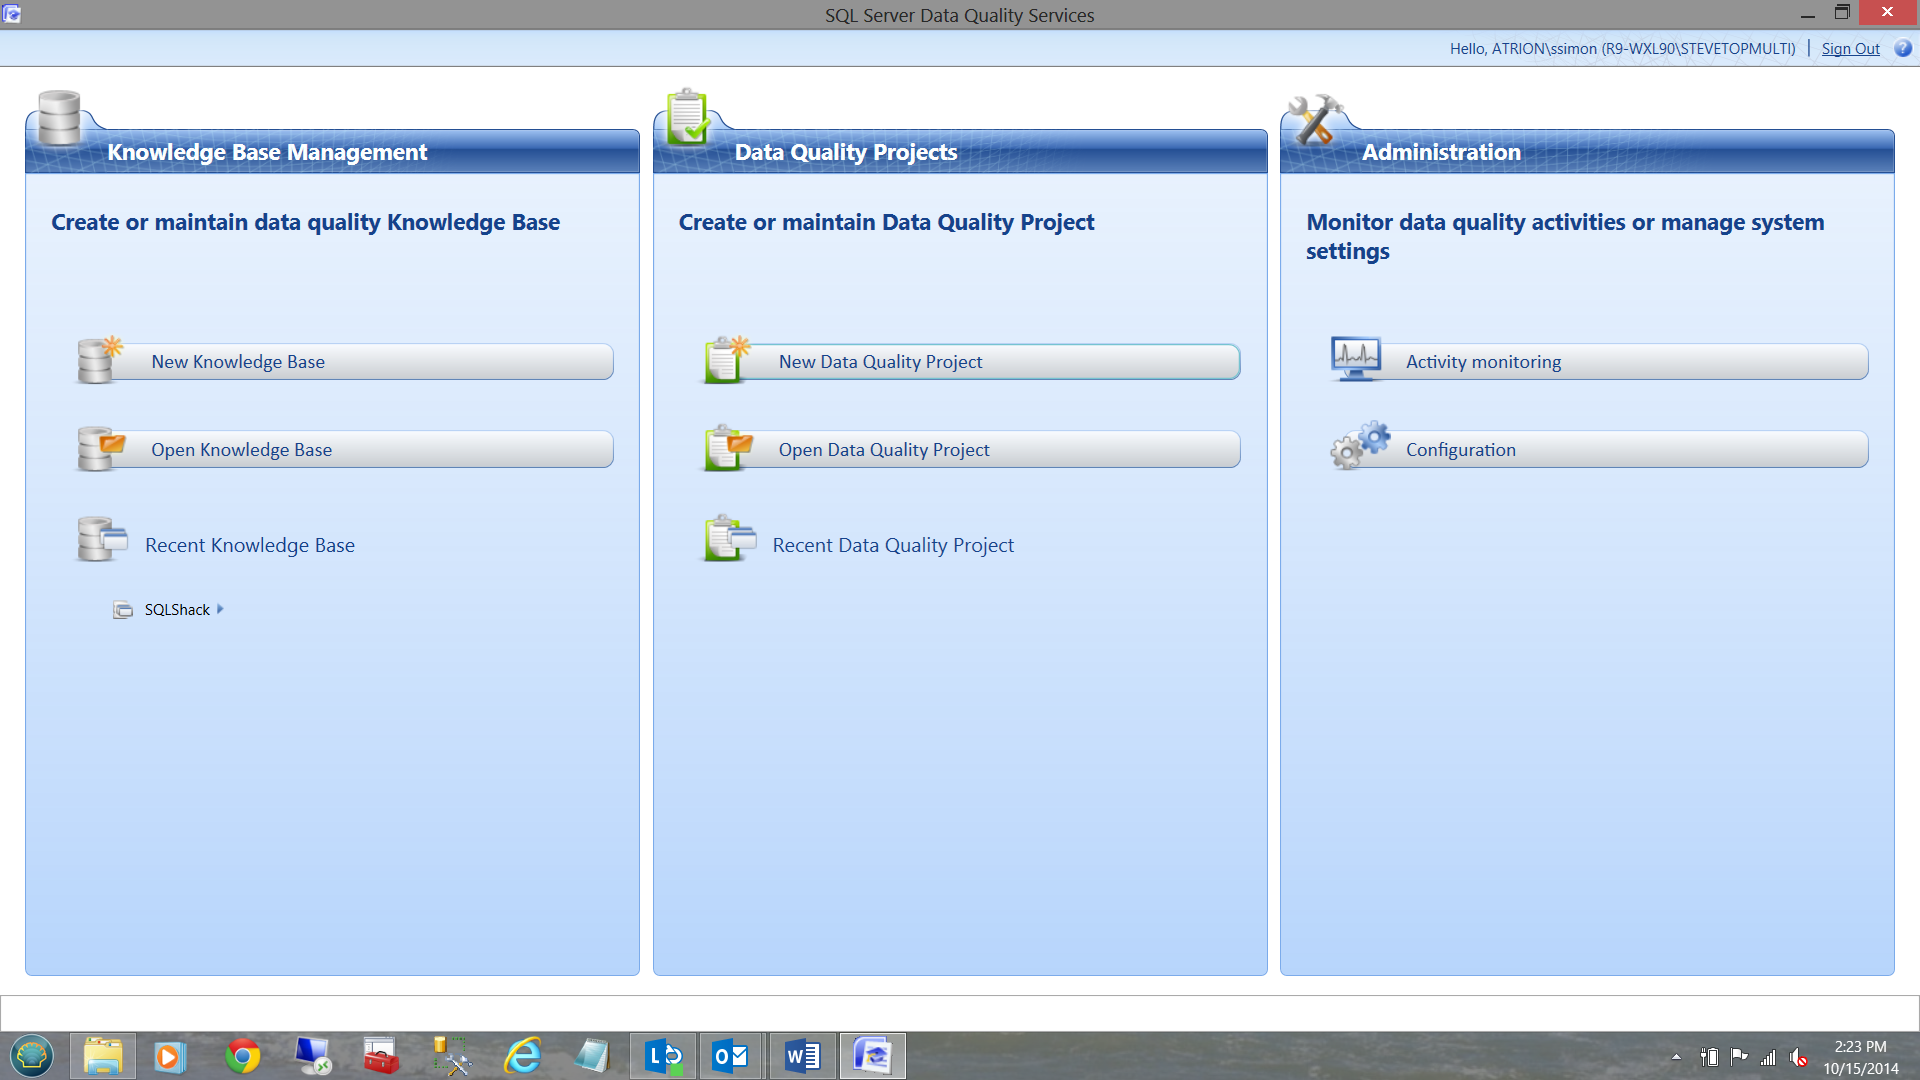
We select the ‘New Data Quality Project’ option from the ‘Data Quality Projects’ menu.
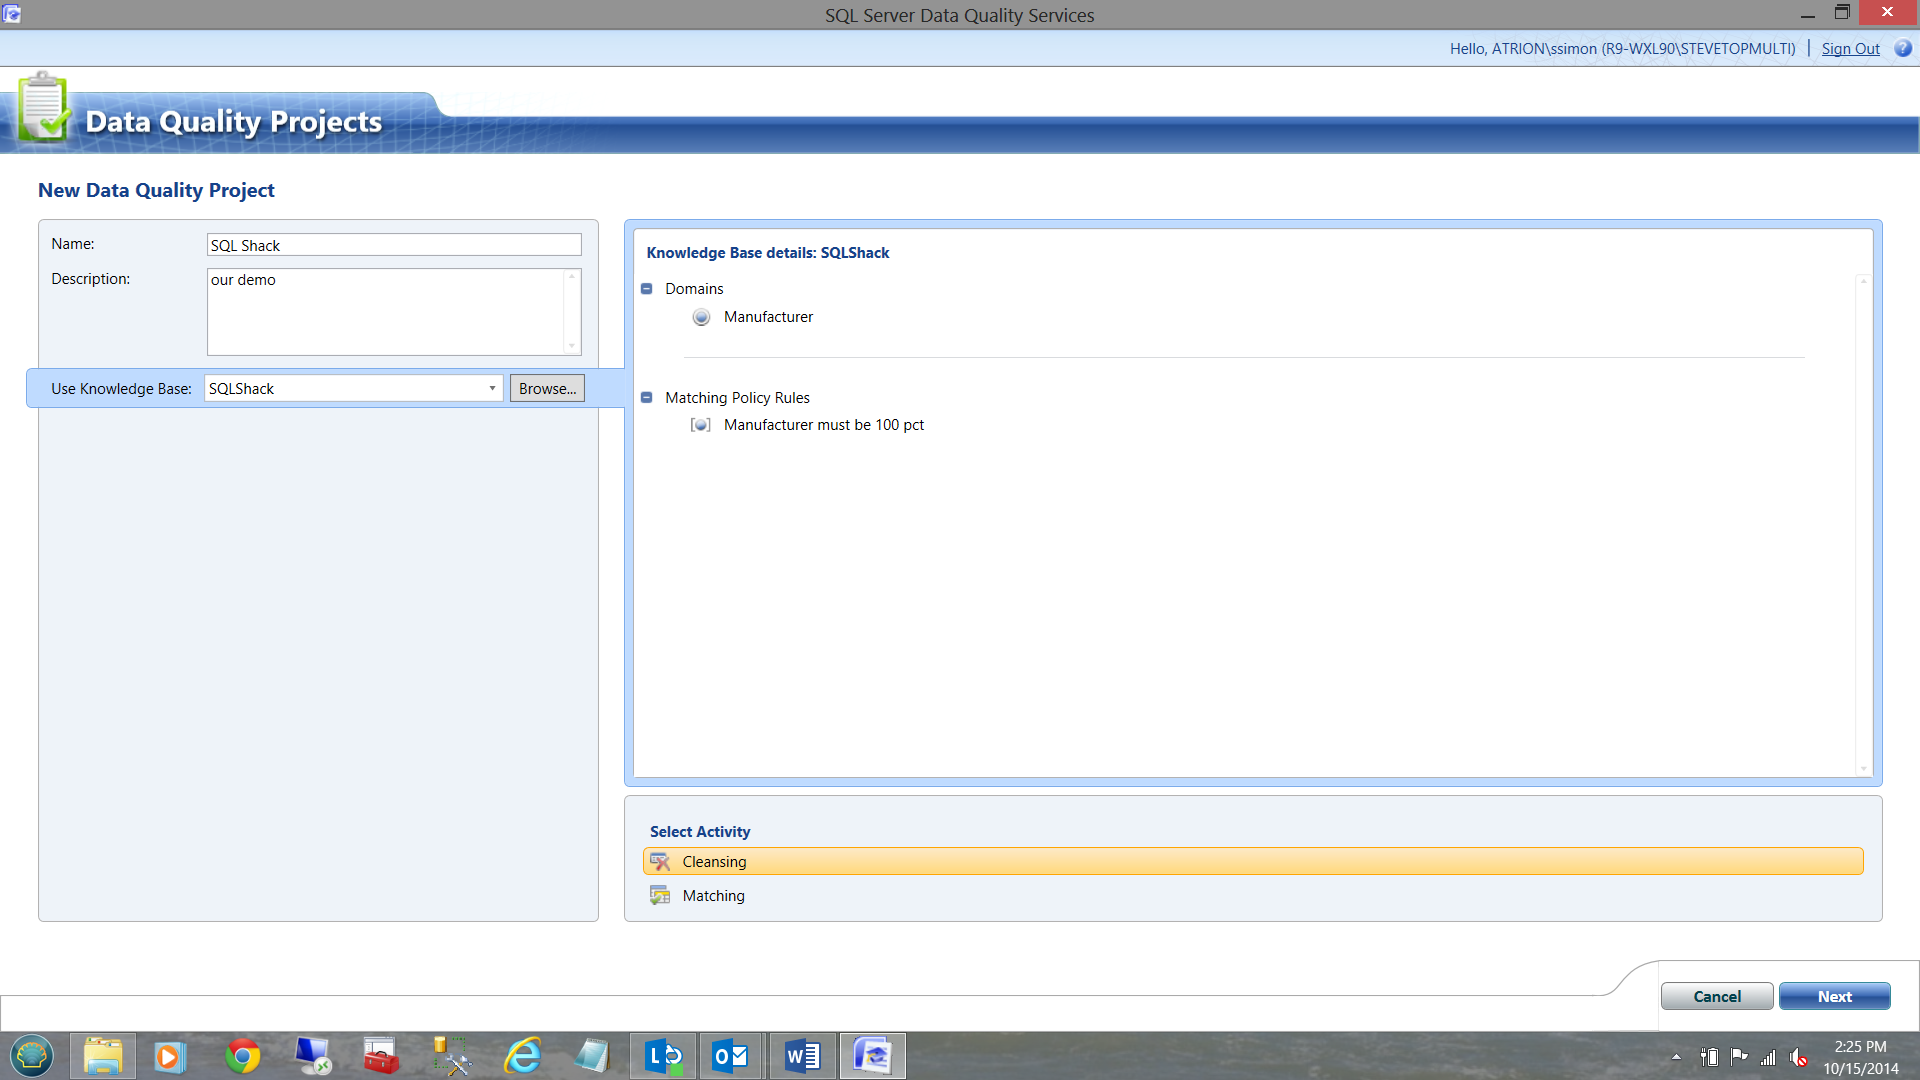
Note that the necessary criteria has been completed for the reader, utilizing the knowledge base that we just created.
We select the ‘Cleansing’ option and click ‘Next’
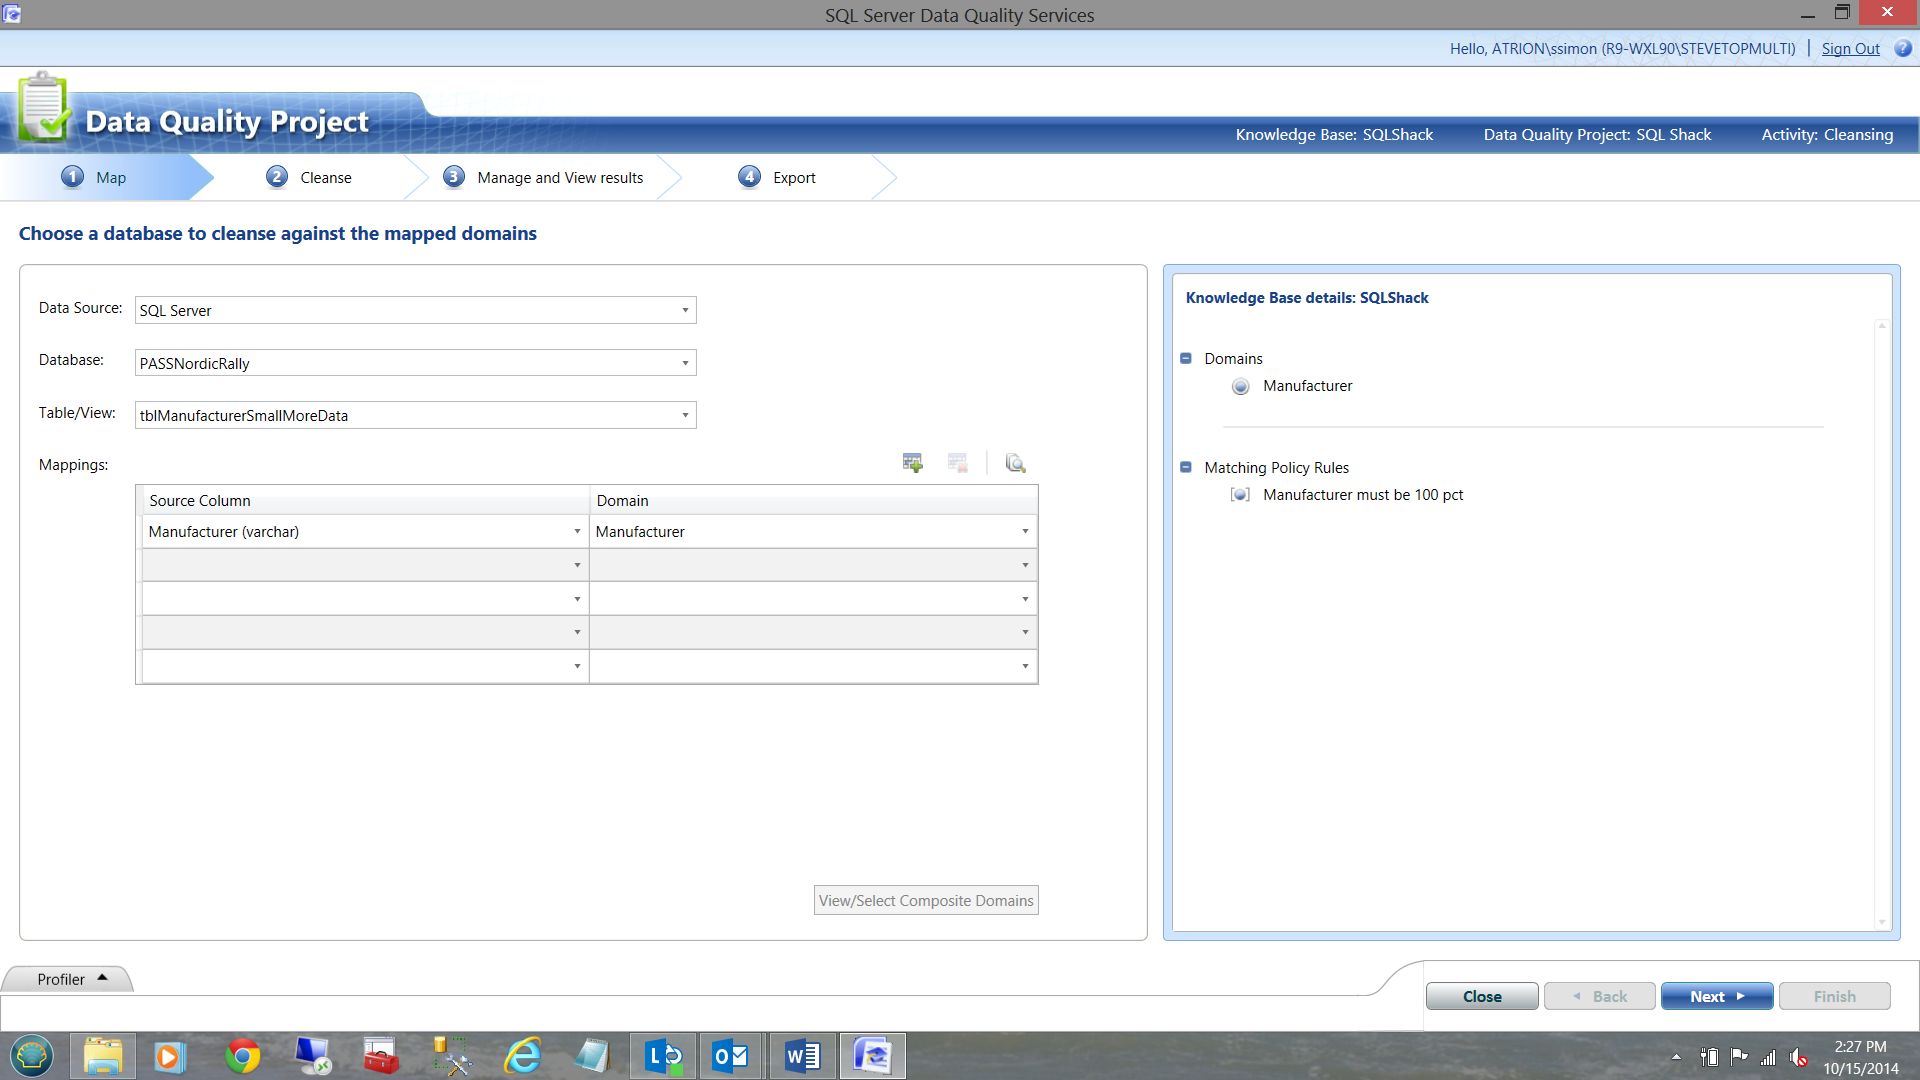
Our familiar database and domain data entry screen appears. Once again I have taken the liberty of completing the required fields as shown above and we then click next.
Performing cleansing on the selected data
Upon arriving at the next screen, we start processing the data and DQS will effectively BEGIN CLEANSING your live data. My results are shown below:
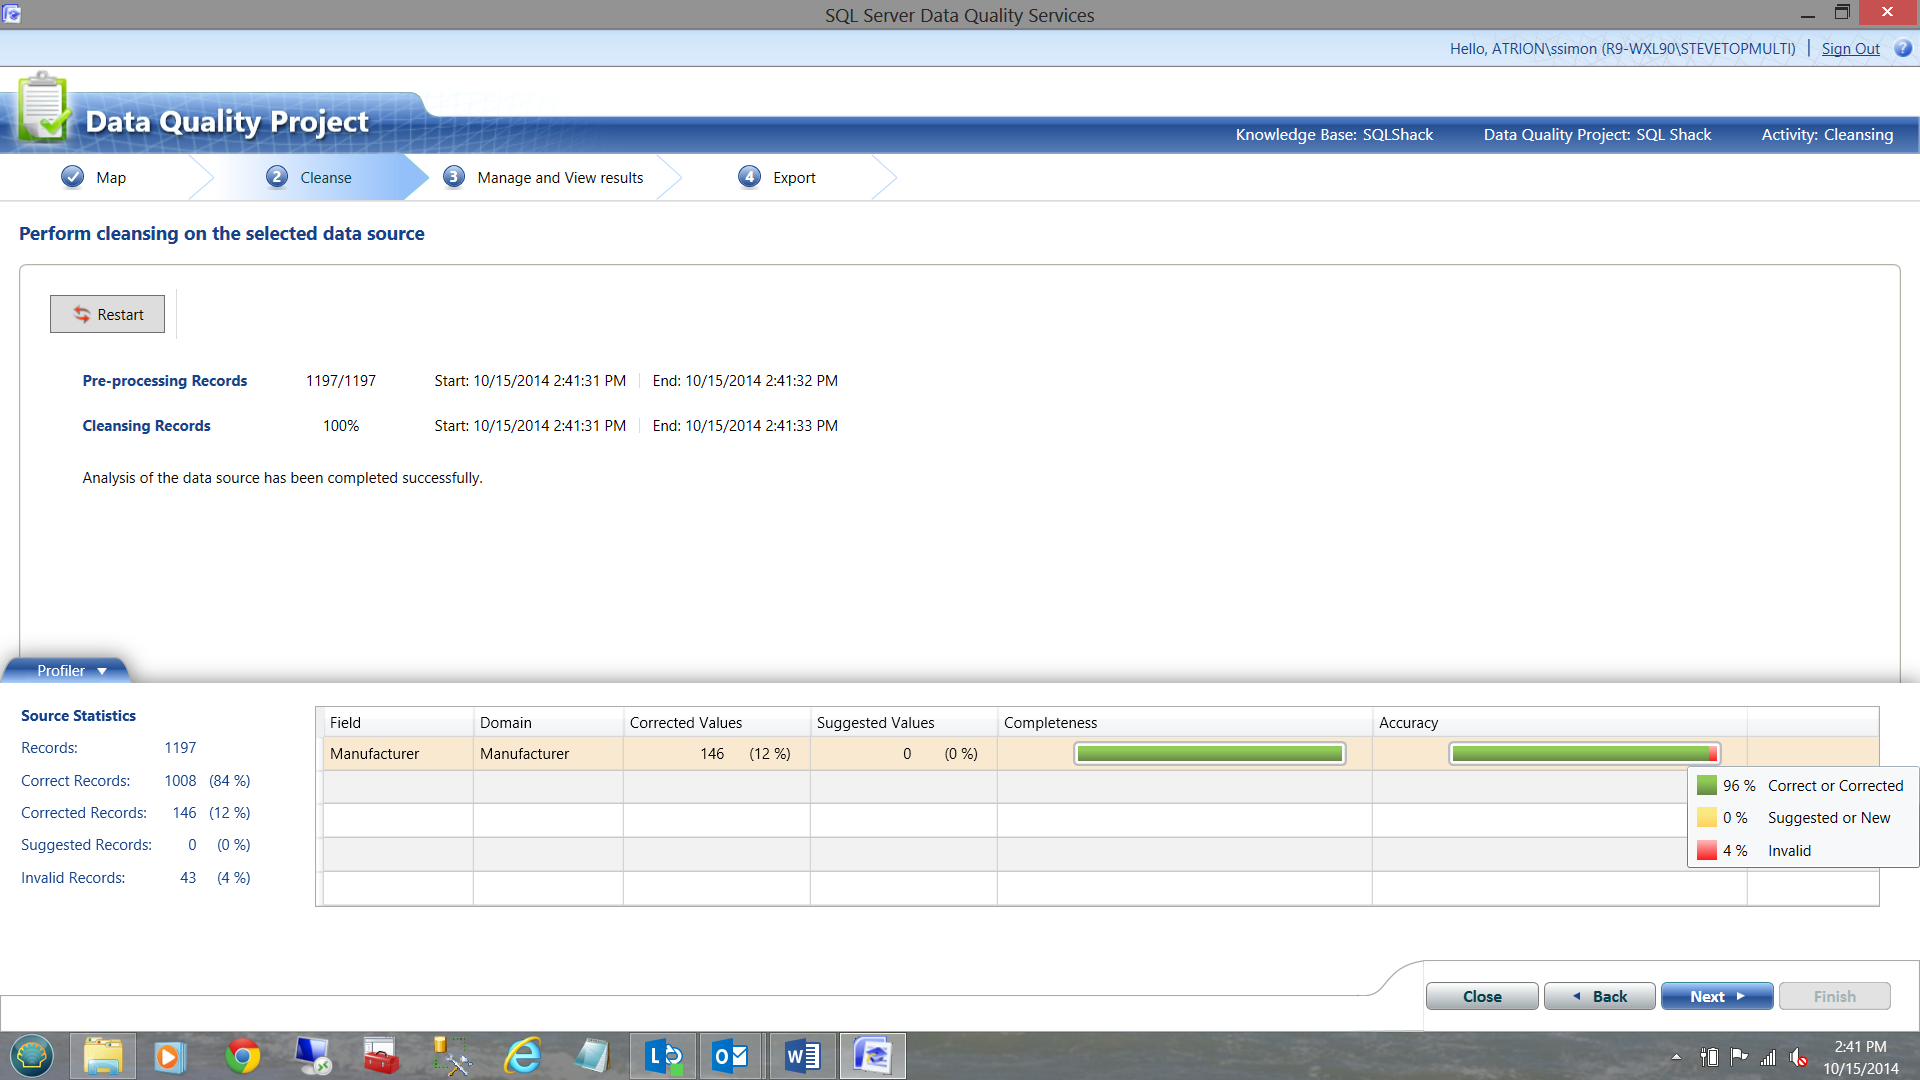
Note that DQS found that 96 % of the records were either correct or were corrected (by DQS). 4% of the records were invalid.
We NOW have the opportunity to look at how DQS processed our data and we have the opportunity to fix any errors, even at this late stage.
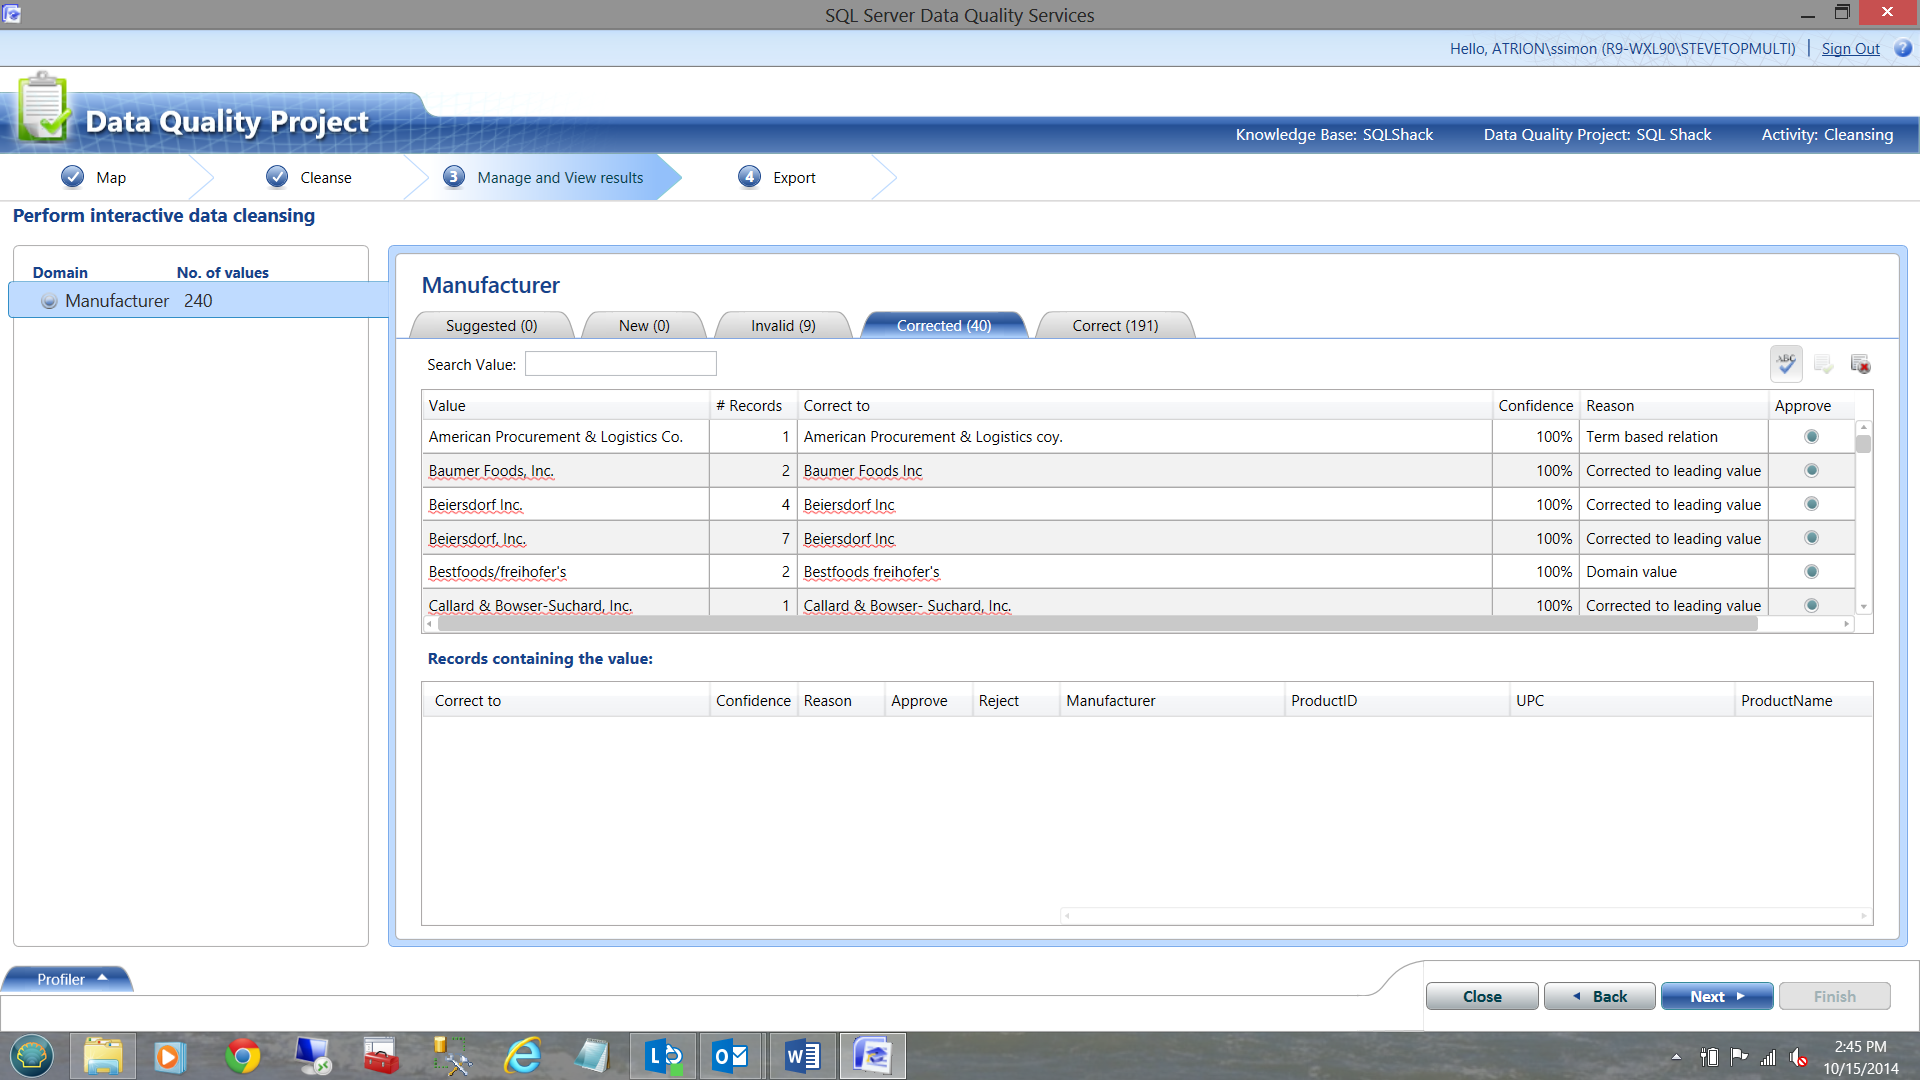
In the screen shot above, we see how DQS corrected our data PLUS the reasons why it made this decision. Looking at the ‘Invalid’ tab, we can see those records that were invalid according to the rules that we set up creating our knowledge base (See below).
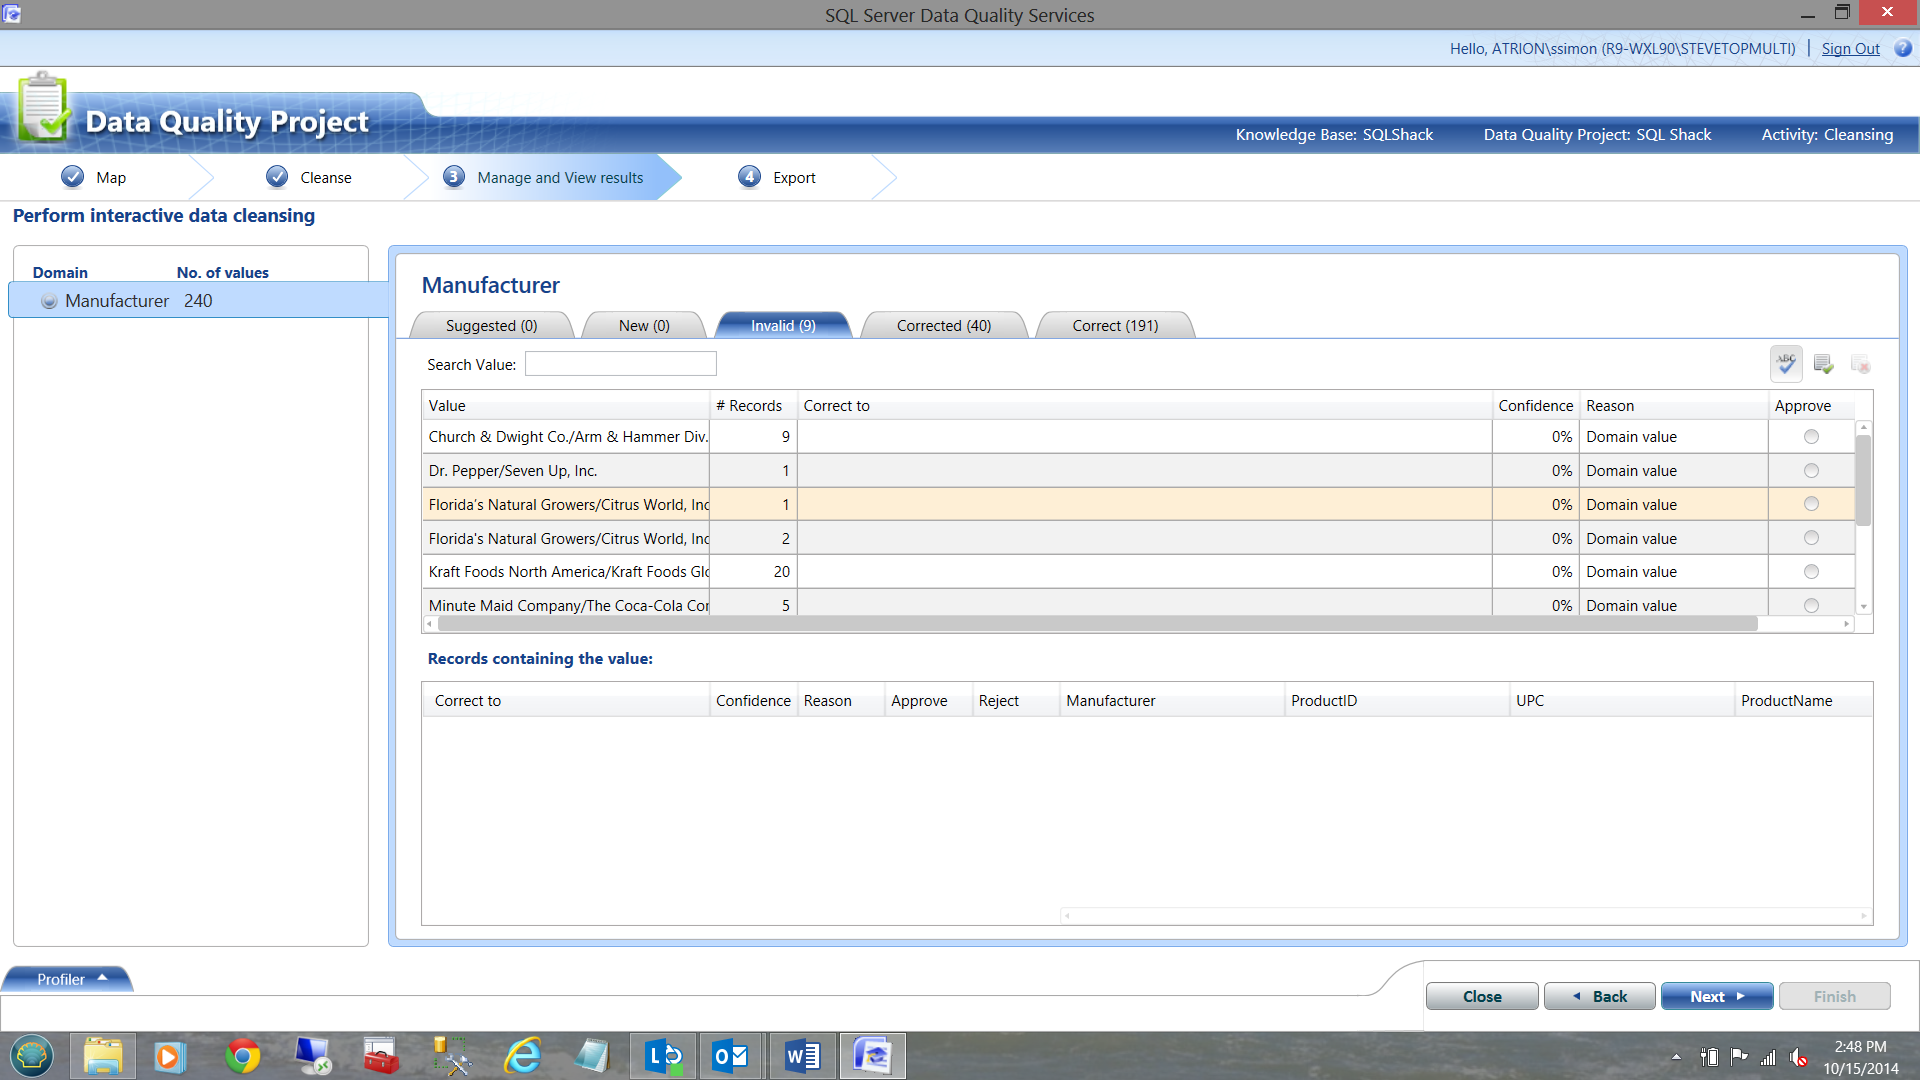
Note the slashes that invalidate the rows.
As always, even at this late stage in the process you have the option to approve or disapprove of any DQS corrections or invalidating actions. NOTE that from here on, the final rules are ‘set in stone’ and future running of this project will respect all the rules that have been set up.
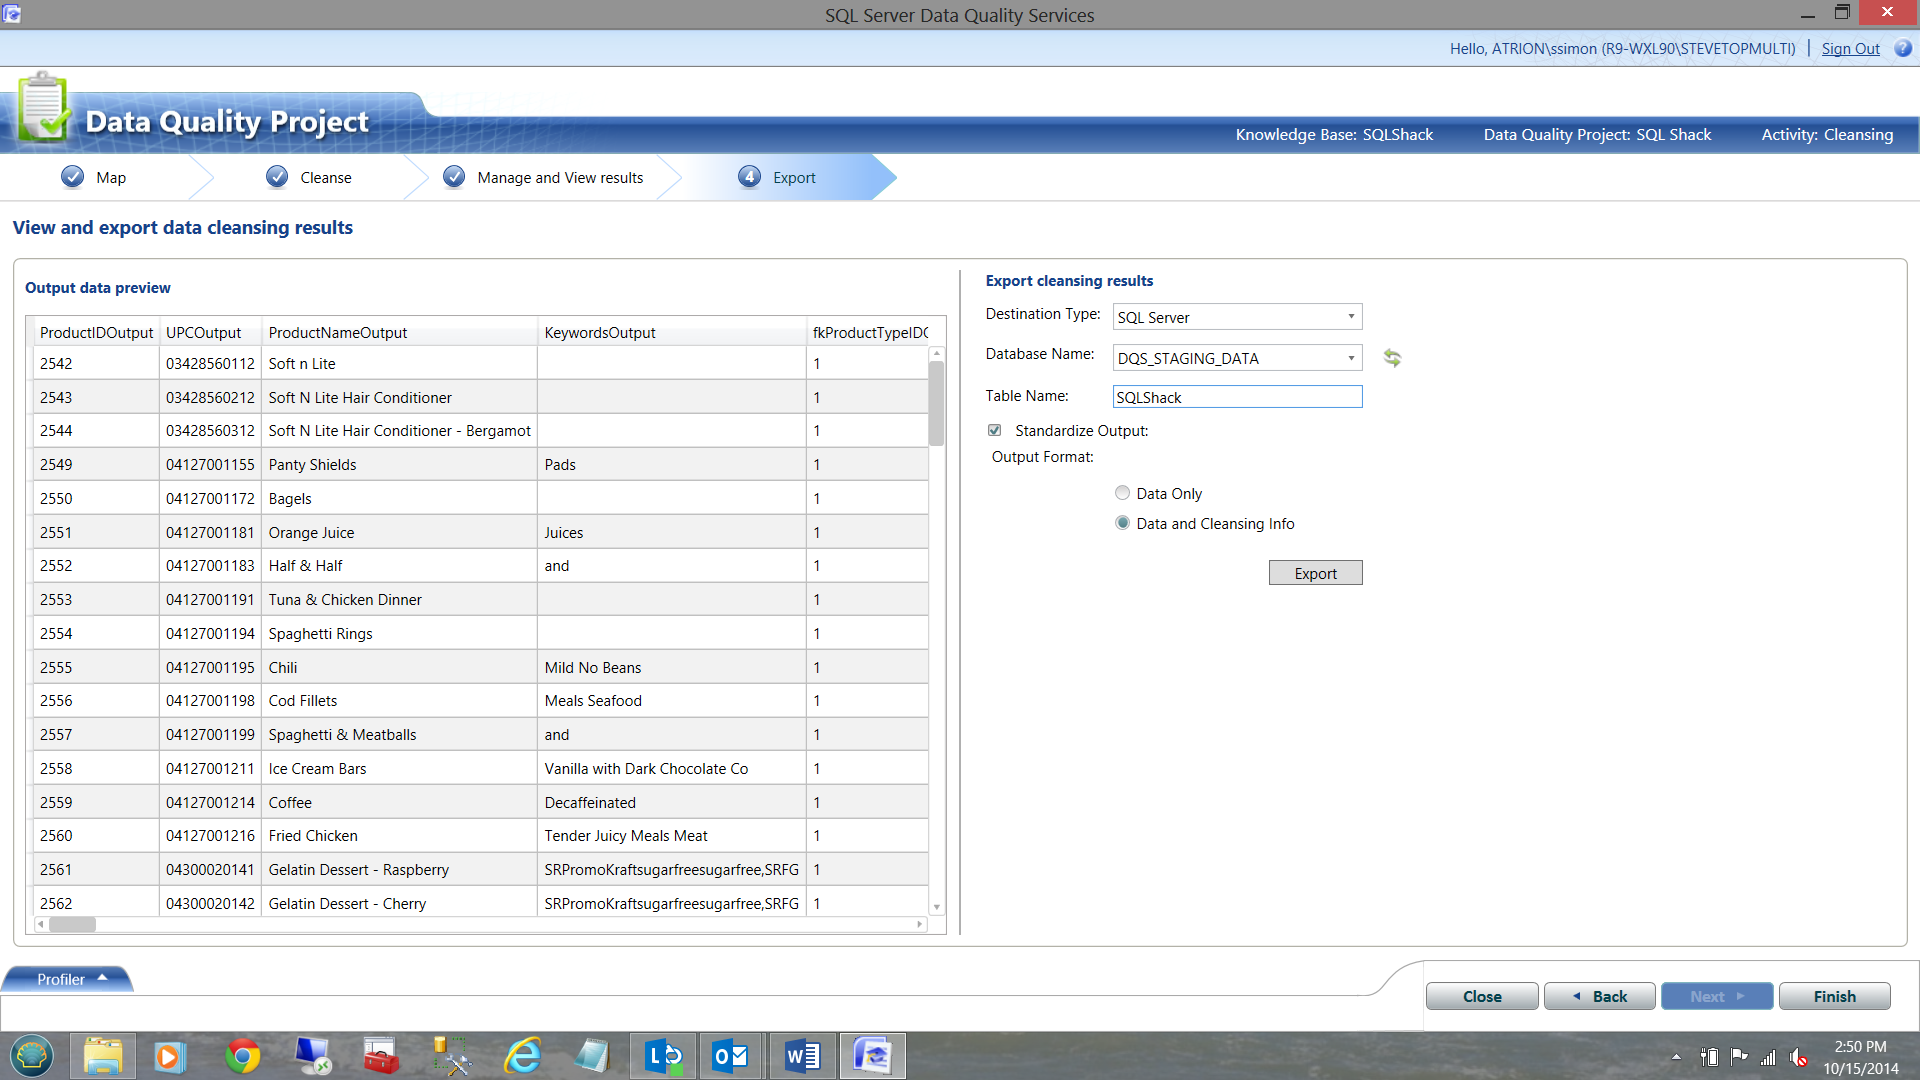
We then click next and arrive at our final screen.

We now may export our results to a SQL Server table for either production usage OR to be scrutinized by the Business Analyst or Data Steward.
I have once again, taken the liberty of completing the necessary fields. The important point to note is that we are exporting the data PLUS the ‘cleansing info’. This ‘cleansing info’ will be CRITICAL to our SQL Server Integration Services nightly process.
Click finish.
The proof of the quality of the pudding, is in the results
Opening SQL Server Management Studio and going to the DQS_STAGING_DATA database, one will note that the data which was just extracted is present in the table ‘SQLShack’. The correct records are show in the screen dump below.
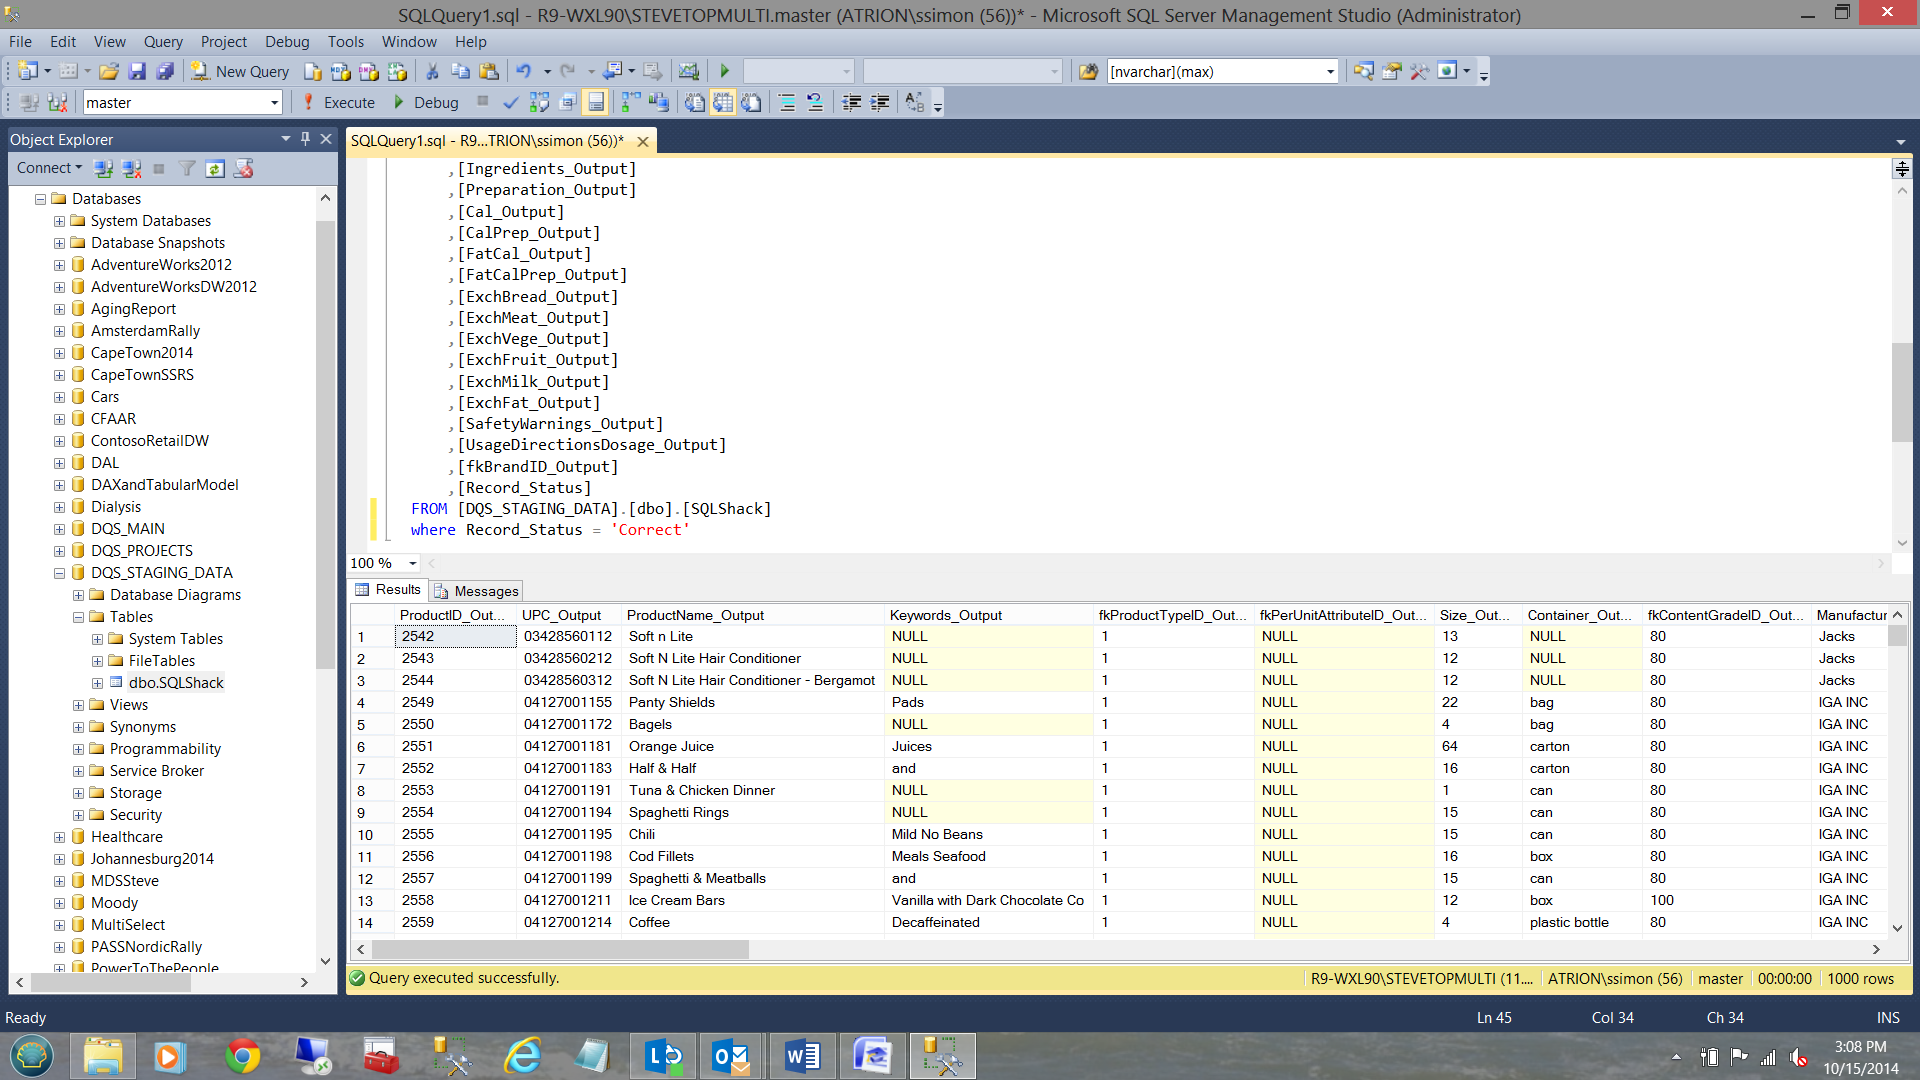
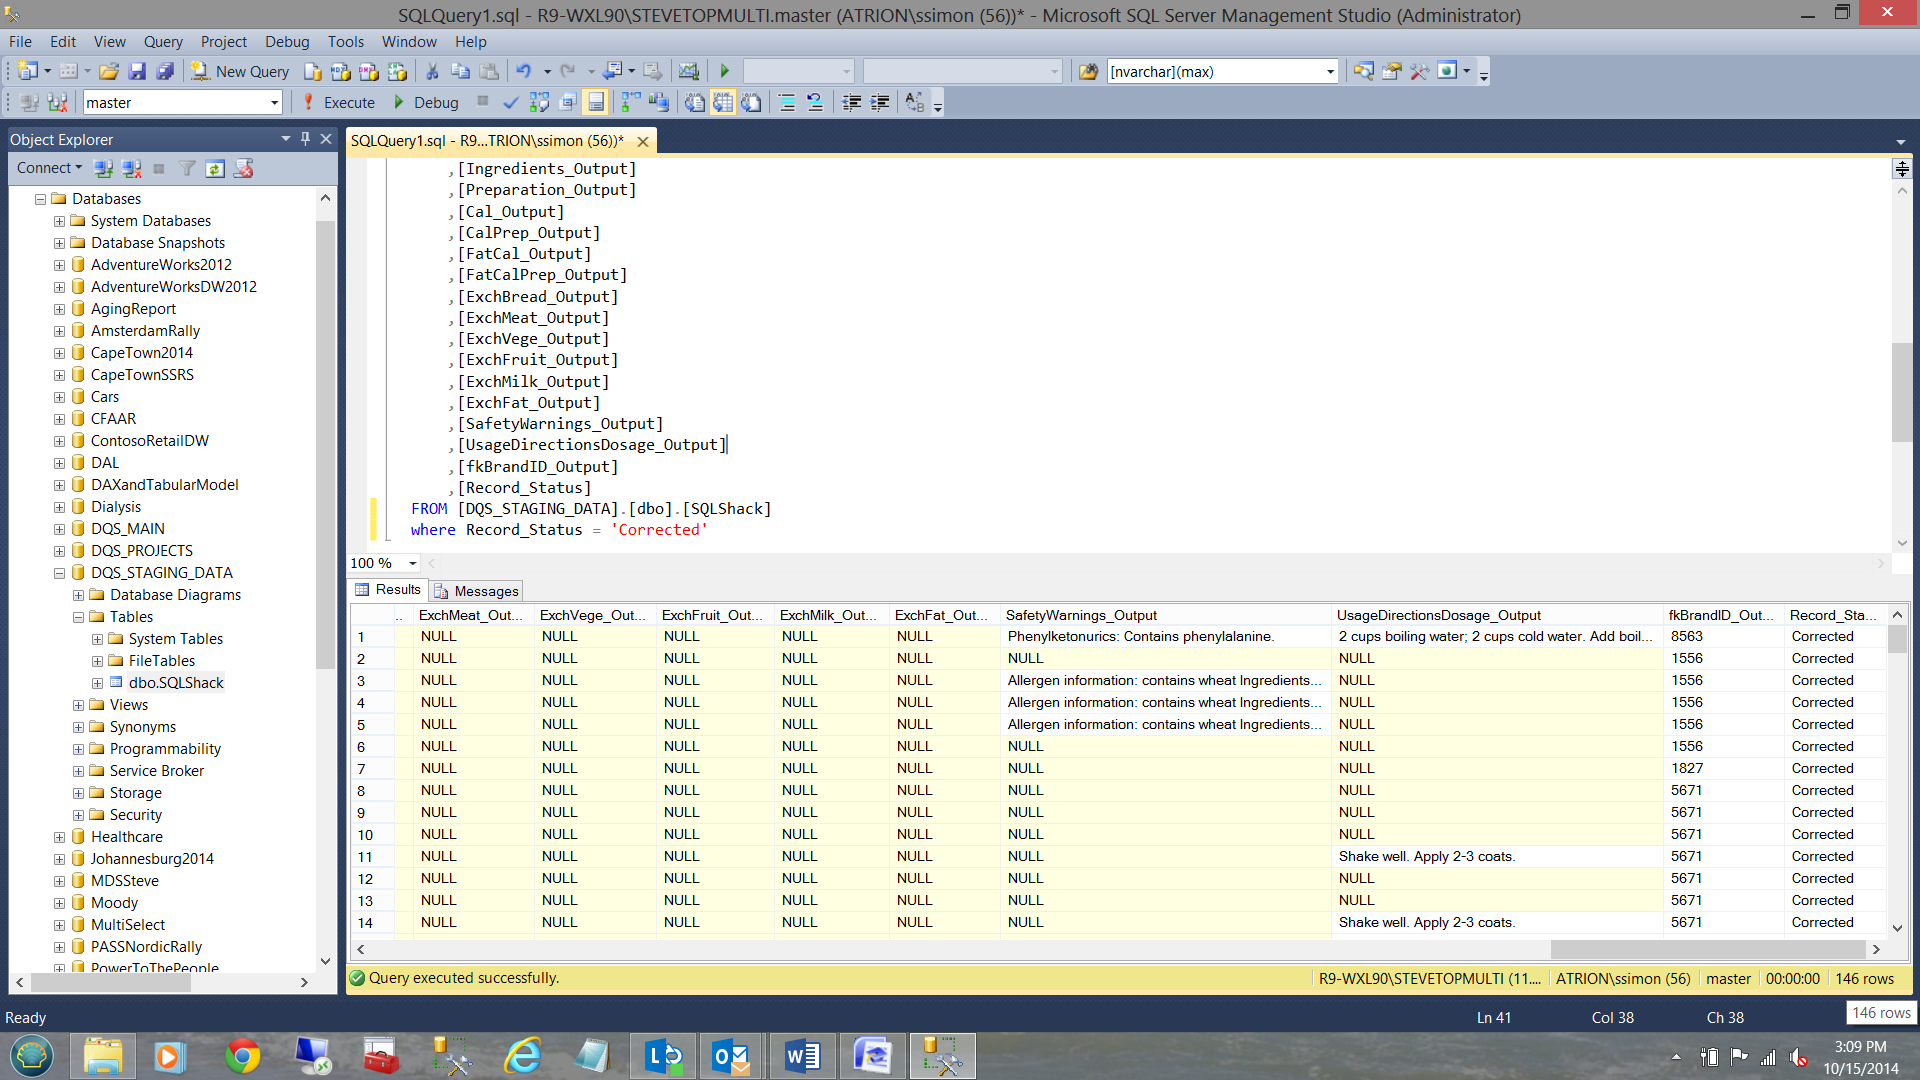
The following are those records that were ‘corrected’ by DQS.
and these… the invalid records.
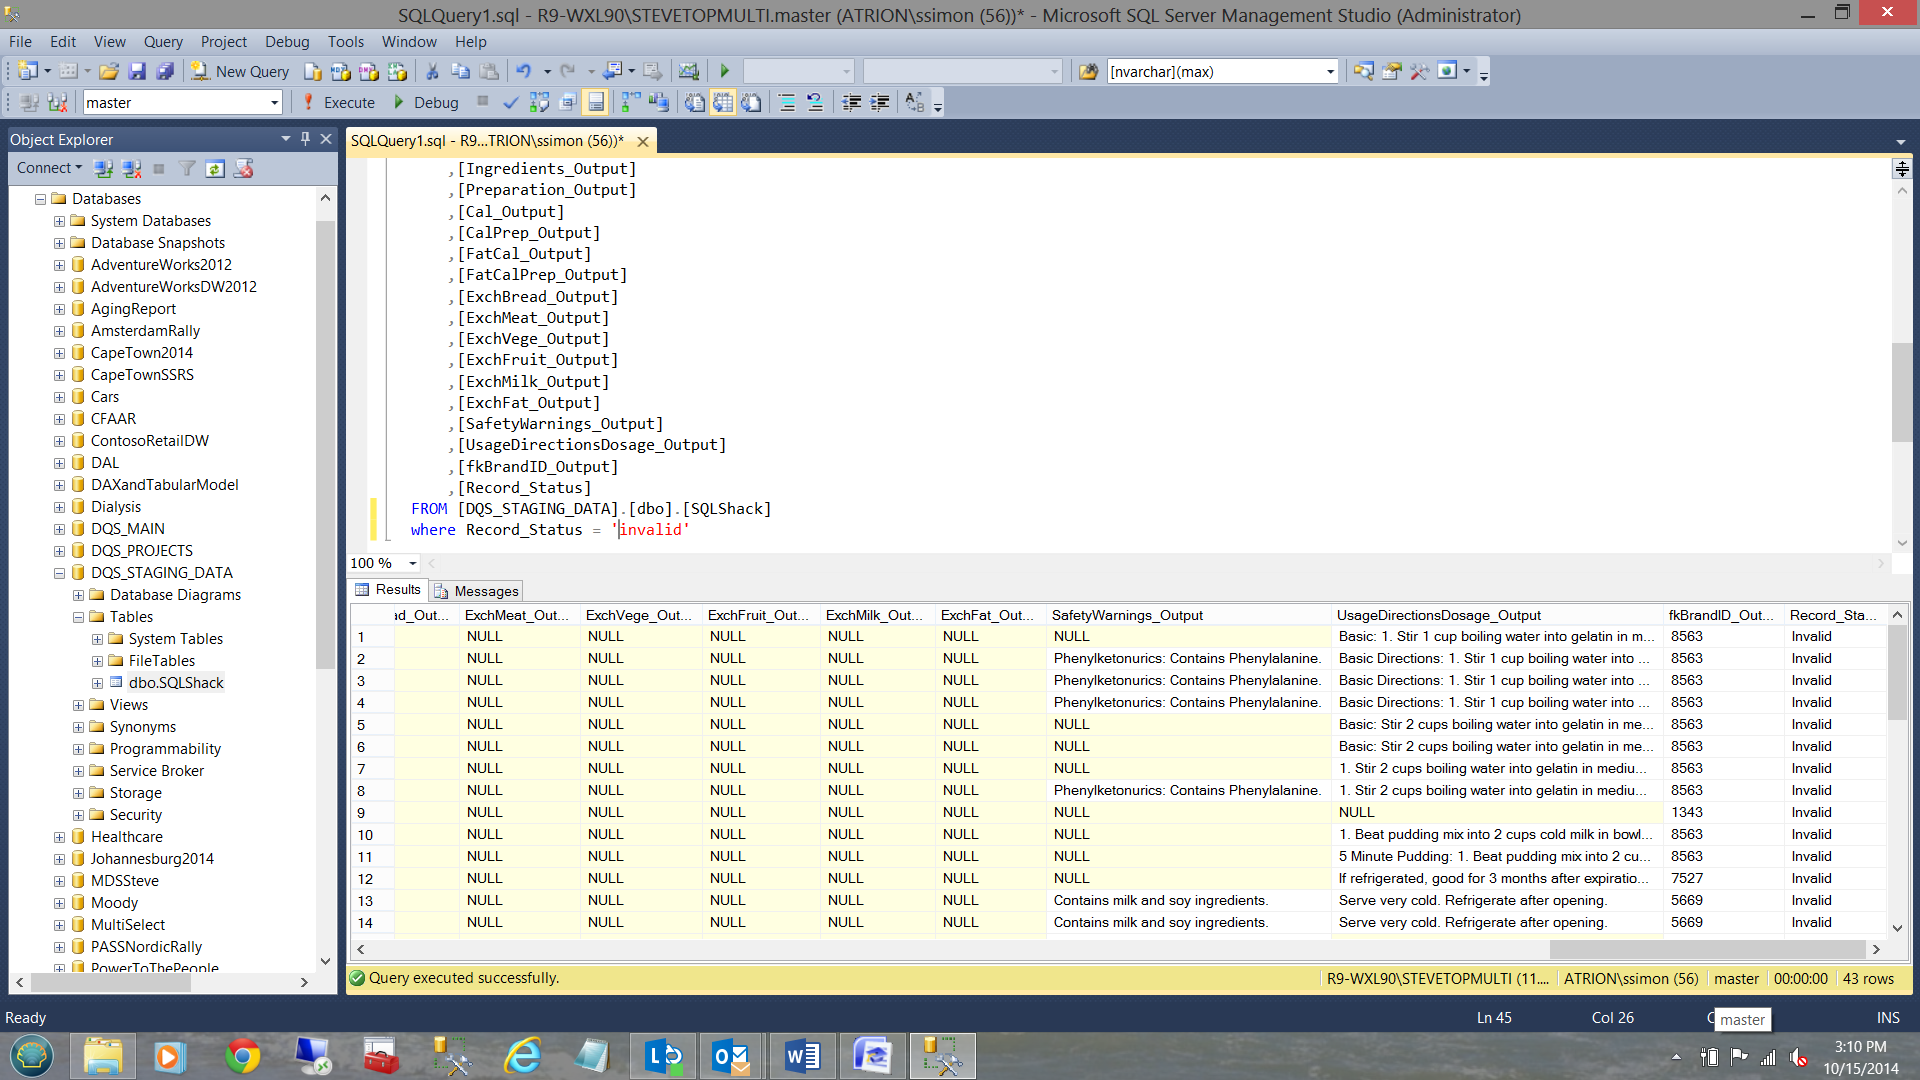
At the end of the day, the correct records would be added to the production data. Dicey records such as ‘corrected’ and ‘invalid’ records may be sent to the business folks for their feedback.
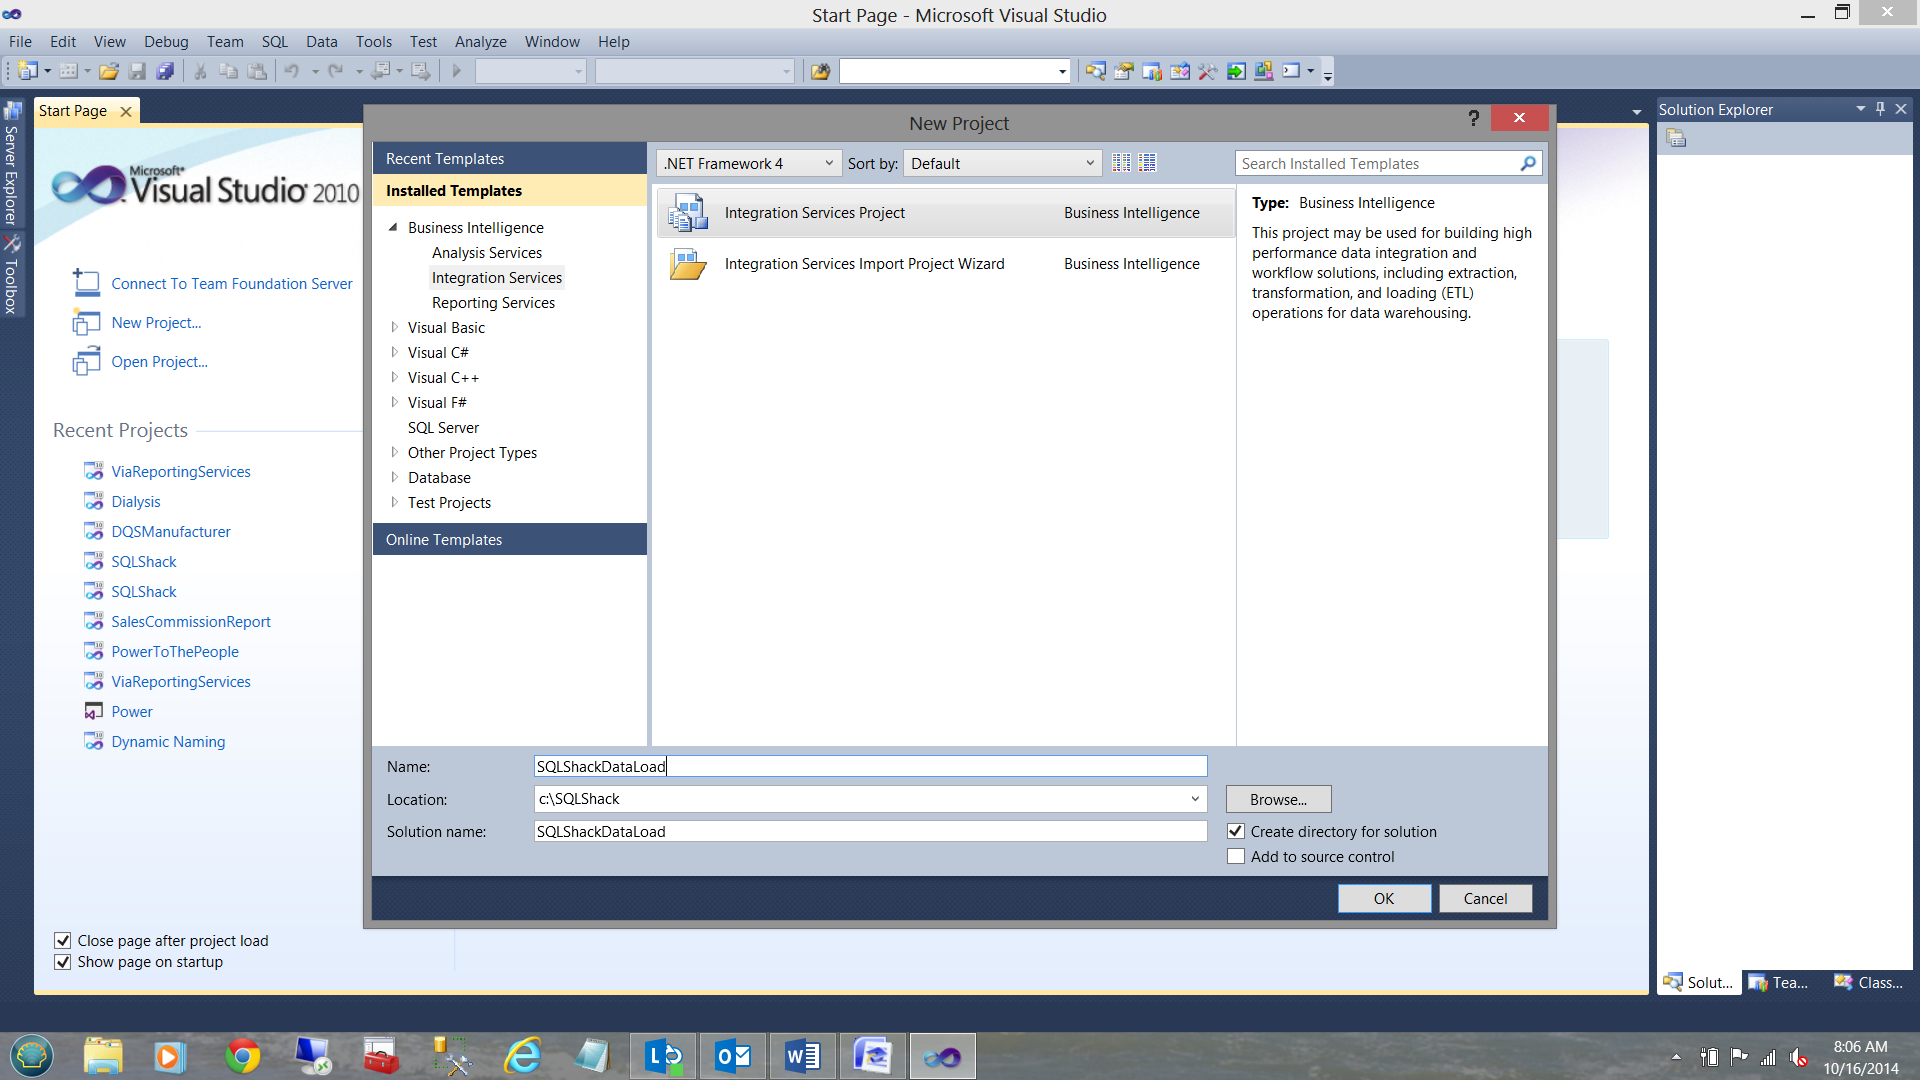
Automating our daily load processes utilizing SQL Server Integration Services
For those of you rejoining me, welcome back!
Now that we have created our Data Quality Project, it is time to utilize it within our daily load process. We start off by creating a new SQL Server Integration Services Project.
We now create two connection managers, one to the DQS data staging database where we shall store our cleansed data and one to the INCOMING NEW source data within my ‘PASSNordicRally’ database. Further, I add an ‘Execute SQL Task’ and a ‘Data Flow Task’ to the Control Flow. (See below)

The ‘Execute SQL Task’ is used to truncate the existing data from the staging tables.
At this point the astute reader will ask ‘why do we want to truncate the ’bad data’ tables especially if the Business Analysts and Data Stewards have not yet finished the data vamping?’ This is a valid point, therefore the truncation of these tables will OBVIOUSLY be dependent on your setup and the business policies.
Creating the Data Flow
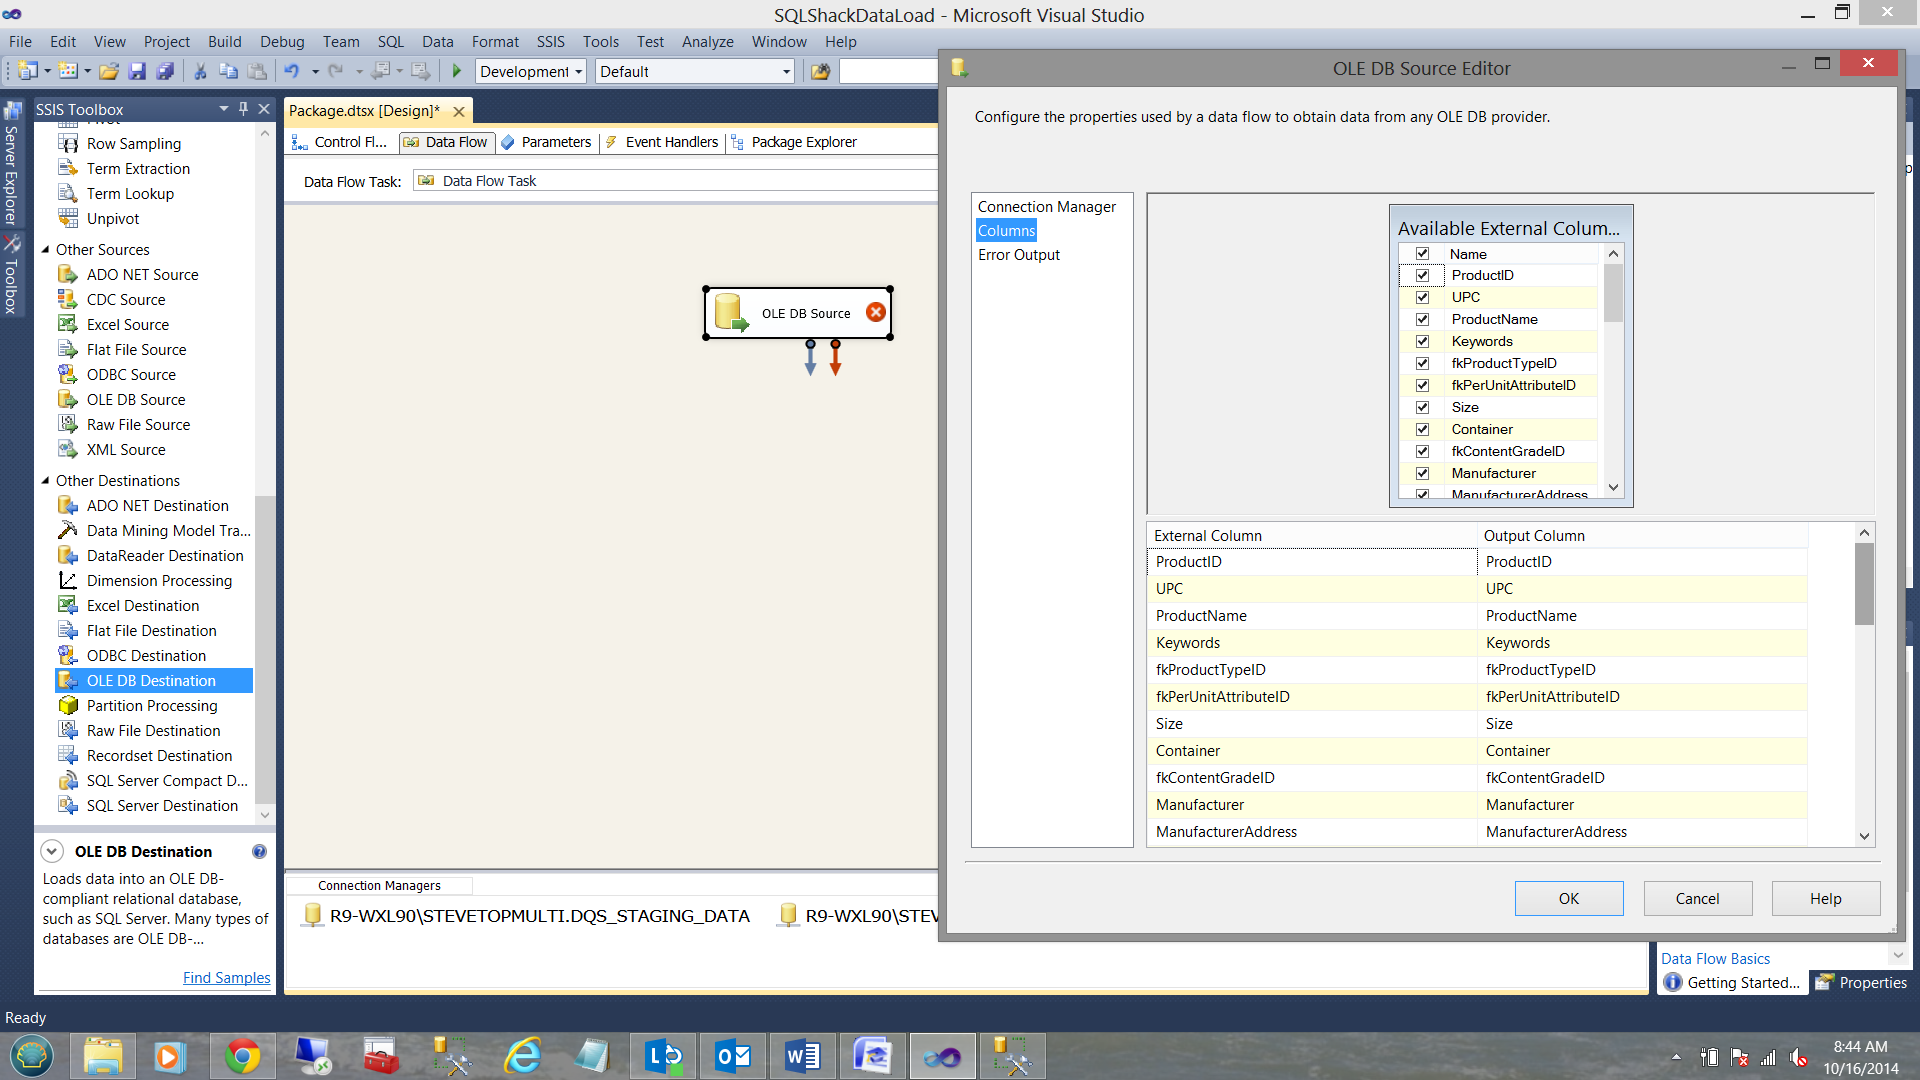
Having access to both the data source and to the destinations, we create the following data source which points to our incoming data table. This table may have been refreshed in a plethora of ways (which are not relevant to our present discussion). Suffice it to say that the table of new data is ready to be run through our data cleansing model.

The columns within this SOURCE table may be seen below:
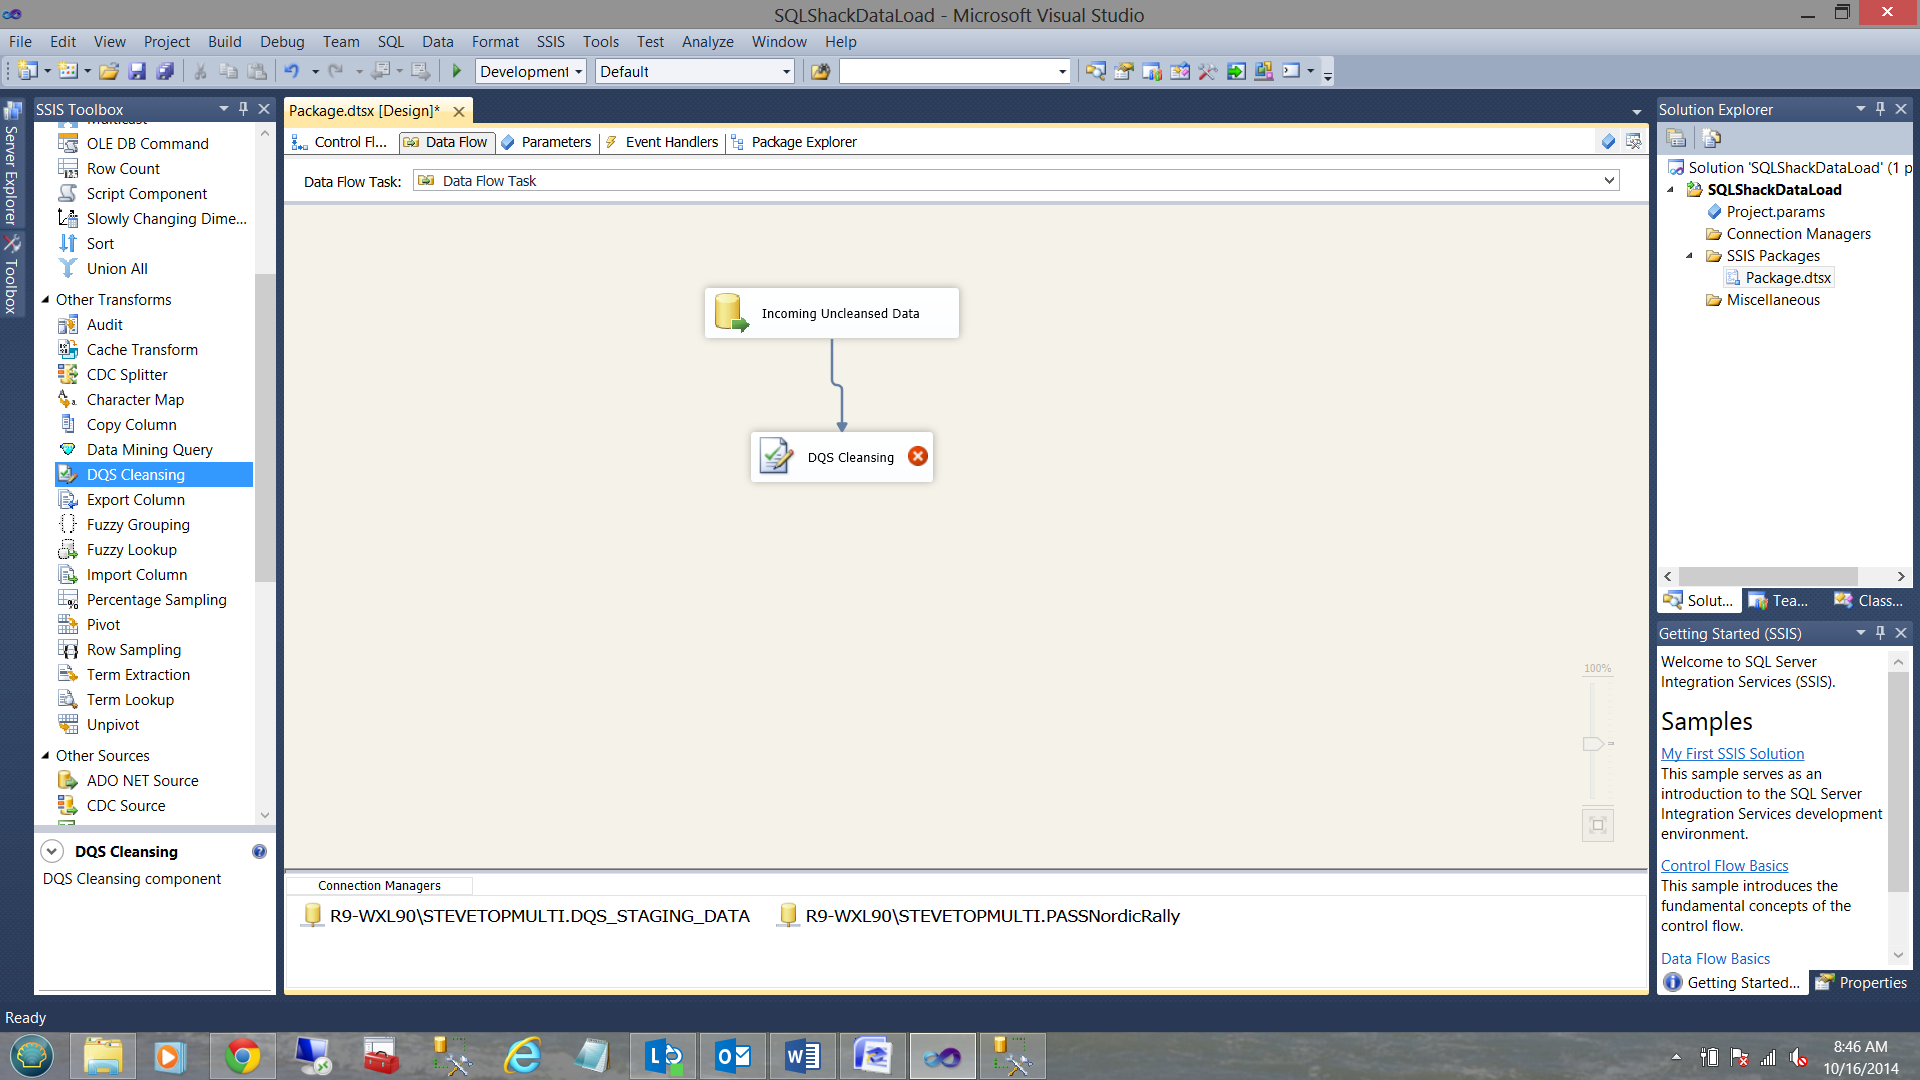
Adding the Data Cleaning Component
We now add a ‘Data Cleansing Component’ which was added to your SSIS tool kit when you installed Data Quality Services.
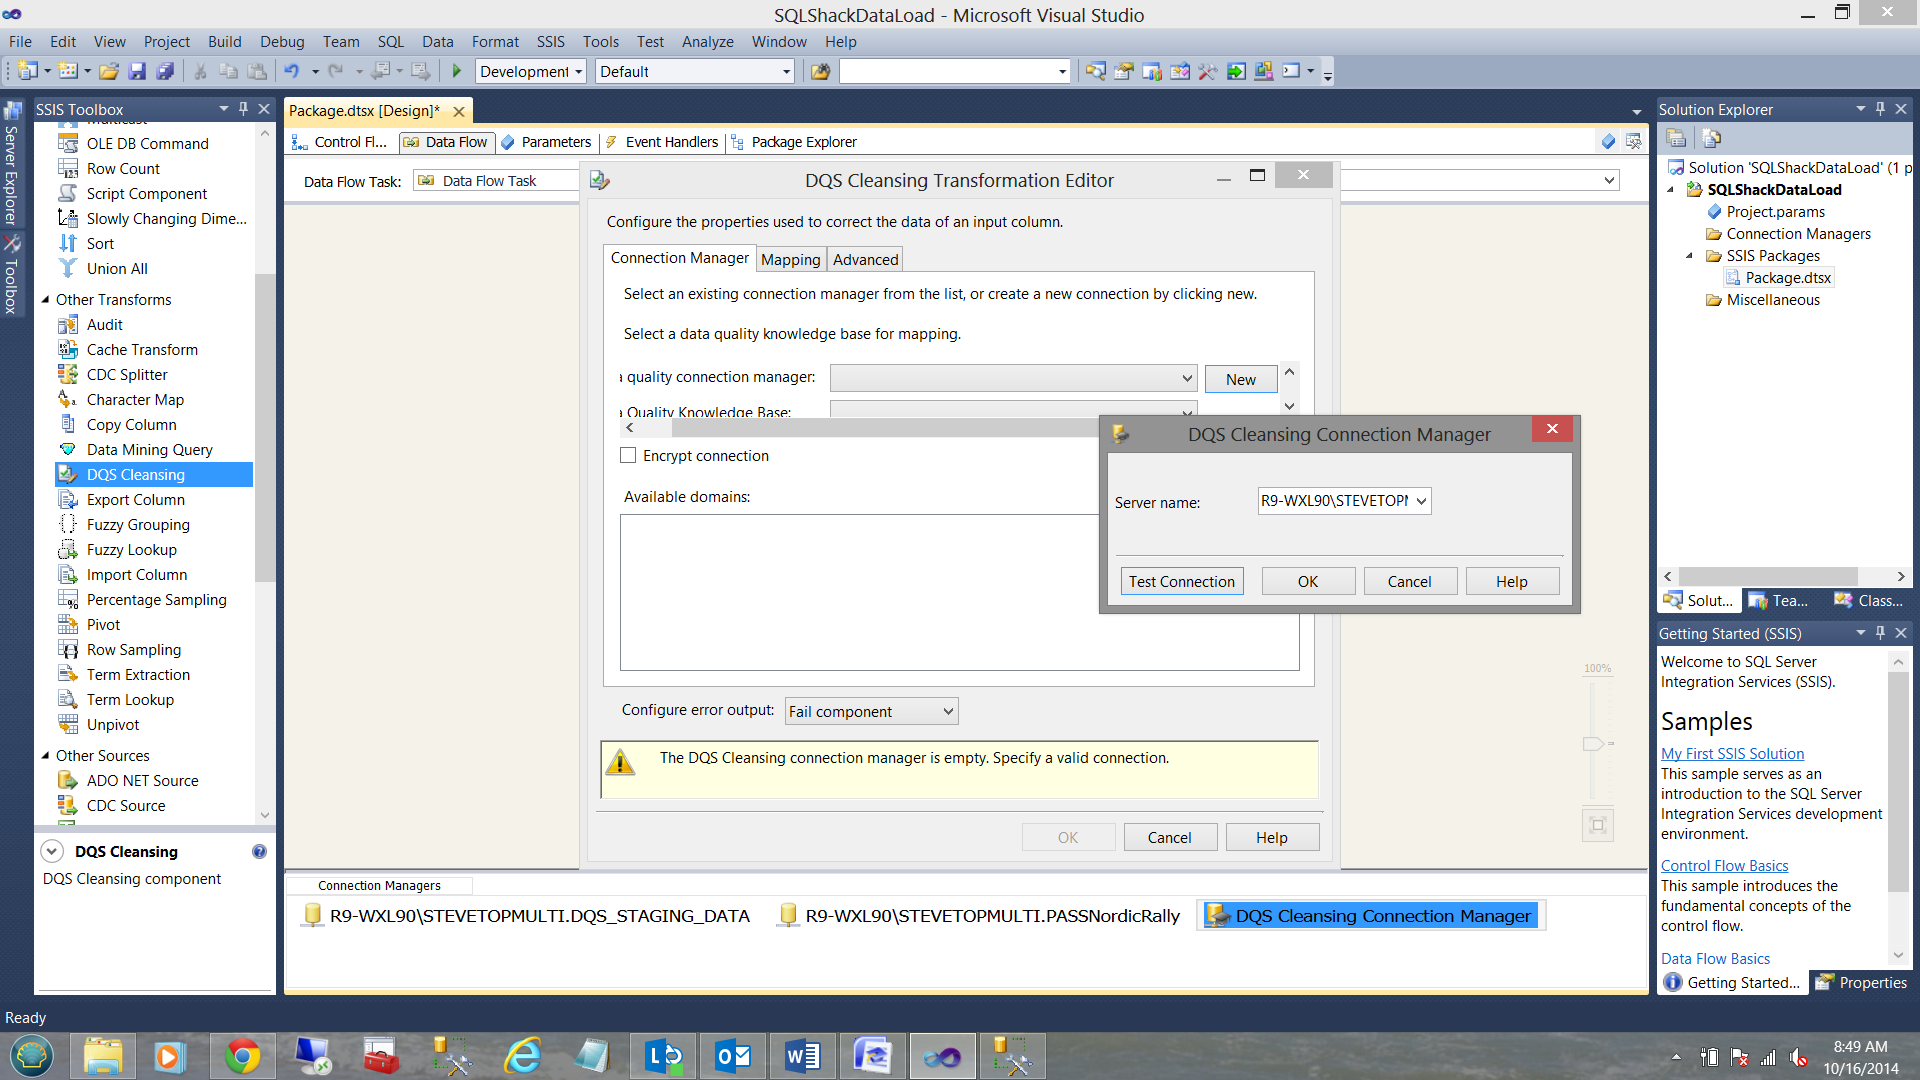
Configuring the Data Cleansing component is fairly fast and easy. We start off by creating a DQS Cleansing Connection Manager.
We now must choose our Knowledge Base.
Notice that our Manufacturer Domain immediately appears after having accepted our Knowledge Base.
The Mapping Tab
Selecting the mapping tab permits us to tell the system which field(s) are to be processed by our cleansing model. In our case (described above) we have been looking at the ‘Manufacturer’ field exclusively thus I have only selected the ‘Manufacturer’. The remaining fields will follow through with the load process.
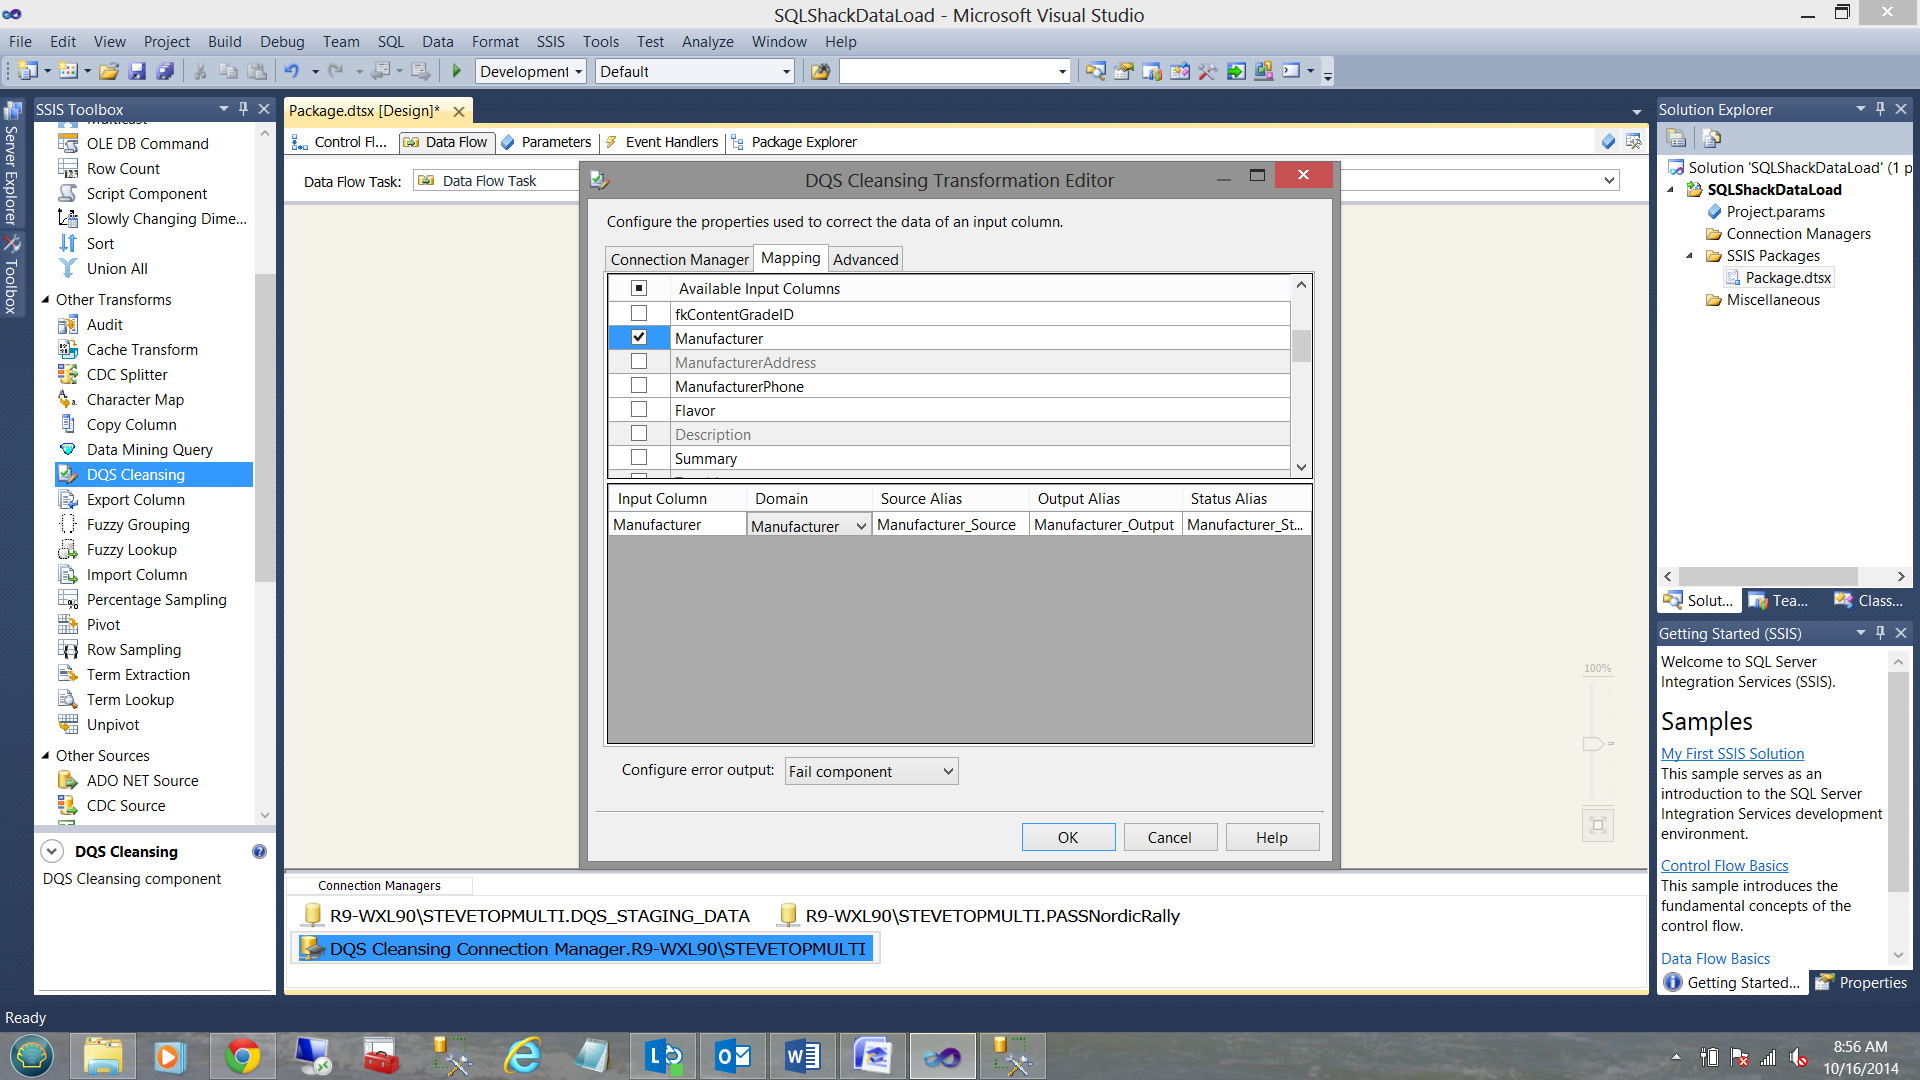
Note that our source field ‘Manufacturer’ and our Domain ‘Manufacturer’ have a one to one mapping.
At this point, we are complete with the Data Cleansing Transform and click OK.
Splitting the feed
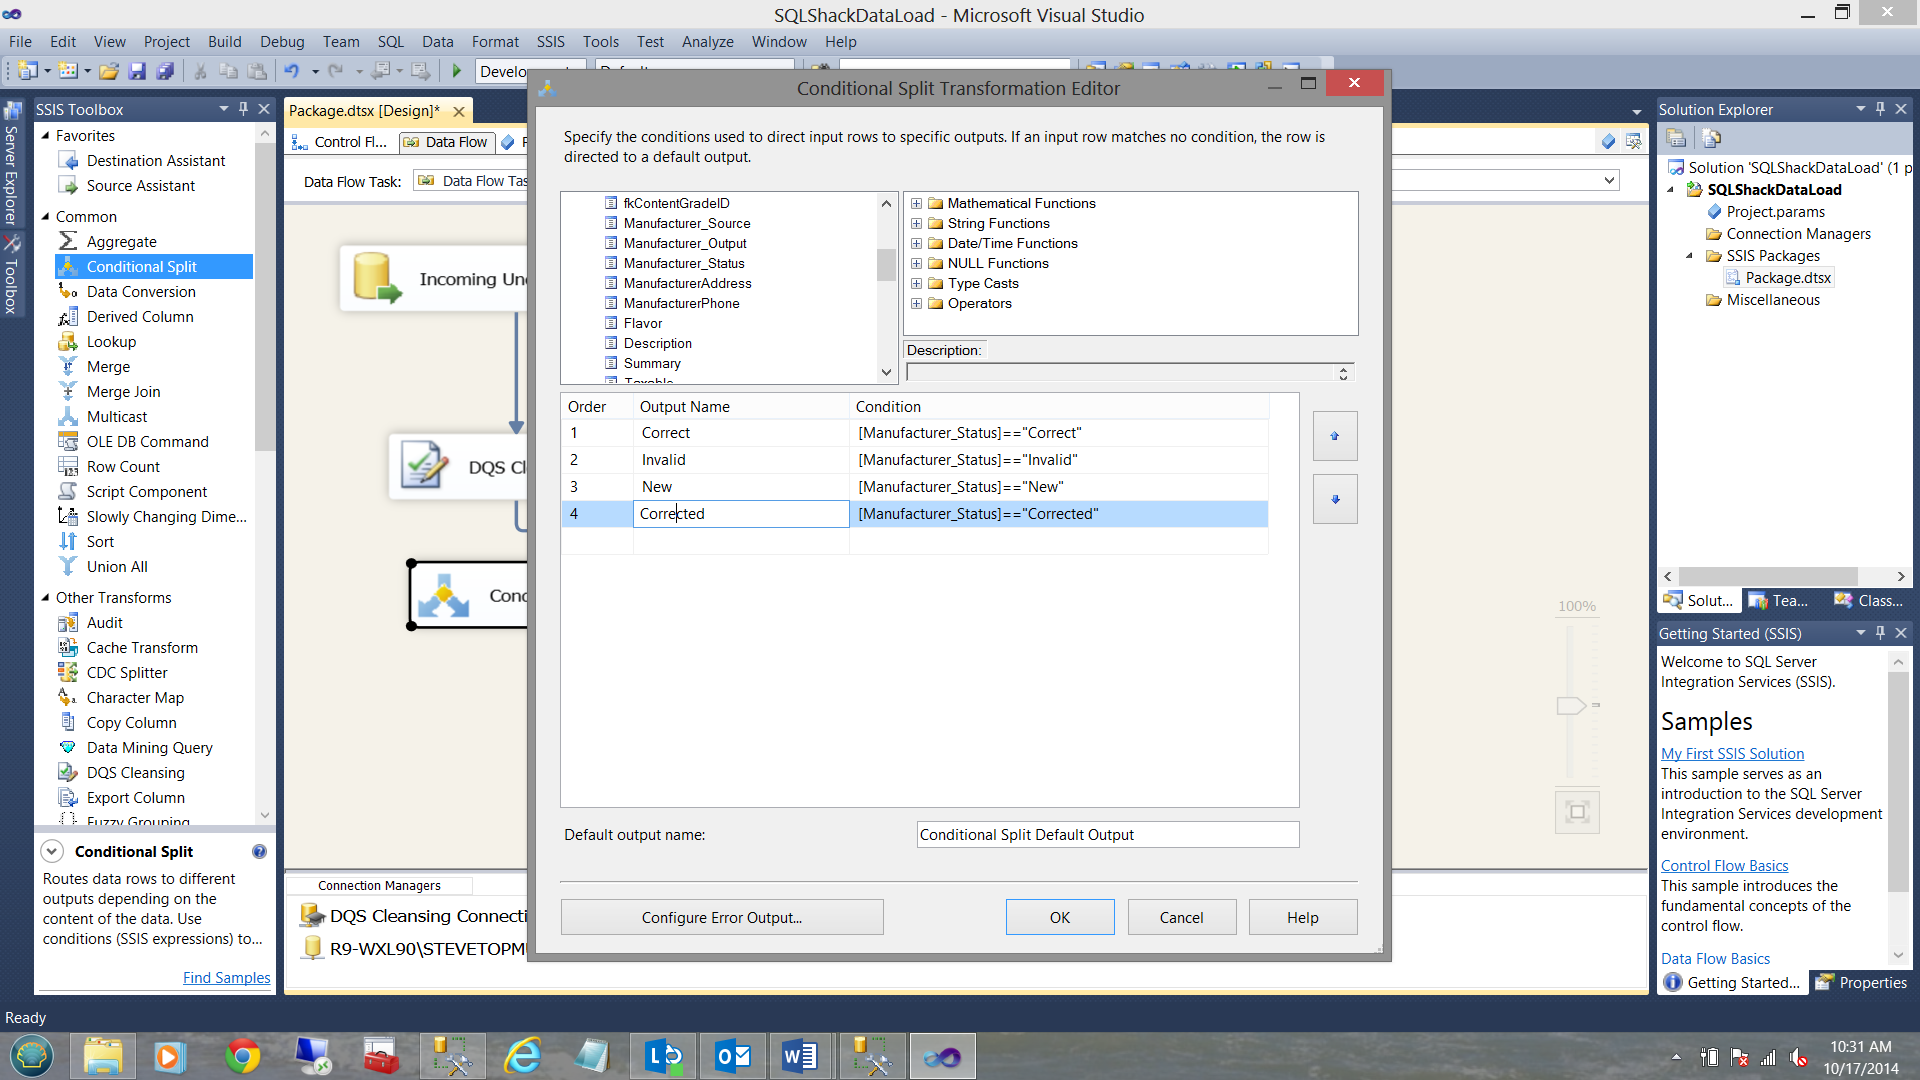
The reader should note that feed exiting the DQS Cleaning Transformation (as seen above) contains an additional field. In our case this field is called Manufacturer_Status and it is the results from this field that we shall be utilizing to split our feed, sending the correct records through to production AND all the invalid, new and corrected records through to the Business Analysts and Data Stewards.
This said, we add a ‘Conditional Split’ to our project (See below).
Finishing our project
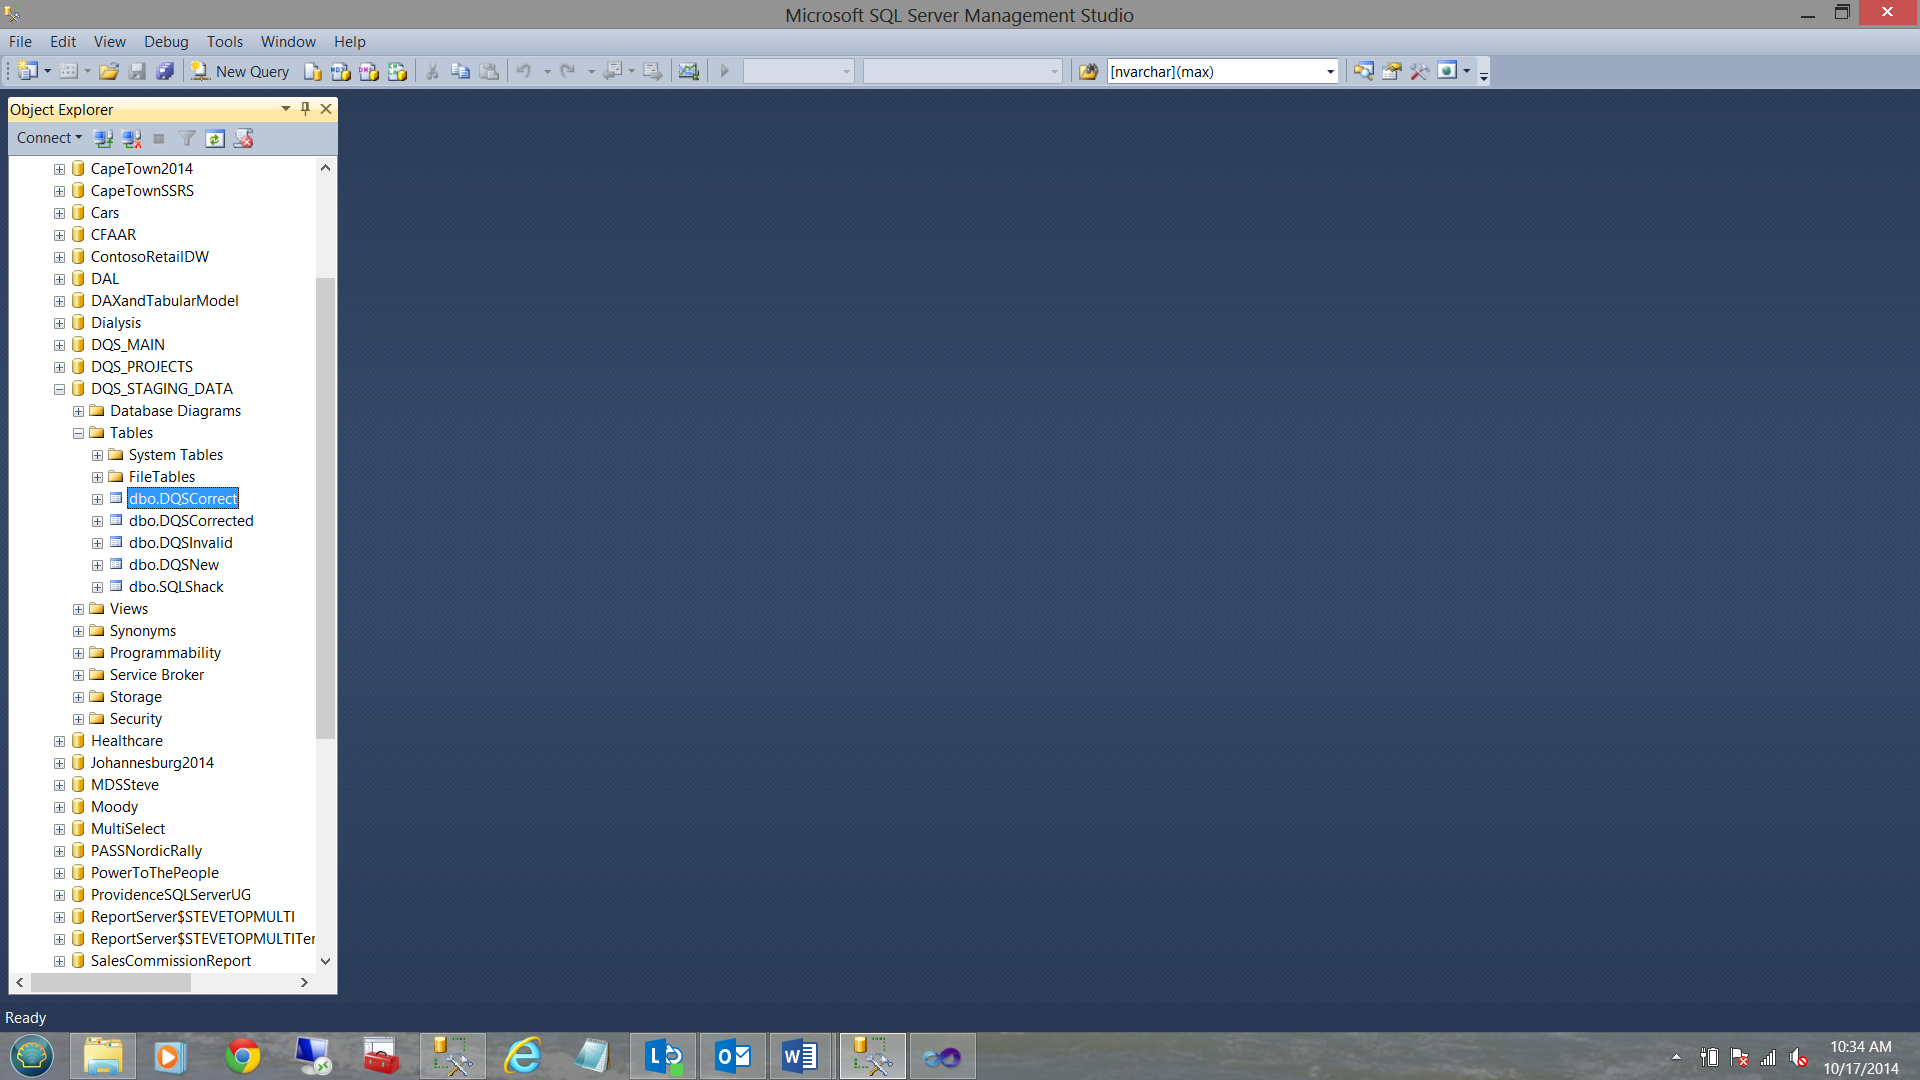
We have now reached the point where we need to set our data destination. All data coming out of the process will be staged in our DQS_STAGING_DATA database. Four staging table exist (See below).
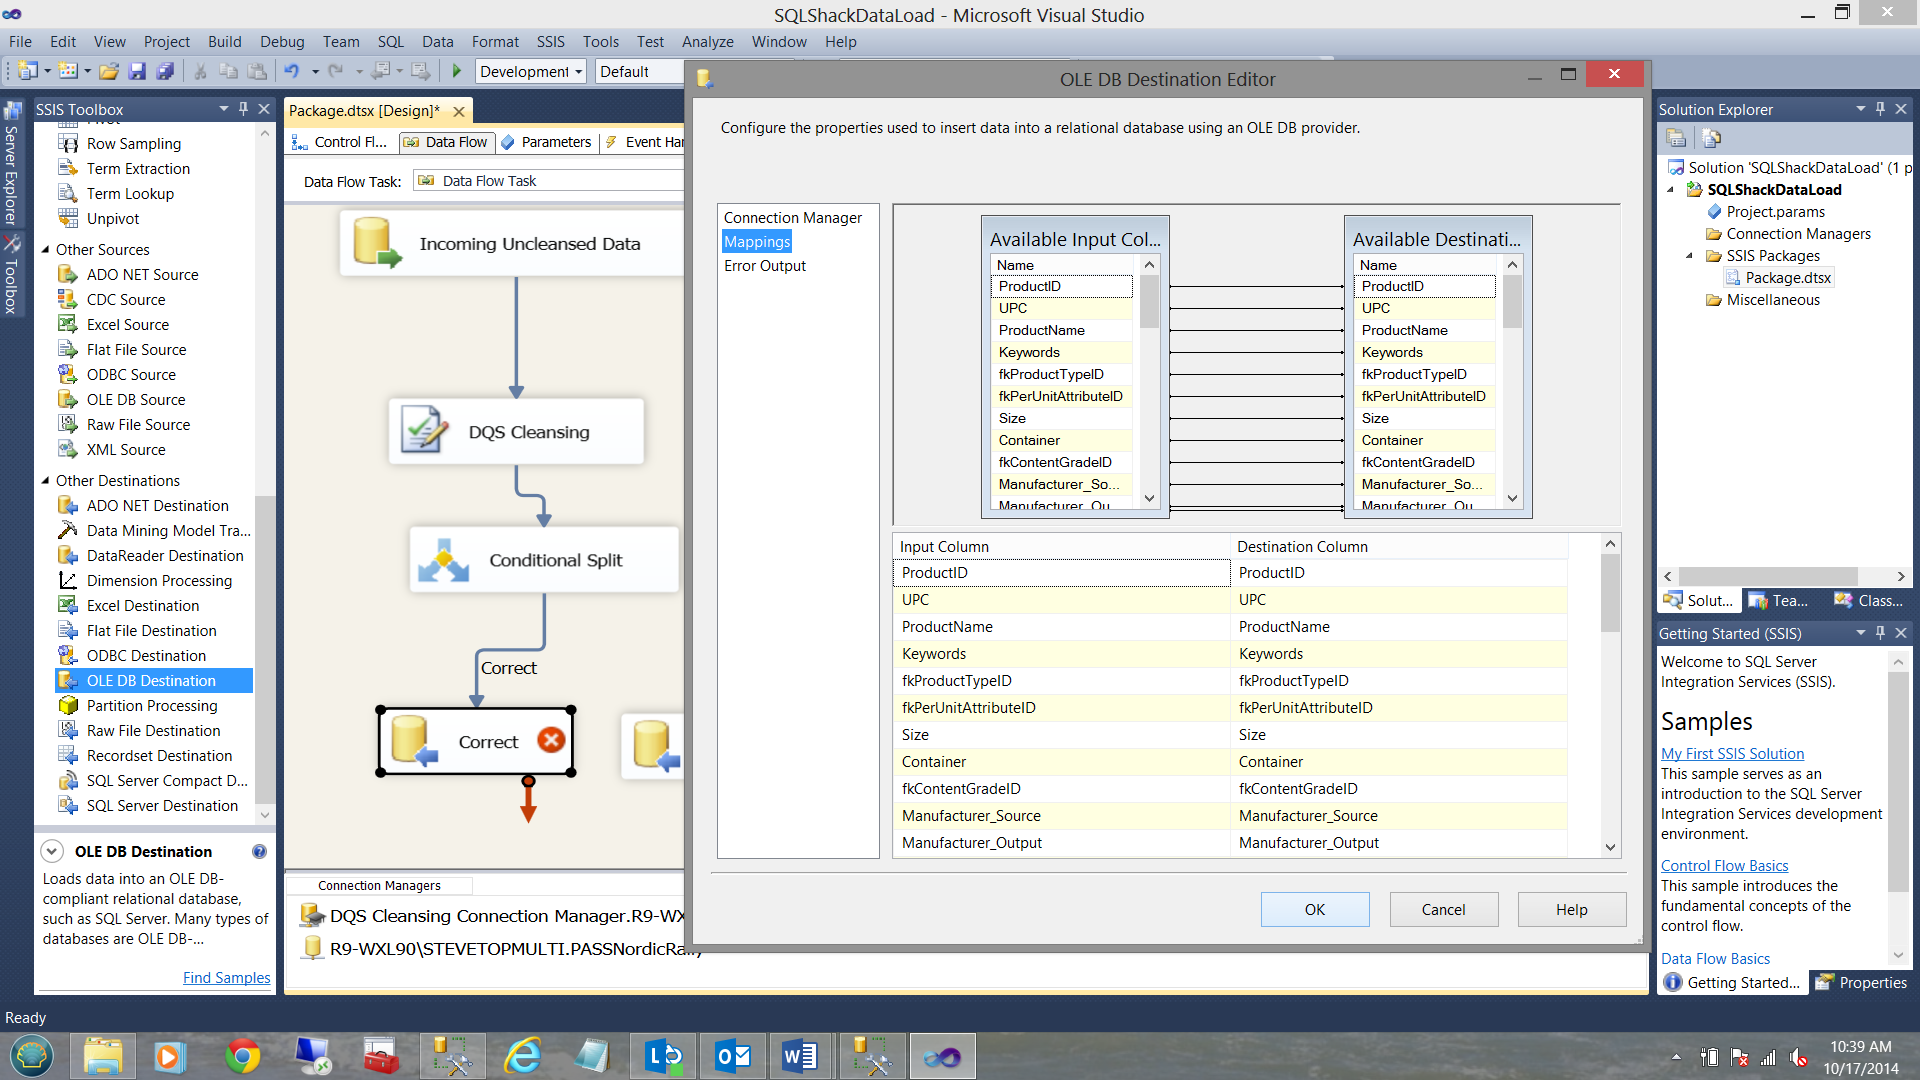
We now proceed to connect the outputs of our conditional split to the OLE DB destinations (See below).

We then complete the mappings (See below).
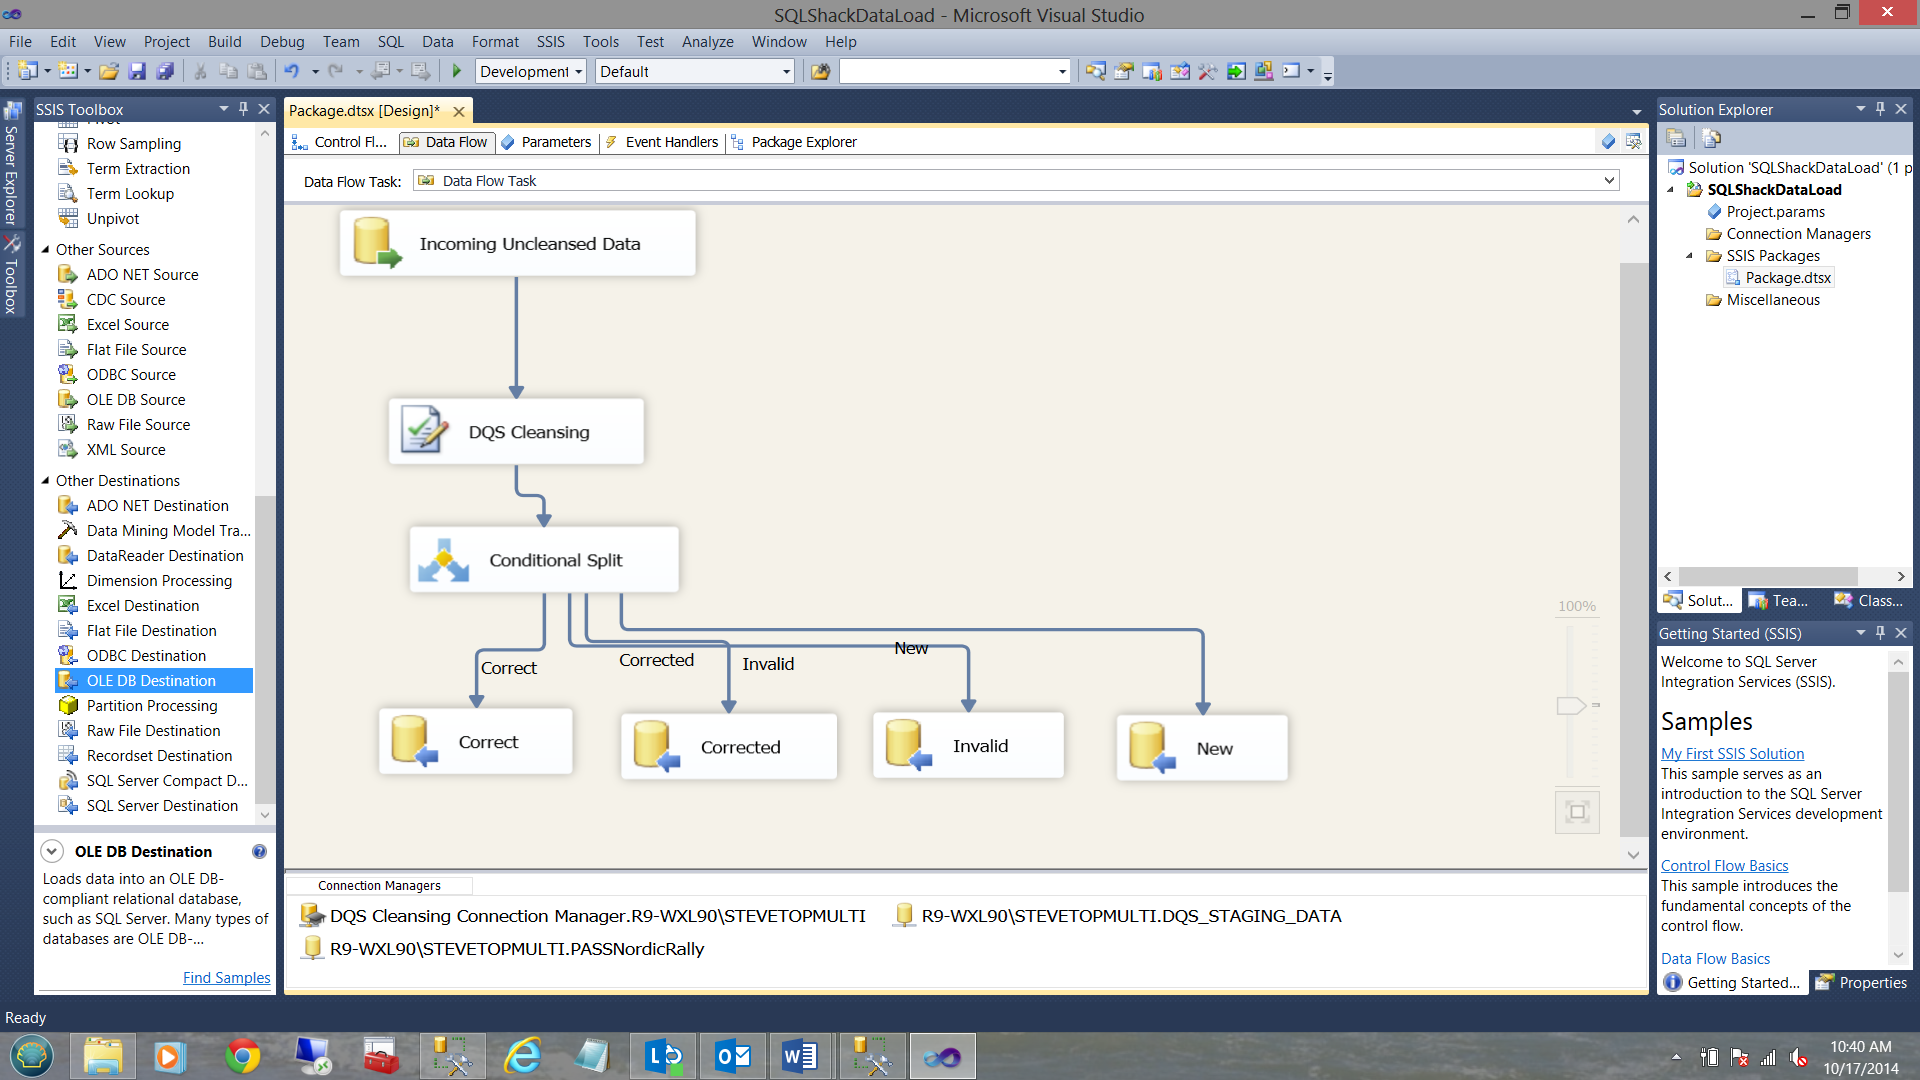
Having then completed the configuring of all four OLE DB destinations, you project should look as follows:
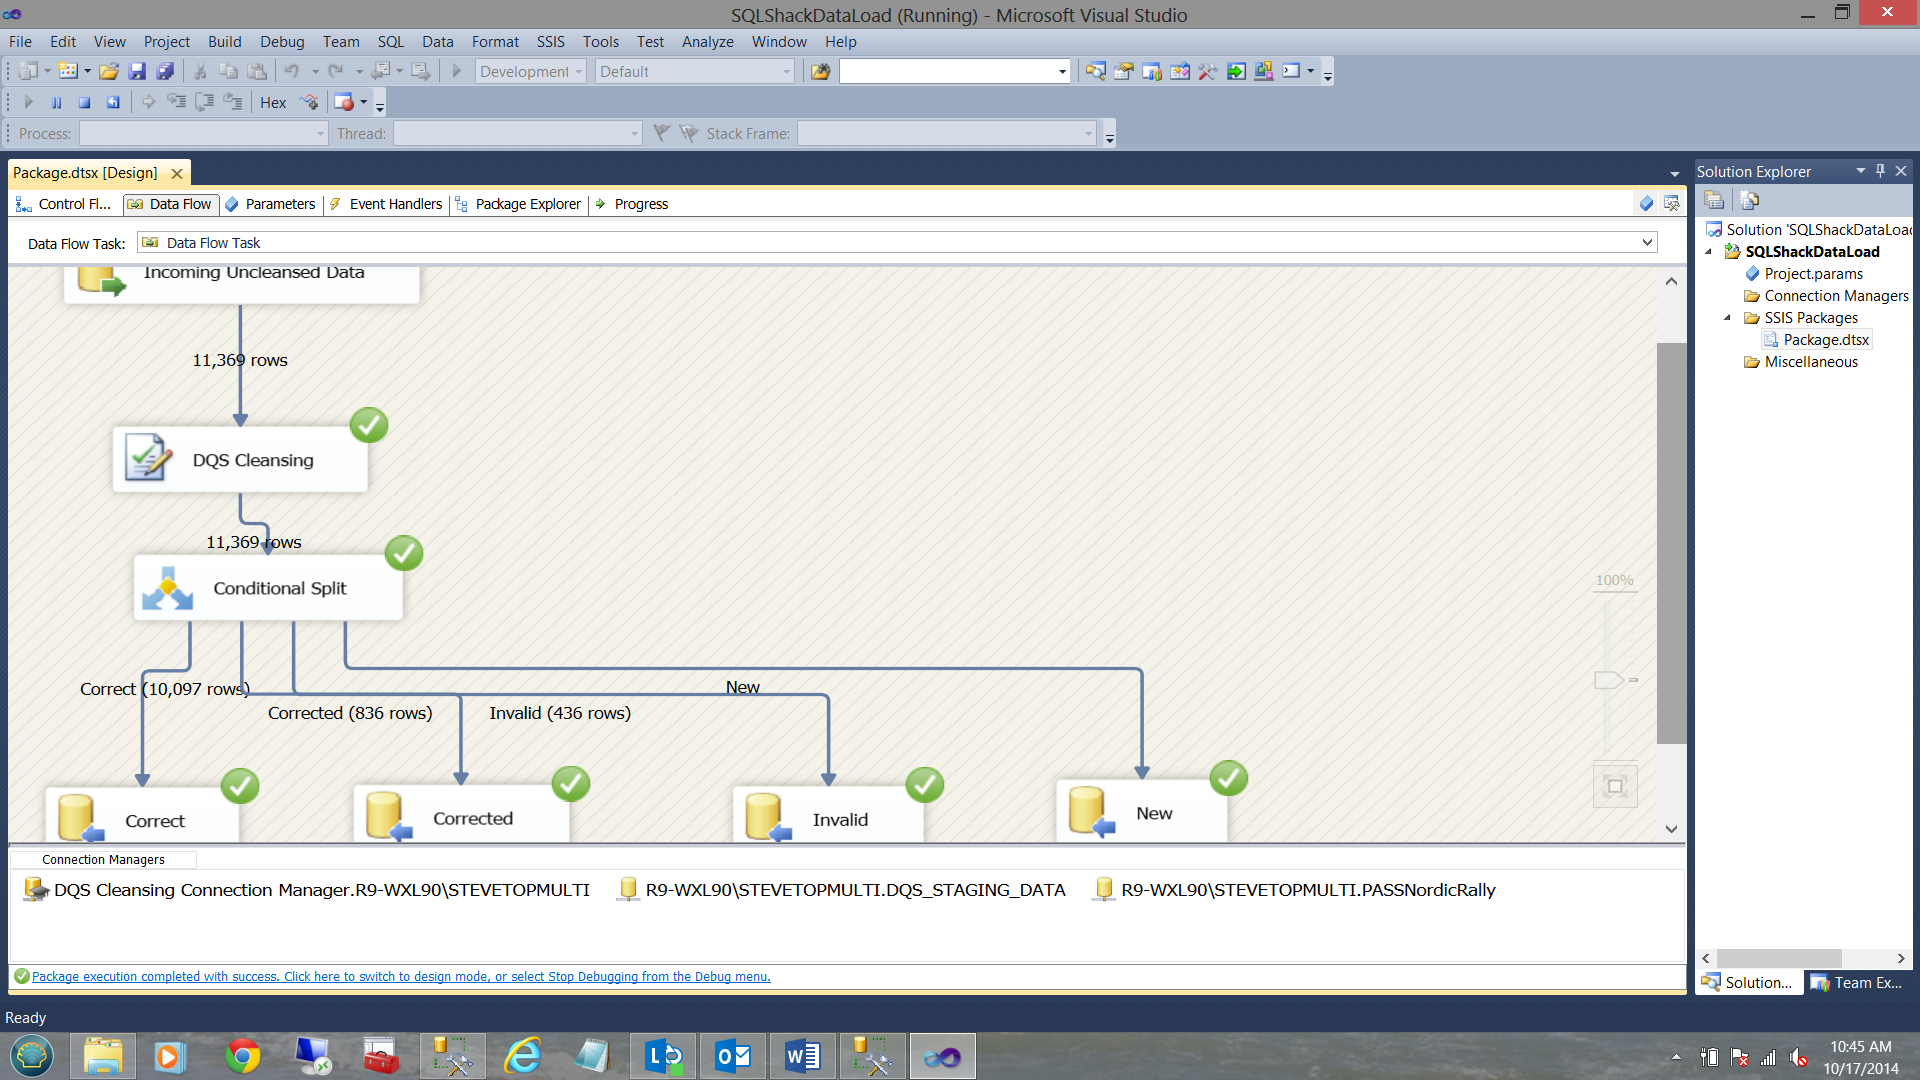
Running our daily process
Test driving our new SQL Server Integration Services project with BRAND NEW data, we now find the following:
Conclusions
It is blatantly obvious that data quality is an ongoing battle. Our nightly processes must be trusted to maintain our data and to ensure that our data is as ‘correct’ as possible. Intelligent algorithms such as those found within Data Quality Services can and will help ensure that we are not ‘reinventing’ the wheel with each new data load.
Our ‘invalid’, ‘new’ and ‘corrected’ data is sent to the Business Analysts / Data Stewards for further validation whilst the ‘correct’ data may be loaded into our production tables.
In our case our Business Analysts and Data Stewards process the faulty data via SQL Server Master Data Services, however this is a topic for another day.
Happy programming.
Steve has presented papers at 8 PASS Summits and one at PASS Europe 2009 and 2010. He has recently presented a Master Data Services presentation at the PASS Amsterdam Rally.
Steve has presented 5 papers at the Information Builders' Summits. He is a PASS regional mentor.
View all posts by Steve Simon
- Reporting in SQL Server – Using calculated Expressions within reports - December 19, 2016
- How to use Expressions within SQL Server Reporting Services to create efficient reports - December 9, 2016
- How to use SQL Server Data Quality Services to ensure the correct aggregation of data - November 9, 2016