This article is an in-depth guide on how PowerShell can be used to maintain and manage SQL backup on Linux and Windows machines.
Here’s an outline of what this article is all about:
- Introduction
- Technical specifications
- How to load SQL Server modules on Windows machine
- Security – Credential Management
- The objectives of Backup and Restore
- Library Linkage
- How SQL Server 2017 backup feature is used on Linux
- And more …
Introduction
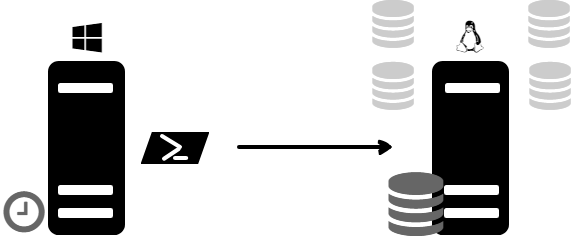
Tools to take SQL database backups, such as sqlcmd, SSMS, and PowerShell, are common to all platforms supported by SQL Server. In this post, I’m going to show how you can backup your SQL Server 2017 databases on a Linux machine using PowerShell.
Pre-requisites
- RedHat Server 7.3 or CentOS 7.0 or higher
- SQL Server 2017 or higher
- SQL Server Management Studio (SSMS) 16.5 or higher
Flow Diagram
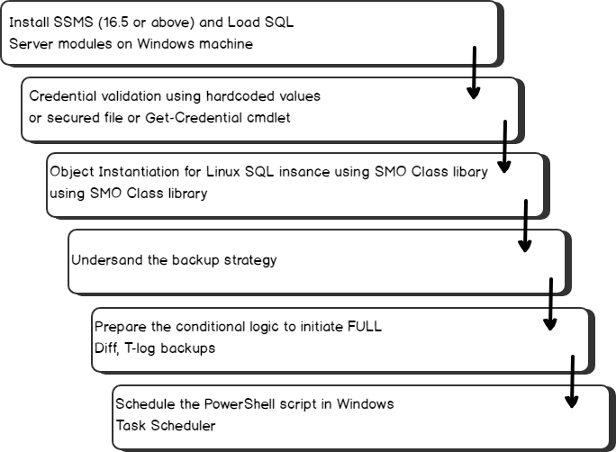
Install the newest version of SQL PowerShell on Windows
The latest version of SSMS is optimized to work efficiently with SQL Server 2017 on Linux. To download and install the latest version, see Download SQL Server Management Studio.
Launch PowerShell and import the sqlserver module
Let’s start by launching PowerShell on Windows. Open a command prompt on your Windows computer, and type PowerShell to launch a new Windows PowerShell session.
PowerShell
SQL Server provides a Windows PowerShell module named SqlServer that can be used to import the SQL Server components (SQL Server provider and cmdlets) into a PowerShell environment. (The name of the SQL PowerShell module for SSMS has changed from SQLPS to SQLServer.)
SSMS uses the new wrapper EXE to instantiate the SQL PowerShell environment. If you do not have the module, use the Install-Module cmdlet to install the SqlServer module. This will add new functionality and cmdlets to your PowerShell session. The new module will be installed to “%Program Files%\WindowsPowerShell\Modules\SqlServer”.
Copy and paste the command below at the PowerShell prompt to import the SqlServer module into your current PowerShell session:
|
1 |
PS P:\> Import-Module -name SqlServer -DisableNameChecking |
Type the command below at the PowerShell prompt to verify that the SqlServer module was imported correctly:
|
1 |
PS P:\> Get-Module -name SqlServer |
How to find what assemblies are loaded in windows
Based on the version of PowerShell, load the associated assembly. In most cases, the following command should be able to find and load the SQL server SMO assembly.
The AppDomain.GetAssemblies method gets the assemblies that have been loaded into the execution context of this application domain.
|
1 |
PS P:\> [AppDomain]::CurrentDomain.GetAssemblies() | where {$_.FullName -match "SQL"}|sort -property fullname | format-table fullname |
If you know the full assembly name use the .Load() method.
|
1 |
PS P:\>[reflection.assembly]::Load("Microsoft.SqlServer.Smo, Version=13.0.0.0, Culture=neutral,PublicKeyToken=89845dcd8080cc91") |

or,
|
1 |
PS P:\> Add-Type -Assembly "Microsoft.SqlServer.Smo, Version=13.0.0.0, Culture=neutral, PublicKeyToken=89845dcd8080cc91 |
Remember that the function, LoadWithPartialName has been deprecated. The recommended solution for PowerShell is to use Add-Type or load the specific library.
How to handle Credentials in Powershell
The three ways of managing credentials are as follows
- Hard code the login credentials
- Using Get-Credential cmdlets
- Using a Secured file
Hard code the login credentials
Often, we encounter a case where a password is hard coded in the script. Of course, the problem with this is that your password will be exposed to anyone with access to the script file.
The below sample code depicts the use of hard coded credential in the script
|
1 2 3 4 5 6 7 8 9 10 11 12 13 14 15 |
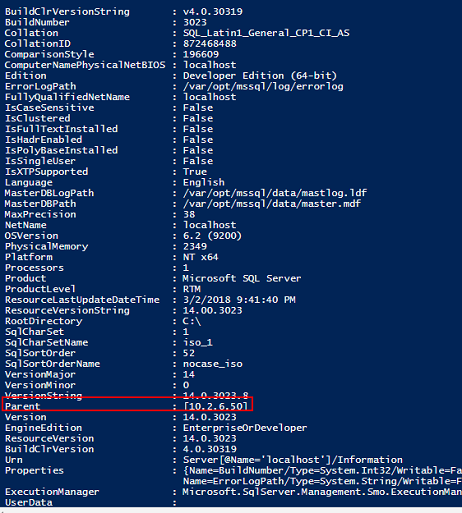
# The Linux SQL instance IP address $serverInstance = "10.2.6.50" $User = 'SA' # Convert plain text into a secure string $Pass = ConvertTo-SecureString 'thanVitha@2015' -AsPlainText –Force #supply the $Pass variable as SecureString for the password $Credentials = New-Object -TypeName System.Management.Automation.PSCredential -ArgumentList $User,$Pass #Build the connection $server = New-Object ('Microsoft.SqlServer.Management.Smo.Server') $serverInstance # Set credentials $server.ConnectionContext.LoginSecure=$false $server.ConnectionContext.set_Login($Credentials.UserName) $server.ConnectionContext.set_SecurePassword($credentials.Password) # Connect to the Server and get a few properties $server.Information |
The output is given below
Using Get-Credential cmdlet – Pop a dialog box
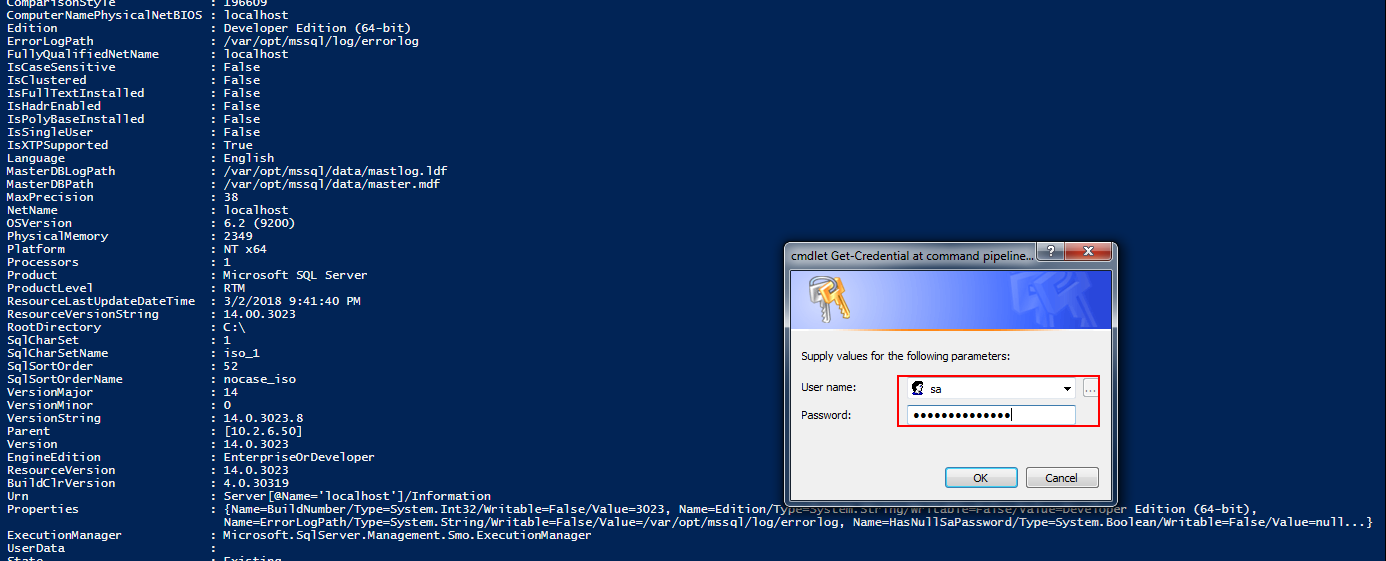
Get-Credential displays a window to enter credential details. This will appear every time you run the script. The $credential variable stores the username and password. The credentials are then fed to the respective queries for further processing.
The below sample code depicts the use of Get-Credential cmdlet
|
1 2 3 4 5 6 7 8 9 10 11 12 13 |
# The Linux SQL instance IP address # Prompt for credentials to login into SQL Server $serverInstance = "10.2.6.62" $credential = Get-Credential # Load the SMO assembly and create a Server object [System.Reflection.Assembly]::LoadWithPartialName('Microsoft.SqlServer.SMO') | out-null $server = New-Object ('Microsoft.SqlServer.Management.Smo.Server') $serverInstance # Set credentials $server.ConnectionContext.LoginSecure=$false $server.ConnectionContext.set_Login($credential.UserName) $server.ConnectionContext.set_SecurePassword($credential.Password) # Connect to the Server and get a few properties $server.Information |
Using a Secured file
First, the password has to be written to a file.
|
1 |
PS P:\> read-host -AsSecureString |ConvertFrom-SecureString |Out-File c:\SQLOnCentOS.txt |
Second, the credentials are read from the file using PSCredential class. You don’t need to re-enter the password over and over again.

|
1 2 3 4 5 6 7 8 9 10 11 12 13 14 15 16 |
# The Linux SQL instance IP address $serverInstance = "10.2.6.62" $User = 'sa' # Convert plain text into a secure string $User = 'sa' $pass= cat c:\SQLOnCentOS.txt |ConvertTo-SecureString #supply the $Pass variable as SecureString for the password $Credentials = New-Object -TypeName System.Management.Automation.PSCredential -ArgumentList $User,$Pass #Build the connection $server = New-Object ('Microsoft.SqlServer.Management.Smo.Server') $serverInstance # Set credentials $server.ConnectionContext.LoginSecure=$false $server.ConnectionContext.set_Login($credential.UserName) $server.ConnectionContext.set_SecurePassword($credential.Password) # Connect to the Server and get a few properties $server.Information |
Save the credentials as XML that can only be used on that computer with only your account.
Pop the credential dialog and input your credentials. This is a one-time thing.
|
1 |
Get-Credential | Export-Clixml \\Path\To\CredentialFile.xml |
Now, make the script,
|
1 2 |
#record your credentials into the variable, $Credentials $Credentials = Import-Clixml \\Path\To\CredentialFile.xml |
|
1 2 3 4 5 6 7 8 |
#Build the connection $server = New-Object ('Microsoft.SqlServer.Management.Smo.Server') $serverInstance # Set credentials $server.ConnectionContext.LoginSecure=$false $server.ConnectionContext.set_Login($credential.UserName) $server.ConnectionContext.set_SecurePassword($credential.Password) # Connect to the Server and get a few properties $server.Information |
Backup
Designing an effective backup and restore strategy requires careful planning, implementation, and testing. This section talks about using SQL Server Management Objects (SMO) to back up an SQL database hosted on a Linux Machine.
Let’s start this section by instantiating the SMO class library
|
1 |
$server = New-Object ('Microsoft.SqlServer.Management.Smo.Server') $serverInstance |
After connecting to the Linux SQL Instance, the properties of the databases can be listed using the below call:
|
1 |
$server.Databases |
The below call lists only the user-defined databases.
|
1 |
$dbs = $server.Databases | where { $_.IsSystemObject -eq $False } |

Prepare the backup file to back up the AdventureWorks database. The following code provides the metadata of the backup file and its backup directory location
|
1 2 3 4 |
$backupDirectory='C:\var\opt\mssql\data' $dbName = 'AdventureWorks' $timestamp = Get-Date -format yyyy-MM-dd-HHmmss $targetPath = $backupDirectory + "\" + $dbName + "_" + $timestamp + ".bak" |

Define the backup object that will be used for the database backup operation
|
1 |
$smoBackup = New-Object ("Microsoft.SqlServer.Management.Smo.Backup") |
Let’s retrieve the backup type information using an enumeration. The action property defines the type of backup.
|
1 |
PS P:\> [enum]::GetNames('Microsoft.SqlServer.Management.Smo.BackupActionType') |

| Member name | Description |
| Database | Backs up all the data files in the database. |
| Files |
Backs up specified data files. This option is recommended only when the transactions that have occurred since the last backup are isolated to the file or group of files that are being backed up. |
| Log | Backs up the transaction log. |
For a full backup, the Action property is set to a database, whereas for a differential backup, the Action property is set to a database along with having the incremental property set to $TRUE. For transaction log backup, on the other hand, we just change the Backup Action to Log.
|
1 2 3 4 5 6 |
# To perform the full backup $smoBackup.Action = "Database" # To turnoff Differential backup $smoBackup.Incremental = $False #Name of the database to backup $smoBackup.Database = $dbName |
Specify the backup description so that we know what this backup is and when it was taken.
|
1 2 3 |
$smoBackup.BackupSetDescription = "Full Backup of " + $dbName $smoBackup.BackupSetName = $dbName + " Backup" $smoBackup.MediaDescription = "Disk" |
We can configure what type of backup device is going to be used for the backup. In this case, it’s a file. To add a backup file to a device, use AddDevice() method.
|
1 |
PS P:\> [enum]::GetNames('Microsoft.SqlServer.Management.Smo.DeviceType') |

| Member name | Description |
| File | Specifies a disk file. |
| LogicalDevice | Specifies a logical device. |
| Pipe | Specifies a named pipe. |
| Tape | Specifies a tape device. |
| Url | Specifies a URL. |
| VirtualDevice | Specifies a virtual device. |
|
1 |
$smoBackup.Devices.AddDevice($targetPath, "File") |
Now, the configuration is set; let’s initiate the database backup.
|
1 |
$smoBackup.SqlBackup($server) |
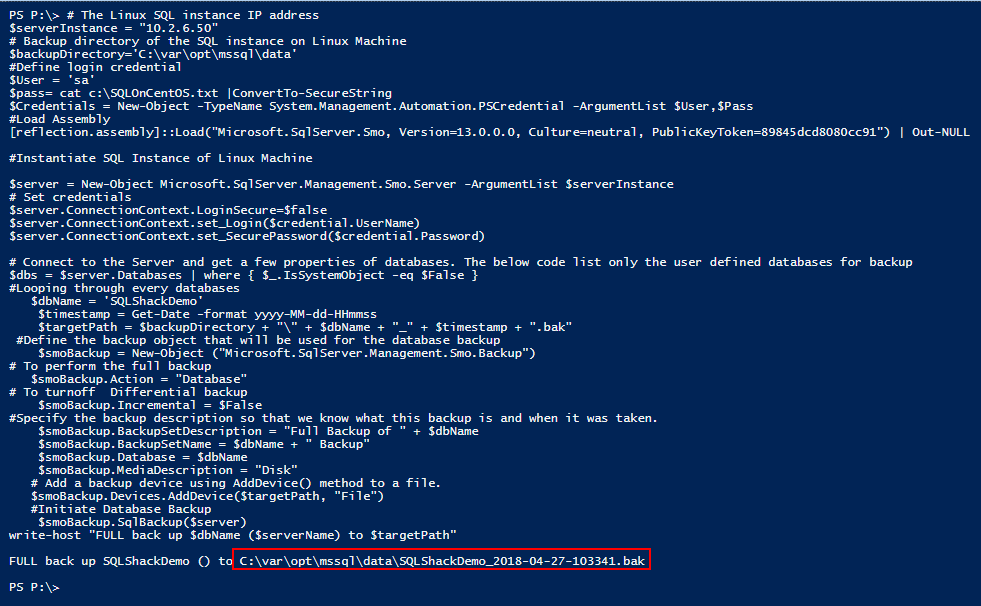
Let’s perform a dry run by combining all the pieces of above code:
|
1 2 3 4 5 6 7 8 9 10 11 12 13 14 15 16 17 18 19 20 21 22 23 24 25 26 27 28 29 30 31 32 33 34 35 36 37 38 39 40 41 |
# The Linux SQL instance IP address $serverInstance = "10.2.6.50" # Backup directory of the SQL instance on Linux Machine $backupDirectory='C:\var\opt\mssql\data' #Define login credential $User = 'sa' $pass= cat c:\SQLOnCentOS.txt |ConvertTo-SecureString $Credentials = New-Object -TypeName System.Management.Automation.PSCredential -ArgumentList $User,$Pass #Load Assembly [reflection.assembly]::Load("Microsoft.SqlServer.Smo, Version=13.0.0.0, Culture=neutral, PublicKeyToken=89845dcd8080cc91") | Out-NULL #Instantiate SQL Instance of Linux Machine $server = New-Object Microsoft.SqlServer.Management.Smo.Server -ArgumentList $serverInstance # Set credentials $server.ConnectionContext.LoginSecure=$false $server.ConnectionContext.set_Login($credential.UserName) $server.ConnectionContext.set_SecurePassword($credential.Password) # Connect to the Server and get a few properties of databases. The below code list only the user defined databases for backup $dbs = $server.Databases | where { $_.IsSystemObject -eq $False } #Looping through every databases $dbName = 'SQLShackDemo' $timestamp = Get-Date -format yyyy-MM-dd-HHmmss $targetPath = $backupDirectory + "\" + $dbName + "_" + $timestamp + ".bak" #Define the backup object that will be used for the database backup $smoBackup = New-Object ("Microsoft.SqlServer.Management.Smo.Backup") # To perform the full backup $smoBackup.Action = "Database" # To turnoff Differential backup $smoBackup.Incremental = $False #Specify the backup description so that we know what this backup is and when it was taken. $smoBackup.BackupSetDescription = "Full Backup of " + $dbName $smoBackup.BackupSetName = $dbName + " Backup" $smoBackup.Database = $dbName $smoBackup.MediaDescription = "Disk" # Add a backup device using AddDevice() method to a file. $smoBackup.Devices.AddDevice($targetPath, "File") #Initiate Database Backup $smoBackup.SqlBackup($server) write-host "FULL back up $dbName ($serverName) to $targetPath" |
That gives us the sample output like below:
The following sample script can be used to back up a database with the following schedule:
Every Sunday Evening at 10 PM – Full Backup
Every [Mon-Sat] Evening at 10 PM – Differential Backup
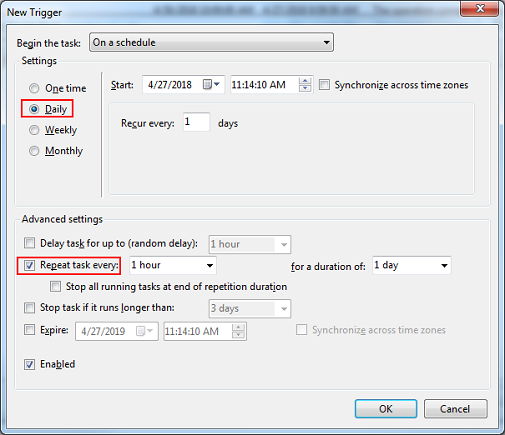
Every hour – Transaction Log

You can run the script on multiple Linux machines by passing the associated IP addresses as a parameter to the calling function Get-SQLinuxBackup. The same script can also be used to run backups for SQL instances on the Windows machines.
|
1 |
Get-SQLinuxBackup -SQLServerInstance "10.2.6.50" -logfile "C:\Backup\BackupSQLInstanceOnLinuxLog.txt" |
Now, copy and save the PowerShell script as C:\BackupLinuxInstance.ps1.
In the script, it is necessary to make changes to the following variables
- BackupDirectory
- Credentials
|
1 2 3 4 5 6 7 8 9 10 11 12 13 14 15 16 17 18 19 20 21 22 23 24 25 26 27 28 29 30 31 32 33 34 35 36 37 38 39 40 41 42 43 44 45 46 47 48 49 50 51 52 53 54 55 56 57 58 59 60 61 62 63 64 65 66 67 68 69 70 71 72 73 74 75 76 77 78 79 80 81 82 83 84 85 86 87 88 89 90 91 92 93 94 95 96 97 98 99 100 101 102 103 104 105 106 107 108 109 110 111 112 113 114 115 116 117 118 119 120 121 122 123 124 125 126 127 128 129 130 131 132 133 134 135 136 137 138 139 140 141 142 143 144 145 146 147 148 149 150 151 152 153 154 155 156 157 158 159 160 161 162 163 164 165 166 167 168 169 170 171 172 173 174 175 176 177 178 179 180 181 182 183 184 185 186 187 188 189 190 |
<# .SYNOPSIS Bakcup Automation for SQL Server 2107 databases on Linux machine using Task Scheduler and Powershell .DESCRIPTION A step by step details is discussed in the script 1. Load the new SQL Server Module 2. Load SMO library 3. Credential usage 4. Define Backup strategy 5. Inititate Backup .NOTES File Name : get-SQLinuxBackup Author : Prashanth Jayaram ,sqlpowershell@gmail.com Requires : PowerShell V3 .EXAMPLE 1 The first example - You can call the script C:\ PS> get-SQLinuxBackup -SQLServerInstance '10.2.6.62' -logfile .EXAMPLE 2 Set-WriteLog -Message "$($_.Server) is reachable and starting the process " -Logfile $Logfile .PARAMETER 1 SQLServerInstance - This is the IP address of the Linux instance .PARAMETER 2 logfile - This is write the progress of the script #> FUNCTION Get-SQLinuxBackup{ [CmdletBinding(SupportsShouldProcess=$true,ConfirmImpact='Low')] Param( [Parameter(Mandatory=$true, Position=0)] [String]$SQLServerInstance, [Parameter(Mandatory=$true, Position=1)] [String]$Logfile ) # Prepare headers for the log file for each execution of script Add-Content $logfile "#################################################################" Add-Content $logfile "Backup Details" Add-Content $logfile "Generated $(get-date)" Add-Content $logfile "Generated from $(gc env:computername)" Add-Content $logfile "#################################################################" Function Set-WriteLog { [CmdletBinding()] Param( [Parameter(Mandatory=$False)] [ValidateSet("INFO","WARN","ERROR")] [String] $Level = "INFO", [Parameter(Mandatory=$True)] [string] $Message, [Parameter(Mandatory=$False)] [string] $logfile ) $Stamp = (Get-Date).toString("yyyy/MM/dd HH:mm:ss") $Line = "$Stamp $Level $Message" If($logfile) { Add-Content $logfile -Value $Line } Else { Write-Output $Line } } # Import sqlserver module Import-Module sqlserver -DisableNameChecking # set the backup directory $backupDirectory='C:\var\opt\mssql\data' # the credentials are hardcoded $User = 'sa' $Pass = ConvertTo-SecureString 'thanVitha@2015' -AsPlainText -Force $Credential = New-Object -TypeName System.Management.Automation.PSCredential -ArgumentList $User,$Pass # load the assembly [reflection.assembly]::Load("Microsoft.SqlServer.Smo, Version=13.0.0.0, Culture=neutral, PublicKeyToken=89845dcd8080cc91") | Out-NULL # declare the SMO isntance of given SQL Server $server = New-Object ('Microsoft.SqlServer.Management.Smo.Server') $SQLServerInstance # Set credentials $server.ConnectionContext.LoginSecure=$false $server.ConnectionContext.set_Login($credential.UserName) $server.ConnectionContext.set_SecurePassword($credential.Password) # listing the user defined databases $dbs = $server.Databases | where { $_.IsSystemObject -eq $False } # backup start data and time $BackupStartTime = get-date $timestamp = Get-Date -format yyyy-MM-dd-HHmmss # Full Backup should start on or after 10 PM on every Sunday and daily on or after 9 PM differential backup should start if ($BackupStartTime.Hour -eq 10) { if ($BackupStartTime.DayOfWeek -eq "Sunday") { foreach ($database in $dbs) { $dbName = $database.Name $targetPath = $backupDirectory + "\" + $dbName + "_" + $timestamp +"_Full"+ ".bak" $smoBackup = New-Object ("Microsoft.SqlServer.Management.Smo.Backup") $smoBackup.Action = "Database" $smoBackup.BackupSetDescription = "Full Backup of " + $dbName $smoBackup.BackupSetName = $dbName + " Backup" $smoBackup.Database = $dbName $smoBackup.MediaDescription = "Disk" $smoBackup.Devices.AddDevice($targetPath, "File") $smoBackup.SqlBackup($server) Set-WriteLog -Message "$SQLServerInstance - FULL Backup of $dbName ($SQLServerInstance) to $targetPath" -Logfile $Logfile } } else { foreach ($database in $dbs) { $dbName = $database.Name $targetPath = $backupDirectory + "\" + $dbName + "_" + $timestamp +"_Diff"+ ".bak" $smoBackup = New-Object ("Microsoft.SqlServer.Management.Smo.Backup") $smoBackup.Incremental = $true $smoBackup.Action = 1 $smoBackup.BackupSetDescription = "Differential Backup of " + $dbName $smoBackup.BackupSetName = $dbName + " Backup" $smoBackup.Database = $dbName $smoBackup.MediaDescription = "Disk" $smoBackup.Devices.AddDevice($targetPath, "File") $smoBackup.SqlBackup($server) Set-WriteLog -Message "$SQLServerInstance - Differential Backup of $dbName ($SQLServerInstance) to $targetPath" -Logfile $Logfile } } } else { $dbs = $server.Databases | where { $_.IsSystemObject -eq $False -and $_.RecoveryModel -ne 3} foreach ($database in $dbs) { $dbName = $database.Name $timestamp = Get-Date -format yyyy-MM-dd-HHmmss $targetPath = $backupDirectory + "\" + $dbName + "_" + $timestamp +"_log"+".bak" $smoBackup = New-Object ("Microsoft.SqlServer.Management.Smo.Backup") $smoBackup.Action = "Log" $smoBackup.BackupSetDescription = "Log Backup of " + $dbName $smoBackup.BackupSetName = $dbName + " Backup" $smoBackup.Database = $dbName $smoBackup.MediaDescription = "Disk" $smoBackup.Devices.AddDevice($targetPath, "File") $smoBackup.SqlBackup($server) Set-WriteLog -Message "$SQLServerInstance - Log Backup of $dbName ($SQLServerInstance) to $targetPath" -Logfile $Logfile } } } # function calling Get-SQLinuxBackup -SQLServerInstance "10.2.6.50" -logfile "C:\Backup\BackupSQLInstanceOnLinuxLog.txt" |
Task Scheduler
How to create an event using the Task Scheduler:
- Open “Task Scheduler” (Go to START—Run. Type “Tasks”, and hit Enter)
- Click on “Create task”
- Pick a name for the task, and choose “Run whether user is logged on or not”
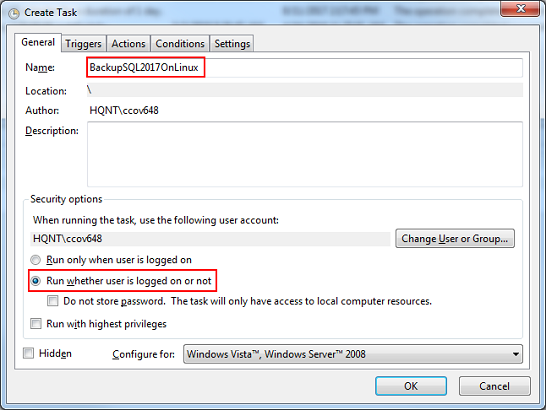
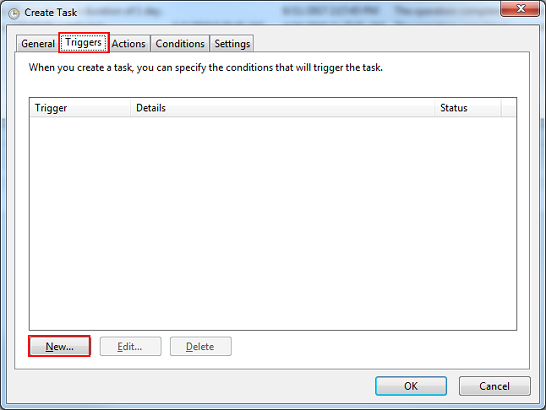
- Choose the “Triggers” Tab, Click “New”
- Specify the option you like, and then click “OK” to create a trigger
- Choose “Actions” tab, Click “New”
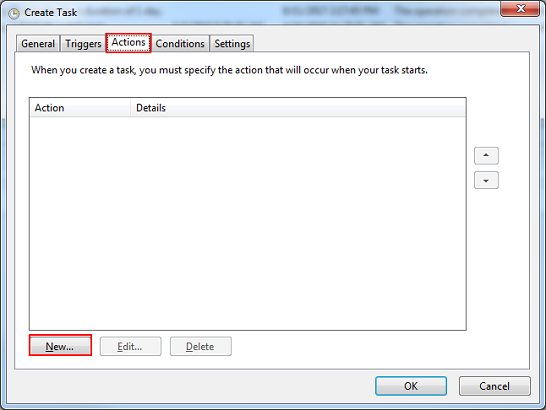
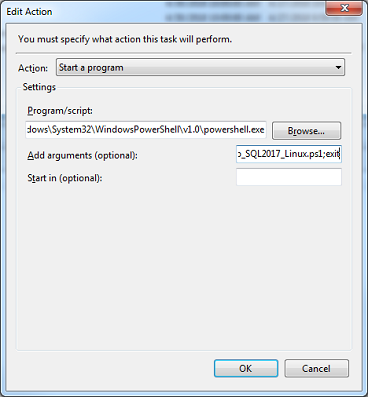
- Copy following command to “Program/script” textbox C:\Windows\System32\WindowsPowerShell\v1.0\powershell.exe
- Enter the path of the saved script file in “Add arguments (optionally)” textbox
As per the screenshot, I saved the file under C:\BackupJob_SQL2017_Linux.PS1. Therefore, in the add arguments text box, I entered: C:\ BackupJob_SQL2017_Linux.PS1;exit
- Right click and run the job.
- Verify the output

That completes the guide to creating a backup of a database hosted on a Linux machine.
Table of contents
References
- Backup.SqlBackup Method (Server)
- Backing Up and Restoring Databases and Transaction Logs
- Backup Class
- Stairway to SQL essentials - April 7, 2021
- A quick overview of database audit in SQL - January 28, 2021
- How to set up Azure Data Sync between Azure SQL databases and on-premises SQL Server - January 20, 2021


