
In today’s world of DevOps and ALM practices, there is often a strong emphasis on the visibility and traceability of the work we perform towards software development. This means that as developers, we often have to account (to clients, business owners, project teams etc.) for a list of development tasks that will be undertaken to deliver a given project requirement or user story. Amidst several tools that can be used to facilitate such a practice, Team Foundation Server (TFS) is one such tool that can be used by developers to keep track of their work items.
Furthermore, with the availability of the cloud-based version of TFS – currently referred to as Visual Studio Team Services (VSTS), developers no longer have to be in a client/project that uses TFS for them to begin using it. In fact, in my previous roles as a consultant, I captured most of my tasks in TFS and thereby making it easy for me to complete timesheets by copying out items from TFS. In this article, we deviate from discussing SQL Server-related development tips and tricks, instead focus on TFS client-side tools that are available to us for the successful capturing and tracking of our development activities.
Background
Although you can use TFS to manage any kind of development, in this article we will limit it to SQL Server-related development. There are also third-party TFS client tools that can be used to manage your development, we are however focusing only on Microsoft related client tools. As a case in point, we revisit the development that was covered in my previous article, working with ragged right formatted files in SSIS in which a breakdown of development activities can be summarized as comprising of the following tasks:
- Create target database
- Create target table
-
Setup File Import SSIS Package
- Configure ragged right flat connection
- Configure target OLE DB connection
- Configure Data Flow Task
- Transform imported data using T-SQL
Hereinafter, our discussion of the TFS client tools will focus on how each tool is able to cater for the capturing and tracking of the aforementioned development activities.
List of TFS client-side tools
Free tools
-
Web browser
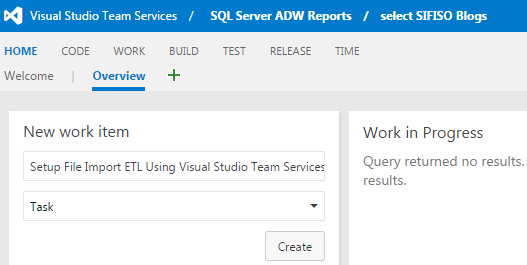
The easiest way to capture work items in VSTS web access is by using a web browser. TFS web access is supported in all major browsers provided you have the latest browser versions and updates installed. Figure 1 shows a screenshot of a New work item widget within the Overview tab of VSTS homepage which can be used to capture work items.

Figure 1 VSTS web access provides you with two more options to capture work items using a browser:
-
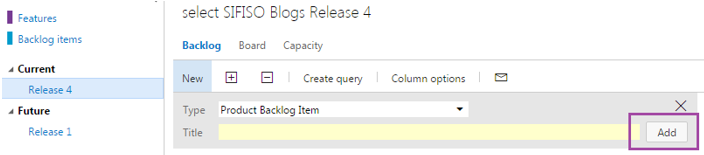
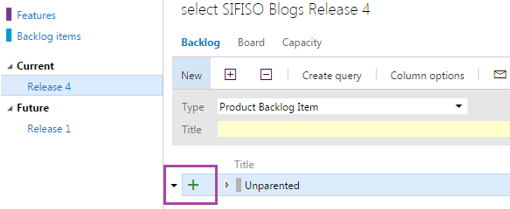
For every backlog view (i.e. Feature backlog, Sprint backlog etc.), as shown in Figure 2, you have an Add button in which can be used to capture new work items
Figure 2 Secondly, as you navigate within the web access view, you should notice a pop-up plus icon in your task board or backlog view (shown in Figure 3) that can further be used to capture items.
Figure 3
-
-
Visual Studio Team Explorer
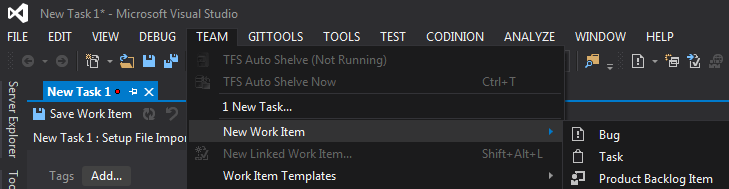
For developers who are already working in Visual Studio, they have an option of capturing their work items directly in Visual Studio. This is made possible by a plug-in called Team Explorer (for information regarding the installation of Team Explorer, refer to my article here). In order to capture work items, you will have to navigate to the TEAM menu tab in Visual Studio as shown in Figure 4.
Figure 4
Paid-for tools
The free tools that have been covered in preceding section should be sufficient to most developers for capturing of their own SQL Server related development tasks. However, if you have already purchased software such as Microsoft Office and Microsoft Test Manager (MTM), it useful to know how they integrate to TFS and subsequently be used to manage work items.
Microsoft Test Manager
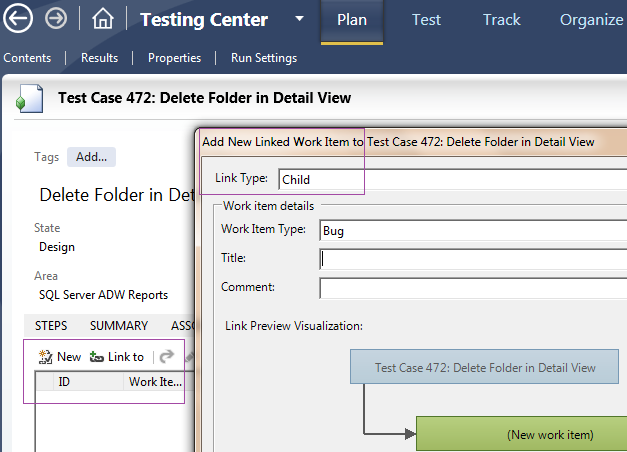
Although the default items that you create in MTM are test cases, you also have an option for creating new linked work items that don’t necessarily have to be of test case type, as shown in Figure 5.
Figure 5
Bulk creation of TFS work items
The following client tools are still categorized as “paid-for” but unlike MTM or any of the tools discussed so far, they allow for bulk-creation and management of work items in TFS: bulk-creation is necessary when you working with a long list of development tasks that ought to be captured in TFS.
Microsoft Excel
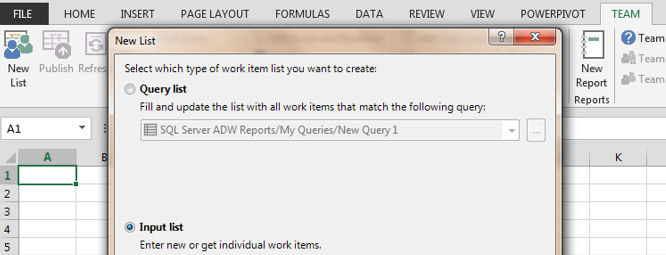
The integration of Excel with TFS is made possible with Team Explorer. This means that you will have install Team Explorer on your machine prior to using Excel for managing TFS. If Team Explorer is already installed, then similar to a Visual Studio IDE, you should see a TEAM menu tab in your excel document.
Similar to other tools discussed so far, the first part towards using Excel for managing TFS work items involves establishing a connection to a TFS server instance which is triggered by clicking on the New List button. After you have established the connection, you can either capture a new item (in the Input list option) or retrieve an existing query – from the Query list option. For the purposes of this article, I opted for an Input list as shown in Figure 6.
Figure 6 Figure 7 shows the captured work items. You will notice that there are no values in the ID field, this is because we haven’t published the items yet – thus, a reminder that the only time changes will be committed to TFS will be when you click the Publish button (located next to the New List button).
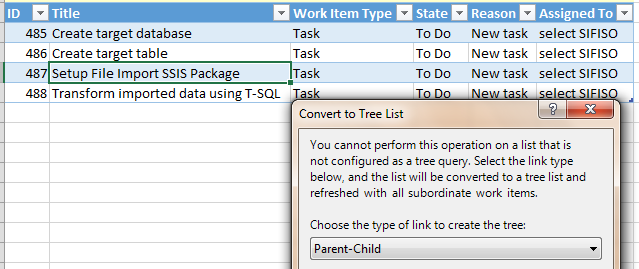
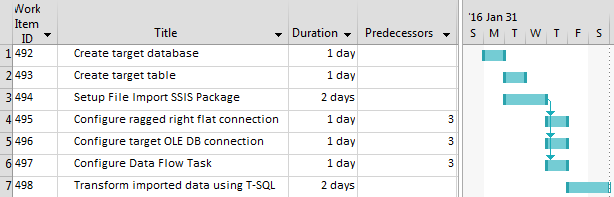
Figure 7 What is now left to do is to complete sub-items within the Setup File Import SSIS Package task as mentioned in the Background section of this article. In order to do that, you have to click the Add Child button whose location is shown in Figure 8.
Figure 8 A few things to look out for when adding child items:
The adding of child items converts the list into a tree structure – this means you will be prompted to convert your flat list view into the tree structure as shown in Figure 9.
Figure 9 You can only add child items after the parent item has been published into TFS, thus, if you run into a TF208028 error code, make sure that you have published the parent item first.
Our final view of our work items in shown in Figure 10 whereby you will notice that all child items are captured underneath a new title column, Title 2.
Figure 10 Microsoft Project
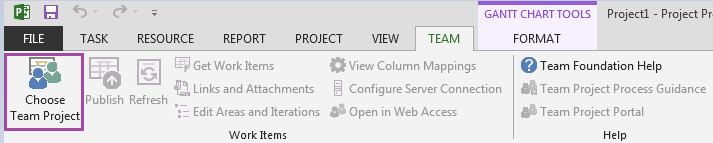
The integration of TFS with Microsoft Project (MS Project) is almost similar to that of TFS in that you still have to install Team Explorer prior to using MS Project for capturing of work items. Likewise, if Team Explorer is installed then by default a TEAM tab should appear as part of the menu items in your MS Project document. However, a noticeable difference is that unlike in Excel whereby you had to look for a New List or Configure buttons, connection to a TFS instance in MS Project is established by clicking the Choose Team Project button as shown in Figure 11. The rest of the rules are similar (i.e. you have to click the Publish button to save your work items into TFS).
Figure 11 Finally, another difference is the manner in which MS Project represents child items. As can be seen in Figure 12, items in rows 4-6 are child items of item 3.
Figure 12


Conclusion
In this article, we’ve identified and discussed a list of TFS client-side tools that can be used to capture, track and manage SQL Server-related development. These tools can be classified into free and paid-for categories. Finally, we demonstrated the ease of convenience in which tools such as Microsoft Excel and Project can be used to bulk-create and edit development tasks into TFS.

Sifiso's LinkedIn profile
View all posts by Sifiso W. Ndlovu