
This article explains the SQL Notebook feature in Azure Data Studio along with the Markdown language to customize it.
Azure Data Studio is a cross-platform tool working on both on-premises and cloud-based systems. Microsoft releases monthly releases of Azure Data Studio. These monthly features include new features, enhancements to existing features, bug fixes etc.
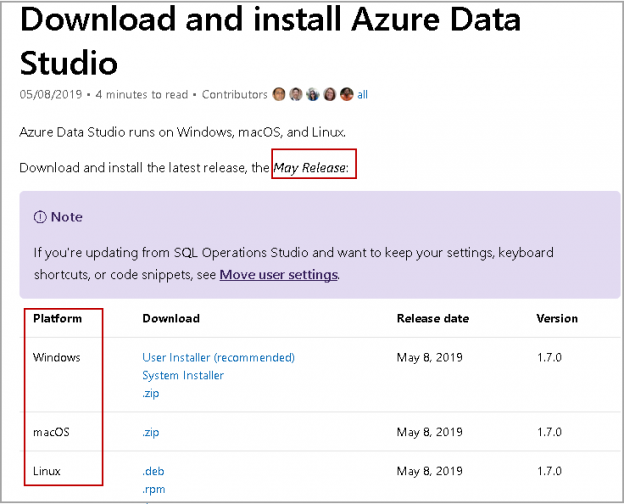
Microsoft released the latest release of Azure Data Studio 1.7.0 on May 8, 2019. You can download installer on a platform of your choice and install it.

In the March release, Microsoft released new feature called SQL Notebook. Let’s explore this feature in this article.
SQL Notebook Overview
Usually, we use Microsoft OneNote to create a notebook and embed documents in it. But with Azure SQL Studio, we can create human-readable documents in SQL Notebook that can include rich format text, code, images. It can also include the query results set in the documents. DBAs can prepare and run the books, troubleshooting guides, baseline documents to store SQL queries, steps and output of these queries.
This technology is part of open source Jupiter initiative and uses Markdown language to prepare it. As an example, Microsoft Docs uses lightweight mark up language Markdown. It is easy to read language and easily converts into HTML format. Each Markdown document is structurally valid in HTML format.
Different approaches to launch SQL Notebook
-
Connect to a SQL instance and right click on it. In the drop-down menu, click on New Notebook

-
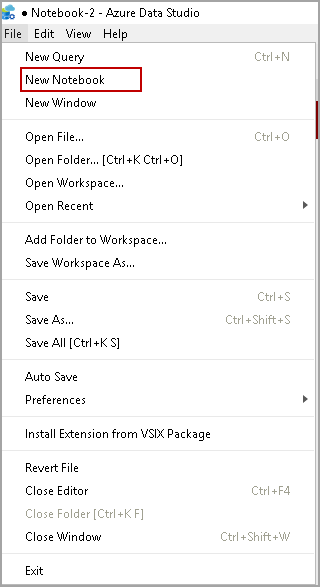
Go to File -> New Notebook
-
You can open Notebooks from Command Palette as well. Go to View -> Command Palette
(Shortcut Key Ctrl + Shift + P)
In the command palette, type new Notebook and select the highlighted option.


You can use any of the above methods to launch it. Once you launch a Notebook, it opens a default window as per the following image.
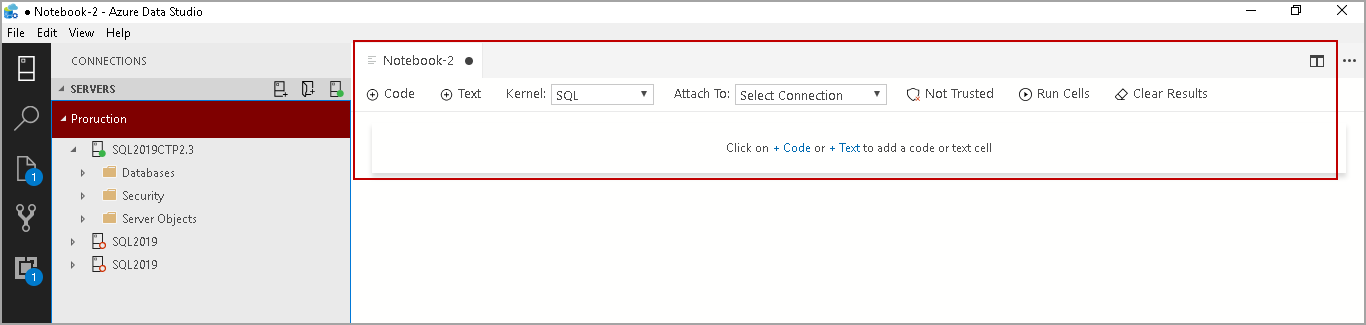
Default SQL Notebook layout in Azure Data Studio
In the default window, we can see the following areas.

Kernel: It is an important area of a Notebook. We can select the code language and the engine to execute it. For example, the default Kernel is SQL, and we can write t-SQL code in it.
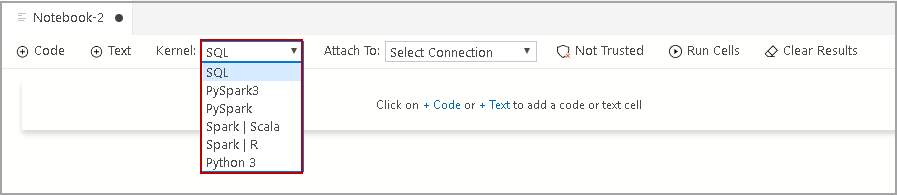
In the following screenshot, you can see available Kernel in SQL Notebook. If you want to save and run Python code, select kernel Python 3 from the drop-down
- Attach To: It shows the connection attached to the Notebook. You can add a connection in the drop-down list and select the required details such as name, port number, and default database
- Code: We can click on +Code to add a t-SQL code in the Notebook
- Text: We can add text as well as using +Text
- Click on +Code or +Text to add a code or text cell: It is a guide to redirect us for adding code or text in a notebook
Not Trusted: We should review the code and text inside the notebook that it does not contain any malicious code. By default, SQL Notebook is Not Trusted. Once you click on Not Trusted, it turns into a Trusted Notebook in Azure Data Studio
Note: You cannot change the Trusted notebook to Not Trusted. If you click on Trusted, it shows the following message
- Run Cells: SQL Notebook is an integrated notebook that can embed code and text inside it in Azure Data Studio. We can execute code in this as well. Click on Run Cells to execute code inside it
- Clear Results: We might want to execute the code but do not want to save the output inside the Notebook. Click on Clear Results removes the output


Example of SQL Notebook in Azure Data Studio
Let’s create a notebook in this section. We want to add both SQL query as well as text in a notebook.
-
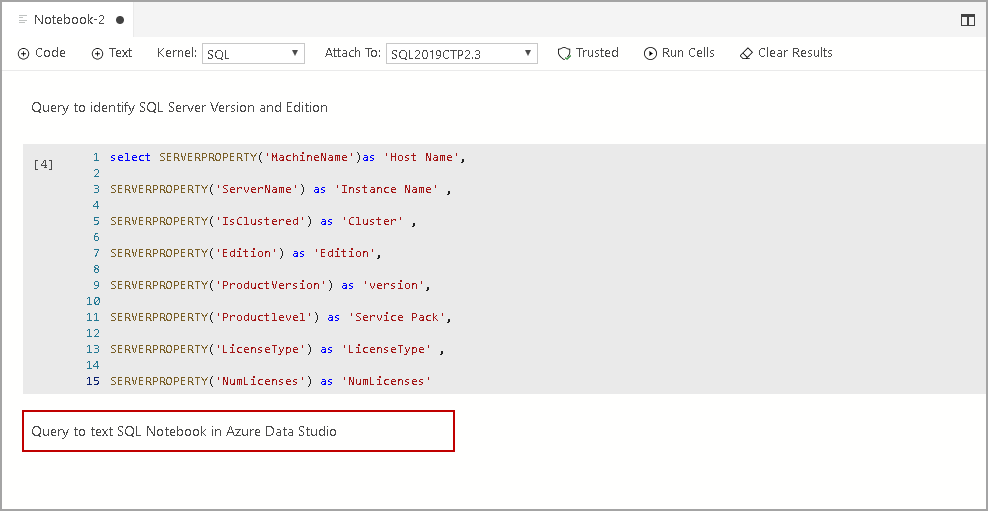
Click on +Text to add text. Once you start writing in the notebook editor, it also gives you a preview as seen in the following screenshot
-
Now, add t-SQL query to get details of SQL Server details such as Edition, version, hostname, Service pack. Click on +Code to add SQL query. You can write a t-SQL on it or paste the query
- Delete the code
- Insert text or code before this code block
- Insert text or code after this code block
- Note: If you have multiple code blocks in SQL Notebook and you click on Run Cells from the top menu, it executes all the queries and shows outputs. You should click on Run Cell on individual code block to get the output of a particular query only.
Note: You should give a space between a hash mark and text.
- We need to use at least three dashes to separate each header cell
- We use outer pipe (|) to separate each column
- We can use optional colons “:” for column alignment
- Understanding PostgreSQL SUBSTRING function - September 21, 2024
- How to install PostgreSQL on Ubuntu - July 13, 2023
- How to use the CROSSTAB function in PostgreSQL - February 17, 2023

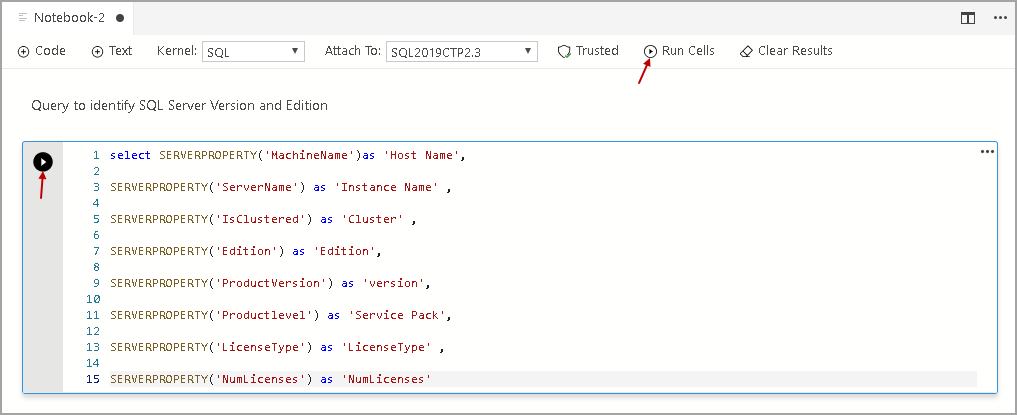
Once you add a t-SQL query, it automatically assigns the line numbers. We can also see a Run Cell icon in the code block. We can execute a query inside a notebook. Click on either Run Cell icon inside a code block or click on Run Cells.
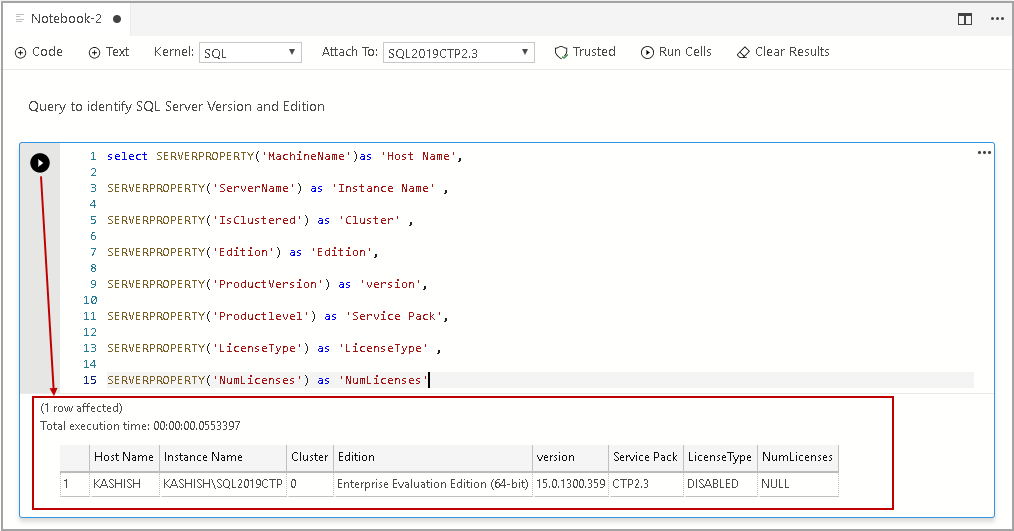
In the following screenshot, we can see the query output inside SQL Notebook. It is an exciting feature where you can directly execute the code and view the output. If you create notebooks in tools such as Microsoft OneNote, you need to copy the code and paste into SQL editor such as SSMS and execute it. We also need to copy paste the output as well back to Microsoft OneNote to save it.
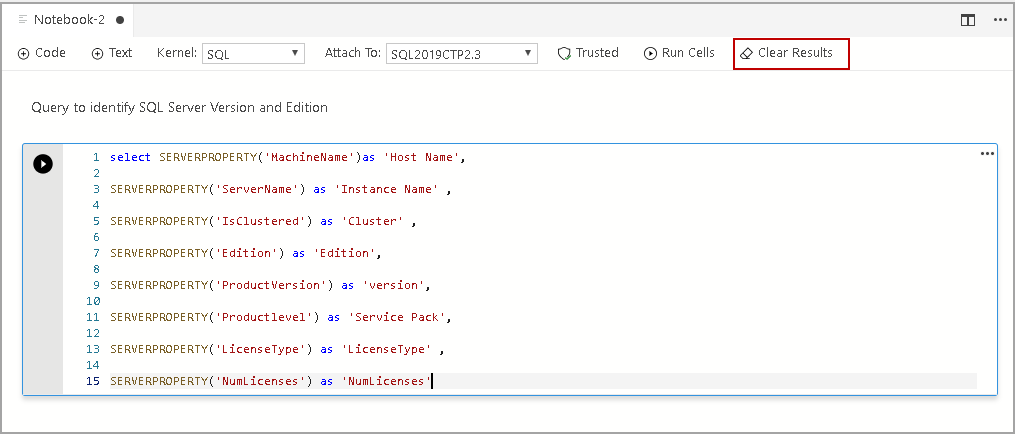
If you do not want to save the output of the query, click on Clear Results. It removes the output as shown in the following image.
Once we click on +Code or +Text, it adds code or text to the end. If we want to add code or text in a specific position(before or after), click on the ellipsis icon, and you get a menu.
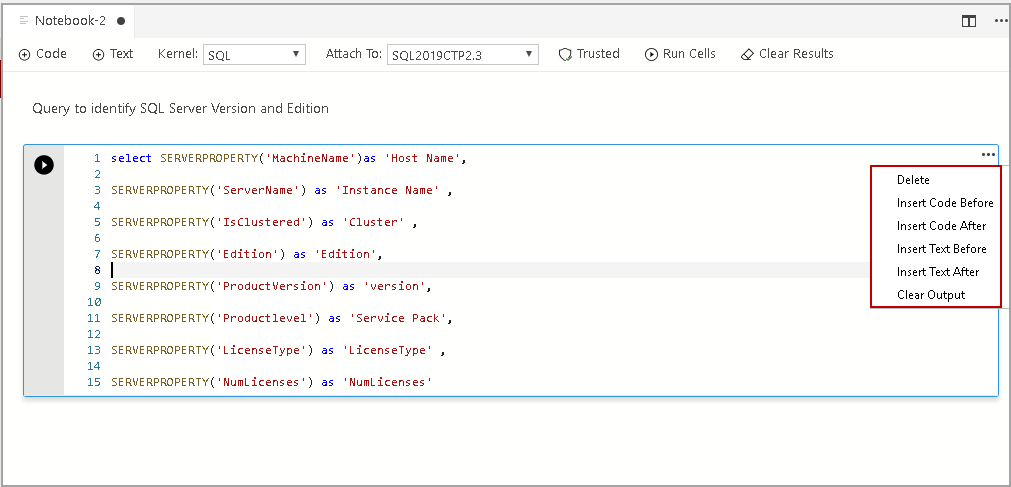
You can select an appropriate option to do the following tasks
Let’s add another text block at the end and write text in it.
Previously, we paste the code in the SQL Notebook code block. We can quickly write t-SQL as well, and Azure Data Studio Code Snippets helps to write code effectively. We can use existing Code Snippets or write custom Code Snippets as well.
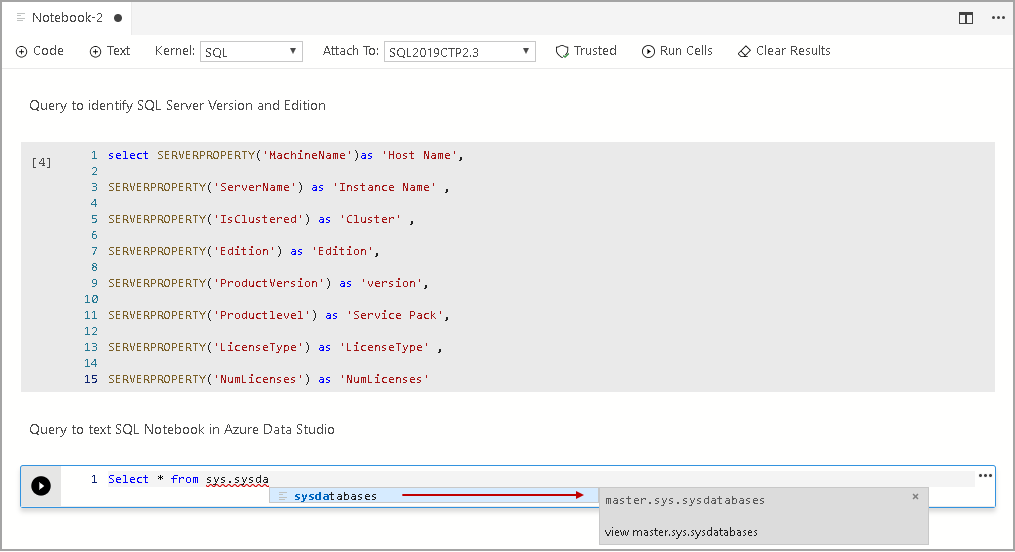
Add a code block and start writing code in it. You get inline suggestion to choose from available Code Snippets.
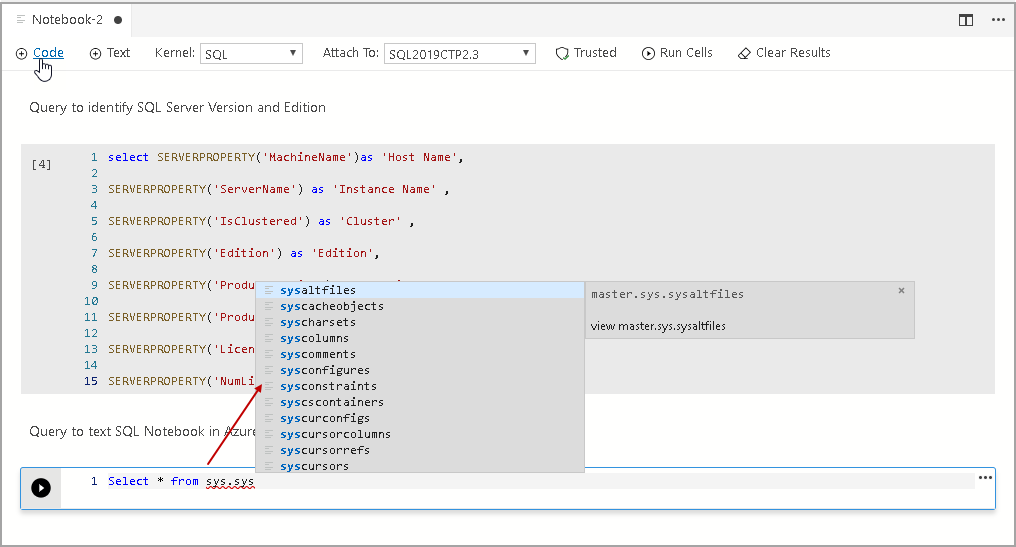
Select the appropriate Code Snippets, and you get brief information of it as well.
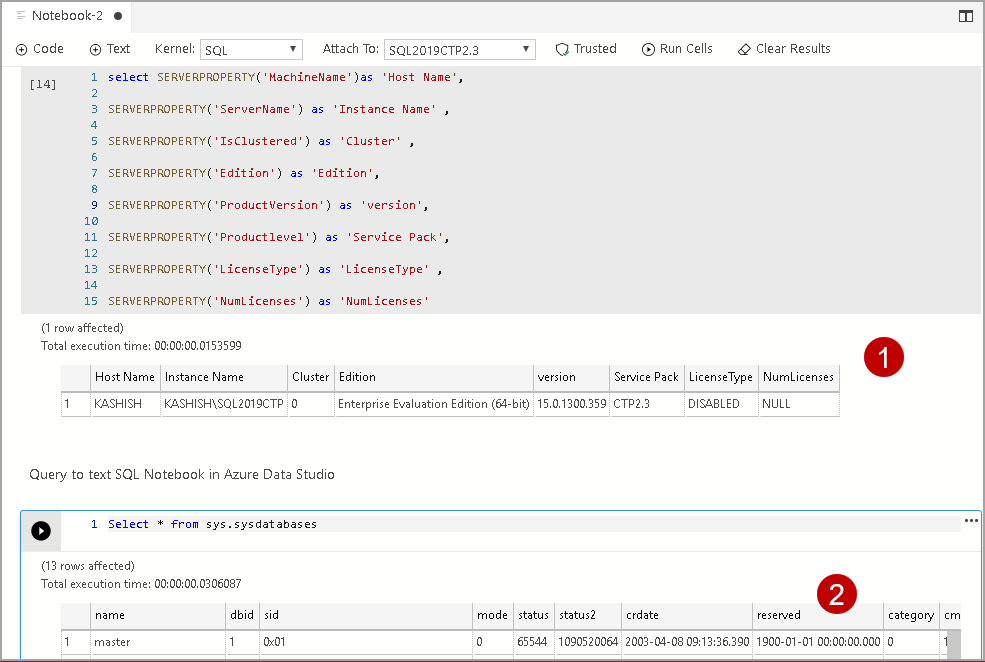
Press Enter and click on Run Cells icon inside a code block. If the result does not fit in a block, we can move the slider to see the complete result set.
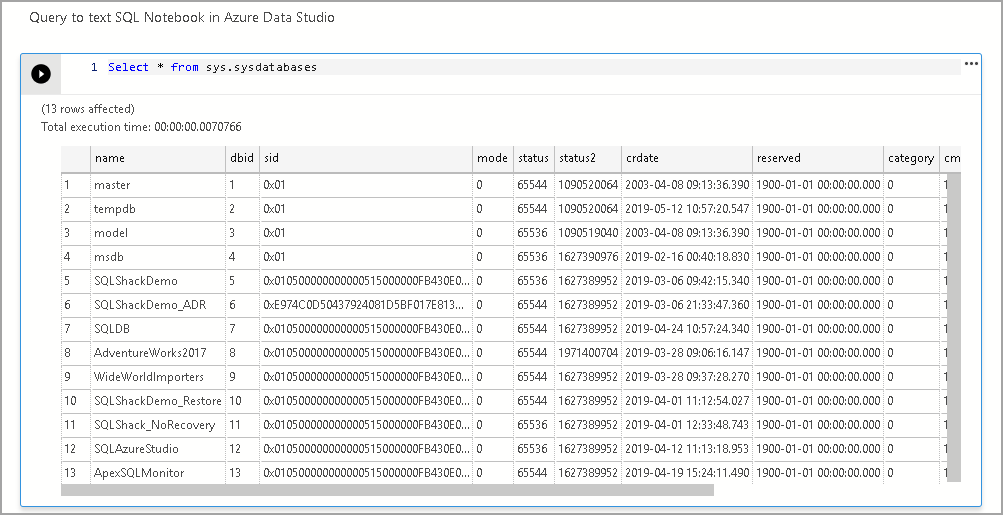
In the following screenshot, we can see both SQL queries output together.
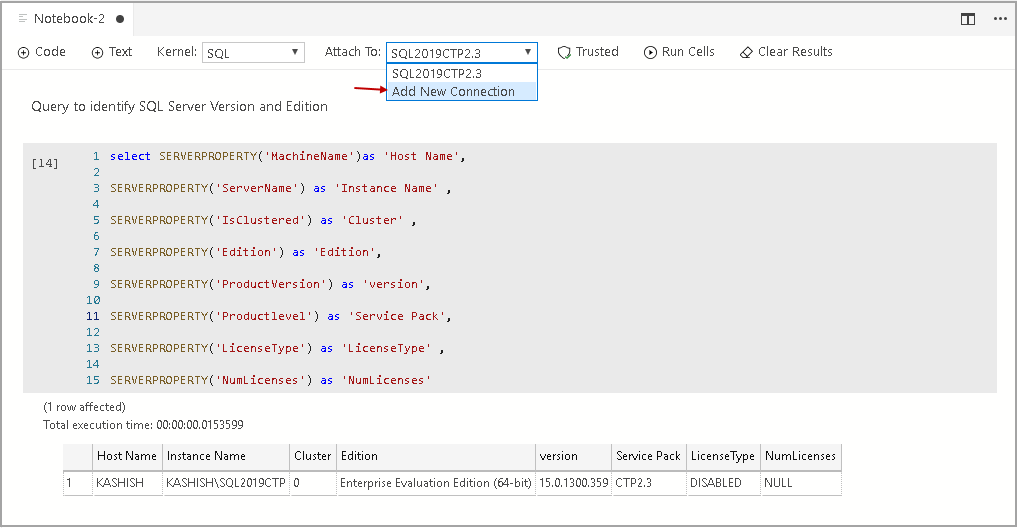
You can change the connection to other SQL Servers as well. For example, previously, we executed the queries on SQL2019CTP2.3 instance. Now, we want to run on SQL instance SQL1. Click on Add New Connection.
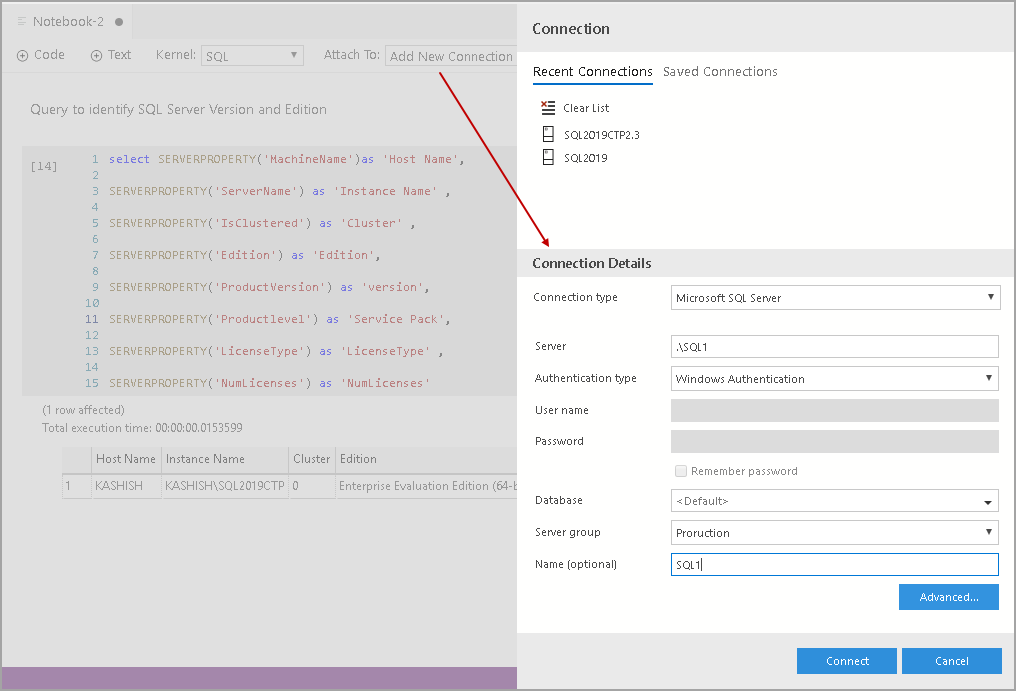
It opens a Connection Manager in which we can use existing connections or configure a new connection. Fill the details in the connection manager such as connection type, Server, port, Authentication type, and click on Connect.
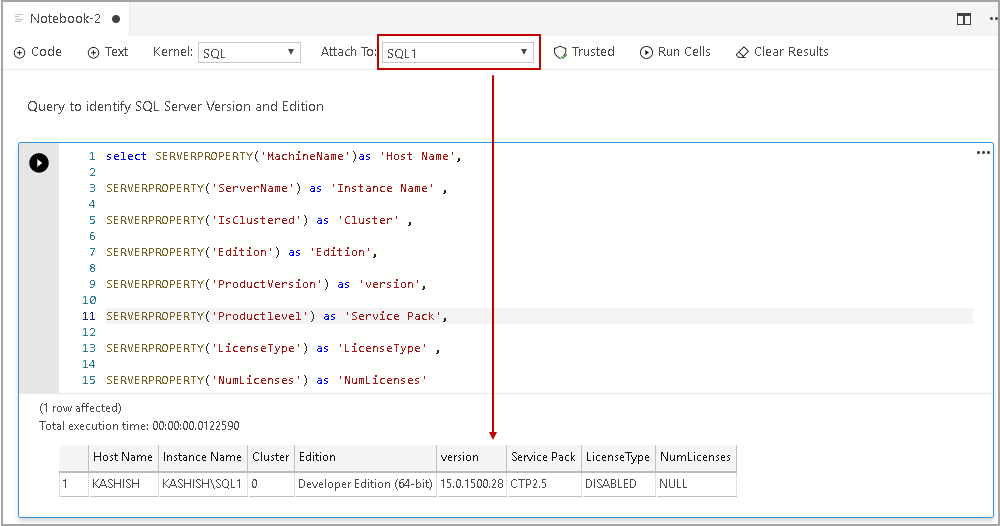
In the Attach To section, you can see new SQL Connection, and it executes the code on a new instance as shown in the results as well.
You should save SQL Notebook on an appropriate location. If you want to save results as well in Notebook, it might take more space depending upon the result set.
To save a Notebook, go to File and click on Save As.
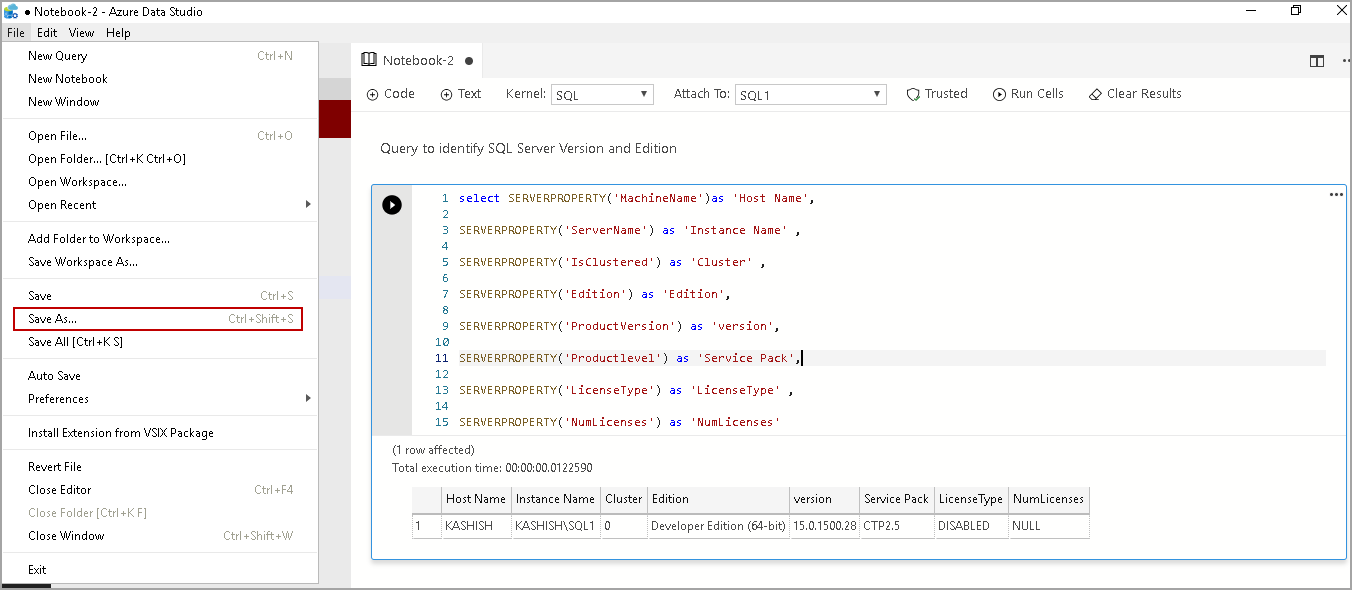
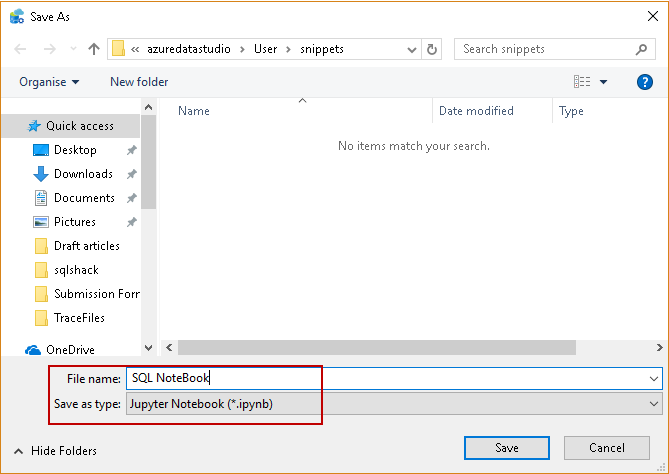
Give an appropriate name. You can also notice the extension for it Jupyter Notebook (*.ipynb).
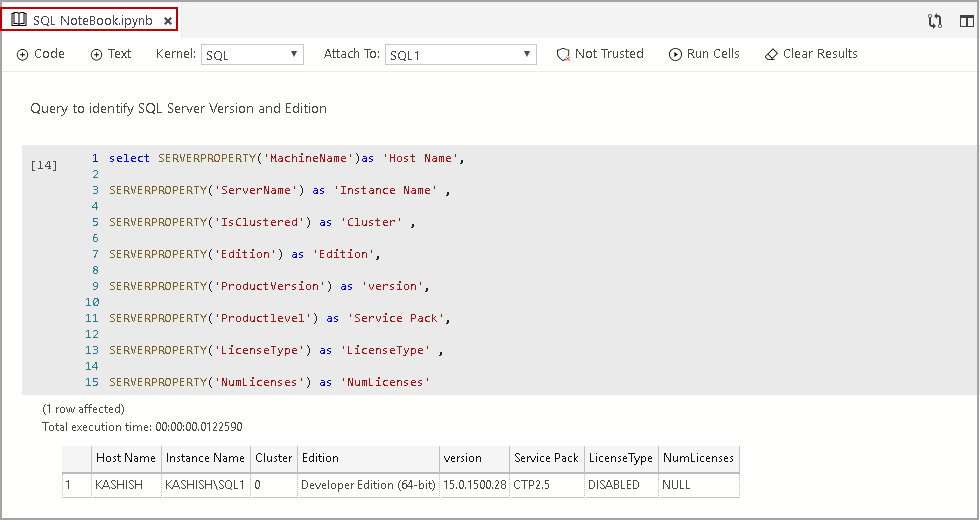
Click on Save. Once you save it, you can see the SQL Notebook name is also modified as per given name.
Markdown language for SQL Notebook in Azure Data Studio
We do different formatting in preparing a document using tools such as Microsoft Word, Microsoft PowerPoint. We can do formatting in a notebook using Markdown language. We need to use a few symbols to do formatting in Markdown language. Let’s explore these formatting options in SQL Notebook.
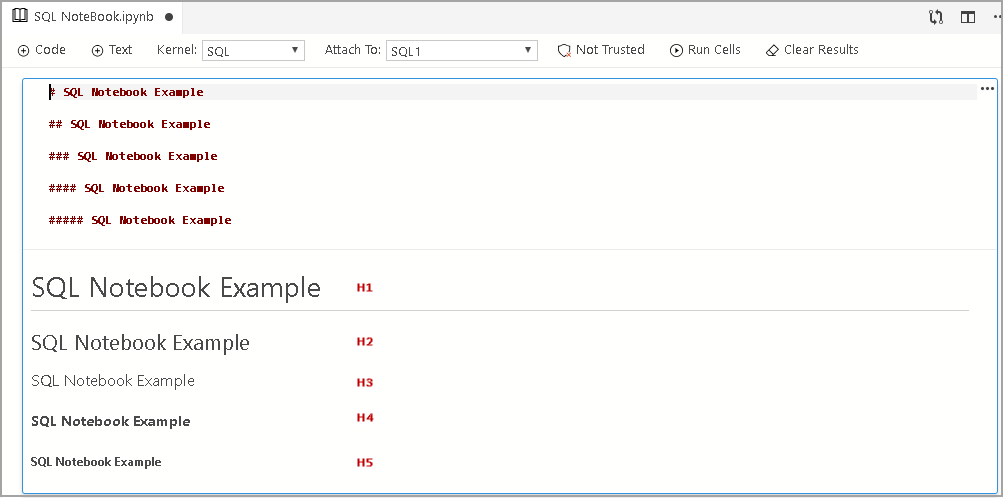
Headings: In the Microsoft Word document, we use heading such as Heading 1 (H1), Heading 2 (H2), and Heading 3 (H3) etc.

We can create heading for SQL Notebook in Azure Data Studio using the hash mark (#).
Hash Mark | Heading |
# | Heading 1 (H1) |
## | Heading 2 (H2) |
### | Heading 3 (H3) |
#### | Heading 4 (H4) |
Bold Text: We need to enclose word or sentence in two asterisks to make it bold. In the following example, you can see email id is mentioned in two asterisks.
Hi Everyone, This is Rajendra Gupta . You can contact me on
**rajendra.gupta16@gmail.com**

Italic Text: We can format word into Italic text by enclosing in a single asterisk.
Hi Everyone, This is Rajendra Gupta. You can contact me on
*rajendra.gupta16@gmail.com*

Bold and Italic Text: we can enclose the word in three asterisks to format them in both bold and italic format.
Hi Everyone, This is Rajendra Gupta. You can contact me on
***rajendra.gupta16@gmail.com***

Blockquotes: We can create blockquotes using (greater than) > symbol. It is good to highlight a particular area or text using blockquotes.
In the following example, you can see we added a symbol > to make it as a blockquote.
>Hi Everyone, This is Rajendra Gupta. You can contact me on
***rajendra.gupta16@gmail.com***

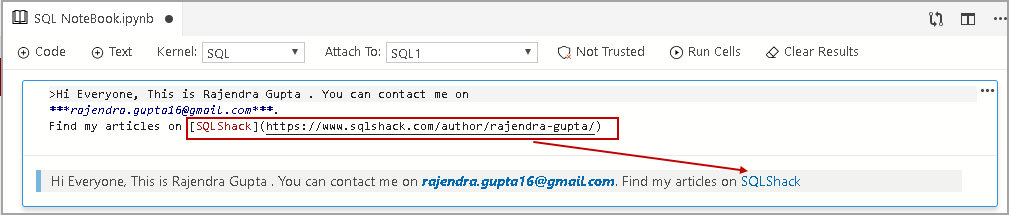
Links: We might want to add a reference link in the SQL Notebook as well. We can add links in Inline link format.
[link text](URL)
In the following example, it creates a link for SQLShack.
>Hi Everyone, This is Rajendra Gupta. You can contact me on
***rajendra.gupta16@gmail.com***.
Find my articles on [SQLShack](https://www.sqlshack.com/author/rajendra-gupta/)
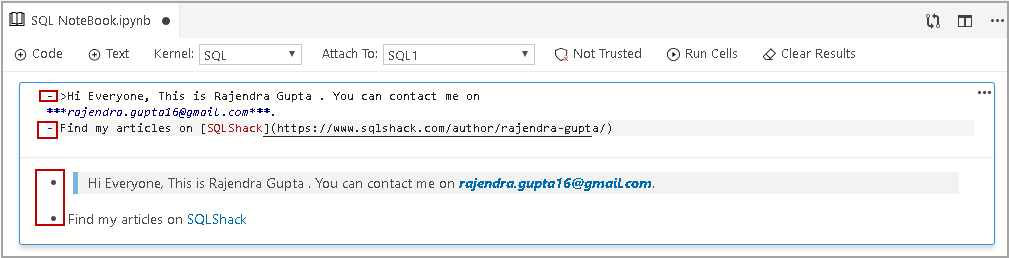
Unordered List: Use a dash (-) to list items in an unordered way.
– Hi Everyone, This is Rajendra Gupta. You can contact me on
***rajendra.gupta16@gmail.com***.
– Find my articles on [SQLShack](https://www.sqlshack.com/author/rajendra-gupta/)
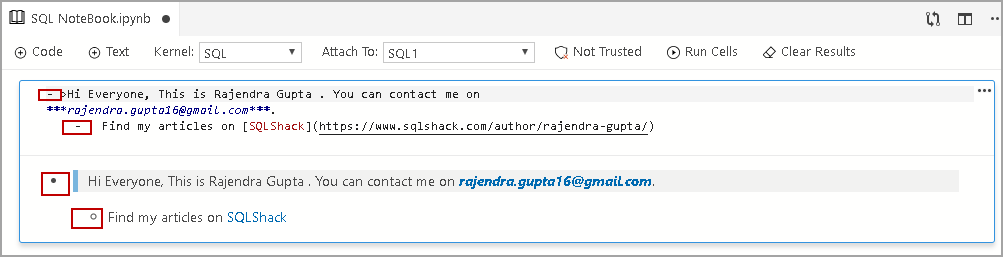
We can also create a Nested list in Markdown language with a tab and dash. In the following example, you can see Nested list.
– Hi Everyone, This is Rajendra Gupta. You can contact me on
***rajendra.gupta16@gmail.com***.
– Find my articles on [SQLShack](https://www.sqlshack.com/author/rajendra-gupta/)
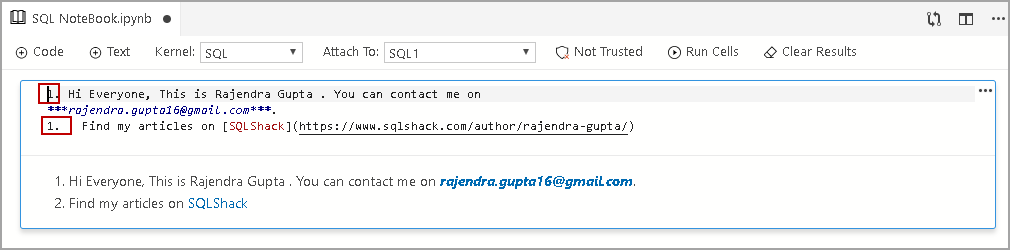
Ordered or Number list
We can write steps sequence in a document using an ordered list. To create an ordered list, write a number in front of it. It automatically assigns an incremental number for the list items.
1. Hi Everyone, This is Rajendra Gupta. You can contact me on
***rajendra.gupta16@gmail.com***.
1. Find my articles on [SQLShack](https://www.sqlshack.com/author/rajendra-gupta/)
Tables
We can also create tables using the Markdown language. It is not straightforward to create a table SQL Notebook.
In the following example, we created a table with three columns and two
|
1 2 3 4 |
| EmpID | EmpName | Country | | ------------- |:-------------:| -----:| |1 | Rajendra-aligned | India | |2 | Raj | India | |

Images
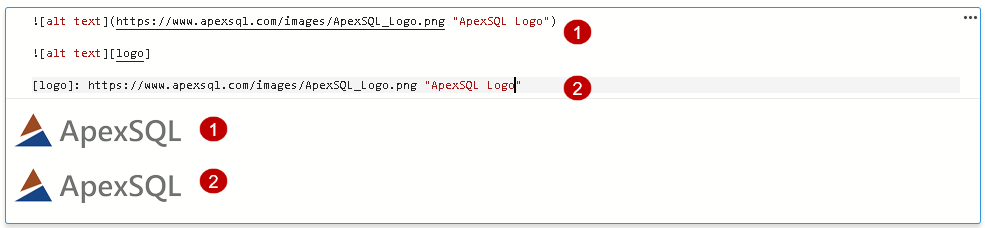
We can add images using Markdown language in the following format.
 “Image Title”
In the following example, we can see the ApexSQL Logo in the notebook.


We can also specify an image in the following reference style.
![alt text][logo]
[logo]: https://www.apexsql.com/images/ApexSQL_Logo.png “ApexSQL Logo”
Videos
Suppose we want to create a learning guide using SQL Notebook. We might save videos link for a reference purpose. We cannot directly add videos here but can add a reference hyperlink with a preview or image of the video. You can click on this image to redirect and play the video.
In the following example, I added a video link and used ApexSQL logo as a video. You can click on this image and it opens a new browser window to play the video.
<a href=”https://www.microsoft.com/en-us/videoplayer/embed/RE2EgJl” target=”_blank”><img src=”https://www.apexsql.com/images/ApexSQL_Logo.png” alt=”IMAGE ALT TEXT HERE” width=”150″ height=”40″ border=”10″ /></a>

Conclusion
In this article, we explored useful feature SQL Notebook in Azure Data Studio. It can help to prepare technical documentation, SOPs, troubleshooting guides, release notes, etc. I will explore more on this feature in future articles. If you had comments or questions, feel free to leave them in the comments below.

I am the author of the book "DP-300 Administering Relational Database on Microsoft Azure". I published more than 650 technical articles on MSSQLTips, SQLShack, Quest, CodingSight, and SeveralNines.
I am the creator of one of the biggest free online collections of articles on a single topic, with his 50-part series on SQL Server Always On Availability Groups.
Based on my contribution to the SQL Server community, I have been recognized as the prestigious Best Author of the Year continuously in 2019, 2020, and 2021 (2nd Rank) at SQLShack and the MSSQLTIPS champions award in 2020.
Personal Blog: https://www.dbblogger.com
I am always interested in new challenges so if you need consulting help, reach me at rajendra.gupta16@gmail.com
View all posts by Rajendra Gupta