
Database administrators can leverage the scalability, automation, and flexibility of Kubernetes to create a highly available SQL database cluster. In this article, you will learn what Kubernetes is, what are the benefits of running an SQL database on Kubernetes, and how to deploy MySQL on Kubernetes.
What Is Kubernetes?
Kubernetes (k8s) is an open-source orchestration and management system for containers. It was developed by Google to help teams reliably deploy and manage containers at scale with automation. Although k8s started as an internal project, it was released to the public back in 2015.
How Kubernetes works
Kubernetes is based on a client-server model. It implements a layered architecture with a master server controlling several nodes (clusters of machines) on which containers are hosted. On each node are a variable number of pods (containers) which run your services and workloads.
During operation, Kubernetes monitors these nodes, distributing traffic across services, and replacing failed resources as needed. It does this with the help of a number of daemons, APIs, and templates.
Running SQL databases on Kubernetes
When running SQL in containers is discussed, it often means running SQL Server. SQL Server container images have been available since 2017. Within each image are the files needed for the SQL Server engine, the server agent, built-in features like replication, and command-line tools.
These images originally only supported Ubuntu 16.04, but with the 2019 update, now support Red Hat, Ubuntu, and Windows. With the 2019 update, a focus has been added to containerization to support big data clusters.
However, you can run other SQL-based databases as well, such as MySQL or Oracle. These work roughly the same way as SQL Server, and there are many images available for you to use.
Here are some key benefits:
- No installation after container start-up
- Portability across environments
- Easy to start, stop, and update
- Services are isolated for better security
Requirements for SQL databases on Kubernetes
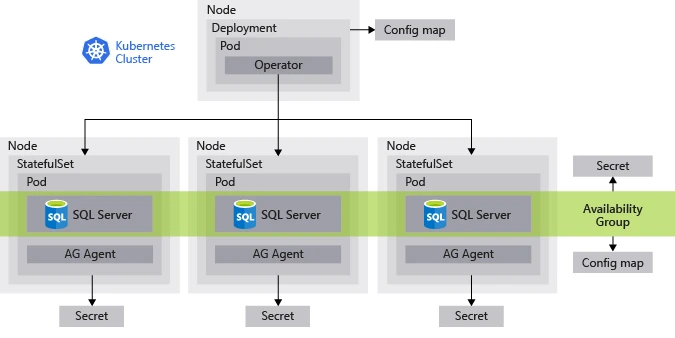
When you want to run a stateful component, such as SQL Server, in Kubernetes, there are several components that you need to be aware of. These components enable you to run your databases without fear of losing data should a container fail.
Stateful sets
Stateful sets are API objects that ensure that pods are unique and ordered. When pods are deployed in a StatefulSet, each has a persistent identifier that it retains regardless of rescheduling. This persistent ID enables you to reconnect pods to the correct storage after a pod has failed.
Persistent volumes
Persistent volumes are storage resources in Kubernetes that operate independently of attached pods. These resources can be provisioned statically at configuration or dynamically through Storage Classes. When you use persistent volumes, you create a PersistentVolumeClaim that operates like a pod. You can attach pods to this claim to allow them to use the persistent storage you created.
There are several different storage types you can use as persistent volumes, including Google Cloud Engine persistent disks, AWS EBS volumes, Azure Disks, and Azure Files. You can learn more in this article about building an ASP.NET app with Azure SQL Database.
Below you can see a diagram that outlines how these components are deployed for a SQL database on Kubernetes in a single cluster:
Key Considerations and Tips for Deploying SQL Databases in Kubernetes
When you’re thinking about deploying a SQL database on Kubernetes, there are a few considerations you should keep in mind. Kubernetes is challenging to operate even with relatively simple workloads, so you should make sure that it can provide the implementation that you need first. Additionally, once you’ve determined that k8s is the right option for you, you can apply the tips below.
Considerations
The most important consideration to keep in mind is that Kubernetes was designed primarily for stateless workloads. While it can support stateful workloads, this requires extra work and diligence.
For example, when it comes time to upgrade Kubernetes, you likely need to take extra steps to backup your persistent volumes in case something goes wrong. This is because, unlike with stateless applications, you can’t just redeploy a clean container image.
Another consideration is that any database deployed on k8s has a high chance of database application restarts and failovers. This is because pods are transient and are designed to be killed and restarted whenever issues arise.
In general, this type of deployment is primarily useful for local application development and testing. In these situations, persistent storage is generally not a concern, as opposed to production environments.
Tips
When setting up your database deployment, it’s a good idea to start with a test database and pilot it extensively. You need to see how it operates with development and QA workloads and ensure that your storage configurations are correct. This means checking load balancing, ID persistence, and maintenance of persistent volumes.
Additionally, take time to make sure that you understand what replication modes are enabled between your components. While synchronous modes require more resources, asynchronous modes can lead to data loss if a pod dies before data is replicated.
You can also use operators to wrap your SQL database on Kubernetes with more accessible features. Operators are methods of packaging Kubernetes that enable you to more easily manage and monitor stateful applications. There are many operators already available, such as the SQL Server Operator released with the preview of SQL Server 2019. You can also create your operators with the help of the coreOS’ Operator Framework.
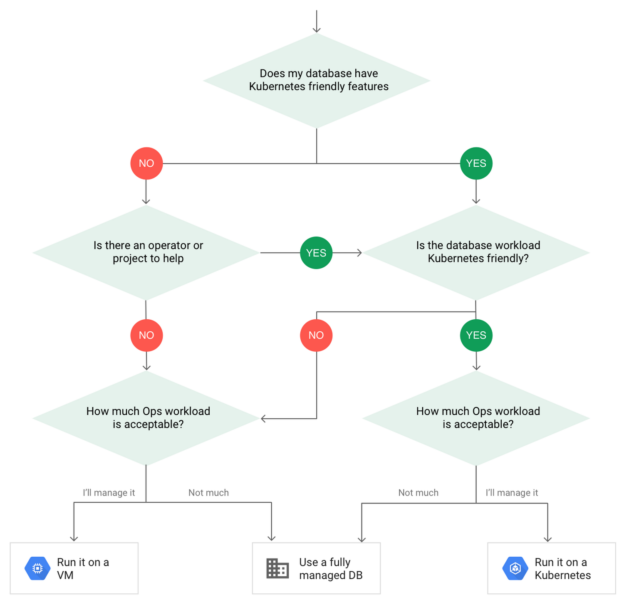
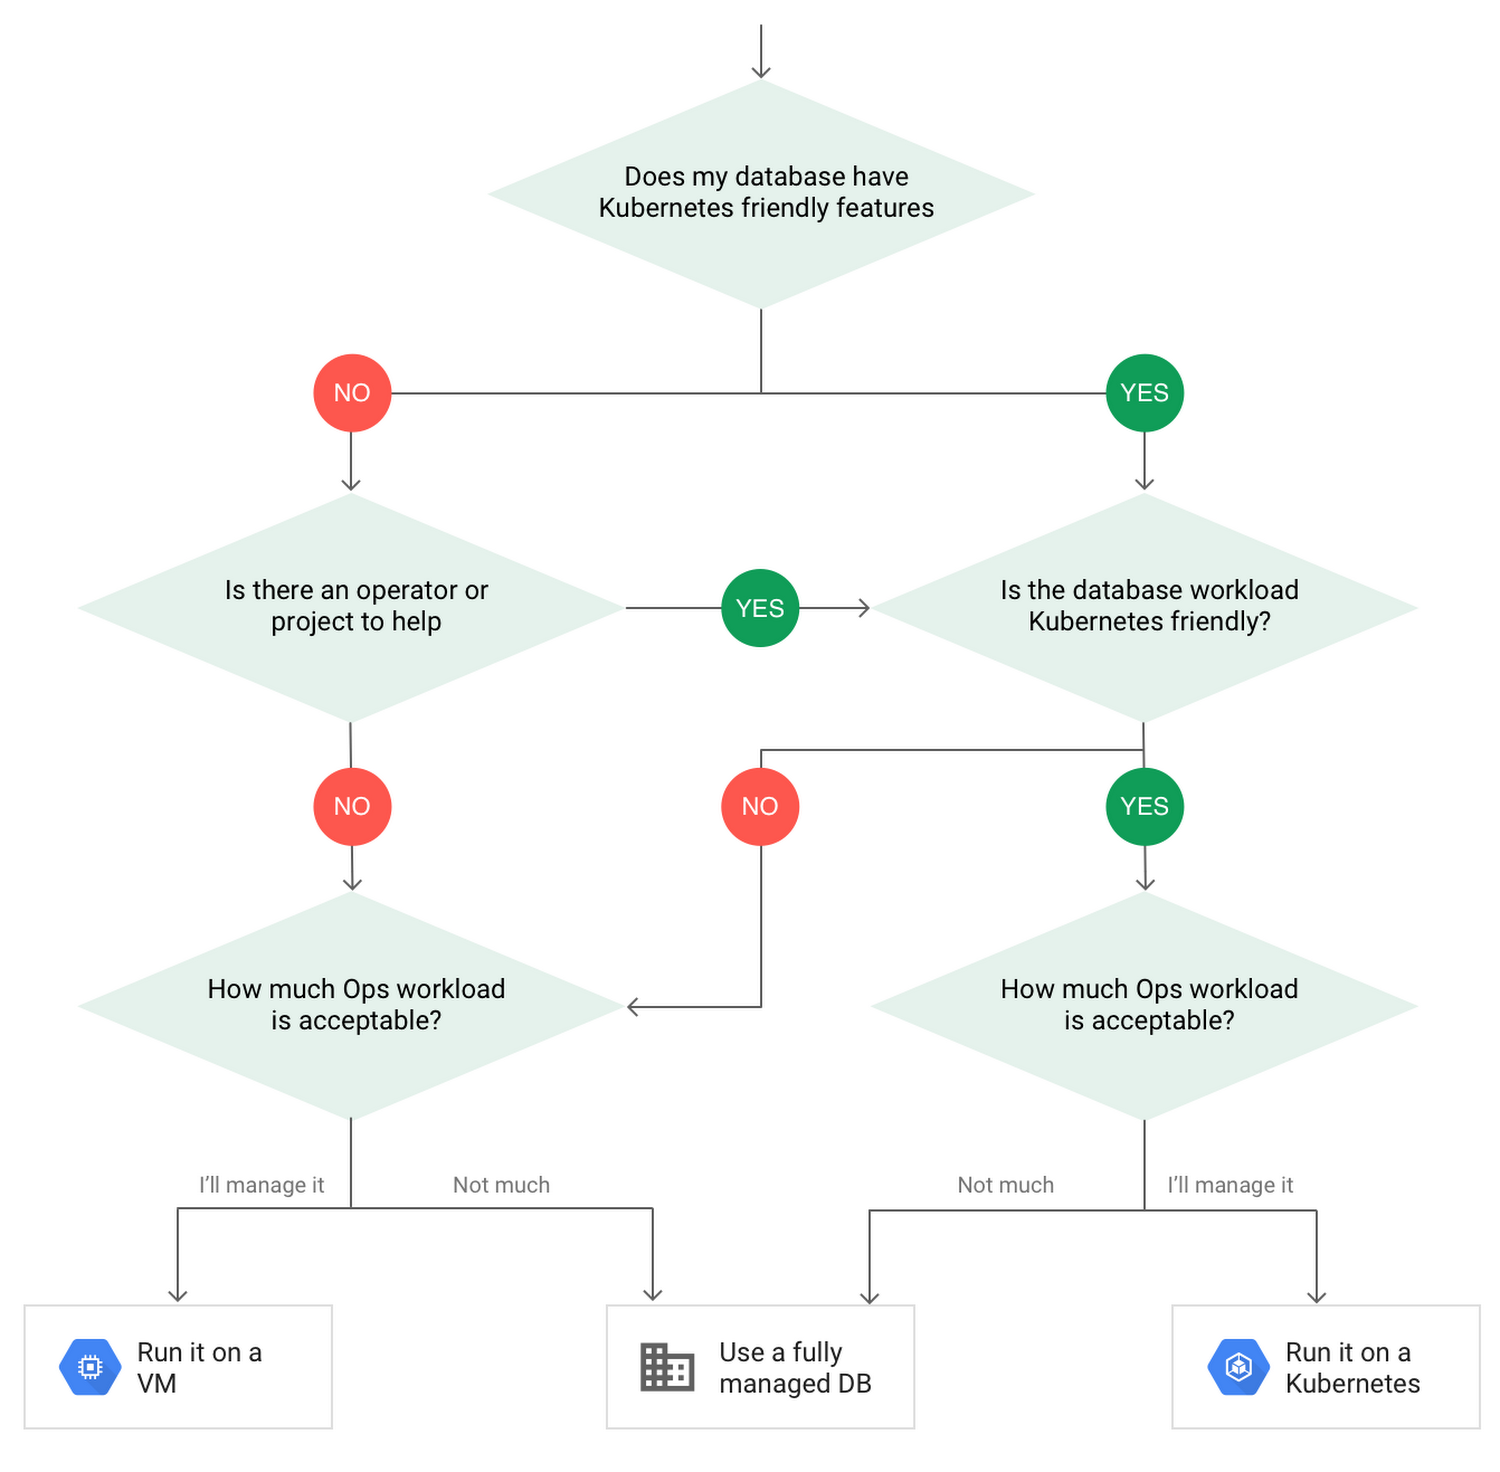
If you still aren’t sure whether deploying to Kubernetes is right for you, consider the following decision tree:
Tutorial: How to Deploy MySQL on Kubernetes
Below is a brief walkthrough that explains how to set up a MySQL database on Kubernetes. This tutorial is abbreviated from the Kubernetes documentation found here.
Prerequisites
Before you can get started you need to have:
- A configured Kubernetes cluster
- The kubectl command-line tool
- Either a dynamic or statically provisioned PersistentVolumeClaim
- A database image
Deploy your MySQL database on Kubernetes
-
To start, you need to create two YAML files, assuming you are statically defining your persistent volume. One should define your deployment, including the image you’re using, your credentials, and your persistent volume names and paths (see an example from the Kubernetes documentation). The other defines your PersistentVolume (PV) and PersistentVolumeClaim (PVC), including storage capacity, access modes, and path (see an example)
-
Once your files are defined, you are ready to deploy them. Deploy your PV and PVC definitions first, followed by your deployment definition. You can do this by using:
kubectl apply -f {file source}
-
After this is done, you need to verify that the deployment went as expected. You can do this by checking the deployment specs:
kubectl describe deployment mysql
Checking the pods that were created:
kubectl get pods -l app=mysql
And inspecting your PersistentVolumeClaim:
kubectl describe pvc mysql-pv-claim
- Assuming that everything looks correct, your database is deployed and ready for use
How can you access your new MySQL instance?
The YAML files we showed in the previous section creates a service that let Pods in the cluster access the MySQL database. We are using Service option clusterIP: None to ensure the Service DNS name resolve to Pod’s IP address. This is because, in our example, there is only one Pod behind the database service.
Here is how to run a MySQL client and connect to your MySQL instance running on Kubernetes:
kubectl run -it –rm –image=mysql:5.6 –restart=Never mysql-client — mysql -h mysql -ppassword
This creates a new Pod running a MySQL client and connects to the server using the Service, with direct DNS resolution.
If the connection is successful, you should see a MySQL command prompt, like this:
mysql>
How can you delete your MySQL instance?
Use the following commands to delete the objects you deployed as per the instructions above:
kubectl delete deployment,svc mysql
kubectl delete pvc mysql-pv-claim
kubectl delete pv mysql-pv-volume
Please note that if you manually provisioned a PersistentVolume, it needs to be deleted as well. However, if you dynamically provisioned the volume, it will be deleted together with the PersistentVolumeClaim.
Conclusion
SQL database infrastructure containerization is not necessarily different from building and deploying any other mission-critical database. However, you need to consider the implications of moving mission-critical data to Kubernetes and containers. Databases on Kubernetes do not include concepts like failover elections, replication, and sharding like in MongoDB or Cassandra. You should put the right level of management and monitoring in place if you want to use Kubernetes and containers for production databases.

You can find him on LinkedIn
- Getting started with MySQL on AWS: Costs, Setup, and Deployment options - November 11, 2022
- SQL Server Performance Tuning made simple - April 19, 2021
- How to migrate to Azure ML: A quick start guide - February 5, 2021