

In this article, we will review how to create a Kubernetes cluster in Azure Kubernetes Service, provision the persistent volume to store the database files and deploy SQL server on Kubernetes cluster.
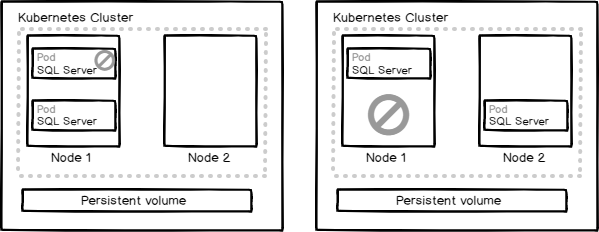
Kubernetes is a container orchestration tool which automates deploying, scaling and operating containers. SQL Server on Kubernetes cluster with persistent volume is like SQL Server failover cluster instance with the shared disk. In case of failure at the container level, a new pod is created on the same node and the volume is attached to the new pod. In case of a node failure, a new pod is created on the other node in the replica set and the persistent volume is attached to the new pod.
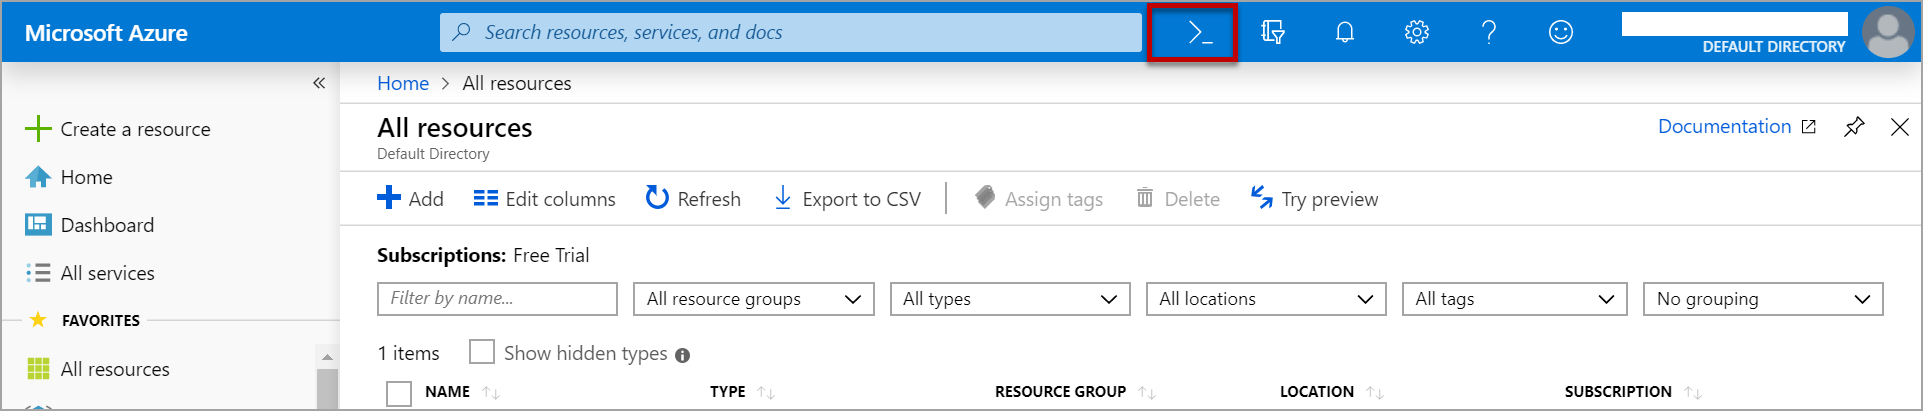
Let us see Step by step to deploy SQL Server on a Kubernetes cluster in Azure Kubernetes Service. We need to create an Azure account and login to the Azure portal. Click on the Cloud Shell icon as shown in the image to launch the console. If you are launching it for the first time, it will ask you to create storage for running cloud shell.
We can also execute commands from our local windows machine. To execute commands from the local machine you need to install azure CLI and kubectl on your machine. Azure CLI is a command line tool to manage Azure resources. Kubectl is a command line interface for running commands against Kubernetes cluster in Azure Kubernetes Service.
- Download the MSI installer from https://docs.microsoft.com/en-us/cli/azure/install-azure-cli-windows?view=azure-cli-latest and install it.
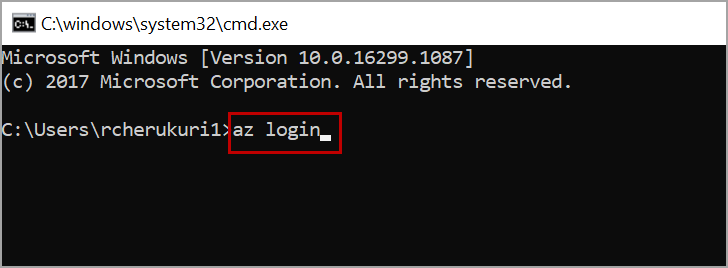
Once you install Azure CLI, use below command in the command prompt to login into the Azure account.
|
1 |
az login |
Azure CLI opens your default browser and asks you to login using your Azure account.
To run the kubectl commands on your local windows machine you have to download the kubectl.exec and set the environment variable.
- Download the installer from https://kubernetes.io/docs/tasks/tools/install-kubectl/#install-kubectl-on-windows.
To set the environment variable, right click on This PC and click on properties. Click on Advanced system settings -> Environment Variables -> Path -> Edit.
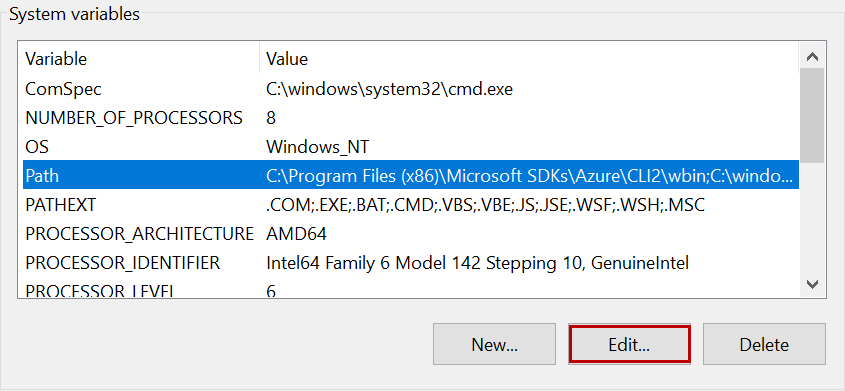
Click on New and add the path of kubectl.exe
Creating a Kubernetes cluster in Azure Kubernetes Service
Now we need to register the resource providers. Execute below commands to register them.
|
1 2 3 4 |
az provider register -n Microsoft.Compute az provider register -n Microsoft.ContainerService az provider register -n Microsoft.Network az provider register -n Microsoft.Storage |

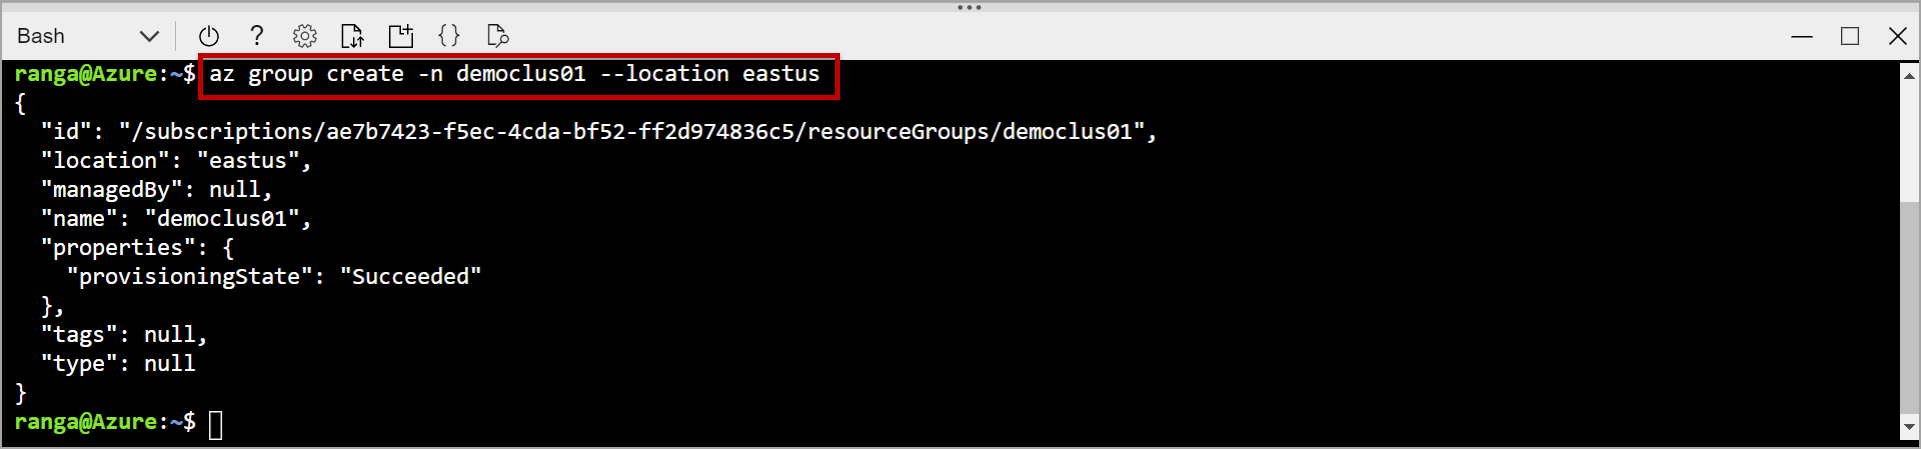
Once you register the required resource providers. We need to create a resource group. Use the below command to create a resource group in your desired location. A resource group is a collection of multiple resources of an Azure solution.
|
1 |
az group create -n democlus01 --location eastus |
“democlus01” is the name of the resource group and “eastus” is the location. You can replace them as per your choice.
Create a Kubernetes cluster using the resource group you created above. Below command create a managed Kubernetes cluster with name “rbctechdemo” in the resource group “democlus01” with 2 nodes of size Standard_B2s which has 2 cores of CPU and 4GB RAM.
|
1 |
az aks create --resource-group democlus01 --name rbctechdemo --node-count 2 --generate-ssh-keys --node-vm-size=Standard_B2s |
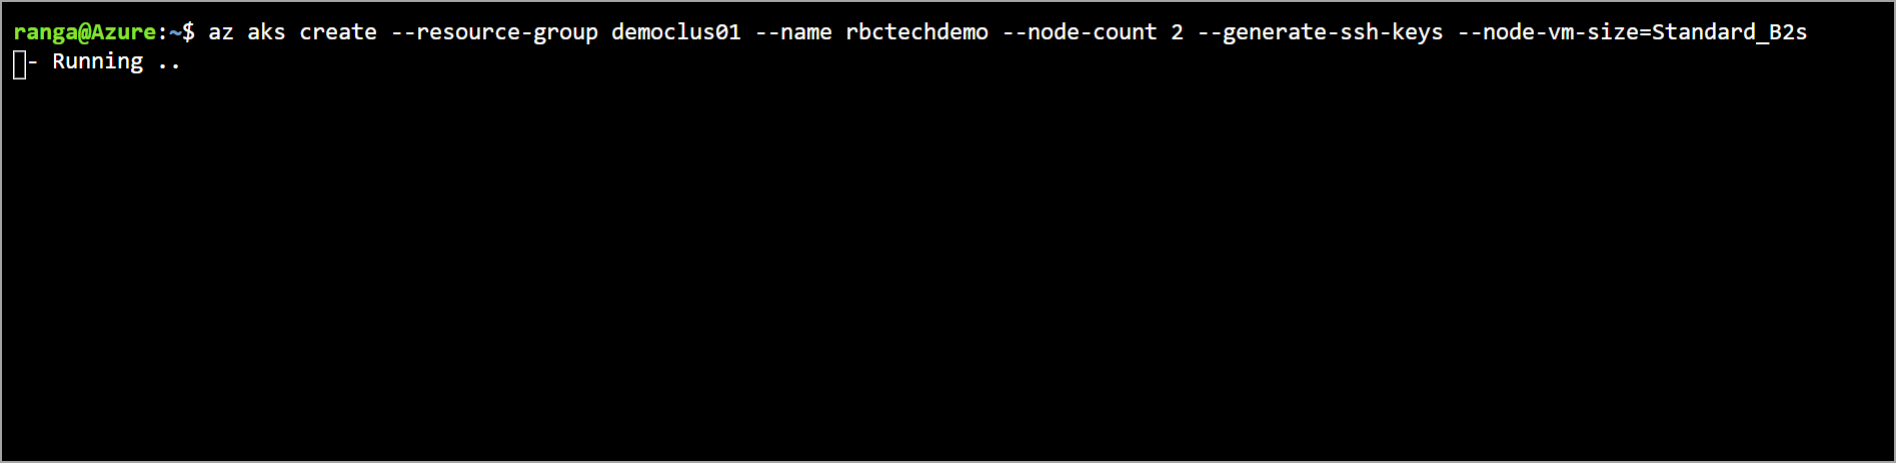
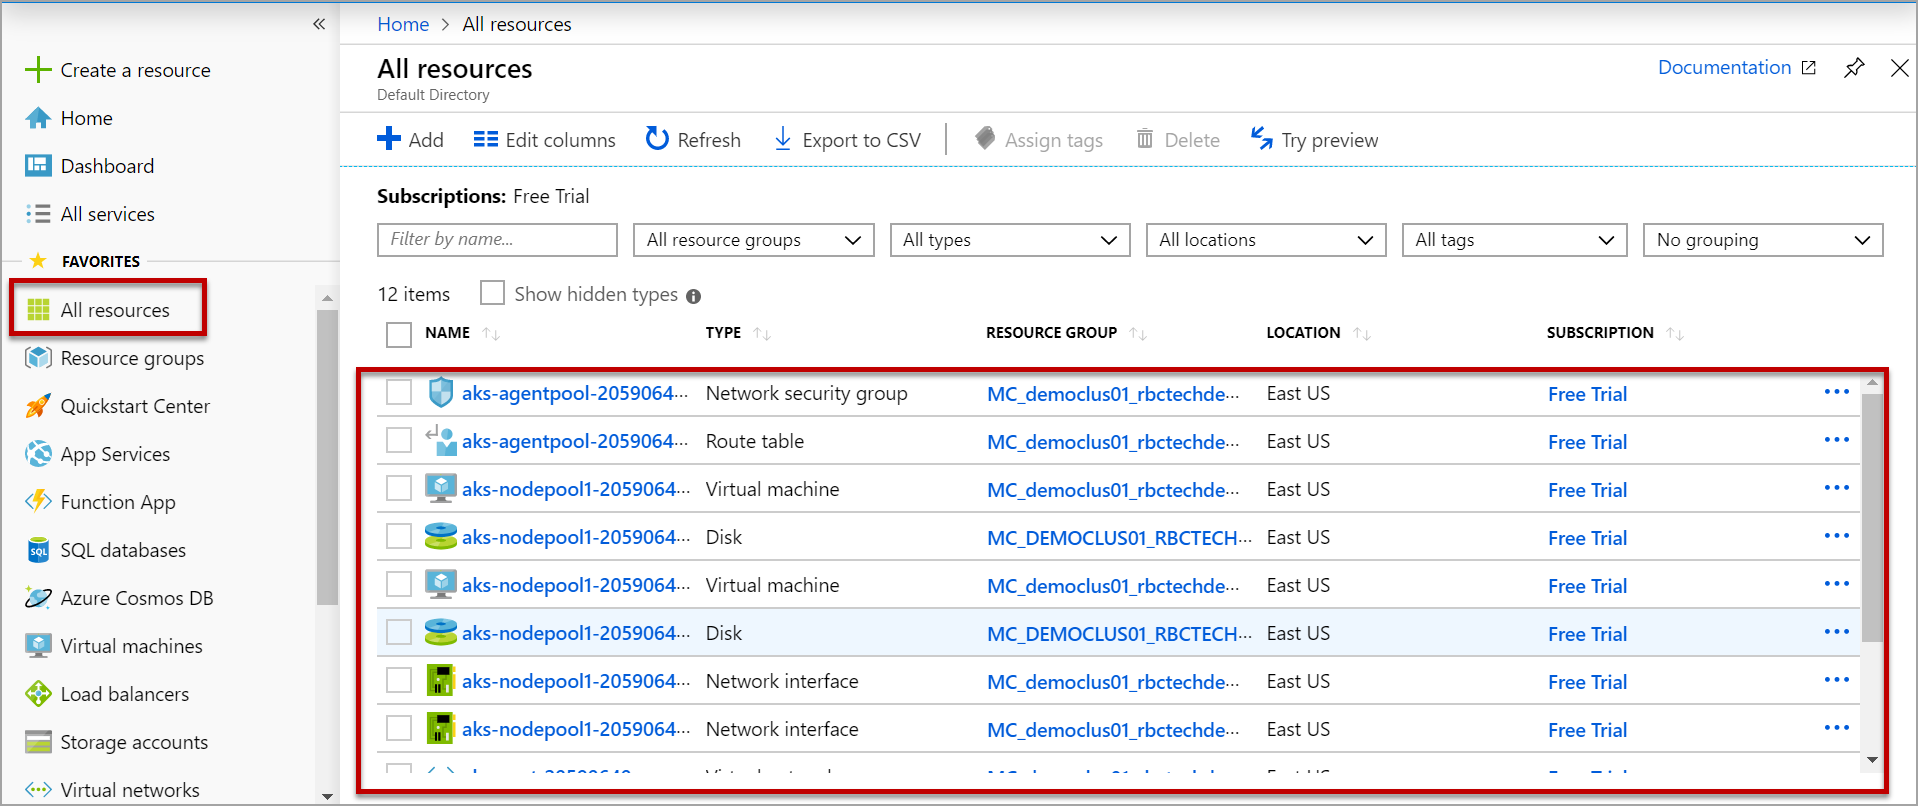
Once you run this command it will take some time around 10 minutes to create the managed Kubernetes cluster. It creates all the resources required for the Kubernetes cluster. To view the resources created, Click on All resources in the Azure portal.
Get the credentials of the managed Kubernetes cluster by using the below command. This configures your kubectl to connect to your managed Kubernetes cluster.
|
1 |
az aks get-credentials --resource-group democlus01 --name rbctechdemo |

Now verify if your nodes in the Kubernetes cluster are ready. Use below kubectl command to get the status of the nodes in the cluster.
|
1 |
kubectl get nodes |

Configuring Persistent volume and Persistent volume claim
When we deploy SQL server on Kubernetes cluster in Azure Kubernetes Service, the deployment is created in the pod. When the pod is deleted or restarted the data inside the pod is lost. To retain the data on SQL Server we need persistent volume and volume claim. A persistent volume is a piece of storage created by the administrator and used in the Kubernetes cluster.
Open notepad and paste the below code and save as .yaml file. In this case, I saved code in VolumeClaim.yaml file.
|
1 2 3 4 5 6 7 8 9 10 11 12 13 14 15 16 17 18 19 20 21 |
kind: StorageClass apiVersion: storage.k8s.io/v1beta1 metadata: name: azure-disk provisioner: kubernetes.io/azure-disk parameters: storageaccounttype: Standard_LRS kind: Managed --- kind: PersistentVolumeClaim apiVersion: v1 metadata: name: mssql-data annotations: volume.beta.kubernetes.io/storage-class: azure-disk spec: accessModes: - ReadWriteOnce resources: requests: storage: 8Gi |
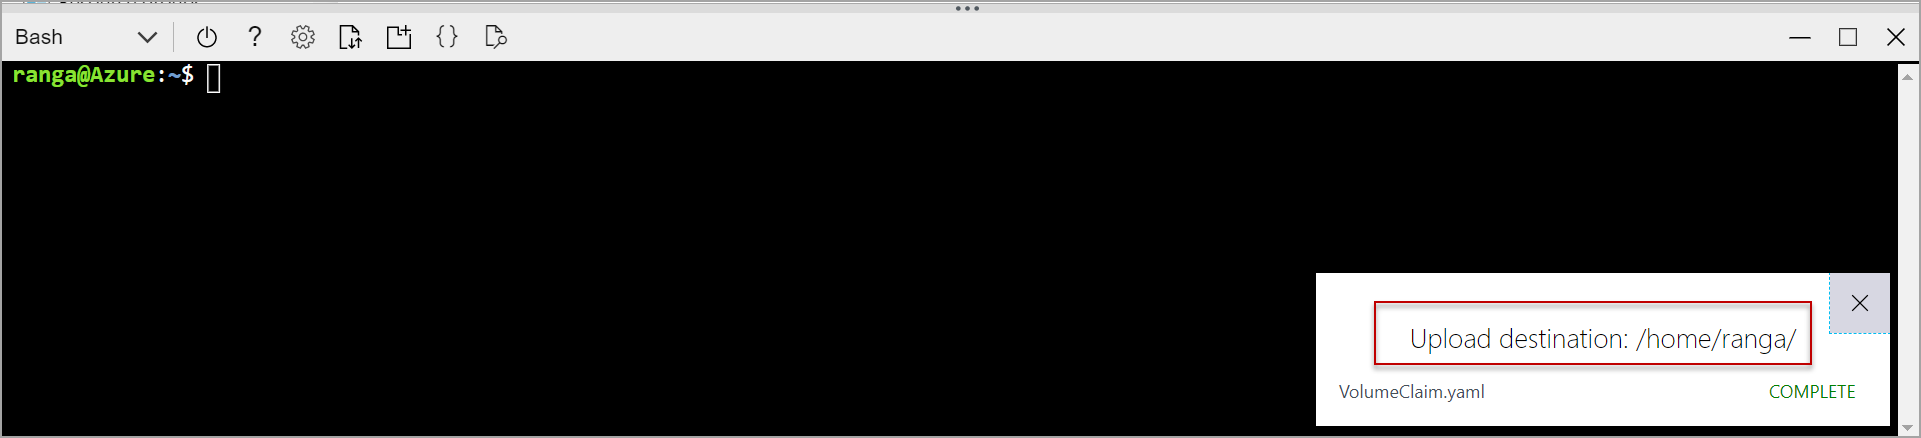
We need to upload the file to Azure cloud shell storage. To upload VolumeClaim.yaml to the cloud shell storage, Click on the Upload/Download icon in the console and Upload. Now select the VolumeClaim.yaml file from your drive and click on Open.
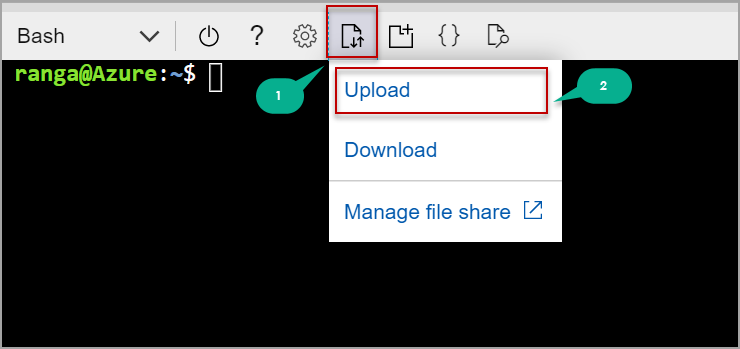
Once the upload is completed it displays the path of the uploaded file. Please note the path which will be used in applying the VolumeClaim.yaml file. Please refer to the below image.
Use kubectl command to apply the VolumeClaim.yaml file.
|
1 |
kubectl apply -f /home/ranga/VolumeClaim.yaml |
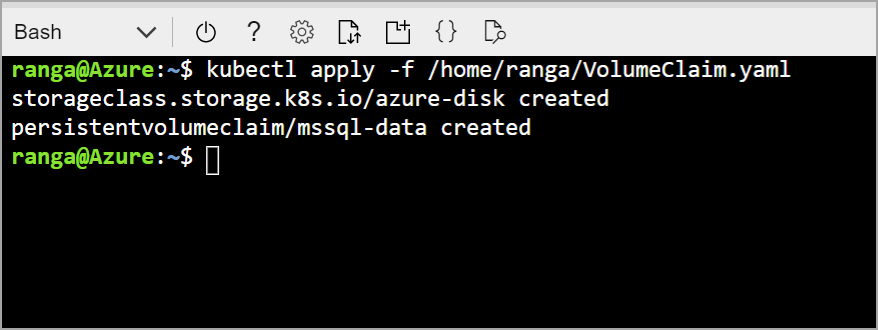
As we are using azure Kubernetes cluster we need to provision Azure disk. Once you apply the VolumeCliam.yaml it creates an azure disk which will be used as persistent volume and a volume claim with name mssql-data.
Below are the commands to check the status of persistent volume and volume claim.
|
1 2 |
kubectl get pv kubectl get pvc |
The status of the persistent volume and volume claim should be bound.

Now we will the volume claim in the SQL Server deployment file.
Deploying SQL Server
First, create a SA password in the Kubernetes cluster using below command which will be used in the deployment.
|
1 |
kubectl create secret generic mssql --from-literal=SA_PASSWORD="yourownpassword" |
Create a manifest file for SQL Server deployment, upload it to the cloud shell storage like how we did for VolumeClaim.yaml and apply the manifest file using kubectl.
Below is the sample code to deploy SQL Server Linux container of developer edition which uses the persistent volume claim mssql-data created above. The SQL Server will run on the specified port number (1433).
|
1 2 3 4 5 6 7 8 9 10 11 12 13 14 15 16 17 18 19 20 21 22 23 24 25 26 27 28 29 30 31 32 33 34 35 36 37 38 39 40 41 42 43 44 45 46 47 |
apiVersion: apps/v1beta1 kind: Deployment metadata: name: mssql-deployment spec: replicas: 1 template: metadata: labels: app: mssql spec: terminationGracePeriodSeconds: 10 containers: - name: mssql image: mcr.microsoft.com/mssql/server:2017-latest ports: - containerPort: 1433 env: - name: MSSQL_PID value: "Developer" - name: ACCEPT_EULA value: "Y" - name: MSSQL_SA_PASSWORD valueFrom: secretKeyRef: name: mssql key: SA_PASSWORD volumeMounts: - name: mssqldb mountPath: /var/opt/mssql volumes: - name: mssqldb persistentVolumeClaim: claimName: mssql-data --- apiVersion: v1 kind: Service metadata: name: rbcsql spec: selector: app: mssql ports: - protocol: TCP port: 1433 targetPort: 1433 type: LoadBalancer |
In this case, I save the above code in sqldeployment.yaml file. Apply the manifest file using below command.
|
1 |
kubectl apply -f /home/ranga/sqldeployment.yaml |

Once the manifest file is successfully applied, the pod is created in which SQL Server is deployed. Use below command to get the pod status.
|
1 |
kubectl get pods |
Above command lists all the pods in the Kubernetes cluster and their status. Please refer to the below image. the pod is created, and the status is ContainerCreating.

To know the exact event, use below command with pod name. this command also tells on which node the pod is running.
|
1 |
kubectl describe pods mssql-deployment-5bc9cc6d54-l4pzs |

For the first time, it may take some time for the pod to come into the running state as it must pull the container image from docker hub. Subsequent deployments will be fast as the image already exists in the node.
Once the deployment is completed, the status of the pod will be changed to running.
Execute the below command in Azure cloud shell to know the services on Kubernetes cluster in Azure Kubernetes Service, internal and external IP address of the services.
|
1 |
kubectl get services |

Use the external IP address returned from the above command and the SA password you created earlier to connect to the SQL server.
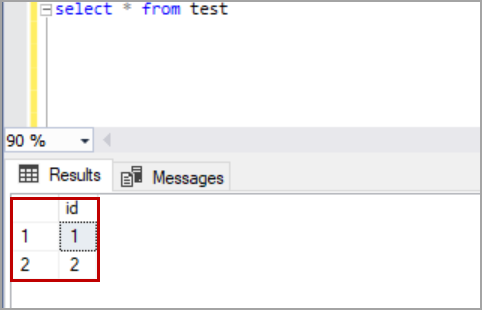
Now open SQL Server management studio and create a database with few tables.
|
1 2 3 4 5 6 7 |
CREATE DATABASE [testdb] GO USE testdb CREATE TABLE test (id int ) insert into test values (1),(2) |
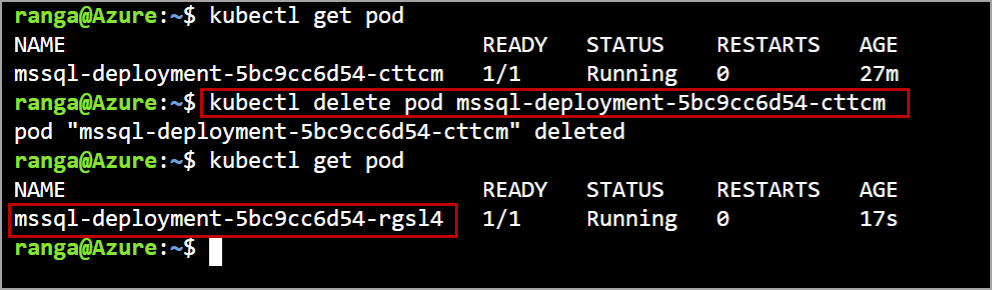
Let us delete the pod so that Kubernetes cluster will create a new pod and deploy the container image and attach the persistent volume to the new pod. Here the service is of load balancer type and the IP does not change even after recovery from failure.
Use the below statement to delete the pod.
|
1 |
kubectl delete pod mssql-deployment-5bc9cc6d54-cttcm |
As soon as the pod is deleted, a new pod is created as per the deployment specification. Please refer to the below image.
After the new pod is created, verify the services by using the below command.
|
1 |
kubectl get services |
Login to the SQL server using management studio and query the tables you created earlier.
To delete the managed Kubernetes cluster use below command. This will delete all the resources created by aks create command.
|
1 |
az aks delete --name rbctechdemo --resource-group democlus01 |
Once you execute the above command it will ask for confirmation. On entering “Y” it will start deleting the cluster and its resources. It takes a few minutes to delete the cluster and all the resources.

I hope you’ve found this article on SQL Server in Azure Kubernetes Service (AKS) useful. Feel free to post any feedback in the comments below

- Geo Replication on Transparent Data Encryption (TDE) enabled Azure SQL databases - October 24, 2019
- Overview of the Collate SQL command - October 22, 2019
- Recover a lost SA password - September 20, 2019