

In this article, you will learn about Azure SQL Database and its uses. Then the article splits into two sets of tutorials. The first part will show you how to create a single database in Azure SQL Database. The second tutorial will show you how to build an ASP.NET app in Azure SQL Database.
ASP.NET is an open-source server-side framework, which was developed by Microsoft. It has evolved into a feature-rich development platform, and it is typically used for building dynamic websites, services, and applications. Azure is Microsoft’s cloud computing service, so it is only natural to use it for ASP.NET apps.

What is Azure SQL Database?
Azure SQL Database is a fully-managed database service offered by Azure. It enables you to easily deploy databases in the cloud, on-premises, or hybrid environments. The service is powered by Microsoft SQL Server engines that provide many of the same features as a standard SQL Server. These include:
- Language features – enables you to control flow language keywords and supports custom variables, stored procedures, sequence numbers, predicates, DML statements, cursors, and data types
- Database features – including automatic tuning (plan forcing), data compression, online index operations, partitioning, temporal tables, change tracking, database collation, and contained users/databases
- Security features – including support for application roles, threat detection, row-level security, and dynamic data masking
- Multi-model capabilities-supports JSON, OPENJSON, XML, OPENXML, Spatial, and graph processing
Benefits of Azure SQL Database include:
- Automated backups with long-term retention for archiving
- Built-in geo-replication of data for data loss prevention and disaster recovery
- Support for migration of databases from on-premises or other services
- Easy optimization of resources with automatic performance tuning
- High-availability resources for mission-critical data
- Scalability to minimize costs and meet workload demands
Use cases of Azure SQL Database include:
- Backup and restore – you can use cloud databases as a backup for on-premise databases. When synchronized, cloud databases can also serve as failovers if needed
- Development and testing environments – cloud applications can be easily connected to environments for development and testing. Once you are ready to deploy an application, you can create a production environment quickly using a database copy
- Business continuity – Geo-replication and high availability features ensure that mission-critical workloads remain available and ensure that data is not lost in a disaster or attack
- Analytics – Azure SQL Database integrates with Azure analytics services, including Data Lake Store and Data Warehouse. This integration enables you to easily reference database data, stage that data, and perform data transformations all in one place
Creating a single database in Azure SQL Database
Before you begin connected apps to your databases, you may want to get familiar with the Azure SQL Database service. The following walkthrough guides you through the steps needed to create a single database from the Azure portal. These steps are summarized-see the full tutorial in the Azure documentation.
Create the database
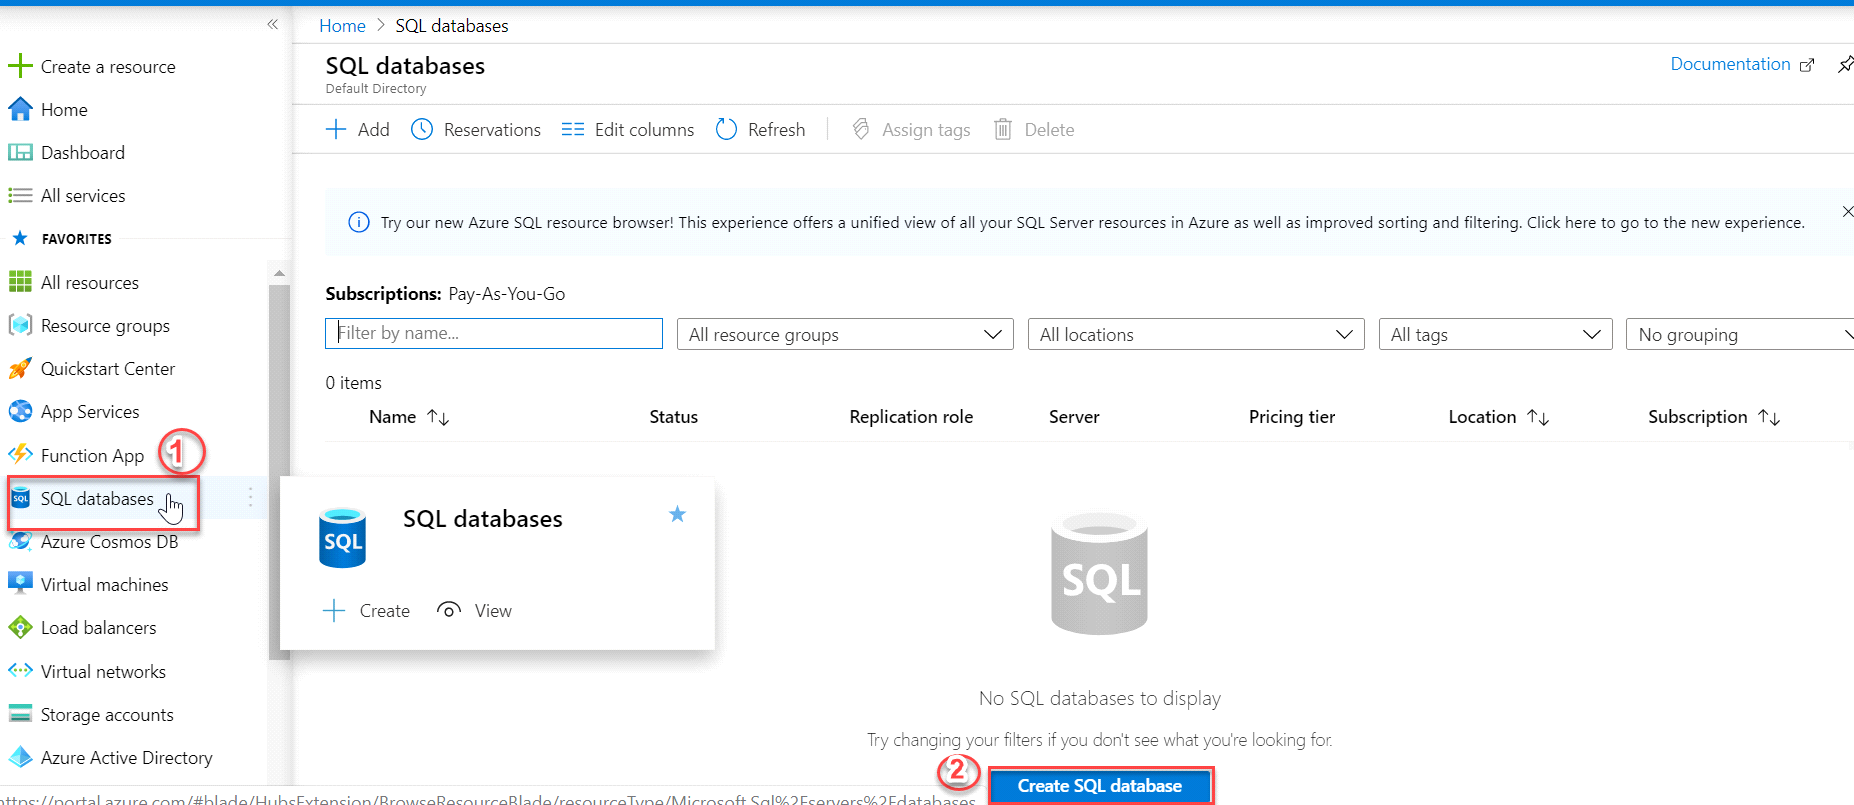
- Sign in to the Azure Portal and click on SQL databases present in the vertical menu on the left-hand side
-
Click the Create SQL database button to create a SQL Database on Azure

Select project and database settings
-
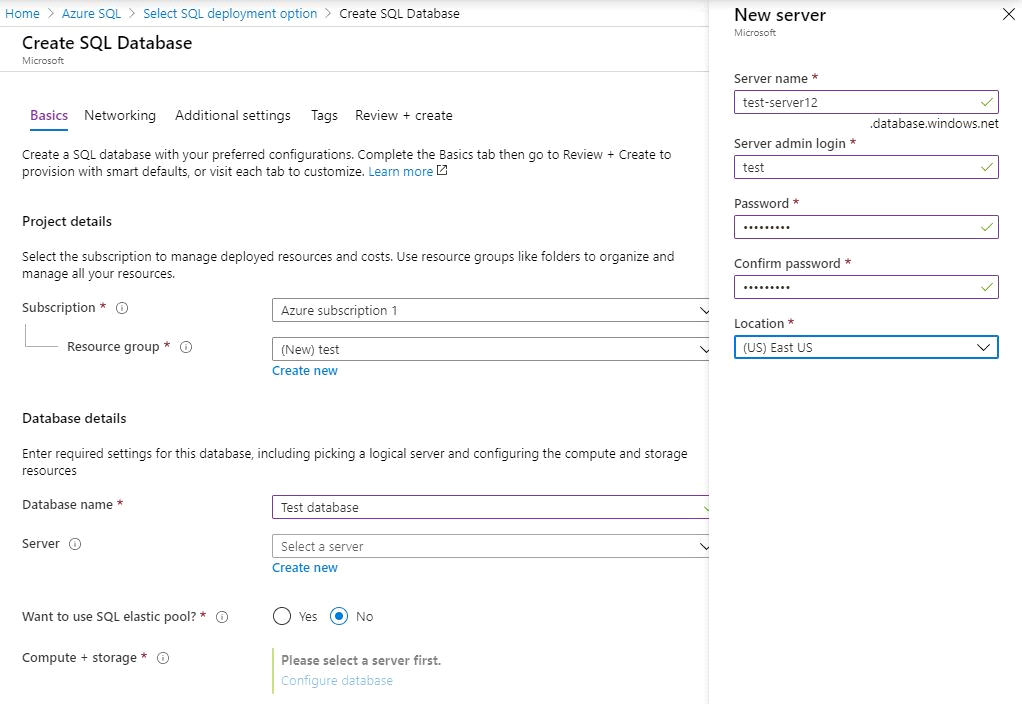
In the Project details section, on the Basics tab, configure the following:
- Subscription: click the drop-down and select the appropriate subscription
- Resource group: click Create new, enter your resource group name, and click OK
-
In the Database etails section, configure the following:
- Database name: enter a unique name
-
Server: select Create new, configure the following values, and then click OK
- Server name: choose a unique ID for your database server
- Server admin login: choose an admin username for your database
- Password: choose a secure password you will use to access your database
- Location: choose the location in which you want to run the database
- Compute + storage: select Configure database and choose your preferred deployment option (Serverless), Data max size, and vCores. You can learn more about the options here
-
Select Apply
Select advanced settings
-
In the Networking tab, determine if you want to create a private endpoint or allow external access to the database
- Make sure that Add current client IP address is set to Yes
-
In the Additional Settings tab, under Data source, choose if you want to create a blank database, or import the data from a backup
- There is a sample database you can use under the existing database option if you prefer
- Review your final configurations and click Create
Build an ASP.NET app in Azure with SQL Database
Once you’re comfortable with how creating a database works, you should be ready to attach databases to your applications. When hosting applications in Azure, an easy option is to use the Azure App Service. This service enables you to deploy applications in a highly scalable and self-patching environment.
One of the types of applications you can create is an ASP.NET application. ASP.NET is a server-side framework that you can use to create dynamic web sites, services and applications.
In the following tutorial, you’ll be shown how to deploy application code to App Service and connect your application to an Azure SQL Database instance. These steps are summarized-see the full tutorial in the Azure documentation.
Prerequisites
To follow this tutorial, you need to have Visual Studio (VS) 2019 installed along with the ASP.NET and web development workload. You can find Visual Studio here and the workload in VS under Tools and Get Tools and Features.
If you already have an ASP.NET application that you wish to use, feel free to do so. If not, you can use this sample project which is a basic MVC create-read-update-delete app based on Entity Framework Code First.
If you are using the sample project, you need to open the project file and run the app without debugging. Once open, create a few to-do items so that you have tasks to work with. This should generate a connection string in the Models/MyDatabaseContext.cs file that you need to reference once you’re ready to connect to your database.
Publish your app to Azure
-
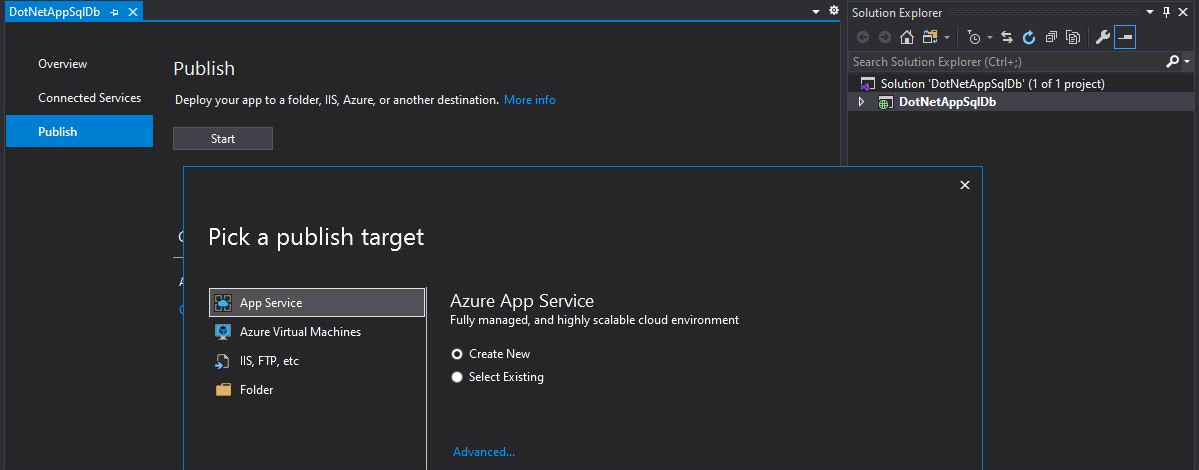
In Solution Explorer, right-click your project and select Publish
-
Make sure that you are publishing to Azure App Service
-
-
Go to the Create App Service dialog, and then choose to Add an account
- If you already have an Azure subscription, sign in to it
-
If not, you can use the free trial to demo the service
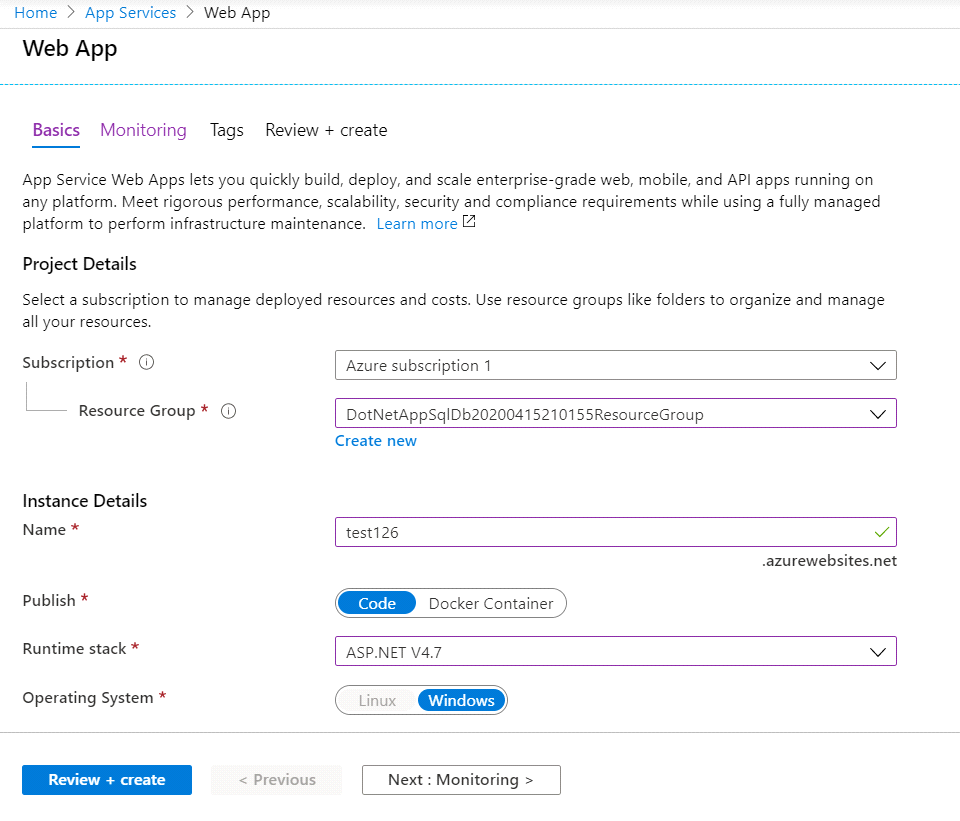
A web application name will be automatically generated for you. You can either keep this name or select another unique name
- Keep in mind, whichever name you choose will be part of your app URL
- This name cannot be shared with any other Azure app, including those of other users
-
Select a Resource Group for your application. If you do not have any groups set up, you can create a New one
- Resource groups are containers used to group your applications, databases, and storage accounts. These groups make it easier to manage various resources
-
Select an existing App Service plan or create a New one
- If you create a new plan, you need to define the Location and Size. Once defined, click OK
- How you configure your plan determines your app region, instance sizes, scale, and SKU
Create a SQL Server instance
This tutorial assumes that you want to create a new database instance to use with your application. If you prefer to connect an existing database you can do so in the Application Settings of your application. Choose Connection Strings and copy the string collected earlier into the string field.
To create a new database, you must first have an Azure SQL Database logical server. If you do not have one created, you can do so by clicking Create a SQL Database under the Explore additional Azure services section.
- If you already have a server, select it from the SQL Server dropdown. If not, click New
-
In the pop-up dialog, configure your details as follows and click OK
- Server Name: you can use the generated name or create your own. The name must be a unique name across all Azure instances. This name will be part of the URL of your server
-
Administrator Username and Administrator Password
- Take note of these as you need these credentials to manage your instance
-
When returned to the Configure SQL Database pop-up, configure your:
- Database Name: you can leave this as the auto-generated name or choose a unique name
- Connection String Name: enter the connection string you obtained earlier from your Models/MyDatabaseContext.cs file
-
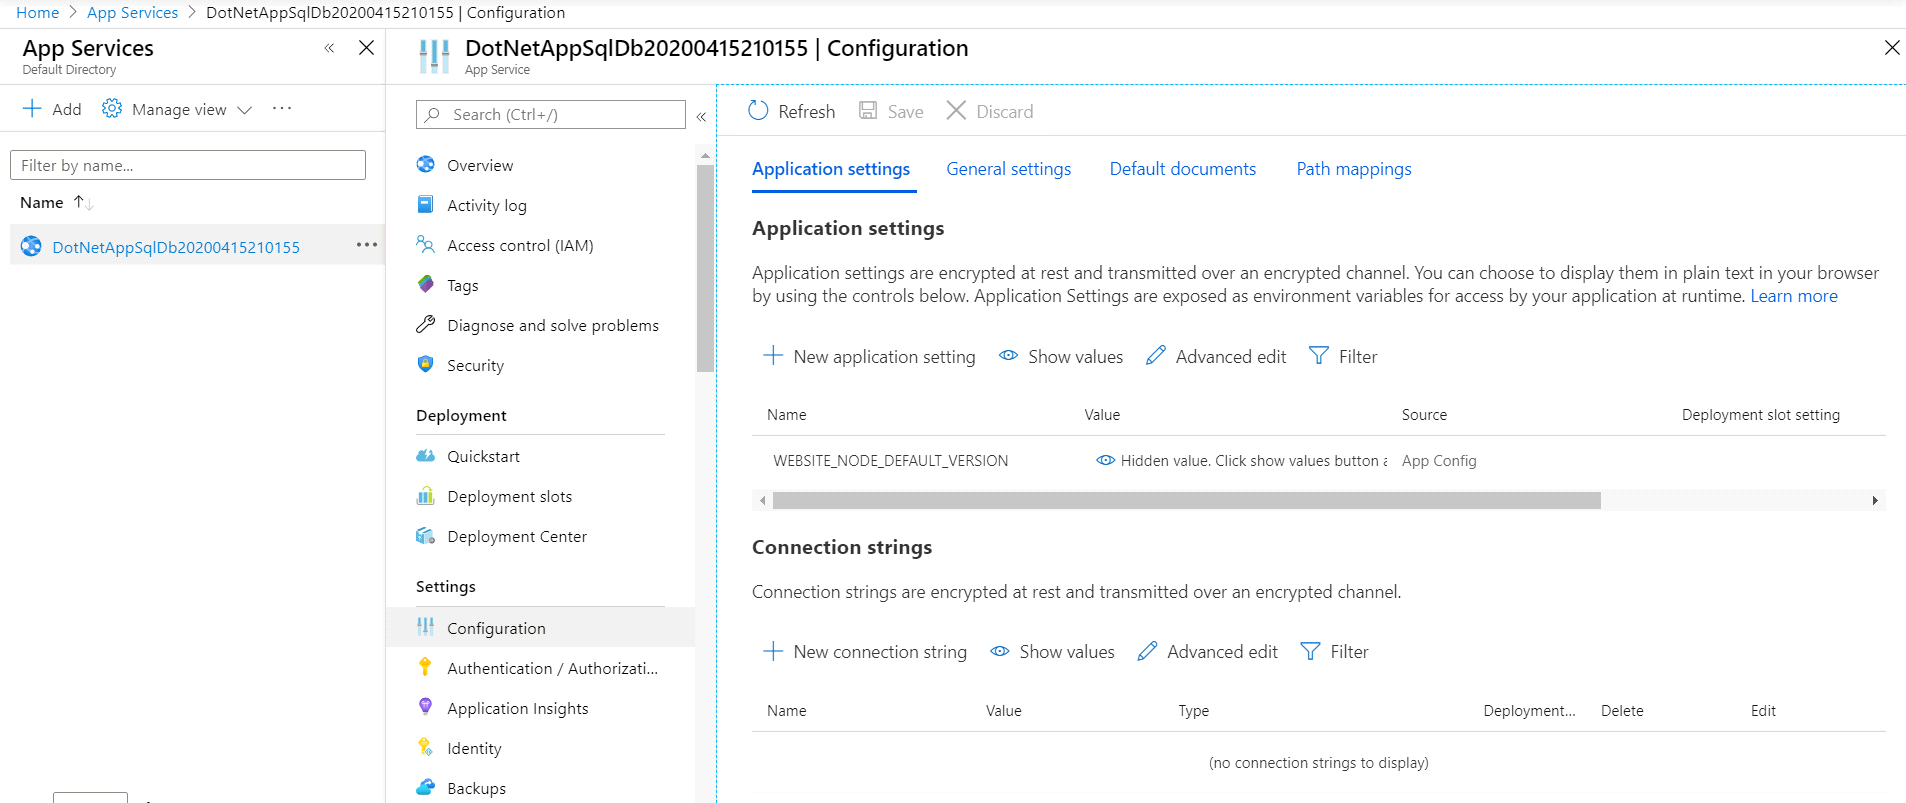
You can also do this through the App Services section of the portal
- Click OK
-
Verify that your configurations are correct and select Create
- If you need to change configurations, you can do so by returning to the previous screens and changing settings as needed
Conclusion
Azure SQL Database is a powerful service that provides many useful features. Amongst the most useful features are the built-in backup and the geo-replication model. These two can help you keep your data safe and available at any time. However, the most important aspect is that both Azure SQL Database and ASP.NET are maintained by Microsoft. This means the integration is seamless and allows you to focus on building.

You can find him on LinkedIn
- Getting started with MySQL on AWS: Costs, Setup, and Deployment options - November 11, 2022
- SQL Server Performance Tuning made simple - April 19, 2021
- How to migrate to Azure ML: A quick start guide - February 5, 2021