

This article will show the basics of hosting MySQL databases in Amazon Web Services (AWS).
What is MySQL?
MySQL is an open-source relational database supported and backed by an active community. It offers a highly reliable, secure, and stable SQL-based database management system. It often serves as a primary database for applications, commercial products, and websites.
MySQL is suitable for various use cases, such as dynamic websites and mission-critical applications. You can also use MySQL as an embedded database for hardware and appliances.
AWS offers various cloud services that support MySQL, including:
- Amazon Relational Database Service (RDS) for MySQL – a fully-managed database service.
- Amazon Aurora – a relational database designed especially for the cloud. It is compatible with MySQL and PostgreSQL.
- Amazon RDS for MariaDB – a fully-managed service that supports MariaDB, a MySQL fork project.
- Amazon EC2 – a cloud computing service you can use to host and self-manage a MySQL database on the AWS cloud.
You can also find various third-party MySQL offerings on the AWS Marketplace.
MySQL hosting options on AWS
Here are the primary options for deploying MySQL on the AWS cloud.
Fully Managed MySQL on Amazon RDS
Here are key reasons to use Amazon Relational Database Service (Amazon RDS):
- Amazon RDS provides access to the capabilities of MariaDB, MySQL, SQL Server, Oracle, or PostgreSQL databases – the applications, tools, and code you use with your existing database, should work smoothly with Amazon RDS.
- Amazon RDS handles upgrades and backups automatically – this keeps database software in line with the most recent version. Developers benefit from the flexibility of scaling the storage capacity or computing resources connected to your relational database instance.
- Amazon RDS makes it simpler to use replication – you can use replication to improve database availability, enhance data durability, or scale beyond the limitations of a single database instance, necessary for read-heavy database workloads.
- Amazon RDS has no up-front costs – there are no up-front fees for Amazon RDS, and you only pay for the resources you use.
- Amazon RDS has advanced data protection features – these include multi-factor authentication, SSL/TLS for encryption of data in transit, automatic encryption of data at rest, and activity logging with AWS CloudTrail.
Amazon Aurora for MySQL
Here are key reasons to use Amazon Aurora for MySQL:
- Amazon Aurora is fast – Amazon Aurora is three times quicker than standard PostgreSQL databases and up to five times quicker than standard MySQL databases. According to Amazon, it offers the availability, reliability, and security of commercial databases at one-tenth of the price. Amazon Relational Database Service (RDS) manages Amazon Aurora, which automates administration jobs such as database set up, backups, patching, and hardware provisioning.
- Amazon Aurora has a fault-tolerant, self-healing, distributed storage system – Amazon Aurora’s system auto-scales up to 128 TB for each database instance. It has high availability and performance with point-in-time recovery, up to 15 low-latency read replicas, replication over three Availability Zones, and ongoing backup to Amazon S3.
However, a key downside of Aurora is that it is only “compatible” with MySQL, it does not run the original MySQL engine. So existing databases might require some modifications when migrating to Aurora.
For this reason, we’ll focus on Amazon RDS for MySQL as the primary deployment option for the rest of this article.
Amazon RDS for MySQL Pricing Model
The regular AWS pricing models apply for RDS – the service provides a free tier, and beyond the free tier allowance, you are billed for the time your database runs and the storage space you use. You can pay for Amazon RDS using reserved instances or on-demand instances. Amazon RDS offers a variety of instance types optimized to suit different relational database use cases.
You can pay for on-demand DB instance compute capacity per hour your DB instance runs. For multi-AZ deployment (two readable standby instances), and multi-AZ deployment (one standby instance), pricing is for each DB instance-hour used for each of your replicas.
Pricing for Compute
Partial DB instance hours are charged in one-second increments with a 10-minute minimum cost after a billable status fee, including starting, modifying, or creating the DB instance class.
Pricing for General Purpose (SSD) Storage
Amazon RDS gives you the option to select from 20 GB to 64 TB of general-purpose (SSD) storage capacity for your data set. With general-purpose (SSD), you will be billed for the storage you provision. Amazon will not bill you the I/Os you use.
Pricing for Provisioned IOPS (SSD) Storage
Amazon RDS lets you provision the I/O capacity your database requires, and you can scale and provision from 1,000 IOPS to 80,000 IOPS and 100GiB to 64 TB of storage. You are billed for the storage and IOPS you provision with provisioned IOPS SSD storage.
Refer to the official pricing page to see up-to-date pricing for each of these components.
How to Create a MySQL Database in Amazon RDS
This tutorial walks you through the process of creating an RDS MySQL database instance configured with the following specs:
- Instance class – db.t2.micro DB
- Storage – 20 GB
- Automated backup – specify a one-day retention period.
The above is part of the free tier, available for new eligible AWS accounts. These instructions are abbreviated from the official tutorial provided by AWS.
To create a MySQL database in Amazon RDS:
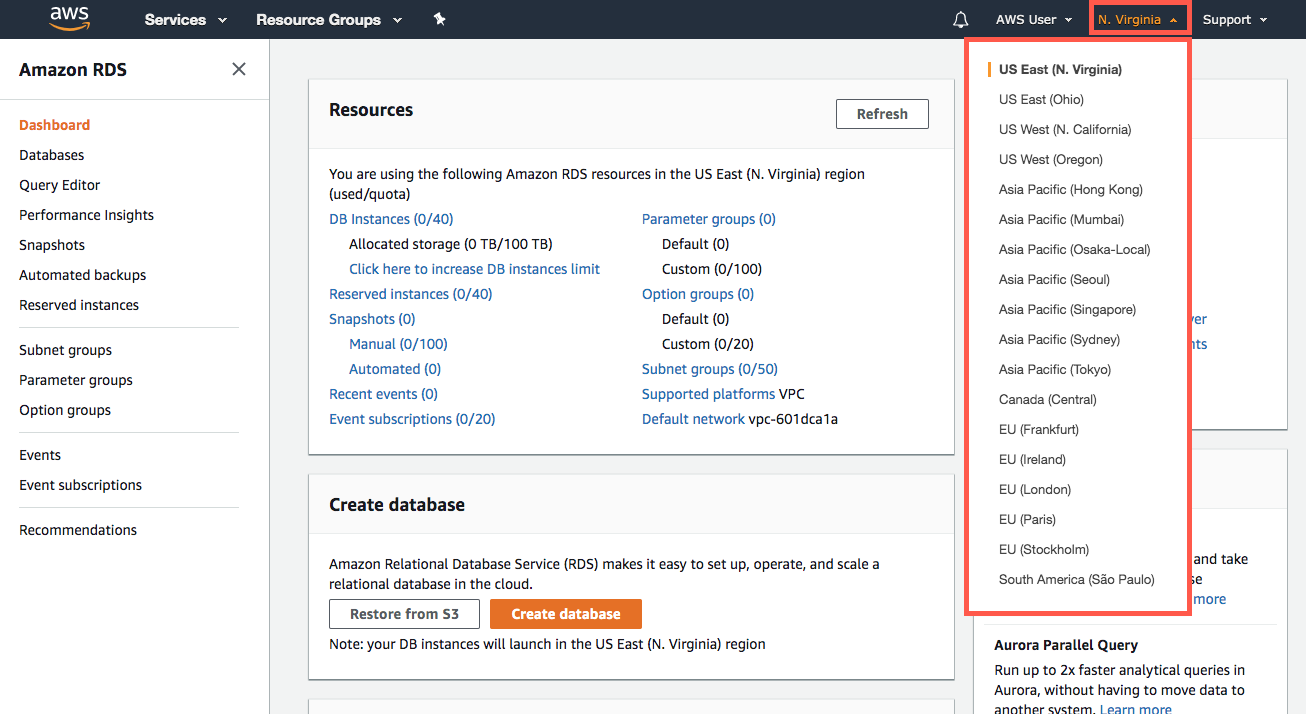
- Go to the Amazon RDS console. Choose a Region to place your new DB instance in the top right corner.
- Go to the Create database section and choose the Create database option.
- In the Engine options section, choose the MySQL icon. For this tutorial, you should use the default edition and engine version.
- In the Templates section, choose the Free tier template.
- Configure the DB instance. Here is an example configuration you can use for this tutorial:
- Go to the Connectivity section and specify the information RDS requires to launch a MySQL DB instance. Here is an example configuration you can use for this tutorial:
- Go to the Additional configurations section and enter the following specs:
- Choose the View Your DB Instances option.

Example configuration for a DB instance:
DB instance identifier | Enter a descriptive name for your DB instance. The name must be unique for your account and the Region. For example: your-name-rds-mysqldb-tutorial. |
Master username | Enter a username. Once entered, the master username lets you log in to the associated DB instance. For example, myMasterUser. |
Master password | Enter a master password consisting of 8-41 printable ASCII characters. You cannot use “, @, and /. |
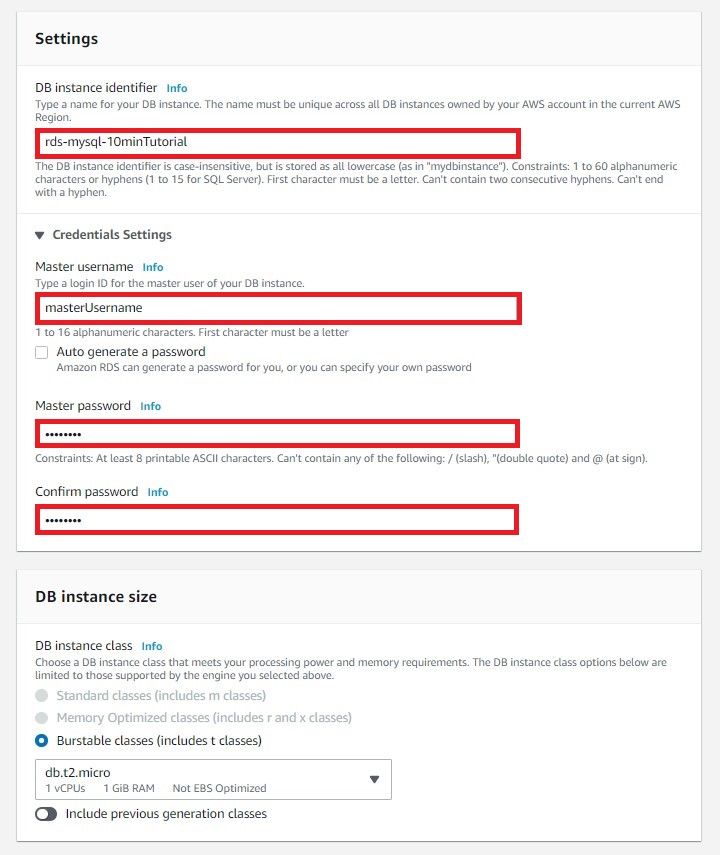
Here are the instance specifications you should use for this tutorial:
DB instance class | Choose db.t2.micro — 1vCPU, 1 GIB RAM. This configuration provides 1 vCPU 1 GB memory. |
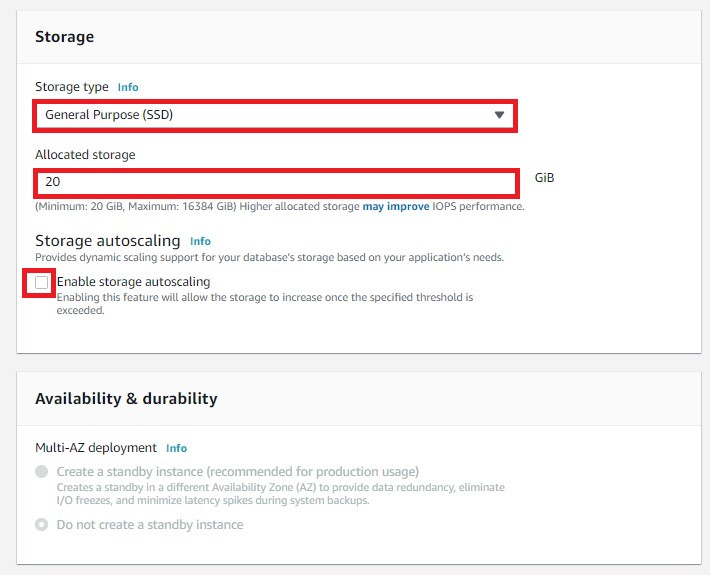
Storage type | Choose General Purpose (SSD). |
Allocated storage | Choose the default value of 20. This value allocates 20 GB of storage for the database. Amazon RDS for MySQL lets you scale up to a maximum of 64 TB. |
Enable storage autoscaling | You can enable storage autoscaling for unpredictable or cyclical workloads. This option lets RDS automatically scale up your storage as needed. Do not use this option for this tutorial. |
Multi-AZ deployment | A Multi-AZ deployment can automatically provision a synchronous standby replica, which is placed and maintained within a different AZ. However, this type of deployment is subject to additional charges. |
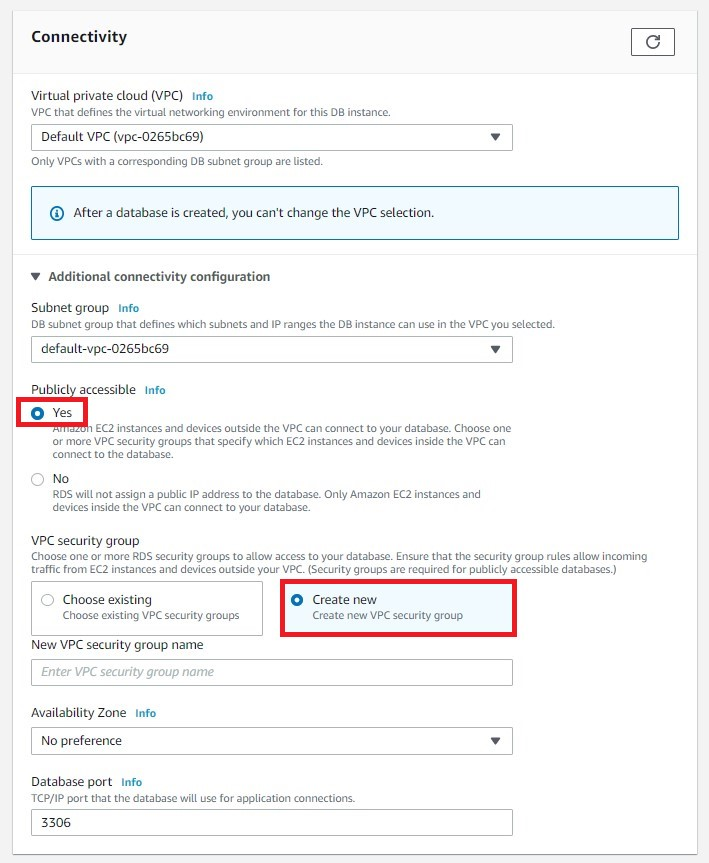
Virtual Private Cloud (VPC) | Select Default VPC. |
Subnet group | Choose the default group. |
Public accessibility | Choose Yes to assign an IP address for your DB instance. This option lets you directly connect to the DB using your device. |
VPC security groups | You can create a new security group by choosing the Create new VPC security group option. It enables connectivity from your device’s IP address to the new database. |
Availability zone | Choose the No preference option. |
Port | Use the default value, which is set to 3306. |
Database options:
Database name | Enter a descriptive database name consisting of 1-64 alpha-numeric characters. RDS does not create a database for a new DB instance automatically. You must specify a name and then RDS knows to create the database. |
DB parameter group | Use the default value. |
Option group | Use the default value. RDS employs option groups to configure and enable additional features. |
Encryption:
The free tier does not offer encryption. For this tutorial, you can skip this option. However, encryption is a fundamental security measure you should use when using MySQL in production.
Backup:
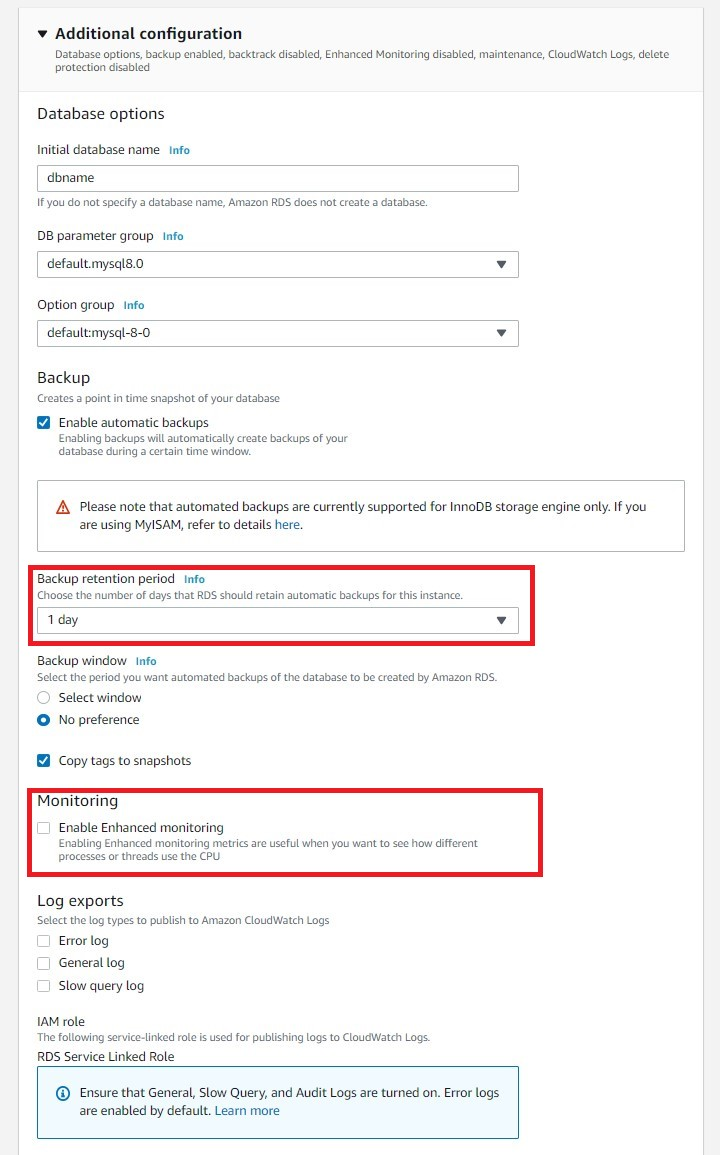
Backup retention period | Define a period to retain backups. For this tutorial, set the value to 1 day. |
Backup window | Choose the default No preference option. |
Monitoring:
Enhanced Monitoring | Choose Disable enhanced monitoring to remain within the resources allowed within the scope of the free tier. Enhanced monitoring provides real-time metrics for your instance’s operating system. |
Maintenance:
Auto minor version upgrade | You can set up automatic updates by choosing the Enable auto minor version upgrade option. |
Maintenance Window | Choose the No preference option. |
Deletion protection:
Clear the Enable deletion protection checkbox for this tutorial. This feature protects your database from accidental deletions. Once you fill in this information, choose Create database.

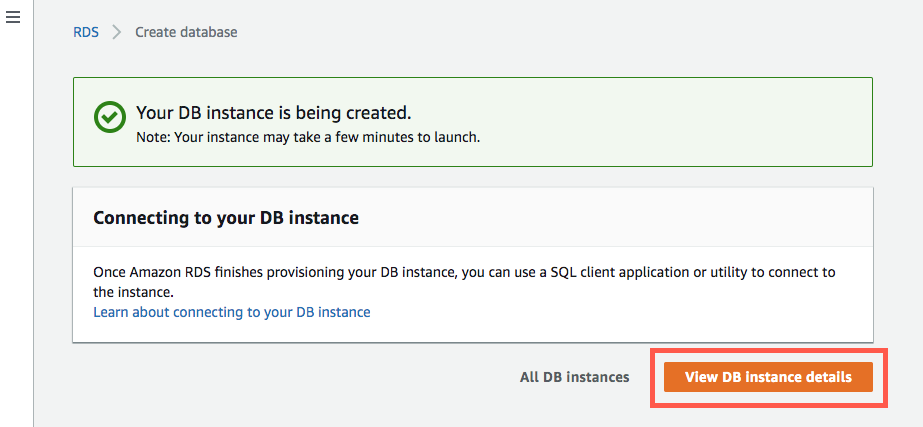
It may take several minutes until your new DB instance becomes available. The allocated storage and DB instance class and storage allocated determine how long this process takes.
Once the system finishes creating the DB instance, you can find it in the list of DB instances on the RDS console. The system assigns the DB instance a status, as follows:
- Creating – this status applies while the system creates the DB instance and until it is ready for use.
- Available – this status applies to a DB instance ready to be connected and used.
While you wait for your new DB instance to become available, you can choose the View DB Instance details.
Conclusion
In this article, we learned the basics of hosting a MySQL database in Amazon Web Services. We covered several hosting methods including running MySQL on an Amazon EC2 instance, using the serverless Amazon Aurora service and running a managed MySQL instance using the Relational Database Service (RDS). Finally, we did a step-by-step walkthrough for creating a MySQL database using the Amazon Console.
I hope this will be useful as you extend your MySQL deployments to the Amazon cloud.

You can find him on LinkedIn
- Getting started with MySQL on AWS: Costs, Setup, and Deployment options - November 11, 2022
- SQL Server Performance Tuning made simple - April 19, 2021
- How to migrate to Azure ML: A quick start guide - February 5, 2021