
In some cases, as a DBA, you are requested to copy the schema and the content of specific tables from a database to another one in the same instance or in a different SQL instance, such as copying specific tables from a production database to a DEV one for testing or troubleshooting purposes.
SQL Server offers a lot of methods that can be used to perform table’s data and schema copy process. In order to go through each one of these methods, we will consider the below scenario:
- The hosting SQL Server: localhost.
- Both databases hosted in the same SQL Server 2017 instance
- The source database: AdventureWorks2018
- The destination database: SQLShackDemo
The tables that will be copied from the source database to the destination one are: Department, Employee, EmployeeDepartmentHistory and EmployeePayHistory under the HumanResources schema.
Tables Copying Methods:
Using SELECT INTO Query
In order to copy our tables from the AdventureWorks2018 database to the SQLShackDemo one, we can use the Select into SQL statement. This statement will create the tables in the destination database first, then it will copy the data to these tables. If you manage to copy the database objects such as the indexes and constraints, you need to generate script for it individually, after that you need to apply the scripts to the destination database.
In our example, to copy the Department, Employee, EmployeeDepartmentHistory and EmployeePayHistory tables under the HumanResources schema from the AdventureWorks2018 database to the SQLShackDemo database, we will run the below script:
|
1 2 3 4 5 6 7 8 9 10 11 |
Create schema HumanResources Go Select * into SQLShackDemo.HumanResources.Department from AdventureWorks2018.HumanResources.Department Select * into SQLShackDemo.HumanResources.Employee from AdventureWorks2018.HumanResources.Employee Select * into SQLShackDemo.HumanResources.EmployeeDepartmentHistory from AdventureWorks2018.HumanResources.EmployeeDepartmentHistory Select * into SQLShackDemo.HumanResources.EmployeePayHistory from AdventureWorks2018.HumanResources.EmployeePayHistory |
The columns in destination tables are created in the order specified in the select statement. All these columns have the exact name, data type, nullability property, and column value as in the source table.
If any of the tables contains an Identity column, the new column in the destination table will inherit the Identity property without the need to turn on the Identity_Insert.
This is valid in most cases unless the Select statement contains Join, you are using Union to join multiple Select statements, the Identity column is mentioned many times in your select statement or the source of this Identity column is a remote data source.
If any one of these conditions mentioned is true, the column will be created with Not null property instead of inheriting the required Identity property.
To overcome this Identity issue, you can use the Identity SQL function in the select statement to create the Identity column.
Using SQL Server Export/Import wizard
Another method that can be used to copy tables from the source database to the destination one is the SQL Server Export and Import wizard, which is available in SQL Server Management Studio. You have the choice to export from the source database or import from the destination one in order to transfer the data:
-
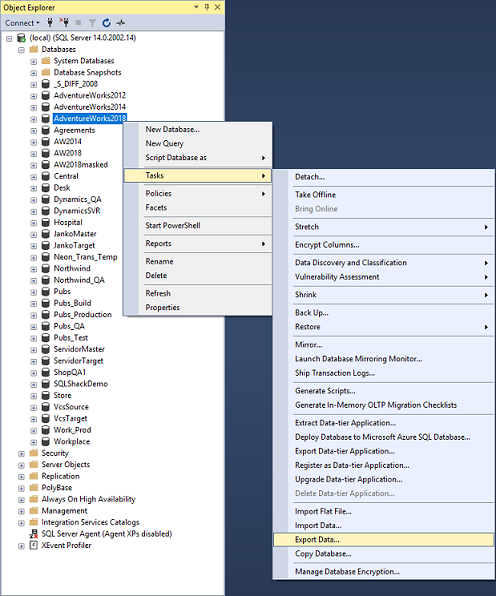
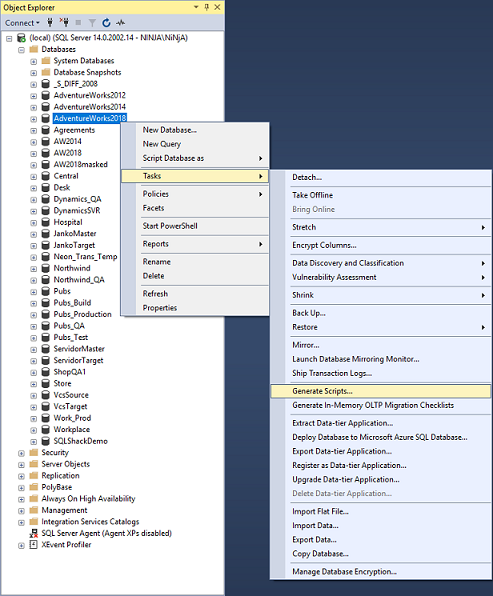
From SQL Server Management Studio, right-click on the AdventureWorks2018 database in the Object Explorer, then from Tasks choose the Export Data command:

-
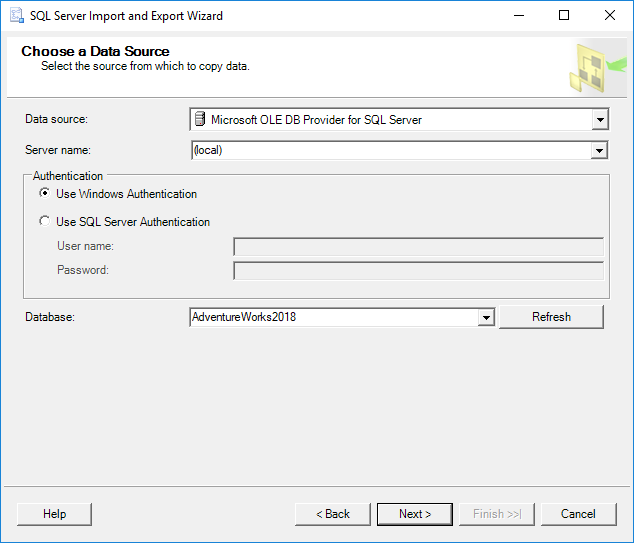
In the Choose a Data Source step of the SQL Server Import and Export Wizard, specify the source Server name, the Authentication method that will be used to connect to the source server, and the source Database name, then click the Next button:
-
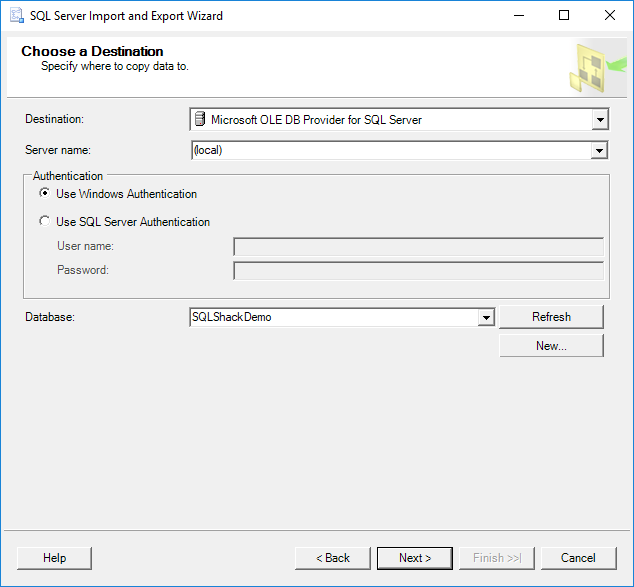
In the Choose a Destination step of the SQL Server Import and Export Wizard, specify the destination Server name, the Authentication method that will be used to connect to the destination server and the destination Database name, then click the Next button:
-
In the Specify Table Copy or Query step of the SQL Server Import and Export Wizard, choose the Copy data from one or more tables or views option and click the Next button:
-
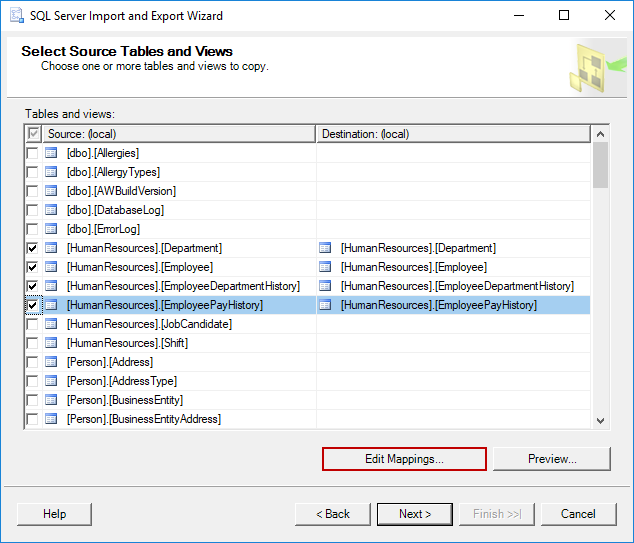
In the Select Source Tables and Views step of the SQL Server Import and Export Wizard, choose the tables that will be copied from the chosen source database to the destination one:
-
In order to make sure that the tables will be created in the destination database, click on the Edit Mappings button and make sure that the Create destination table option is ticked, and if any of your tables contain Identity column, make sure to tick the Enable identity insert option, then click the OK button. If you have more than one table to be exported to the destination database, you need to go through the Edit Mappings check table by table:
-
In the Select Source Tables and Views step, click the Next button, once all tables are checked via the Edit Mappings
-
In the Save and Run Package step, click the Next button:
-
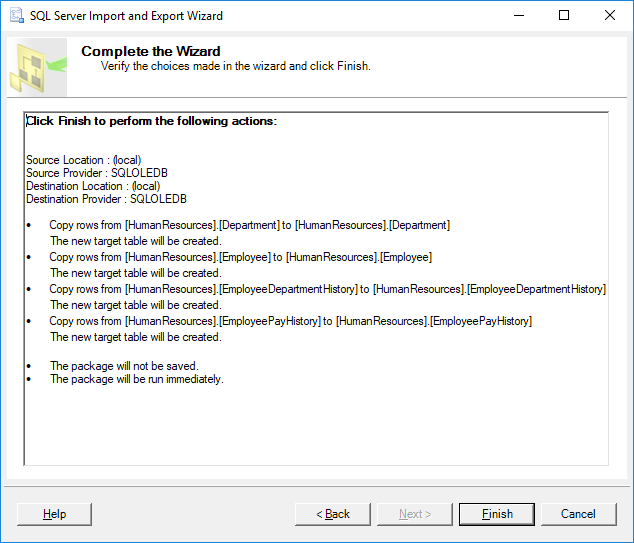
In the Complete the Wizard step, click the Finish button:
-
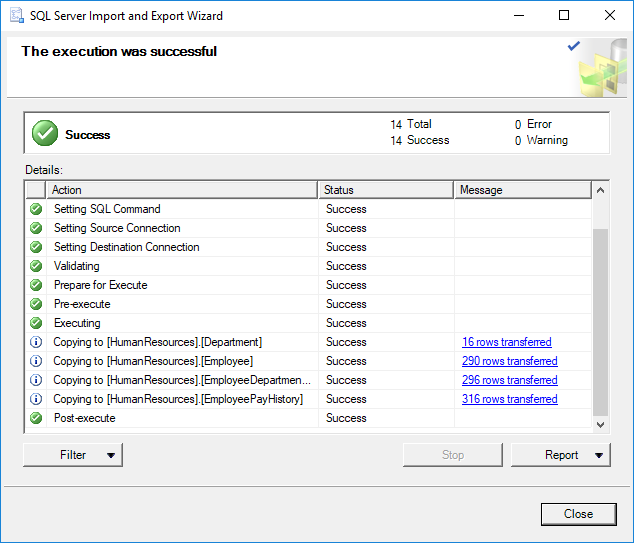
Once the execution is completed successfully, you can view the steps followed to migrate the tables and the number of records transferred. Review the steps and the messages, if there is no error click the Close button:


This method is a quick way to copy tables from the source database to the destination one if you arrange to copy the tables with no concern with the tables’ relationships and orders.
Using this method, the tables’ Indexes and keys will not be transferred. If you are interested in copying it, you need to generate scripts for these database objects.
If these are Foreign keys connecting these tables together, you need to export the data in the correct order, otherwise the export wizard will fail.
Using Generate Scripts
SQL Server provides another way to generate script for the SQL Server databases with its objects and data. This script can be used to copy the tables’ schema and data from the source database to the destination one in our case.
-
Using the SQL Server Management Studio, right-click on the source database from the Object Explorer, then from Tasks choose the Generate Scripts command:
-
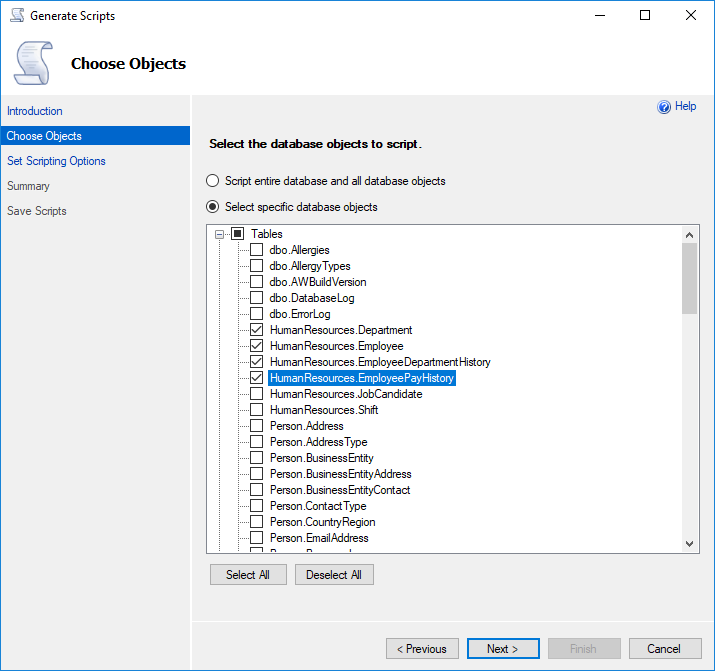
In the Choose Objects step, choose the Select specific database objects option to specify the tables that you will generate script for, then choose the tables by ticking beside each one of it and click the Next button:
-
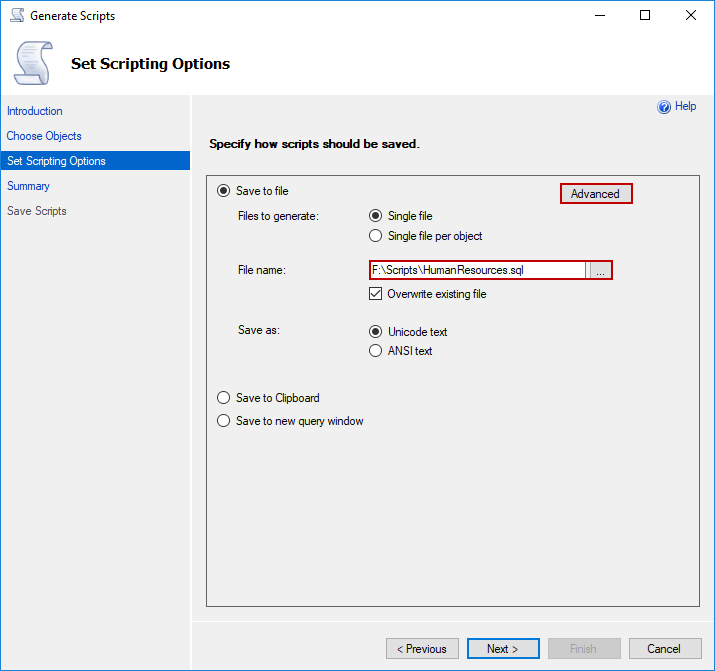
In the Set Scripting Options step, specify the path where you will save the generated script file, and click the Advanced button:
-
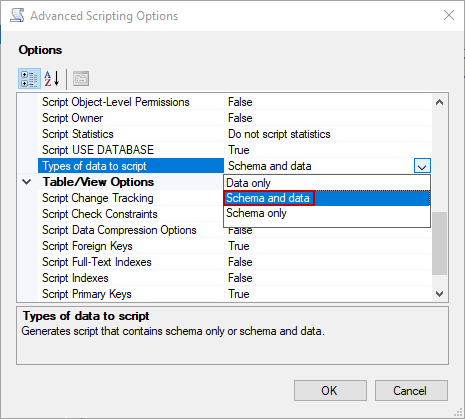
From the appeared Advanced Scripting Options window, specify Schema and data as Types of data to script:
You can decide from here if you want to script the indexes and keys in your tables. -
Click the OK button and after getting back to the Advanced Scripting Options step, click the Next button
-
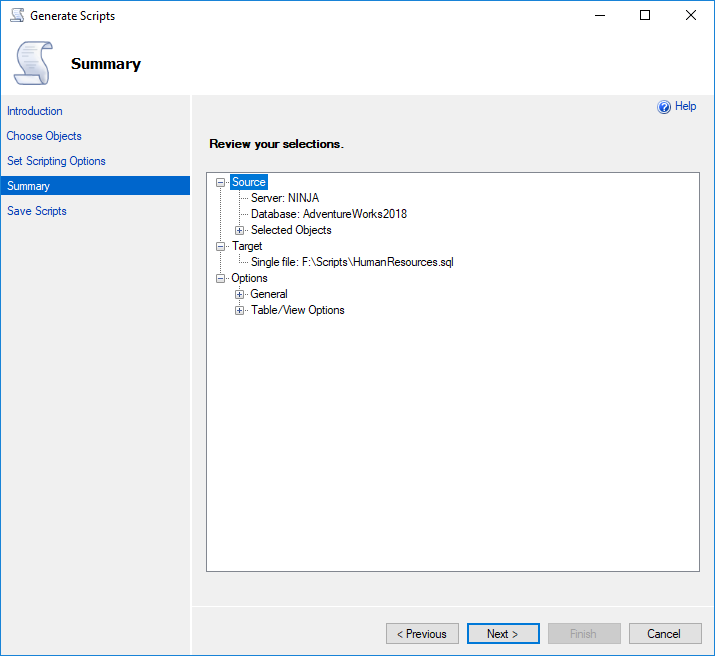
Review the Summary step and click the Next button:
-
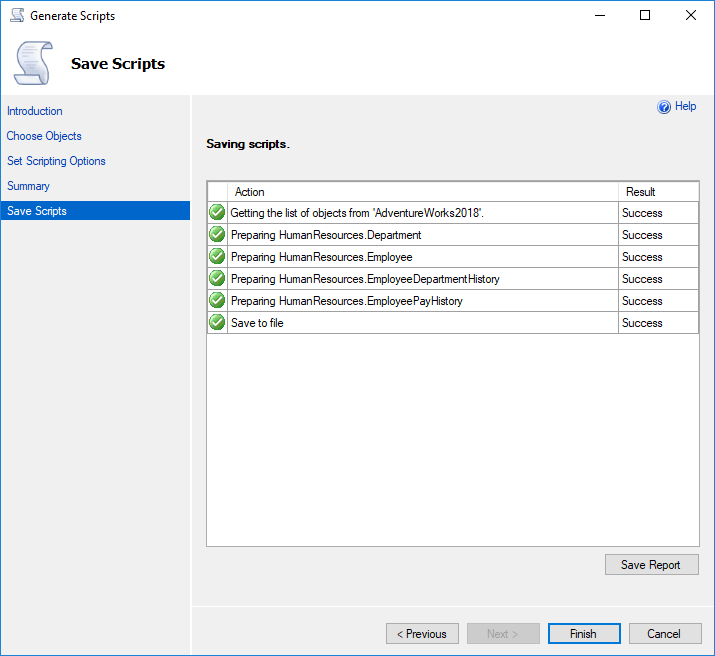
You can monitor the progress from the Save Scripts step. If there are no errors click the Finish button and you will find the script file in the specified path:
SQL Scripting method is useful to generate one single script for the tables’ schema and data, including the indexes and keys. But again, this method doesn’t generate the tables’ creation script in the correct order if there are relations between the tables.
Using the ApexSQL Diff and ApexSQL Data Diff combination
ApexSQL Diff is a useful SQL tool that can be used to find the differences between the databases from schema side and generate synchronization script to create these tables in the destination database in the correct order.
ApexSQL Data Diff also is another SQL tool that can be used to find the differences between the databases from data side and generate synchronization script to insert the data in the destination database tables, taking into consideration the Identity columns.
We can take benefits of these two tools together to generate the required scripts to create the tables to be copied with its objects, and copy the data from the source tables to the destination ones by following these steps:
-
Start the ApexSQL Diff tool
-
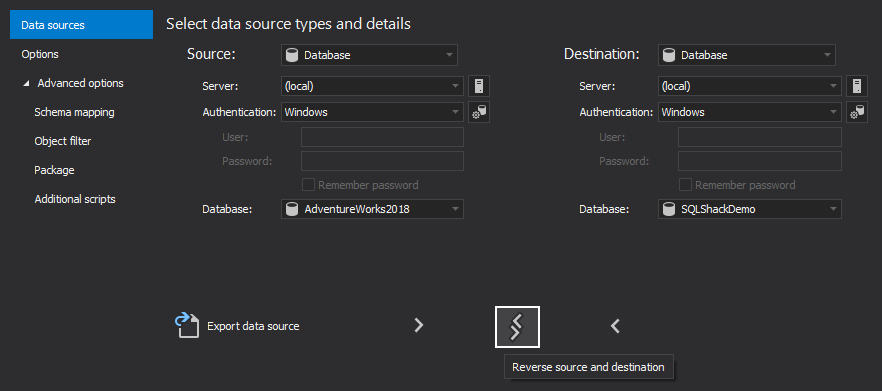
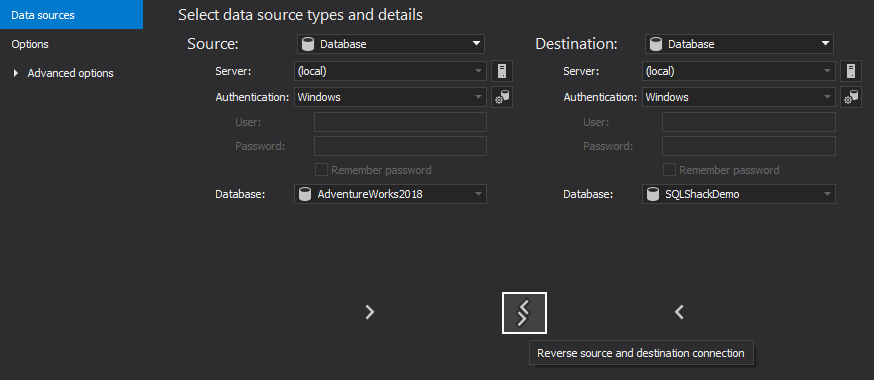
From the Data sources tab of the New project window, specify the source server name, the source database name and the Authentication method used to connect to the source server. You need to specify a valid user name and password if you choose SQL Server authentication.
Also specify the destination server name, the destination database name and the Authentication method used to connect to the destination server. You need to specify a valid user name and password if you choose SQL Server authentication.
You can change the role of each server specified as the source or destination one with a click on the Reverse button below data sources:
-
Once everything is set, click the Compare button
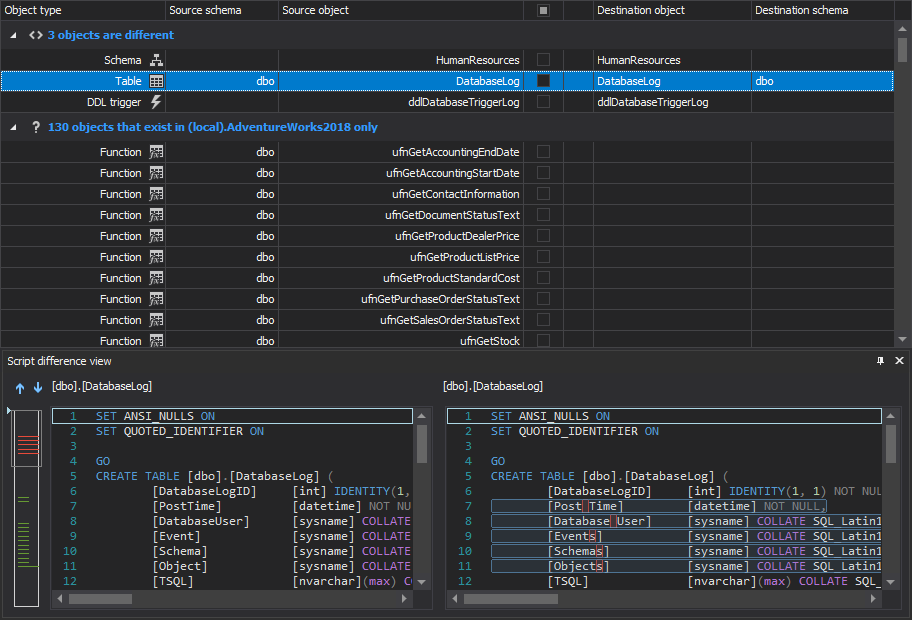
The main application window will be shown, that contains the Results grid with objects that are common between the two databases and the objects exist in one of the databases but not existed in the second one:
In our example, we are interested in the objects that exist in the AdventureWorks2018 database and not exist in the SQLShackDemo database, where we can find the tables to be copied.
-
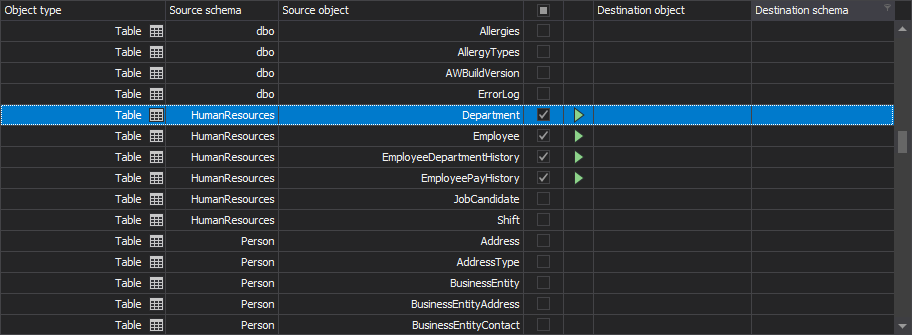
Expand the objects that exist in the AdventureWorks2018 database only, and choose the tables that you will copy:
-
Once the tables are checked, click the Synchronize button from the Home tab:
-
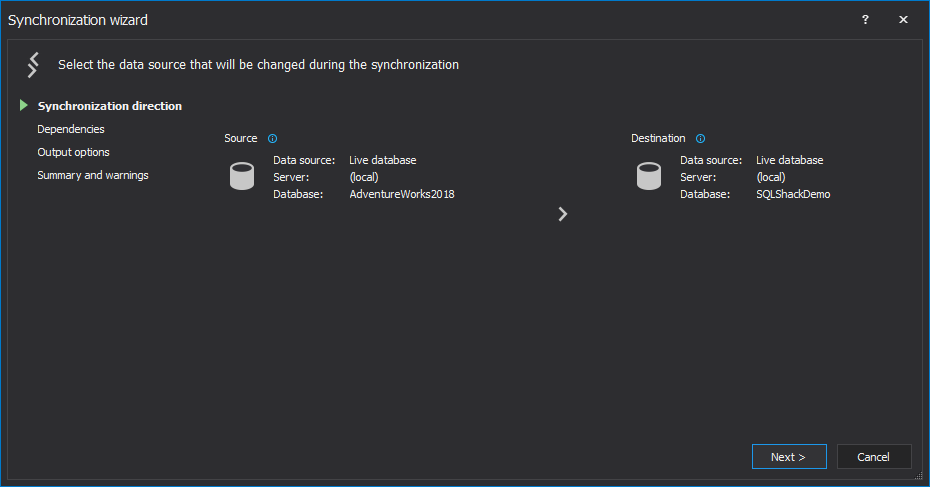
In the Synchronization direction step of the Synchronization wizard, click the Next button, if you don’t want to change the synchronization direction:
-
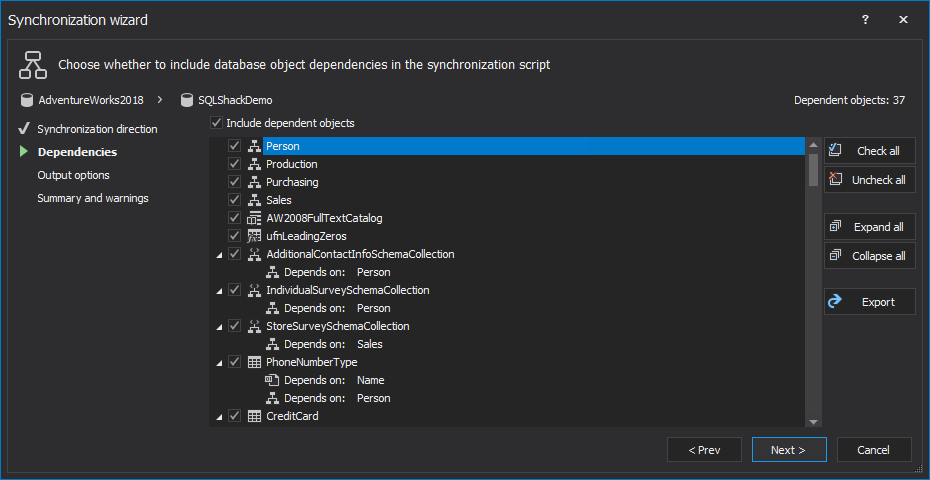
In the Dependencies step of the Synchronization wizard, uncheck the Include dependent database objects option, if you don’t want to script the related tables and click the Next button:
-
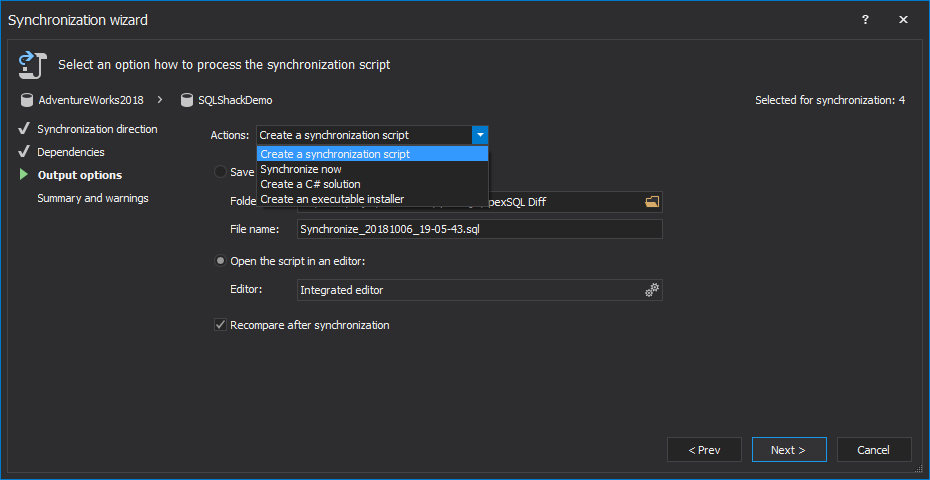
In the Output options step of the Synchronization wizard, choose the Create a synchronization script action if you want to generate script and run it manually or the Synchronize now action to let the tool to run the script on the destination server directly and click the Next button:
-
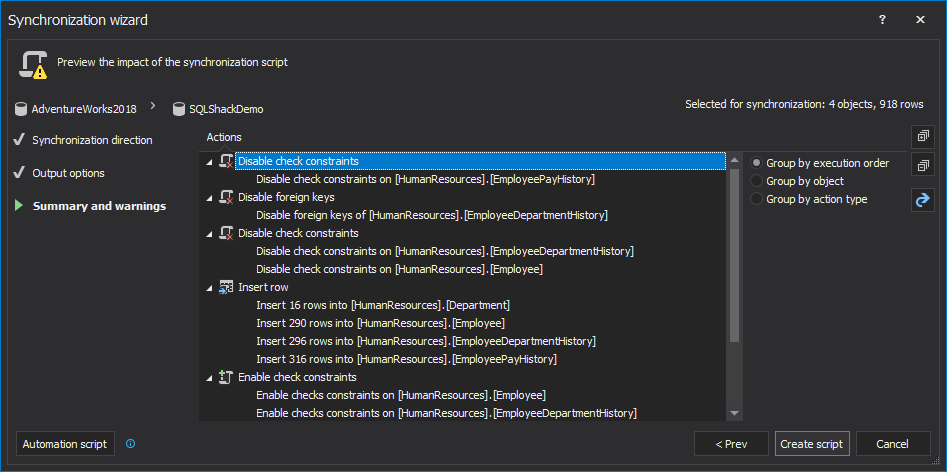
In the Summary and warning step of the Synchronization wizard, review the Actions and click the Create script button:
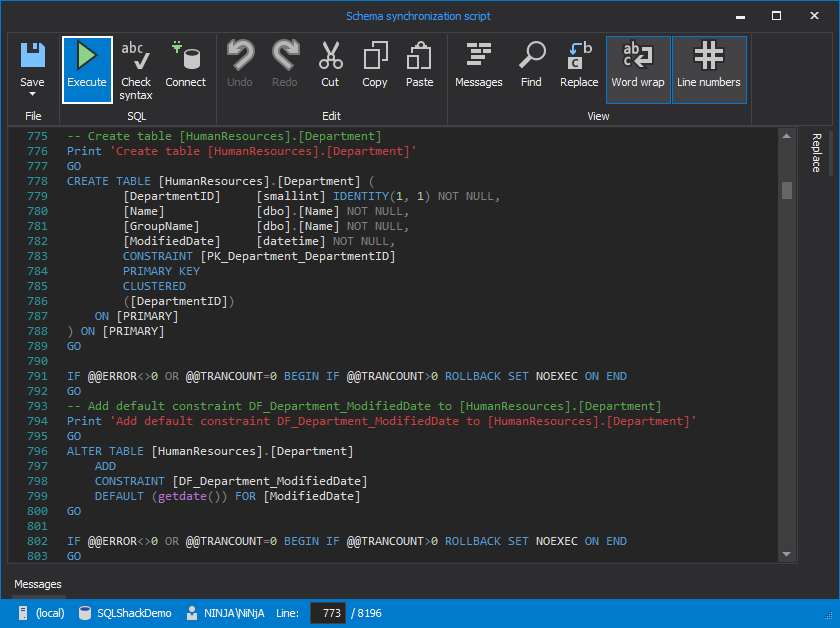
Now the script for creating the database tables with its objects are generated and in the correct order. You can simply run this script on the destination database to create the tables with a click on the Execute button:
-
Start the ApexSQL Data Diff tool
-
From the Data sources tab of the New project window, specify the source server name, the source database name and the Authentication method used to connect to the source server. You need to specify a valid user name and password if you choose SQL Server authentication.
Also specify the destination server name, the destination database name and the Authentication method used to connect to the destination server. You need to specify a valid user name and password if you choose SQL Server authentication.
You can change the role of each server specified as the source or destination one with a click on the Reverse button:
-
Once everything is set, click the Compare button
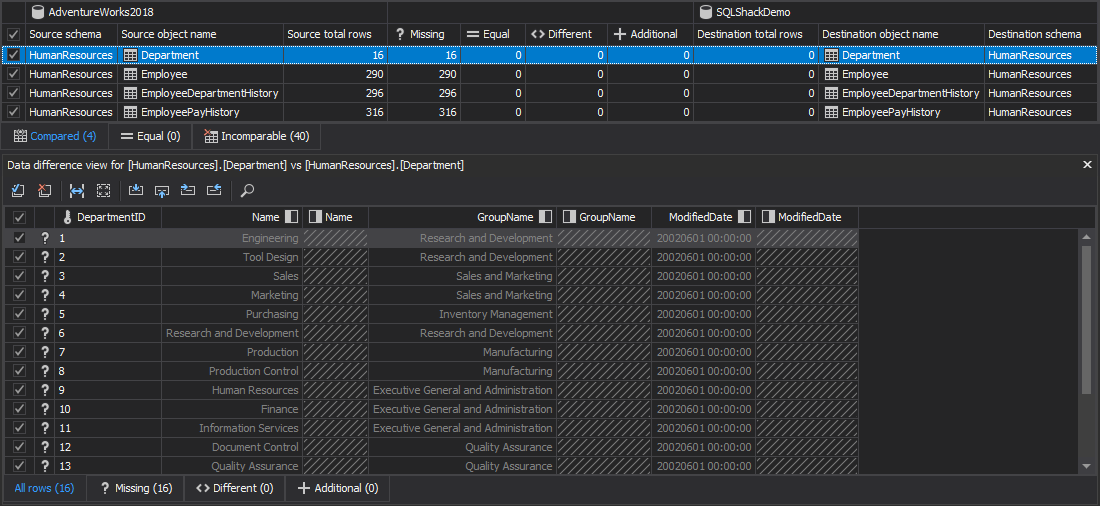
The main application window will be shown, that contains the data differences between the tables in the source and destination databases in addition to the identical and incomparable data.
Here we are interested in the data differences between the tables in the source and destination databases, as in the previous steps we created these tables schema, but they are still empty.
-
From the differences result grid, choose the tables that you need to copy its data to the destination database, then click the Synchronize button from the Home tab:
-
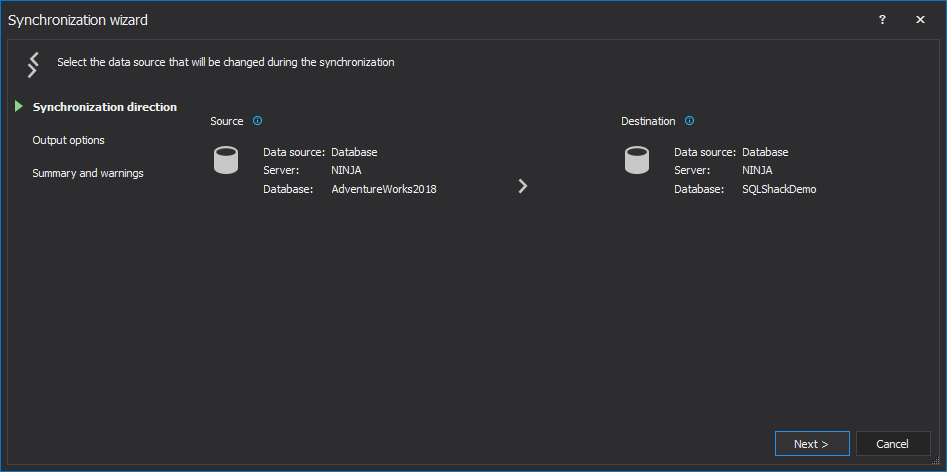
In the Synchronization direction step of the Synchronization wizard, click the Next button, if you don’t want to change the synchronization direction:
-
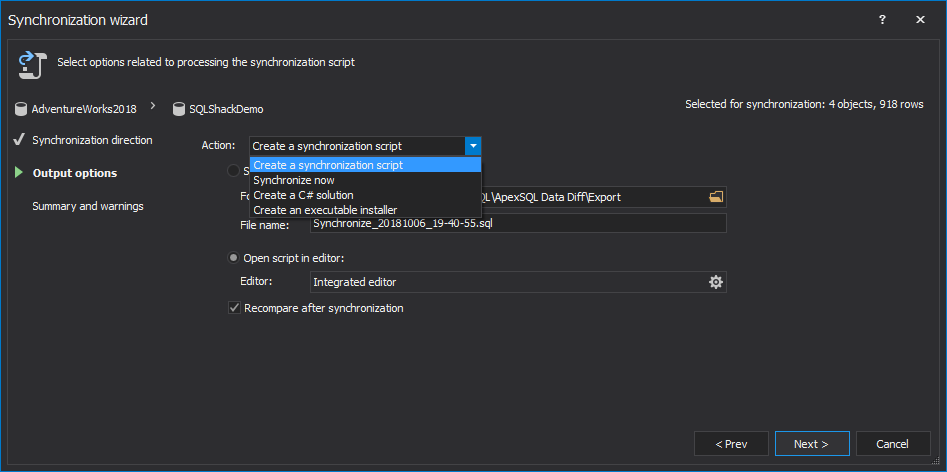
In the Output options step of the Synchronization wizard, choose the Create a synchronization script action, if you want to generate script and run it manually or the Synchronize now action to let the tool to run the script on the destination server and click the Next button:
-
In the Summary and warnings step of the Synchronization wizard, review the actions and click the Create script button:
Now the script to insert the database tables, handling the Identity insert, are generated. You can simply run this script on the destination database with a click on the Execute button to insert the tables’ data:


The combination of the ApexSQL Diff and ApexSQL Data Diff tools are useful to copy SQL database tables by generating complete scripts for these tables’ schema with indexes and keys and in the correct order, and the tables’ data handling the Identity column insert.
Using ApexSQL Script
Another useful tool provided by ApexSQL that can be used to copy SQL Server tables data and schema from the source database to the destination one is the ApexSQL Script tool. This nice tool will create script for the database tables schema and data with the indexes and keys of these tables handling the Identity column insert.
-
Start the ApexSQL Script tool
-
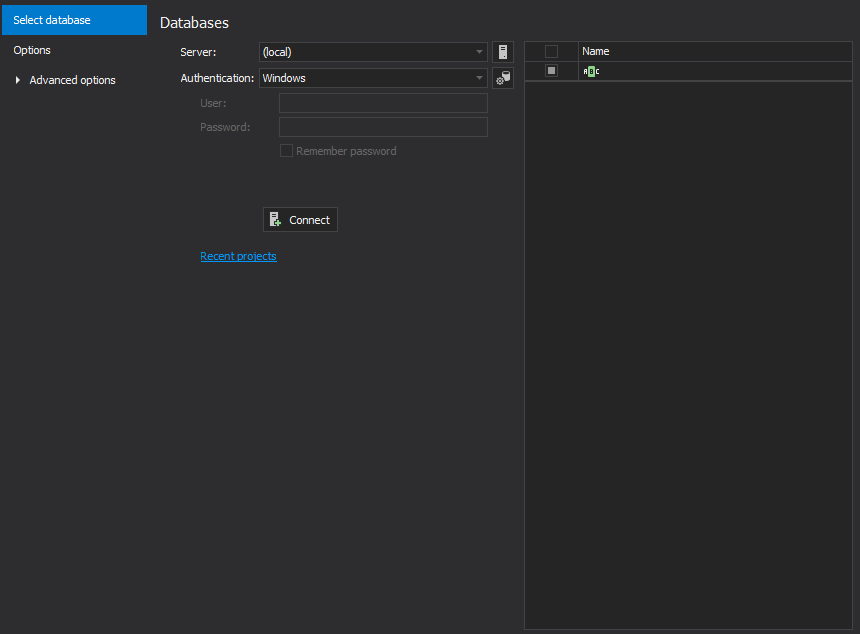
From the Select databases tab of the New project window, specify the source server name and the Authentication method used to connect to the source server and click the Connect button:
You need to specify a valid user name and password if you choose SQL Server authentication.
-
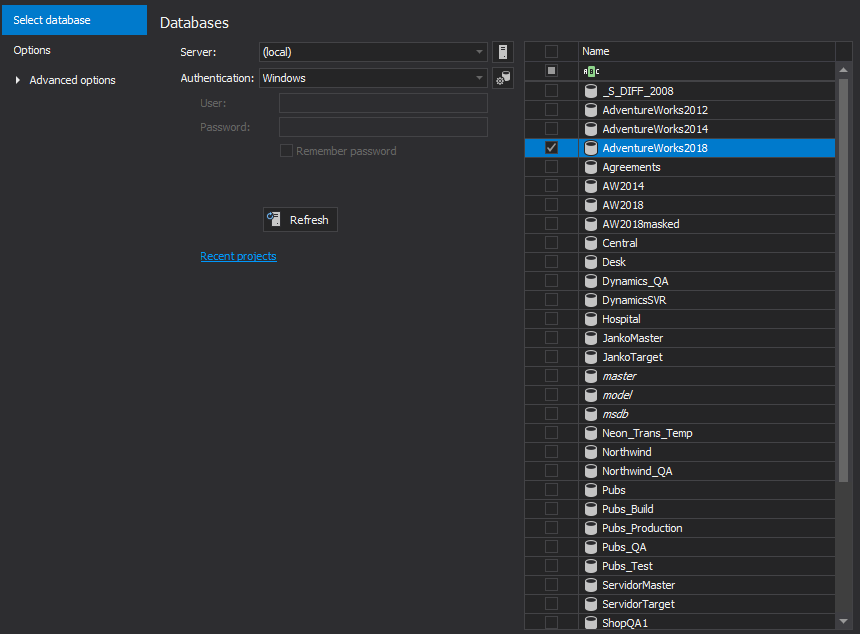
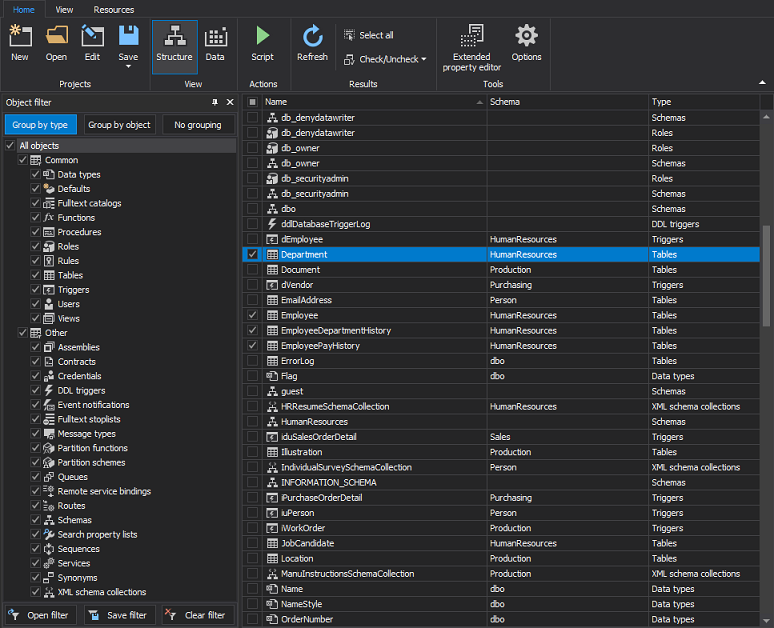
A list of all databases hosted in your server will be viewed in the right database list. Choose the source database name which is AdventureWorks2018 in our example:
-
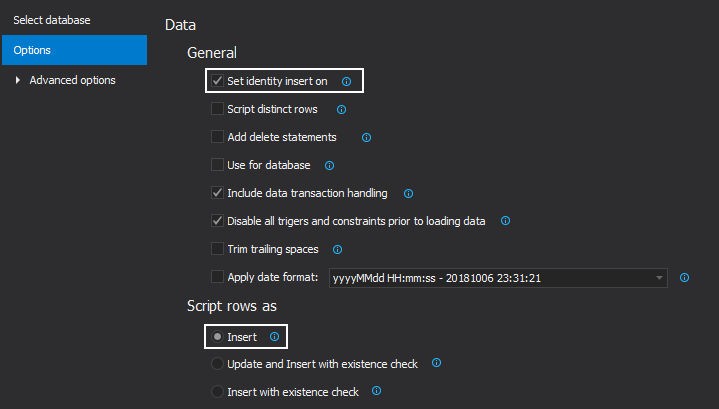
From the Options tab, under the Data section, select the Set identity insert on option from the General sub-section and Insert from the Script row as sub-section and click the Load button:
-
Once the database is loaded, by default the Structure view is shown. Choose the tables that you will copy to the destination database and click the Data button from the Home tab under the View section:
-
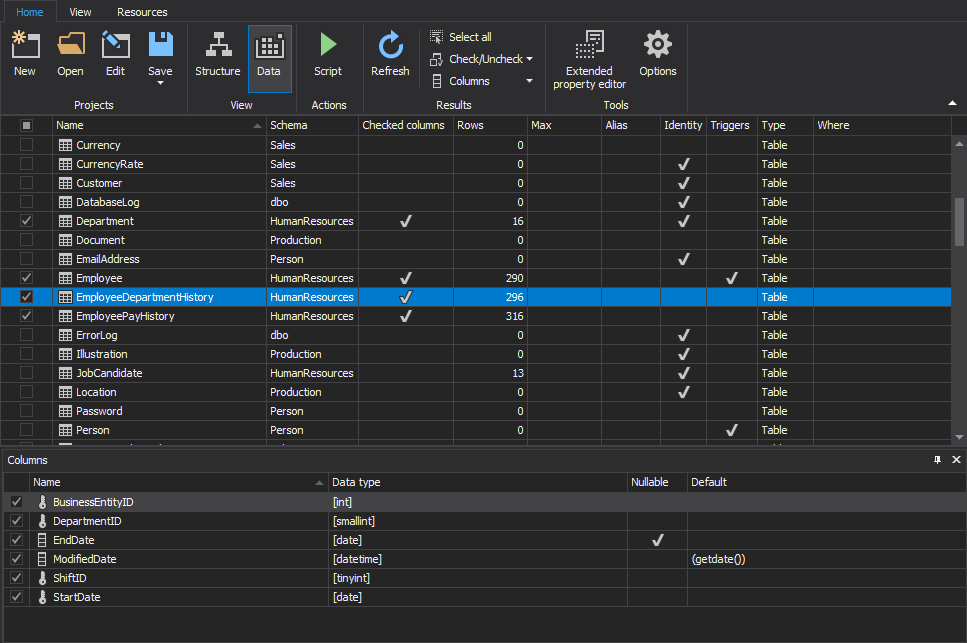
Under the Data view, choose the same tables as in the Structure view, so that data from those tables is included as well:
-
Once everything is set, click the Script button from the Home tab:
-
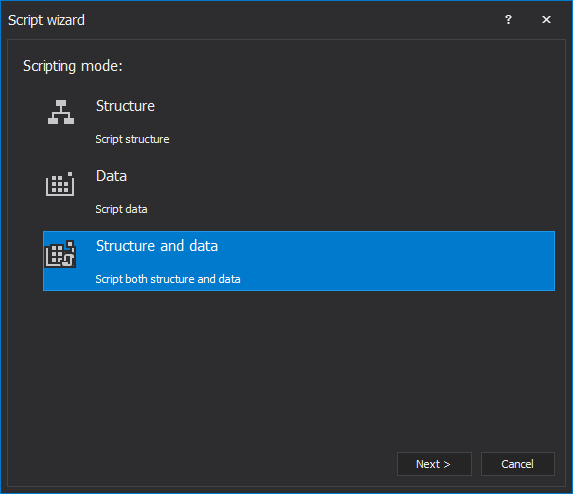
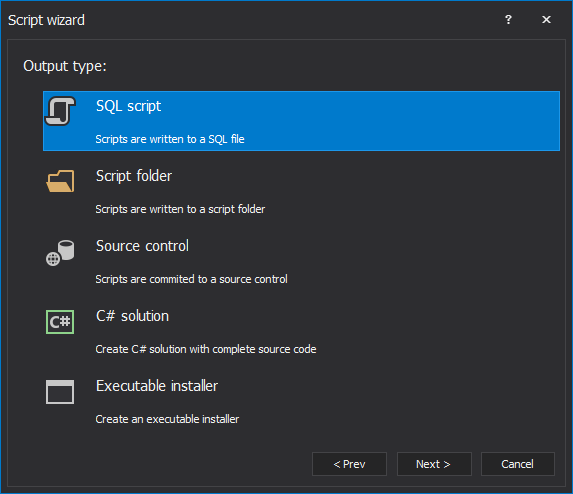
Choose Structure and data as the Scripting mode in the first step of the Script wizard and click the Next button:
-
Choose SQL script as the Output type, from the Script wizard and click the Next button:
-
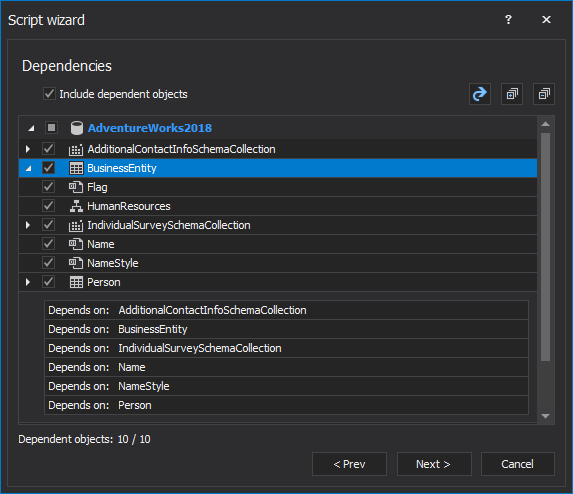
In the Dependencies window, uncheck any dependent objects or leave all checked and click the Next button:
-
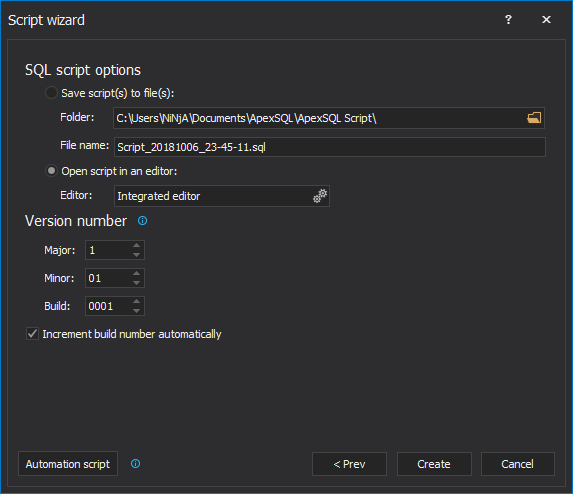
In the SQL script options step, choose the Open script in editor option and then click the Create button:
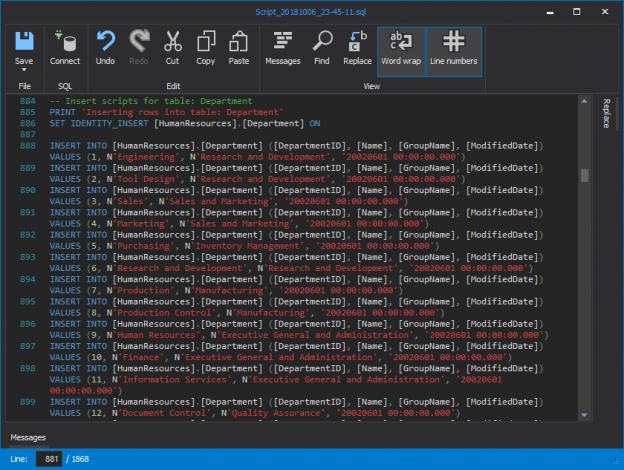
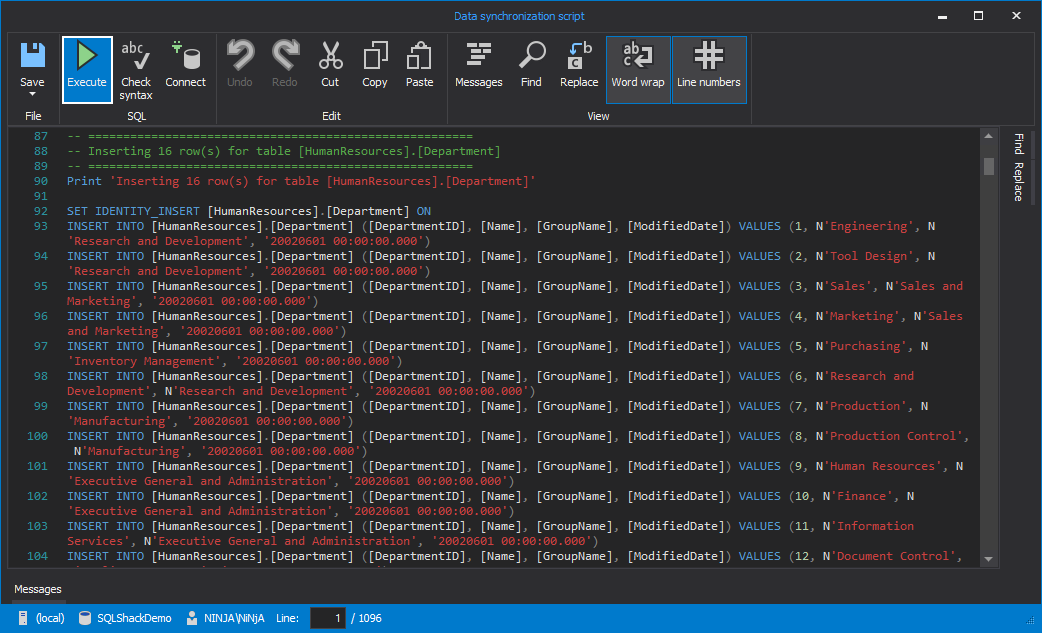
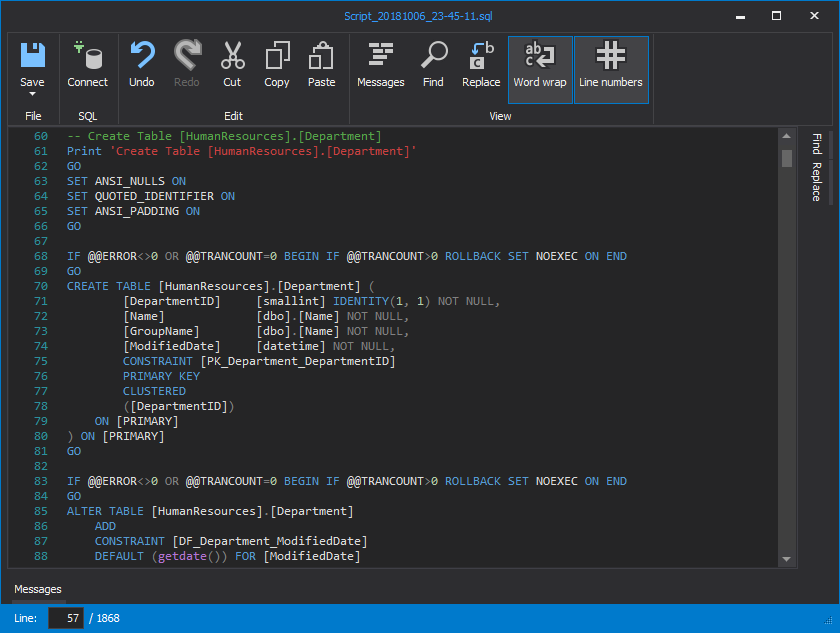
Now a completed single script is generated. Just run it on the destination database and the tables will be copied completely. You can go through the script to check the tables’ creation scripts in the correct order as below:
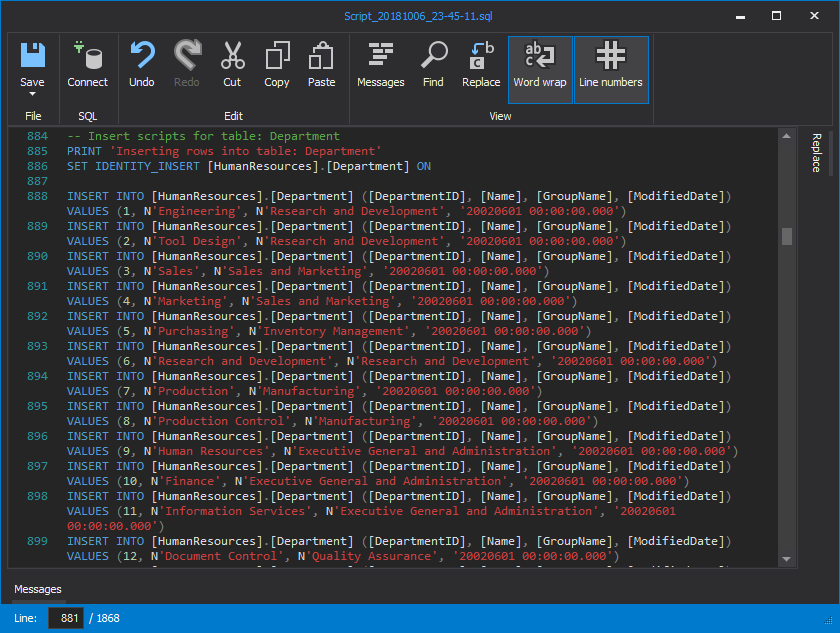
Also, you can find the Insert statements for the tables’ data as follows:

ApexSQL Script is a very useful tool that can be used to copy SQL Server database tables from the source database to the destination one without any effort from your side to handle the tables’ creation order. Also, no action required from your side to handle the Identity insert.
Conclusion:
As you can see, multiple methods can be used to copy tables from the source database to the destination one, including schema and data. Most of these tools require a big effort from your side to copy the tables’ objects such as indexes and keys. Also, these tools will not handle the creation order for these tables if there are relations between it. From the data side, most of these tools need extra steps from your side to handle the Identity insert. Using the combination of the ApexSQL Diff and ApexSQL Data Diff or using ApexSQL Script, by a few numbers of simple steps, you will have a complete script for the database tables’ schema and data with no extra effort from your side to handle anything. Just run these scripts on the destination database and enjoy the result.

He is a Microsoft Certified Solution Expert in Data Management and Analytics, Microsoft Certified Solution Associate in SQL Database Administration and Development, Azure Developer Associate and Microsoft Certified Trainer.
Also, he is contributing with his SQL tips in many blogs.
View all posts by Ahmad Yaseen
- Azure Data Factory Interview Questions and Answers - February 11, 2021
- How to monitor Azure Data Factory - January 15, 2021
- Using Source Control in Azure Data Factory - January 12, 2021