
In this article, the steps to connect to remote MySQL databases using Secure Sockets Layer (SSL) will be shown. MySQL is one of the most popular relational database management systems and by default, is configured to accept only connections from the machine where MySQL is installed. To connect to the MySQL database which sits on another machine, the additional configuration must be set to accept the remote connection with secure SSL encryption.
Prerequisite
For this article, two instances of Linux Ubuntu 18.04 needs to be installed.
On one of the Ubuntu machines, install MySQL and configure the root user using the guide from the How to install MySQL on Ubuntu 18.04 page.
On the second machine install the MySQL client using the following command:
sudo apt install mysql-client
Otherwise, you will get the following message, when trying to connect to remote MySQL server:
sudo: mysql: command not found

In this article, the name of a machine on which MySQL server sits will be called SSLServer1 and the name of a machine from which we will establish a secure SSL connection to a MySQL server will be called SSLServer2.
Checking status of SSL
So, let’s start configuring SSL for the MySQL server on the SSLServer1 machine. First, let’s check the current status of SSL on the remote MySQL server instance.
Login to MySQL instance using the command below:
mysql -u root -p -h 127.0.0.1

Enter a password for the root user and hit the Enter key from the keyboard.
Once we are logged in, type and execute the following command:
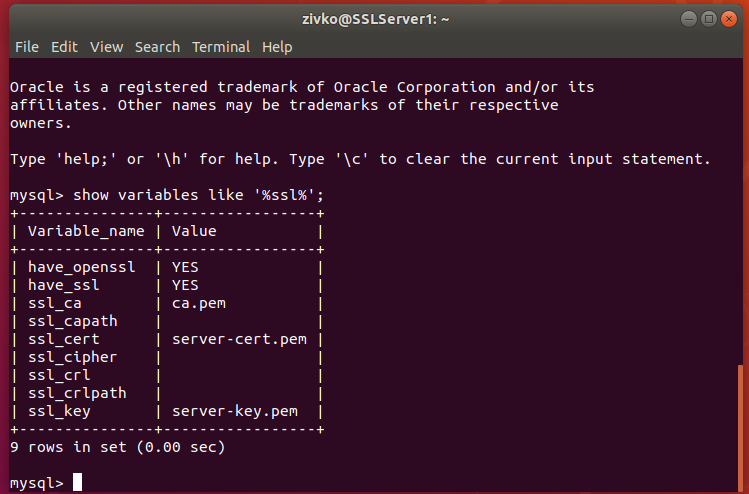
SHOW VARIABLES LIKE ‘%ssl%’;
Depending on the installed MySQL version on your machine, you can get different results. If you are running the MySQL server 5.7.27 and below versions, then you will probably get the following result:
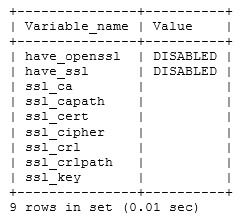
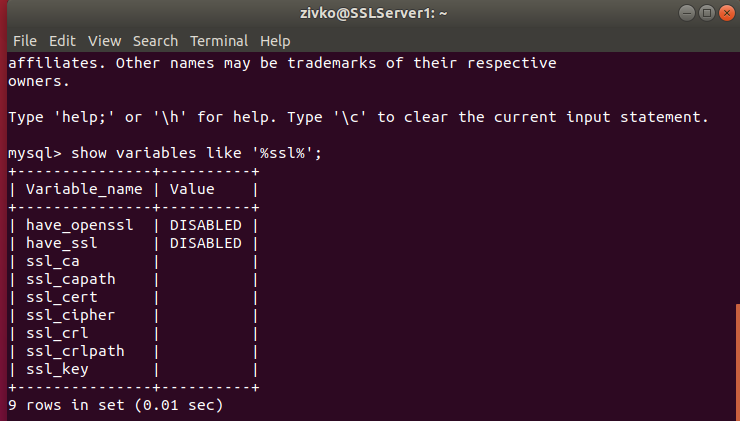
As can be seen, the have_openssl and have_ssl variables are disabled. To confirm that SSL is not used for the current connection, execute the following:
\s
or
status

The output result will be similar like one below:
————–
mysql Ver 14.14 Distrib 5.7.29, for Linux (x86_64) using EditLine wrapper
Connection id: 3
Current database:
Current user: root@localhost
SSL: Not in use
Current pager: stdout
Using outfile: ”
Using delimiter: ;
Server version: 5.7.29-0ubuntu0.18.04.1 (Ubuntu)
Protocol version: 10
Connection: 127.0.0.1 via TCP/IP
Server characterset: latin1
Db characterset: latin1
Client characterset: utf8
Conn. characterset: utf8
TCP port: 3306
Uptime: 10 min 10 sec
Threads: 1 Questions: 6 Slow queries: 0 Opens: 106 Flush tables: 1 Open tables: 99 Queries per second avg: 0.009
————–
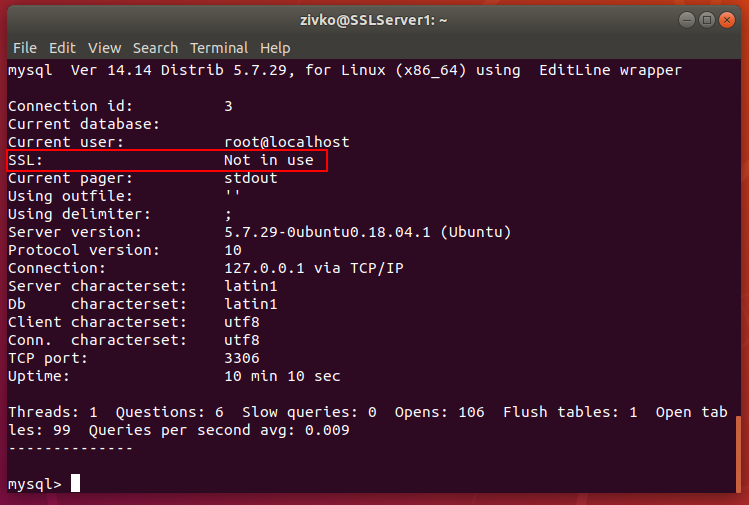
As can be seen from the image above, the SSL is not in use for this connection.
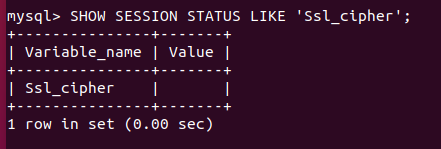
Another method to determine whether the current connection with the MySQL server uses encryption is to check the session value of the Ssl_cipher status variable:
SHOW SESSION STATUS LIKE ‘Ssl_cipher’;
If the value is empty, it indicates that the current connection does not use encryption:
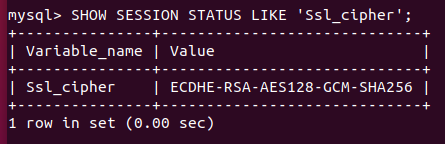
In the situation where current connection uses encryption, then the value will not be empty and will look like shown below:
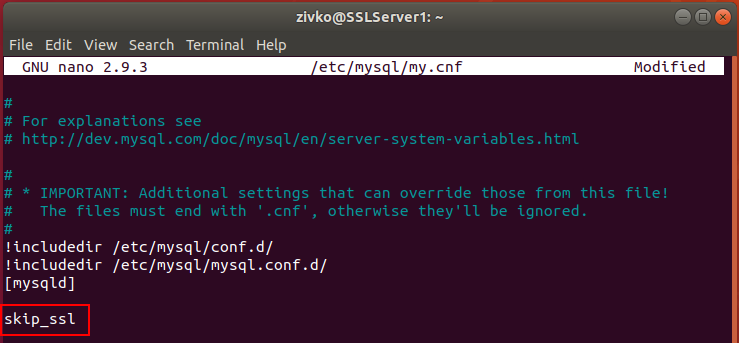
- Note: I use MySQL 5.7.29 version in which by default the SSL is enabled, but for this example, I disabled SSL by modifying the my.cnf file to show the DISABLED status of SSL:

In this configuration file, I entered the following command to disable SSL:
skip_ssl
To enable SSL and generates appropriate certification and key files you can use the mysql_ssl_rsa_setup utility:
sudo mysql_ssl_rsa_setup –uid=mysql
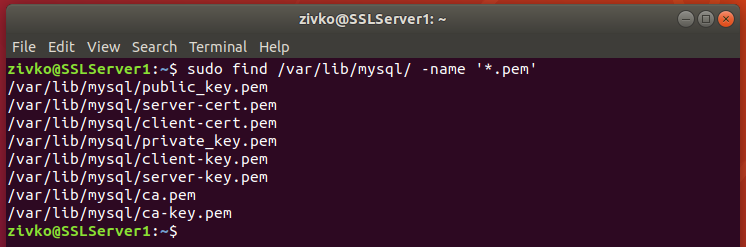
By default, MySQL stored SSL certification on this location: /var/lib/mysql
Let’s check that by executing this command:
sudo find /var/lib/mysql/ -name ‘*.pem’
But if you have installed the MySQL 5.7.28 version and above, then SSL certification will be automatically generated on the /var/lib/mysql location and SSL encryption enabled when starting MySQL:

Configuring remote MySQL server
Now that we have enabled SSL, the next step in the configuration of MySQL is to enable (allow) remote connection. By default, MySQL is configured to listen to the connection from the machine on which is installed and only accept connection from the localhost AKA 127.0.0.1 IP address.
If we try now to connect from the client machine (SSLServer2) to MySQL that sit on SSLServer1 machine, we will probably get the following error message:
ERROR 2003 (HY000): Can’t connect to MySQL server on (111)

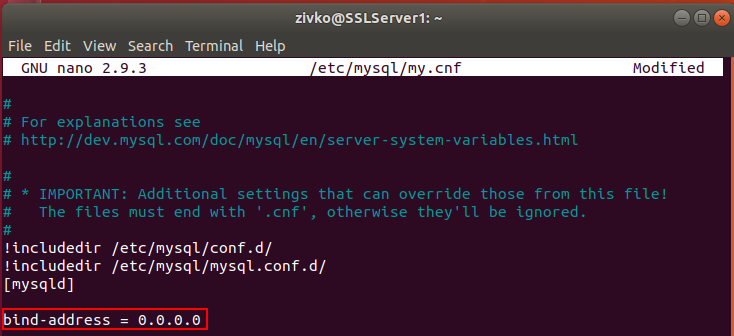
To allow connection to MySQL server from any remote IP address, in the MySQL configuration file /etc/mysql/my.cnf add the following:
bind-address = 0.0.0.0
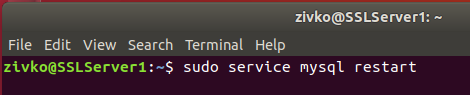
Now, restart the MySQL service for the changes to changes take effect:
sudo service mysql restart
When we try again to connect to remote MySQL server, we will get an error message:
ERROR 1045 (28000): Access denied for user (using password: YES)
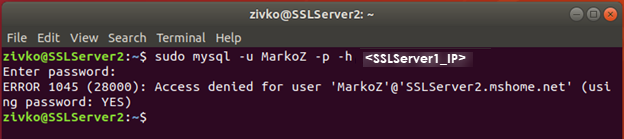
Currently, all MySQL users are configured to connect locally from the MySQL server. To connect to remote MySQL server, you will need to create a new user with the IP address of the client machine, in our case, we need the IP address of the SSLServer2 machine.
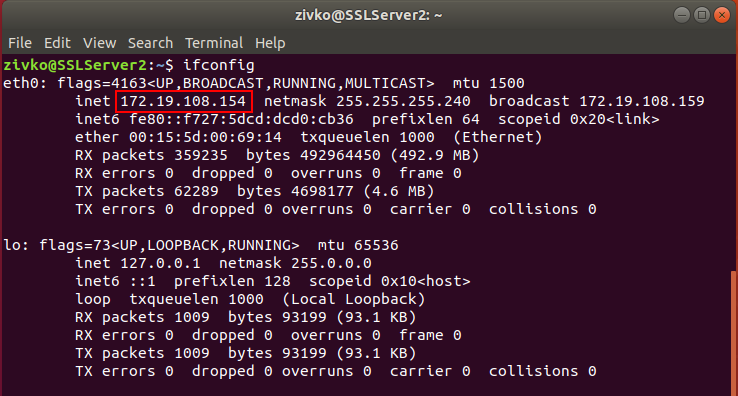
To view the IP address of the machine (SSLServer2), in terminal type and execute the following command:
Ifconfig
Now, when we get all necessary information, let’s create a user that will be allowed to connect to remote MySQL with secure connection by adding REQUIRE SSL clause:
CREATE USER ‘SSL_USER’@'<SSLServer2_IP>’ IDENTIFIED BY ‘password’ REQUIRE SSL;
After we have created the user, let’s gave him all permissions to access all remote MySQL databases.
Execute the following command:
GRANT ALL ON *.* TO ‘SSL_USER’@'<SSLServer2_IP>’;
To apply these settings immediately, execute the following:
FLUSH PRIVILEGES;
One more thing that needs to be done on the SSLServer1 machine is to add the require_secure_transport option to the my.cnf file and set it to ON.
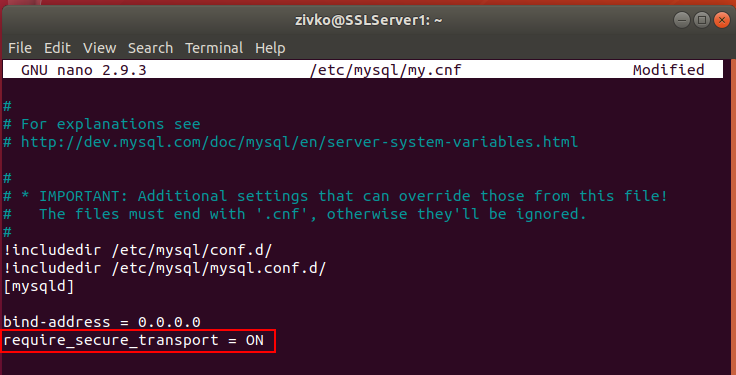
This requires all remote connections to be made with SSL.
After this, restart the MySQL service, to apply the new settings:
sudo service mysql restart
With this, we allowed the SSL_USER to connect from a remote location. To confirm that, let’s connect with SSL_USER from the SSLServer2 machine.
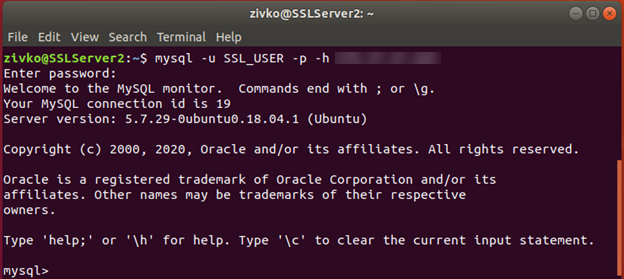
On the SSLServer2 machine, open the Terminal and execute the following command:
mysql -u SSL_USER -p -h <SSLServer1_IP>

After entering the password of SSL_USER, you’ll be able to connect to remote MySQL server that sits on the SSLServer1 machine:
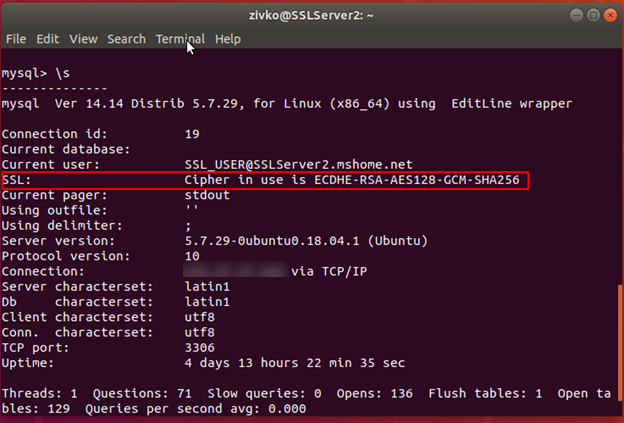
Now, type the \s to confirm the status of the server and confirm you are using a secure connection:

To confirm that MySQL server only accepts the secure connection and rejects insecure, try to connect with the same credentials but this time in connection string add –ssl-mode=disabled command:
mysql -u SSL_USER -p -h
After executing, the following error may appear:
ERROR 1045 (28000): Access denied for user ‘SSL_USER’@’SSLServer2_IP’ (using password: YES)

By now, you have set MySQL server with an SSL certificate signed by a locally generated certificate authority (CA), this is enough to provide secure encryption for incoming connections.
To provide the fully trusted relationship between the SSLServer1 and SSLServer2 machines, from SSLServer1 machine will be copied the CA certificate with the client certificate and the client key to the SSLServer2 machine, also the SSL_USER will be modified to require a trusted certificate.
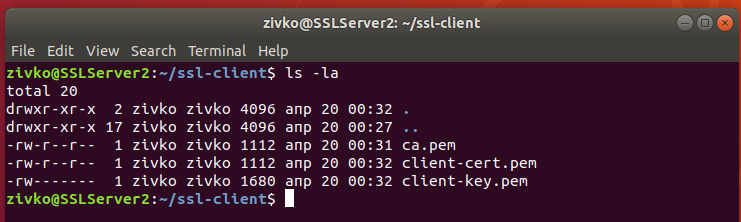
On the SSLServer2 machine first, create a folder where the client files will be placed:
mkdir ~/ssl-client
Use the SCP or SFTP to secure transfer files from one machine to another, or just use the cat command to read and copy the content from the CA certificate, client-cert.pem and client-key.pem files on the SSLServer1 machine and create those files and past the content in it on the SSLServer2 machine:
After the appropriate files are copied, alter the SSL_USER, and put the REQUIRE X509 clause:
ALTER USER ‘SSL_USER’@'<SSLServer2_IP>’ REQUIRE X509;
Now, when connecting to remote MySQL server with the SSL_USER user, the –ssl-key and –ssl-cert options must be specified, also it is recommended but not required the –ssl-ca option to be specified. If we connect to remote MySQL server without specifying client certificates:
mysql -u SSL_USER1 -p -h <SSLServer1_IP>
The following error message may appear:
ERROR 1045 (28000): Access denied for user ‘SSL_USER’@’SLLServer2_IP’ (using password: YES)
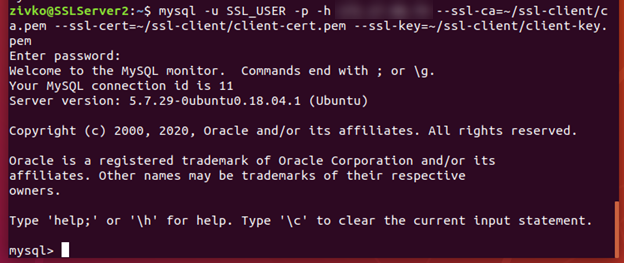
Let’s specify appropriate client certificate by adding –ssl-ca, –ssl-cert, and –ssl-key options to connection string to point to the files under the ~/ssl-client directory:
mysql -u SSL_USER -p -h SSLServer1_IP –ssl-ca=~/ssl-client/ca.pem –ssl-cert=~/ssl-client/client-cert.pem –ssl-key=~/ssl-client/client-key.pem
After you hit the Enter, you should connect to remote MySQL server successfully:
Using the –ssl-ca, –ssl-cert, and –ssl-key options and entering a path to the relevant files every time you want to connect to remote MySQL server is a tidiest and time-consuming job, so let’s optimizing and improve connection usability.
In the SSLServer2 machine, if the my.cnf file doesn’t exist under these locations:
- /etc/my.cnf
- /etc/mysql/my.cnf
- /usr/etc/my.cnf
- ~/.my.cnf
We can create one in the home directory:
~/.my.cnf:
Execute the following command:
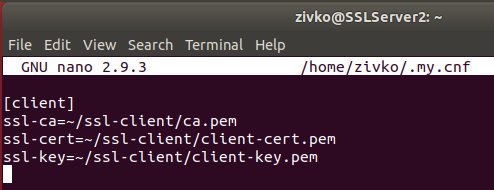
nano ~/.my.cnf
And in the .my.cnf file paste and save the following:
[client]
ssl-ca = ~/ssl-client/ca.pem
ssl-cert = ~/ssl-client/client-cert.pem
ssl-key = ~/ssl-client/client-key.pem
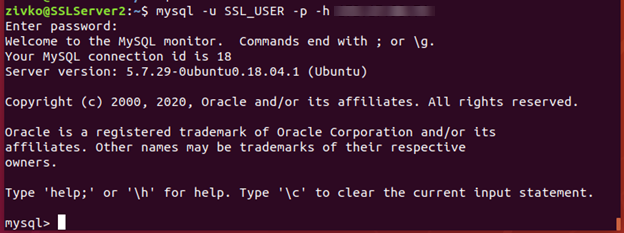
Now, you can connect to remote MySQL server without adding the –ssl-ca, –ssl-cert, and –ssl-key options in the connection string:
mysql -u SSL_USER1 -p -h <SSLServer1_IP>
Conclusion
In this article, you’ve seen how to set up a remote MySQL database connection. We kicked off by explaining the prerequisites for this to work, then we checked the status of SSL, made some modifications to allow users to connect to remote MySQL server, and finally tweaked some settings a little bit to make life easier and save some typing every time we connect remotely.

He is a prolific author of authoritative content related to SQL Server including a number of “platinum” articles (top 1% in terms of popularity and engagement). His writing covers a range of topics on MySQL and SQL Server including remote/linked servers, import/export, LocalDB, SSMS, and more.
In his part-time, Zivko likes basketball, foosball (table-soccer), and rock music.
See more about Marko at LinkedIn
View all posts by Marko Zivkovic
- How to connect to a remote MySQL server using SSL on Ubuntu - April 28, 2020
- How to install MySQL on Ubuntu - March 10, 2020
- Using SSH keys to connect to a remote MySQL Server - November 28, 2019