

Introduction
Microsoft Azure offers hundreds of cloud products, with more on the way. In the database space, Microsoft offers Azure Cosmos DB, a NoSQL database product. We can build Java, .Net, etc. applications around Cosmos DB resources. To extend this capability, this article will show how to query Cosmos DB directly from SQL Server.
The SQL Server database
We’ll start with the sample OFFICE_EQUIPMENT_DATABASE database seen in my earlier SQL Shack articles, with modifications. Built-in SQL Server 2014 Standard on a Windows 10 Education edition device, it has three tables, as shown below:
- OFFICES
- OFFICE_EQUIPMENT
- OFFICE_MANAGERS
And this stored procedure, SP_SQLSERVER_COSMOSDB_OFFICE_EQUIPMENT.
Run the first script in SQL Shack article Lever T-SQL to dynamically define duplicate SQL Server database table rows to build the basic OFFICE_EQUIPMENT_DATABASE database. Then, run the below script to build the resources in that database that we’ll need for this article:
|
1 2 3 4 5 6 7 8 9 10 11 12 13 14 15 16 17 18 19 20 21 22 23 24 25 26 27 28 29 30 31 32 33 34 35 36 37 38 39 40 41 42 43 44 45 46 47 48 49 50 51 52 53 54 55 56 57 58 59 60 61 62 63 64 65 66 67 68 69 70 71 72 73 74 75 76 77 78 79 80 81 82 83 84 85 86 87 88 89 90 91 92 93 94 95 96 97 98 99 100 101 102 103 104 105 106 107 108 109 110 111 112 113 114 |
USE [OFFICE_EQUIPMENT_DATABASE] CREATE TABLE [dbo].[OFFICES]( [OFFICE_ID] [int] NOT NULL, [OFFICE_MANAGER_ID] [int] NOT NULL, [CITY] [nchar](50) NOT NULL, [STATE_OR_PROVINCE] [nchar](2) NOT NULL, [FLOOR_SPACE] [int] NOT NULL ) GO CREATE TABLE [dbo].[OFFICE_MANAGERS]( [OFFICE_MANAGER_ID] [int] NOT NULL, [FIRST_NAME] [nvarchar](50) NOT NULL, [LAST_NAME] [nvarchar](50) NOT NULL, [EMAIL] [nvarchar](75) NOT NULL, [SALARY] [money] NOT NULL ) GO INSERT [dbo].[OFFICE_MANAGERS] ([OFFICE_MANAGER_ID], [FIRST_NAME], [LAST_NAME], [EMAIL], [SALARY]) VALUES (1, N'Jan', N'Dodonna', N'jdodonna@yavin.edu', 250000.0000) GO INSERT [dbo].[OFFICE_MANAGERS] ([OFFICE_MANAGER_ID], [FIRST_NAME], [LAST_NAME], [EMAIL], [SALARY]) VALUES (2, N'James', N'Kirk', N'jtkirk@ncc1701.gov', 5450000.0000) GO INSERT [dbo].[OFFICE_MANAGERS] ([OFFICE_MANAGER_ID], [FIRST_NAME], [LAST_NAME], [EMAIL], [SALARY]) VALUES (3, N'Joseph', N'Crater', N'judgecrater@erehwon.edu', 1350000.0000) GO INSERT [dbo].[OFFICE_MANAGERS] ([OFFICE_MANAGER_ID], [FIRST_NAME], [LAST_NAME], [EMAIL], [SALARY]) VALUES (4, N'Charles', N'Kane', N'kane@xanadu.org', 13050000.0000) GO INSERT [dbo].[OFFICE_MANAGERS] ([OFFICE_MANAGER_ID], [FIRST_NAME], [LAST_NAME], [EMAIL], [SALARY]) VALUES (5, N'Randy', N'Stone', N'rstone@chicagoilstar.com', 100000.0000) GO INSERT [dbo].[OFFICE_MANAGERS] ([OFFICE_MANAGER_ID], [FIRST_NAME], [LAST_NAME], [EMAIL], [SALARY]) VALUES (6, N'Britt', N'Ponset', N'ponset@outwest.edu', 75000.0000) INSERT [dbo].[OFFICES] ([OFFICE_ID], [OFFICE_MANAGER_ID], [CITY], [STATE_OR_PROVINCE], [FLOOR_SPACE]) VALUES (1, 3, N'Pasadena', N'CA', 2500) GO INSERT [dbo].[OFFICES] ([OFFICE_ID], [OFFICE_MANAGER_ID], [CITY], [STATE_OR_PROVINCE], [FLOOR_SPACE]) VALUES (2, 6, N'Phoenix', N'AZ', 3000) GO INSERT [dbo].[OFFICES] ([OFFICE_ID], [OFFICE_MANAGER_ID], [CITY], [STATE_OR_PROVINCE], [FLOOR_SPACE]) VALUES (3, 5, N'Denver', N'CO', 1750) GO INSERT [dbo].[OFFICES] ([OFFICE_ID], [OFFICE_MANAGER_ID], [CITY], [STATE_OR_PROVINCE], [FLOOR_SPACE]) VALUES (4, 4, N'Dallas', N'TX', 2500) GO INSERT [dbo].[OFFICES] ([OFFICE_ID], [OFFICE_MANAGER_ID], [CITY], [STATE_OR_PROVINCE], [FLOOR_SPACE]) VALUES (5, 2, N'Boise', N'ID', 2750) GO INSERT [dbo].[OFFICES] ([OFFICE_ID], [OFFICE_MANAGER_ID], [CITY], [STATE_OR_PROVINCE], [FLOOR_SPACE]) VALUES (6, 1, N'Vancouver', N'BC', 3125) GO -- Add the OFFICE_ID column to the OFFICE_EQUIPMENT table, -- and update OFFICE_ID values for some of the rows ALTER TABLE [dbo].[OFFICE_EQUIPMENT] ADD OFFICE_ID INT NULL; GO UPDATE OFFICE_EQUIPMENT SET OFFICE_ID = 1 WHERE OFFICE_EQUIPMENT_ID IN (8, 17, 18) UPDATE OFFICE_EQUIPMENT SET OFFICE_ID = 2 WHERE OFFICE_EQUIPMENT_ID IN (5, 16) UPDATE OFFICE_EQUIPMENT SET OFFICE_ID = 3 WHERE OFFICE_EQUIPMENT_ID IN (4, 14) UPDATE OFFICE_EQUIPMENT SET OFFICE_ID = 4 WHERE OFFICE_EQUIPMENT_ID IN (20, 22) /****** Object: StoredProcedure [dbo].[SP_SQLSERVER_COSMOSDB_OFFICE_EQUIPMENT] Script Date: 7/18/2020 2:00:16 PM ******/ SET ANSI_NULLS ON GO SET QUOTED_IDENTIFIER ON GO CREATE PROCEDURE [dbo].[SP_SQLSERVER_COSMOSDB_OFFICE_EQUIPMENT] @OFFICE_ID int = NULL AS /* To use: EXEC SP_SQLSERVER_COSMOSDB_OFFICE_EQUIPMENT EXEC SP_SQLSERVER_COSMOSDB_OFFICE_EQUIPMENT 1 EXEC SP_SQLSERVER_COSMOSDB_OFFICE_EQUIPMENT -3 */ SELECT OE.OFFICE_EQUIPMENT_NAME AS 'Office Equipment Name', COE.OFFICE_ID AS 'Office ID', OE.PURCHASE_DATE AS 'Purchase Date', COM.FIRST_NAME + ' ' + COM.LAST_NAME AS 'Office Manager' FROM OFFICE_EQUIPMENT OE LEFT OUTER JOIN ( SELECT CITY, FLOOR_SPACE, OFFICE_ID, OFFICE_MANAGER_ID, STATE_OR_PROVINCE FROM OPENQUERY(COSMOSDB, 'SELECT CITY, FLOOR_SPACE, OFFICE_ID, OFFICE_MANAGER_ID, STATE_OR_PROVINCE FROM OFFICES') ) COE ON OE.OFFICE_ID = COE.office_id LEFT OUTER JOIN ( SELECT OFFICE_MANAGER_ID, FIRST_NAME, LAST_NAME, EMAIL, SALARY FROM OPENQUERY(COSMOSDB, 'SELECT OFFICE_MANAGER_ID, FIRST_NAME, LAST_NAME, EMAIL, SALARY FROM OFFICE_MANAGERS') ) COM ON COE.OFFICE_MANAGER_ID = COM.OFFICE_MANAGER_ID WHERE @OFFICE_ID IS NULL OR OE.OFFICE_ID = @OFFICE_ID GO |
We’ll use Azure Cosmos DB to host data that the SQL Server stored procedure will query. Although Azure products can become expensive, depending on data volumes and product use, Azure offers a free trial pricing plan. The data we’ll host will fall within the trial plan limits. This SQL Shack article,Getting Started with Azure Cosmos DB, explains how to get going with it, so we won’t cover that topic in this article. For this article, we’ll need an Azure Cosmos DB resource with firewall and virtual network settings that will accept queries that originate from the internet.
Placing data in the Azure Cosmos DB
The original OFFICE_EQUIPMENT_DATABASE table has two tables that we’ll clone over to Cosmos DB. We’ll focus first on the original OFFICES table. This table has six rows. The data we’ll import needs a JSON format, so first, we must convert the source data. The screenshot below shows the original data:
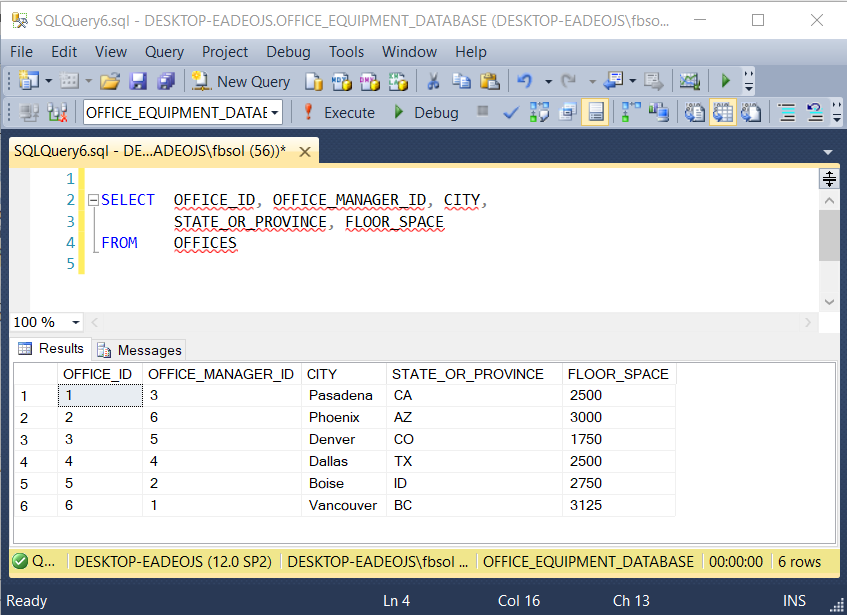
This query builds the result set seen in the above screenshot:
|
1 2 3 |
SELECT OFFICE_ID, OFFICE_MANAGER_ID, CITY, STATE_OR_PROVINCE, FLOOR_SPACE FROM OFFICES |
In an earlier SQL Shack article, How to import/export JSON data using SQL Server 2016, Marko Zivkovic explained that in SQL Server 2016 and later, the FOR JSON clause export data as JSON. For earlier SQL Server versions, we’ll use the STUFF< function, as shown below:
|
1 2 3 4 5 6 7 8 9 10 11 12 |
SELECT '[' + STUFF ( ( SELECT ',{"OFFICE_ID":"' + CAST(o.office_id AS NVARCHAR(MAX)) + '",' + + '"OFFICE_MANAGER_ID":"' + CAST(o.office_manager_id AS NVARCHAR(MAX)) + '",' + + '"CITY":"' + RTRIM(CAST(o.CITY AS VARCHAR(50))) + '",' + + '"STATE_OR_PROVINCE":"' + CAST(o.STATE_OR_PROVINCE AS NVARCHAR(MAX)) + '",' + + '"FLOOR_SPACE":"' + CAST(o.FLOOR_SPACE AS NVARCHAR(MAX)) + '"}' FROM offices o FOR XML PATH(''), TYPE ).value('.', 'varchar(max)'),1,1,'' ) + ']'; |
Every source table column becomes an expression in the SELECT clause. If needed, JSONLint, for example, can validate the output JSON format. In this query, the FOR XML PATH clause places each row into a formatted JSON row, with key/value pairs that match the column/value pairs of the original rows. To get the data ready, the empty (”) value in the FOR XML PATH() clause at line 10 separates each XML row with a default comma. At line 11, the STUFF function arguments format the result set as a string and remove the leading “.” in the original data. Save the finished result XML-format result set as a JSON file. This file will become the data we’ll import.
A Cosmos DB database has zero or more collections, which correspond to SQL Server tables. A collection has zero or more documents, which correspond to SQL Server table rows. In the Cosmos DB
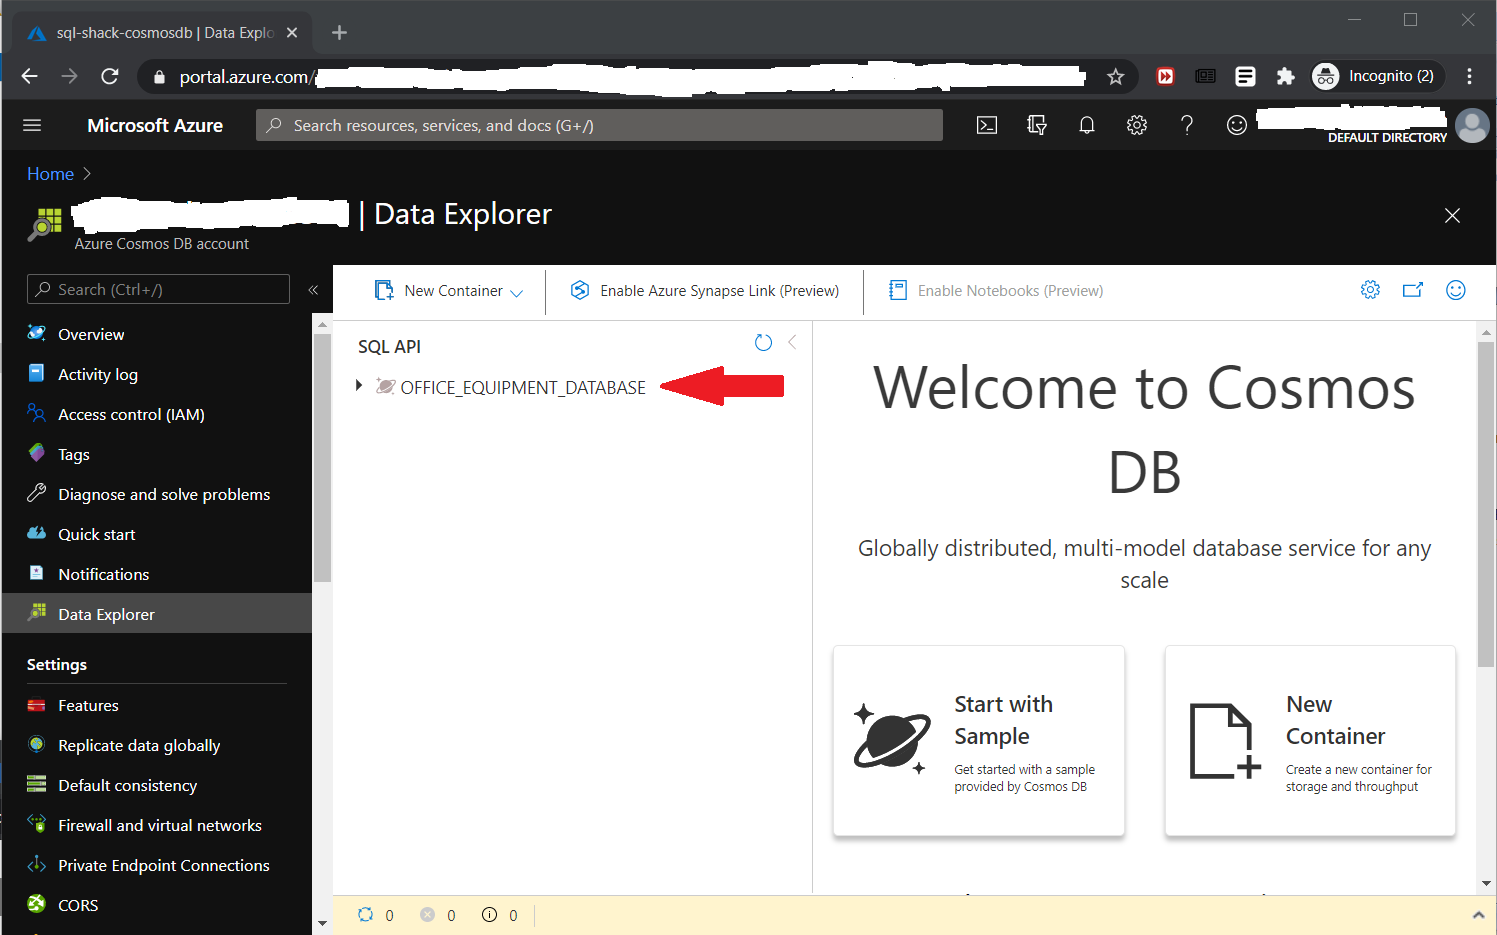
OFFICE_EQUIPMENT_DATABASE database, we’ll create a collection called OFFICES, and then place the OFFICES table rows from the SQL Server OFFICE_EQUIPMENT_DATABASE into that collection. Similarly, create an OFFICE_MANAGERS collection. First, create a database called OFFICE_EQUIPMENT_DATABASE beforehand. This screenshot shows the new database:
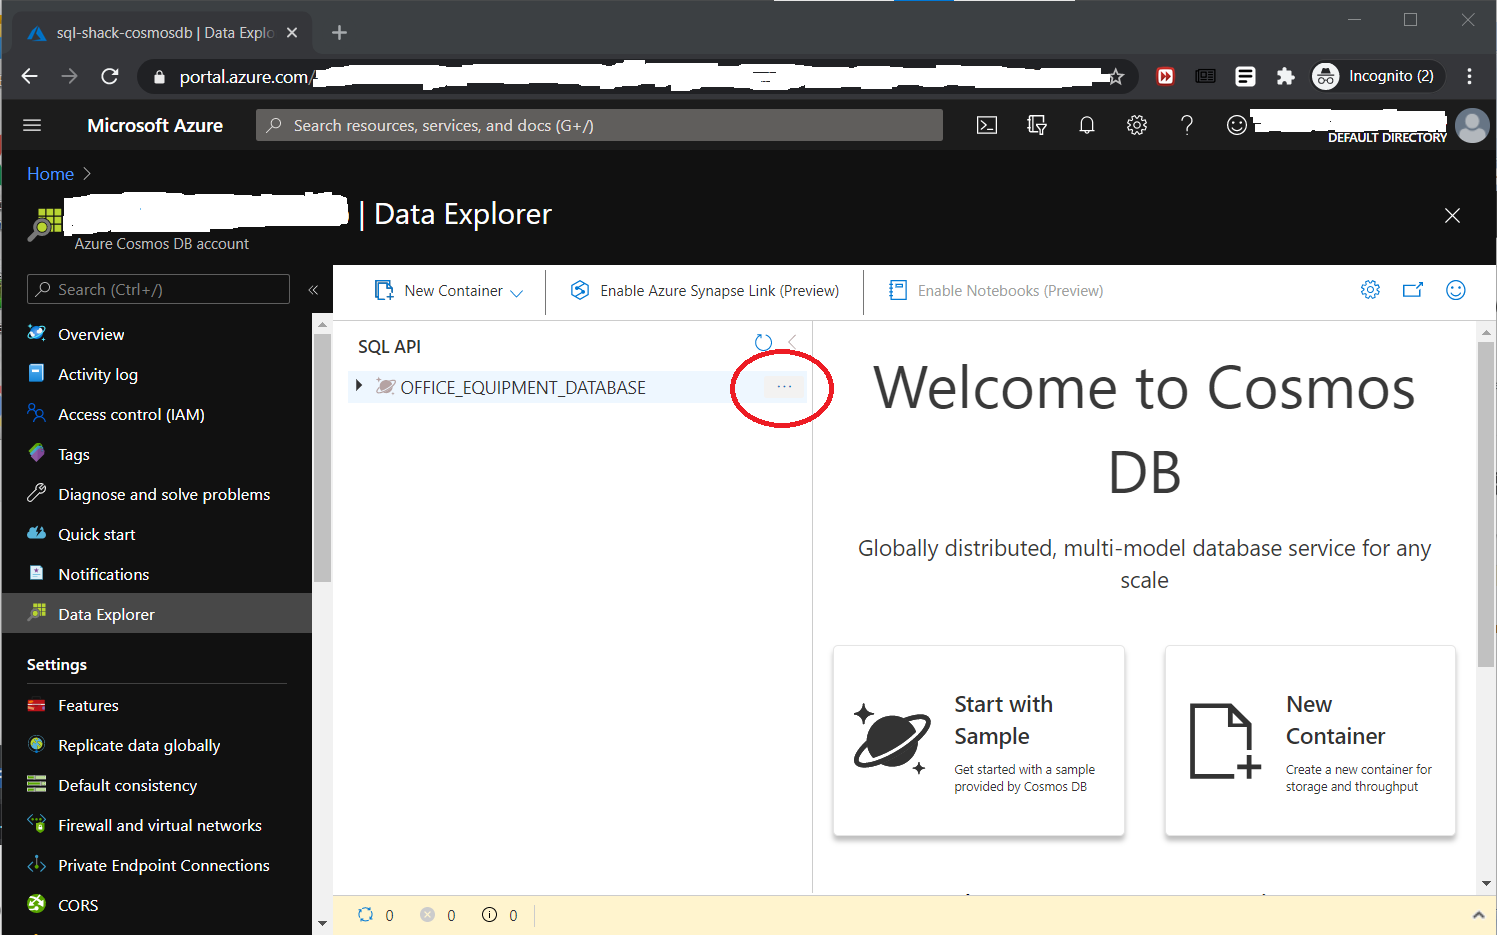
Click OFFICE_EQUIPMENT_DATABASE and click the dots at the right, as shown in this screenshot:
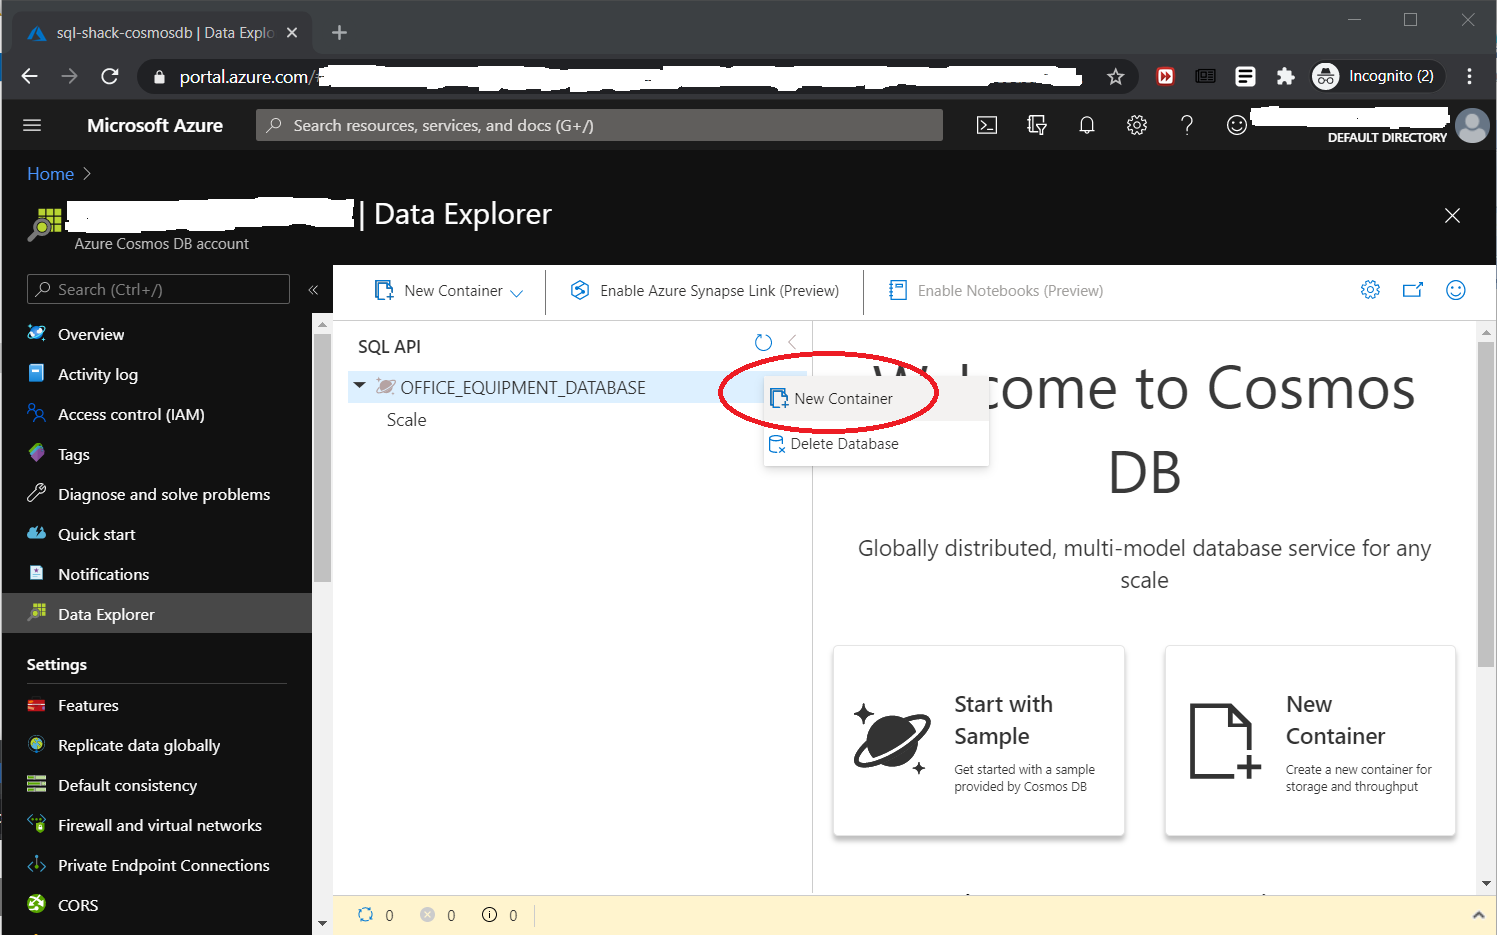
Drill down to New Container, as shown in this screenshot:
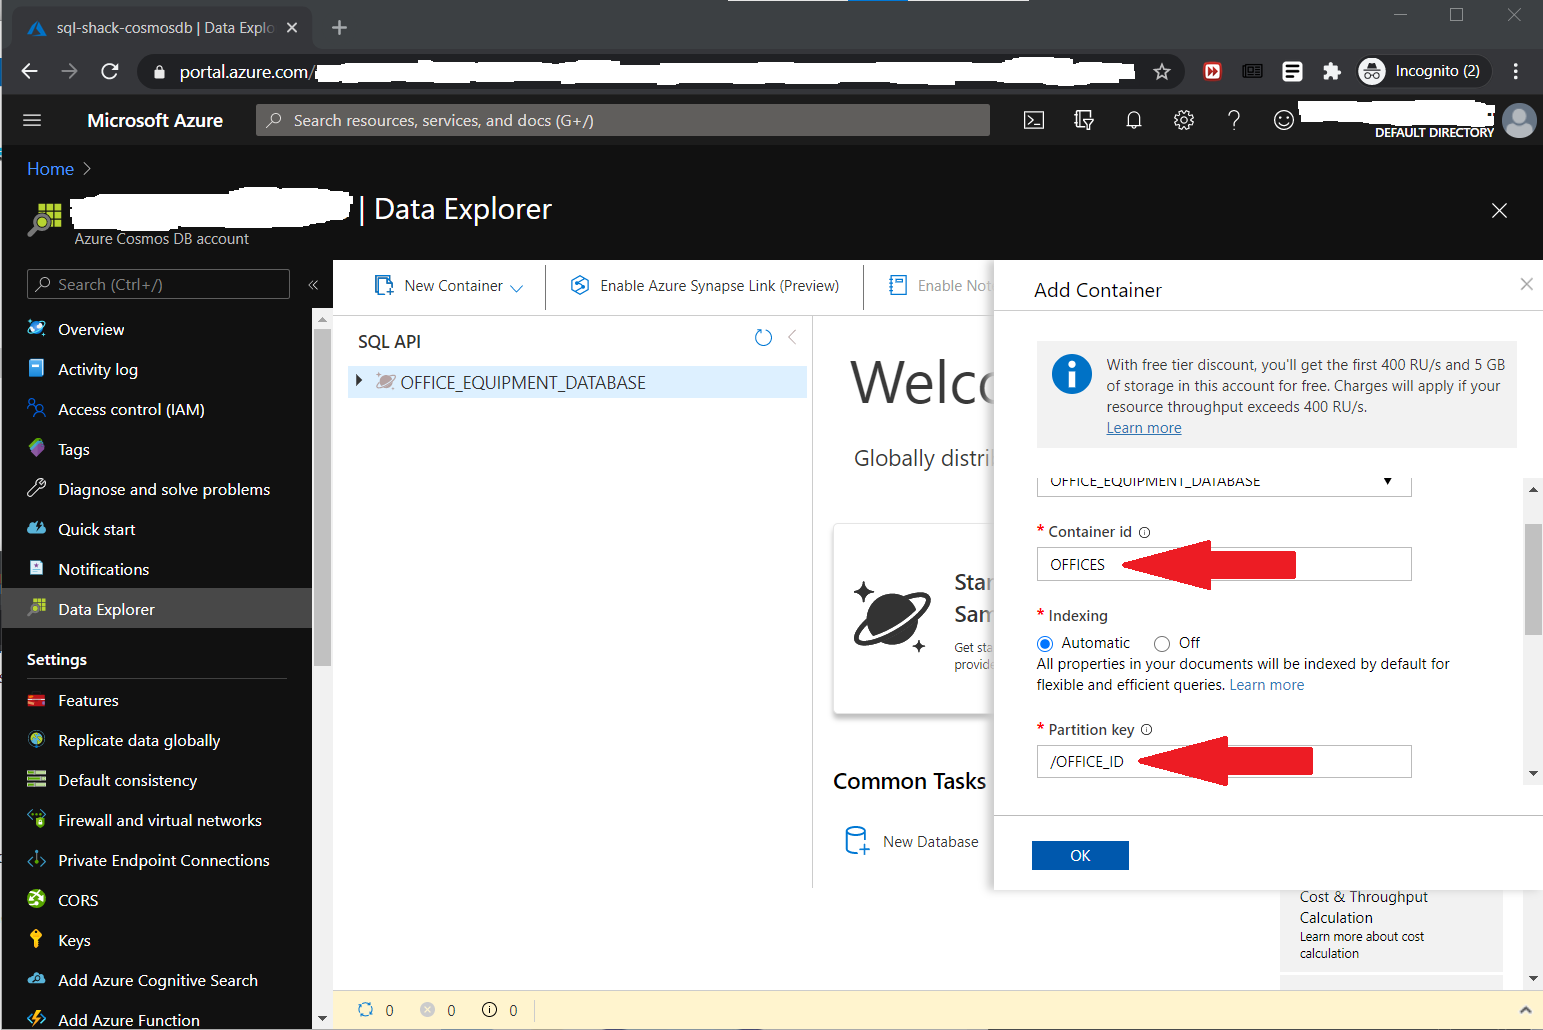
This opens the Add Container pane. We’ll call the container “OFFICES” and we’ll add OFFICE_ID as the partition key, as seen in this screenshot:
Click OK. Then, click OFFICES -> Itemsand drill into Upload Items, as seen in this screenshot:
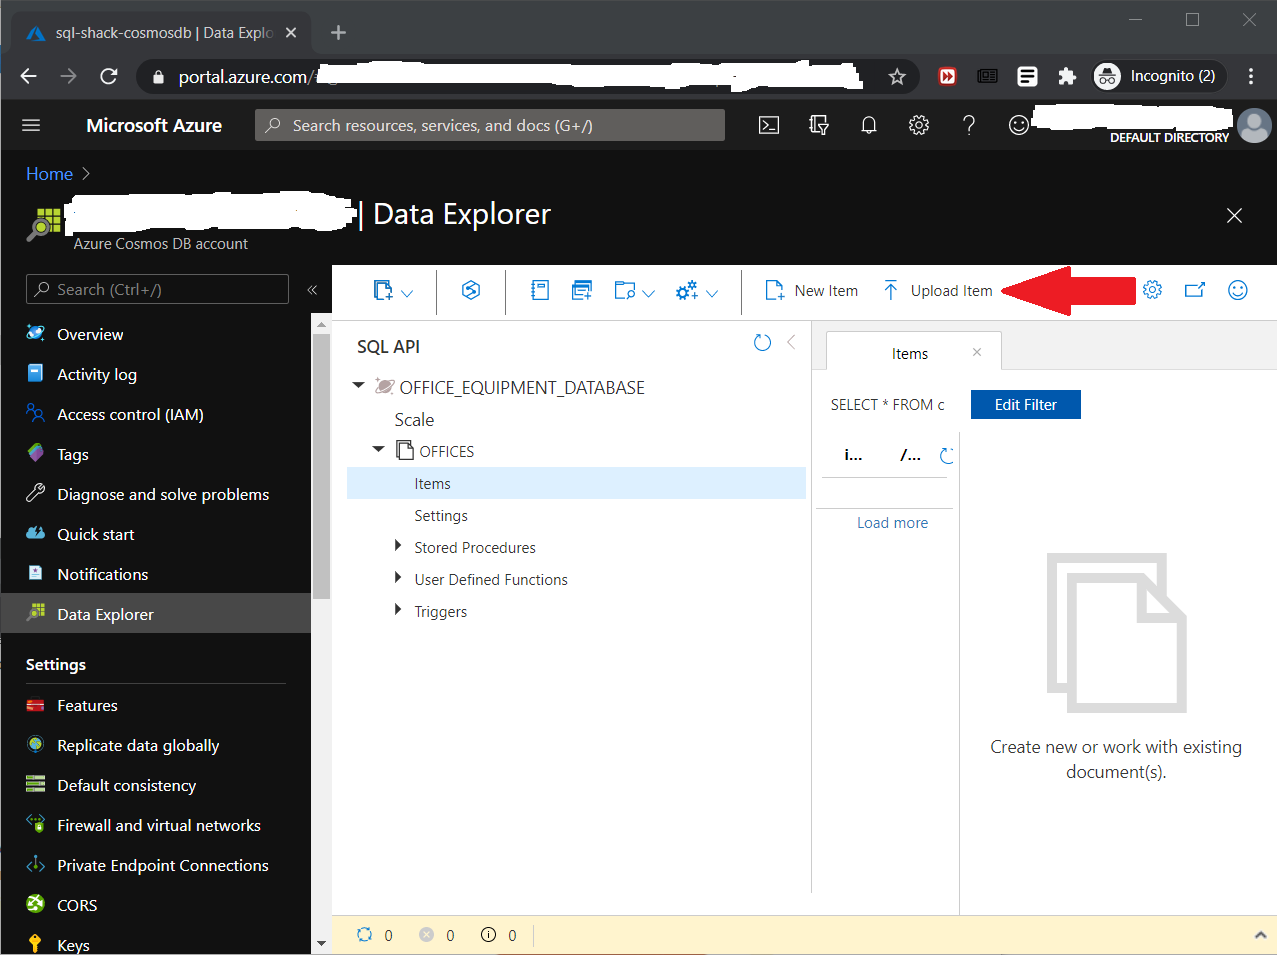
Click Upload Item to open the Upload Items pane, as seen in this screenshot:
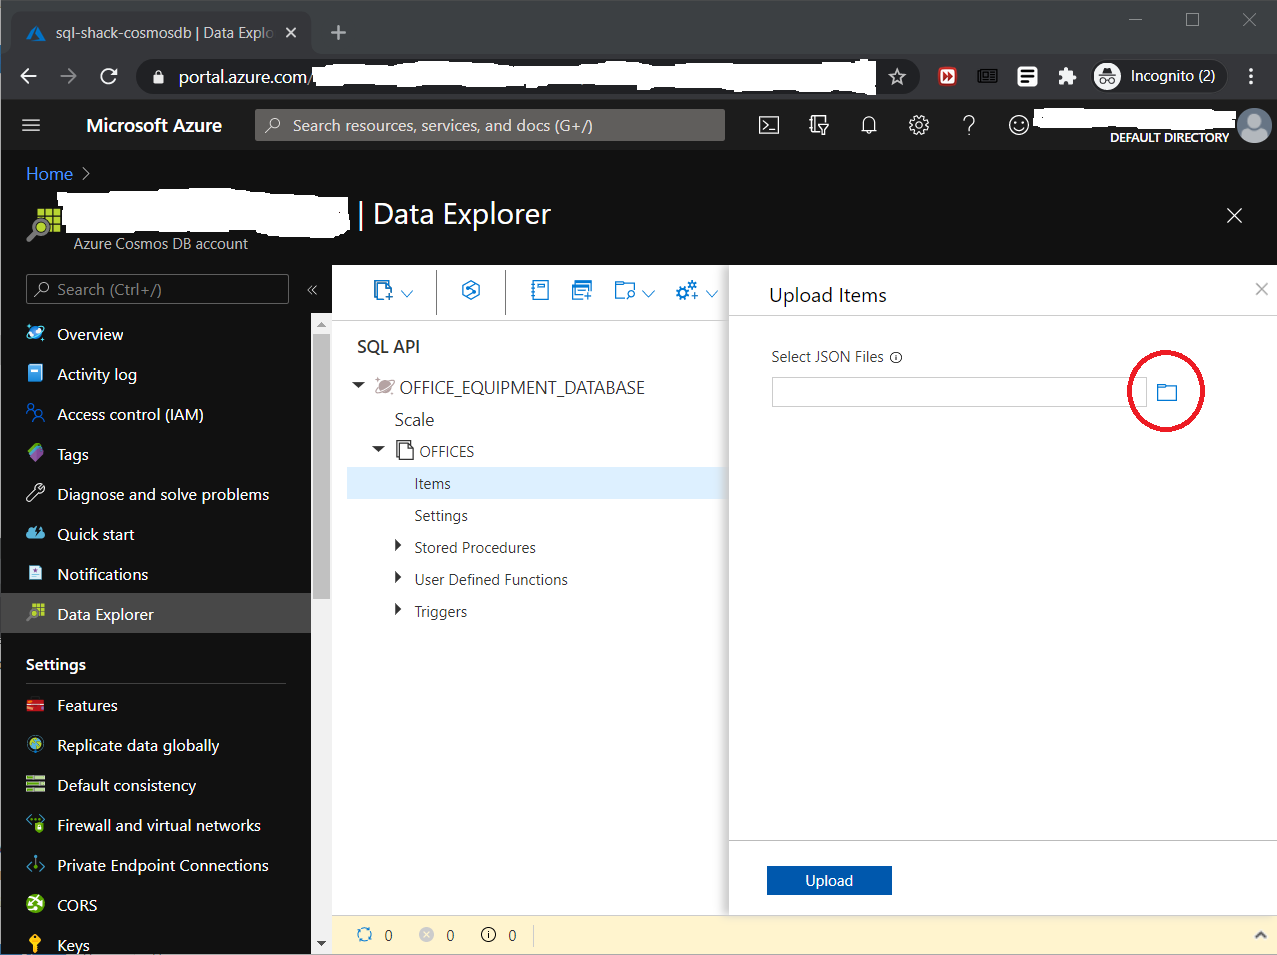
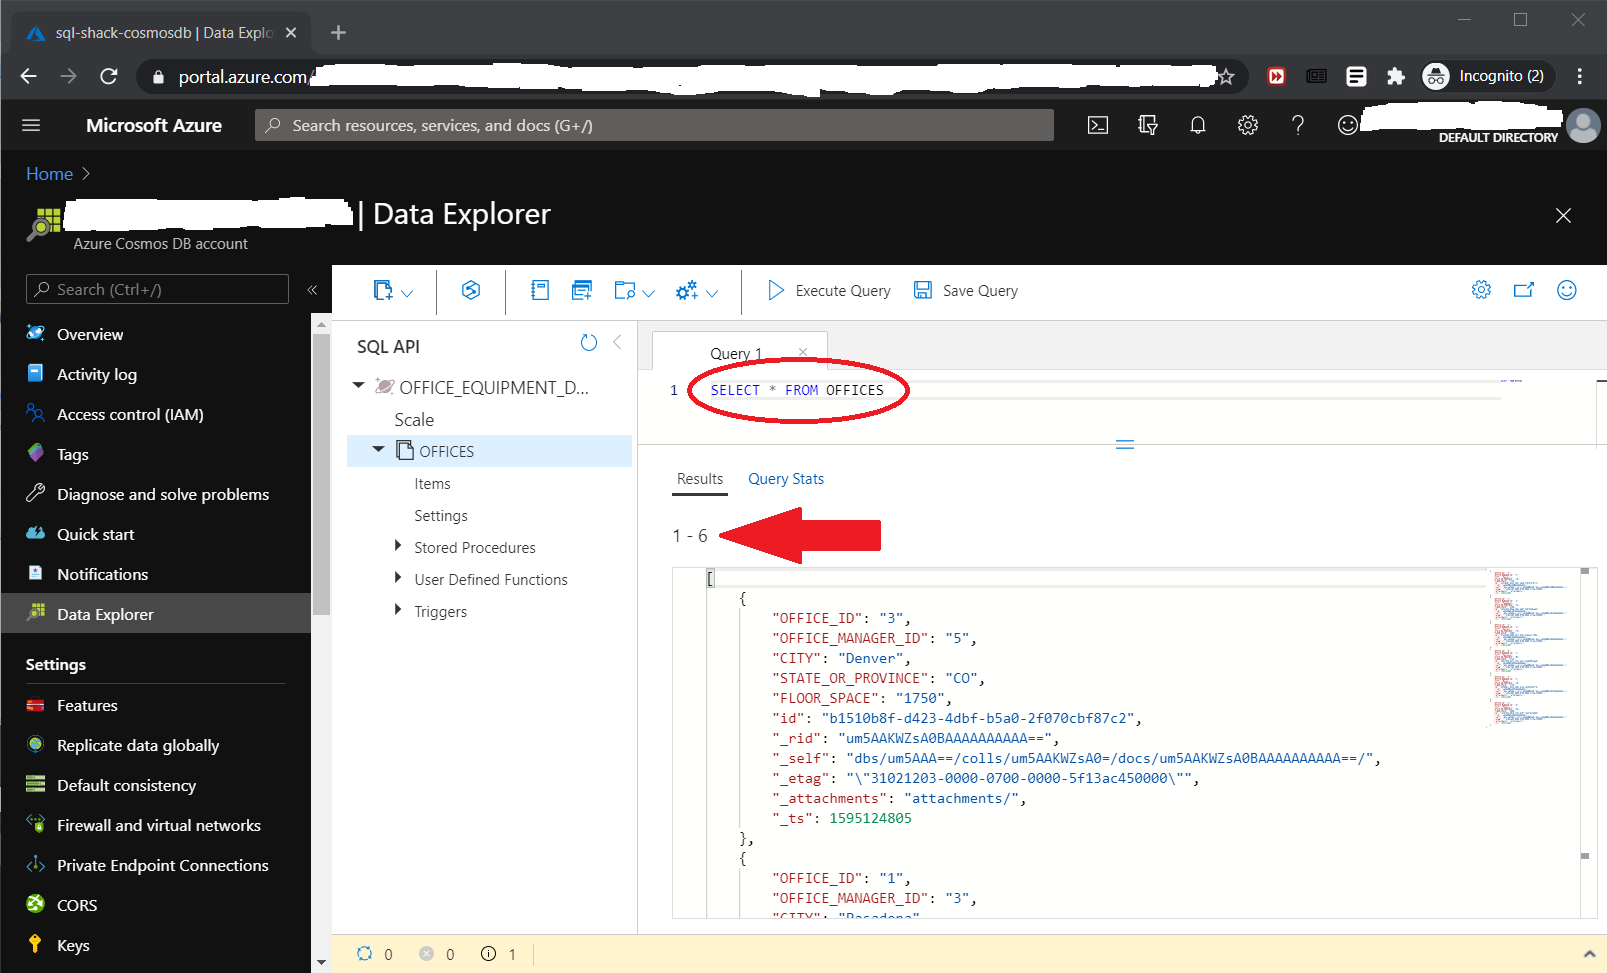
Click the circled icon to open a file picker, to upload the JSON format OFFICES table data file we built earlier. Verify that the upload steps worked with the query:
|
1 |
SELECT * FROM OFFICES |
You can see in the below screenshot:
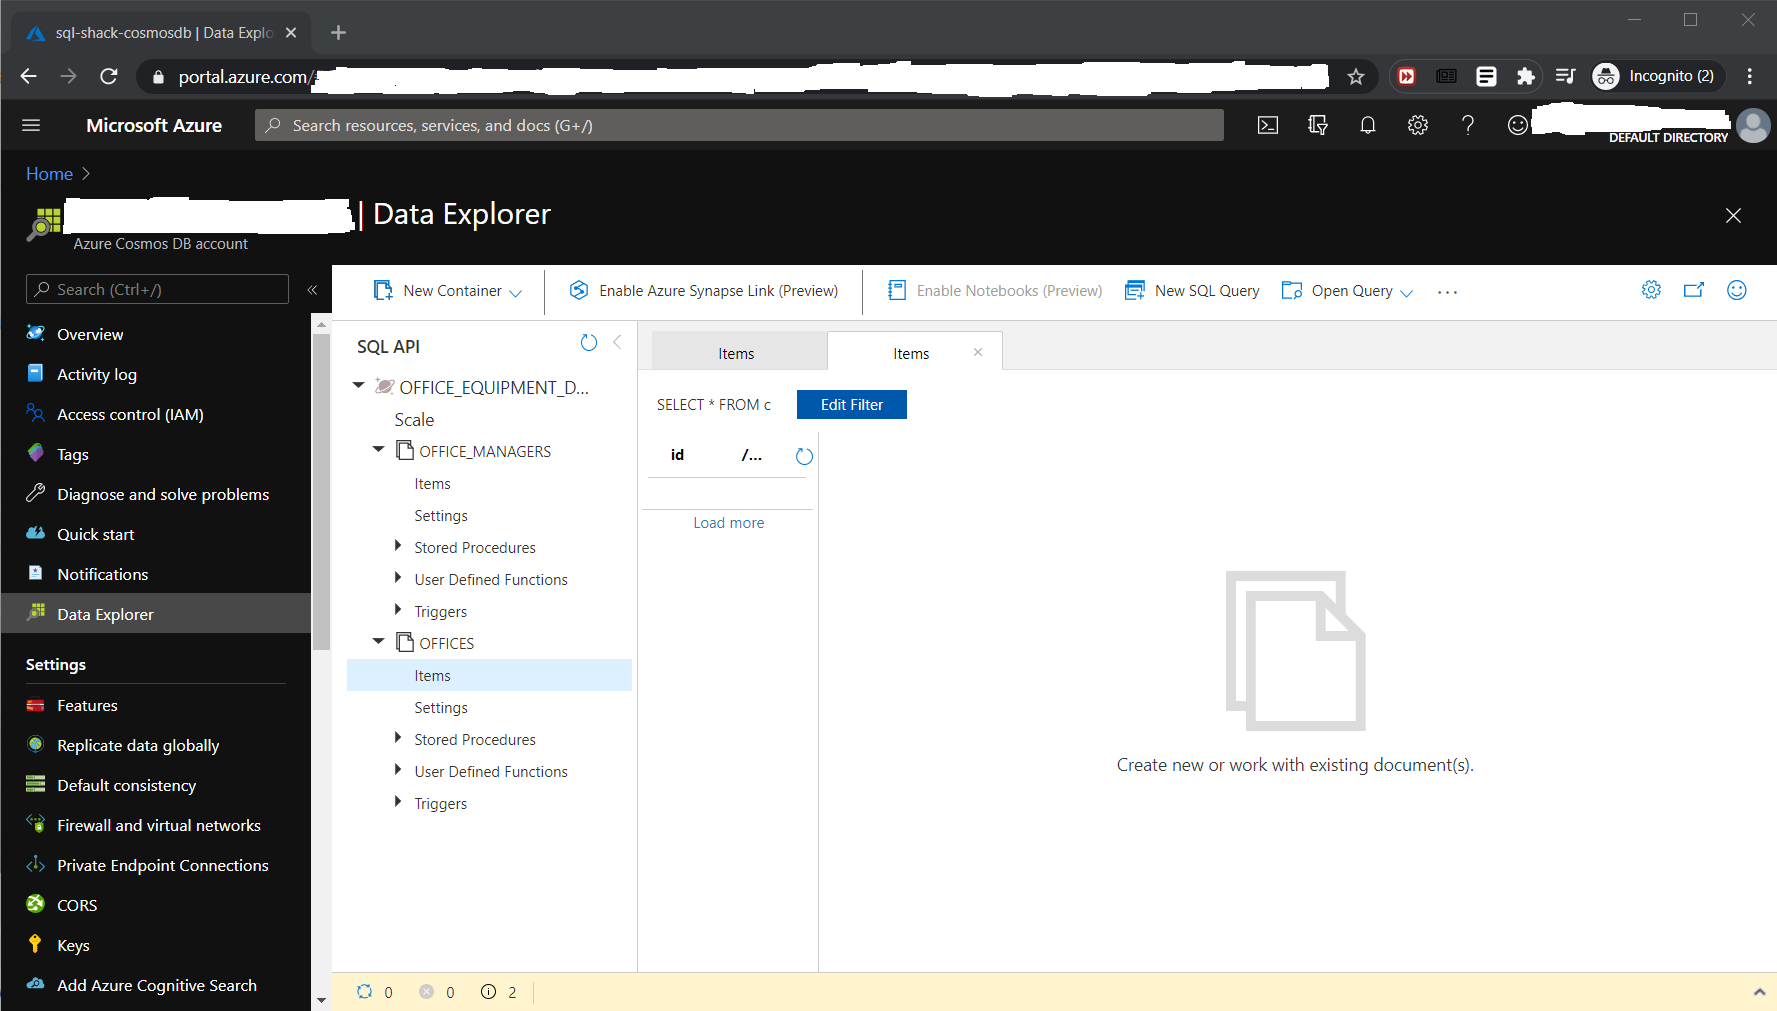
With similar steps, use the SQL Server OFFICE_MANAGERS table to create the OFFICE_MANAGERS collection OFFICE_EQUIPMENT_DATABASE. At that point, we can access both collections in the Data Explorer, as seen in this screenshot:
Configure the ODBC connection
We need to make the Cosmos DB resource visible to our SQL Server instance. We’ll build a new ODBC connection for this, with a specific Microsoft tool. Starting at this page, download the relevant MSI file.
On that page, Microsoft provides the Microsoft Azure Cosmos DB 64-bit.msi (installs the ODBC Data Sources 64-bit application) and Microsoft Azure Cosmos DB ODBC 32×64-bit.msi (installs the ODBC Data Sources 32-bit application) installation files as downloads for 64-bit Windows devices. This article relied on the second MSI file.
At the Azure portal, select the OFFICE_EQUIPMENT_DATABASE, and in the Settings category, click Keys, as shown in this screenshot:
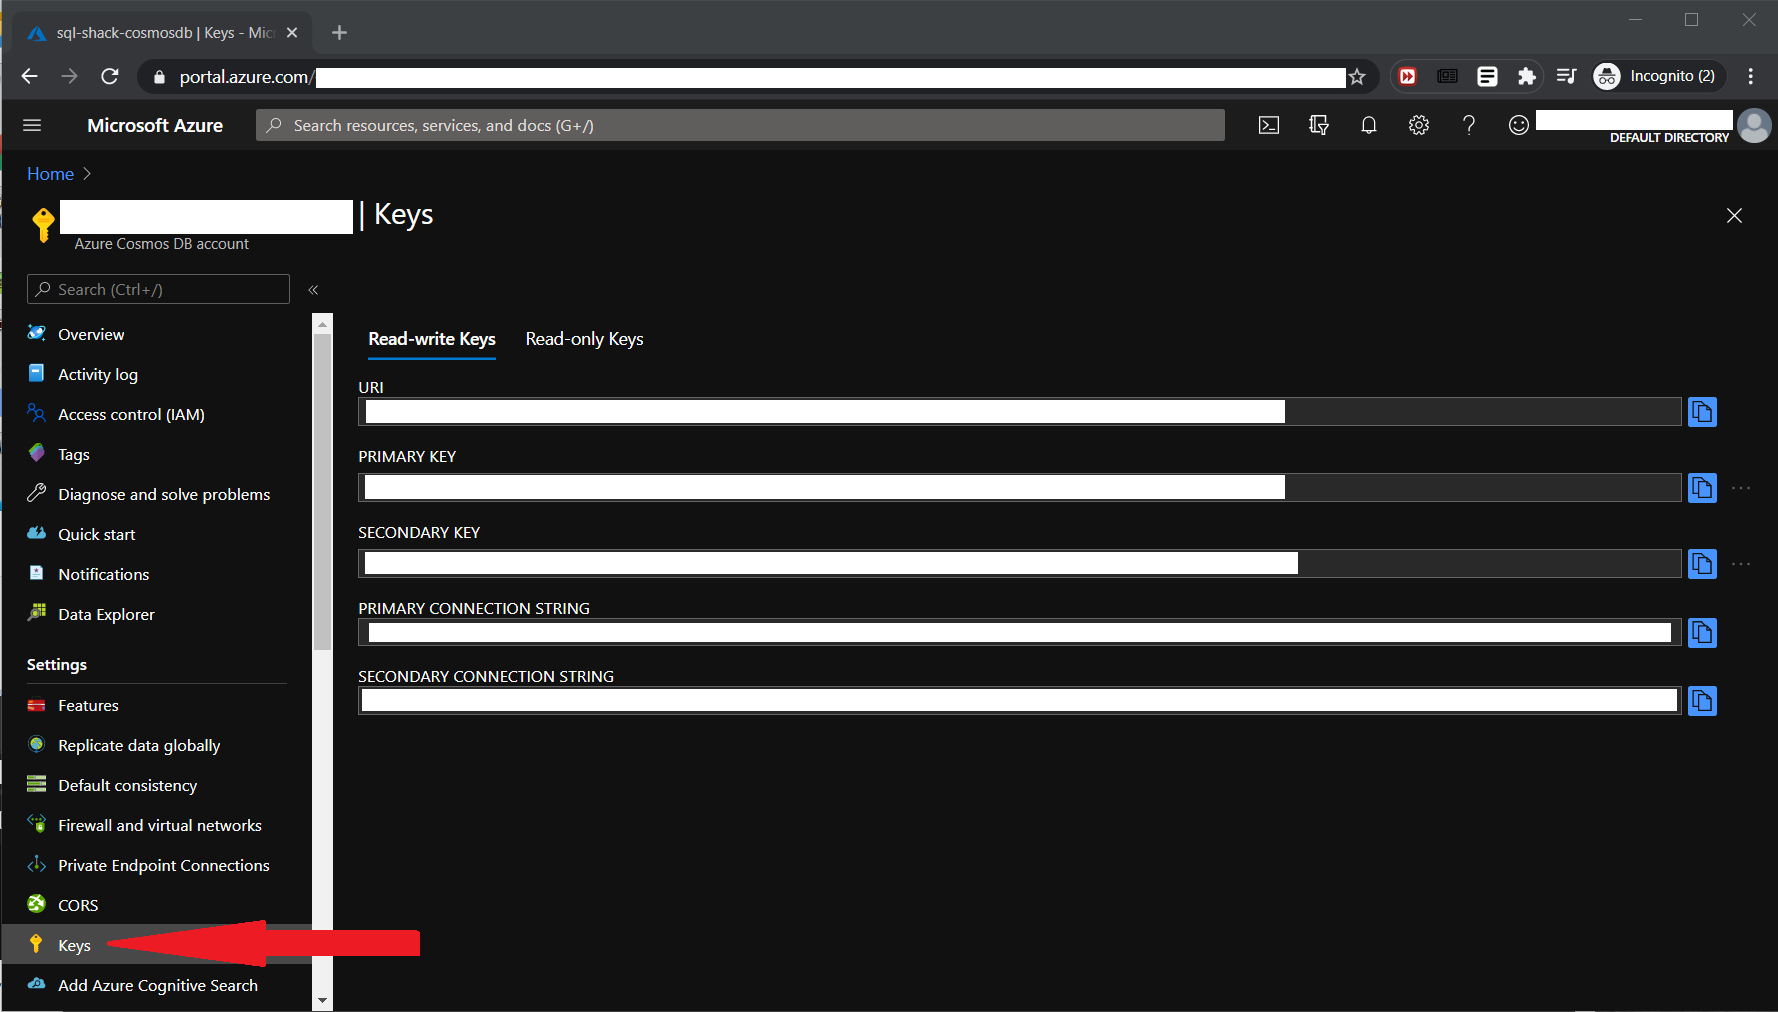
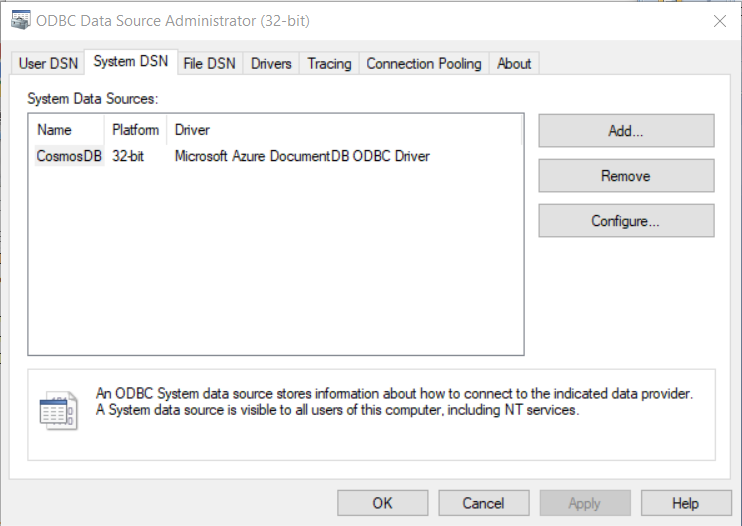
Copy the URI and PRIMARY KEY values, blanked out in the screenshot above. Next, open the ODBC Data Source Administrator tool, and click the System DSN tab, as shown in this screenshot:
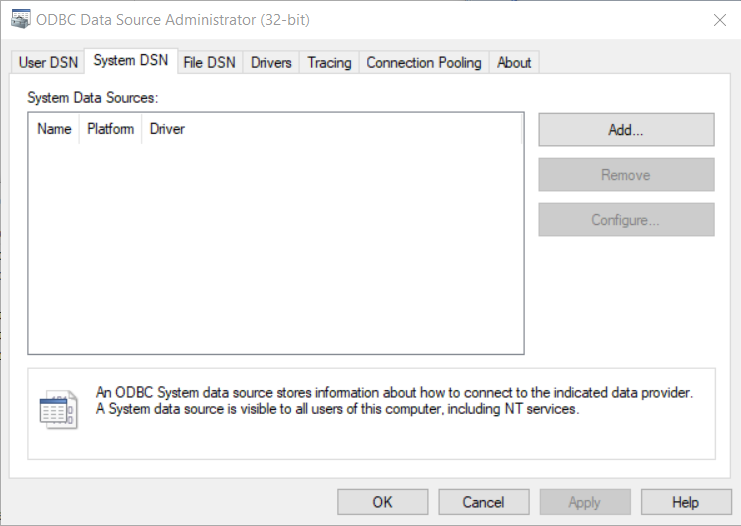
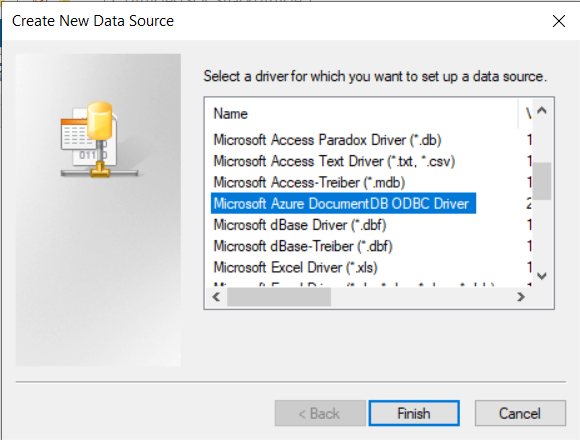
Click Add to open the Create New Data Source window. Scroll down to Microsoft Azure DocumentDB ODBC Driver and click Finish, as shown in this screenshot:
The DocumentDB ODBC Driver DSN Setup window will open, as shown in this screenshot:
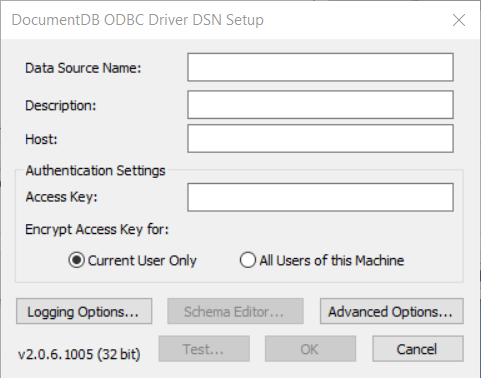
We copied values from the Keys page earlier; place the URI value in the Host box, and the PRIMARY KEY value in the Access Key box. Except for the Host textbox value – blanked out in this screenshot – it should have these values as shown:

For this connection, ignore Logging Options, Schema Editor, and Advanced Options; click Test… to test the driver, and finally, click OK. The Administrator tool System DSN tab will list the driver, as shown in this screenshot:
Click OK to close the tool. When building the ODBC connection, the first 64-bit MSI file might look like the logical choice to install the tool. However, it could lead to an error message, as shown in this screenshot:
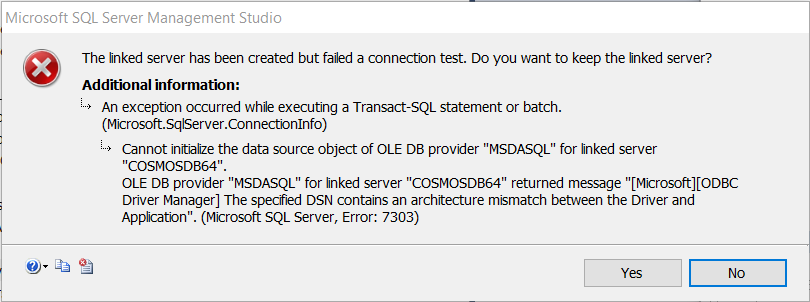
In that case, try the second 32×64-bit MSI file, and proceed.
Build a Linked Server
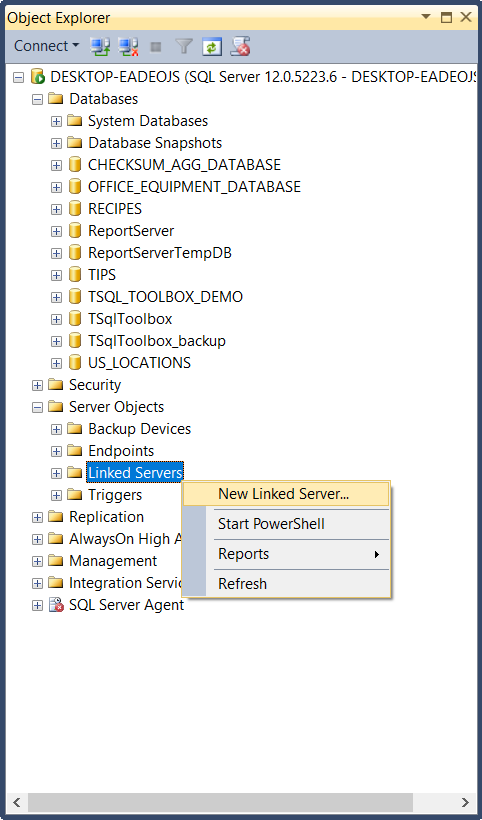
In a SQL Server instance, we can use a SQL Server Linked Server to work with a data resource outside of that instance. From the OFFICE_EQUIPMENT SQL Server database that we built, we want to query data in the OFFICE_EQUIPMENT Cosmos DB database. We just built an ODBC driver that can see that database, so we have everything we need to build a Linked Server. First, right-click Linked Servers in Object Explorer, and click New Linked Server… as shown in this screenshot:
The New Linked Server dialog box will open. Fill it in as shown in this screenshot:
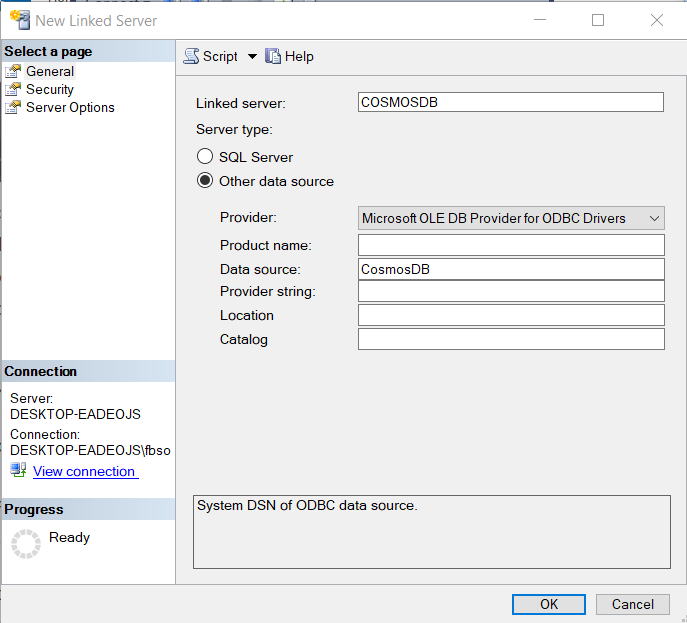
In the first textbox, we named this Linked Server‘ COSMOSDB’. In the Provider dropdown, pick the Microsoft OLE DB Provider for ODBC Drivers option. In the Data source textbox, use CosmosDB – the name of the ODBC driver we built above. Click OK. Drill down to see the collections in the SQL Server Object Explorer, as shown in this screenshot:

Link an Azure Cosmos DB into a SQL Server Stored Procedure
The OFFICE_EQUIPMENT_DATABASE has one stored procedure, SP_SQLSERVER_COSMOSDB_OFFICE_EQUIPMENT , with this code:
|
1 2 3 4 5 6 7 8 9 10 11 12 13 14 15 16 17 18 19 20 21 22 23 24 25 26 27 28 29 30 31 32 33 34 35 36 37 38 39 |
CREATE PROCEDURE [dbo].[SP_SQLSERVER_COSMOSDB_OFFICE_EQUIPMENT] @OFFICE_ID int = NULL AS /* To use: EXEC SP_SQLSERVER_COSMOSDB_OFFICE_EQUIPMENT EXEC SP_SQLSERVER_COSMOSDB_OFFICE_EQUIPMENT 1 EXEC SP_SQLSERVER_COSMOSDB_OFFICE_EQUIPMENT -3 */ SELECT OE.OFFICE_EQUIPMENT_NAME AS 'Office Equipment Name', COE.OFFICE_ID AS 'Office ID', OE.PURCHASE_DATE AS 'Purchase Date', COM.FIRST_NAME + ' ' + COM.LAST_NAME AS 'Office Manager' FROM OFFICE_EQUIPMENT OE LEFT OUTER JOIN ( SELECT CITY, FLOOR_SPACE, OFFICE_ID, OFFICE_MANAGER_ID, STATE_OR_PROVINCE FROM OPENQUERY(COSMOSDB, 'SELECT CITY, FLOOR_SPACE, OFFICE_ID, OFFICE_MANAGER_ID, STATE_OR_PROVINCE FROM OFFICES') ) COE ON OE.OFFICE_ID = COE.office_id LEFT OUTER JOIN ( SELECT OFFICE_MANAGER_ID, FIRST_NAME, LAST_NAME, EMAIL, SALARY FROM OPENQUERY(COSMOSDB, 'SELECT OFFICE_MANAGER_ID, FIRST_NAME, LAST_NAME, EMAIL, SALARY FROM OFFICE_MANAGERS') ) COM ON COE.OFFICE_MANAGER_ID = COM.OFFICE_MANAGER_ID WHERE @OFFICE_ID IS NULL OR OE.OFFICE_ID = @OFFICE_ID WHERE @OFFICE_ID IS NULL OR OE.OFFICE_ID = @OFFICE_ID |
Also seen in the following screenshot:
At line 3, this stored procedure has one integer parameter, @OFFICE_ID, which can have a NULL value. It has two derived tables, one between lines 19 and 26, and one between lines 29 and 35.
The first derived table has a conventional SELECT clause, as shown in this code:
|
1 2 3 4 5 6 7 8 |
( SELECT CITY, FLOOR_SPACE, OFFICE_ID, OFFICE_MANAGER_ID, STATE_OR_PROVINCE FROM OPENQUERY(COSMOSDB, 'SELECT CITY, FLOOR_SPACE, OFFICE_ID, OFFICE_MANAGER_ID, STATE_OR_PROVINCE FROM OFFICES') ) COE |
In the FROM clause, the OPENQUERY function supplies the basic set of rows, from the Azure Cosmos DB database, for the query itself. In the OPENQUERY function, the first parameter specifies the name of the linked server we want to use. Here, we’ll use COSMOSDB. The second parameter specifies a query string that we want to execute at the linked server. Lines 23 and 24 list the column names of the originally uploaded data, and we could easily place only the columns used in the SELECT clause in lines 20 and 21. At lines 23 and 24,
SELECT * would also work. However, this would include the following :
- _attachments
- _etag
- _rid
- _self
- _ts
- id
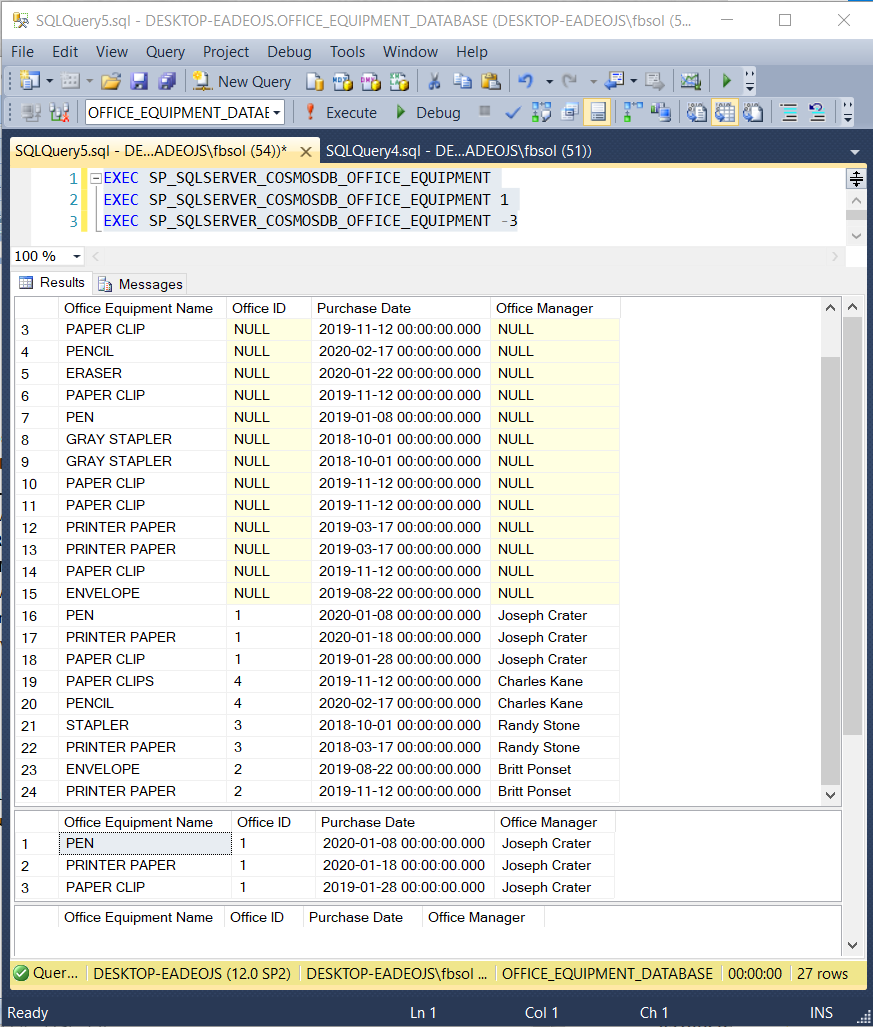
Line 26 aliases the derived table as COE, for “Cosmos Office Equipment.” Line 18 LEFT OUTER JOINs the COE derived table to the OFFICE_EQUIPMENT SQL Server table on the OFFICE_ID column, to catch OFFICE_EQUIPMENT rows that have no OFFICE_ID values. Between lines 29 and 35, the second derived table operates in a similar way. Line 28 LEFT OUTER JOINs the COM, or Azure Cosmos DB “Cosmos Office Manager” derived table, to the OFFICE_EQUIPMENT SQL Server table on the OFFICE_ID column. This catches OFFICE_EQUIPMENT rows that might have no OFFICE_MANAGER_ID value. At line 37, the WHERE clause uses the @OFFICE_ID parameter to filter the result set at the OFFICE_EQUIPMENT.OFFICE_ID value. If @OFFICE_ID has a NULL value, the WHERE clause filters no rows and returns the entire unfiltered result set. This screenshot shows tests of the SP_SQLSERVER_COSMOSDB_OFFICE_EQUIPMENT stored procedure:
Conclusion
As the importance of cloud products grows, we need a way to integrate cloud data resources – including NoSQL resources like Azure Cosmos DB – with the SQL Server data products that we build. This article shows how to do it.

See more about Frank at LinkedIn.
Remove the non-standard characters from this address: fb} <s.author@gmail.com to reach him by email.
- Lever the TSQL MAX/MIN/IIF functions for Pinpoint Row Pivots - May 16, 2022
- Use Kusto Query Language to solve a data problem - July 5, 2021
- Azure Data Explorer and the Kusto Query Language - June 21, 2021