
When managing Azure Cosmos DB, we can use the Azure portal and create resources through the interface or use the command line in the portal and create resources. PowerShell also supports some functionality for creating and managing these resources, which can help development teams automate the creation of these databases for quick creations, unit and security tests, removals if the resources aren’t required following the tests. We can also use these scripts for creating templates that we may use in multi-scaling creations (like databases in a group designed for horizontal scale). Generally, in one-off situations, the Azure Portal will suffice for deployments if there is a cost to develop automation that is not required. In this tip, we’ll look at the process of creating a blank and removing the same Azure Cosmos DB.
Installing PowerShell Az
Before we begin creating and using PowerShell with Azure Cosmos DB, we’ll need to install the PowerShell Az module first. Microsoft recommends using this module for future PowerShell development in Azure – the AzureRm module will be supported through 2020, so this provides developers time to make the switch. This Az module requires PowerShell 5.1 or greater. Because we want to keep permissions restricted when doing this, we’ll scope this module to our current user (the alternative is to run PowerShell as an administrator). According to Microsoft, the below will allow us to install this module scoped to the current user, so that we can avoid installing with the administrator account.
|
1 |
Install-Module -Name Az -Scope CurrentUser |
If we can install with the administrator account, we can remove the -Scope CurrentUser and run the script. We’ll be using this module to create our Cosmos database account and we’ll also see that there are alternatives provided in the portal that use the AzureRm module.
Getting Parameters from the Azure Portal
When creating an Azure Cosmos DB account, we can use the interface in Azure Portal to get all the information we’ll need – we can use contrived values if we want to see the full creation process, or we can actually create the account and remove it after creation so that we know what we’ll need for our script. The below images show what we’ll see when we set up a new Cosmos account resource and contrived values will work for progressing through the next screens to get the final validation – nothing will have been created yet until we confirm on the final step.
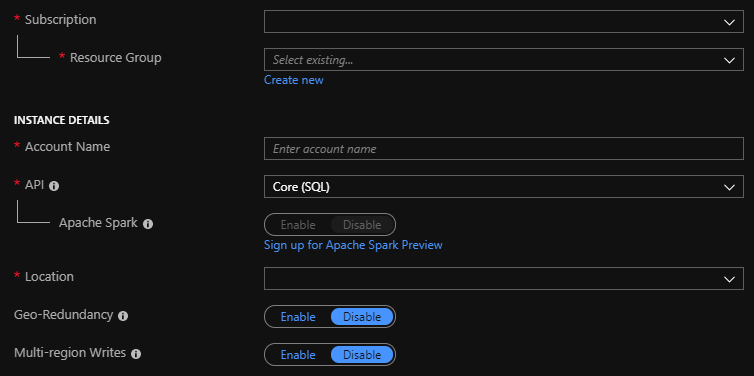
Creating an Azure Cosmos DB account in the Azure Portal.
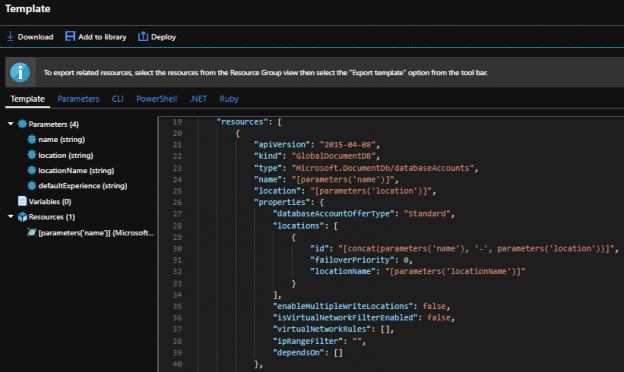
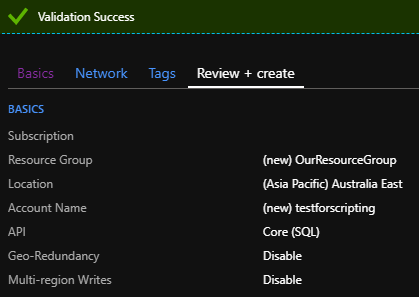
Before the creation takes place in the portal, we see the Review + create with the values we’ve entered which we’ll be using for some of our parameters that will be required. On the bottom right of the below image, we’ll also see an option Download a template for automation that we can use to create this Cosmos account with languages like PowerShell, .NET, Ruby, etc (seen in the second image). We’ll be using the Az module, so we’ll be using a different route, but it is worth mentioning that the below template creation technique is an option that developers can use. Depending on how many options we want configured, it may be worth using the template, or it may be faster using the Az module. Since we’ll be customizing our own script using the Az module, we’ll use it.
We can download template files for creating Azure Cosmos DBs as an alternative to the Az module or portal.

The options we see when we select the download template for automation.
The above two images – the confirmation screen and template data – show some of the options we will use when executing our Az scripts to create our Azure Cosmos DB. We can use these screens if we’re customizing a Cosmos account to specific criteria and we need to find the values. We’ll note a few of these options along with their values that will be parameters later in our script:
- Resource Group: OurResourceGroup
- Location: Australia East
- apiVersion: 2015-04-08
- type: Microsoft.DocumentDb/databaseAccounts
- databaseAccountOfferType: Standard
In addition, we see that we’re not writing to multiple locations and this isn’t part of a virtual network, so these options are not required for the later properties of this Cosmos account. If these were options we needed, we would specify them as properties. Depending on your needs, when you run through the above steps and select different options, you will see these options specified in these screens to help you know how to script these with the Az module.
The Create and Remove Script
In the above images, we went through the process of selecting the options we wanted for our Azure Cosmos DB, but we didn’t create it. We will now create our database by executing a PowerShell script that uses many of the parameters we see above this. First, we will log into Azure and set our properties accordingly – using the resource group, location, API version, type, and the offer type. Before we start creating our re-usable function, we’ll look at the options we need to include to create our Cosmos account we have shown from the portal steps. We can run a test creation on this step, or wait until our script is wrapped in a function to test the creation.
|
1 2 3 4 5 6 7 8 9 10 11 12 13 14 |
Connect-AzAccount $api = "2015-04-08" $rGroup = "OurResourceGroup" $location = "Australia East" $cosmosdb = "testscriptcosmos" ### We must specify all properties we want - in this example a standard account $properties = @{"databaseAccountOfferType"="Standard"} New-AzResource -ResourceType "Microsoft.DocumentDb/databaseAccounts" -ApiVersion $api ` -ResourceGroupName $rGroup -Location $location -Name $cosmosdb -PropertyObject $properties |

After we execute the script, our Azure Cosmos DB is created.
After we run the above script (or if we run the below script to create the account), we’ll note that it takes a few minutes before the account is created. Once it’s created, we’ll see testscriptcosmos (or the name you chose) in our list within the Azure Portal. Now, for re-usability, we’ll wrap our functionality within a function that we can re-use that starts with a Cosmos account creation. Because properties may differ by environment, we will leave it outside the function – if an environment always specifies the same properties, we can keep that within the process block.
|
1 2 3 4 5 6 7 8 9 10 11 12 13 14 15 16 17 18 19 20 |
$properties = @{"databaseAccountOfferType"="Standard";} Function Create-AzureCosmosDB { Param( [Parameter(Mandatory=$true)][string]$api , [Parameter(Mandatory=$true)][string]$rGroup , [Parameter(Mandatory=$true)][string]$location , [Parameter(Mandatory=$true)][string]$cosmosdb ) Process { Connect-AzAccount New-AzResource -ResourceType "Microsoft.DocumentDb/databaseAccounts" -ApiVersion $api ` -ResourceGroupName $rGroup -Location $location -Name $cosmosdb -PropertyObject $properties } } Create-AzureCosmosDB -api "2015-04-08" -rGroup "OurResourceGroup" -location "Australia East" -cosmosdb "testscriptcosmos" |
Now that we have our function to create the Azure Cosmos DB, we also want the ability to remove it. Because creating and removing in testing often take place together in increments – we create an account, we run unit and security tests, and we remove the account, we’ll take the same above function and add the ability to specify removing the Cosmos account. In other contexts like creating the database account for use, we may not need to include a remove step and the same is true if we use the script to automatically create another database for scaling.
|
1 2 3 4 5 6 7 8 9 10 11 12 13 14 15 16 17 18 19 20 21 22 23 24 25 26 27 28 29 30 |
$properties = @{"databaseAccountOfferType"="Standard";} Function CreateDrop-AzureCosmosDB { Param( [Parameter(Mandatory=$true)][string]$api , [Parameter(Mandatory=$true)][string]$rGroup , [Parameter(Mandatory=$true)][string]$location , [Parameter(Mandatory=$true)][string]$cosmosdb , [Parameter(Mandatory=$true)][ValidateSet("Create","Remove")]$option ) Process { Connect-AzAccount switch ($option) { "Create" { New-AzResource -ResourceType "Microsoft.DocumentDb/databaseAccounts" -ApiVersion $api ` -ResourceGroupName $rGroup -Location $location -Name $cosmosdb -PropertyObject $properties } "Remove" { Remove-AzResource -ResourceType "Microsoft.DocumentDb/databaseAccounts" -ApiVersion $api ` -ResourceGroupName $rGroup -Name $cosmosdb } } } } CreateDrop-AzureCosmosDB -api "2015-04-08" -rGroup "OurResourceGroup" -location "Australia East" -cosmosdb "testscriptcosmos" -option Remove |
We could demarcate the create or remove on its own function, but the above gives us the ability to re-use our function and its parameters on the same object that was created for testing situations where we don’t want to keep what we’ve created. Re-use in creation and removals tend to come up frequently in temporary testing situations. In a similar manner for different creation contexts, we may not want to wrap any functionality because we may customize each account with significant differences.
Like creating an Azure Cosmos DB account takes a few minutes, removing it can also take some time.

Our Azure Cosmos DB no longer appears in the portal once it’s removed.
Conclusion
As we see, we can create or remove an Azure Cosmos DB quickly with PowerShell’s Az module. This may help us quickly validate a unit and security test without committing to a Cosmos account (create, test, remove), or we may use this as a template to automate the creation of resources or scaled resources. Finally, there may be situations where the alternatives are faster or more appropriate. We’ve also seen that we can use templates provided through the Azure Portal that are supported in several languages and we can create the Azure Cosmos DB account through the portal if that is the fastest route, such as situations where we only need on database account.
Table of contents

He has spent a decade working in FinTech, along with a few years in BioTech and Energy Tech.He hosts the West Texas SQL Server Users' Group, as well as teaches courses and writes articles on SQL Server, ETL, and PowerShell.
In his free time, he is a contributor to the decentralized financial industry.
View all posts by Timothy Smith
- Data Masking or Altering Behavioral Information - June 26, 2020
- Security Testing with extreme data volume ranges - June 19, 2020
- SQL Server performance tuning – RESOURCE_SEMAPHORE waits - June 16, 2020