
In this article, I am going to explain how we can deploy the MySQL InnoDB cluster. InnoDB Cluster is a high availability solution provided by MySQL that has single and multi-master capabilities and failover detection.
MySQL InnoDB has three major components:
- MySQL group replication – It is a group of database servers. It replicates the MySQL databases across the multiple nodes, and it has fault tolerance. When changes in the data occur in the MySQL databases, it automatically replicates to the secondary nodes of the server. The concept of the MySQL group replication is similar to the concept of the AlwaysOn availability group
- MySQL Router – When a failover occurs, the client application must be aware of the PRIMARY instance and cluster topology. This functionality is handled by the MySQL Router. It routes that redirects the data requests to the available MySQL Server instance. MySQL Router acts as a proxy that is used to hide the multiple MySQL database servers. The concept of the MySQL Router is similar to the Virtual network name of the Windows Server failover cluster
- MySQL Shell – It is a configuration tool that can be used to connect, deploy, and manage the MySQL InnoDB cluster. MySQL Shell contains an Admin API that has a dba global variable. The dba variable is used to deploy and manage the InnoDB cluster
To demonstrate the deployment process, I have created three virtual machines on my workstation. I have installed ubuntu 18.04 and MySQL Server 8.0 on the virtual machines. In this article, I am not going to explain the installation process of the MySQL Server on Linux. You can read How to install MySQL on Ubuntu article to understand the step by step installation process of MySQL Server on Ubuntu 18.04.
Following is the configuration of the virtual machines.
|
Host Name |
IP Address |
Operating System and MySQL Server version |
|
SQLLinux01 |
192.168.0.107 |
Ubuntu 18.04 , MySQL Server 8.0 |
|
SQLLinux02 |
192.168.0.101 |
Ubuntu 18.04 , MySQL Server 8.0 |
|
SQLLinux03 |
192.168.0.105 |
Ubuntu 18.04 , MySQL Server 8.0 |
I have also installed the following software.
-
Vi editor: This tool is used to configure or edit the configuration file. You can install it by executing the following command:
nisarg@LinuxSQL01:~$ sudo apt-get install vi
-
Net tools: It is a networking tool that can be used to test the connectivity between the nodes/servers. You can install it by executing the following command:
nisarg@LinuxSQL01:~$ sudo apt-get install net-tools
I have divided the entire process of deploying the MySQL InnoDB cluster into the following steps:
- Map Domain Address with IP Address
- Configure MySQL Server to allow remote connections
- Create a MySQL administrator user in and grant privileges
- Configure the group replication using MySQL Shell
- Create a MySQL InnoDB cluster using MySQL Shell
- Configure the MySQL Router using MySQL Shell
- Monitor, manage, and scale the MySQL InnoDB cluster
Map Domain address with IP Address
To map the domain address with IP Address, we must edit the hosts file. On Linux, the file is in /etc directory. The full path is /etc/hosts. The entries in the hosts file are in the following format:
IP addresses DomainName [DomainAliase]
I am going to use vi editor to edit the hosts file. To edit the file, press the ‘I’ key and enter the IP Addresses and the hosts names in the following format.
192.168.0.107 LinuxSQL01
192.168.0.101 LinuxSQL02
192.168.0.105 LinuxSQL03
See the following image:
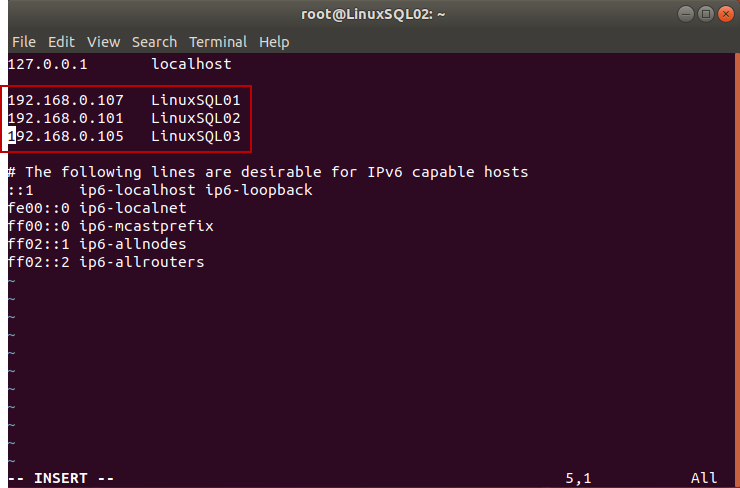
Once the file is updated, press ‘:wq’ to save the changes in the hosts file.
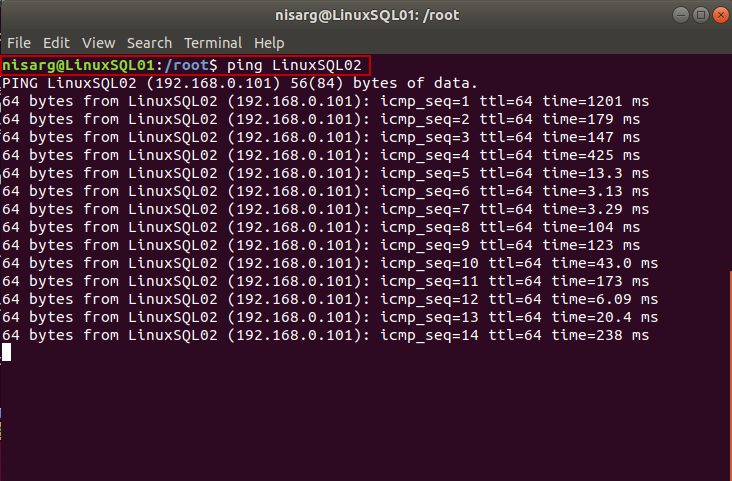
Once IP Addresses are mapped, run the ping command to test the connectivity using the hostname. Run the following command:
nisarg@LinuxSQL01:~$ ping LinuxSQL02
See the following image:
The above configuration settings must be performed on LinuxSQL02 and LinuxSQL03.
Configure MySQL Server to allow remote connections
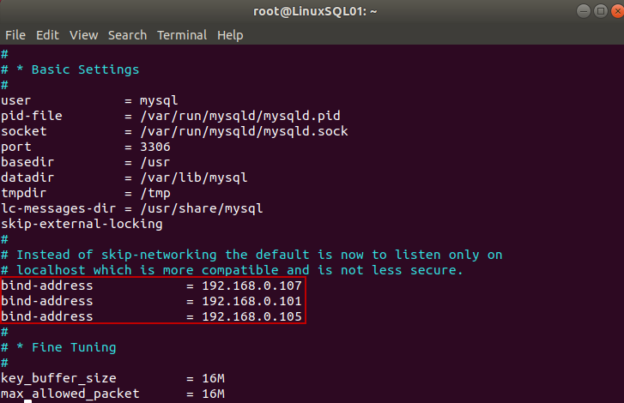
When we install the MySQL database server, it does not allow remote connection. To connect to the remote connections, we must specify the IP Addresses in the configuration file mysqld.cnf using a text editor. The configuration file is located at /etc/mysql/mysql.conf.d/mysqld.cnf. You must specify the list of IP Addresses in the bind-address parameter. The format is bind-address = ‘IP Address of the Server.’ Specify the IP Addresses in the configuration file. It should look like the following:
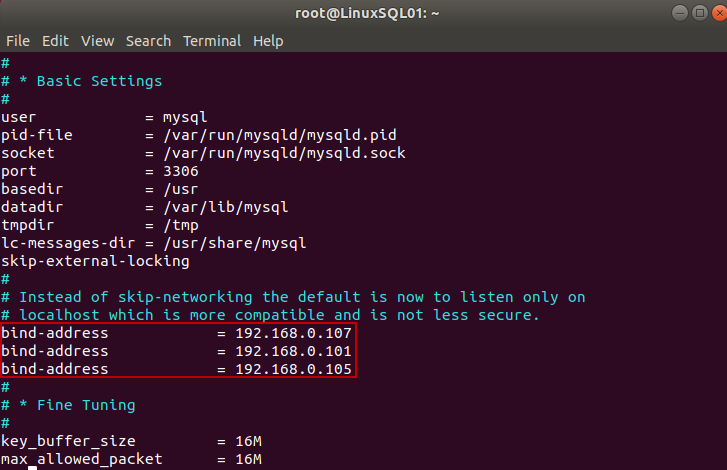
- Note: If you want to allow all the incoming connections, the value of the bind-address parameter must be 0.0.0.0
Once changes are applied, save the configuration file by pressing ‘:wq’.
The above configuration settings must be performed on LinuxSQL02 and LinuxSQL03.
Create a MySQL administrator user in and grant privileges
Now, let us create a MySQL user and grant appropriate permission to it. To create a user, first, connect to MySQL using the following command:
root@LinuxSQL01:~# mysql
Once connected, execute the following command to create a user.
Mysql> create user ‘nisarg’ identified by ‘N*****@****’;
Once the user is created, execute the following command to grant appropriate permission to it.
GRANT ALL PRIVILEGES ON *.* To ‘nisarg’
If you are not using the root user to configure the group replication, you must grant the following set of permissions on metadata databases to the user.
|
Metadata database |
List of permissions to be assigned. |
|
All databases |
CREATE USER, FILE, PROCESS, RELOAD, REPLICATION CLIENT, REPLICATION SLAVE, SELECT, SHUTDOWN, SUPER |
|
All databases that start with mysql |
DELETE, INSERT, UPDATE |
|
All databases that start with mysql_innodb_cluster_metadata |
ALTER, ALTER ROUTINE, CREATE, CREATE ROUTINE, CREATE TEMPORARY TABLES, CREATE VIEW, DELETE, DROP, EVENT, EXECUTE, INDEX, INSERT, LOCK TABLES, REFERENCES, SHOW VIEW, TRIGGER, UPDATE |
|
All databases that start with mysql_innodb_cluster_metadata_bkp |
ALTER, ALTER ROUTINE, CREATE, CREATE ROUTINE, CREATE TEMPORARY TABLES, CREATE VIEW, DELETE, DROP, EVENT, EXECUTE, INDEX, INSERT, LOCK TABLES, REFERENCES, SHOW VIEW, TRIGGER, UPDATE |
|
All databases that start with mysql_innodb_cluster_metadata_previous |
ALTER, ALTER ROUTINE, CREATE, CREATE ROUTINE, CREATE TEMPORARY TABLES, CREATE VIEW, DELETE, DROP, EVENT, EXECUTE, INDEX, INSERT, LOCK TABLES, REFERENCES, SHOW VIEW, TRIGGER, UPDATE |
Execute the following command to grant permission to the user.
GRANT CREATE USER, FILE, PROCESS, RELOAD, REPLICATION CLIENT, REPLICATION SLAVE, SELECT, SHUTDOWN, SUPER ON *.* TO ‘nisarg’@’%’ WITH GRANT OPTION;
GRANT DELETE, INSERT, UPDATE ON mysql.* TO ‘nisarg’@’%’ WITH GRANT OPTION;
GRANT ALTER, ALTER ROUTINE, CREATE, CREATE ROUTINE, CREATE TEMPORARY TABLES, CREATE VIEW, DELETE, DROP, EVENT, EXECUTE, INDEX, INSERT, LOCK TABLES, REFERENCES, SHOW VIEW, TRIGGER, UPDATE ON mysql_innodb_cluster_metadata.* TO ‘nisarg’@’%’ WITH GRANT OPTION;
GRANT ALTER, ALTER ROUTINE, CREATE, CREATE ROUTINE, CREATE TEMPORARY TABLES, CREATE VIEW, DELETE, DROP, EVENT, EXECUTE, INDEX, INSERT, LOCK TABLES, REFERENCES, SHOW VIEW, TRIGGER, UPDATE ON mysql_innodb_cluster_metadata_bkp.* TO ‘nisarg’@’%’ WITH GRANT OPTION;
GRANT ALTER, ALTER ROUTINE, CREATE, CREATE ROUTINE, CREATE TEMPORARY TABLES, CREATE VIEW, DELETE, DROP, EVENT, EXECUTE, INDEX, INSERT, LOCK TABLES, REFERENCES, SHOW VIEW, TRIGGER, UPDATE ON mysql_innodb_cluster_metadata_previous.* TO ‘nisarg’@’%’ WITH GRANT OPTION;
Configure the group replication
To configure the group replication, we are going to use MySQL Shell. We will configure the group replication using the root user.
nisarg@LinuxSQL01:~# Sudo -s
[sudo] password for nisarg:
Provide the correct password of user nisarg and hit enter.
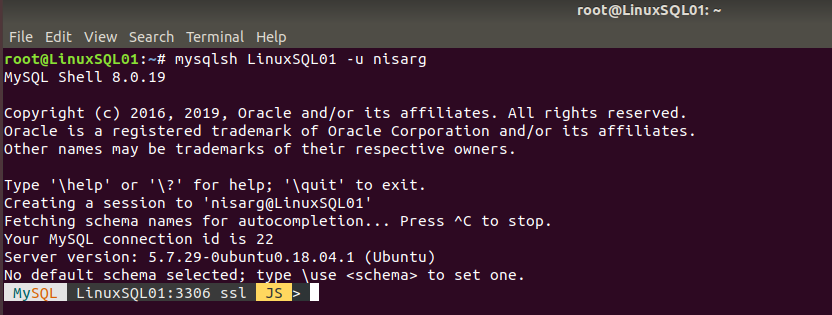
Once we are connected to the root user, we will connect to the MySQL shell. To do that, execute the following command on terminal
root@LinuxSQL01:~# mysqlsh LinuxSQL01 -u nisarg
See the following image:
We have performed a fresh installation of MySQL Server; hence we must change some configurations. The configuration changes are performed by using dba.ConfigureLocalInstance() command. This command is used to configure the InnoDB cluster administration. This command can be used locally and remotely.
The syntax of the command is dba.configurelocalinstance(username@MySQLServer:Portnumber);
Execute the following command on MySQL Shell to configure the group replication:
MySQL JS > dba.configureLocalInstance(“nisarg@LinuxSQL01:3306”);
The command shows the list of configuration parameters that need to be fixed. See the following image:
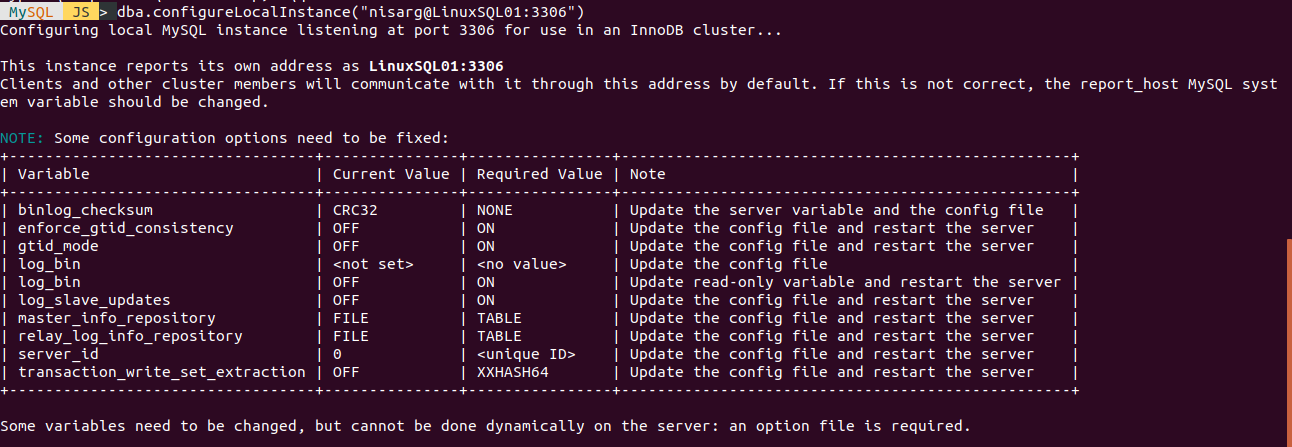
When you run the command, it prompts for the confirmation of the changes in the mysqld.cnf configuration file. The standard location of the file is /etc/mysql/mysql.conf.d/mysqld.cnf. Once you review and confirm the changes, it updates the mysqld.cnf file.
The above steps must be performed on LinuxSQL02 and LinuxSQL03.
In my next article, I plan to explain the following:
- Create a MySQL InnoDB cluster using MySQL Shell
- Configure the MySQL Router using MySQL Shell and test the failover
- How to monitor, manage, and scale the MySQL InnoDB cluster
Summary
In this article, I have covered how we can:
- Map Domain Address with IP Address
- Configure MySQL Server to allow remote connections
- Create a MySQL administrator user in and grant privileges
- Configure the group replication using MySQL Shell

He has expertise in database design, performance tuning, backup and recovery, HA and DR setup, database migrations and upgrades. He has completed the B.Tech from Ganpat University. He can be reached on nisargupadhyay87@outlook.com
- Different ways to identify and change compatibility levels in SQL Server - July 22, 2024
- Copy SQL Databases between Windows 10 and CentOS using SQL Server data tools - October 19, 2022
- Changing the location of FILESTREAM data files in SQL Database - October 14, 2022