
In the previous articles listed below, we went through the Azure Data Studio tool, starting from the installation procedure, showing the purpose of each component, how to organize your connections, and develop the different types of SQL Server database objects using the interactive query editor in that data studio.
- Starting your Journey with Azure Data Studio
- Developing your SQL Server database using Azure Data Studio
- Digging deeper into Azure Data Studio: More code and less GUI
In this article, we will extend the built-in features of the Azure Data Studio by using the Extensions and show how to connect to and develop an Azure SQL Database.
Using Extensions
As we discussed in the previous articles, Azure Data Studio (ADS) is not an administration tool, where most of the GUI wizards and features available in the SQL Server Management Studio (SSMS) tool are not available in ADS. For example, there is no wizard in ADS to create a new database, create a new table, add a server login, or map it to a database user.
To support additional functionalities in ADS, the Extensions that are developed by the Microsoft development team, or by the development community can be easily installed and added to ADS and used as any other built-in features within that data studio.
In this article, we will show three useful extensions that you can take advantage of. But feel free to search for and install any other available extension that you may need.
SQL Server Agent
SQL Server Agent is not available as a built-in component within the Azure Data Studio. But it can be easily added to the data studio in case you need to schedule a specific task or create an alert or an operator to be notified when a specific event is detected.
The SQL Server Agent extension for Azure Data Studio provides basic functionalities, such as creating a new scheduled job, controlling the run of the job, and checking the execution history of the agent jobs. In addition, you can use that extension to create an alert or an operator to be notified based on the alert or job status.
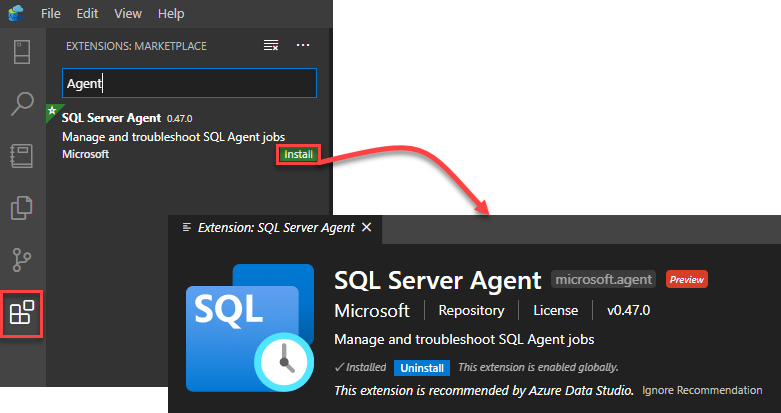
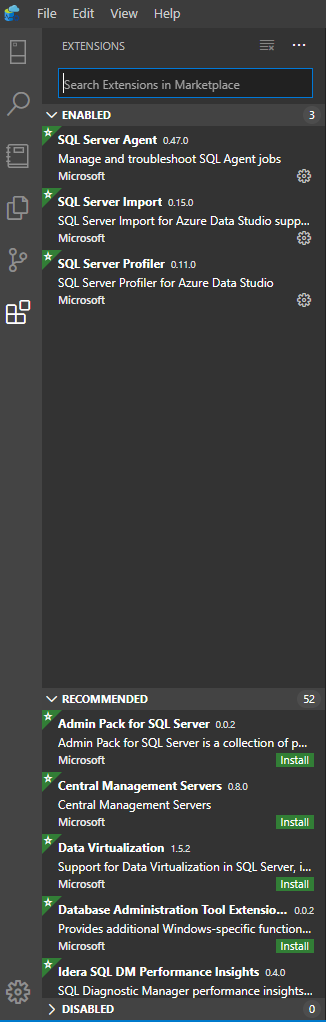
To add the SQL Server Agent extension, browse the Extensions tab, search for the SQL Server Agent extension then click Install, and the extension will be installed in a few seconds, as shown below:
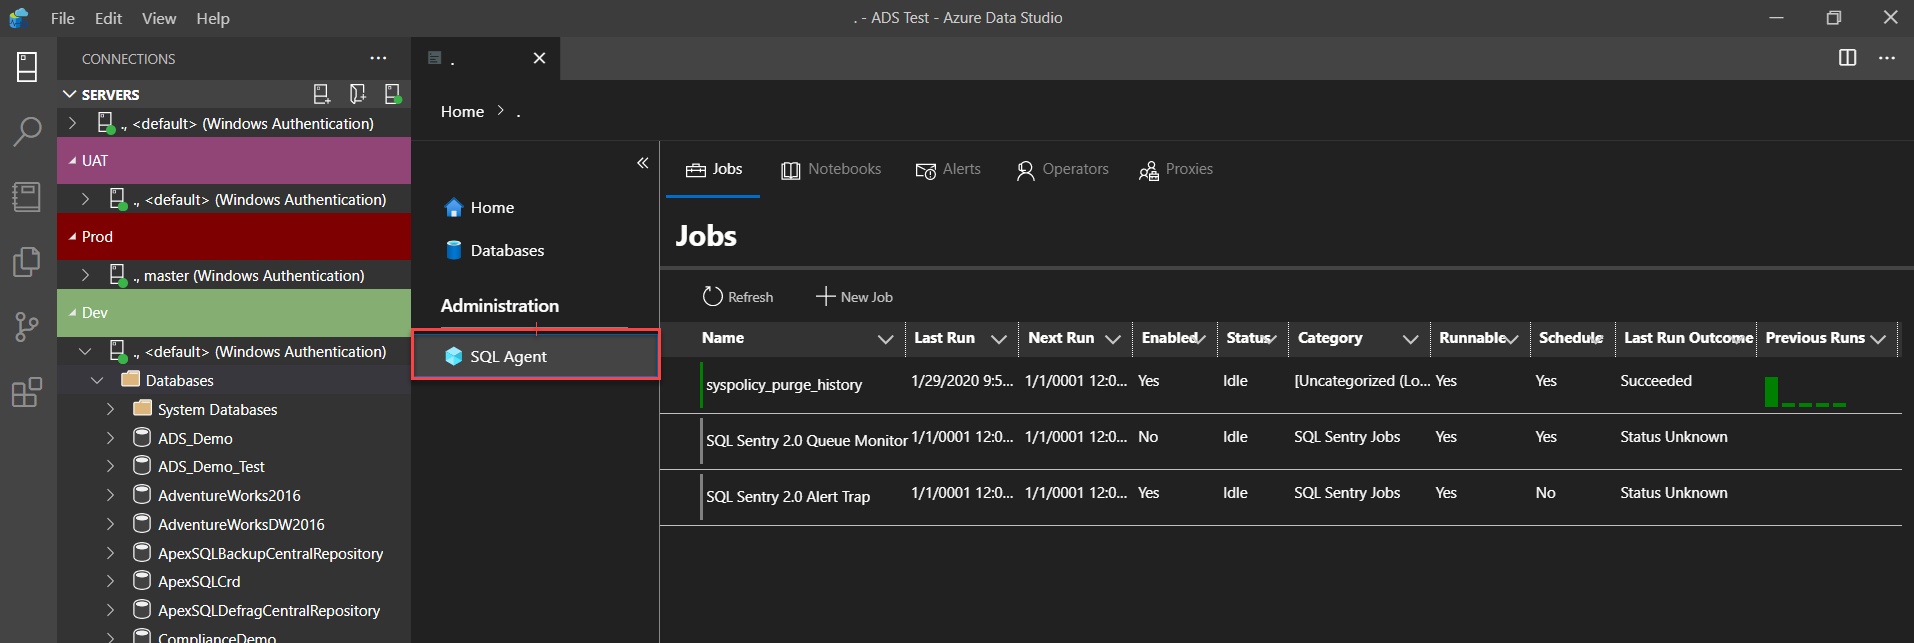
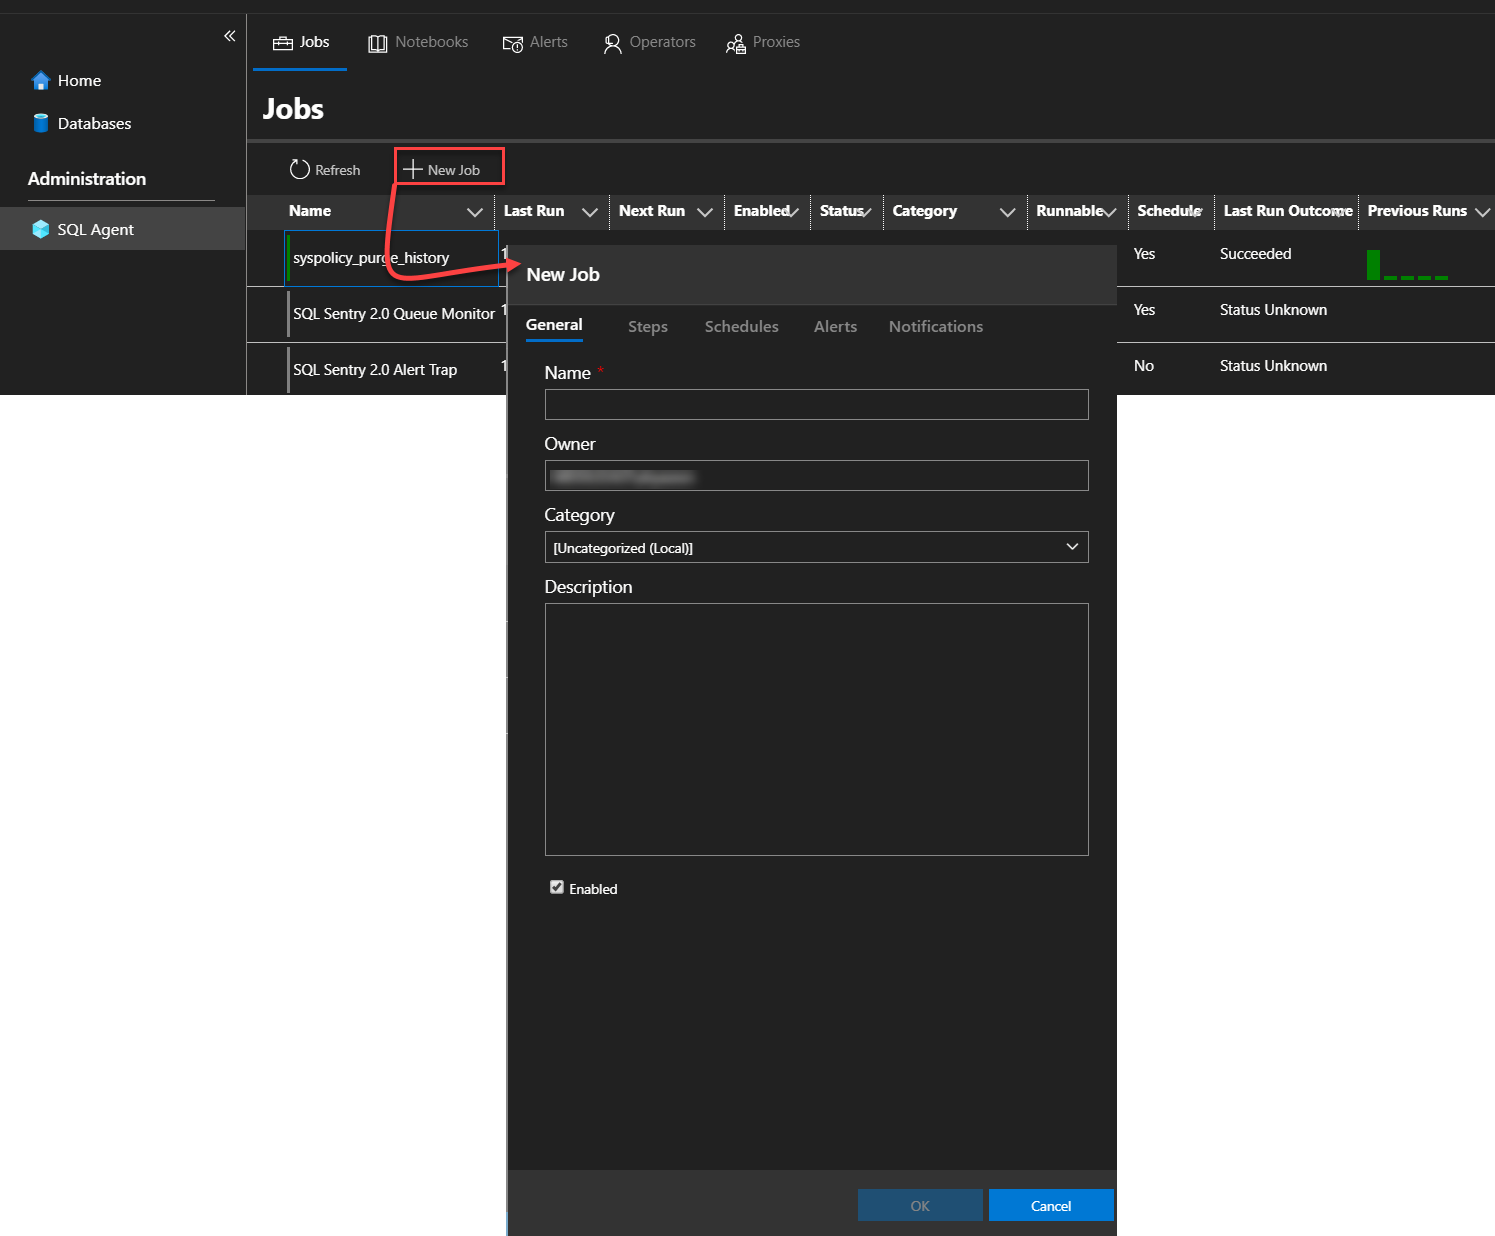
After installing the SQL Server Agent Extension, it can be accessed by right-clicking on the SQL Server instance then choose the Manage option, where a new tab will be displayed under the Administration section, showing the list of all available SQL Server Agent job under that SQL instance, as shown below:
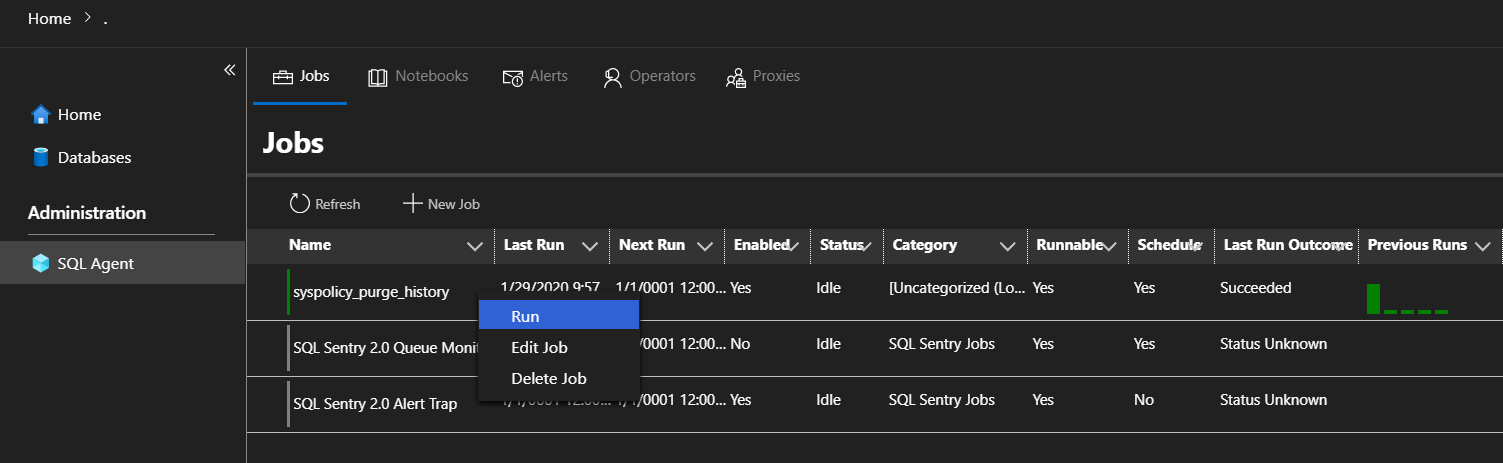
The SQL Server Agent extension of the Azure Data Studio, provides you with the ability to start, stop, edit or delete any SQL Server Agent job created under that SQL Server instance, by right-clicking on the job name and choose the required action, as below:
From the same window, you can choose the New Job option to create a new SQL Agent job that is used to run a specific task, schedule it to be executed based on a predefined schedule or as a response for an event and create a notification to notify a SQL operator when the job completed, succeeded or failed.
The SQL Server Agent extension provides you with the ability to create an alert that will run an Agent job or notify an operator when a specific event occurs, create an operator to be notified when a job is completed, or an alert is received, and create a proxy account to impersonate the execution of a specific task that accesses an external resource as shown below:
SQL Profiler
The SQL Profiler tool is one of the SQL Server management tools that is installed when the SQL Server Management Studio is installed on your machine. It is a simple tracing tool that can be used to track the queries that are currently running in the connected SQL Server instance, showing the T-SQL text for the queries and other properties that help in identifying the applications and workload issues.
SQL Profiler can be added to the Azure Data Studio as an extension, which is still under preview. This extension helps in identifying the slowest queries that are causing problems and affecting other queries, studying the performance of these queries, and tune its performance.
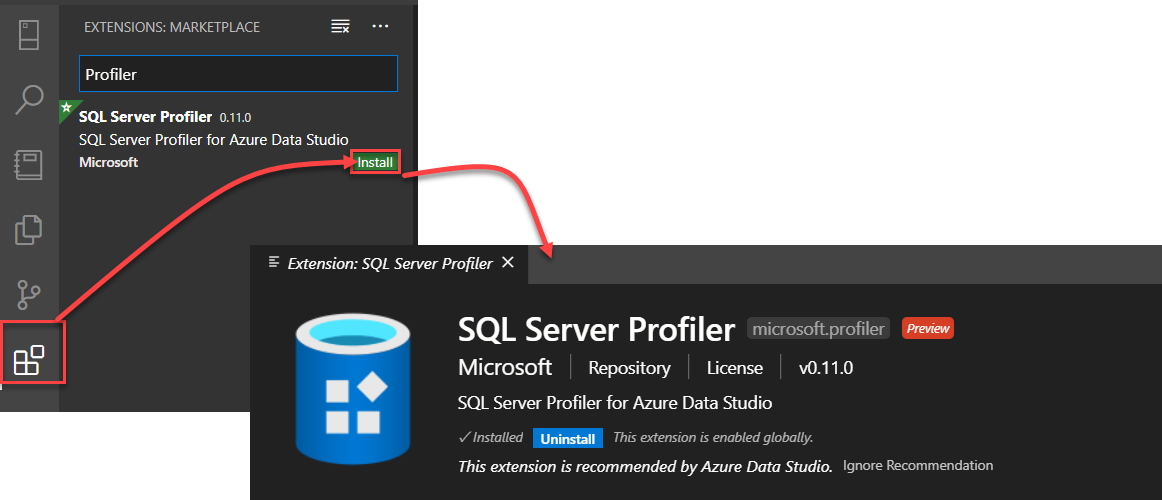
The SQL Profiler extension can be installed by browsing the Extensions tab, search for the SQL Profiler extension then click Install, and the extension will be installed and ready to use in a few seconds, as shown below:
The SQL Profiler extension is simpler than the SQL Profiler of the SSMS tool, where it contains a few templates that help in tracking the queries without advanced configurations and options.
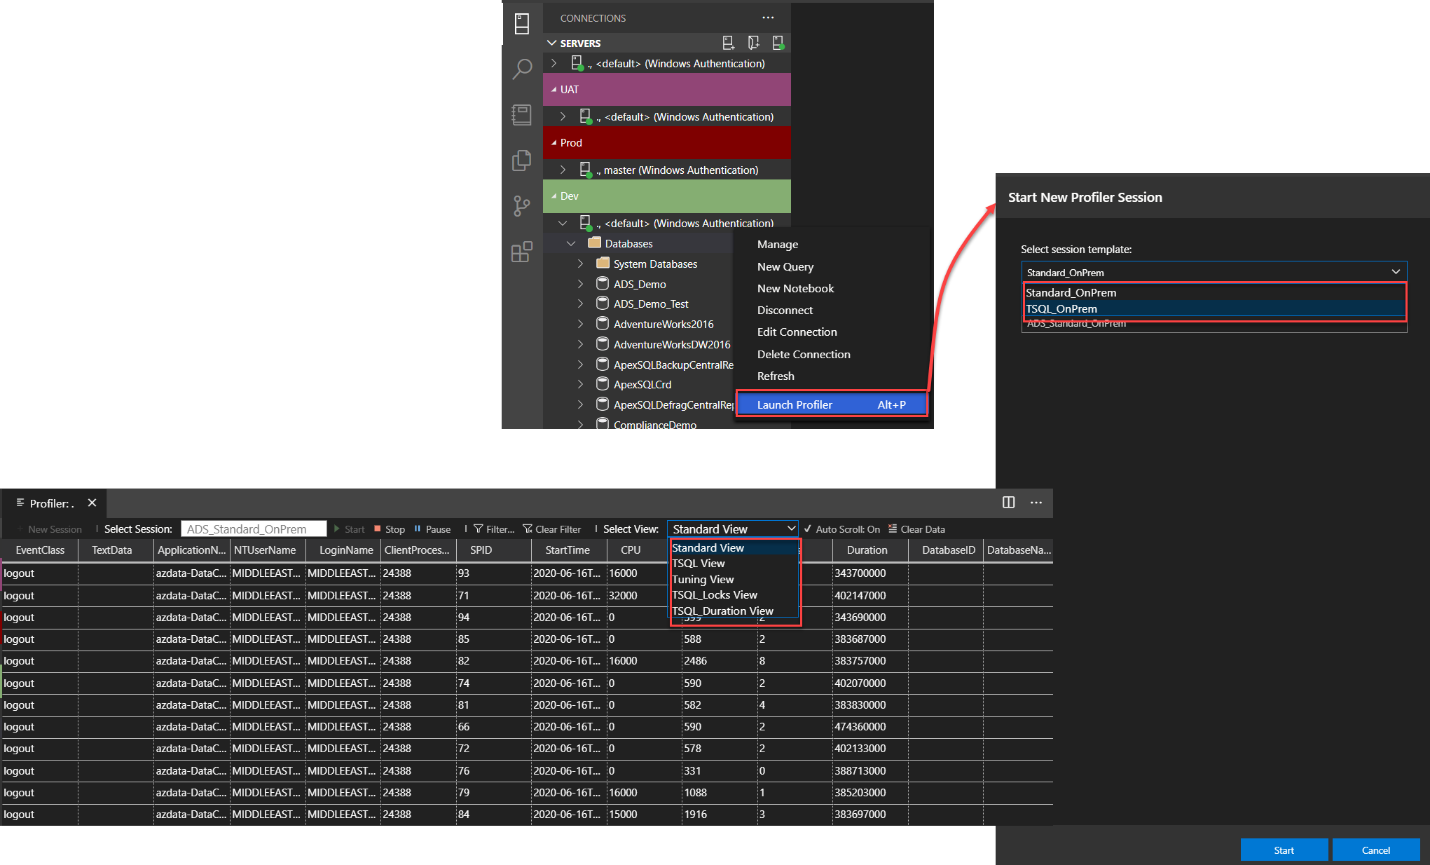
To open the SQL Profiler extension, right-click on the SQL Server instance and choose the Launch Profiler option, then choose whether to use the standard or the T-SQL profiler template. When the SQL Profiler extension started, you can change the view of the displayed events in a way that serves a specific goal, such as concentrating on the duration, workload, tuning or the T-SQL queries, as shown below:
SQL Server Import
The SQL Server Management Studio Import and Export wizard, based on SSIS packages, is a useful tool that helps in exchanging the data between different types of parties in a proper and organized way.
Unfortunately, this tool is not available in the Azure Data Studio. But the Microsoft development team provided an extension, under preview, which can help in importing data from flat files, such as .txt and .csv files, to the databases hosted in the actively connected SQL Server instance.
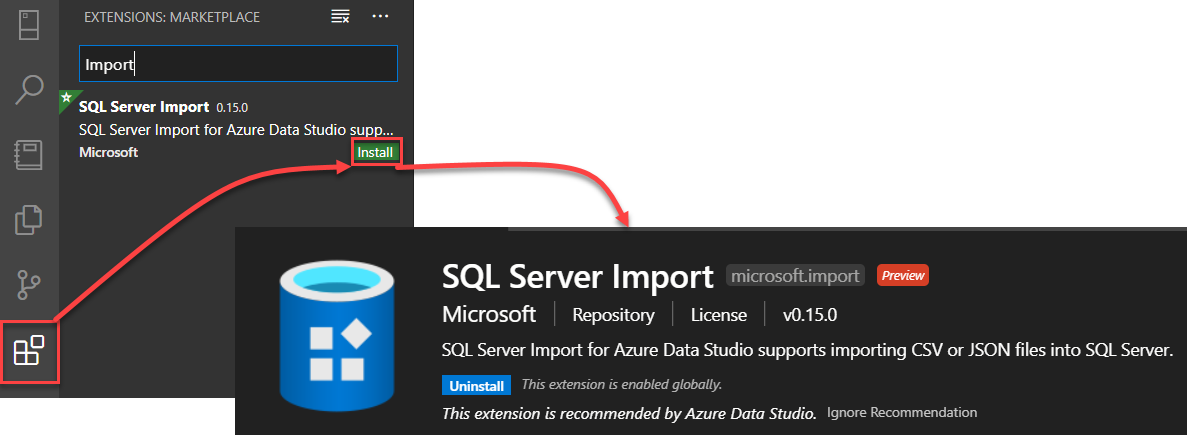
The SQL Server Import extension can be installed by browsing the Extensions tab, search for the SQL Server Import extension then click Install, and the extension will be installed and ready to use in a few seconds, as shown below:
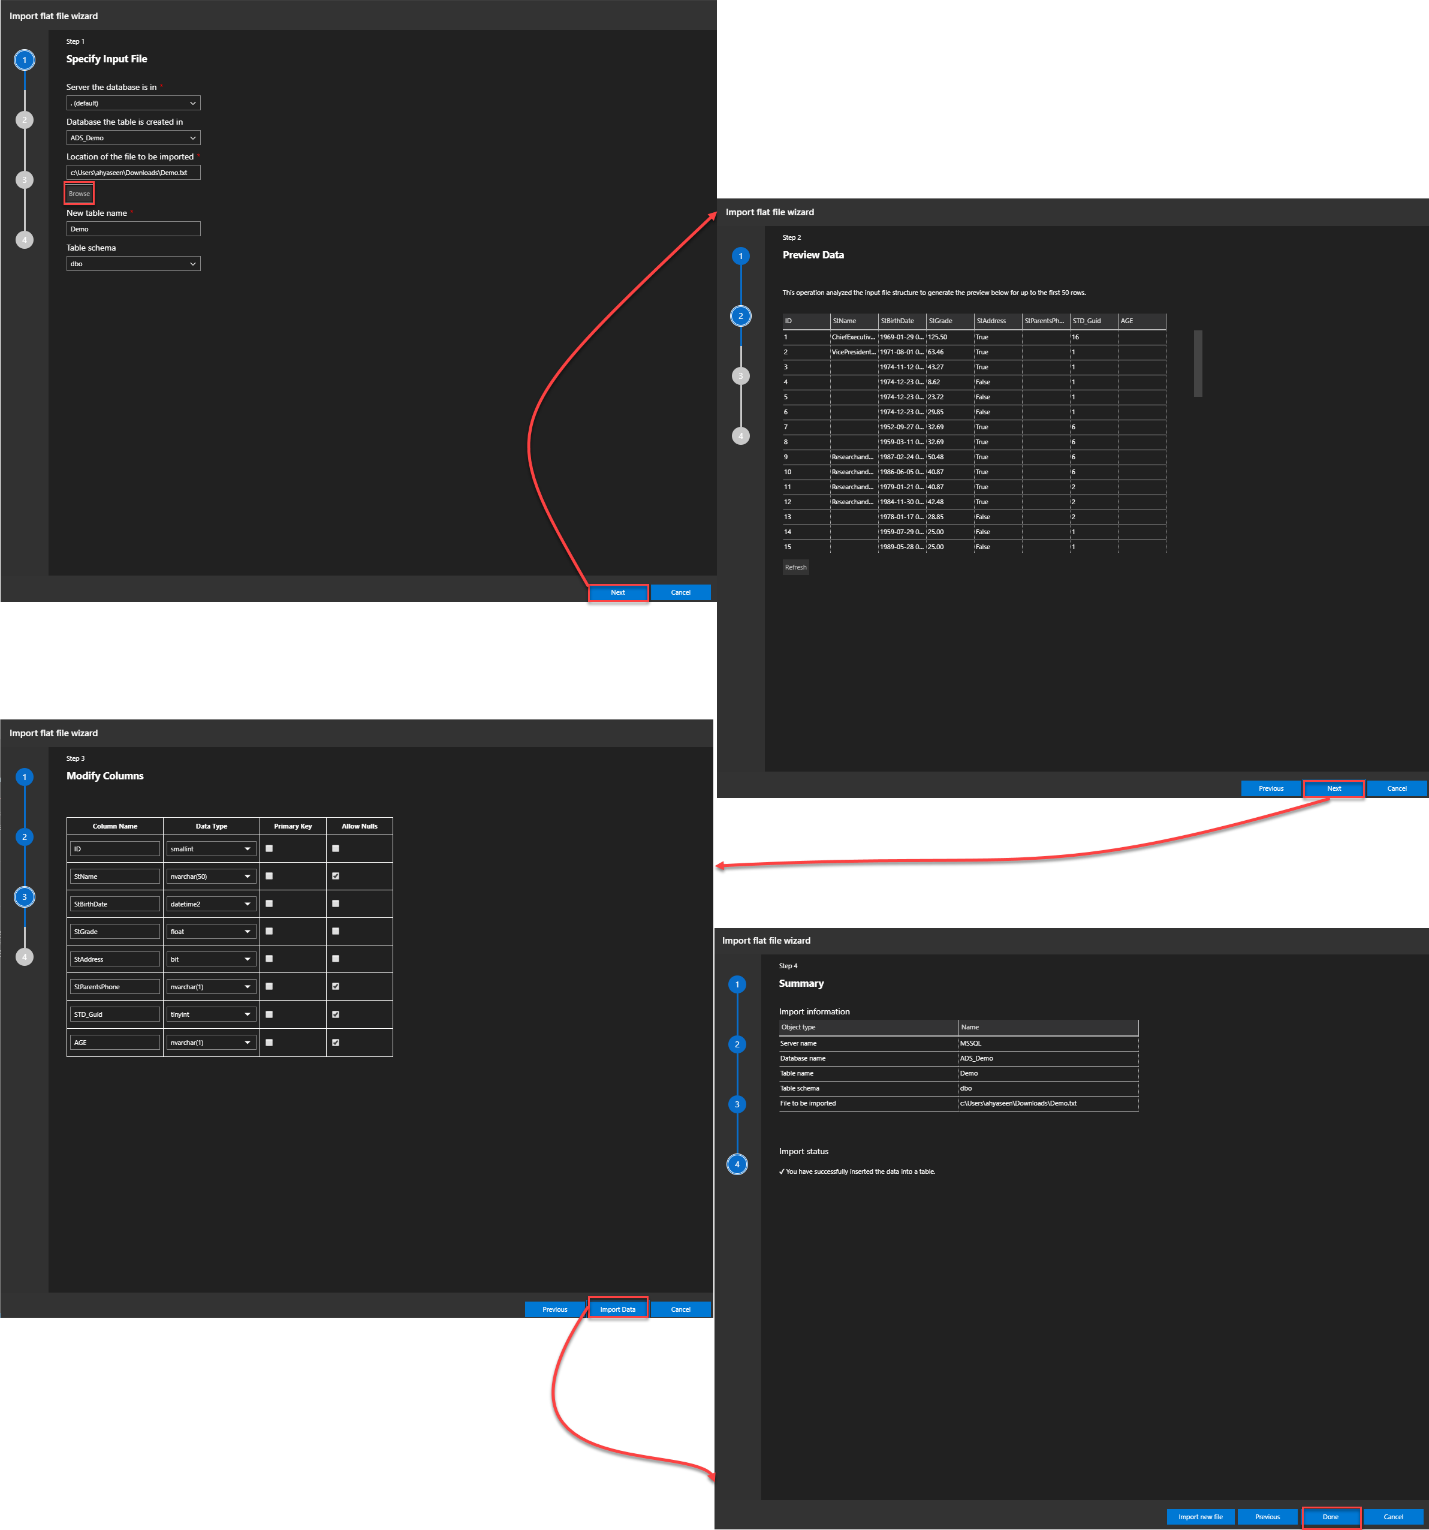
To start the SQL Server Import wizard, right-click on the database name from the list of databases under the Connections tab, and choose the Import Wizard option, as shown below:

From the opened Import Flat File wizard, specify the location of the .txt or.csv file that contains the data to be imported, the connection information of the destination database table, preview the data before importing it, check the columns data types and properties then click Done to start the import process, and the data will be successfully imported if there are no compatibility issues, as shown below:
Don’t forget that you can extend the functionality of the Azure Data Studio by adding other extensions based on your requirements. Just search for what you want and install it to help you with your tasks, as shown below:
Azure SQL DB Development
Azure Data Studio, as the name indicates, can be used to connect to the Azure data-related services and perform different development tasks on these services, such as the Azure SQL Database, Azure SQL Managed Instance and Azure Database for PostgreSQL.
Getting Started
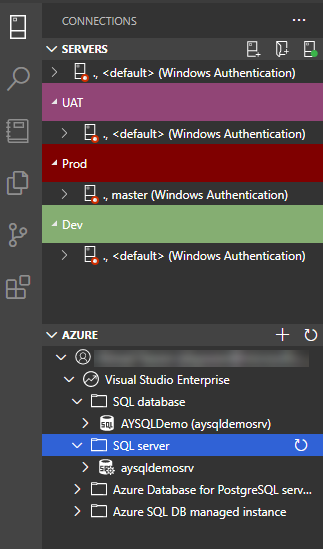
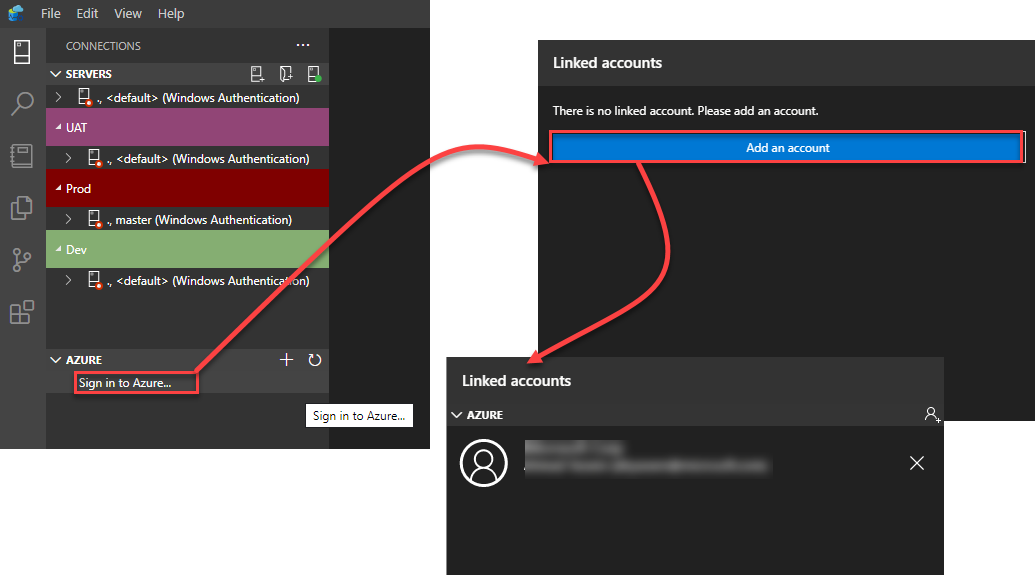
In order to connect to your Azure database services, browse the Azure section under the Connections tab and click on the Sign in to Azure. From the opened Linked accounts window, click Add an account option, which allows you to log in to your Azure account, as shown below:
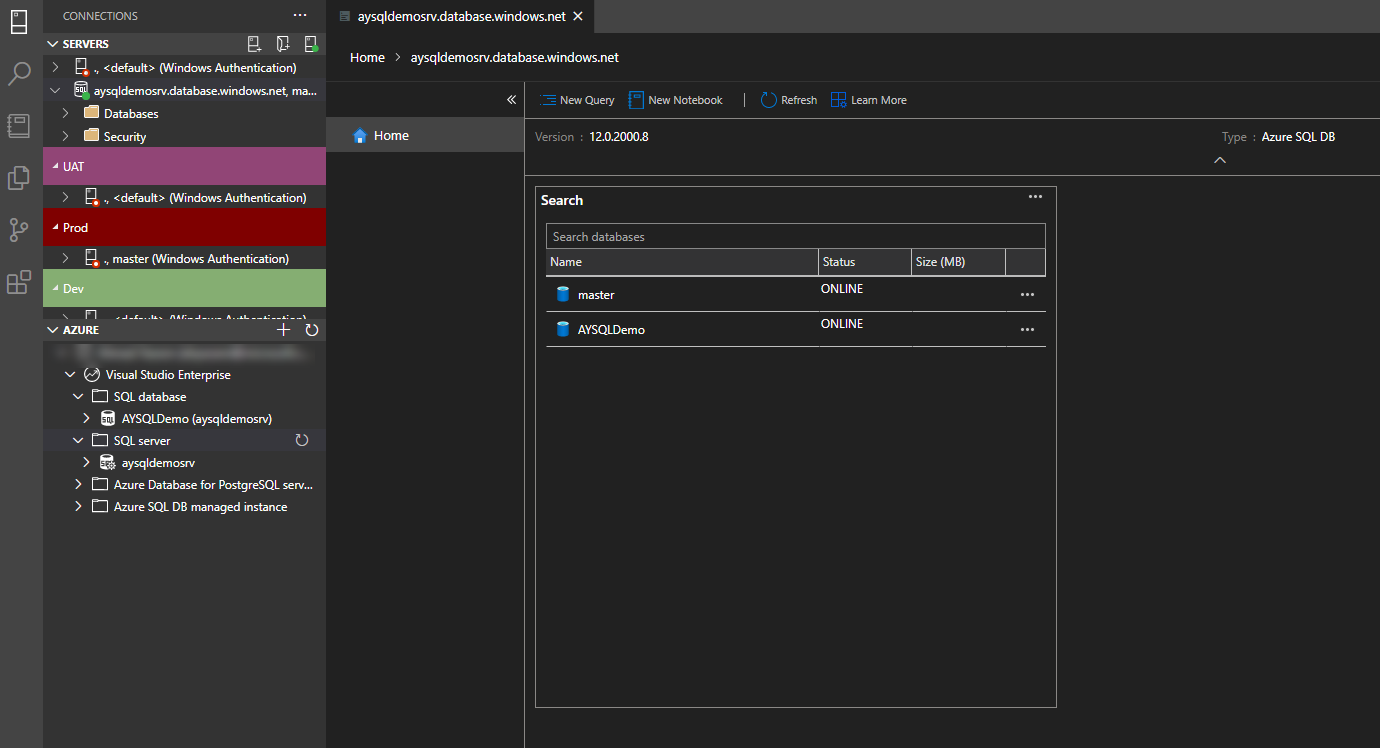
Once the Azure account is added, you can choose the Azure subscription that contains your database services, and the Azure Data Studio will display all available database services under that subscription, as shown below:

To connect to Azure SQL Database under your subscription, click on the plug icon and provide the required SQL authentication credentials, then click on the Connect option, as shown below:

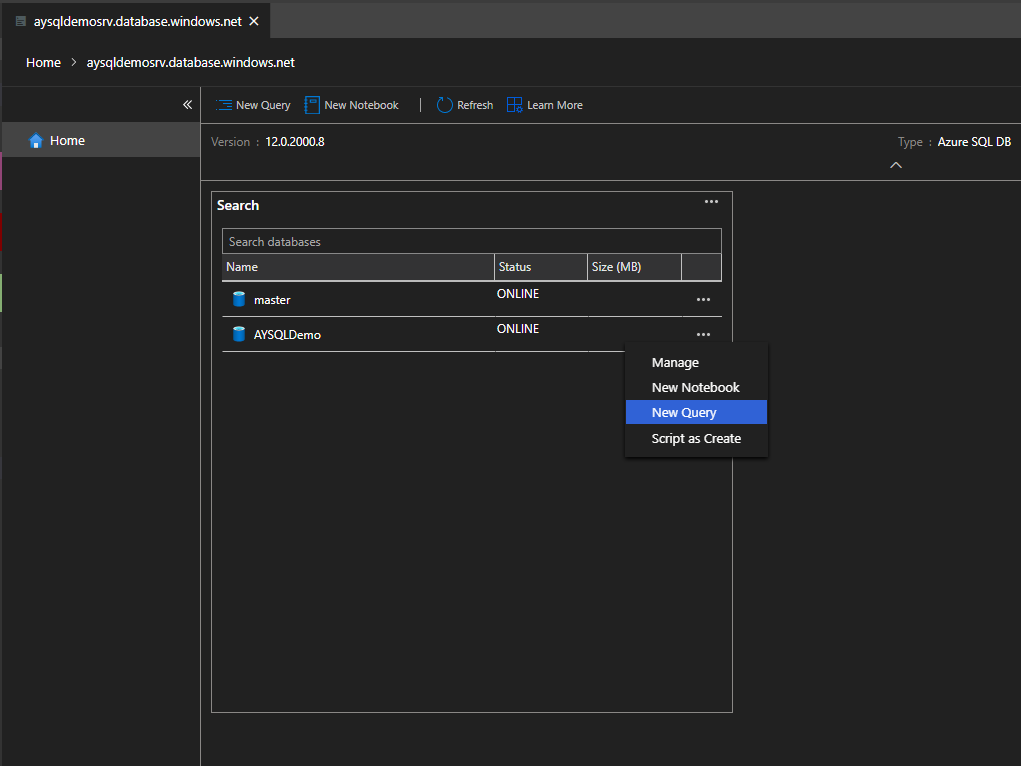
When the connection established successfully, the Home page will be displayed, with a brief description of the Azure SQL Database version and the list of all available databases under that Azure SQL Server, as shown below:
Develop Azure SQL Database
Most of the database development tasks that we performed on the on-prem SQL Server databases can be performed on the Azure SQL Database.
To open the query editor, right-click on the database name and choose New Query option, as shown in the screenshot below:
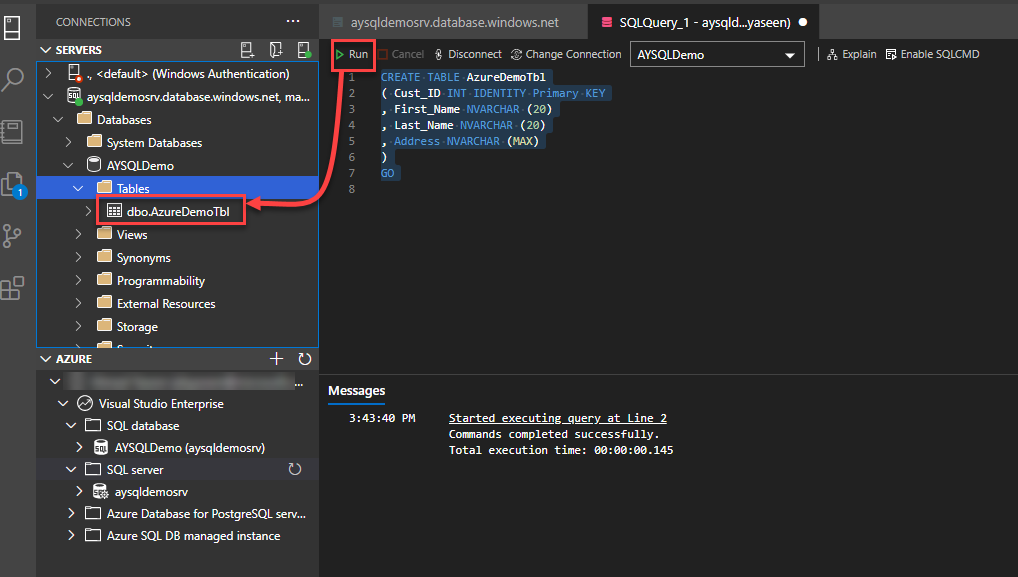
In the opened query editor, create a new database table, using the Create Table T-SQL statement, providing the list of the required columns, the data type of each column, and the indexes and constraints that are needed to connect the tables together. When you complete drawing your table, click on the Run option, and the table will be created directly, as shown below:
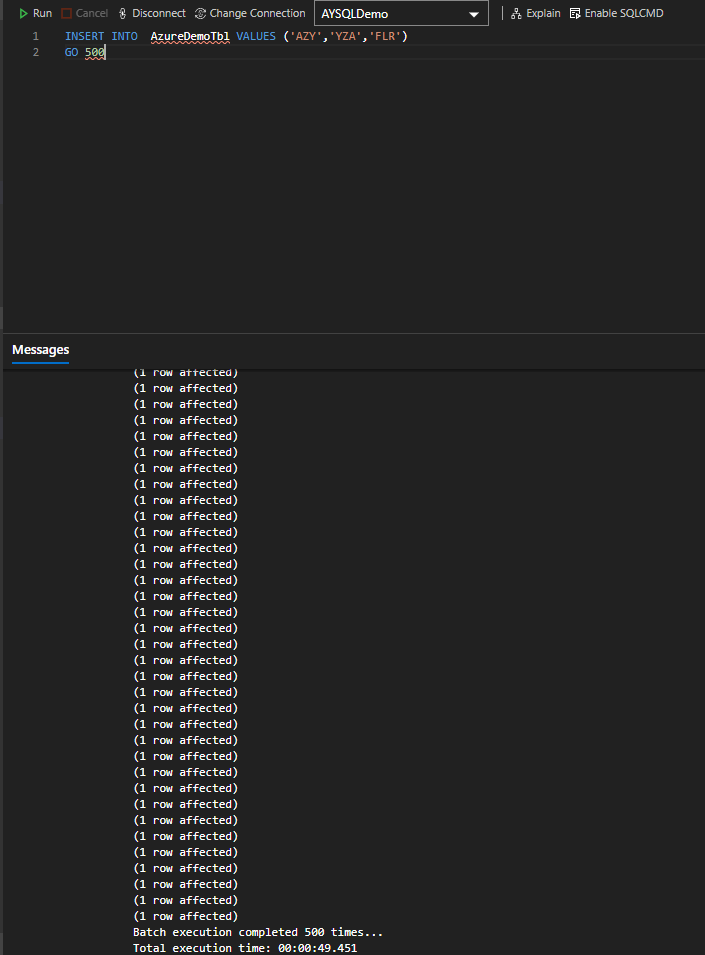
Once the table is ready, we will fill that table with data, using the INSERT INTO T-SQL statement below:
To review the data that is inserted to the table, write a SELECT statement from that table, or simply right-click on the table name and choose SELECT TOP 1000 option, and the data will be displayed in a grid view, as shown below:

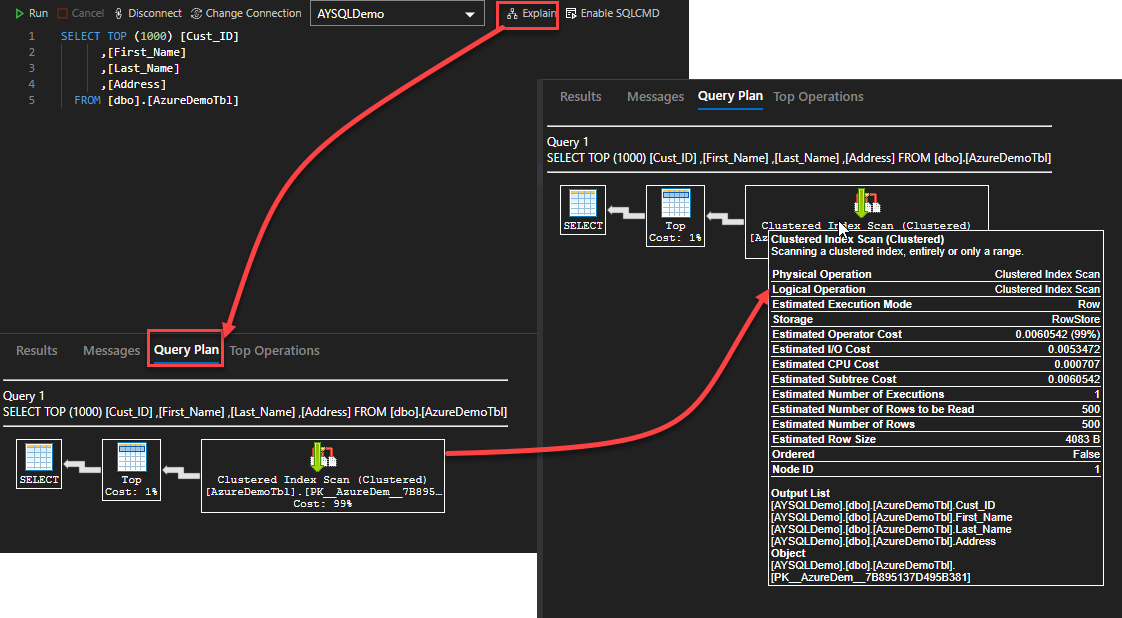
The query editor allows you to tune your queries by studying how the query execution will be performed. This can be achieved by using the Explain option, which displays the estimated execution plan of that query. If you move the mouse pointer over any node of the execution plan, a tooltip will be displayed, showing all estimated execution statistics for that specific operation, as shown below:
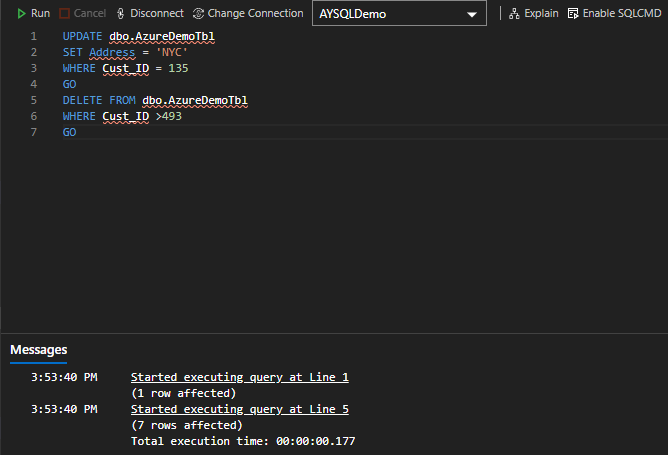
To modify the column value for a specific record, or delete a set of rows that are no longer needed from your Azure SQL Database, you can easily write an UPDATE or DELETE statement in the Azure Data Studio query editor, as shown below:
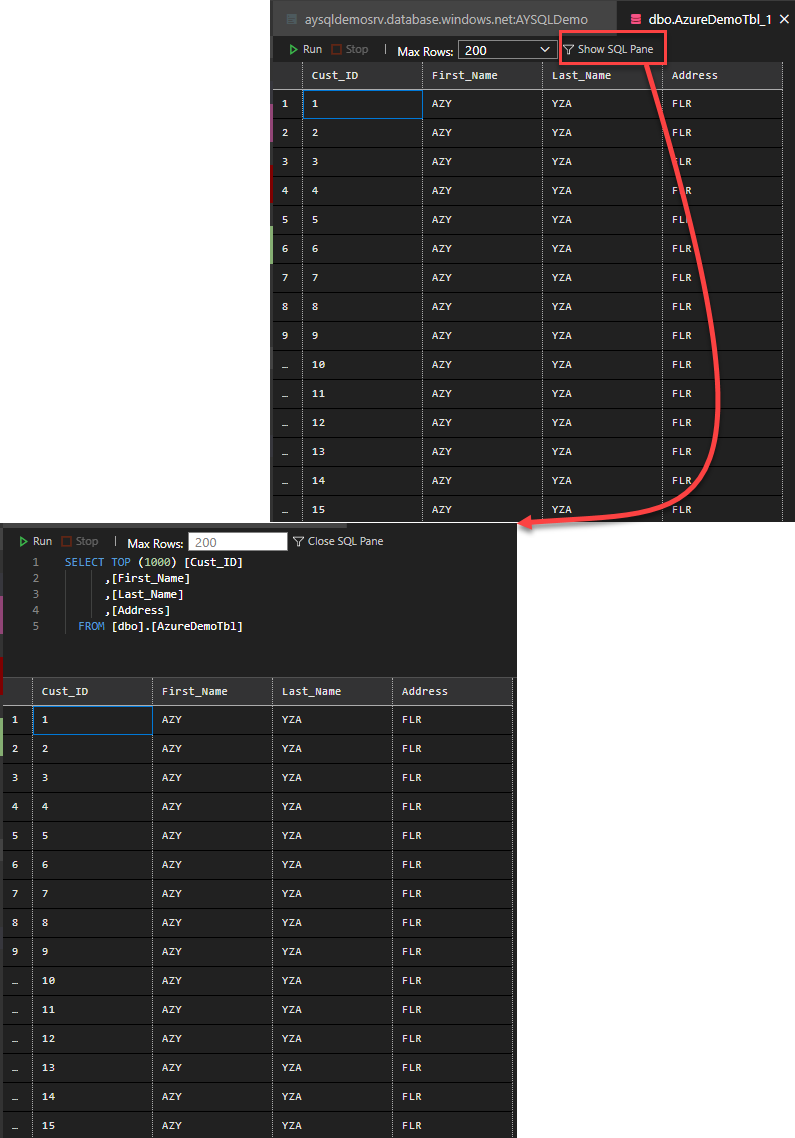
Or simply right-click on the table name and choose the Edit Data option, that opened the table’s data in edit view, allowing you to change any columns value directly. It also provides you with the ability to display the T-SQL statement that is used to view the data, using Show SQL Pane option, edit the query with the condition that filters the required data then run the query to display only the records you are interested in, and the records will be ready for the modification, as shown below:
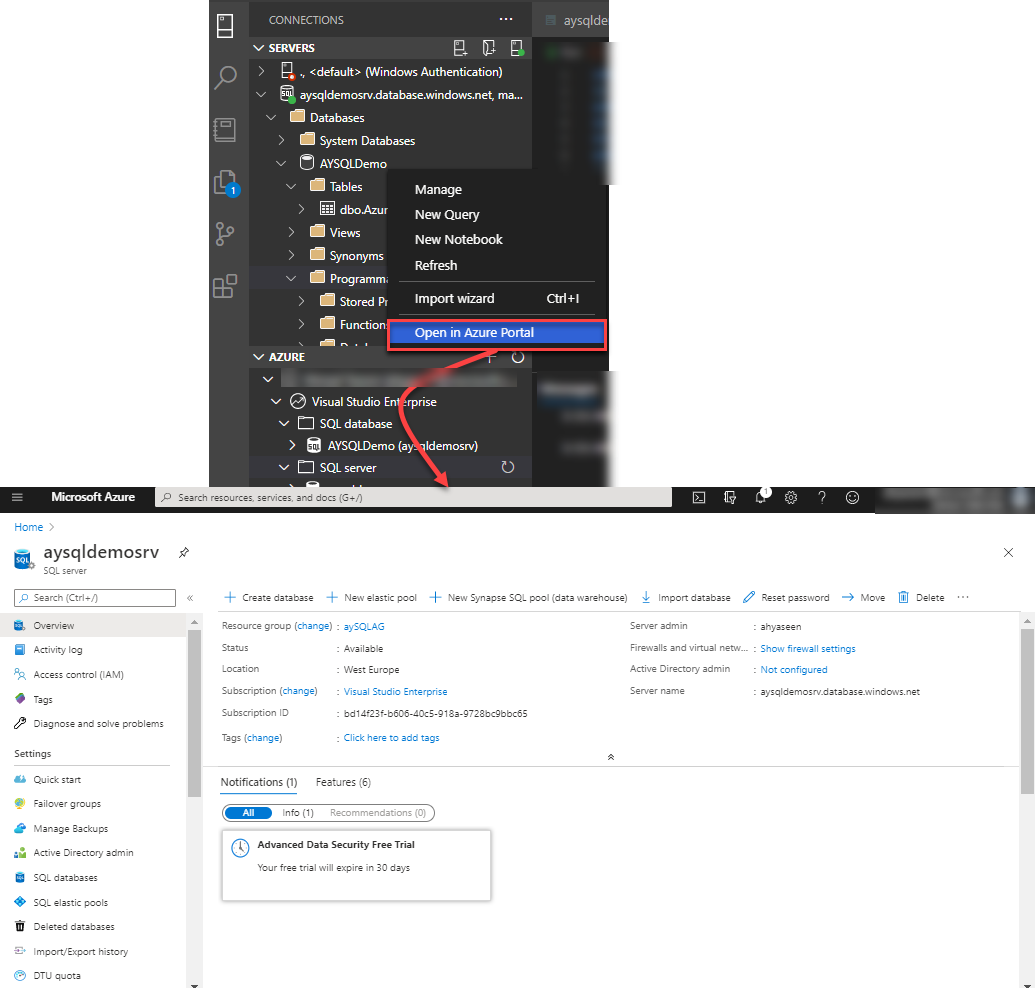
And finally, if you plan to perform any administrative task on that Azure SQL Database or modify any configurable option, Azure Data Studio provides you with an option, Open in Azure Portal, to open that Azure service in the Azure Portal, and perform the required action directly in the Azure Portal, as shown below:
Conclusion
In this article, we showed how to extend the Azure Data Studio functionality using Microsoft or third-party extensions. In addition, we discussed how to connect to the Azure SQL Database service from ADS and develop database objects in it as we do for on-premises databases.
This is the last (but not least) article about Azure Data Studio for now. But I will continue with that series once I find another interesting and useful functionality in ADS for database developers or administrators. I hope you enjoyed that subject and found it useful. Stay tuned for the next subject!

He is a Microsoft Certified Solution Expert in Data Management and Analytics, Microsoft Certified Solution Associate in SQL Database Administration and Development, Azure Developer Associate and Microsoft Certified Trainer.
Also, he is contributing with his SQL tips in many blogs.
View all posts by Ahmad Yaseen
- Azure Data Factory Interview Questions and Answers - February 11, 2021
- How to monitor Azure Data Factory - January 15, 2021
- Using Source Control in Azure Data Factory - January 12, 2021