

In the previous article, Starting your journey with Azure Data Studio, we put the first stone that helps you to be familiar with the Azure Data Studio and start using it to interact with your database objects.
In this article, we will dig deeper and show how to use Azure Data Studio to create the main database objects and interact directly with the data stored in your database using different DML operations.
Azure Data Studio can be used easily to develop your database components and view/modify the data in the database tables. It allows you to run T-SQL queries, review, edit, and export the result to different useful formats, such as CSV, Excel, XML, and JSON, that can be processed by your applications or to be imported by another database engine.
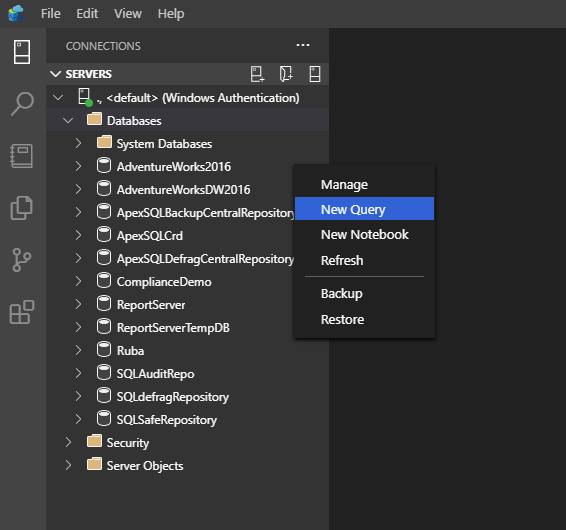
To write a new query, right-click on your database, from the databases list under the Connections tab, and choose New Query option, or simply select the New Query option under the Files menu, as shown below:
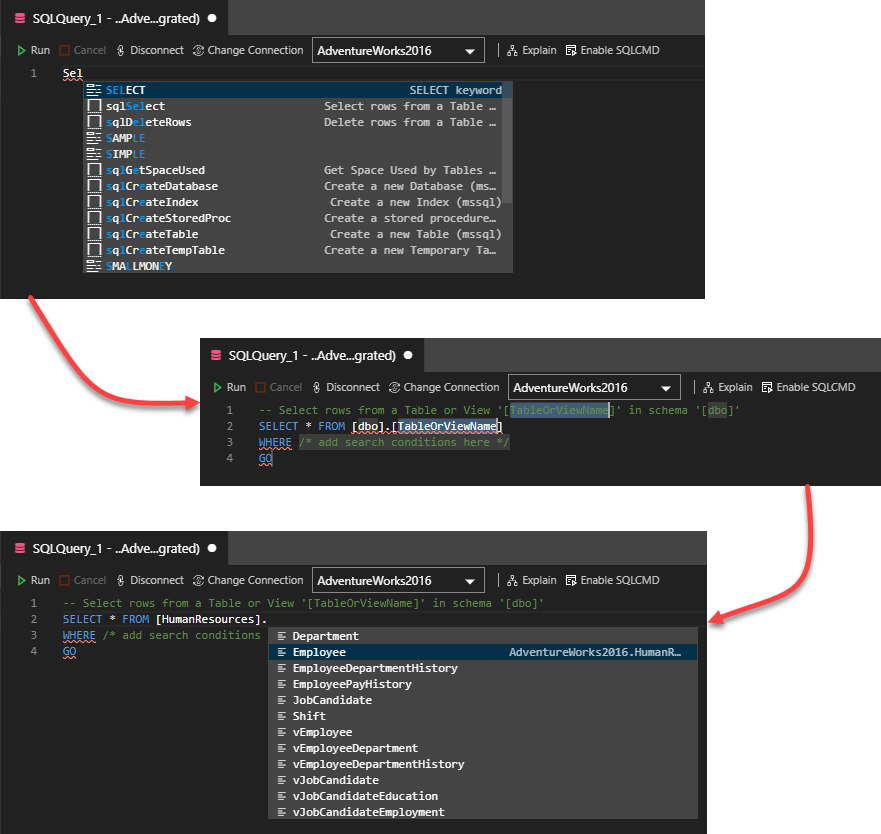
From the opened New Query window, you can easily write your T-SQL script with the help of the built-in IntelliSense feature that provides you with all options to complete your code automatically, by providing few characters only. For example, writing “SEL” only will provide you with all commands that contain these characters, with the first valid one is the “SELECT” statement.
Besides, the SQL code snippets feature helps in providing the requested SQL syntax that you can use to create the different SQL Server objects, such as databases, tables, views, or stored procedures or modifying the existing objects. What is requested from your side is filling the variable information in the provided snippet and enjoy the simple developing process.
In the example below, we only write the first three letters from the “SELECT” statement, and the IntelliSense feature will complete the SELECT statement automatically. Also, the code snippets feature provides us with the “select rows from a table” template, and you can drag it directly to your code by clicking on it, then fill the name of the table and provide the search condition directly without any complexity in the coding process, taking into consideration that the IntelliSense feature also helps in providing the list of database objects that we can use in our query, as shown below:
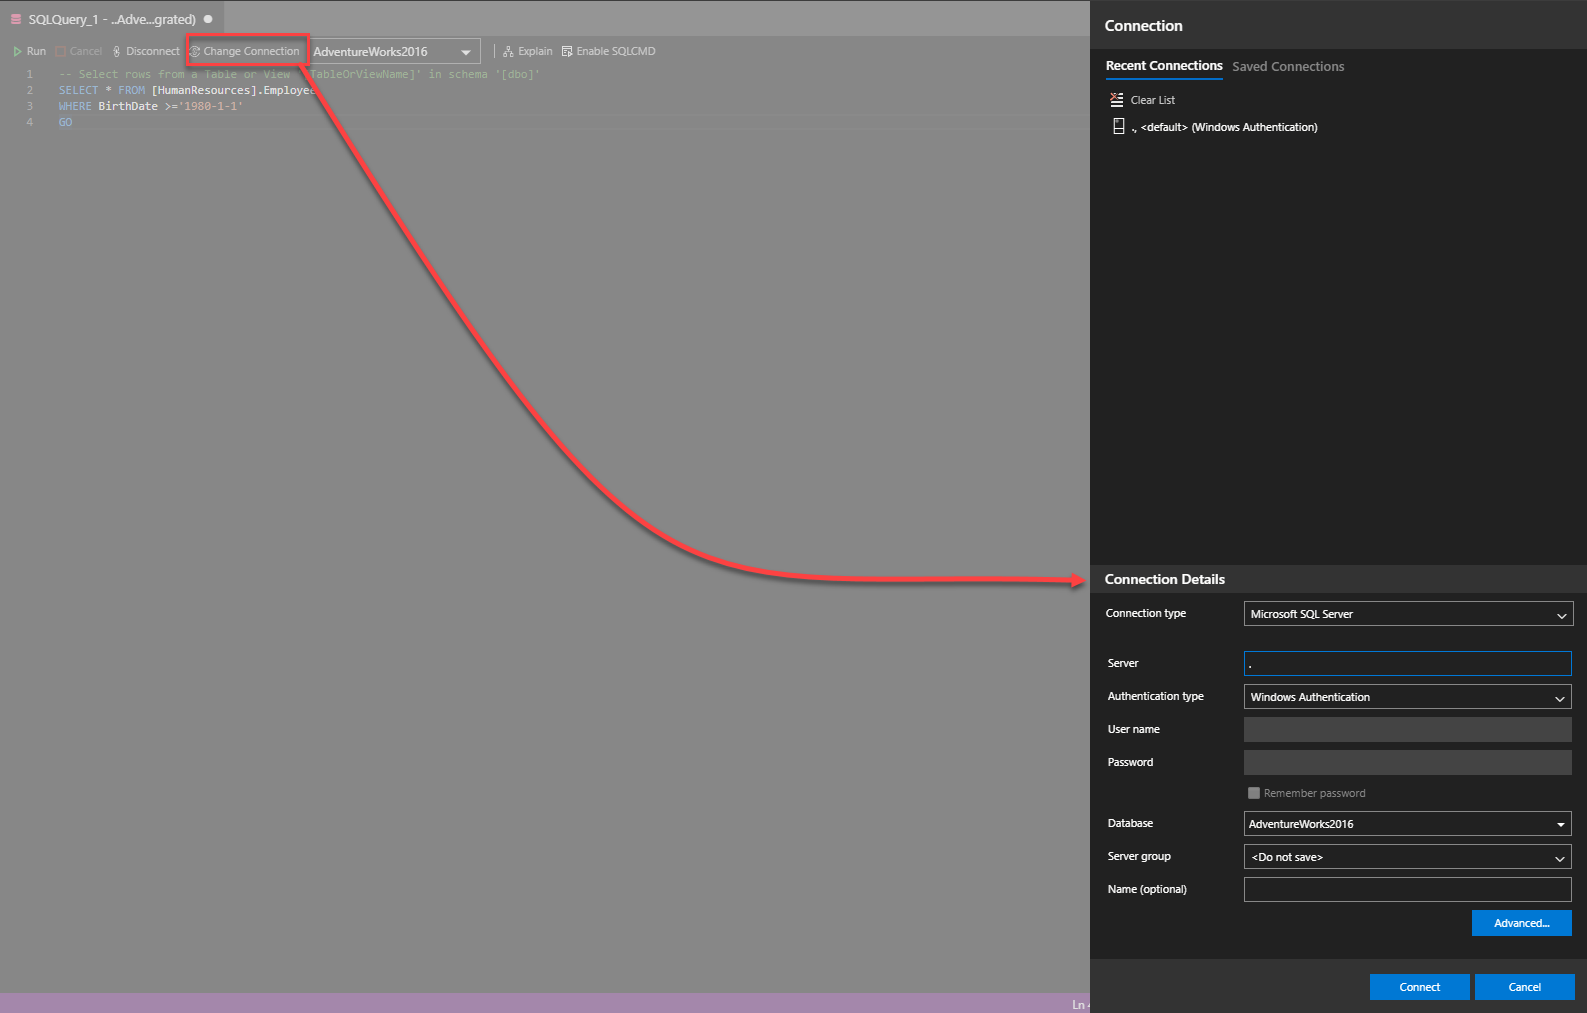
From the same query editor, you can easily change the current connection, if you manage to execute the query in another SQL Server instance. This can be done by clicking on the Change Connections option and select the new connection from the recently connected servers or the saved connections, or provide the new connection information, includes the server name, credentials and authentication mode, in order to connect to the new instance, as shown below:
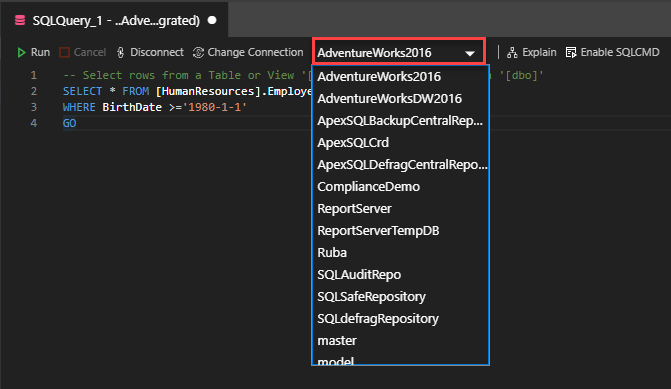
With the ability to move between the current connection databases, by selecting the new database name from the databases drop-down list, or easily include the USE database name clause at the top of your query, as shown below:
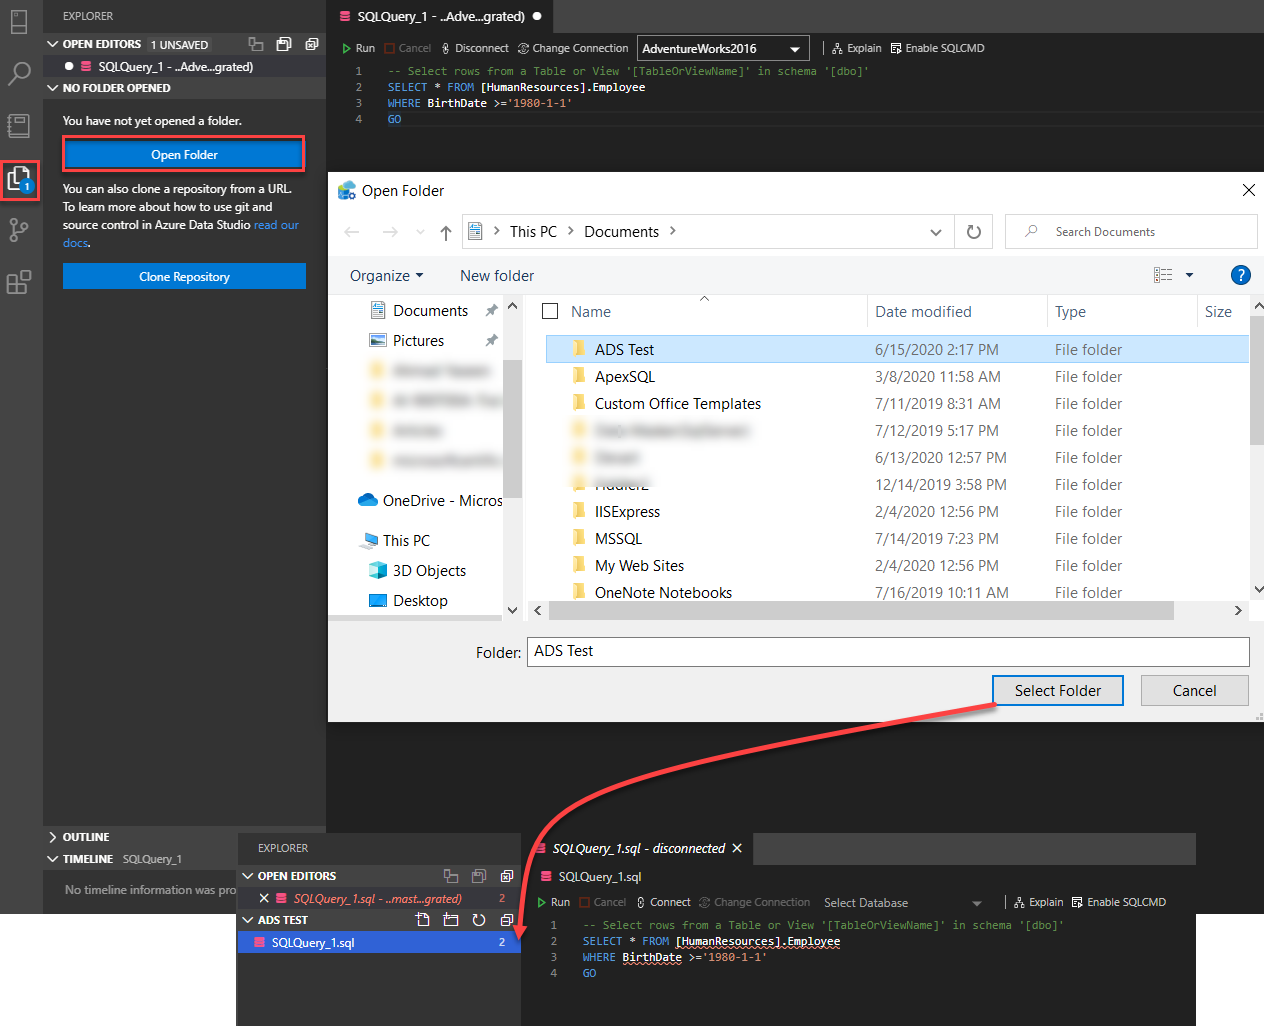
Azure Data Studio provides you with the ability to organize your query files within folders and save the related script files in a specific folder. To achieve that, browse the Explorer tab and choose the Open Folder option to assign a specific folder for the current project and save the opened script files to that folder, with the ability to save the files to a Git repository as we discussed in the previous article, as shown below:
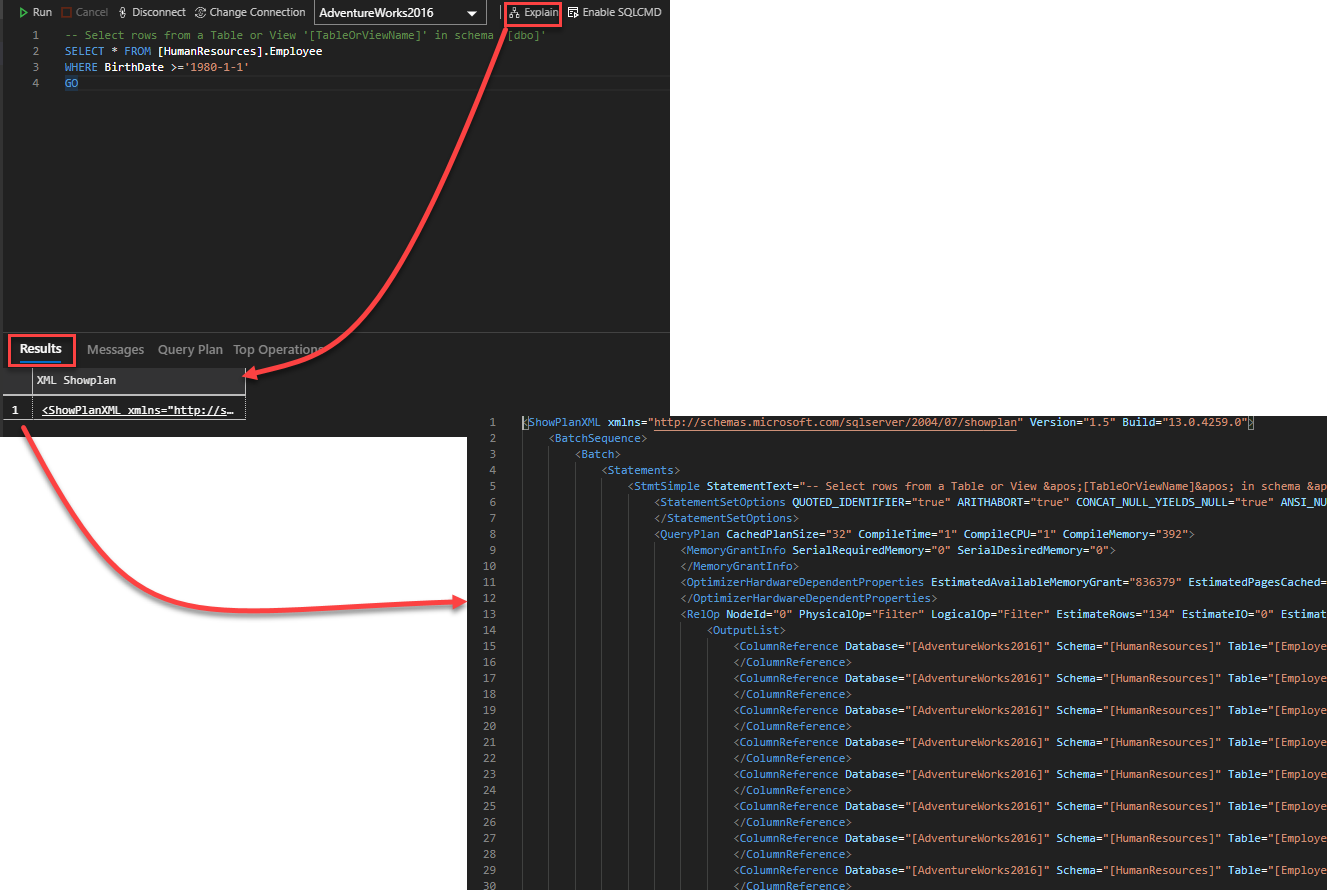
The query editor of the Azure Data Studio is very rich querying console, where it provides you with the ability to analyze the query that you write before executing it, by generating an estimated execution plan for that query and provide full analysis about that query.
Once you finish writing your query, click on the Explain option, and check the Results tab that contains the execution plan for that query in XML format. To review the XML plan for the query, click on the plan XML link and the XML plan will be opened in a separate window that allows you to review it easily, as shown below:
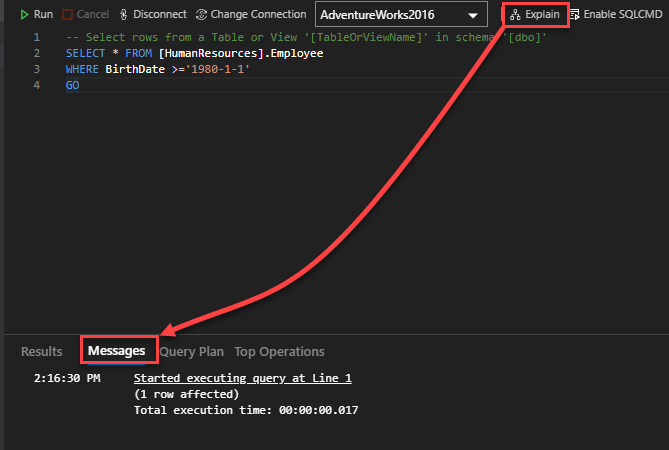
In addition to the XML plan, the Explain option provides you with the time that is required to generate that plan and if the query has any validation error, under the Messages tab, as below:
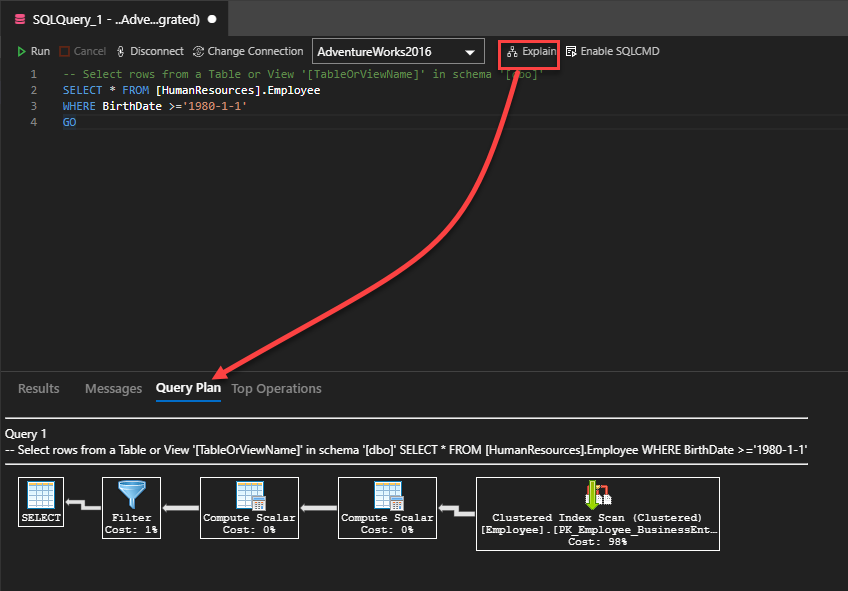
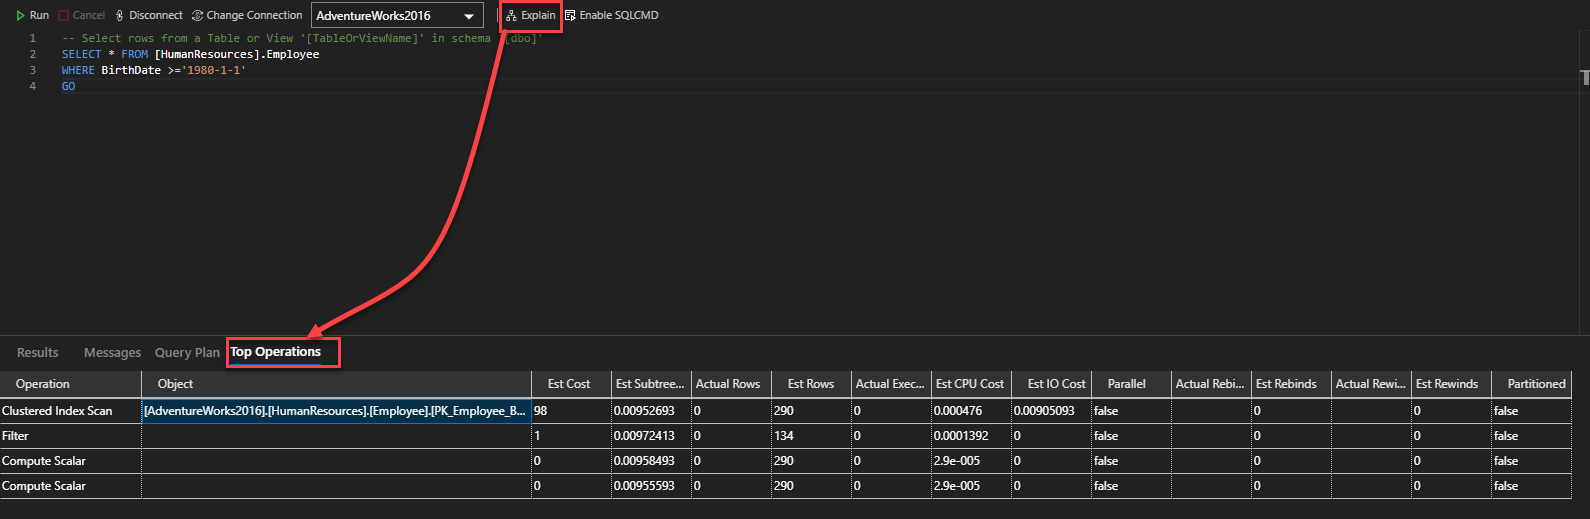
The most useful result, for me, from the Explain option is the graphical execution plan of the query, that contains the expected execution map for that query with the components that are affecting the performance of the query, allowing you to tune the performance of that query before using it in the production environment, as below:
To dig deep in the graphical execution plan statistics, the Top Operations tab provide statistical information about each component in the execution plan, that helps you to identify the bottlenecks in the query and enhance it, as follows:
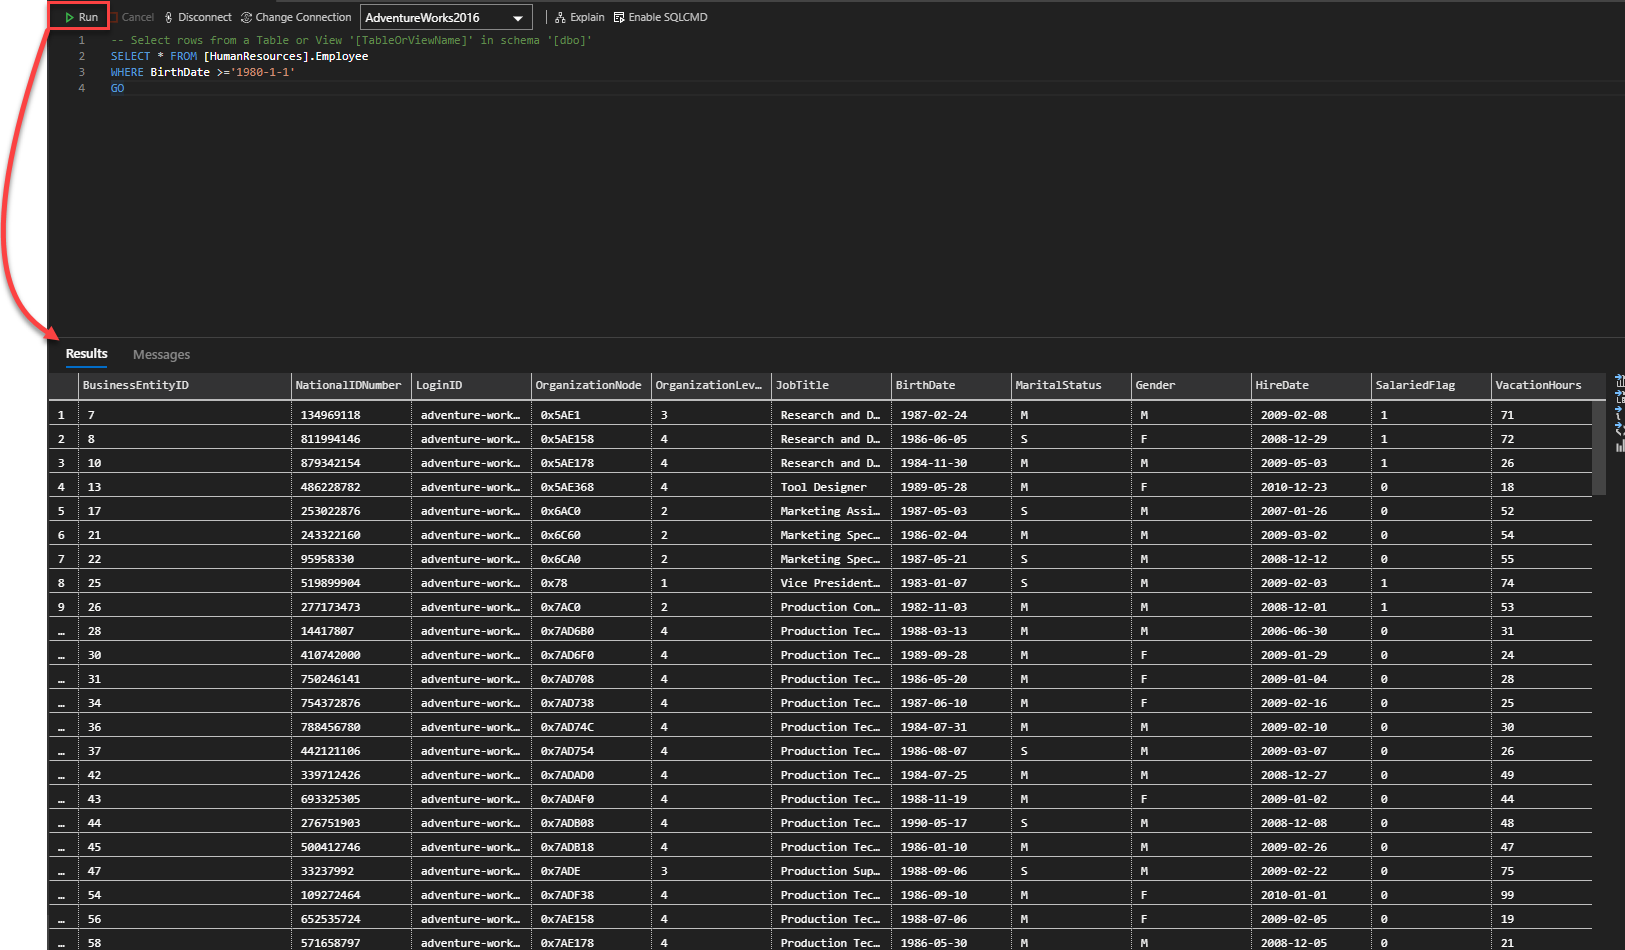
After checking the query and enhance it to retrieve the requested data in the best way, click on the Run option to execute the query and retrieve the needed records from the database table, and the records will be returned, by default, in a grid format, similar to the grid returned by the SSMS, as shown below:
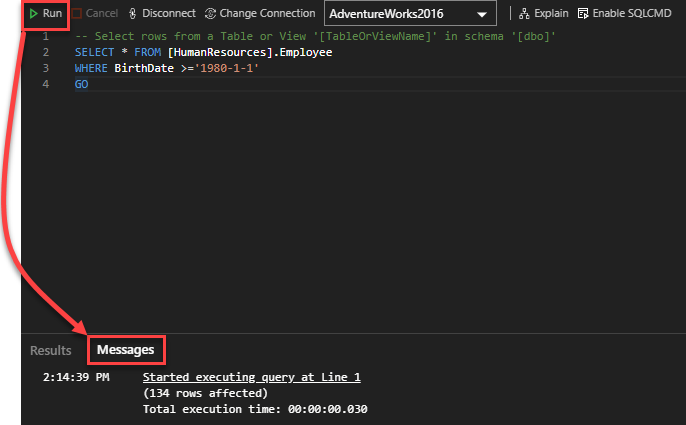
Without enabling any type of statistics, the Azure Data Studio provides you with the number of rows returned by your query and the time it takes the SQL Server Database Engine to return the data, as shown below:
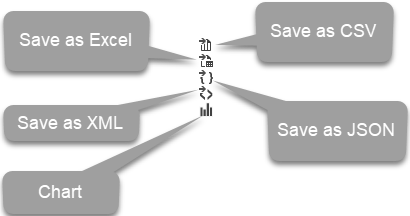
Another special feature in the Azure Data Studio is the ability to export the data that is returned by any query to different formats that can be processed by your applications, used as input for another database engine, or stored in on-prem or Azure storage.
These options include saving the query result to an Excel file, a CSV file, an XML file, a JSON file, or display it using a chart if possible. Below is the description for each icon that can be used as an export destination:
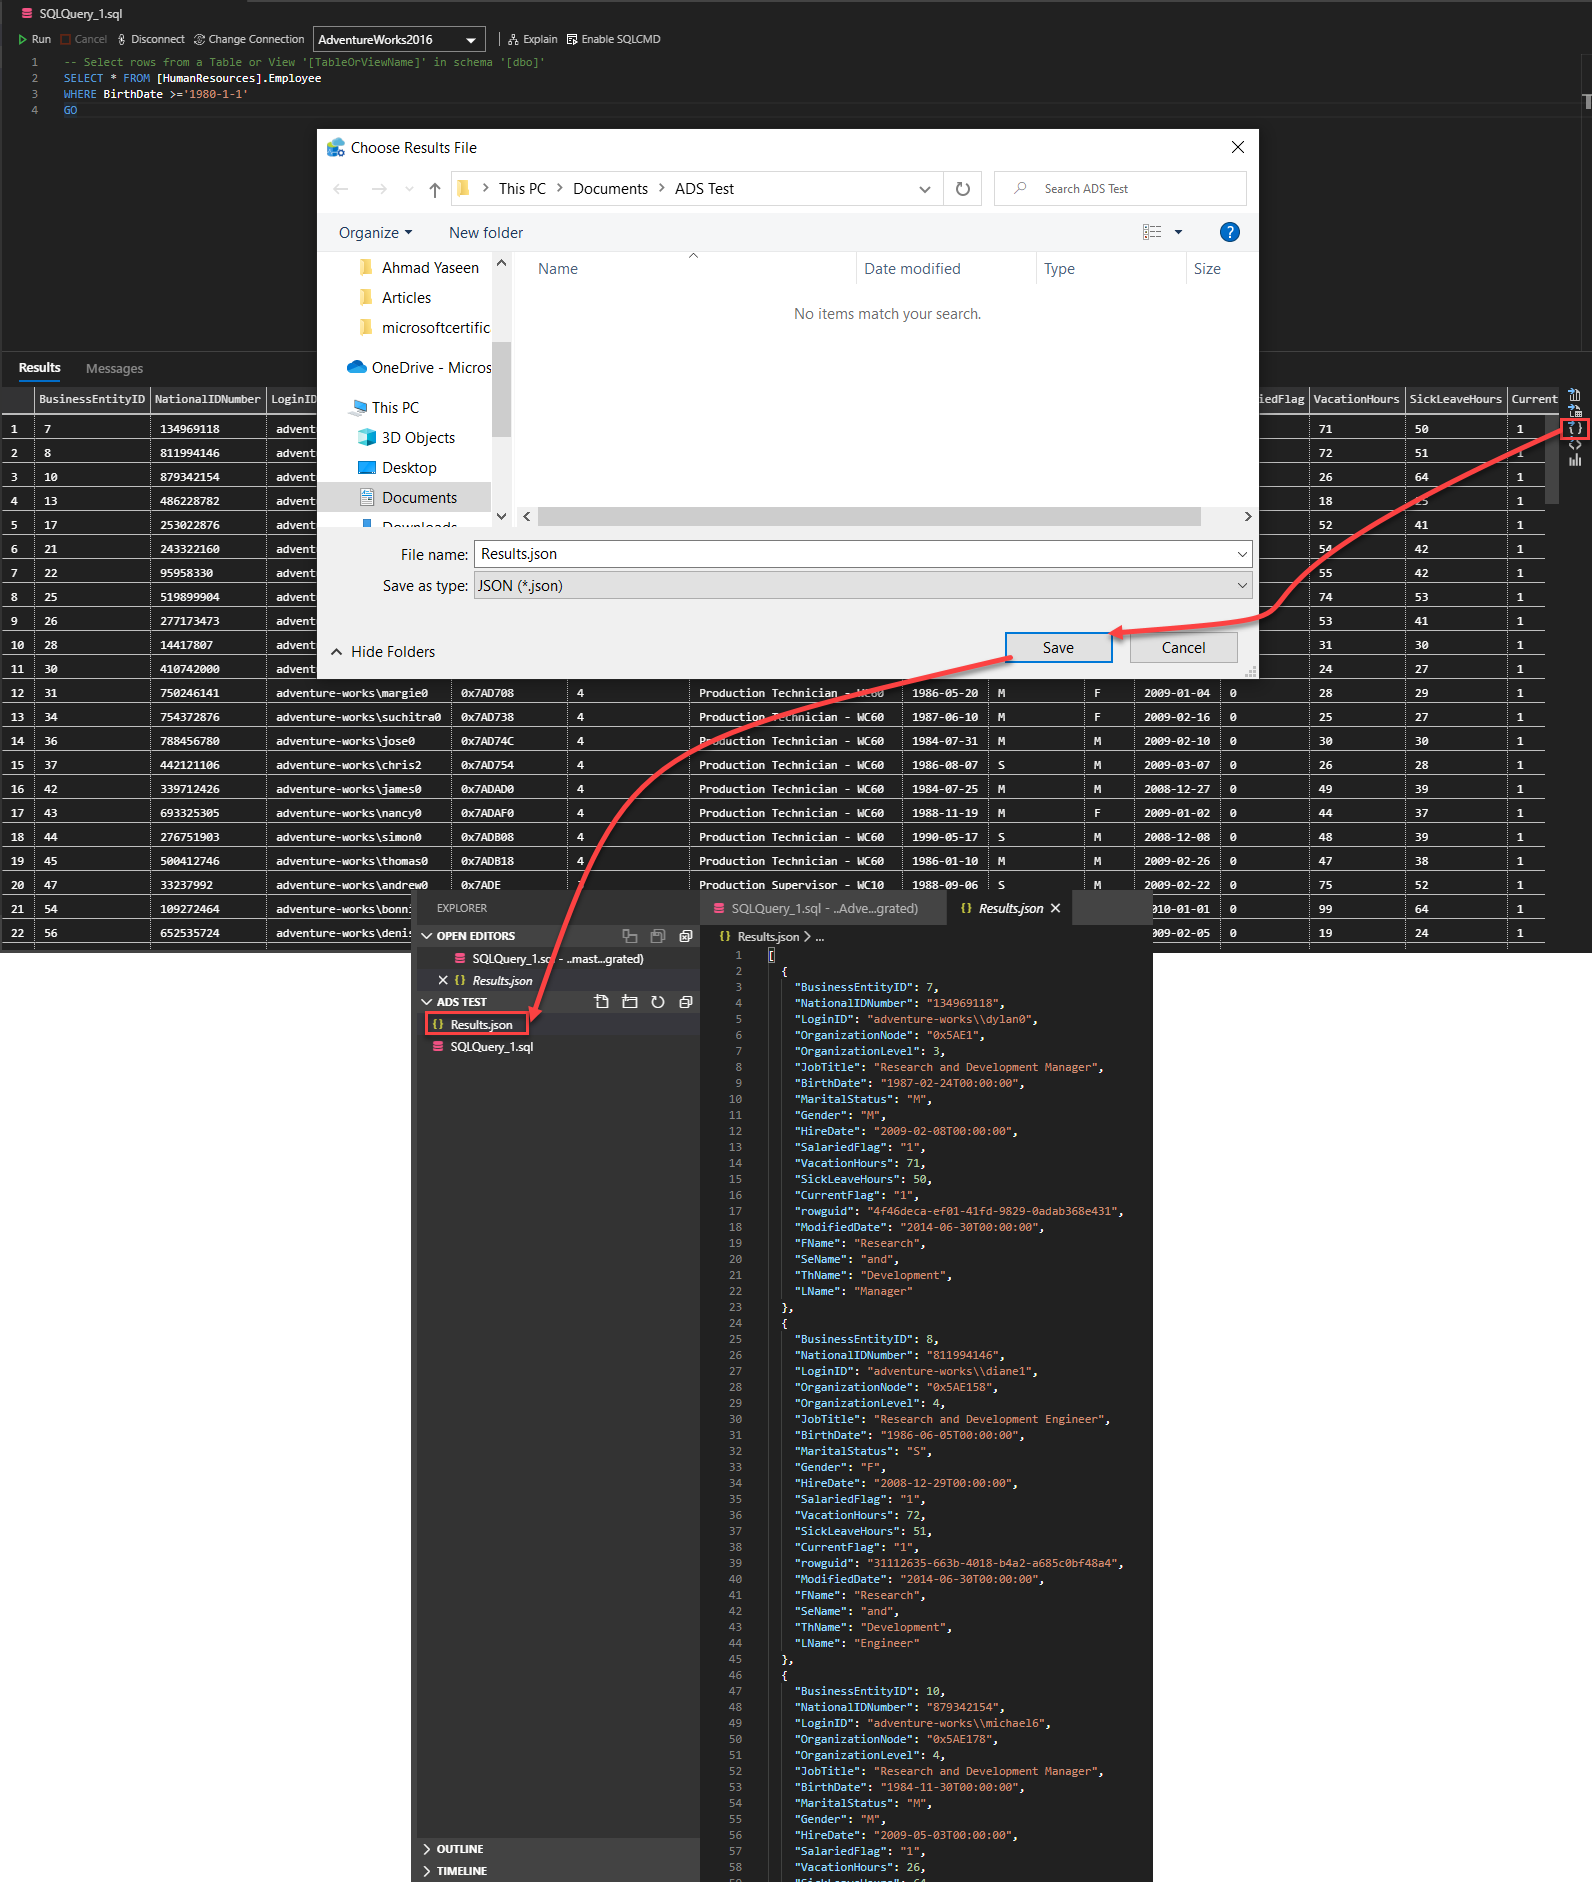
For example, if you manage to export the records that are returned from the previous query to a JSON file in order to be processed by our local system. To achieve that, click on the Save as JSON icon, specify where to save that file, with the default folder is the current project folder we created previously, then the file will be saved and opened directly once created to allow you to review it, as shown below:
Azure Data Studio contains a rich query editor that allows you to write any DDL or DML commands with the help of the built-in IntelliSense and code snippet features.
Assume that we need to create a new database using that studio. As the Azure Data Studio is a development console, there is no GUI option to create a new database or database objects using a wizard. Instead, you need to open a new query window and create the database using CREATE DATABASE T-SQL statement directly, as shown below:

Once the query is executed, refresh the databases list within the Connections tab, and you will see that the database is created successfully, as below:

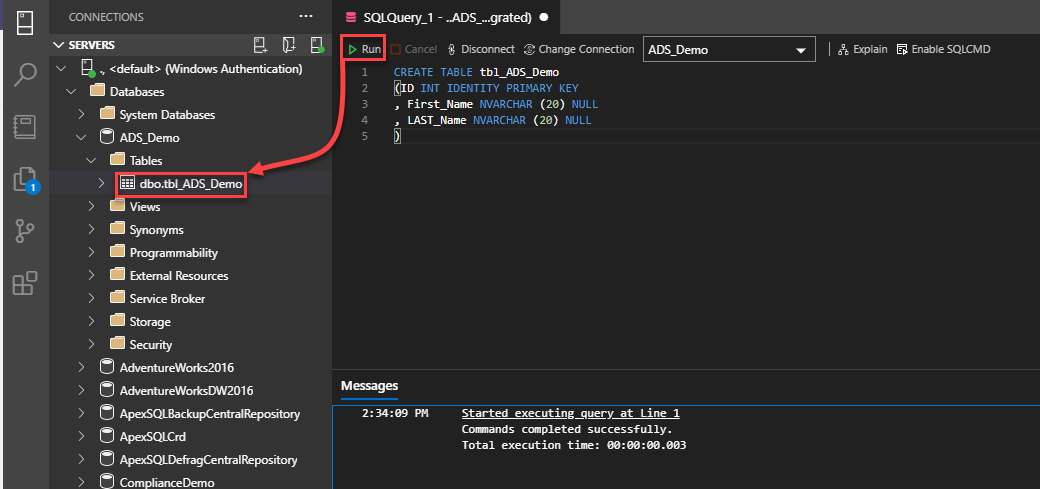
To create a new table inside the created database, you need to use the CREATE TABLE T-SQL statement, providing the column name, data types, and any requested constraint or index, then execute the query and refresh the database tables, where the table will be created successfully, as below:
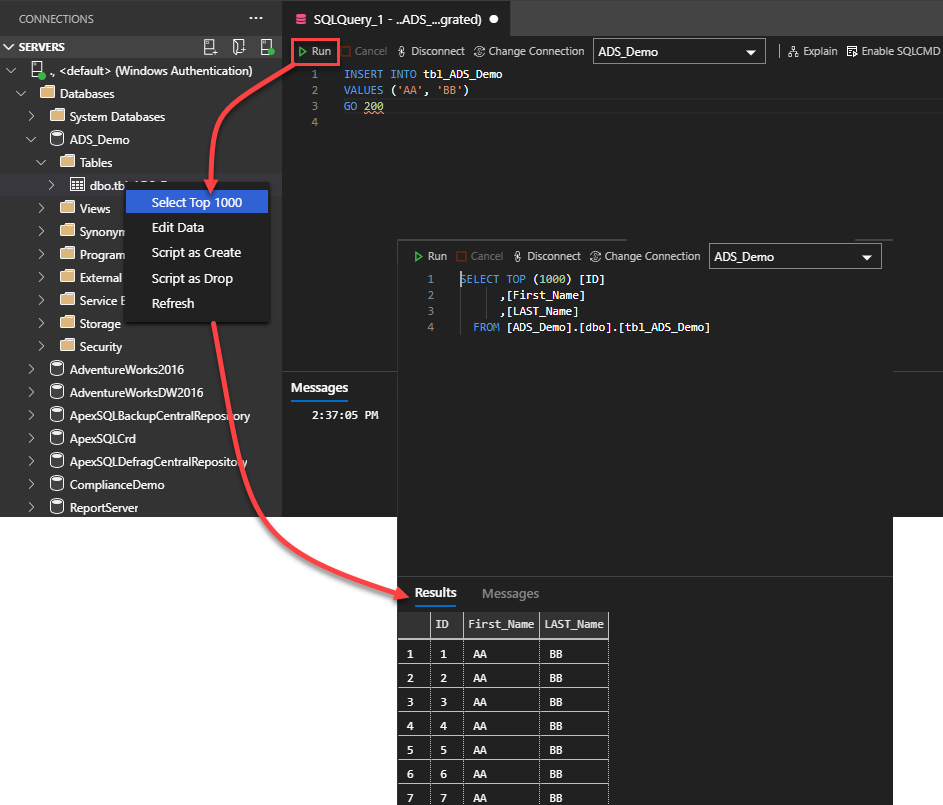
Now we are ready to insert new records to the created table. This can be achieved using the INSERT INTO T-SQL statement by providing values for all mandatory columns in the correct order. After executing the INSERT INTO query, we can confirm that the data is inserted correctly by writing a SELECT statement from that table or simply right-clicking on the table and choose SELECT TOP 1000, and the data will be displayed in a grid format, allowing you to review and analyze it easily, with the ability to export it to different formats as mentioned previously:
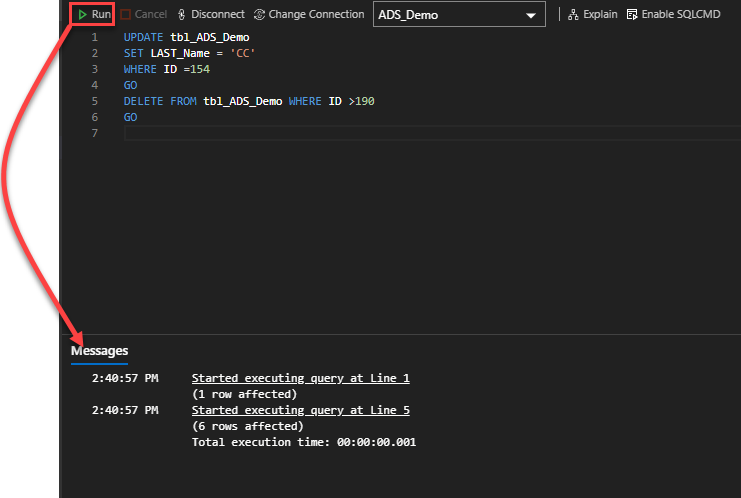
Azure Data Studio supports writing all types of T-SQL commands, including the data modification statements. In the example below, we write two statements; the first one is used to modify the last name for a specific user, and the second one is used to delete few records that are no longer needed. After executing the queries, the query editor will provide you with the number of affected rows from each statement and the time consumed to execute the whole batch, with the ability to calculate the execution time for each statement using the provided starting time:
Conclusion
In this article, we went through different database development functionalities that are supported by the Azure Data Studio. In the next article, we will try to show more complex tasks that can be performed easily using the Azure Data Studio. Stay tuned!

He is a Microsoft Certified Solution Expert in Data Management and Analytics, Microsoft Certified Solution Associate in SQL Database Administration and Development, Azure Developer Associate and Microsoft Certified Trainer.
Also, he is contributing with his SQL tips in many blogs.
View all posts by Ahmad Yaseen
- Azure Data Factory Interview Questions and Answers - February 11, 2021
- How to monitor Azure Data Factory - January 15, 2021
- Using Source Control in Azure Data Factory - January 12, 2021