
This article will deploy SQL Server on Azure VM using a Jupyter notebook in Azure Data Studio.
Introduction
The SQL on Azure VM is an Infrastructure-as-a–Service(IaaS) for migrating or deploying SQL Server in Azure cloud Infrastructure. You get complete control over SQL Server, OS similar to an on-premises SQL Server.
You can use the following feature that improves the working experience over a traditional SQL VM.
- Automated patching
- Automated backup
- High Availability
- Different VM configuration and easy to upgrade resources
- Automated storage configuration
- Different licensing models such as Pay-as-you-Go, Bring your Own licenses, Azure Hybrid
You can refer to the article, Azure SQL Database vs SQL Server on Azure VMs to compare SQL on Azure VM (IaaS) and Azure SQL Database (PaaS).
In the article, Deploy SQL Server on Azure VM using the Azure Portal, we explored the Azure portal for configuring SQL on Azure VM.
Deployment of SQL Server on Azure VM using Azure Data Studio
Azure Data Studio is a cross-platform data development application for SQL Server. We can use it for deploying Azure resources such as Azure SQL Database, Azure SQL Managed Instance and SQL Server on Azure VM. After going through the GUI deployment wizard in ADS, it generates a Jupyter notebook with Azure CLI scripts and instructions. This notebook comes in handy for deployments, automation. You can also share these notebooks with peers for using them or view scripts, their outputs.
- Note: You should go through Deploy SQL Server on Azure VM using the Azure Portal to get familiar with deploying SQL on Azure VM using a GUI Azure portal
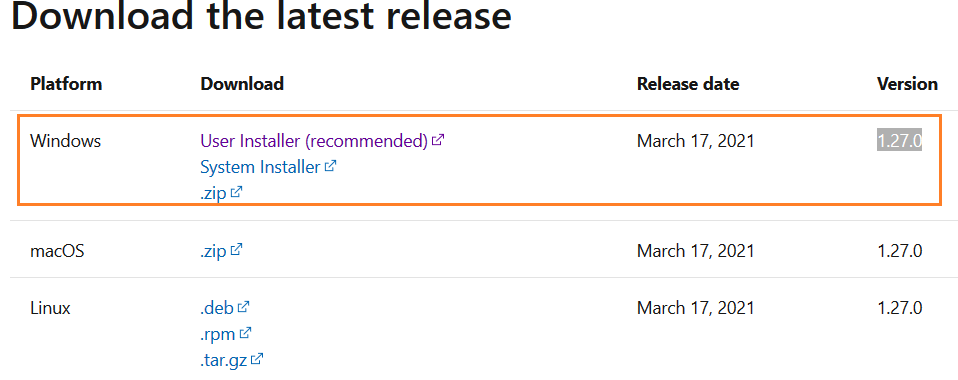
For this article, you will require the Azure Data Studio latest version. This article uses ADS version 1.27.0. You can download ADS on Windows, macOS or Linux operating systems.
Launch ADS and click on New deployment.
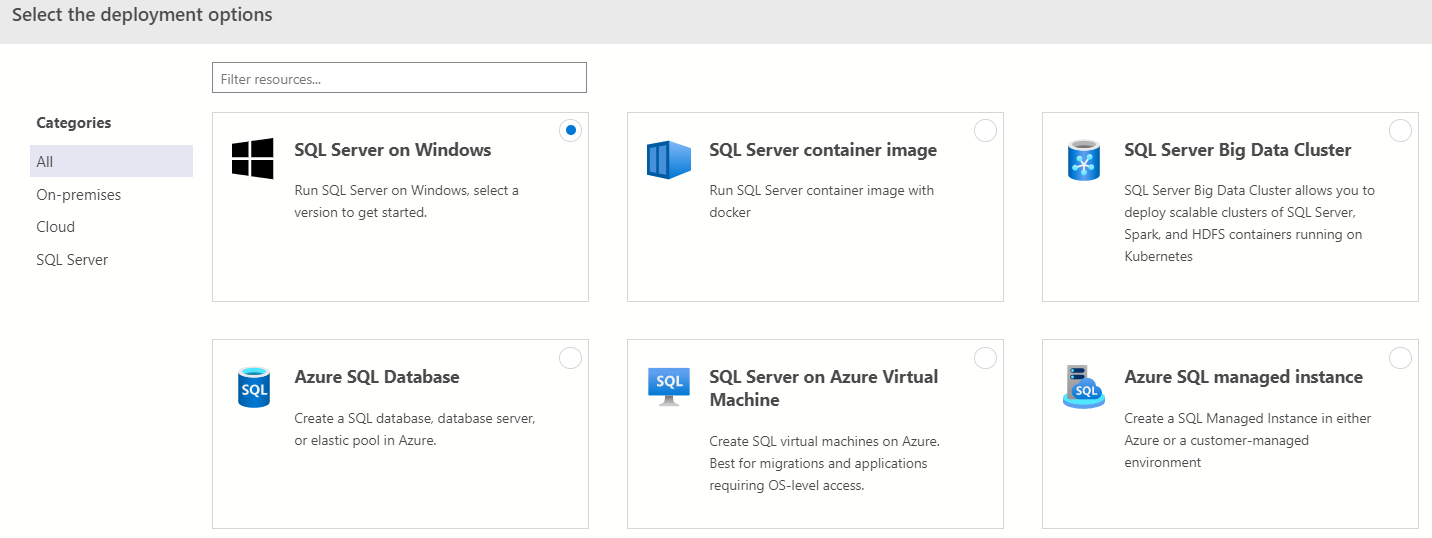
Click on SQL Server on Azure Virtual Machine suitable for migration and applications requiring OS-level access. Let’s explore the steps for configurations of Azure VM for SQL Server.
Step 1: Deployment pre-requisites
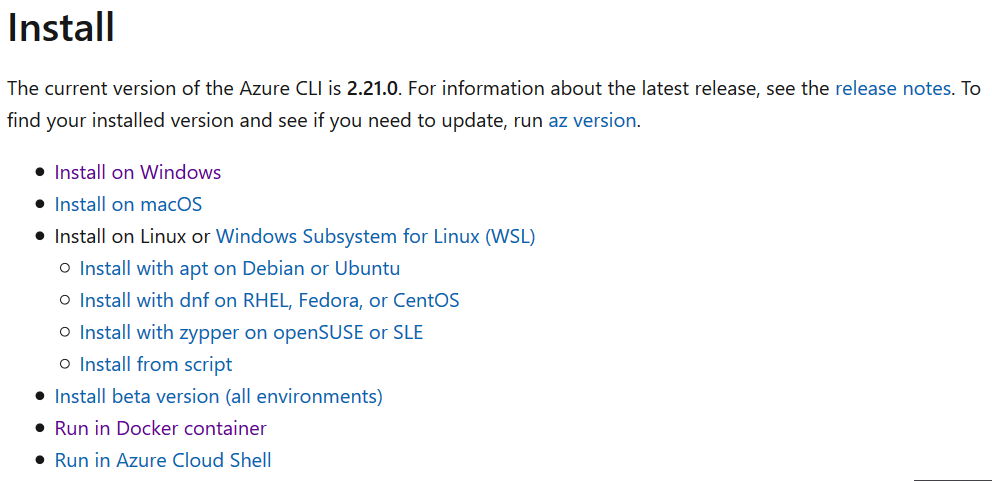
The first step is to download Azure CLI tools. You can install it using the Install theAzure CLI or click on Install tools on this page.
- Note: The current version of Azure CLI is 2.21.0
Currently, the following figure shows status as Not Installed in my lab environment.

Once the Azure CLI is installed on your system, restart Azure Data Studio, and you can view its status as installed and directory.
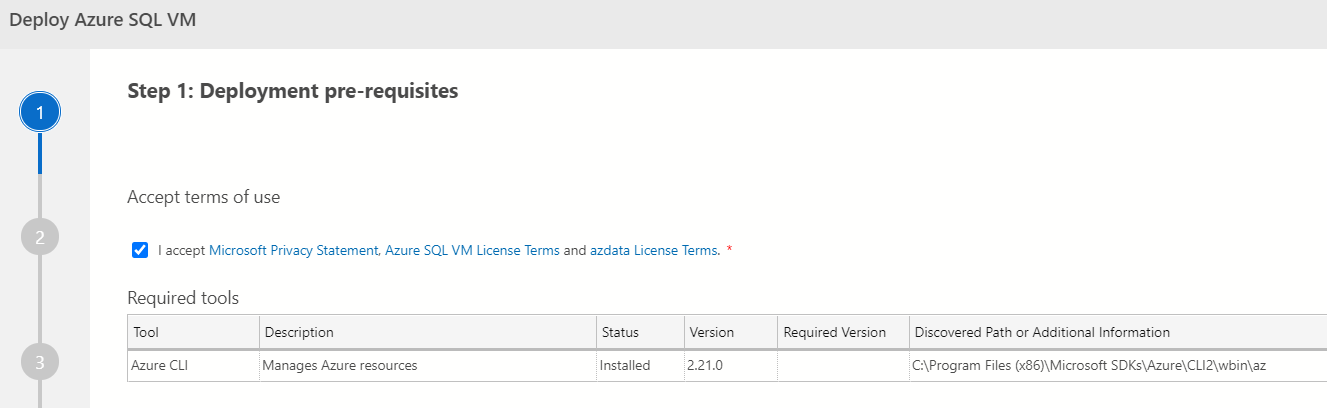
Now, put a tick for accepting the Microsoft privacy statement, Azure SQL VM license terms and azdata license terms and click Next.
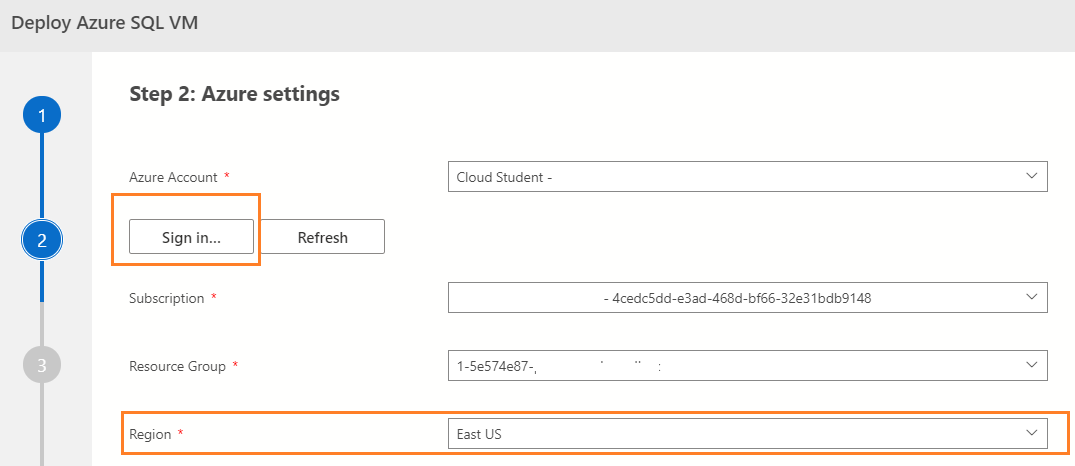
Step 2: Azure settings
In step 2, connect to your Azure account using your credentials using the Sign-in button. For the sign-in, enter your Azure credentials and authenticate for use in the ADS. Once you have signed in, it shows the account name from which you are signed in.
After the authentication, you get a subscription ID and resource groups. Select the resource group, Azure region for deploying SQL Server on Azure VM.
In this article, for demonstration, I use the East US location, as shown below.
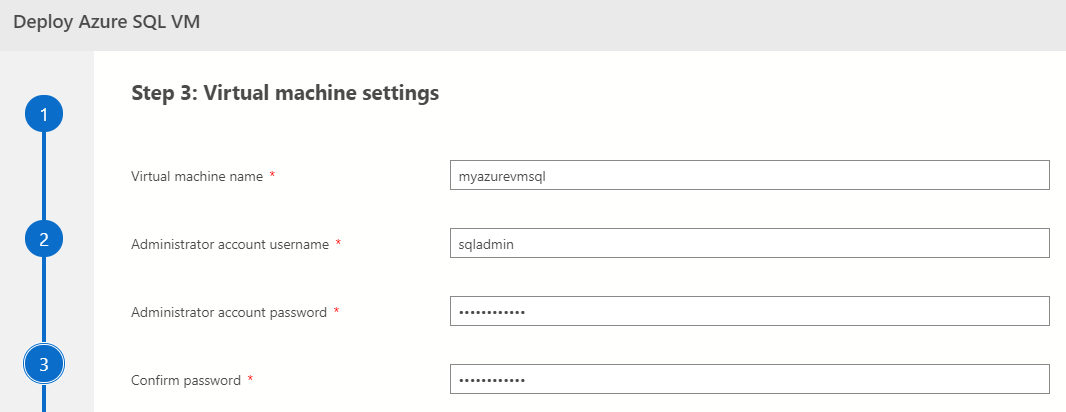
Step 3: Virtual Machine settings
In this step, we specify the VM configurations for SQL Server using the following.
- Azure virtual machine name
- Administrator account user name
- Administrator account password
- Image: Select the SQL Server image with the OS using the drop-down list. It has various images for deployment on both Windows and Linux OS. In this lab environment, I choose SQL Server 2019 on Windows Server 2019
- Image SKU: Select the edition such as Standard, Enterprise, developer. For the developer, choose sqldev, as shown below

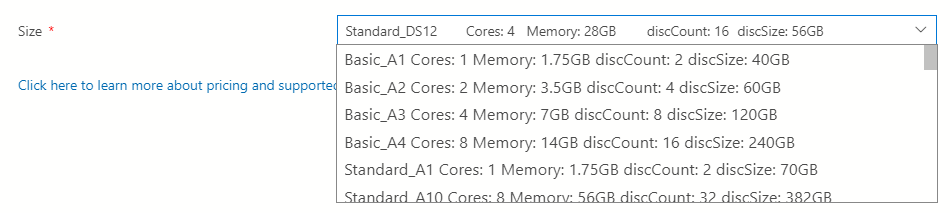
Scroll down and select the VM size. Azure provides various machine sizes to choose from depending on the vCPU, RAM, supported disk type and pricing. It gives a brief description of each VM machine. However, you should refer to Azure VM for reference purposes before deploying SQL Server.
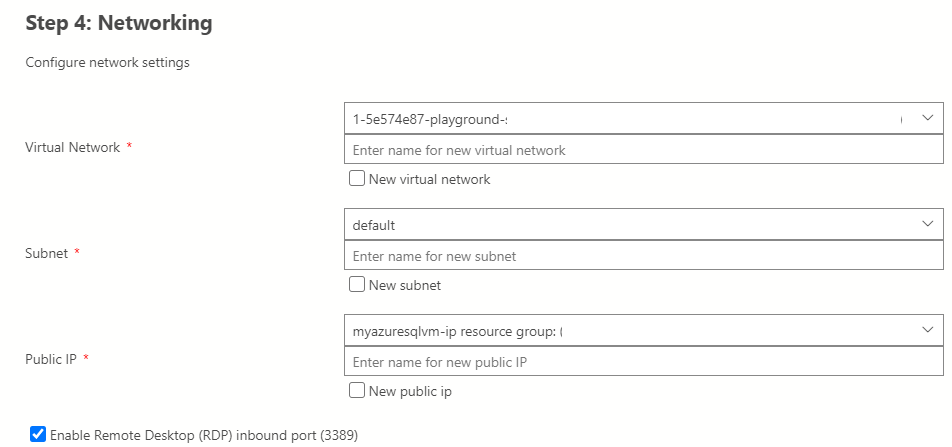
Step 4: Networking
In the networking, select the virtual network, subnet and public IP configurations. If you don’t have any existing VM networks, choose the option – -New virtual network.
Also, put a tick on the checkbox – Enable Remote Desktop (RDP) inbound window.
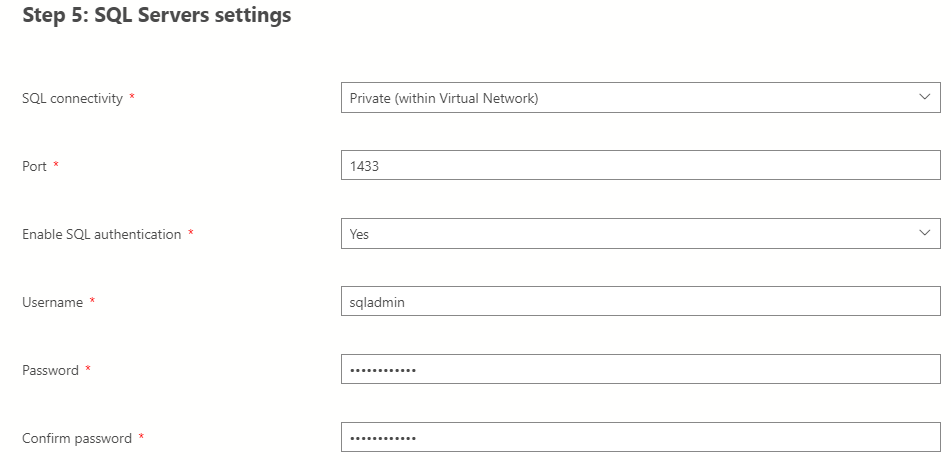
Step 5: SQL Server Settings
In the next step 5, SQL Server settings, we specify the following values.
- SQL Server connectivity: Private (within Virtual Network)
- Port: 1433 (default). If you want a non-default port, specify the port number
- Enable SQL Server authentication: Yes
- User name and password: Here, specify the administrator credentials for SQL Server authentication
Click Next and review your SQL on Azure VM configurations before deployment.
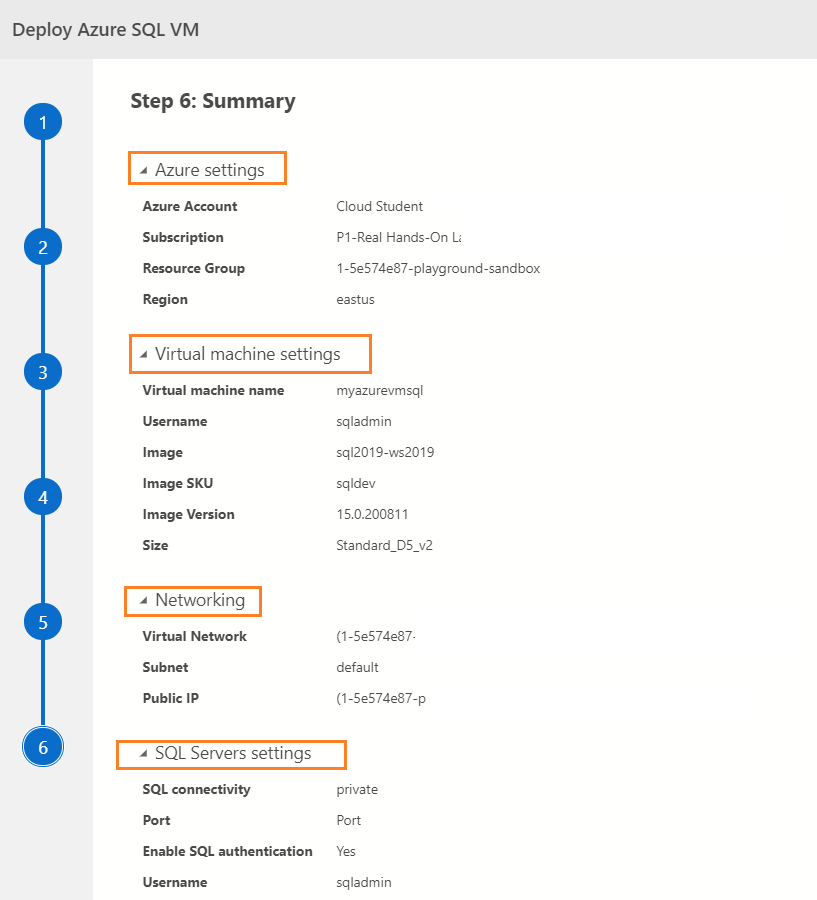
Click on Select, and it opens a SQL notebook with Azure CLI scripts in the Azure Data Studio.
Explore Jupyter notebook for deploying SQL Server on Azure VM
Azure Data Studio Jupyter notebook uses Python 3 kernel for running the script in the notebook. If you do not have Python 3, it automatically installs it for you.
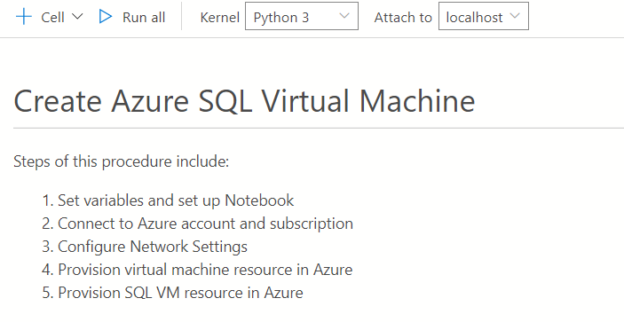
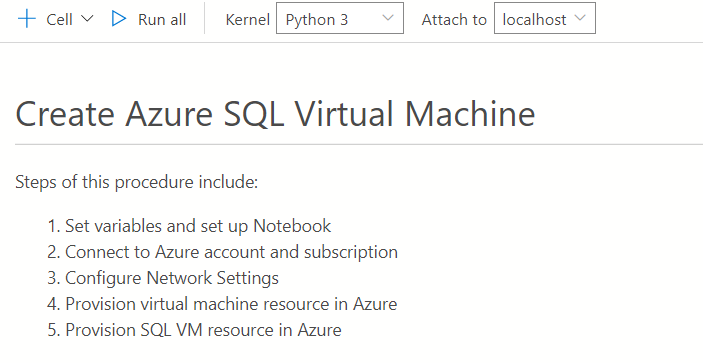
At the top of the Jupyter notebook, it gives the summary and steps for implementing Azure SQL Virtual Machine.
It uses the following steps for overall deployment:
- Set variables and set up a notebook
- Connect to Azure account and subscriptions
- Configure Network settings
- Provision virtual machine resources in Azure
- Provision SQL VM resource in Azure
The Jupyter notebook contains the following steps for deploying SQL Server on Azure VM.
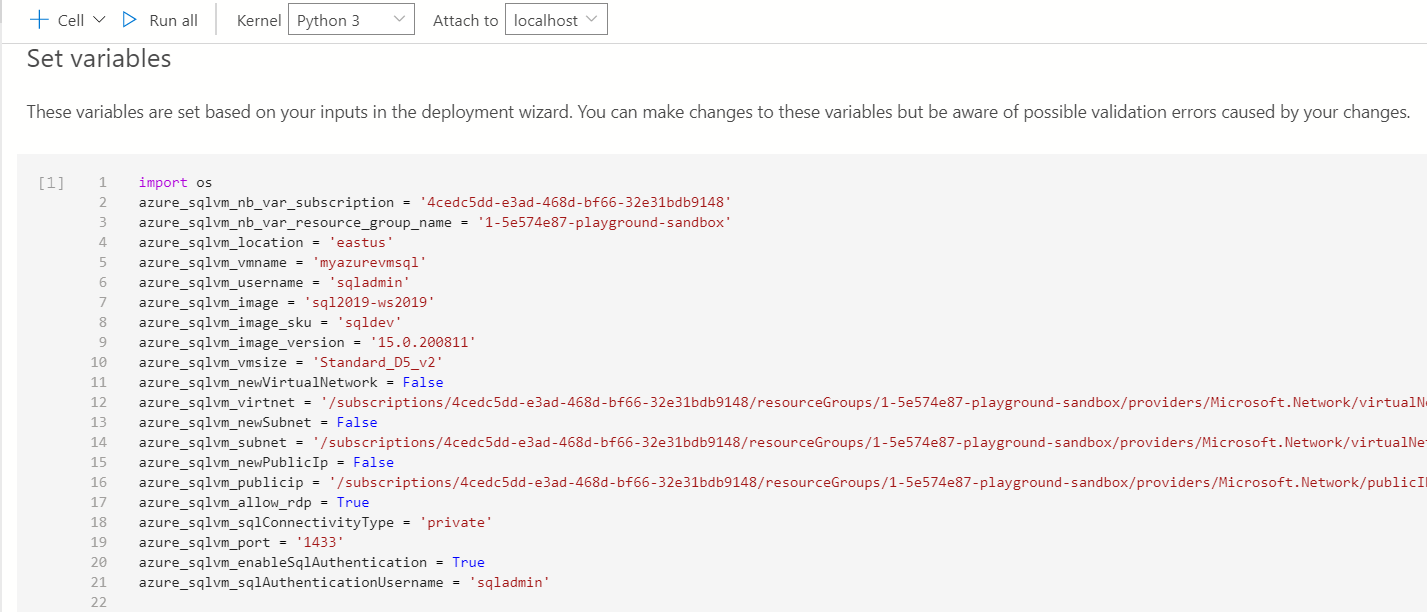
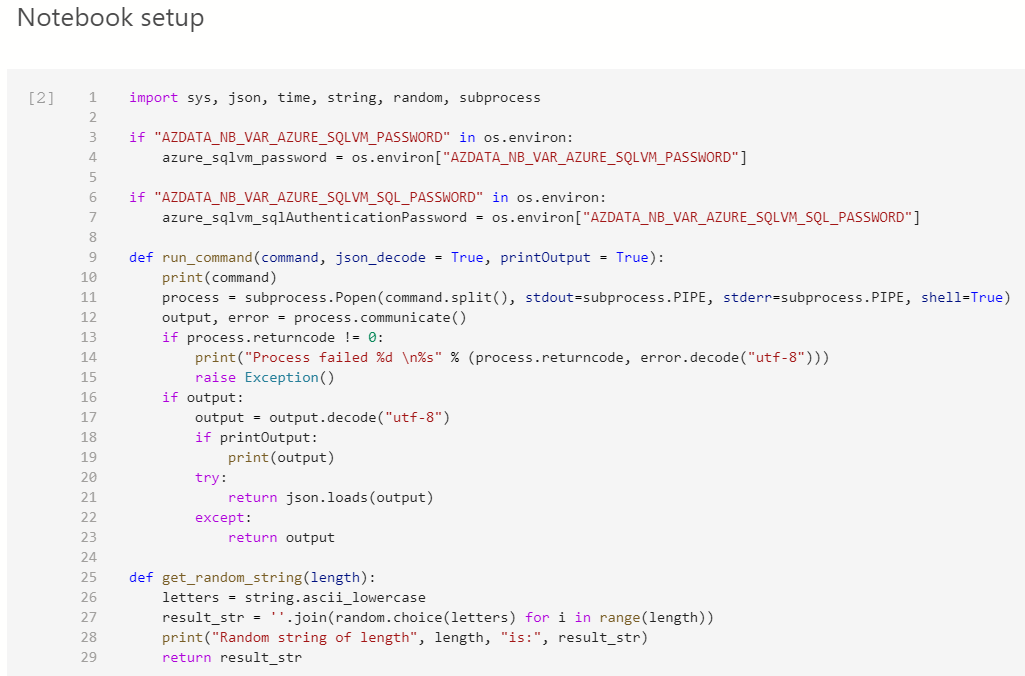
Step 1: Set variables and set up the notebook
Step 1 collects variables information based on user input during the Azure deployment wizard in Azure Data Studio.
-
Set variable: You can review variables and their values for Azure VM deployment

-
Notebook setup
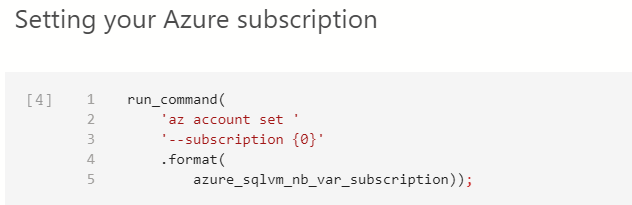
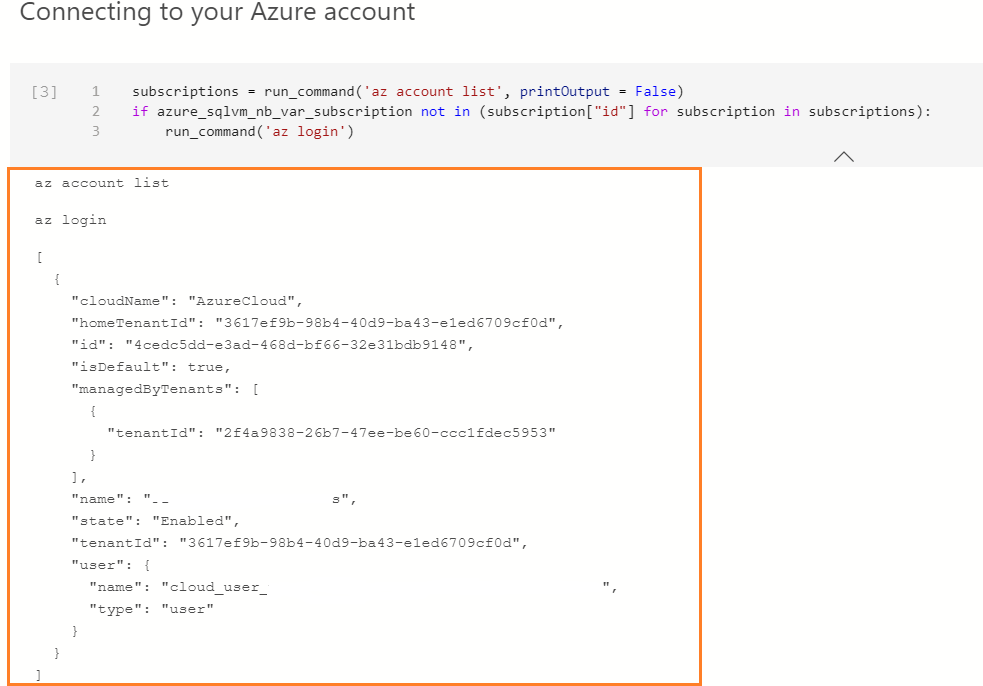
Step 2: Connect to Azure account and subscriptions
In step 2, the Jupyter notebook connects with the Azure account using the CLI script and fetches the subscription information.

Next, it uses the az account set CLI command for setting the Azure subscription.
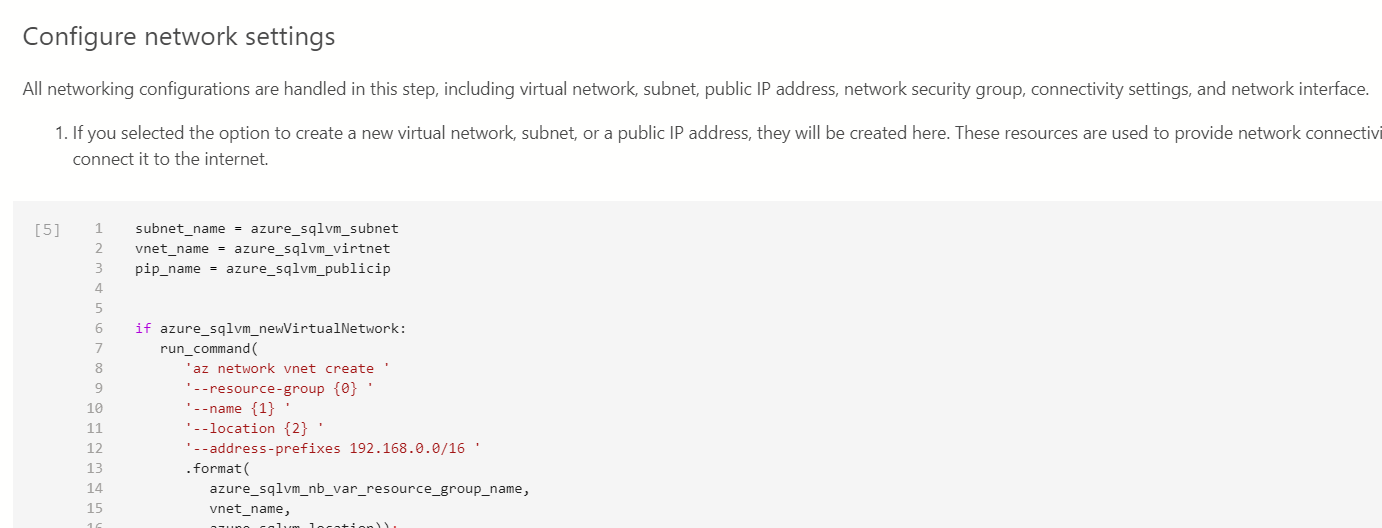
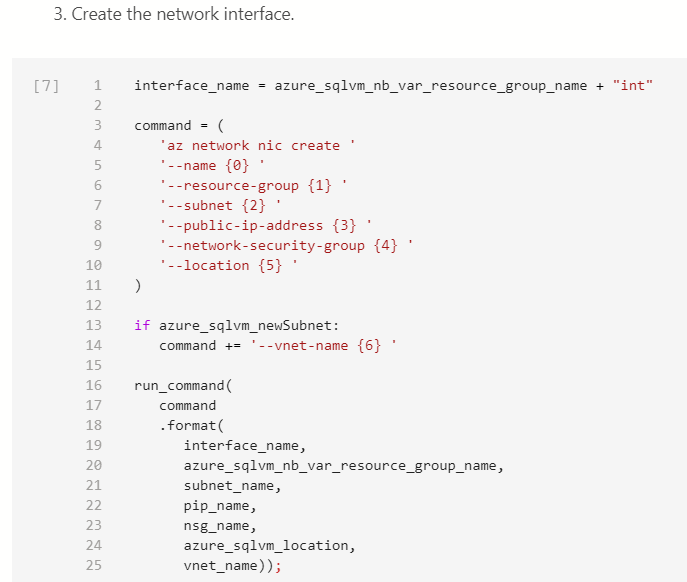
Step 3: Configure Network settings
The network settings section creates a new virtual network, subnet, and public IP address based on user inputs. The public IP address helps connect Azure resources over the internet.
Second, it creates a network security group and configures rules to allow RDP (port 3389) and SQL Server connections (port 1433).
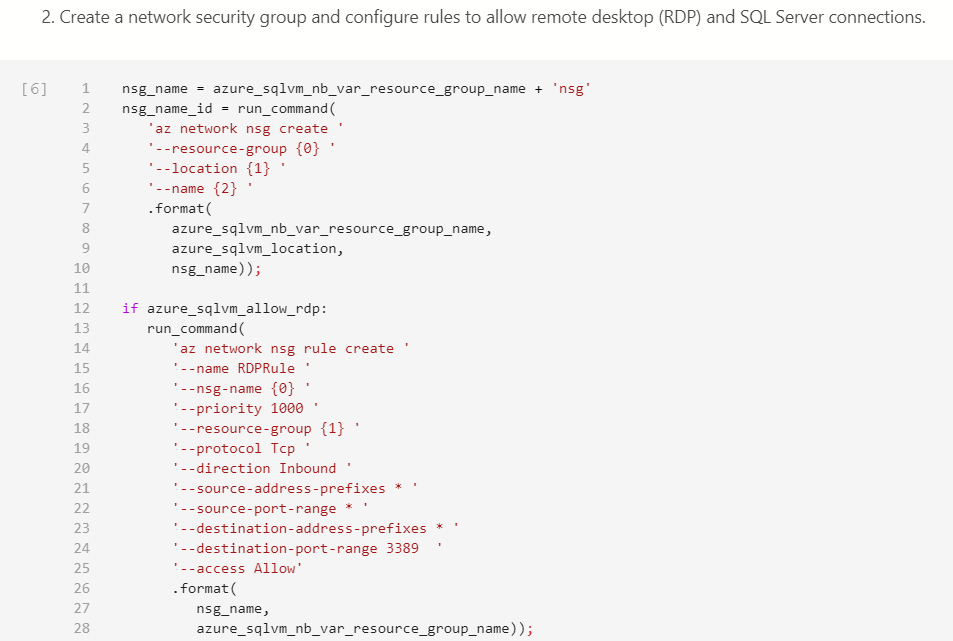
In the third step, the CLI script creates the network interface using the az network nic create command.
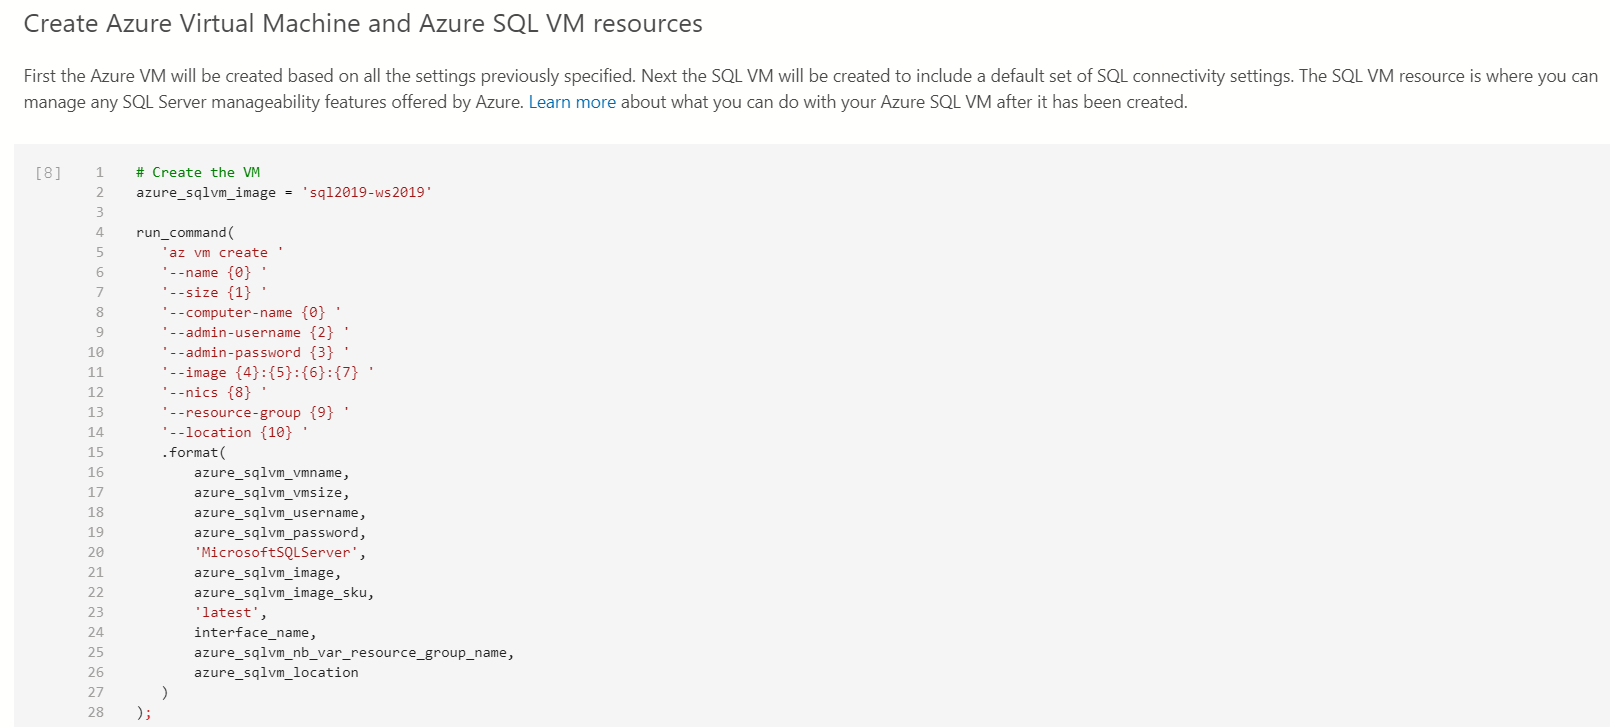
Step 4: Provision of virtual machine resources in Azure
In step 4, the CLI script creates an Azure VM based on the configurations specified in Steps 1-3. Here, it uses the az vm create CLI command for Azure VM deployment. Later, it creates a SQL VM with the default set of connectivity settings.
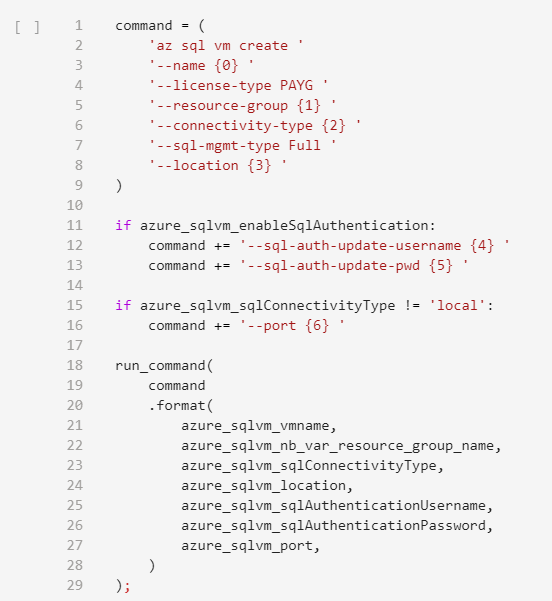
Step 5: Provision SQL VM resource in Azure
In this step, the Jupyter notebook uses az sql vm create CLI script for deploying SQL Server on Azure VM. It also configures SQL Server authentication based on the specified credentials.
You can modify the configurations using the Azure CLI scripts in the Azure Data Studio and quickly deploy SQL Server on Azure VM without going through Azure portal steps. Click on Run all to run the Jupyter notebook.

The Jupyter notebook embeds scripts and their outputs in a single console. For example, the following figure gives Azure CLI script as well as its JSON output.
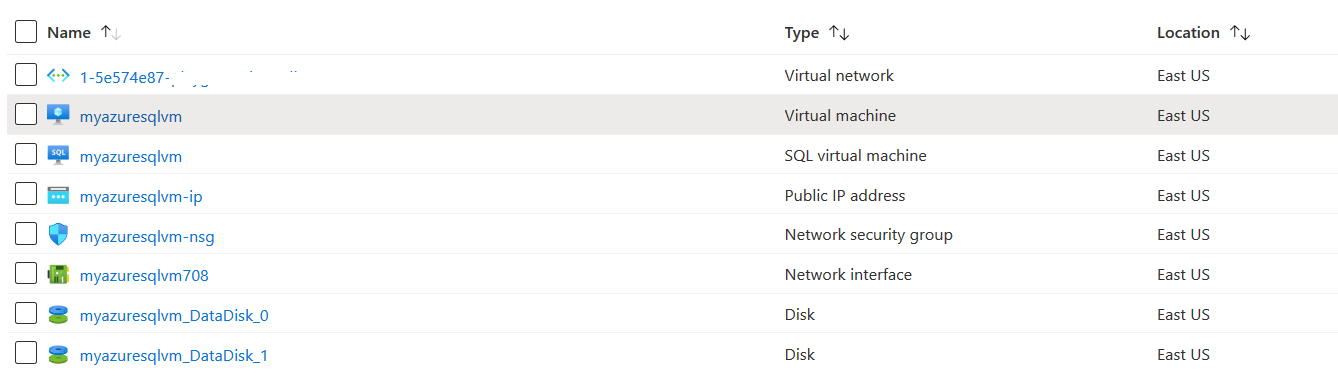
Once the Jupyter notebook script executes successfully, you can refresh the resource group in the Azure portal. It shows deployed resources such as virtual network, virtual machine, SQL virtual machine, public IP address, disk.
Conclusion
In this article, we explored Jupyter notebooks for deploying SQL Server on Azure VM deployment wizard. It uses Azure CLI scripts for quick configurations, deployments without the knowledge of CLI scripting.

I am the author of the book "DP-300 Administering Relational Database on Microsoft Azure". I published more than 650 technical articles on MSSQLTips, SQLShack, Quest, CodingSight, and SeveralNines.
I am the creator of one of the biggest free online collections of articles on a single topic, with his 50-part series on SQL Server Always On Availability Groups.
Based on my contribution to the SQL Server community, I have been recognized as the prestigious Best Author of the Year continuously in 2019, 2020, and 2021 (2nd Rank) at SQLShack and the MSSQLTIPS champions award in 2020.
Personal Blog: https://www.dbblogger.com
I am always interested in new challenges so if you need consulting help, reach me at rajendra.gupta16@gmail.com
View all posts by Rajendra Gupta
- Understanding PostgreSQL SUBSTRING function - September 21, 2024
- How to install PostgreSQL on Ubuntu - July 13, 2023
- How to use the CROSSTAB function in PostgreSQL - February 17, 2023