

This article will show you how to web scrape data using Azure Data Factory and store the data on one of the Azure data repositories.
Introduction
Typically, when data sources are being considered, we tend to think of sources like relational databases, NoSQL databases, file-based data sources, data warehouses or data lakes. One huge, unstructured, or semi-structured source of data is the web pages that are publicly or privately accessible to the web. These pages contain various elements like text, images, media, etc. But one of the most valuable elements in the web pages from a data perspective is the web tables which can be directly mapped to data objects in data repositories or even be stored in the form of files. This technique of reading or extracting data from web pages is popularly known as web scraping.
The technique of web scraping is not new. Most of the popular programming languages or frameworks like R, Python, .NET, Java, etc. provide libraries that can directly web scrape data, convert as well parse the data in JSON format and process it as desired. With the advent of cloud computing platforms, Extract Transform Load (ETL) services are available in a Platform-as-a-Service model, which allows building data pipelines that execute on a managed infrastructure. For large scale web-scraping, for example, scraping data from a data source like Wikipedia at scheduled intervals that involves hundreds to thousands of pages, one would want to execute such tasks on a data pipeline that runs on a managed infrastructure on the cloud instead of typically executing the same using custom code on a single virtual machine. Azure Data Factory is Azure’s ETL offering that supports building data pipelines. It also supports building data pipelines that can web scrape data.
Creating web scraping data pipelines with Azure Data Factory
The first thing we will need to web scrape data is the actual data itself. This data should be in the form of some tables on a web page hosted on a publicly accessible website. One of the easiest means of accessing such a website is Wikipedia. We will be using a page from Wikipedia as our data source, but one can use any publicly accessible webpage that contains a table as a data source for this exercise. Shown below is the webpage that we are considering scraping using our data pipeline that we will build using Azure Data Factory. This page can be accessed from here.
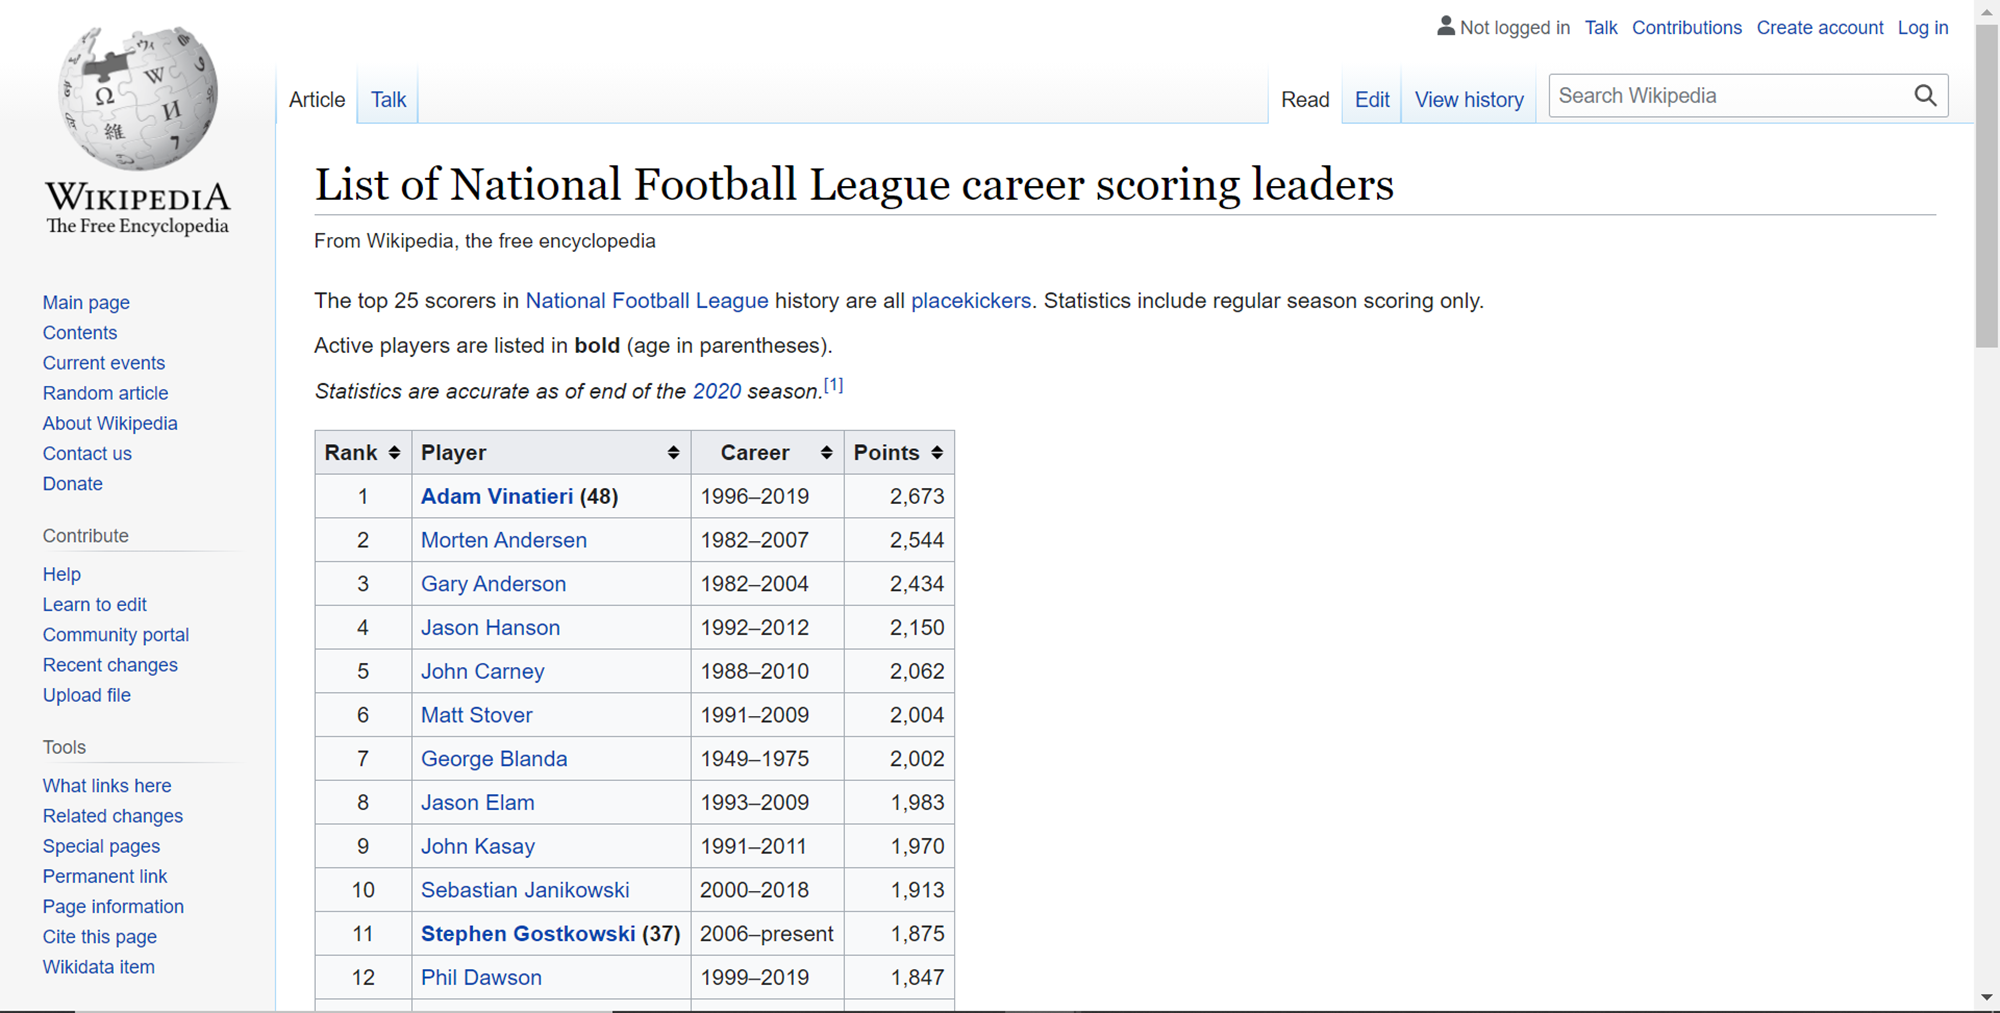
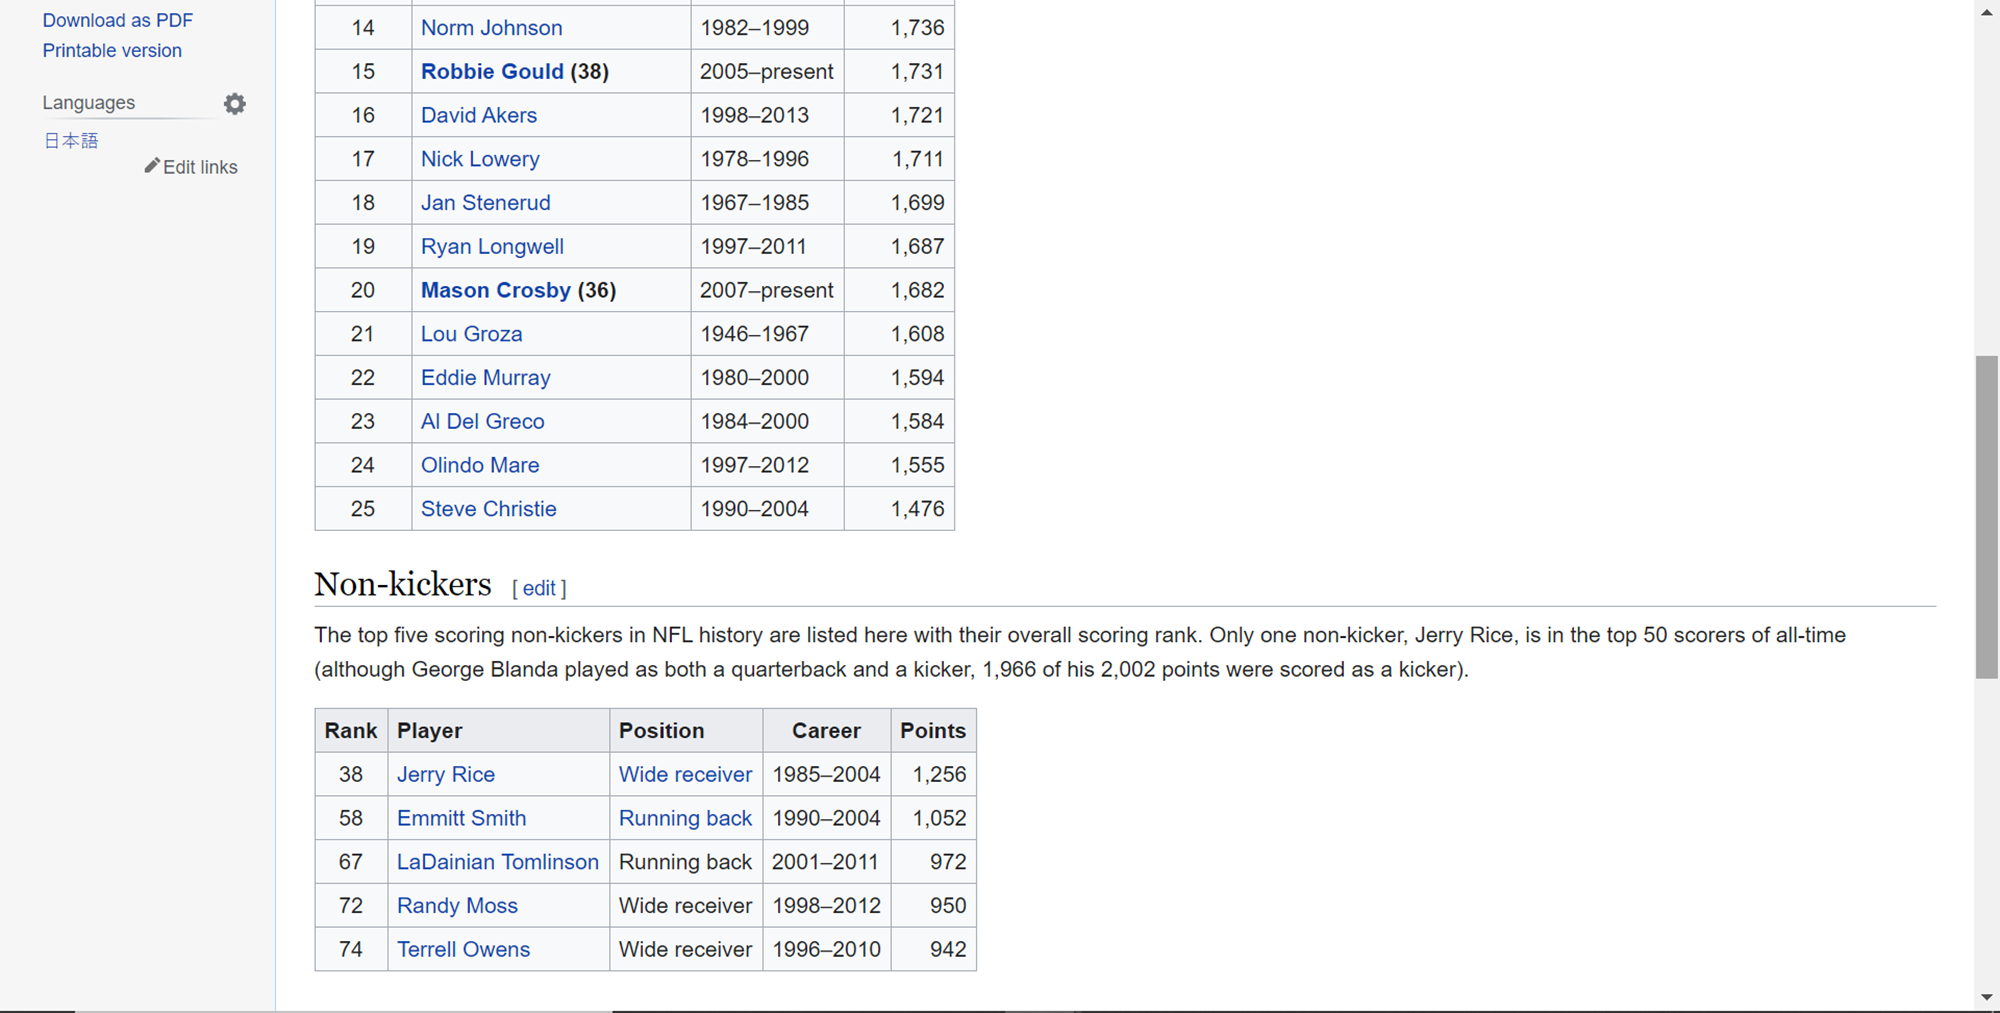
This page contains multiple tables. If we scroll down this page, we will find another table as shown below. Typically, pages may contain multiple tables and we may want to scrape one or more of them, hence we have selected a page with multiple tables.
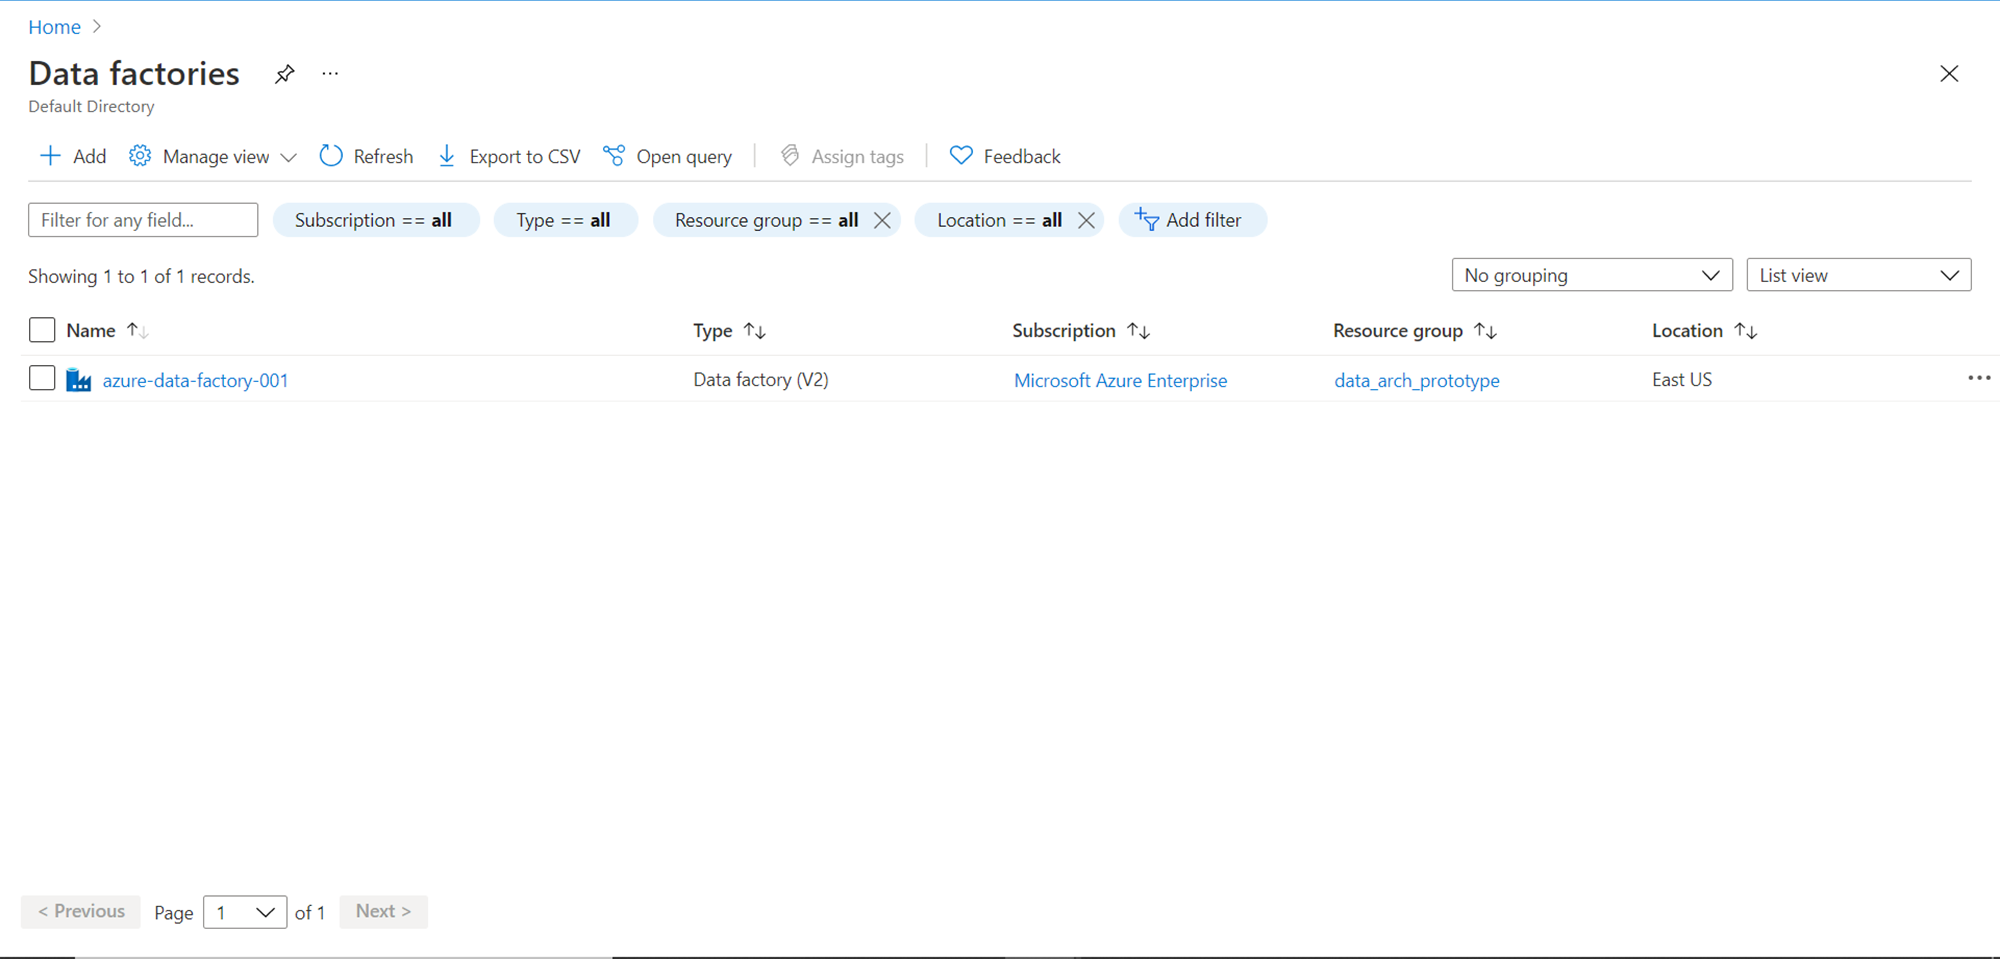
Now that we have the data source identified, it is time to start working on our data pipeline creation. It is assumed that one has the required access to the Azure Data Factory service on the Azure platform. Navigate to the Azure portal, open the Data Factories service and it will open the dashboard page that lists all the Azure Data factory instances you may have. If it’s the first time you are working with Azure Data Factory, you may not have any instance created. Click on the Add button to create a new Azure Data Factory instance. Provide basic details of your subscription, resource group and name of the data factory instance and click on the Create button, which will result in the creation of a new data factory instance as shown below.
Click on the instance name and it will open the dashboard of the specific instance. You should be able to see a link in the middle of the screen titled “Author and Monitor”. Click on this link and it will open the Azure Data Factory portal, which is the development and administrative console that facilitates the creation of data pipelines. This is the location where we will create and host our data pipeline that will web scrape data from the webpage that we have identified earlier.
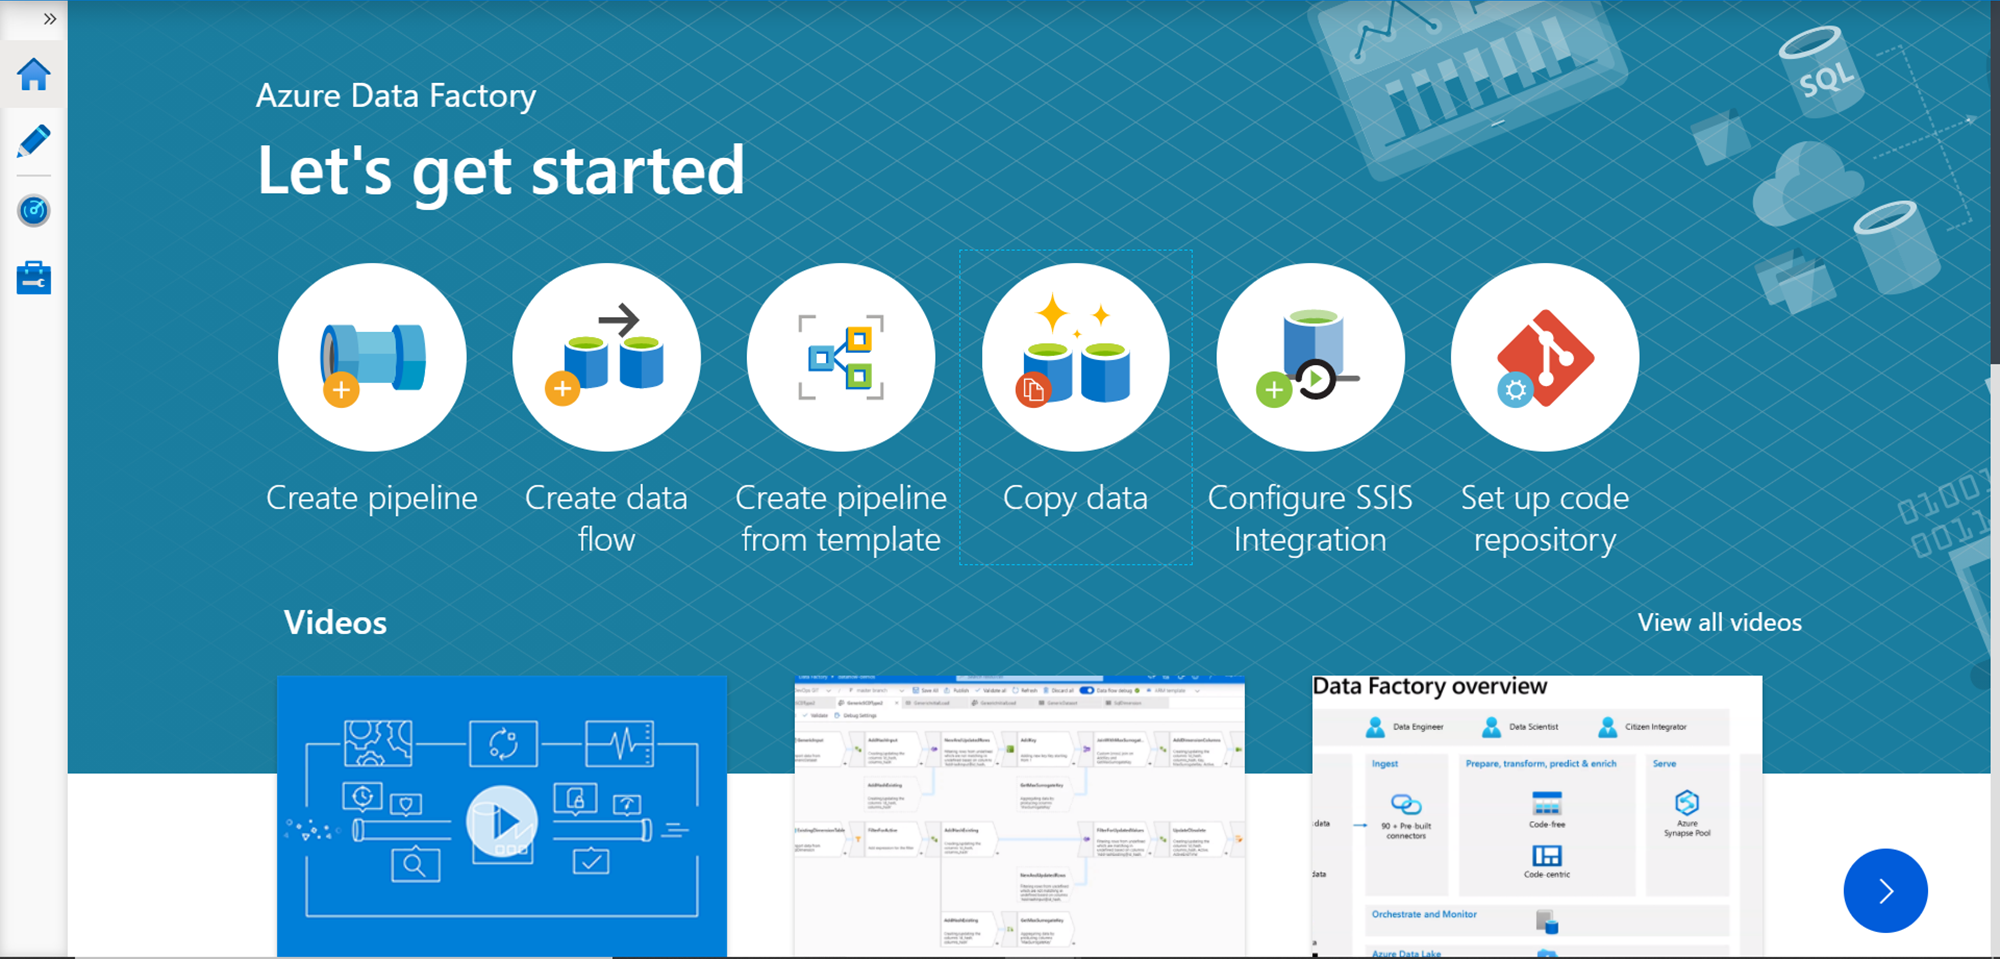
We intend to copy data from the web table on the web page, so we can start with the Copy Data feature. Click on the link titled “Copy data” as shown above and it will directly start the creation of a new data pipeline that walks through the steps required to copy data from source to destination. In the first step, we need to provide the name of the task and optionally a description for the same. Then we need to provide the scheduling requirements to execute this task. For now, we can continue with the “Run once now” option. This can be modified later as well. Once done, click on the Next button to proceed to the next step.

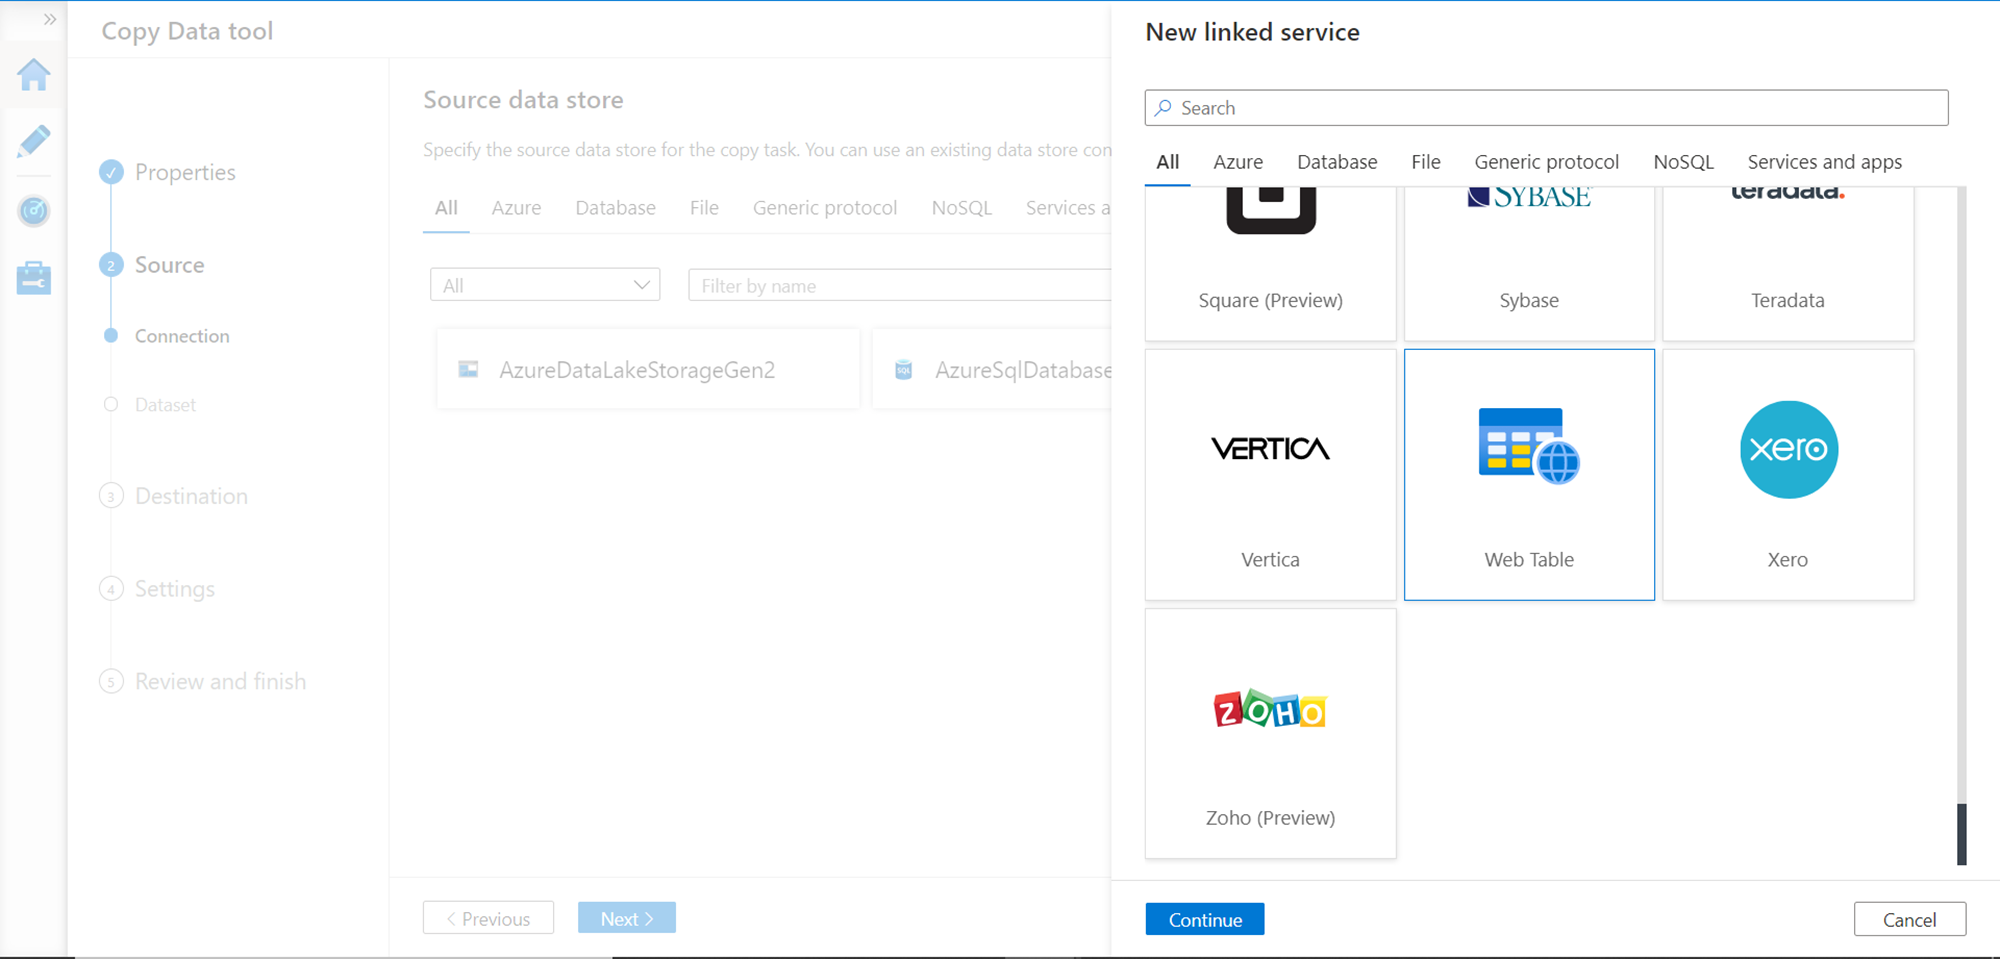
In this step, we need to register the data source from which we intend to copy data. Click on Add new connection button which will open a list of supported data sources as shown below. For our use case, we need to select Web Table as the source as shown below. Once selected, click on the Continue button.
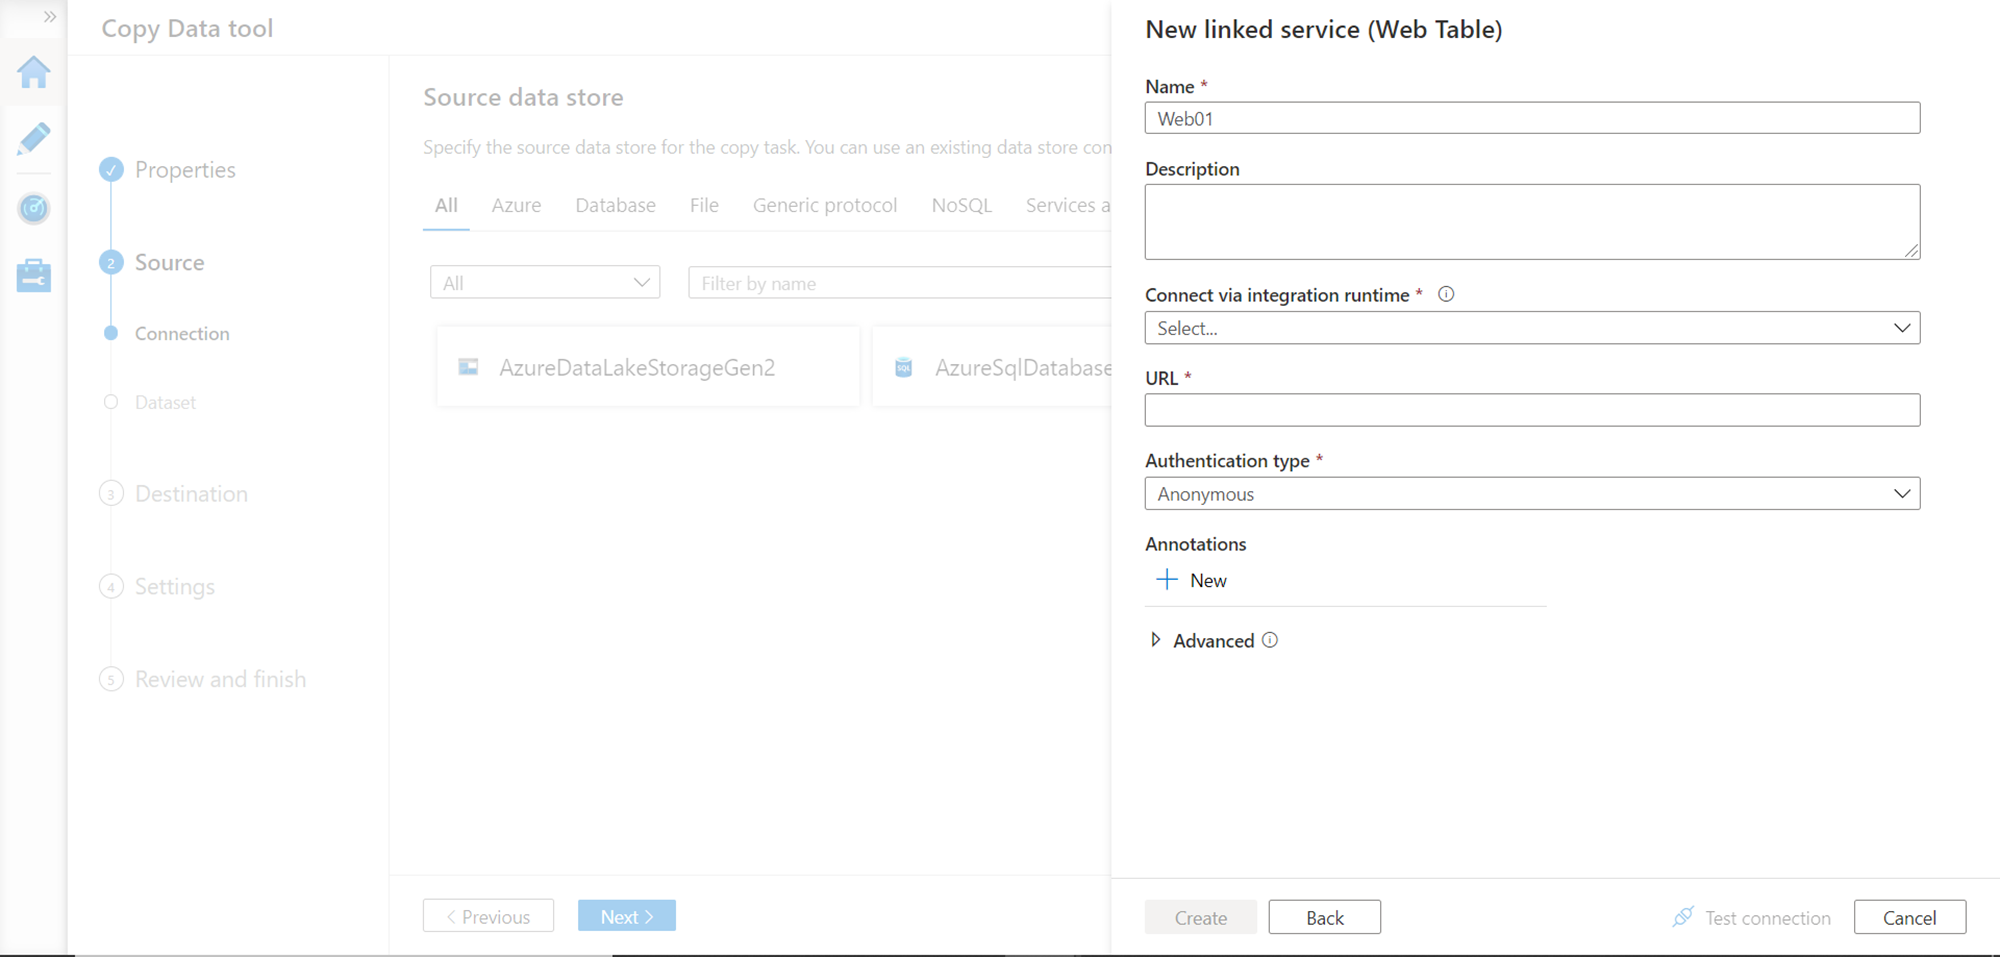
In this step, we need to provide the name of the linked service being created i.e. the web table data source and optionally a description for it. We need an integration runtime to be created to connect to this data source. Expand the integration runtime drop-down and click on the New option in the drop-down.
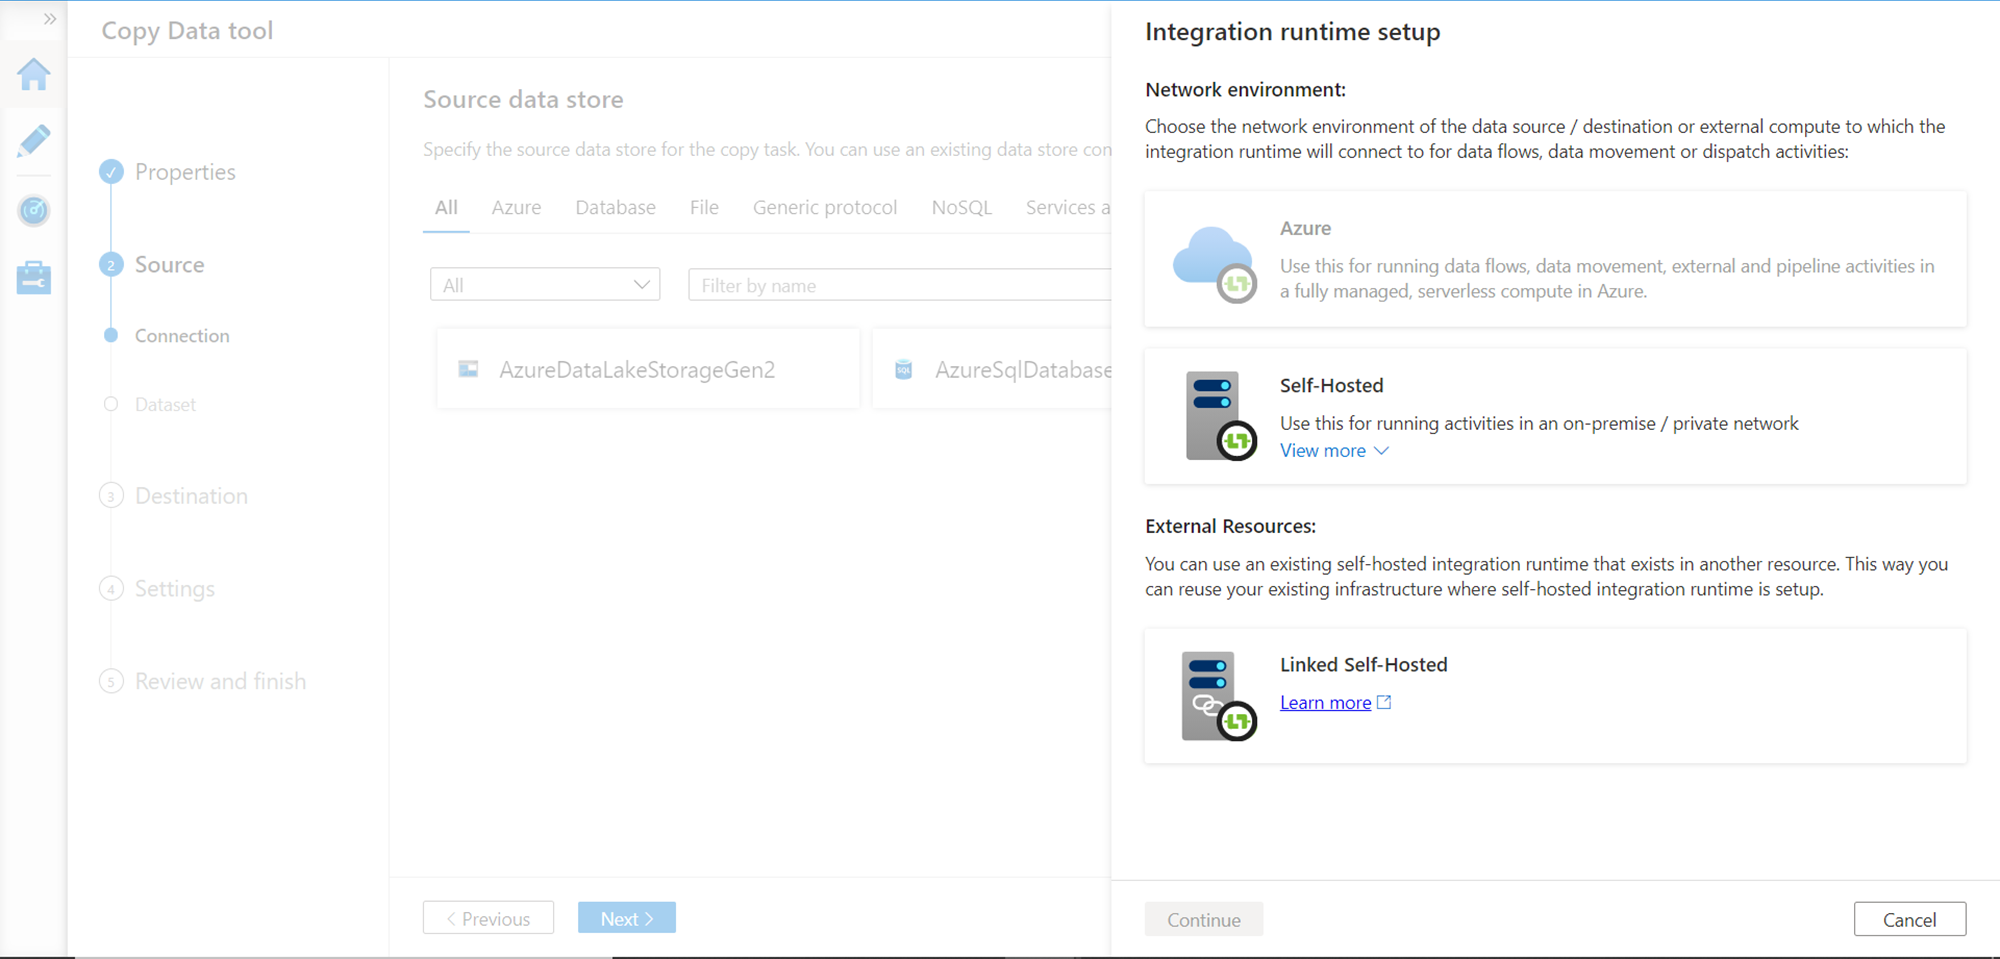
It will pop up the below options to create a new integration runtime. Depending on the availability and suitability options, one can select any option to create the runtime. One of the most straightforward approaches is the Self-Hosted option with Express settings which will download and install an executable on your local machine and create a runtime. Choose the desired option here and create a new runtime.
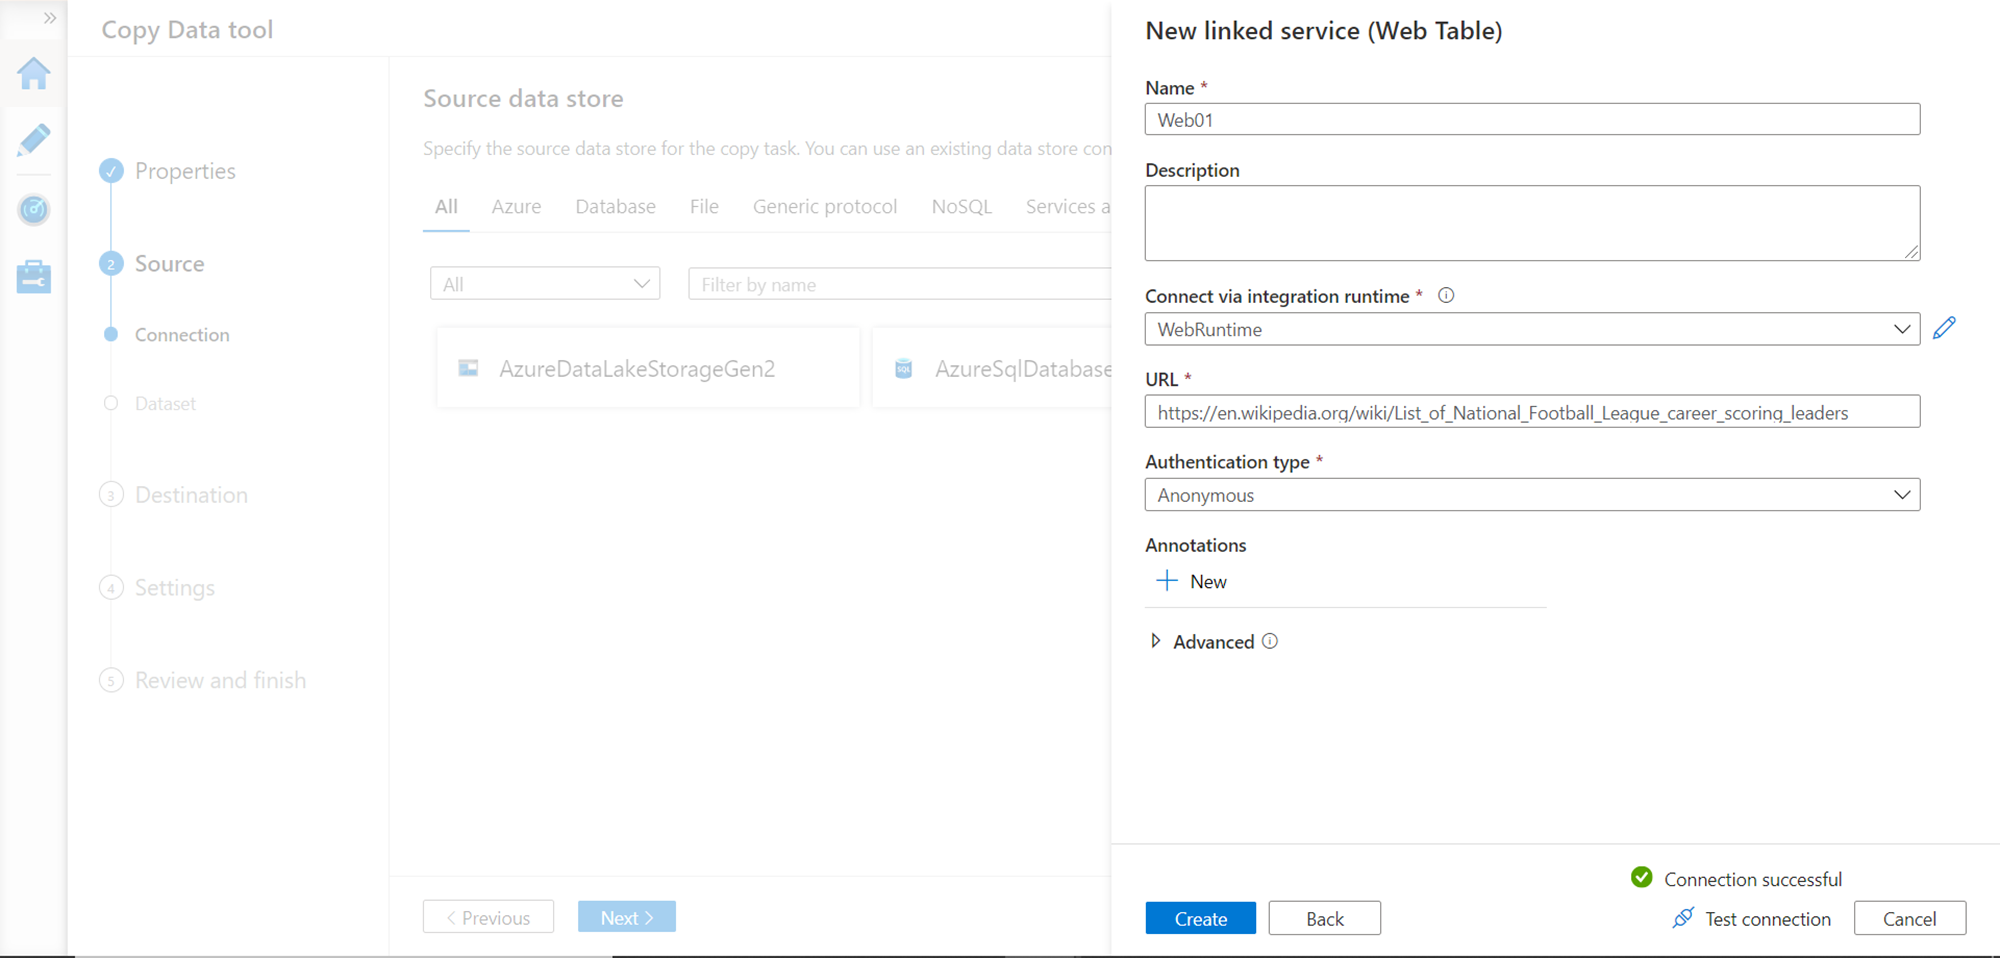
Once the runtime is created, you will find the same listed in the dropdown as shown below. Now we can provide the URL of the Wikipedia page that we have identified and click on the Test Connection button. If everything is in place, this connection will be successful as shown below. One can also configure authentication type if one is reading from a private webpage that requires authentication, unlike Wikipedia which is a publicly accessible website with anonymous authentication.
Now that we have registered the data source, we need to configure the dataset from this data source that we intend to extract. In this step, we can specify the path to the web table or specify an index, whichever is convenient. An index value of 0 would result in the extraction of the table shown in the preview pane. If you compare it with the web page, it’s the first table on the page.
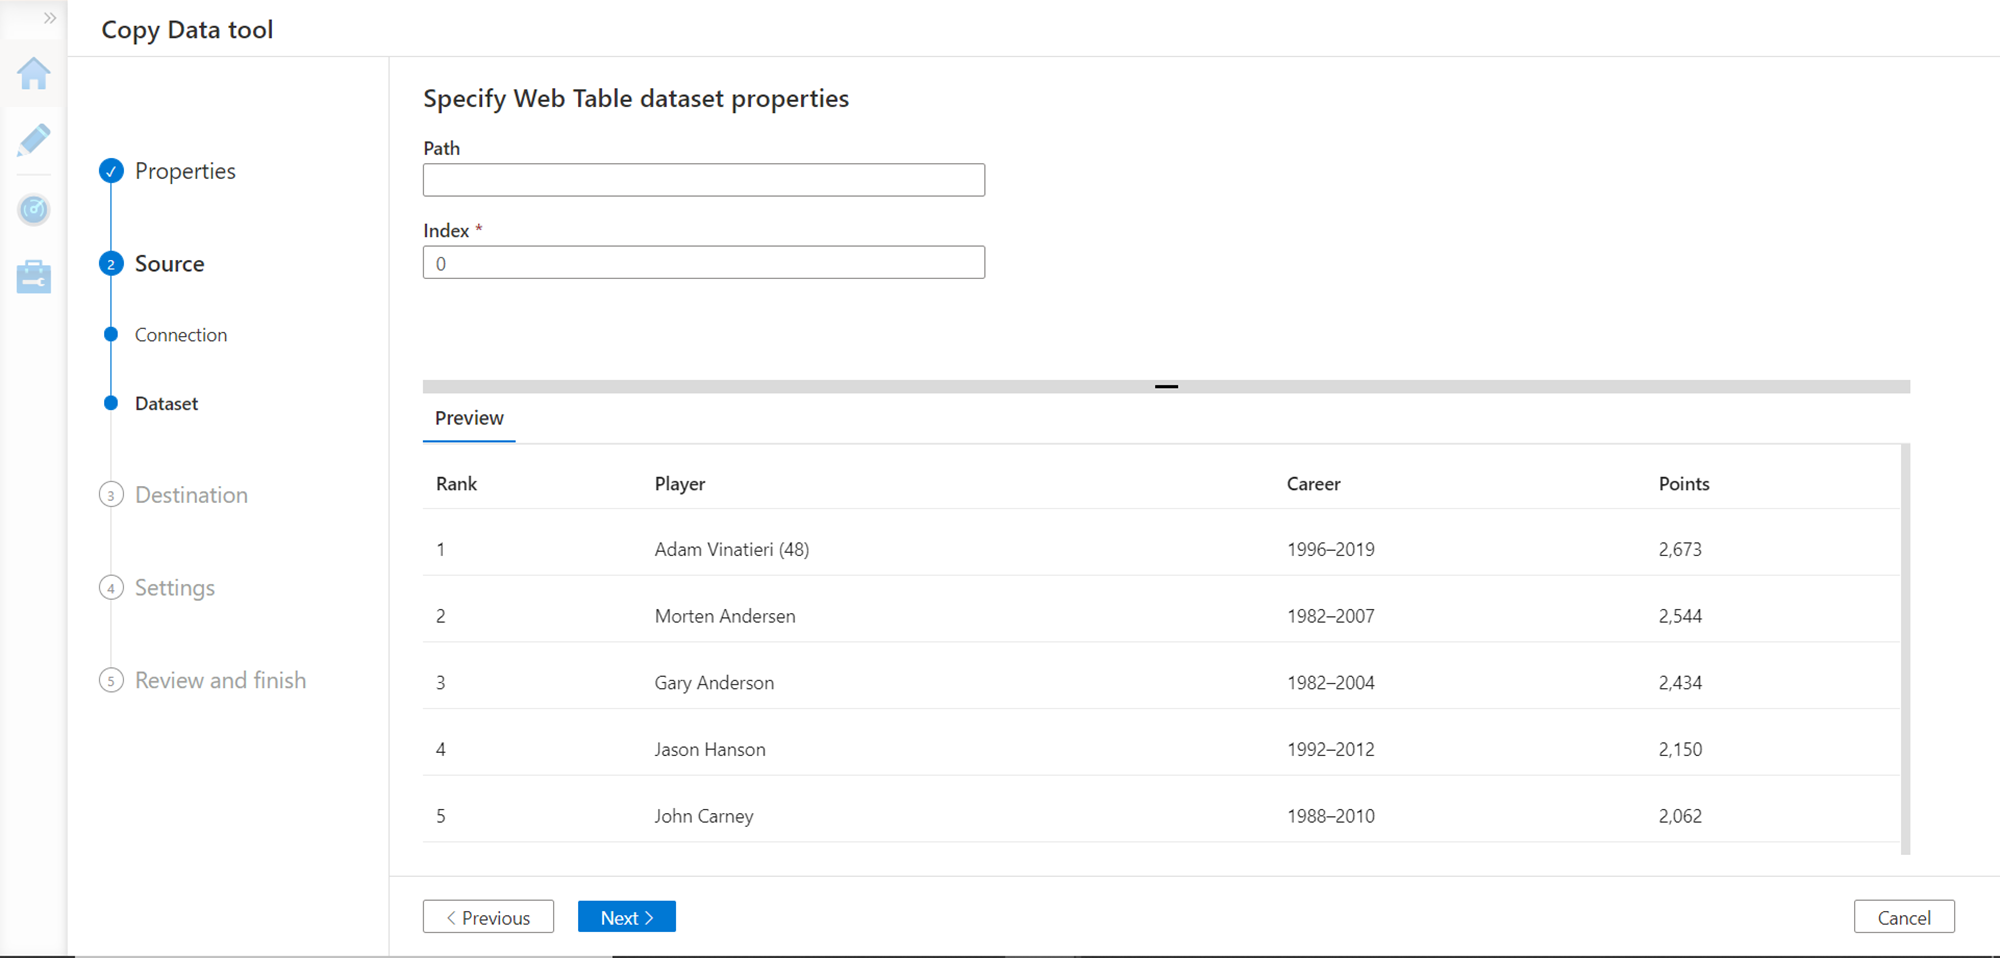
Change the value of the index to 1 and it will show the next table on the web page. In this way, even if we do not know the path to the table in the web page, we can just specify the index and extract the desired web table from the web page. We will continue with the first table with index 0 and click on the Next button.

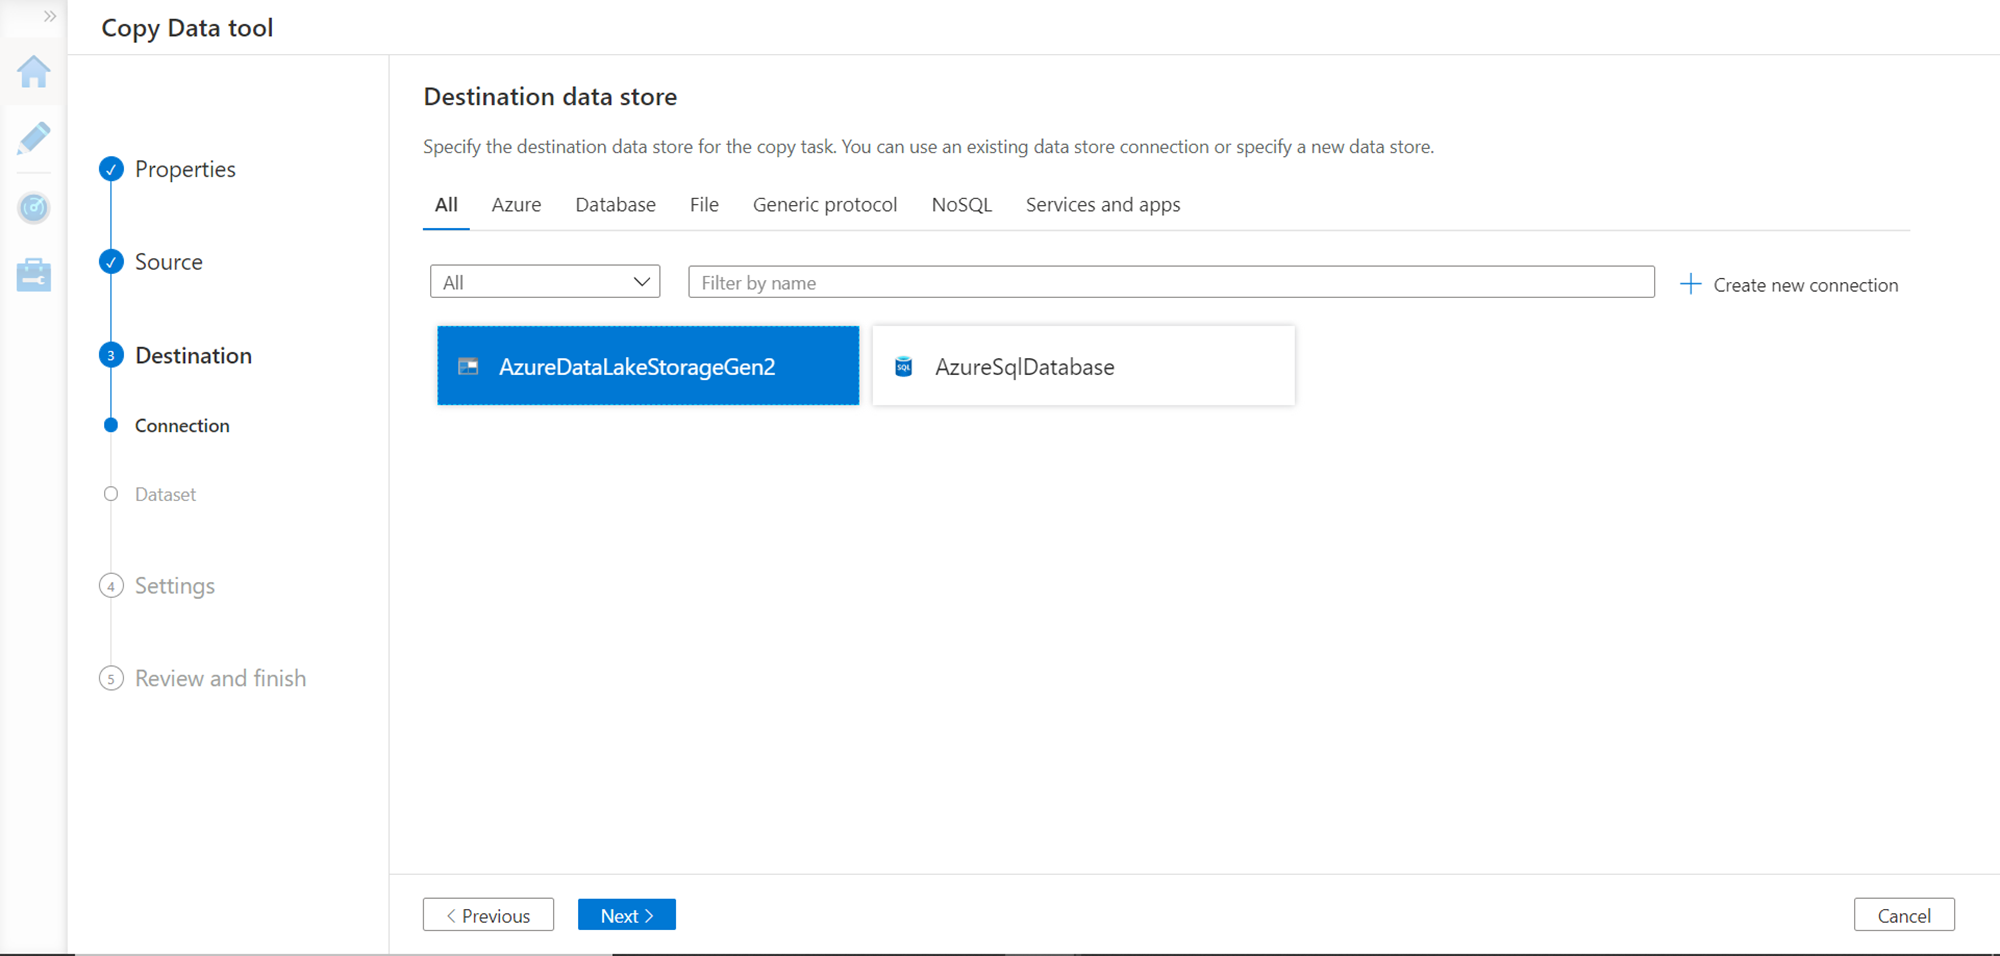
Now that we have selected the data source, we need to select the destination where the extracted data will be loaded. Depending on the requirement, we can register any supported data destinations. In this case, using the steps shown earlier, Azure Blob Storage has been added as the destination as we will be storing the data in the form of a file.
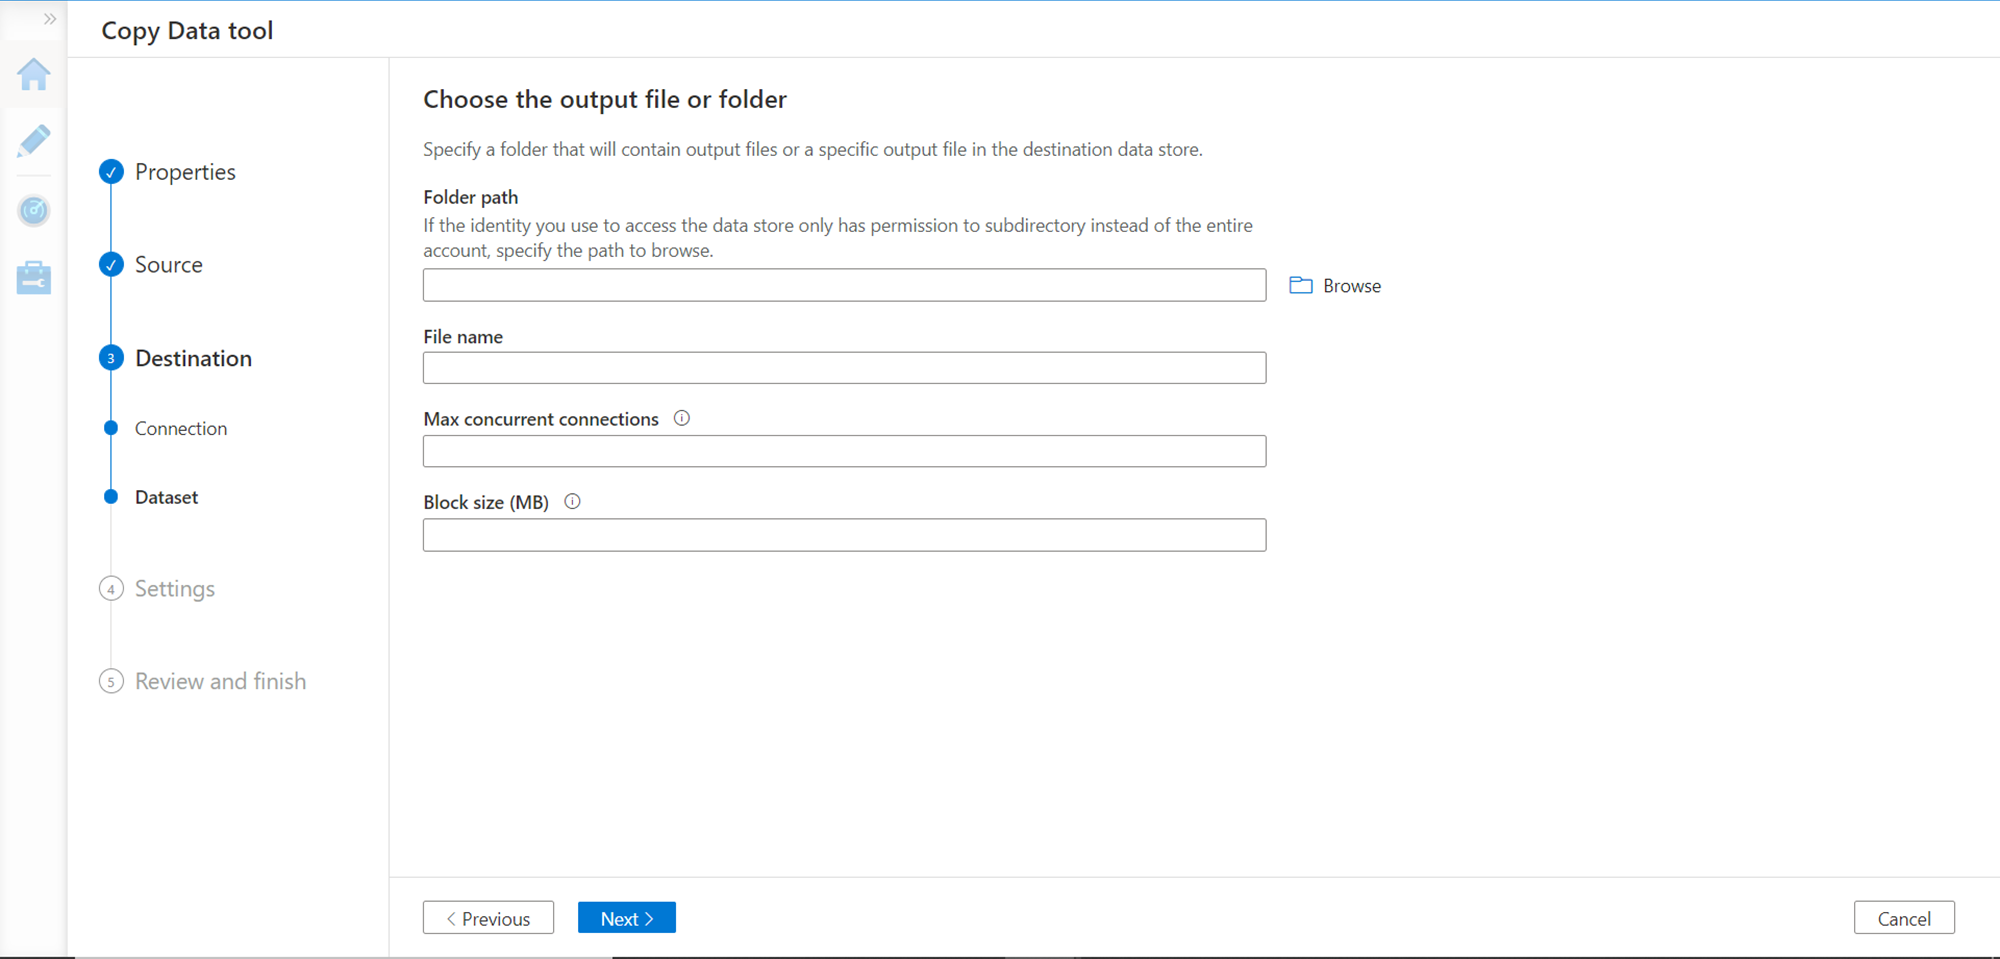
In the next step, provide the details of the location where the file will be stored as well as the details of the file like file name, concurrent connections, and block size.
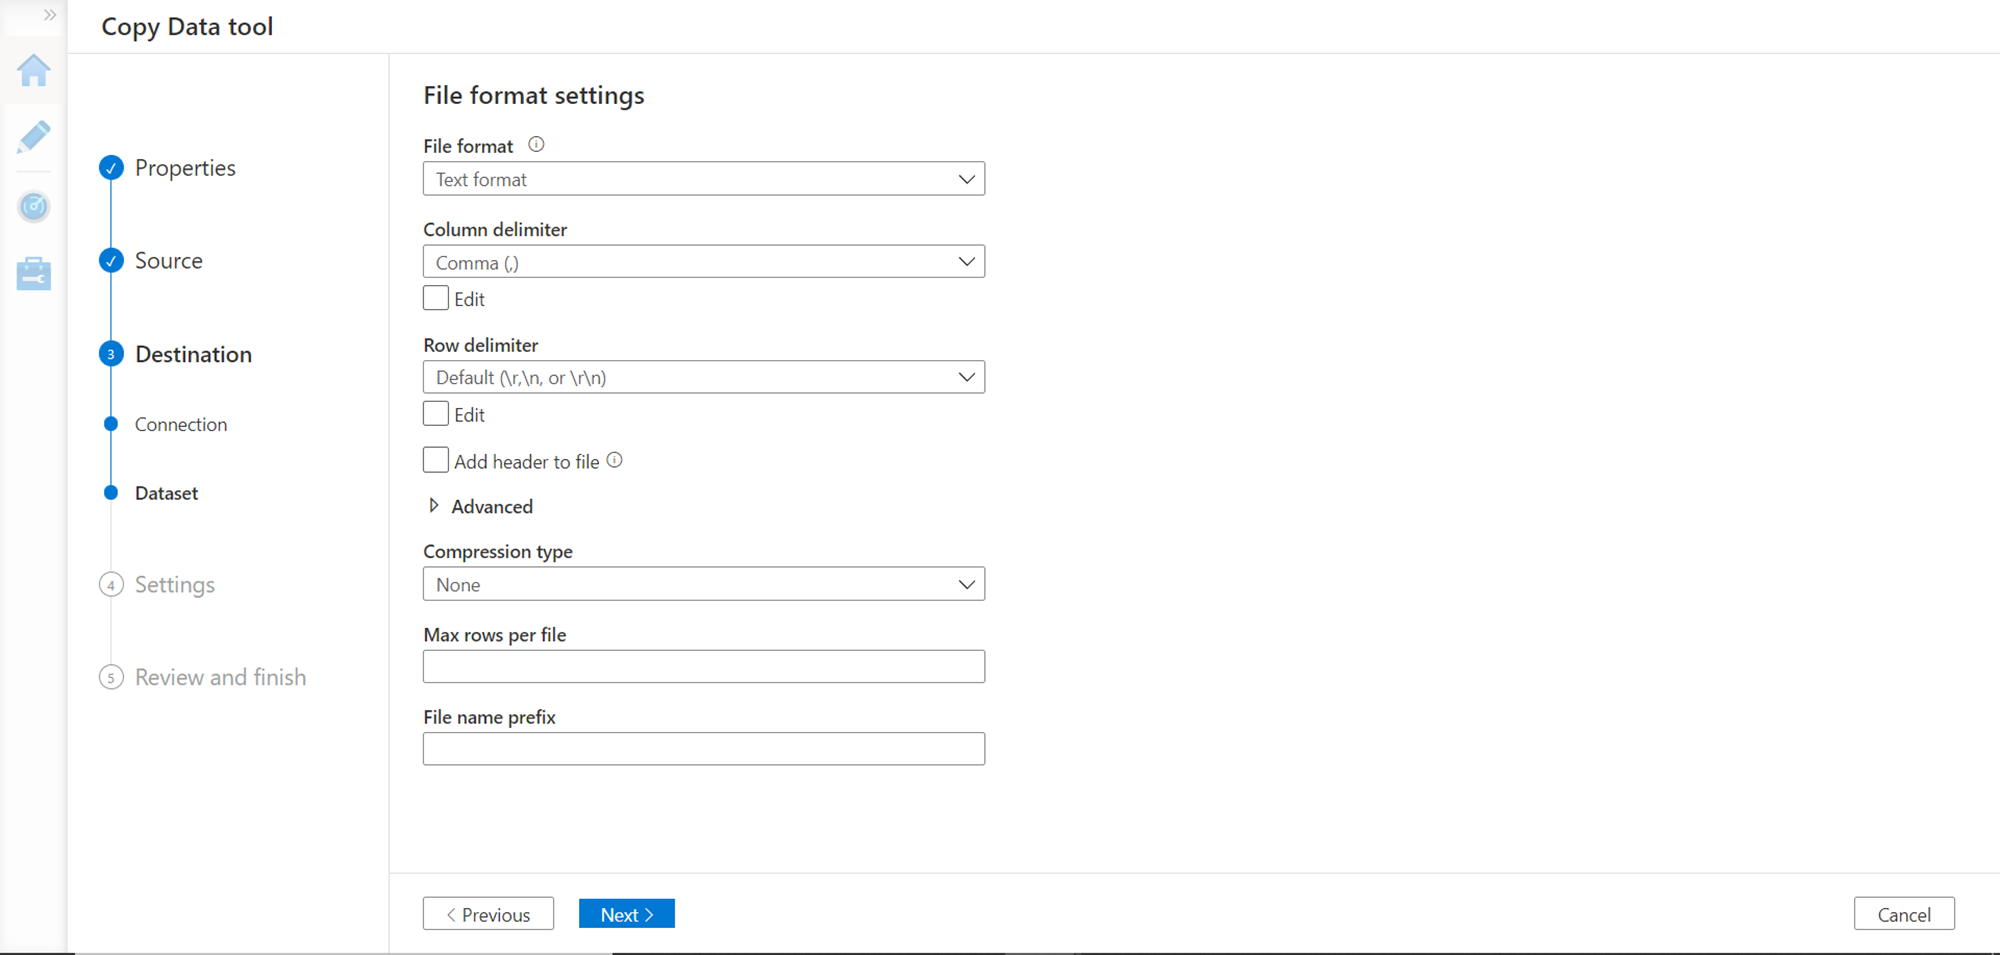
In the last step, we need to provide the format of data that we need to save in the file. We intend to save the file in a comma-separated format, so we have chosen the settings shown below.
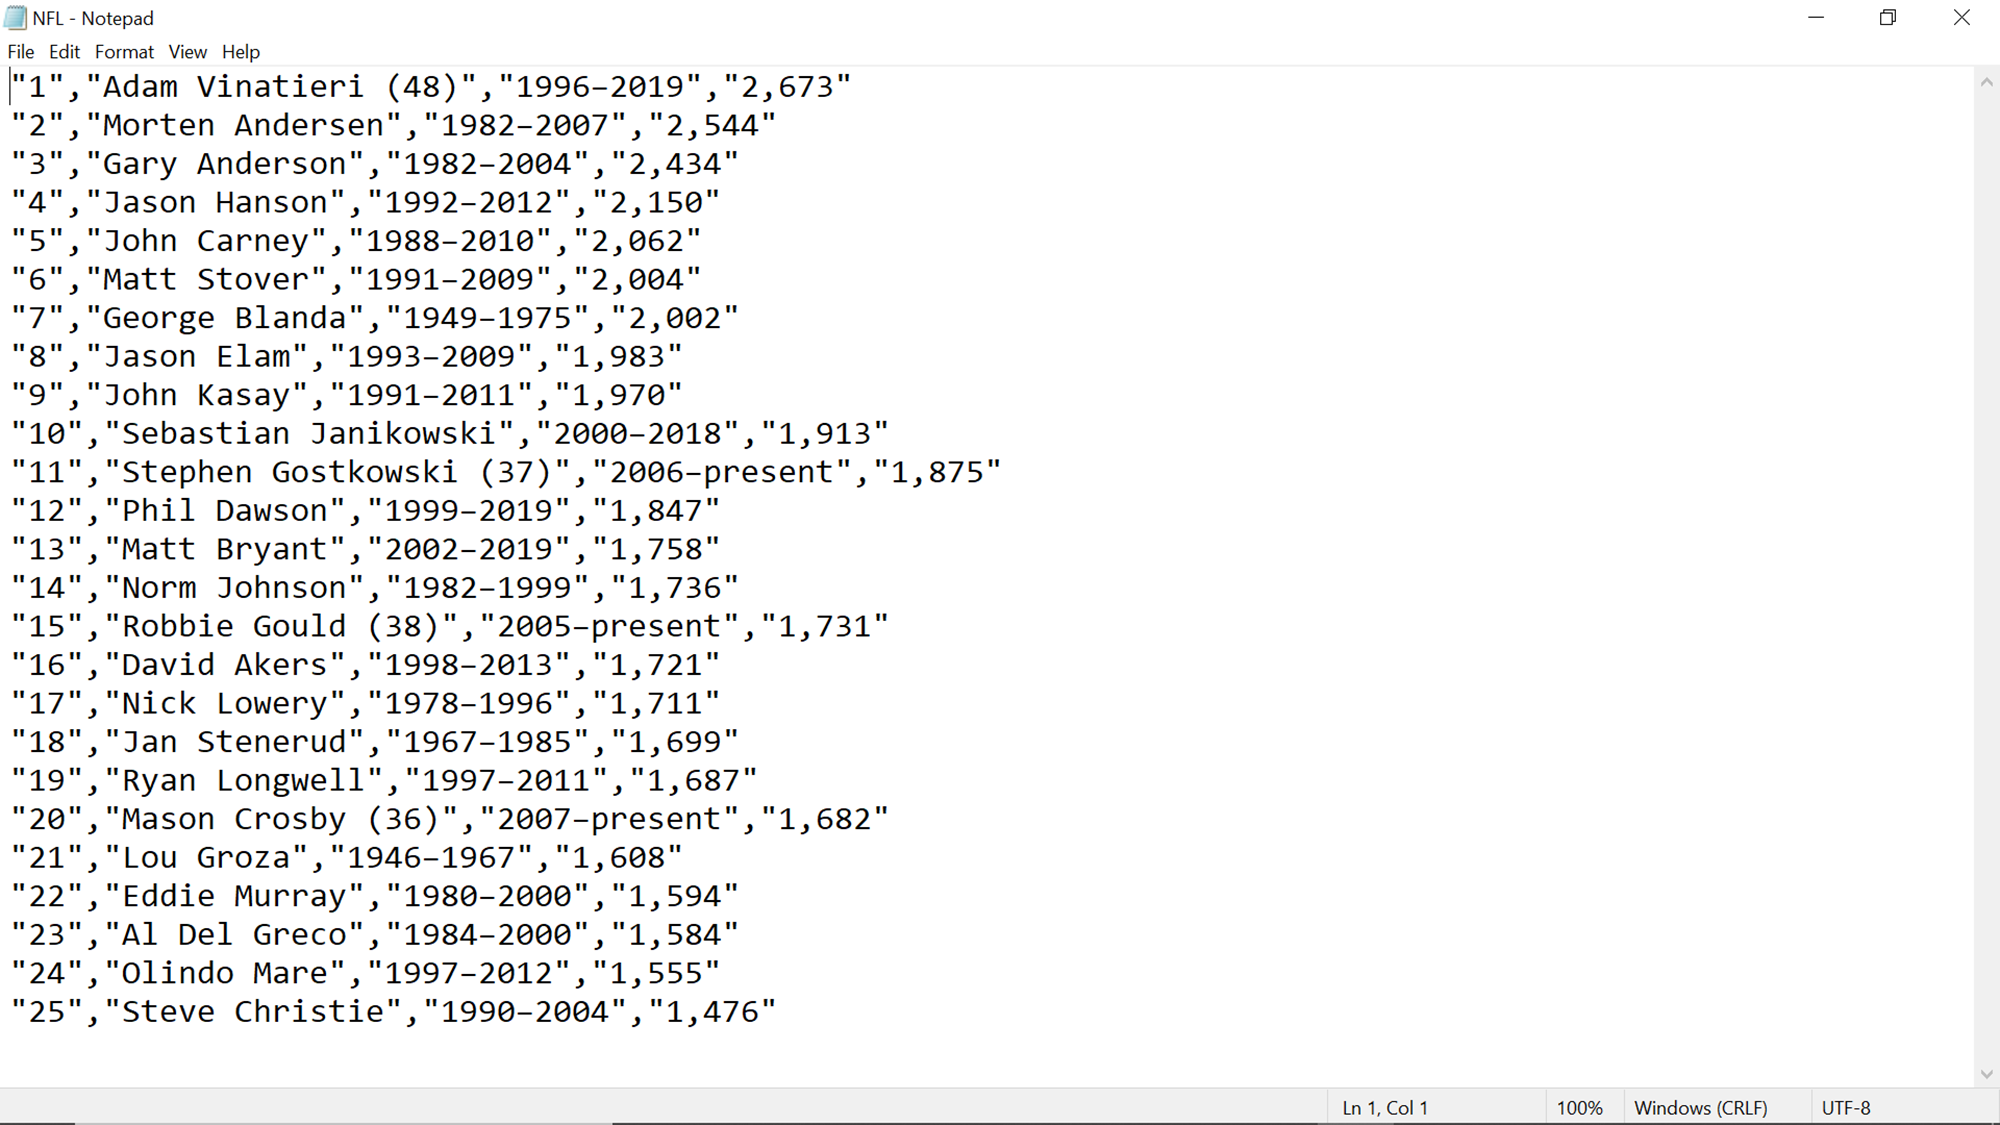
Once done, move to the next step where you can review the details, save the data pipeline, and execute the same. Once the execution completes, the output file would be generated at the location that we selected earlier. Navigate to the storage account location where the file has been created, download the same, and open it. The output will look as shown below.
In this way, we can web scrape data using Azure Data Factory and populate it on data repositories on the Azure platform.
Conclusion
In this article, we learned the concept of web scraping. We learned about the Web Table data source in Azure Data Factory and learned to build a data pipeline that can web scrape data and store the same on Azure data repositories.

She has a deep experience in designing data and analytics solutions and ensuring its stability, reliability, and performance. She is also certified in SQL Server and have passed certifications like 70-463: Implementing Data Warehouses with Microsoft SQL Server.
View all posts by Gauri Mahajan
- Oracle Substring function overview with examples - June 19, 2024
- Introduction to the SQL Standard Deviation function - April 21, 2023
- A quick overview of MySQL foreign key with examples - February 7, 2023