

Relational database management systems including SQL Server are very good at processing data in sets.
However, if you want to process data on row-by-row basis rather than in sets, cursors are your only choice. Unfortunately, cursors are extremely slow and so where possible should be replaced with JOINS.
Why cursors are slow
To populate a cursor, database tables are iterated on row-by-row basis rather than in sets. While a cursor is being populated, the table being iterated is locked. Row operations can take a long time to execute depending upon the type of task being performed on each row. While the cursor is open, a table cannot be accessed or updated by the other users. This makes cursor-based operations extremely. Therefore, cursors can be avoided wherever they can by the set based operations.
In this article, we will see how cursors process data and look at how and when we can replace cursors with JOINS.
Preparing dummy data
Let’s start by creating some dummy data to work with.
|
1 2 3 |
CREATE Database company; |
Next, we need two tables “department” and “employee” with the department table having two columns: id and dep_name, and the employee table having four columns: id, name, dep_id, and salary.
The dep_id column of employee table will hold values from the id table of the department table, with a one too many relations between the department and employee tables. Remember this is not a perfectly normalized data table as we just want some data to execute example queries on.
|
1 2 3 4 5 6 7 8 9 10 11 12 13 14 15 16 17 |
USE company; CREATE TABLE department ( id INT PRIMARY KEY, dep_name VARCHAR(50) NOT NULL, ) CREATE TABLE employee ( id INT PRIMARY KEY, name VARCHAR(50) NOT NULL, dep_id INT NOT NULL, salary INT NOT NULL |
Finally let’s add some dummy data.
|
1 2 3 4 5 6 7 8 9 10 11 12 13 14 15 16 17 18 19 20 21 22 23 24 25 26 27 28 29 30 31 |
USE company; INSERT INTO department VALUES (1, 'Sales'), (2, 'HR'), (3, 'IT'), (4, 'Marketing'), (5, 'Finance') INSERT INTO employee VALUES (1, 'David', 1, 5000), (2, 'Jim', 2, 6000), (3, 'Kate', 3, 7500), (4, 'Will', 4, 6500), (5, 'Shane', 5, 5500), (6, 'Shed', 1, 8000), (7, 'Vik', 2, 7200), (8, 'Vince', 3, 6600), (9, 'Jane', 4, 5400), (10, 'Laura', 5, 6300), (11, 'Mac', 1, 5700), (12, 'Pat', 2, 7000), (13, 'Julie', 3, 7100), (14, 'Elice', 4, 6800), (15, 'Wayne', 5, 5000) |
A simple cursor example
Let start by creating a simple cursor that will loop through each row in the employee table. There are 15 rows in the employee table and so this won’t illustrate the performance issues that cursors can suffer but if the table contained >10,000 rows the performances issues would be clear.
|
1 2 3 4 5 6 7 8 9 10 11 12 13 14 15 16 17 18 19 20 |
USE company; DECLARE @EmpId INT DECLARE @EmpName NVARCHAR(50) DECLARE EmpCursor CURSOR FOR SELECT id, name FROM employee OPEN EmpCursor FETCH NEXT FROM EmpCursor INTO @EmpId, @EmpName WHILE(@@FETCH_STATUS = 0) BEGIN PRINT 'Employee Id = ' + CAST(@EmpId AS NVARCHAR(10)) + ' | Name = ' + @EmpName FETCH NEXT FROM EmpCursor INTO @EmpId, @EmpName END CLOSE EmpCursor DEALLOCATE EmpCursor |
The above code creates two variables @EmpId and @EmpName that will hold the id and name from the employee table respectively. To declare a cursor we use the DECLARE keyword followed by the cursor’s name and the FOR keyword.
Next, we declare the SELECT statement that will select the records that the cursor will process row-by-row.
The following lines create EmpCursor that will contain the id and name from the employee table:
|
1 2 |
DECLARE EmpCursor CURSOR FOR SELECT id, name FROM employee |
At this point, data is added to the cursor. Before we can use the cursor we have to open it using the OPEN keyword. At this point, the cursor points at the top of the table. To move the cursor to the first row we use the FETCH NEXT command. We then use the INTO statement to fetch data from the cursor and insert it into our local variables. To move the cursor to next row we again use FETCH NEXT.
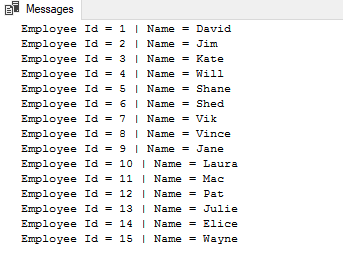
A better approach is to use a loop and call FETCH NEXT within the loop so that the cursor can iterate over all the rows. The @@FETCH_STATUS returns 0 as long as there are more rows in a set of records. In the above script, we used a WHILE loop to iterate through all the records in EmpCursor until @@FETCH_STATUS returns 0. When there are no more rows left, the @@FETCH_STATUS returns a non-zero value and the loop will exit. Inside the loop, we print the id and name from each row in the EmpCursor. Finally, we close the cursor we opened using CLOSE keyword.
The output of the above script will be as follows:
Cursor example involving multiple tables
In the next example, we will use a cursor that will store the id and dep_id of the employee. Inside the WHILE loop, we will retrieve the department name from the department table where the id of the department matches the dep_id of the employee table.
In addition, if the department name is “Sales”, we will increase the salary of the employee by 10% by multiplying the actual salary by 1.1. If the department name is “HR”, we will increase the salary of the employee by 20% by multiplying the actual salary by 1.2. Finally, if the department name is “IT”, we will increase the salary of the employee by 50% by multiplying the actual salary by 1.5.
|
1 2 3 4 5 6 7 8 9 10 11 12 13 14 15 16 17 18 19 20 21 22 23 24 25 26 27 28 29 30 31 32 33 34 35 |
USE company; DECLARE @Dep_Id INT DECLARE @Emp_Id INT DECLARE EmpCursor CURSOR FOR SELECT dep_id, id FROM employee OPEN EmpCursor FETCH NEXT FROM EmpCursor INTO @Dep_Id, @Emp_Id DECLARE @DepName NVARCHAR(50) WHILE(@@FETCH_STATUS = 0) BEGIN SELECT @DepName = dep_name FROM department where id = @Dep_Id IF(@DepName = 'Sales') BEGIN UPDATE employee SET salary = (salary * 1.1) WHERE id = @Emp_Id END ELSE IF(@DepName = 'HR') BEGIN UPDATE employee SET salary = (salary * 1.2) WHERE id = @Emp_Id END IF(@DepName = 'IT') BEGIN UPDATE employee SET salary = (salary * 1.5) WHERE id = @Emp_Id END FETCH NEXT FROM EmpCursor INTO @Dep_Id, @Emp_Id END CLOSE EmpCursor DEALLOCATE EmpCursor |
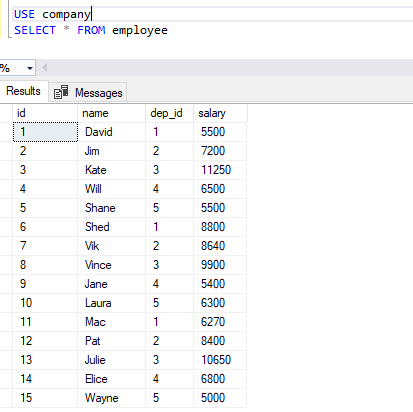
Now if you SELECT records from the employee table, you will see an increase of 10%, 20% and 50% on the salaries of employees from Sales, HR and IT department, respectively.
The new salaries are shown in the following table:
Replacing cursors with JOINs
As explained earlier, cursors are extremely slow and should be replaced with JOINs whenever possible. Let’s look at how we replace the cursor that we saw in the last example with a JOIN statement. We will use a JOIN statement to increment the salaries of the employees from Sales, HR and IT department by of 10%, 20%, and 50% respectively, as we did in the previous example.
Note: Before you execute this script, truncate the employee table and insert dummy records as we did at the start of this article. This is to make sure that we achieve the same results using cursors and JOINs.
|
1 2 3 4 5 6 7 8 9 10 11 12 |
USE company; UPDATE employee SET salary = CASE WHEN dep_name = 'Sales' THEN (salary * 1.1) WHEN dep_name = 'HR' THEN (salary * 1.2) WHEN dep_name = 'IT' THEN (salary * 1.5) END FROM employee JOIN department ON department.id = employee.dep_id WHERE (dep_name = 'Sales' OR dep_name = 'HR' OR dep_name = 'IT') |
The above query will be at least 20 times faster than the cursor and will achieve same results. We have used a CASE statement to update the salary based on the dep_name. The employee and department tables have been joined so that we can access salary from the employee table and dep_name from department table in the same query. The JOIN has been implemented on the id column of the department table and the dep_id column of the employee table. The WHERE clause is used to filter records where the name of the department is Sales, HR or IT. This is because we are only updating the salaries of employees from these departments.
Conclusion
In this article we saw that how cursor based operations lead to performance issues. Therefore, JOINS should always be used in preference to cursors because of their efficiency and simplicity, unless you need to carry out a row-by-row operation on the records.
Other great articles from Ben
| Sequence Objects in SQL Server |
| Debugging stored procedures in SQL Server Management Studio (SSMS) |
| Understanding cursors and replacing them with JOINs in SQL Server |

View all posts by Ben Richardson
- Working with the SQL MIN function in SQL Server - May 12, 2022
- SQL percentage calculation examples in SQL Server - January 19, 2022
- Working with Power BI report themes - February 25, 2021