

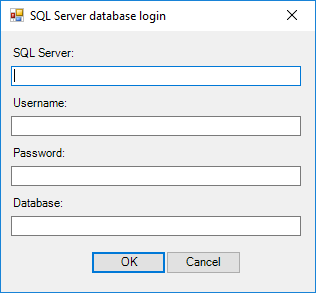
In this article, we’ll be creating a SQL Server login form, as shown in the example below, using PowerShell to accept user input. We’ll show the code behind the form, how to capture the user input and utilize it:
First, let’s create the function that will be used for creating custom input form:
|
1 2 3 |
function Show-InputForm() |
Now, the first thing is to create the input form:
|
1 2 3 4 5 6 7 8 9 |
{ #create input form $inputForm = New-Object System.Windows.Forms.Form $inputForm.Text = $args[0] $inputForm.Size = New-Object System.Drawing.Size(330, 100) $inputForm.StartPosition = "CenterScreen" [System.Windows.Forms.Application]::EnableVisualStyles() |
Next, let’s define handling of the Enter and Escape keys to perform as OK and Cancel:
|
1 2 3 4 5 6 7 8 9 10 11 12 13 14 15 16 17 18 19 |
#handle button click events $inputForm.KeyPreview = $true $inputForm.Add_KeyDown( { if ($_.KeyCode -eq "Enter") { $inputForm.Close() } }) $inputForm.Add_KeyDown( { if ($_.KeyCode -eq "Escape") { $inputForm.Close() } }) |
The next part is used to create the OK button, define its size, position, title and behavior:
|
1 2 3 4 5 6 7 8 9 10 11 12 |
#create OK button $okButton = New-Object System.Windows.Forms.Button $okButton.Size = New-Object System.Drawing.Size(75, 23) $okButton.Text = "OK" $okButton.Add_Click( { $inputForm.DialogResult = [System.Windows.Forms.DialogResult]::OK }) $inputForm.Controls.Add($okButton) $inputForm.AcceptButton = $okButton |
Also, let’s create the Cancel button, define its size, position, title, and behavior:
|
1 2 3 4 5 6 7 8 |
#create Cancel button $cancelButton = New-Object System.Windows.Forms.Button $cancelButton.Size = New-Object System.Drawing.Size(75,23) $cancelButton.Text = "Cancel" $inputForm.Controls.Add($cancelButton) $inputForm.CancelButton = $cancelButton |
The following loop dynamically creates labels and text boxes:
|
1 2 3 4 5 6 7 8 |
[System.Collections.Generic.List[System.Windows.Forms.TextBox]] $txtBoxes = New-Object System.Collections.Generic.List[System.Windows.Forms.TextBox] $y = -15; for($i=1;$i -lt $args.Count;$i++) { $y+=30 $inputForm.Height += 30 |
Now, let’s create dynamic label, define its size, position and set the associated parameter as its text:
|
1 2 3 4 5 6 7 8 9 10 |
#create label $objLabel = New-Object System.Windows.Forms.Label $objLabel.Location = New-Object System.Drawing.Size(10, $y) $objLabel.Size = New-Object System.Drawing.Size(280, 20) $objLabel.Text = $args[$i] +":" $inputForm.Controls.Add($objLabel) $y+=20 $inputForm.Height+=20 |
Also, let’s create dynamic text box, define its size and position:
|
1 2 3 4 5 6 7 8 9 10 11 12 |
#create TextBox $objTextBox = New-Object System.Windows.Forms.TextBox $objTextBox.Location = New-Object System.Drawing.Size(10, $y) $objTextBox.Size = New-Object System.Drawing.Size(290, 20) $inputForm.Controls.Add($objTextBox) $txtBoxes.Add($objTextBox) $cancelButton.Location = New-Object System.Drawing.Size(165, (35+$y)) $okButton.Location = New-Object System.Drawing.Size(90, (35+$y)) |
If the input parameter contains sign (*) the text box associated with the parameter will have obscured text:
|
1 2 3 4 5 6 7 8 |
if ($args[$i].Contains("*")) { $objLabel.Text = ($objLabel.Text -replace '\*','') $objTextBox.UseSystemPasswordChar = $true } } |
The last part will show the input form, focus the cursor in the first text box. If OK button is clicked all entered values will be returned, otherwise the script execution will be stopped:
|
1 2 3 4 5 6 7 8 9 10 11 12 13 14 15 |
$inputForm.Topmost = $true $inputForm.MinimizeBox = $false $inputForm.MaximizeBox = $false $inputForm.AutoSizeMode = [System.Windows.Forms.AutoSizeMode]::GrowAndShrink $inputForm.SizeGripStyle = [System.Windows.Forms.SizeGripStyle]::Hide $inputForm.Add_Shown({$inputForm.Activate(); $txtBoxes[0].Focus()}) if ($inputForm.ShowDialog() -ne [System.Windows.Forms.DialogResult]::OK) { exit } return ($txtBoxes | Select-Object {$_.Text} -ExpandProperty Text) } |
With this last part, the Show-InputForm() function is completed and we can move with providing examples.
In the following line, we’ll load .NET types necessary for working with Windows forms:
|
1 2 3 |
Add-Type -AssemblyName "system.windows.forms" |
Here is an example of using the Show-InputForm() function and defining variables for entering source and destination SQL Server database credentials:
|
1 2 3 4 5 6 7 8 |
#variables for our SQL Server login form login = Show-InputForm "SQL Server database login" "SQL Server" "Username" "Password*" "Database" $server = $login[0] $user = $login[1] $password = $login[2] $database = $login[3] |
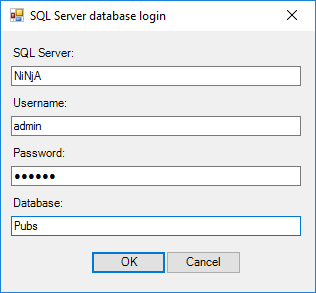
Once we hit “OK” we’ll collect the information input and use it to build a connection string to connect to SQL Server using the following part in the PowerShell script:
|
1 2 3 4 |
$ConnectionString = "Server = $server; Database = $database; Integrated Security = False; User ID = $user; Password = $password;" Write-Output $ConnectionString |
You can download the complete PowerShell script from here.

He uses his spare time on tuning and styling of his car, playing video games, and fishing.
Nemanja is currently working for ApexSQL LLC as a Software sales engineer. He’s specialized in SQL database schema and data comparison and synchronization, and he helps customers with technical issues, providing DEMO presentations, and does the quality assurance for ApexSQL Data Diff and ApexSQL Diff.
View all posts by Nemanja Popovic