
In this article, we are going to see how to add a new disk to an existing SQL Server failover clustered instance (which I will be referring as FCI from now on). Let’s assume a scenario where you have an existing FCI with dedicated data and log drives and you want to add a new disk (Let’s say you have a new requirement to store your backups locally).
I will be demonstrating this in my lab setup where I have a two node failover clustered SQL Server 2017 Instance, running on Windows Server 2012 R2. Below is the current state of my FCI from failover cluster manager.
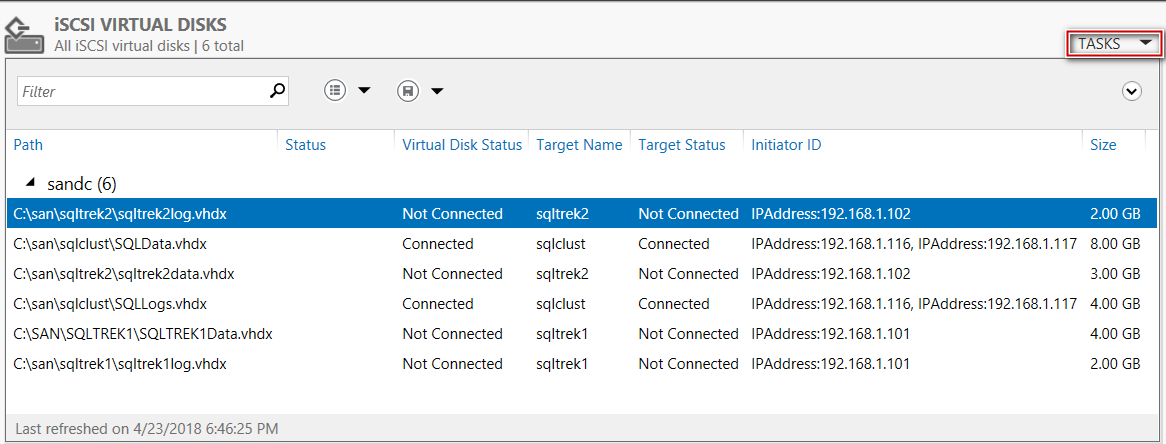
As you can see I have two disk drives (E$-SQLData and F$-SQLLogs) dedicated to my SQL Server Instance. Now I would like to add a new disk with volume label SQLBacks. First thing first, we need to carve a new disk from SAN and present it to windows (This part will be typically done by Storage admins and or Windows admins depending on your organization). FYI, in my lab environment for the demo purposes, I am leveraging windows server iSCSI for building my SAN infrastructure. In order to create a new disk drive and present to both the nodes of my failover cluster, I am going to create a new iSCSI virtual disk from my SANDC machine. This is the server which acts as Domain Controller and SAN (File and Storage Services role has already been installed and configured) in my lab environment.
Creating a new Disk
Open server manager and navigate to “File and Storage Services” and click on Tasks button located at the top right corner (highlighted in the above screenshot) and select “New iSCSI virtual disk”. This will open a create disk wizard.
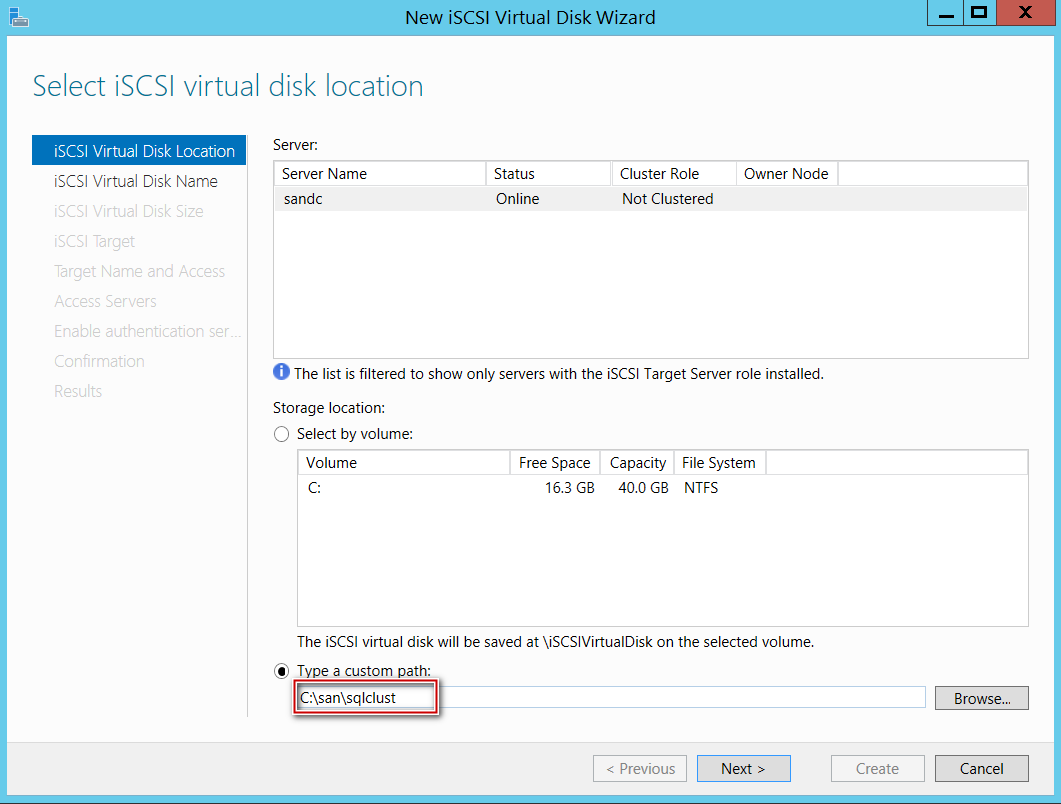
Select a path where you want the desired hard disk file to be created. To clarify, this is the folder where we are asking iSCSI services to create VHDX (Hard Disk Image) files which will be presented as hard disks to my cluster nodes eventually.
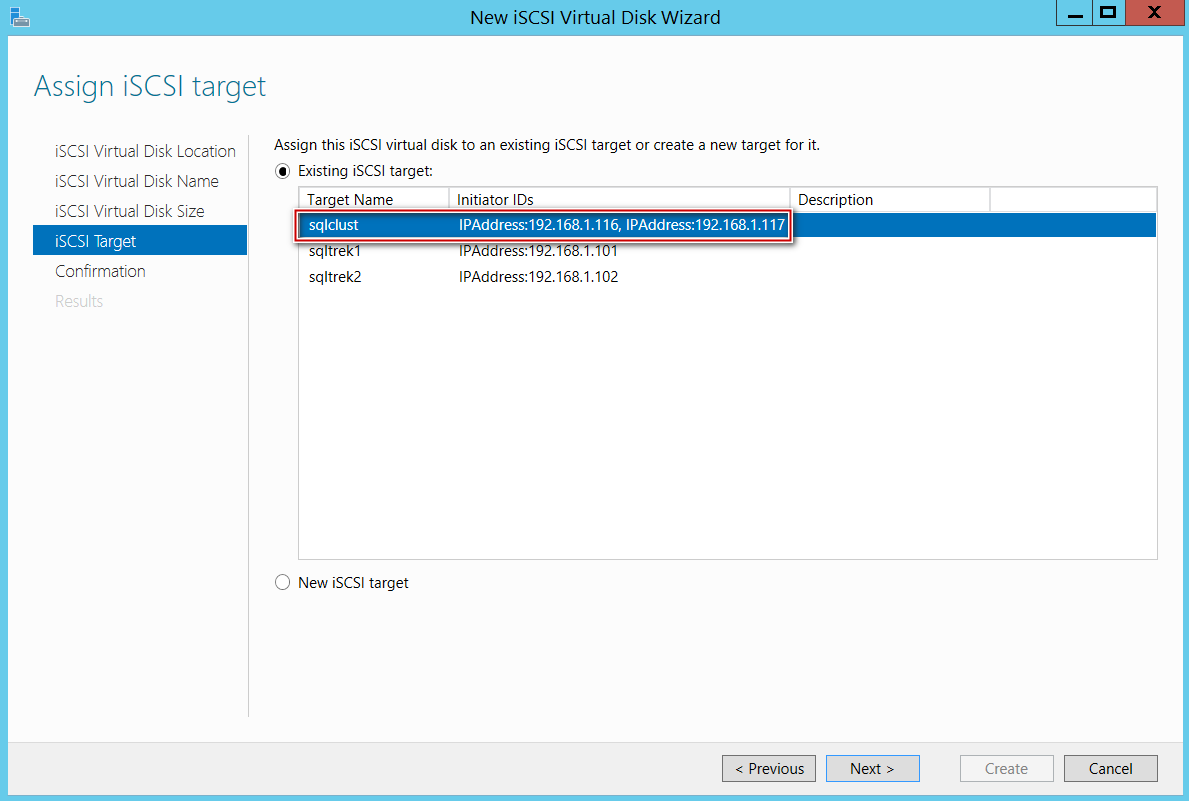
After selecting a path, give it a name and size and select a desired iSCSI target. As you can see in the below screenshot, I already have an iSCSI target dedicated to my SQL server FCI. This is where I will be adding my newly created hard disk. (You can notice I have listed both my cluster nodes 192.168.1.116 and 192.168.1.117 as Initiator ID’s under my iSCSI target ‘SQLCLUST’.
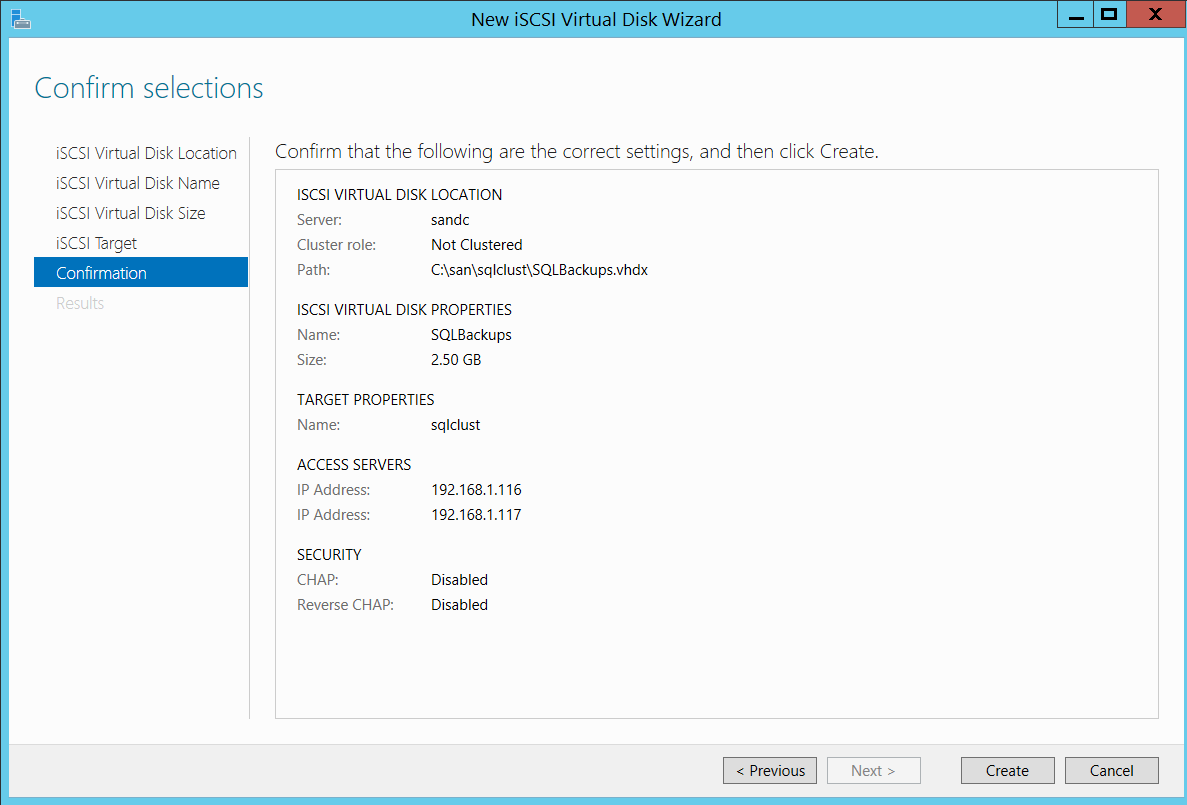
Below is the summary of all the steps what I have done so far.
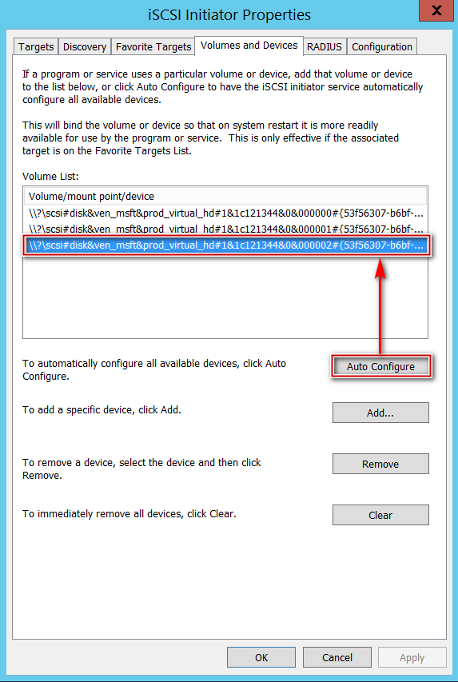
Now, All I have to do is connect to both my cluster nodes and fire up iSCSI initiator and connect the newly created disk. Since I already have my iSCSI target setup on both the nodes, All I have to do is just to refresh the connection and click on Auto Configure under volumes and devices as shown below, Immediately I see my newly created disk under my volume list.
Well, we are done with all the hard work, all we are left with is to bring the newly assigned disk Online, Initialize and create a simple volume from Disk Management.

On the other node(s), just bring the disk online (we don’t have to initialize and format on the second node as that part has been already taken care on the first node where we created the simple volume).
Once the newly created drive has been presented to windows, step 1 is to add the new drive to Windows cluster, I am going to perform this using Microsoft failover cluster manager.
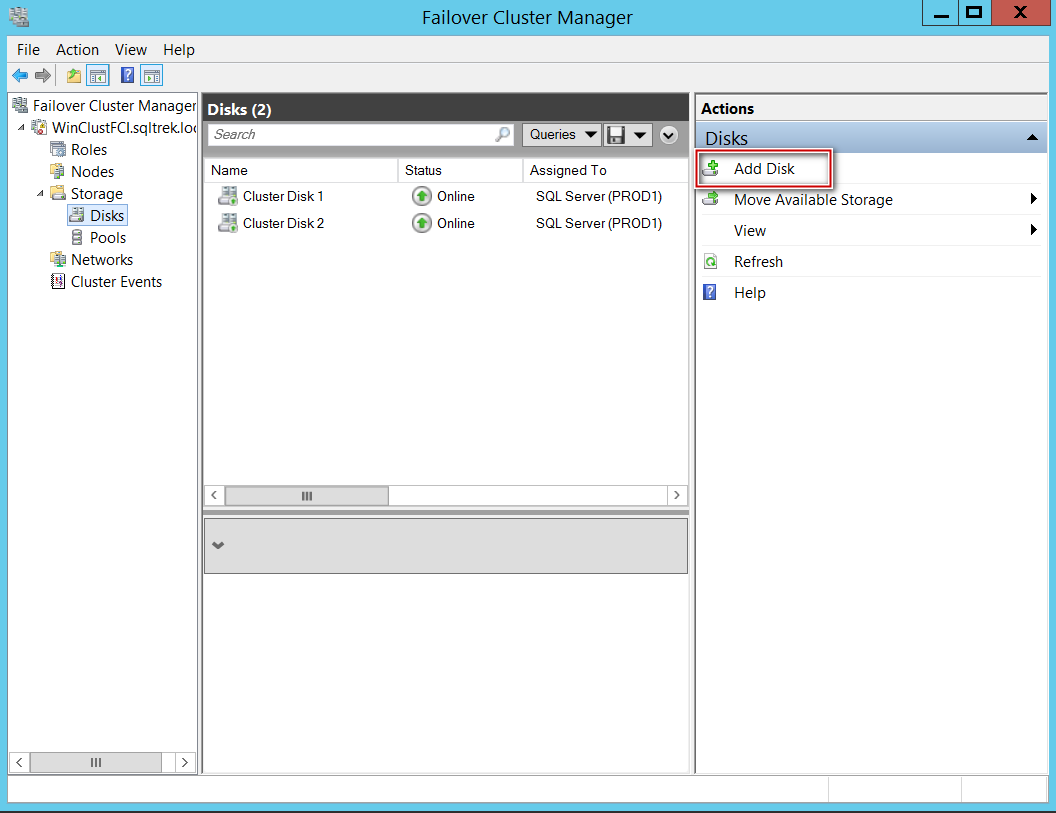
Navigate to storage and select Add disk as shown in the above screenshot, failover cluster manager will automatically detect eligible storage.
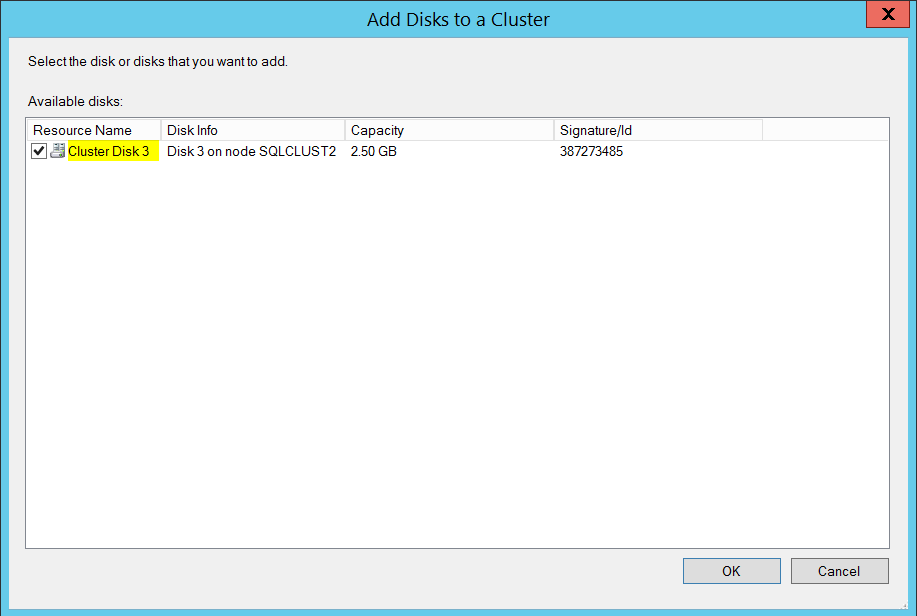
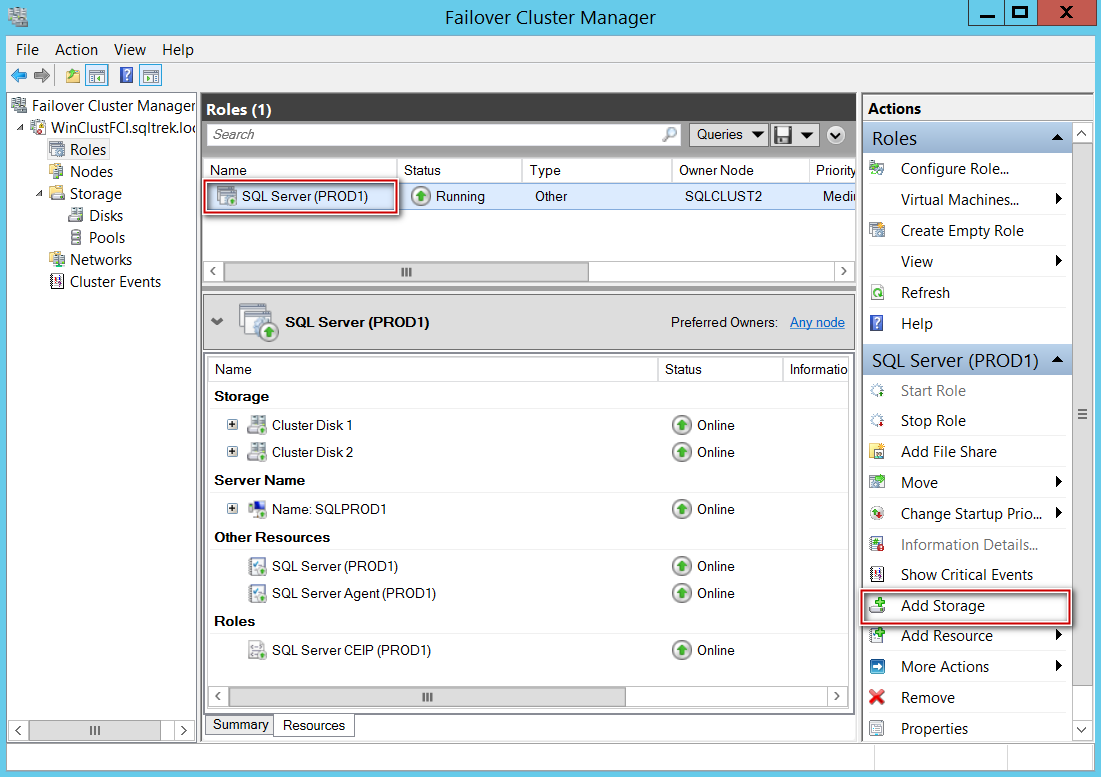
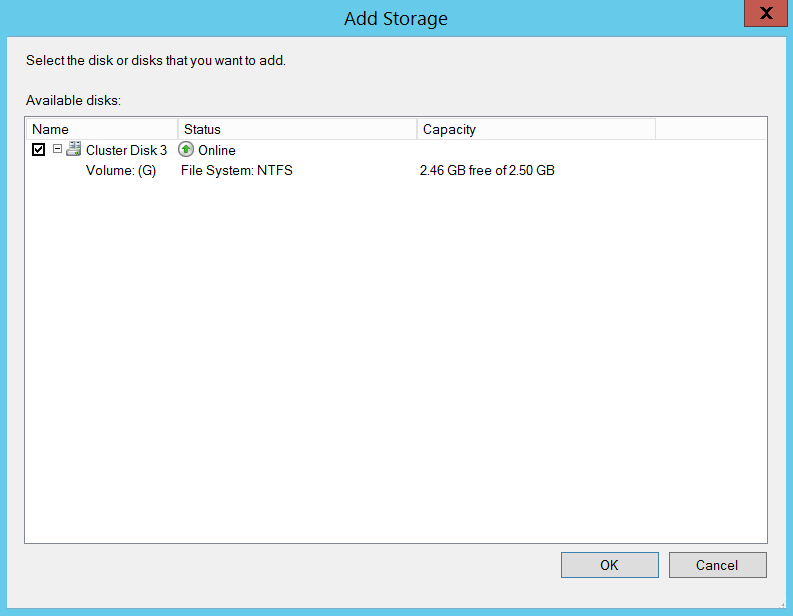
Moving on to the next step, add the newly created disk which is listed as available storage in the above screenshot to SQL Server Role.
In order to do that, Select SQL Server Role, choose Add storage and select the newly created disk as shown below.
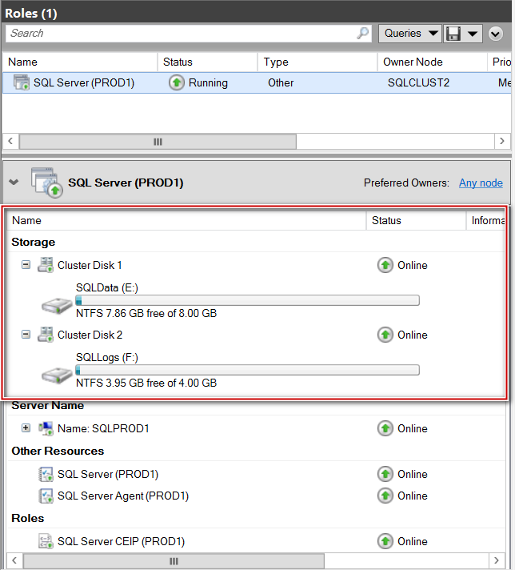
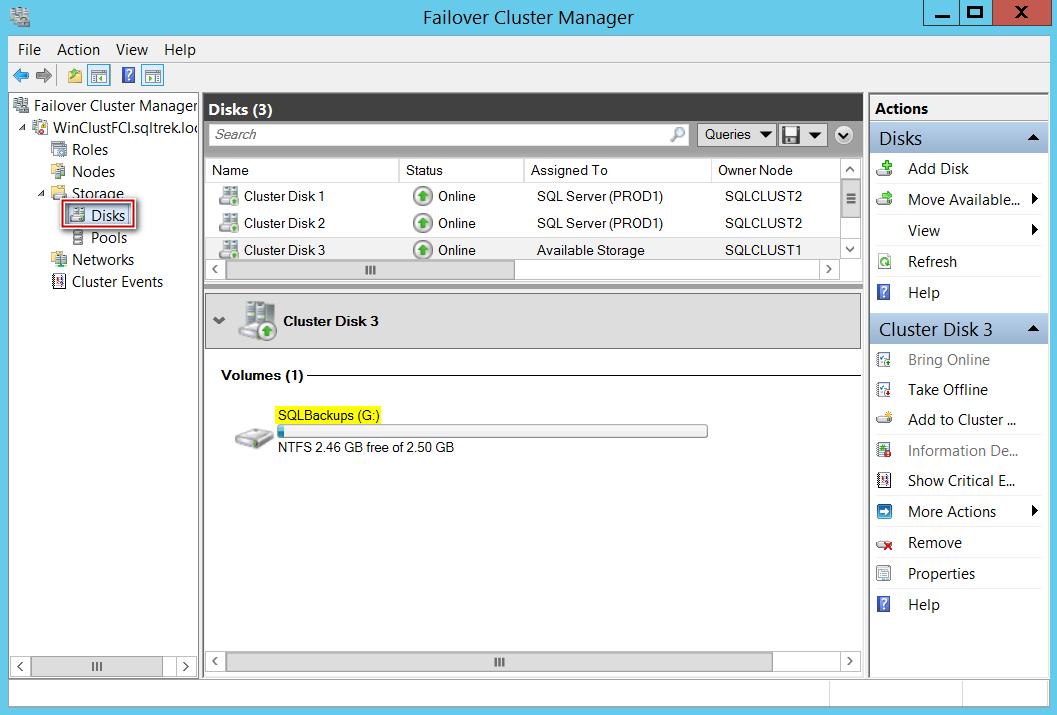
Once the cluster disk 3 (G$-SQLBacks) has been added to SQL role, below is how my SQL Server role looks like in failover cluster manager.
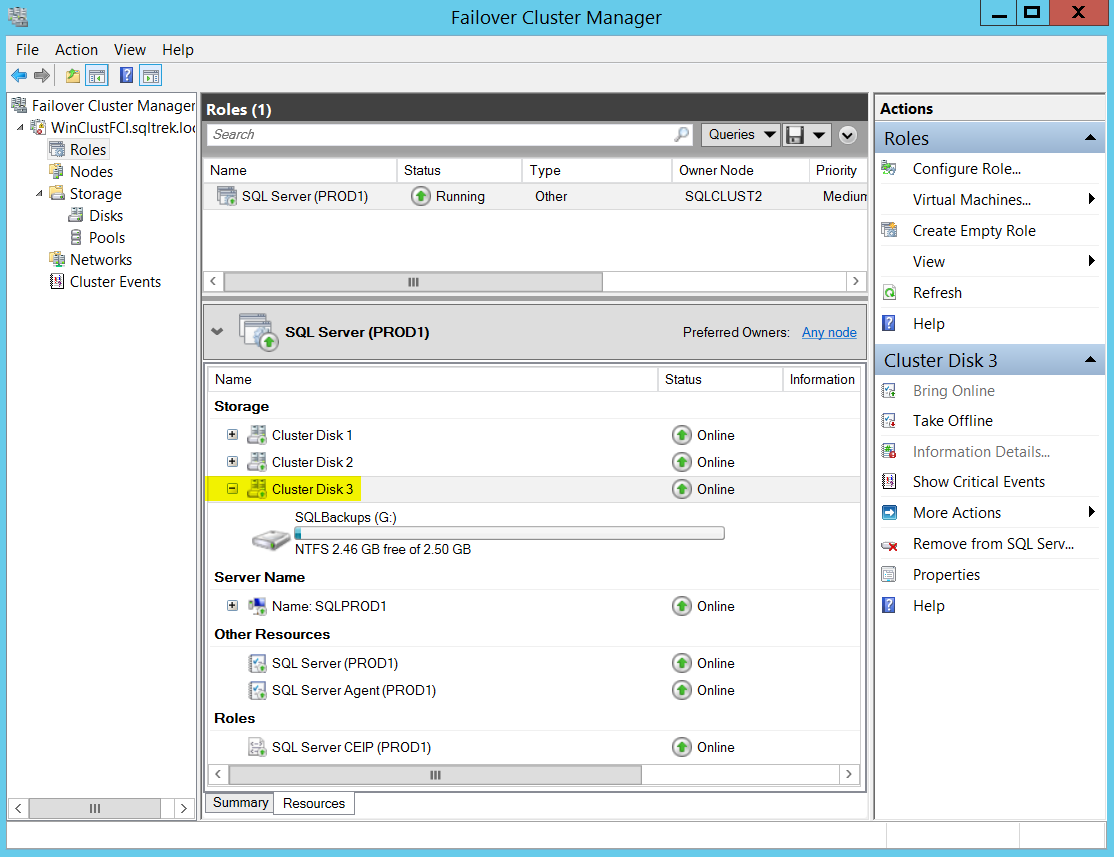
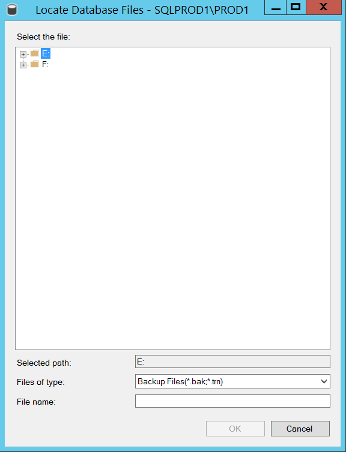
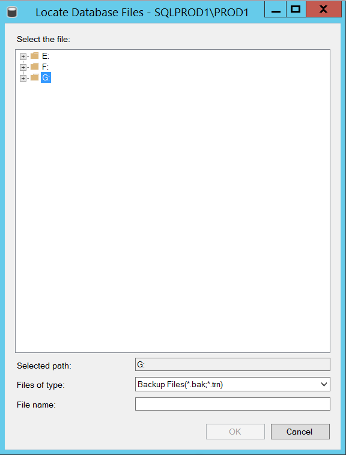
At this stage, you can see that my SQL Server Instance(SQLPROD1/PROD1) has three disk drives including the one which we just added. Okay, let’s try taking a Full backup of one of the user databases and place it on G$. As you can see in the below screenshot, my SSMS couldn’t even locate the newly added disk drive. Well, basically it’s not allowing me to take a backup pointing to my newly created volume at this point.
So, what are we missing?
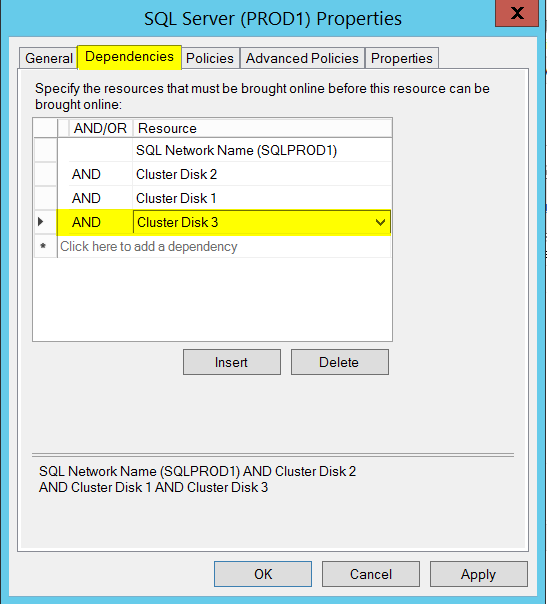
Here comes the important part which I often see being ignored. Before going any further below is the screenshot of the dependency report (You can notice, the newly created drive is not tied to SQL Server)
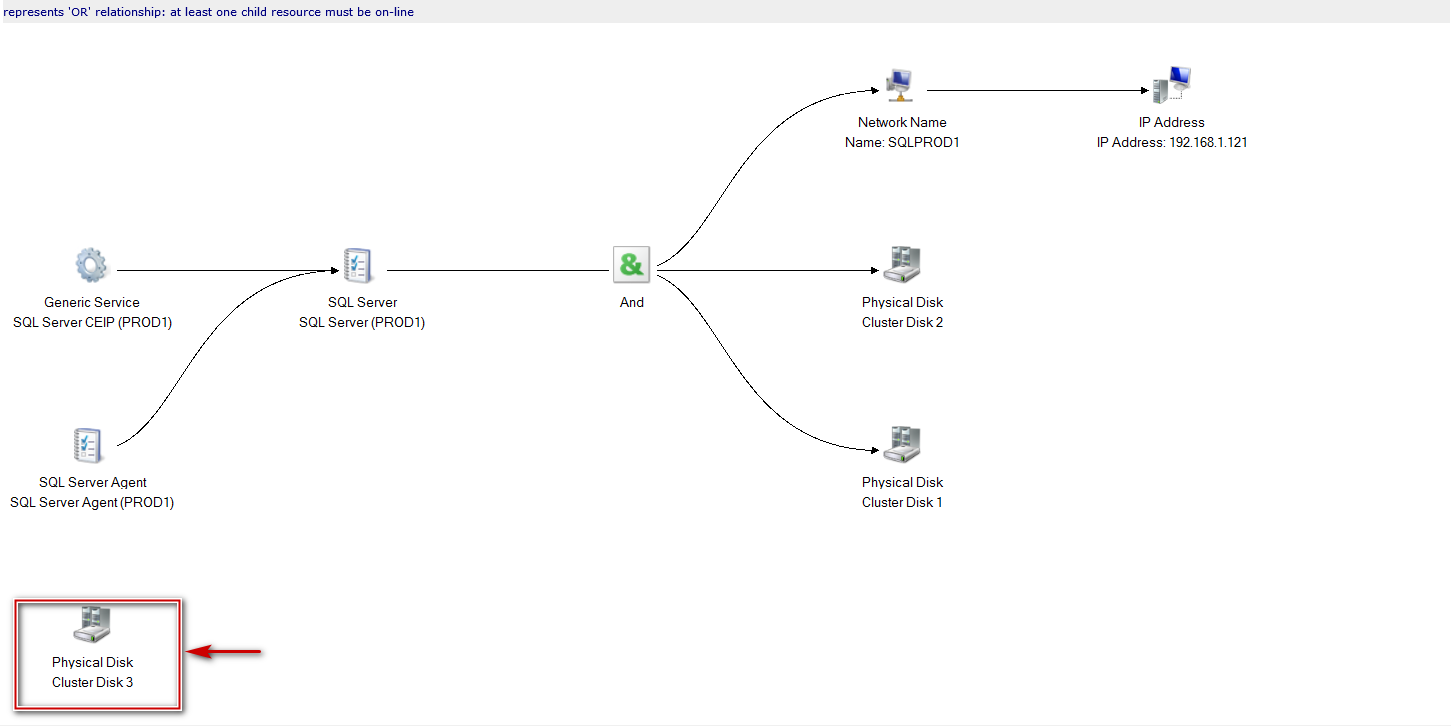
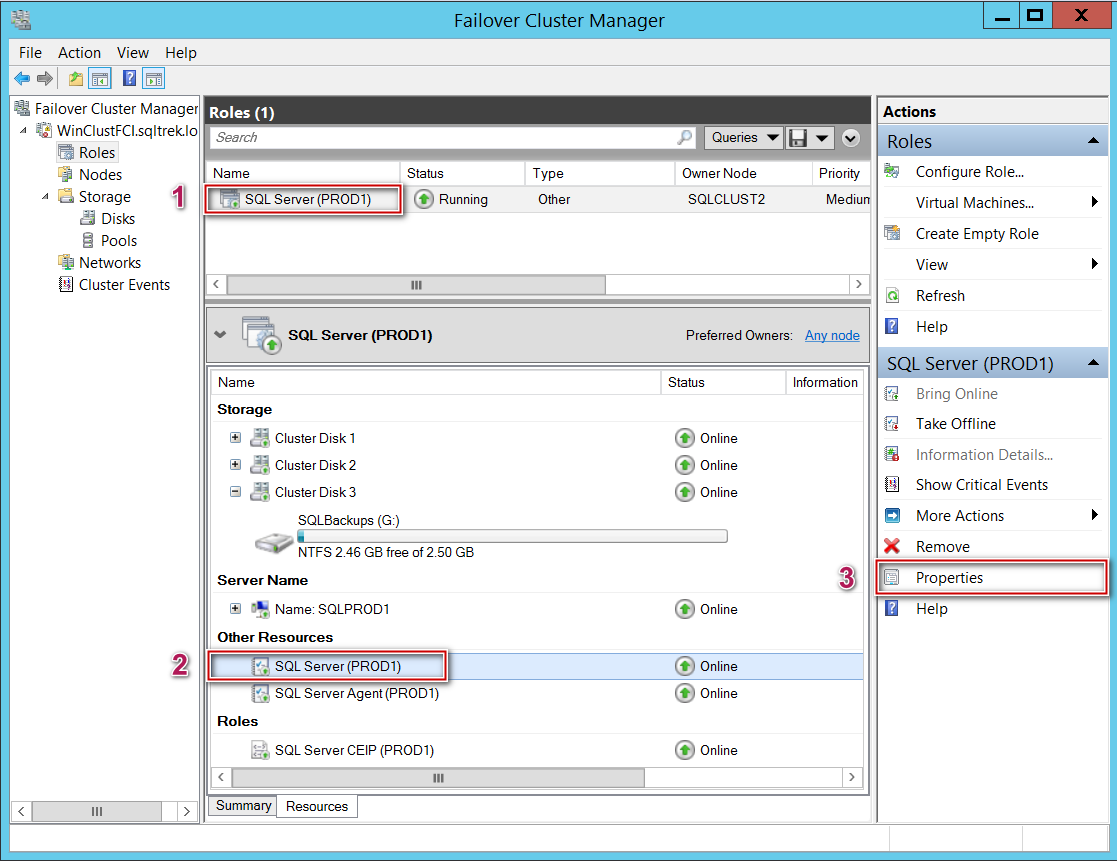
So, what’s the tricky part? The answer is adding “AND Dependency”. To add this dependency for your newly added physical disk, navigate to SQL Server Resource and go to Properties, locate Dependencies tab and add newly created disk as “AND” dependency as shown in the below screenshots.
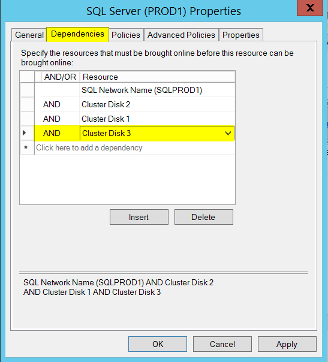
Once that has been taken care, now here is how my SQL Server dependency report looks like.
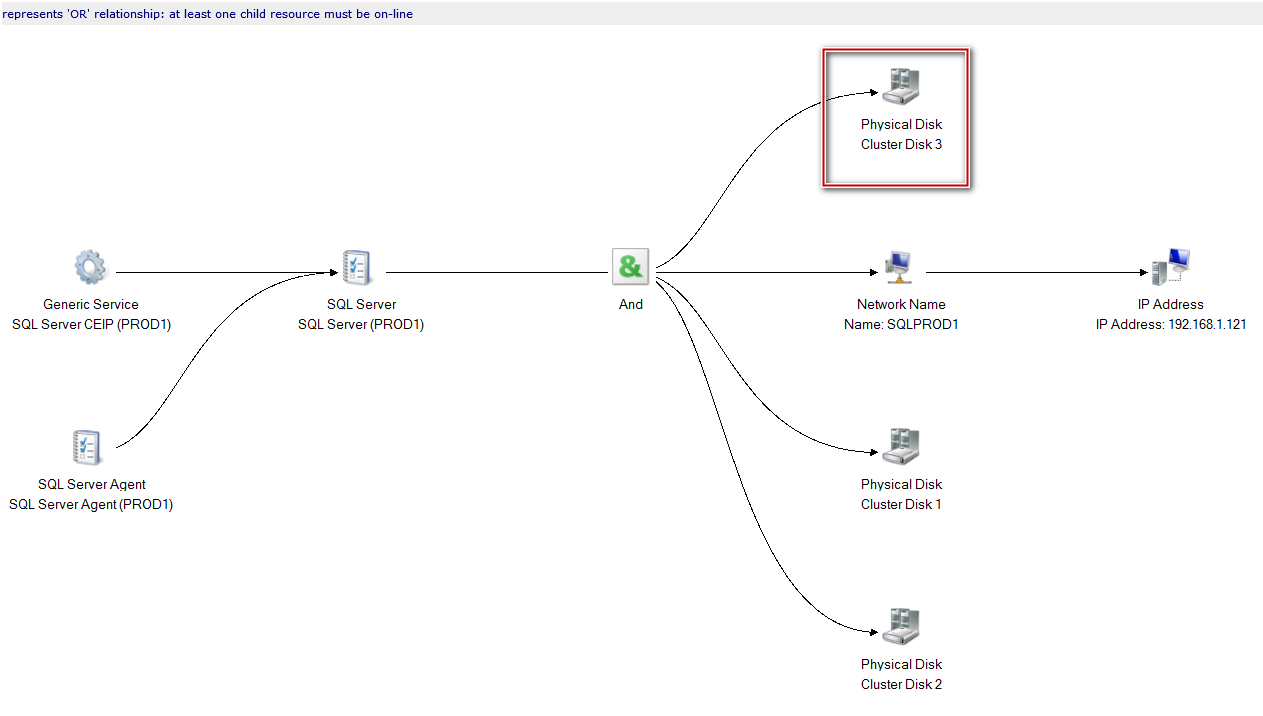
As you can see the newly added physical disk is no longer floating in the air and tied to SQL Server and of course now my SSMS is able to locate G$-SQLBacks drive without any issues.
This task can be performed without impacting the cluster services or SQL Server services. However, you might want to failover SQL Server services to all other available nodes in your cluster to make sure everything is intact and working as expected. That’s all for the post and I hope this has been helpful.

View all posts by Sreekanth Bandarla
- SQL Server with a Docker container on Windows Server 2016 - April 15, 2019
- Simulating a Multi Subnet cluster for setting up SQL Server Always On Availability Groups – lab setup - March 14, 2019
- Deploy SQL Server with Cluster Shared Volumes – part 2 - September 19, 2018