
In this article, I am going to explain how we can install and configure the iSCSI Target Server Role on Windows Server 2016. iSCSI stands for Internet Small Computer System Interface and iSCSI Target Server allows you to boot multiple computers from a single operating system (OS) image.
To demonstrate the deployment process, I have created two virtual machines on my workstation. I have installed Windows Server 2016 on the virtual machines. Following is the configuration of the virtual machines.
|
Host Name |
IP Address |
Operating System |
Role |
|
DC.Local |
192.168.0.100 |
Windows Server 2016 |
iSCSI initiator |
|
SAN.Dc.Local |
192.168.0.130 |
Windows Server 2016 |
iSCSI Target Server |
First, let us create an iSCSI server. To do that, we must install the iSCSI server role.
Create and configure the iSCSI target server role
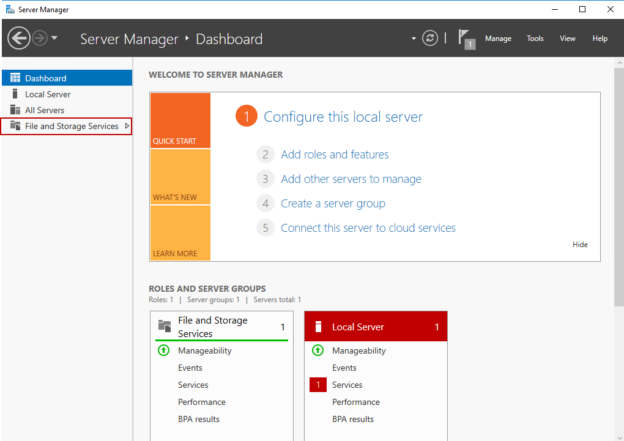
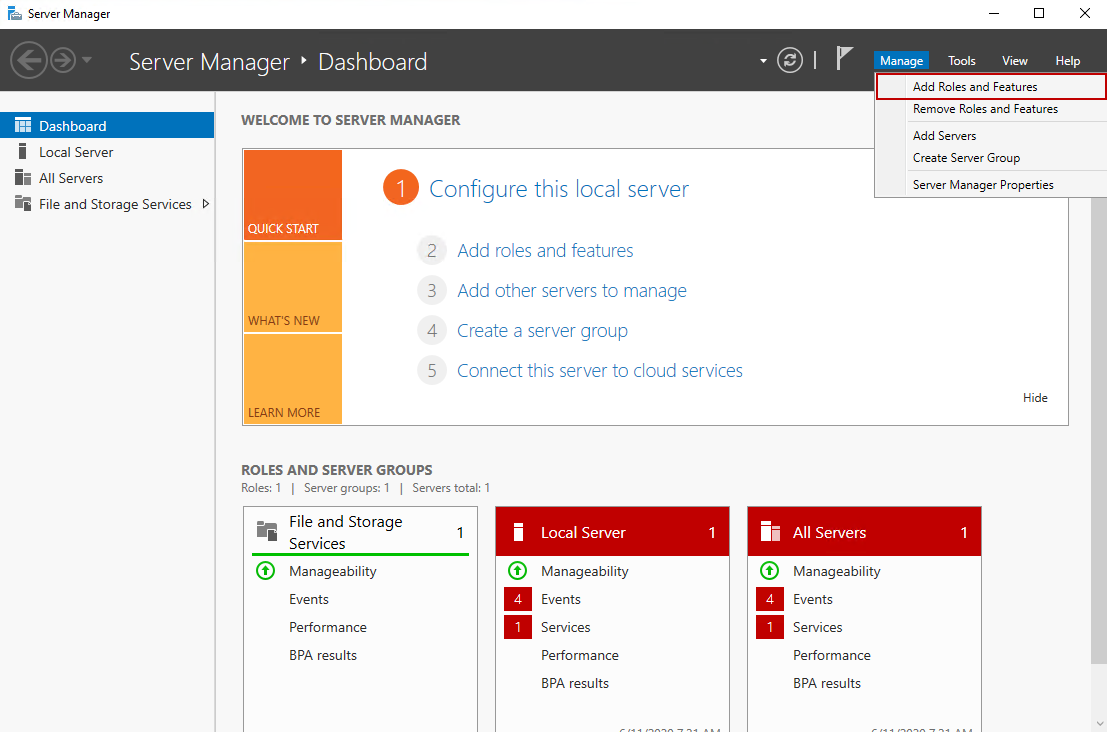
To configure the iSCSI target server, we must install the “File and iSCSI Services” role in Windows Server. To do that, Open Server Manager and click on “Manage” and select “Add roles and features.” See the following image.
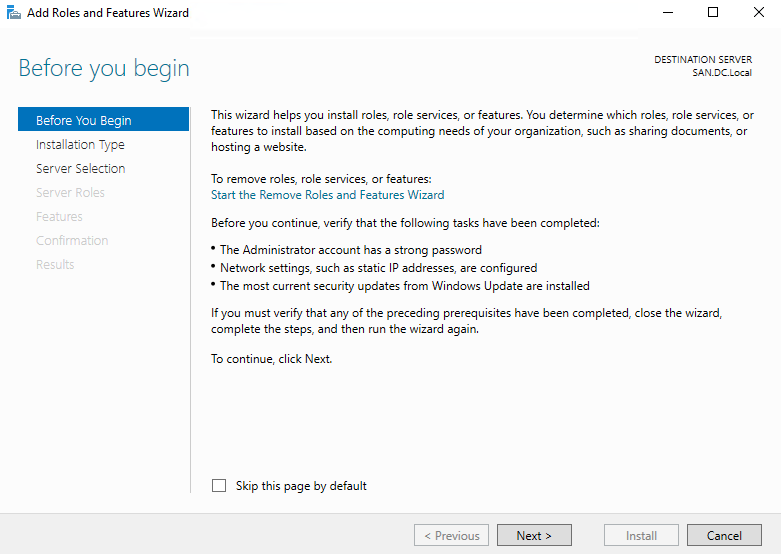
On Add Roles and Features Wizard screen, you can see the detailed information about the wizard. We can skip this screen by checking on “Skip this page by default” checkbox. Click Next. See the following image:
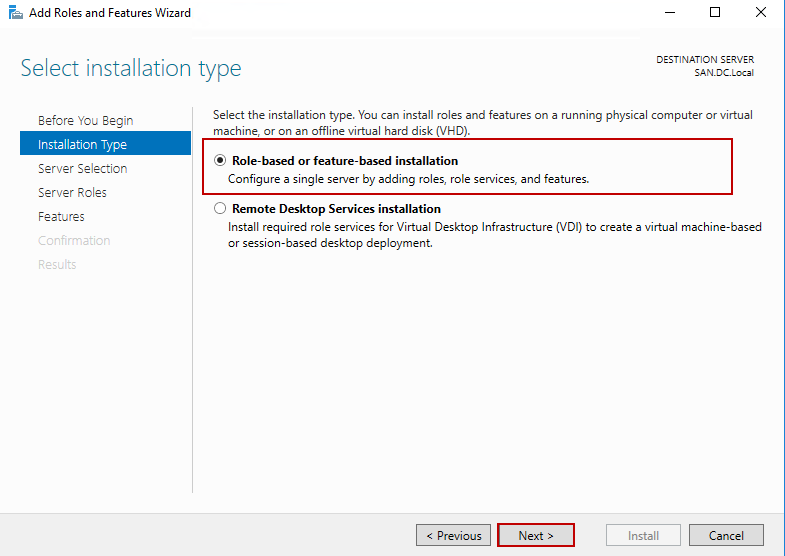
On Select Installation Type screen, you can choose to install a role on a dedicated computer or install a role on a virtual hard disk. We want to install the iSCSI service on a virtual machine; therefore, choose “Role-based or feature-based installation” Click on Next. See the following image:
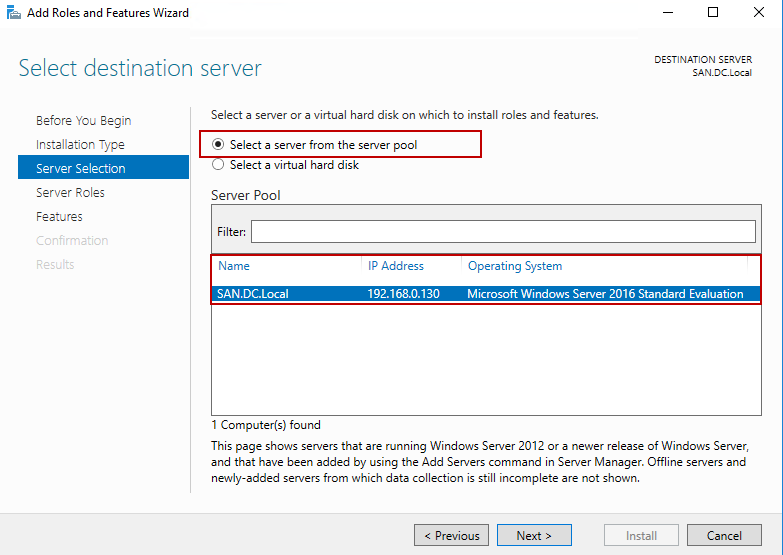
On the “Select destination server” screen, we can choose the server or the virtual disk on which we want to install the desired role or feature. We want to install the iSCSI services on SAN.DC.Local hence, choose SAN.DC.Local from the list of servers within Server Pool.
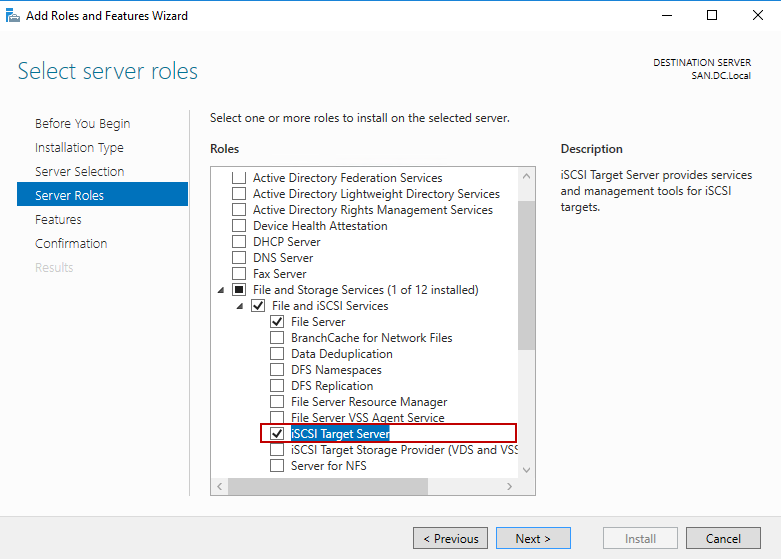
On the “Select server roles” screen, we can choose the desired role from the list of roles. We want to install File and iSCSI Services. To do that, expand, File and Storage Services, expand “File and iSCSI Services” and select “iSCSI Target Server”. See the following image:
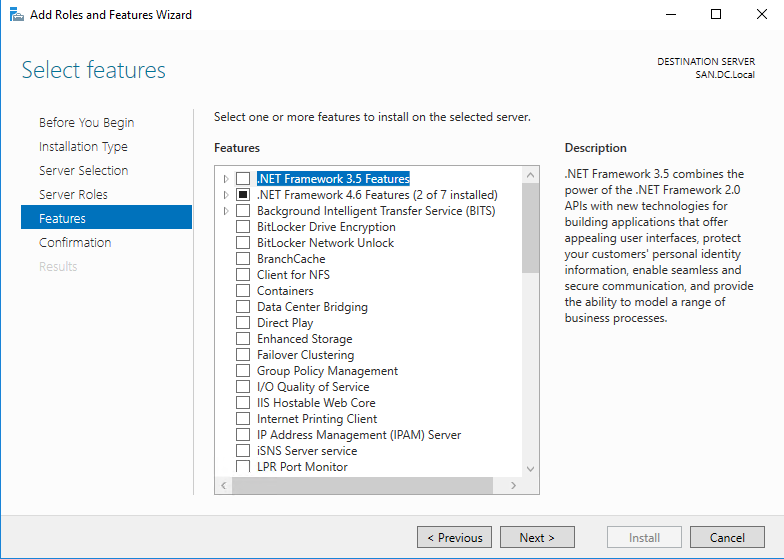
On the “Select features” screen, we can choose the required feature that we want to install. We do not want to install any feature, hence click on Next. See the following image:
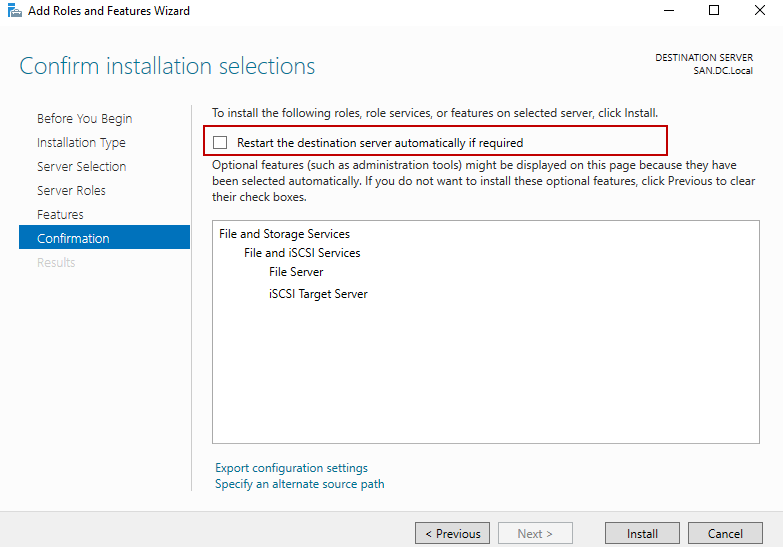
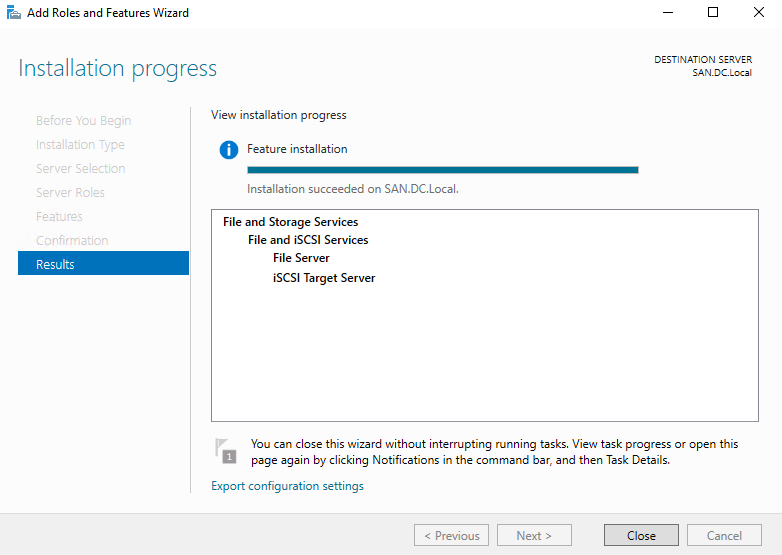
On Confirm installation selections screen, you can see the summary of the roles and the list of features that you are going to install on the server. Some roles and features require to restart the server during the installation process so you can enable the option to restart the server automatically during installation. Review the details of roles and click on Install. See the following image:
Once installation completes, click on Close.
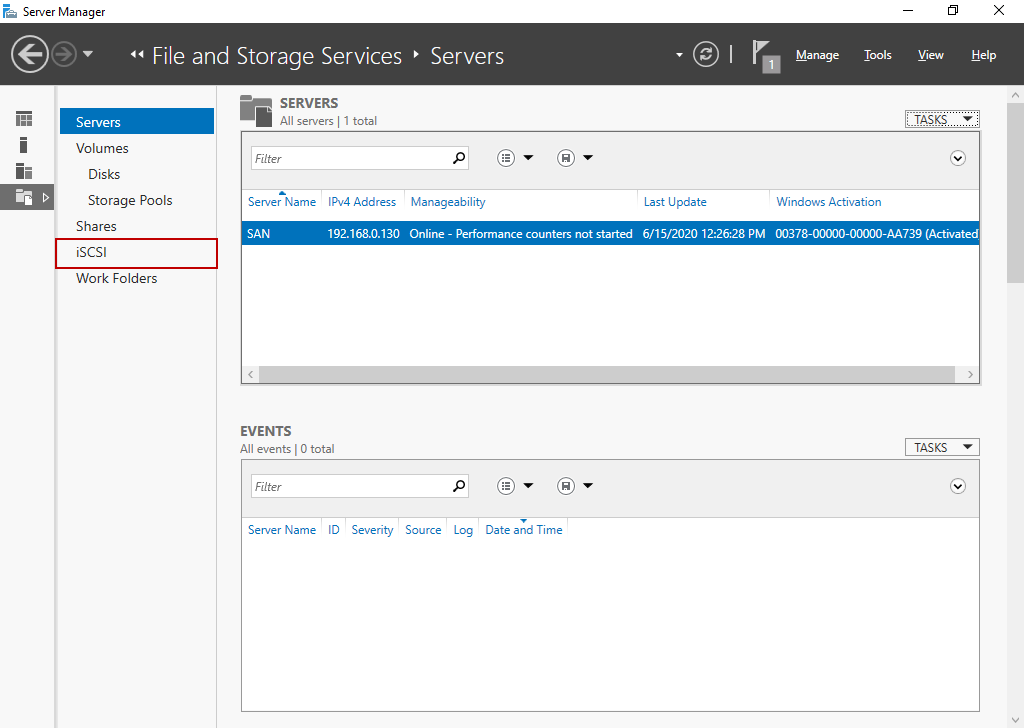
To verify that the iSCSI target server role has been installed successfully, open Server Manager and expand “File and Storage Services.” See the following image:

In the left pan, you can view the iSCSI target server that has been installed. See the following image:
Creating iSCSI Virtual disks
Once the iSCSI target server has been configured, let us create an iSCSI virtual disk. To do that,
- Launch Server Manager – expand “File and Storage services”
- Click on “iSCSI”
- On the right pan, click on “Start the new iSCSI virtual disk wizard”
See the following image:

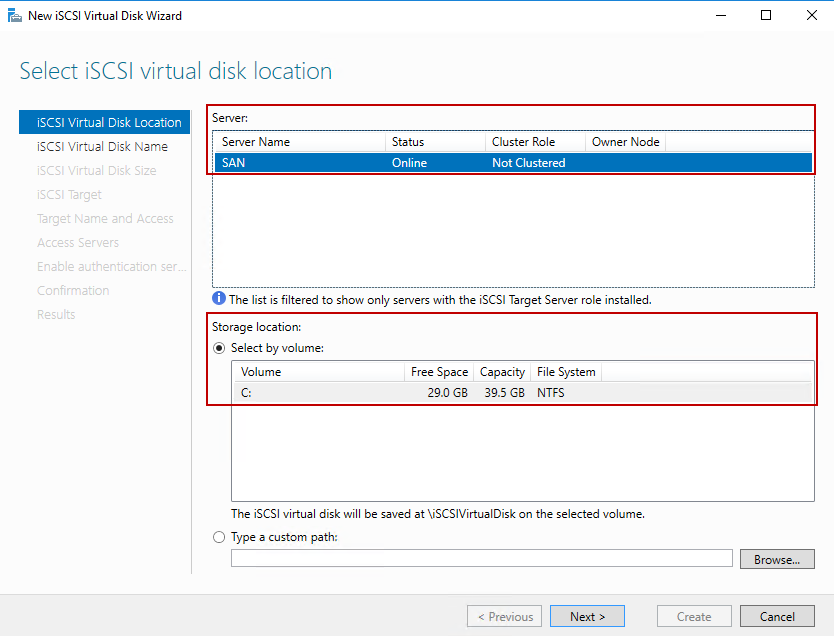
New iSCSI disk wizard starts. On the “Select iSCSI virtual disk location” screen, you can choose the location of the virtual disk. If you have installed the iSCSI Target Server role on multiple servers, then you can choose the desired server from the list. The list of servers with the iSCSI target role will be populated automatically in the “Servers” text box. The disk volume can be selected from the “Select by Volume” list. You can also provide the custom path in the “Type a custom path” text box. We are going to create a virtual disk on the C drive of the SAN.DC.Local, hence choose C: from the “Select by Volume” textbox. Click on Next. See the following image:
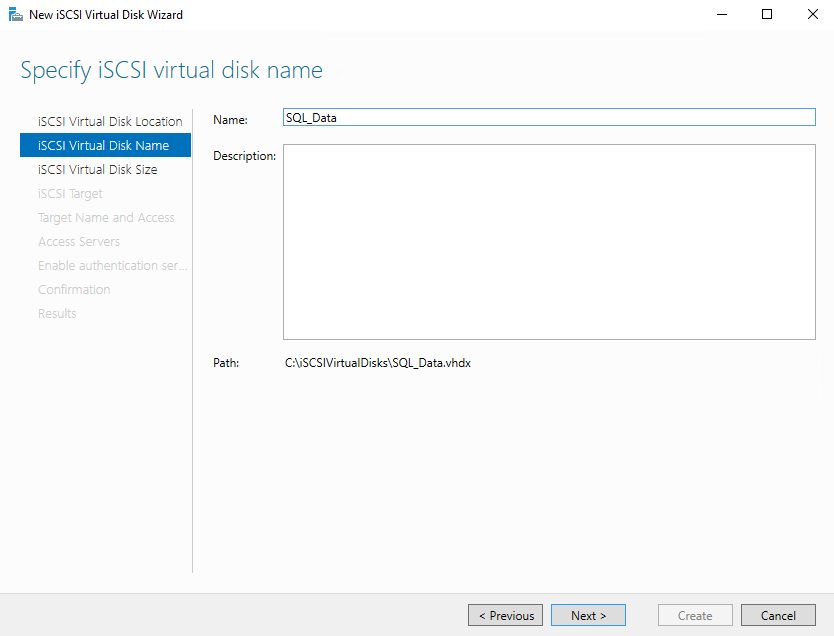
On the “Specify iSCSI virtual disk name” screen, you can provide the desired name of the virtual disk name. Click on Next. See the following image:
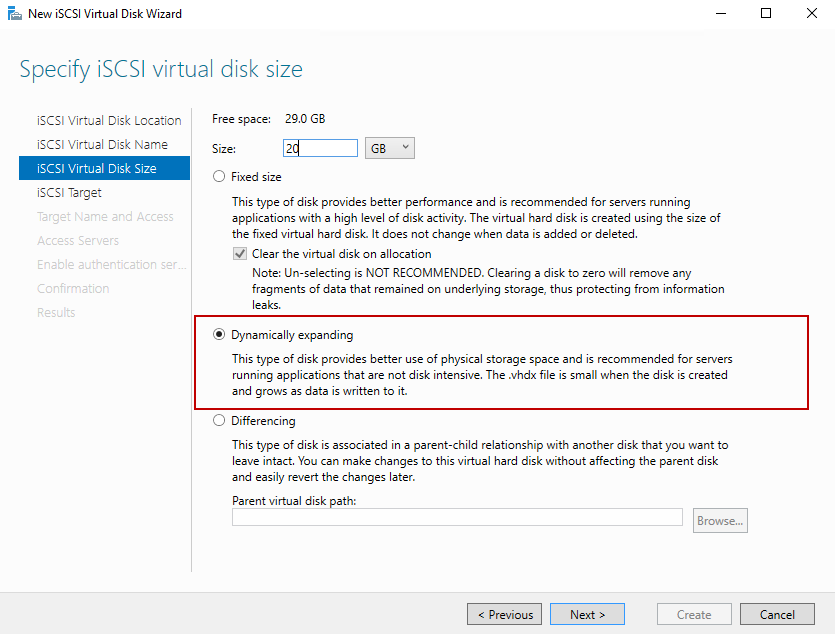
On the “Specify iSCSI virtual disk size” screen, you can specify the size of the virtual disk. You can create any of the following disk types:
- Fixed Size: When we choose the fixed size, the wizard creates the disk that has the size specified in the “Size” textbox. This disk type is useful when you want to run the application that involves high disk activity. When you add or remove the data from the disk, the size of the disk does not change
- Dynamically expanding: When we choose dynamically expanding disk type, the wizard creates a disk with a small size. Later, the size of the disk increases based on the volume of the data that has been added
- Differencing: If you have a scenario when you want to create multiple child virtual disk in one parent disk. The changes should be made in child disks, and those changes can be revert. This setup can be configured using the differencing disk type
We want to create a disk that can be expanded based on the amount of the data added to the disk hence, choose “Dynamically expanding” disk type, enter the desired size of the disk in the “Size” textbox and click on Next. See the following image:
On the “Assign iSCSI target” screen, we can provide the desired name of the iSCSI target. The iSCSI target name is used by the iSCSI initiators to identify the specific target. If you have created an iSCSI target, you can choose it from “Existing iSCSI target.” We have not created any target yet, so select “New iSCSI target” and click on “Next.” See the following image:

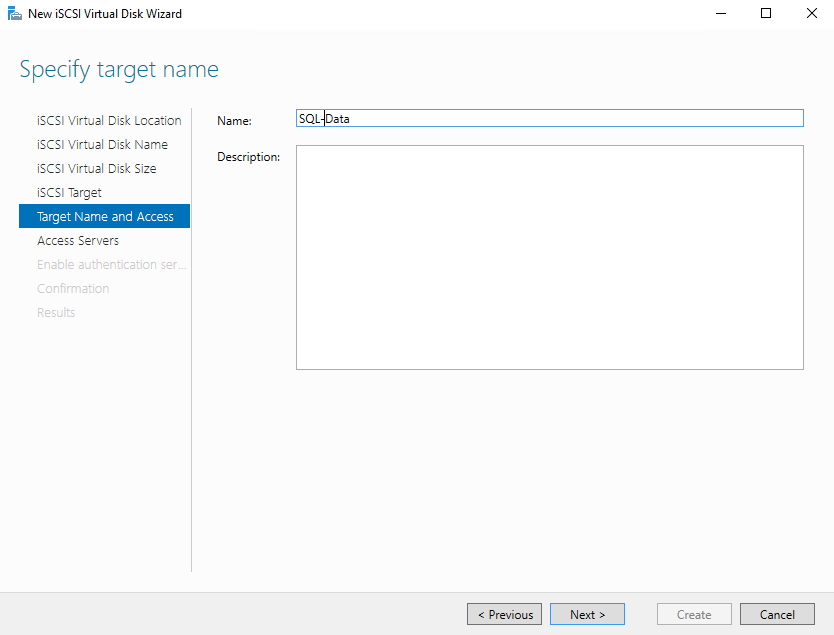
On the “Specify target name” screen, you can provide the name of the target that can be used by iSCSI initiators. Provide the desired name in “Name” textbox and click on Next. See the following image:
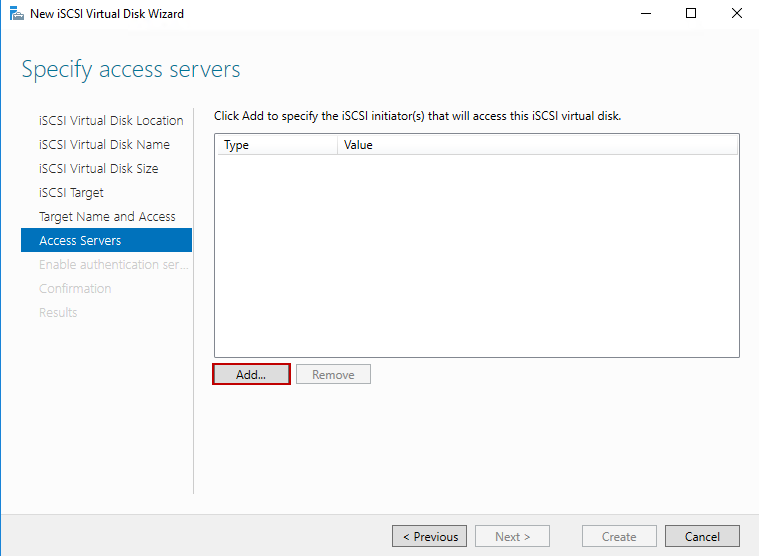
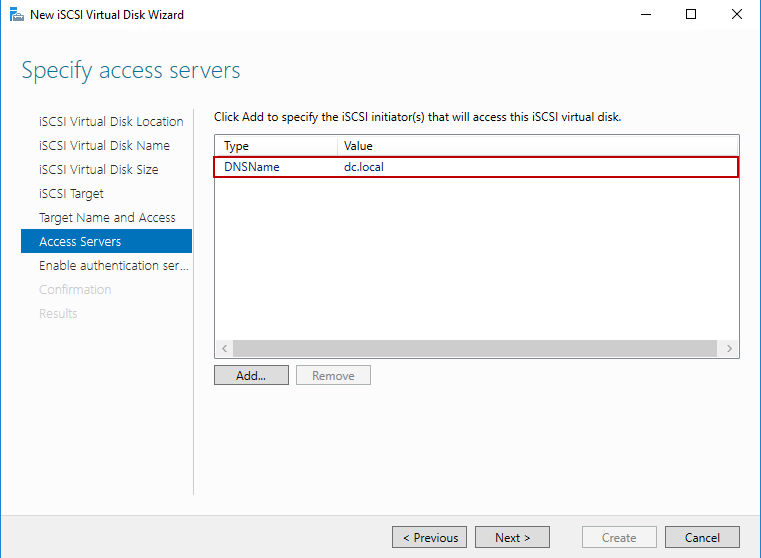
On the “Specify Server Access” screen, you can specify the list of iSCSI initiators that can access the virtual disk. To add the iSCSI initiators, click on Add. See the following image:
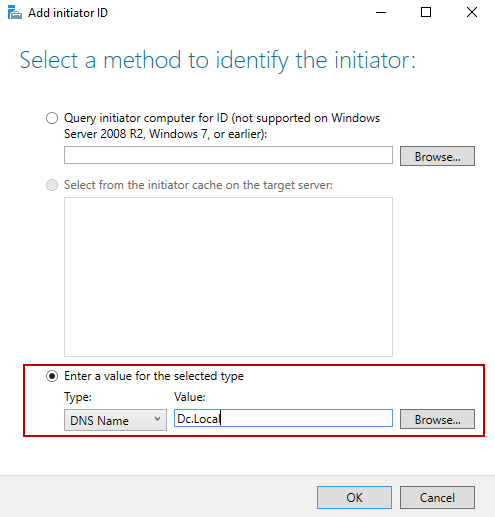
By default, the iSCSI initiator cannot connect to the target server. We must install/enable iSCSI initiators. To connect to the iSCSI target server, we can use any of the following:
- Query initiator for computer ID: In “Query initiator for computer ID” text box, you can specify the fully qualified hostname of the computer that has iSCSI initiator. This method is supported by windows server 2008 R2 OR windows 7 or later operating systems
- IQN: You can specify the IQN of the machine that has an iSCSI initiator. IQN is a qualified name of the iSCSI. The format of the IQN is “<Type>.<Date>.<Naming Authority>.<string defined by naming authority>”
- DNS Name: You can specify the DNS name of the computer where the iSCSI initiator has been installed
- IP Address: If you want to use the iSCSI target from outside of the domain, we can specify the IP Address of the computer that has iSCSI initiator
- Mac Address: You can also specify the MAC address of the computer that has an iSCSI initiator
We are going to connect the iSCSI target from DC. Local computer. To do that, on “Select a method to identify the initiator” screen, choose “DNS Name” from the type drop-down box and enter “DC.Local” in “Value” text box and click on OK to close the screen. See the following image:
Back to the “Specify Server access” screen, you can see that the initiator has been added to the list. Click on Next. See the following image:
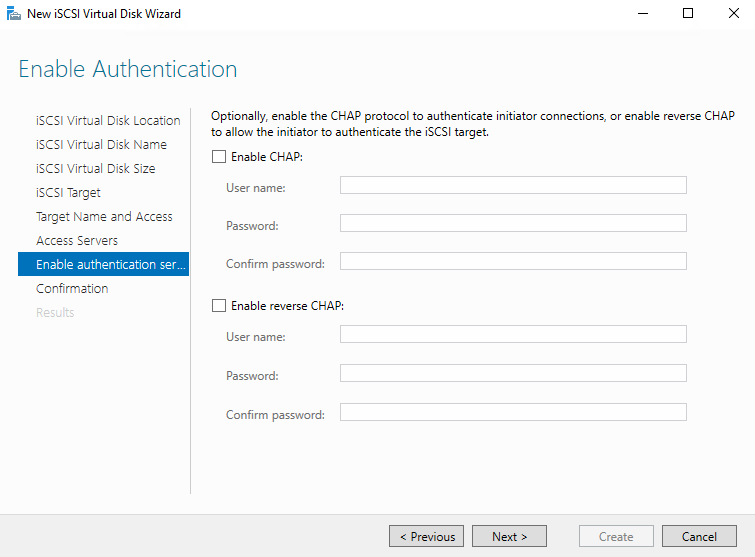
If you want to enable CHAP (Challenge-handshake authentication protocol) or reverse CHAP, click on “Enable CHAP” and “Enable reverse CHAP” and provide username and password. We do not want to enable CHAP or Reverse CHAP, hence click on Next. See the following image:
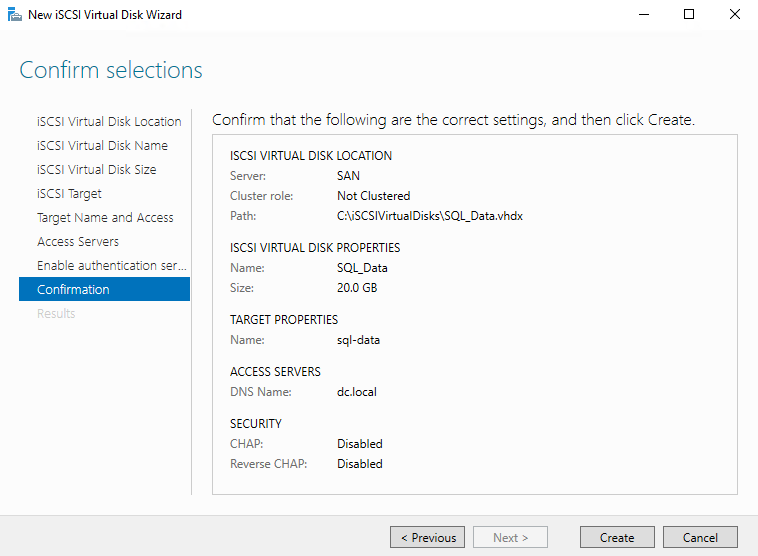
On confirm selection screen, review all the settings, and click on “Create” to create an iSCSI virtual disk. See the following image:
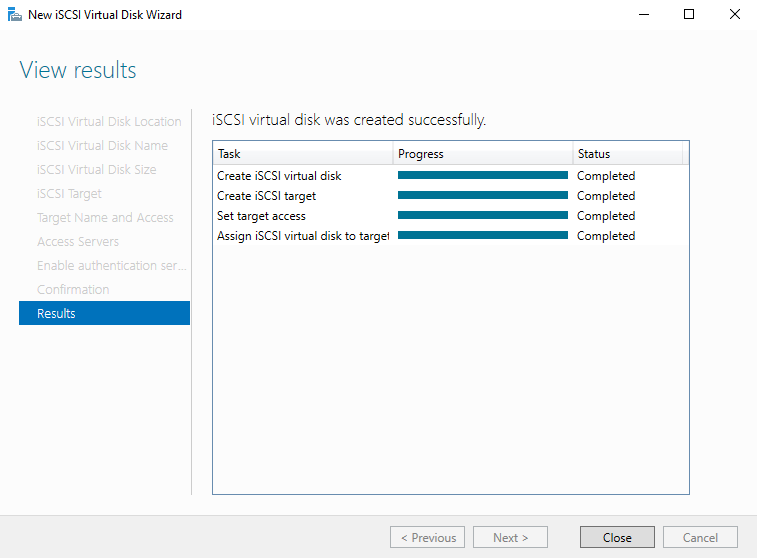
On the “View Result” screen, you can see that disk has been created successfully. You can close the window. See the following image:
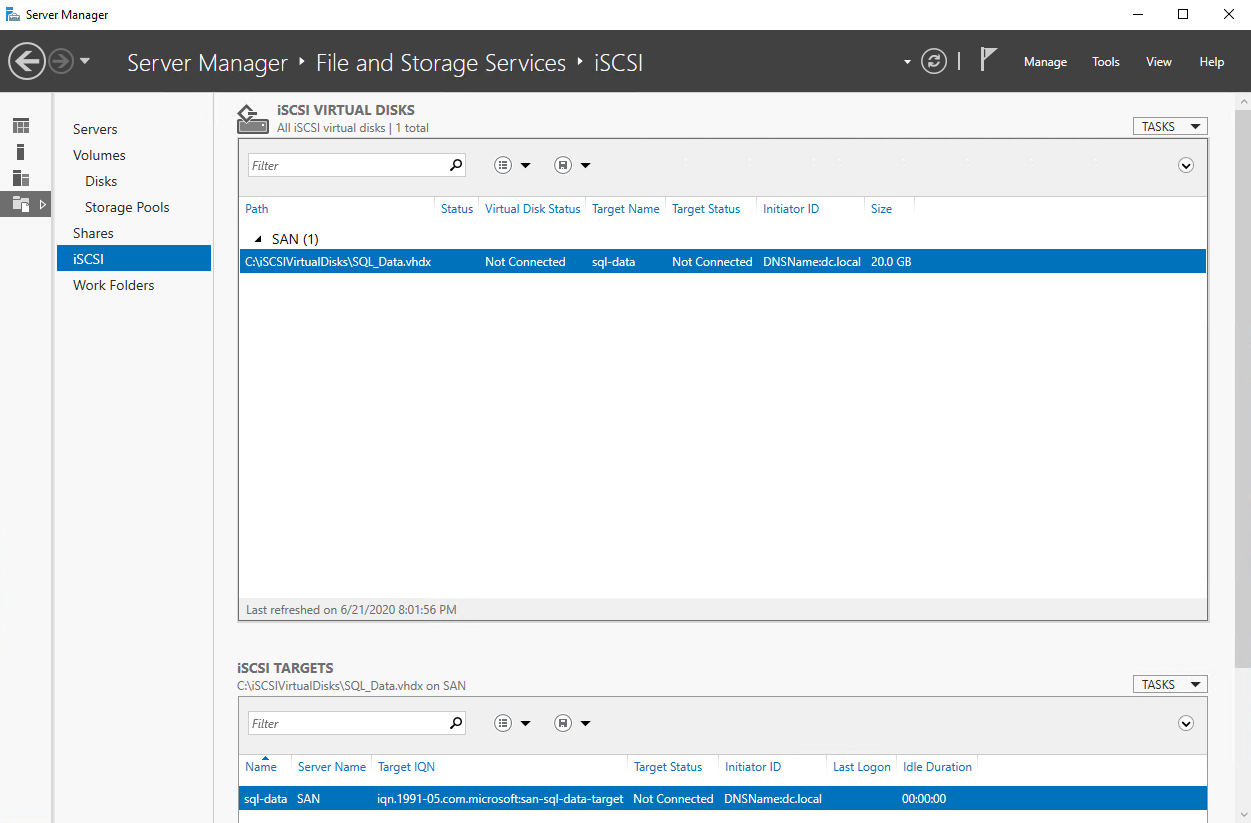
Once the disk has been created, you can see the list of iSCSI virtual disks in the server manager. See the following image.
Summary
In this article, I have explained how we can install the iSCSI Target Server Role and configure the iSCSI Target Server on Windows Server 2016. In my next article, I will explain that how we can configure the iSCSI initiator and use it to connect to the iSCSI virtual disk. Stay tuned!

He has expertise in database design, performance tuning, backup and recovery, HA and DR setup, database migrations and upgrades. He has completed the B.Tech from Ganpat University. He can be reached on nisargupadhyay87@outlook.com
- Different ways to identify and change compatibility levels in SQL Server - July 22, 2024
- Copy SQL Databases between Windows 10 and CentOS using SQL Server data tools - October 19, 2022
- Changing the location of FILESTREAM data files in SQL Database - October 14, 2022