
This article will take you through the process to apply Dynamic Data Masking on the dedicated SQL pool of Azure Synapse Analytics.
Introduction
Data generally start originating from transactional data sources like files, databases, applications, line-of-business systems, logs, etc. To derive values and insights from this data, different types of data sources need to be correlated, which may require collocating data and processing it as per the nature of consumption. To warehouse this data on the cloud, Azure offers Azure Synapse Analytics service. Data from different data repositories can be populated into the Azure Synapse Analytics service which offers different types of data pools like serverless on-demand SQL pool, dedicated SQL pool, and spark pool.
In the case where data locality is required, the volume of the data is large and a SQL-based data processing mechanism is required, dedicated SQL pools are often employed. As data is a warehouse in a variety of data sources, the data engineering team may have access to a vast amount of data. While role-based data security is generally available in any type of data repositories, at times engineering team needs to have access to data without being able to really view the data. This becomes a classic case for applying data masking which allows access to data, but sensitive data attributes will be masked. Let’s go over and apply Dynamic Data Masking on the dedicated SQL pool of Azure SQL Analytics.
Pre-Requisites
The first thing that we need to perform this exercise is an instance of Azure Synapse Analytics workspace. Once the workspace is in place, it would enable us to access Azure Synapse Analytics studio, which is the central place to administer different pools supported by Azure Synapse.
Once the workspace instance is in place, we need to create a dedicated SQL pool. This pool would cost on an hourly basis. So, it’s recommended to create the pool when one is ready to perform the exercise and terminate it as soon as the exercise is completed. It is assumed that a dedicated SQL pool has been created. We can use the minimum capacity configuration.
Connect to the SQL Pool using SQL Server Management Studio (SSMS) and create at least one table using regular T-SQL that we use with SQL Server. Populate the table with sample data, as we need some data to test the data masking. One method of populating sample data in the dedicated SQL pool of Azure Synapse Analytics is by using COPY command or services like Azure Data Factory to populate data from other repositories into the SQL pool. This can be useful if you have some existing data or want some real-life sample data for masking a variety of data patterns like email, phone numbers, zip codes, salary, etc. It is assumed that the SQL pool is populated with the required sample data. Once this setup is in place, we can start pursuing the following steps.
Data Masking
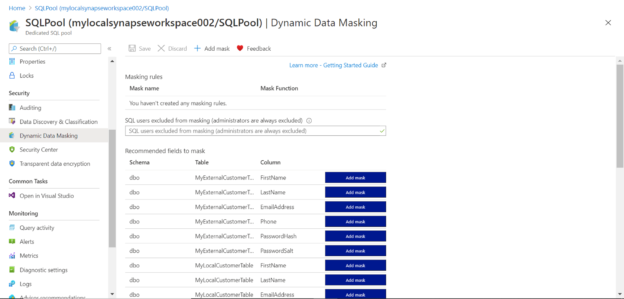
Navigate to the Azure Synapse Analytics Studio in the Azure portal and find the dedicated SQL pool name under the SQL pools tab of the dashboard. Click on it and open the SQL pool instance. Once you are on the dashboard page of the SQL pool, click on the Dynamic Data Masking menu in the left pane and it would look as shown below. Depending on the data objects you have in your instance, you would find a list of fields and tables as shown below. Here we have the option to mask individual fields as shown below.

Let’s say that we intend to mask some personal data. Typically, personally identifiable information (PII) data is the category of sensitive data that required maximum anonymization due to its sensitivity. For demonstration purposes, let’s select a field like a zip code. Depending on data, one can select as many fields as required.
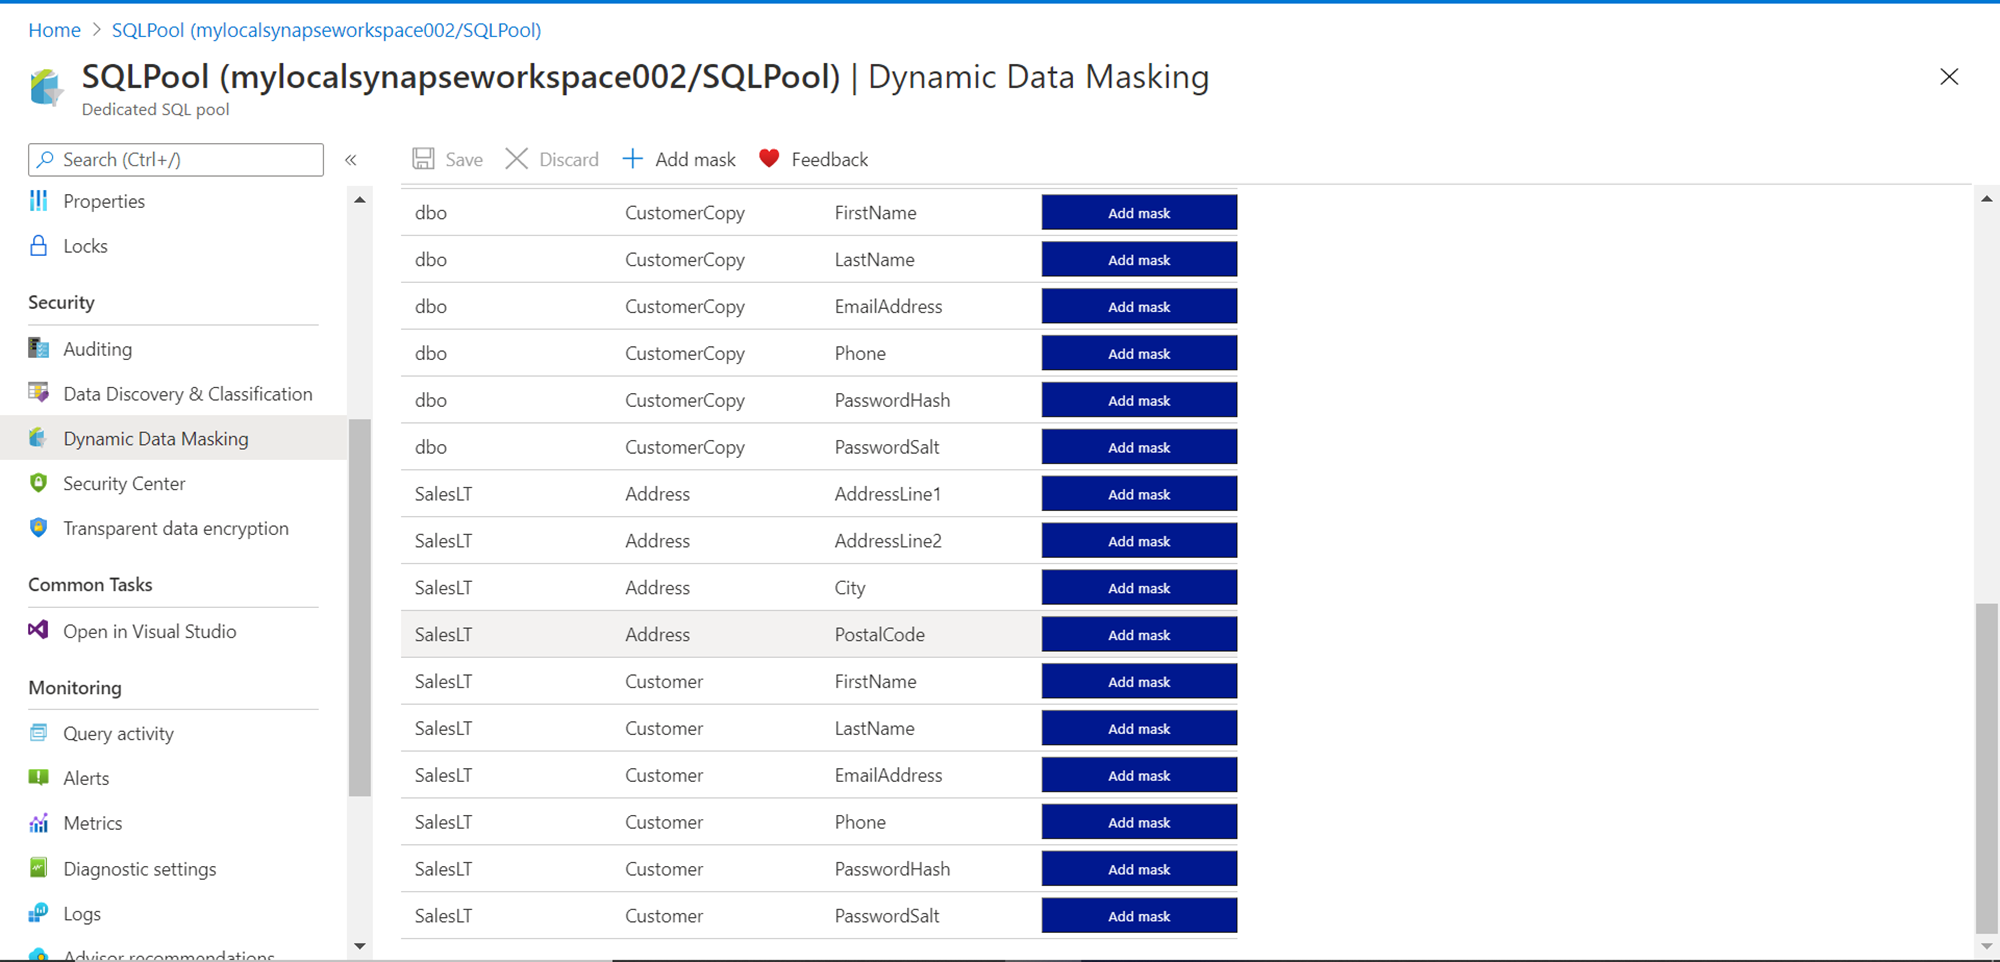
Click on the Add mask button to add the masking rule for the desired field. This will create a rule for the specific field that we are trying to mask dynamically. Once the field is added it would look as shown below. A mask name is auto-generated, and a mask function is associated with it depending on the type of data detected in the field. The masking function may not be an exact match, but the closest available masking function is associated.

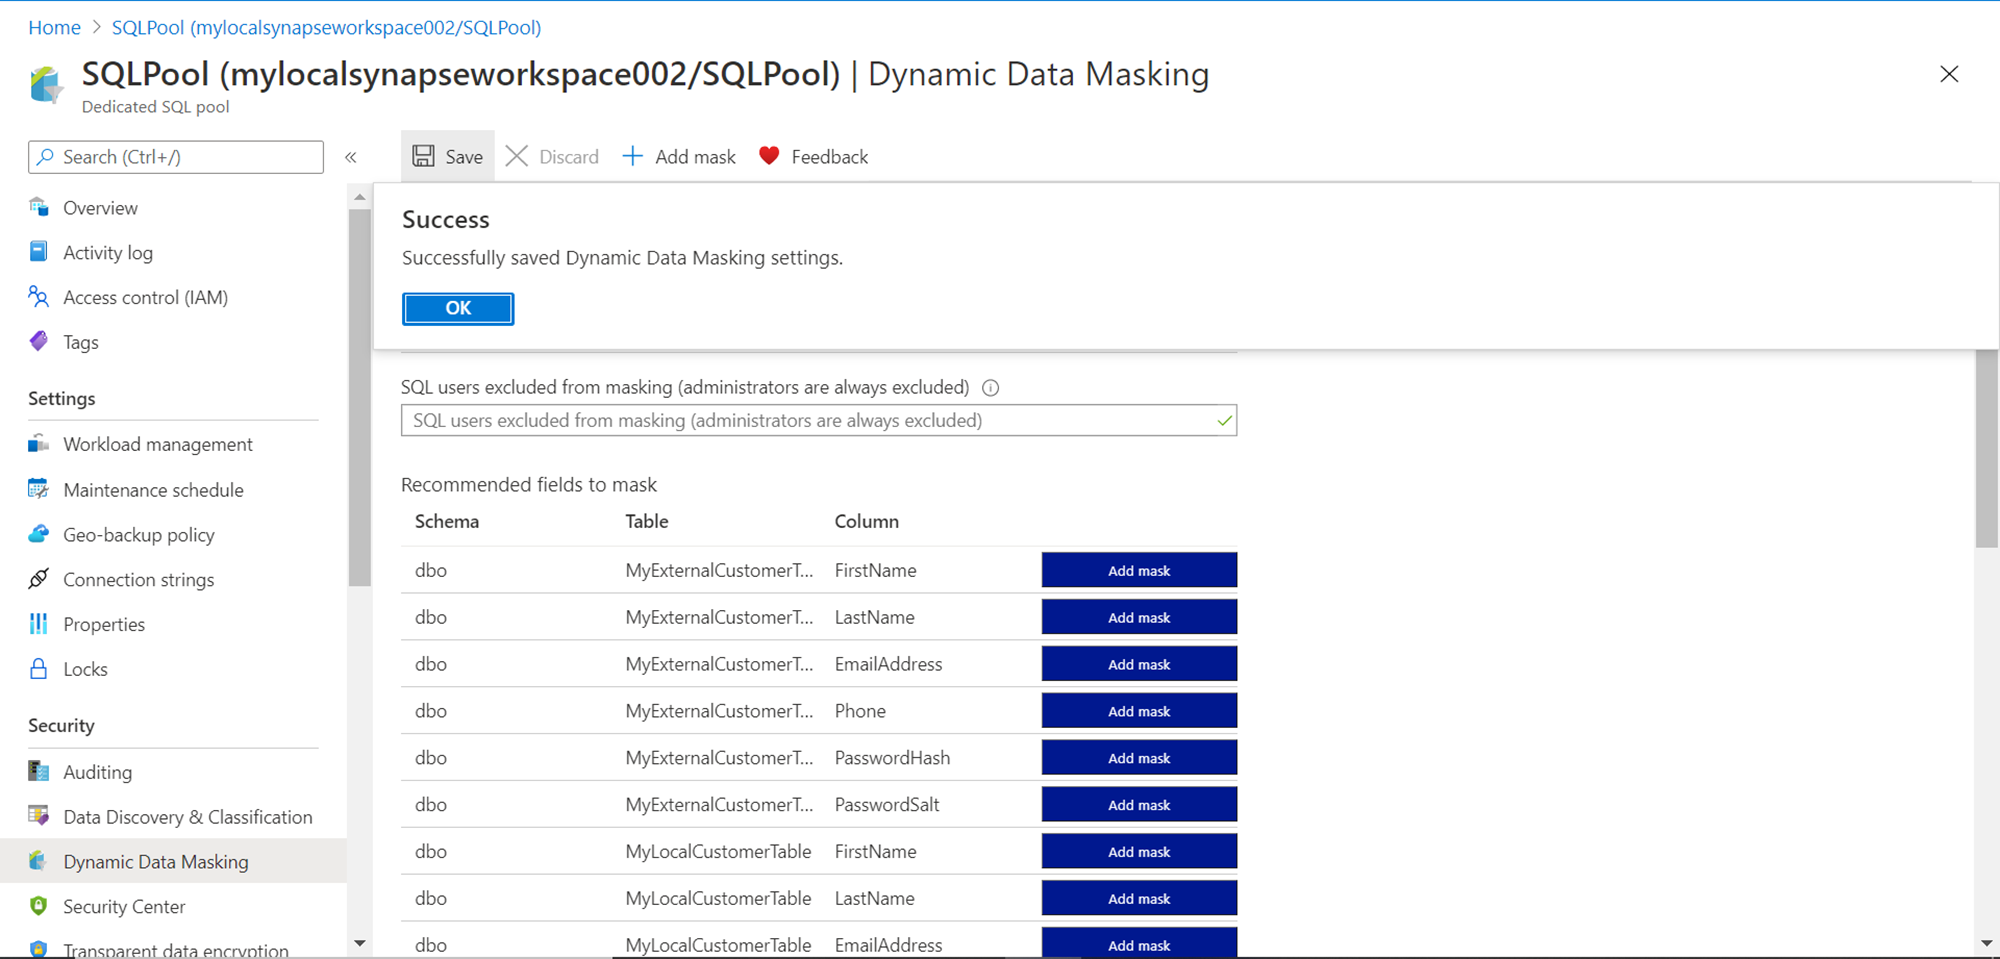
It should be kept in view that these rules and functions are not applied yet. There are just in draft mode, so one can pick and choose as many fields as one may want to mask. Once the selection is done, click on the Save button, which would result in the rules being applied to the database objects, and we would be able to see a confirmation message as shown below.
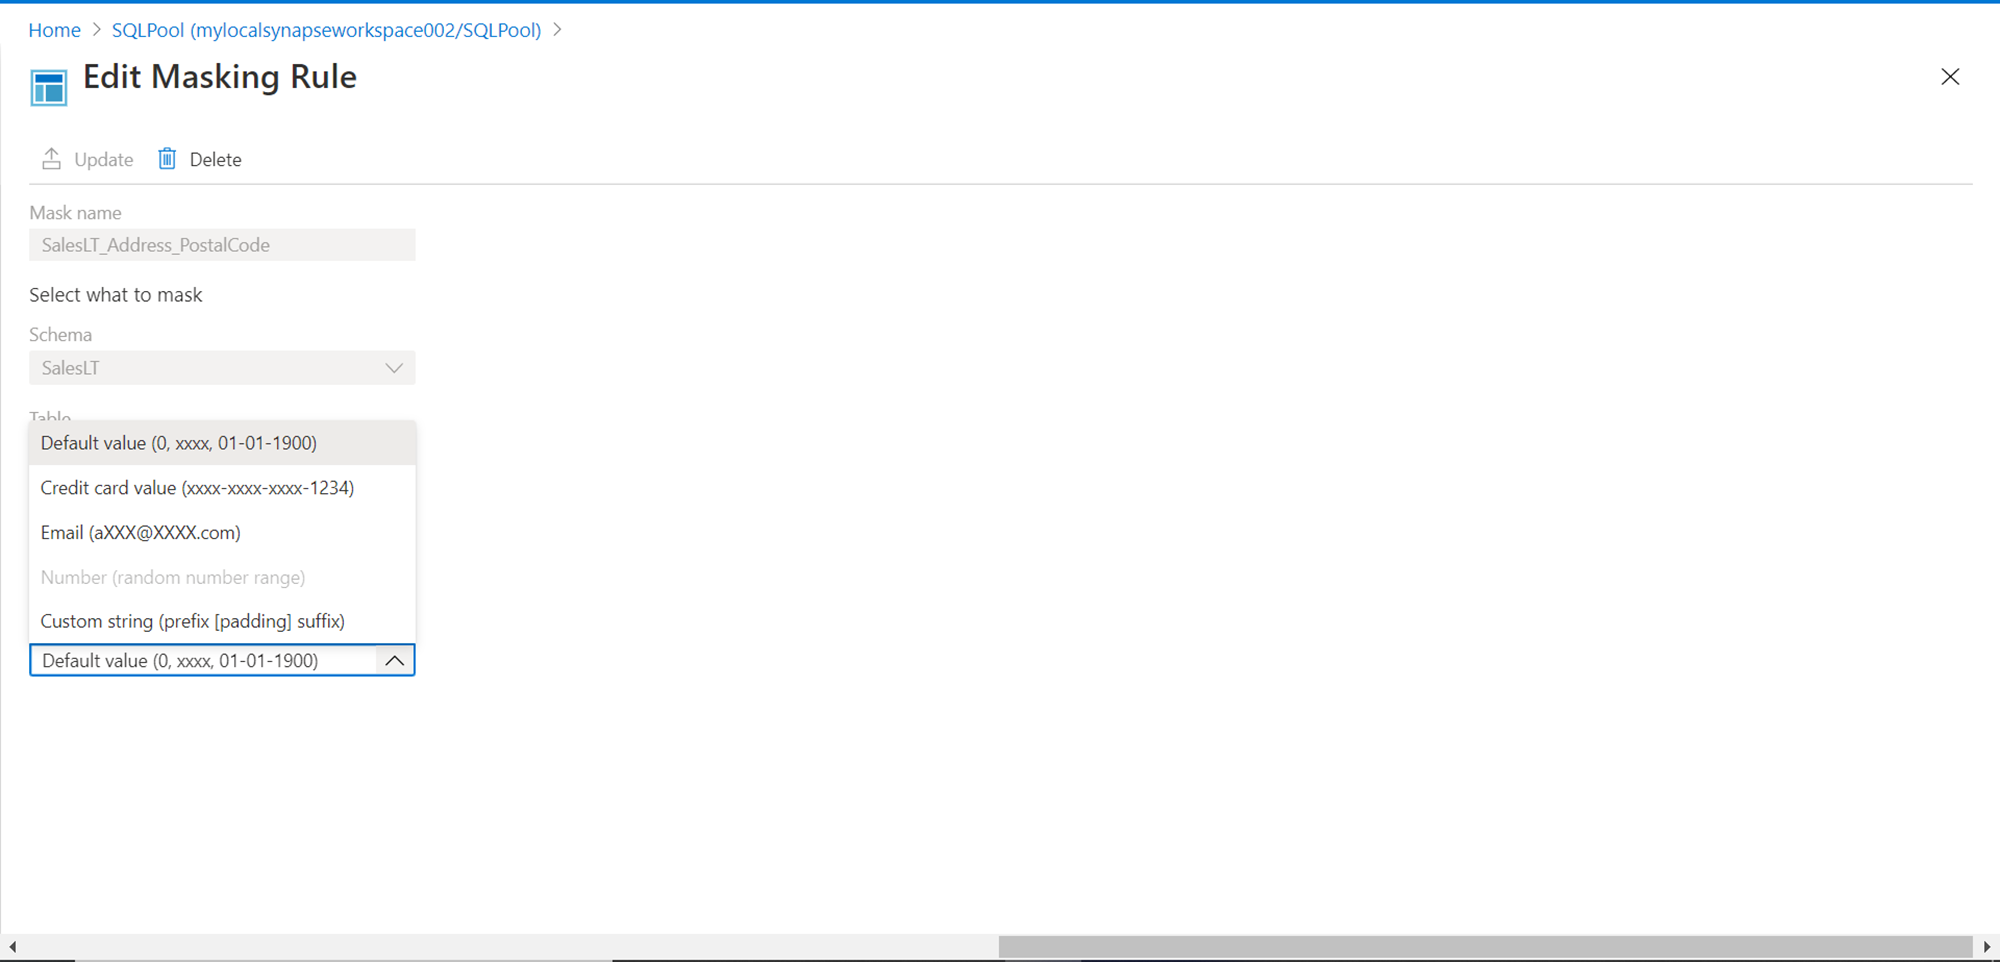
As the auto-selected masking function may not be relevant to the data, one has the option to edit the same. Click on the masking rule, and it would open an interface as shown below to change the masking function associated with the rule. Some readily available masking functions are for credit card numbers, Emails etc. If none of the out-of-box functions are enough, one can create custom masking rules as well. For now, we will go with the default function as our focus is on assessing how masking is applied.
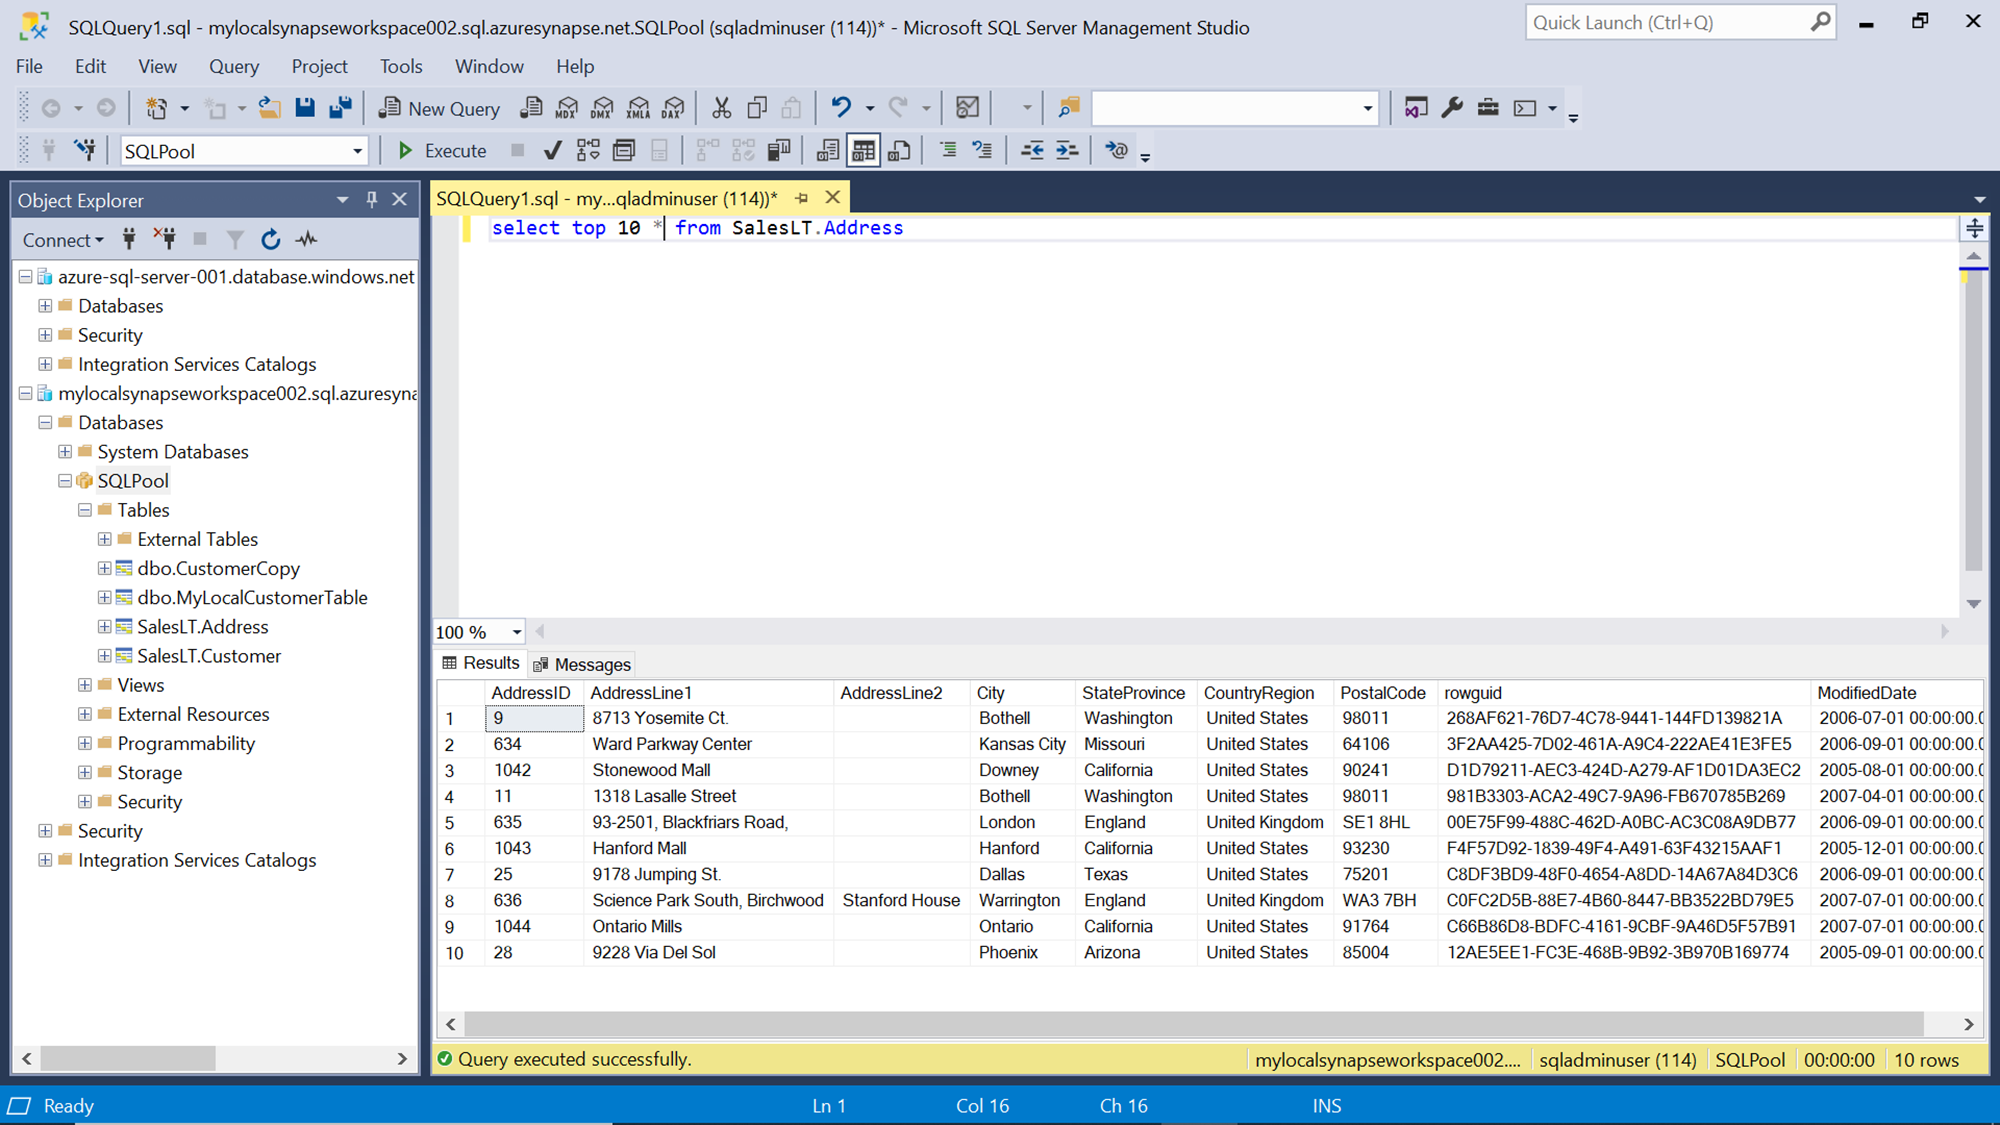
Connect to the SQL Pool with SQL Server Management Studio using the admin credentials and query a few records of the table on which we applied the masking function to check whether masking is being applied while querying the data. The result will look as shown below. The zip code field which we tried to mask is coming out in the clear text, which means masking is not being applied. The reason for the same is that the administrator role is always excluded from data masking.
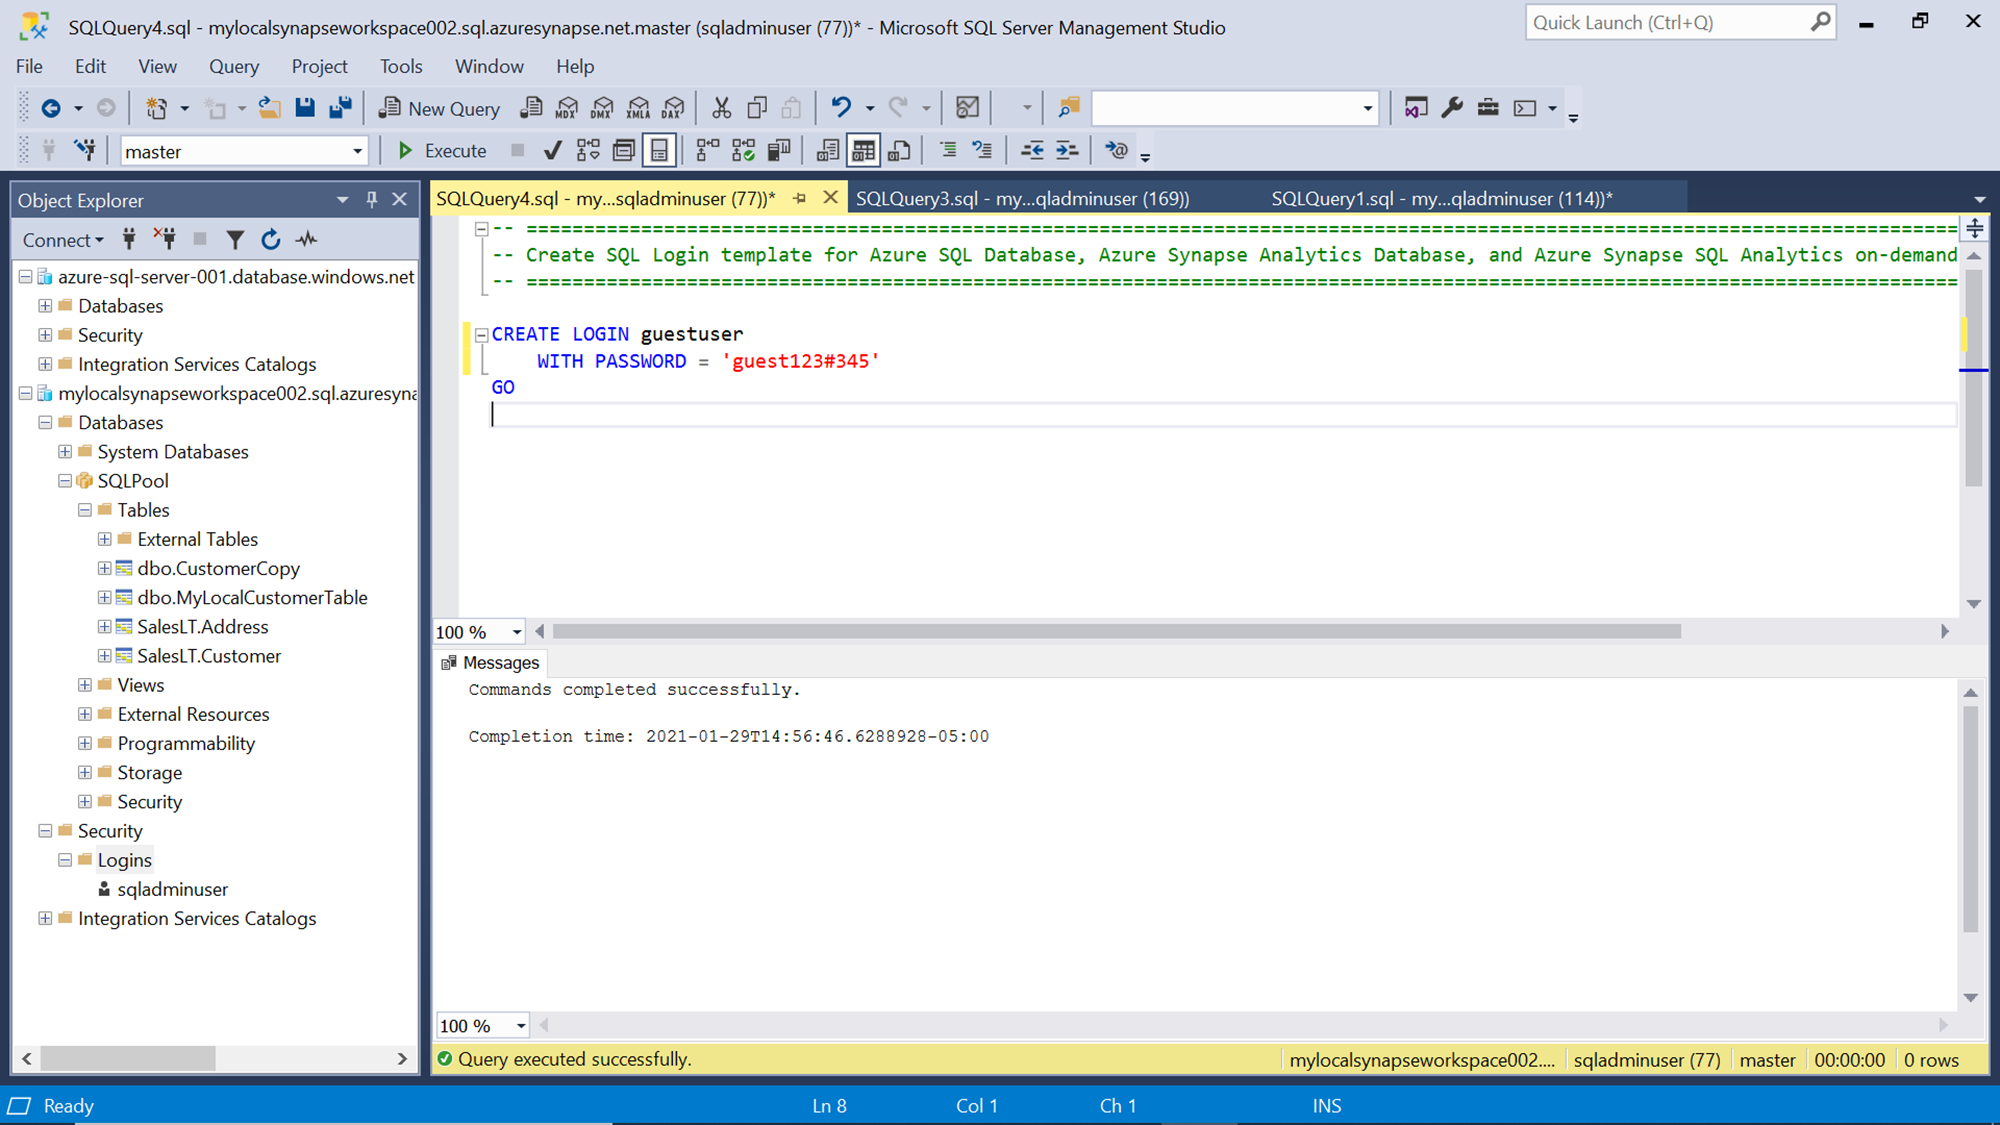
To test the dynamic data masking functionality, we need to create an additional login, user and assign it to a database role. The first step is to create a new login which can be created with CREATE LOGIN command as shown below.
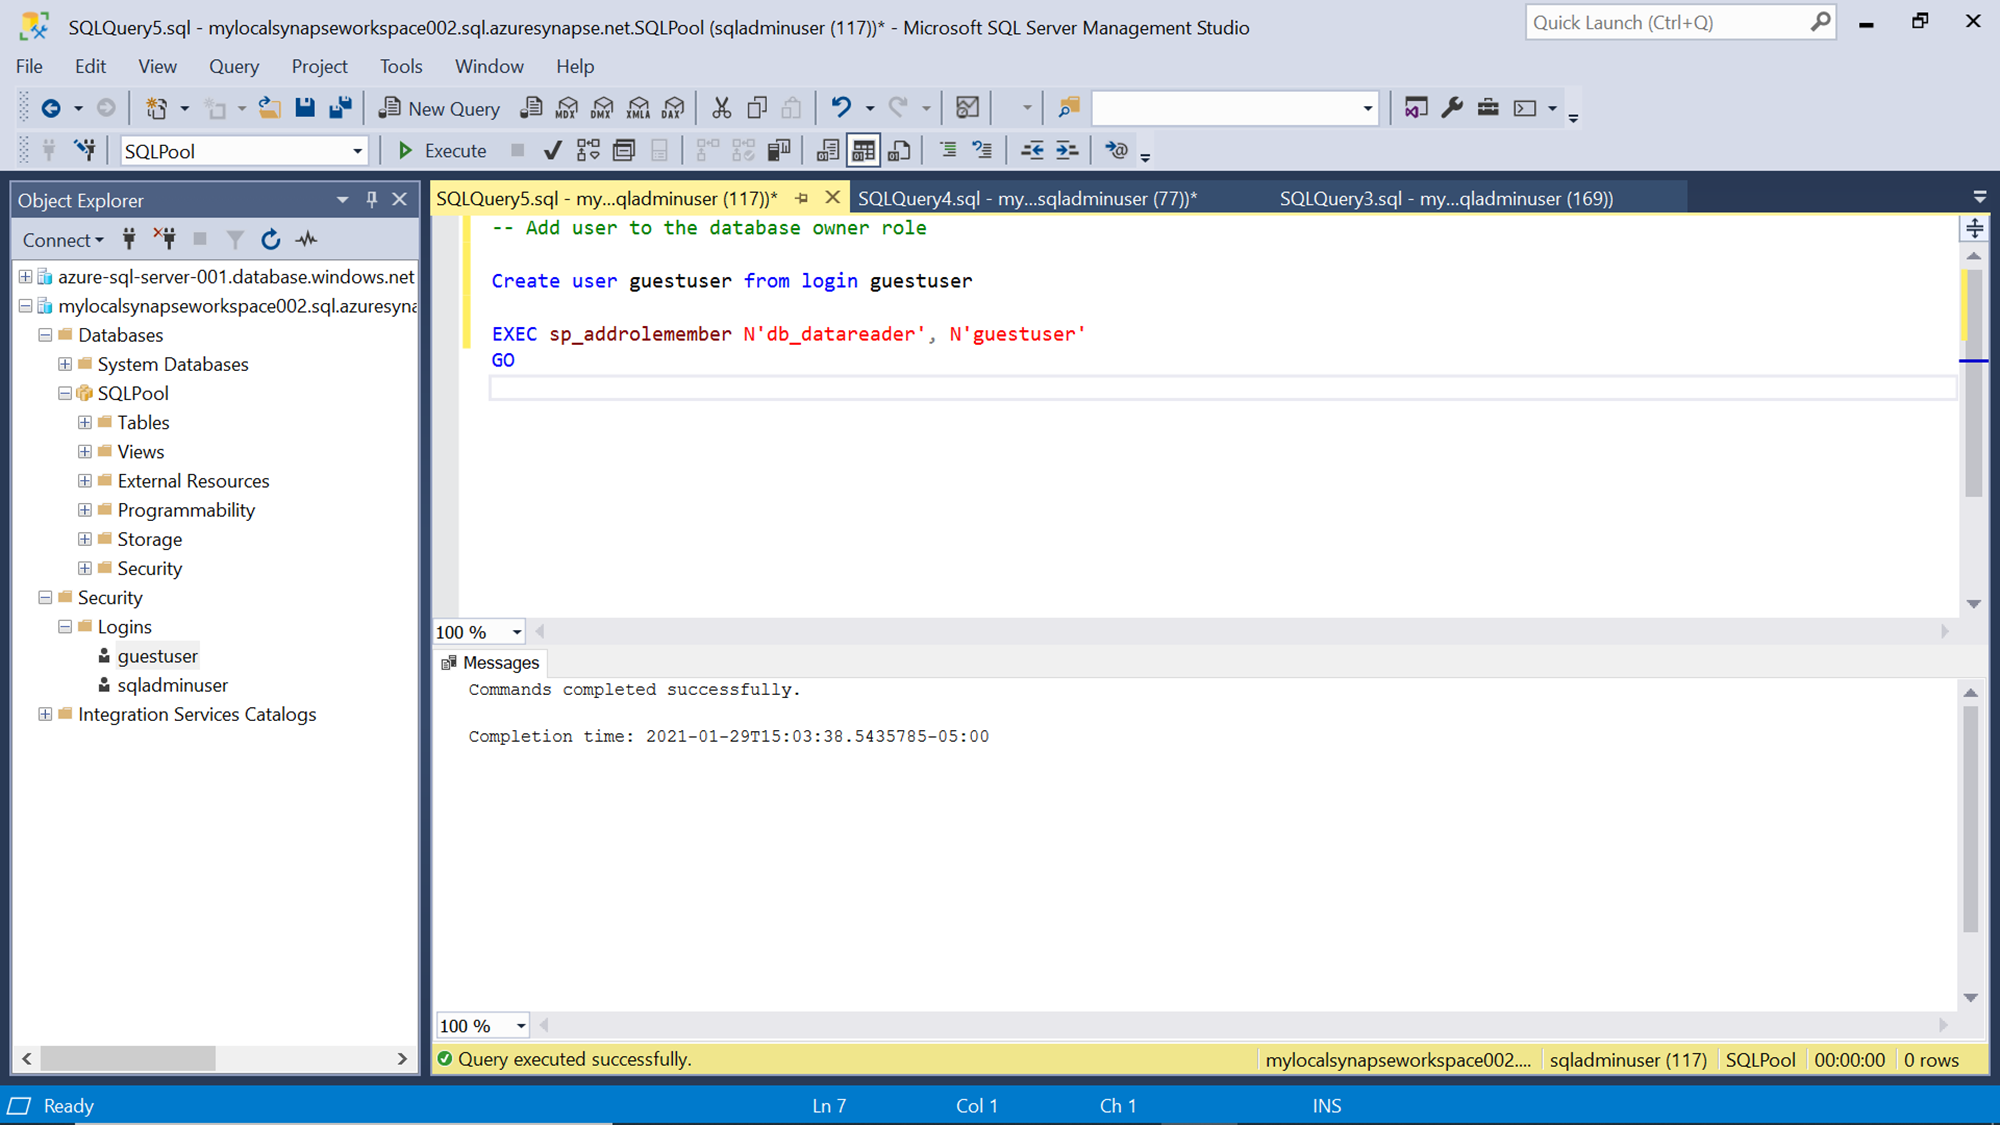
Once the login is created, we will create a new user by using the CREATE USER command and associate it with the previously created login as shown below. Also, after the new user is created, we will add the user to the datareader role using the sp_addrolemember system stored procedure.
Now that the new user credentials are in place, create a new connection to the dedicated SQL pool of Azure Synapse Analytics using the newly created user login. Depending on the configuration of the databases and security context, you may face an error in logging on to the database as the new user may not have access to the master database. One way to resolve this is by creating the new user in the master database as well as the user-created database. This will enable a smooth login to the SQL pool of Azure Synapse Analytics using the new credentials.
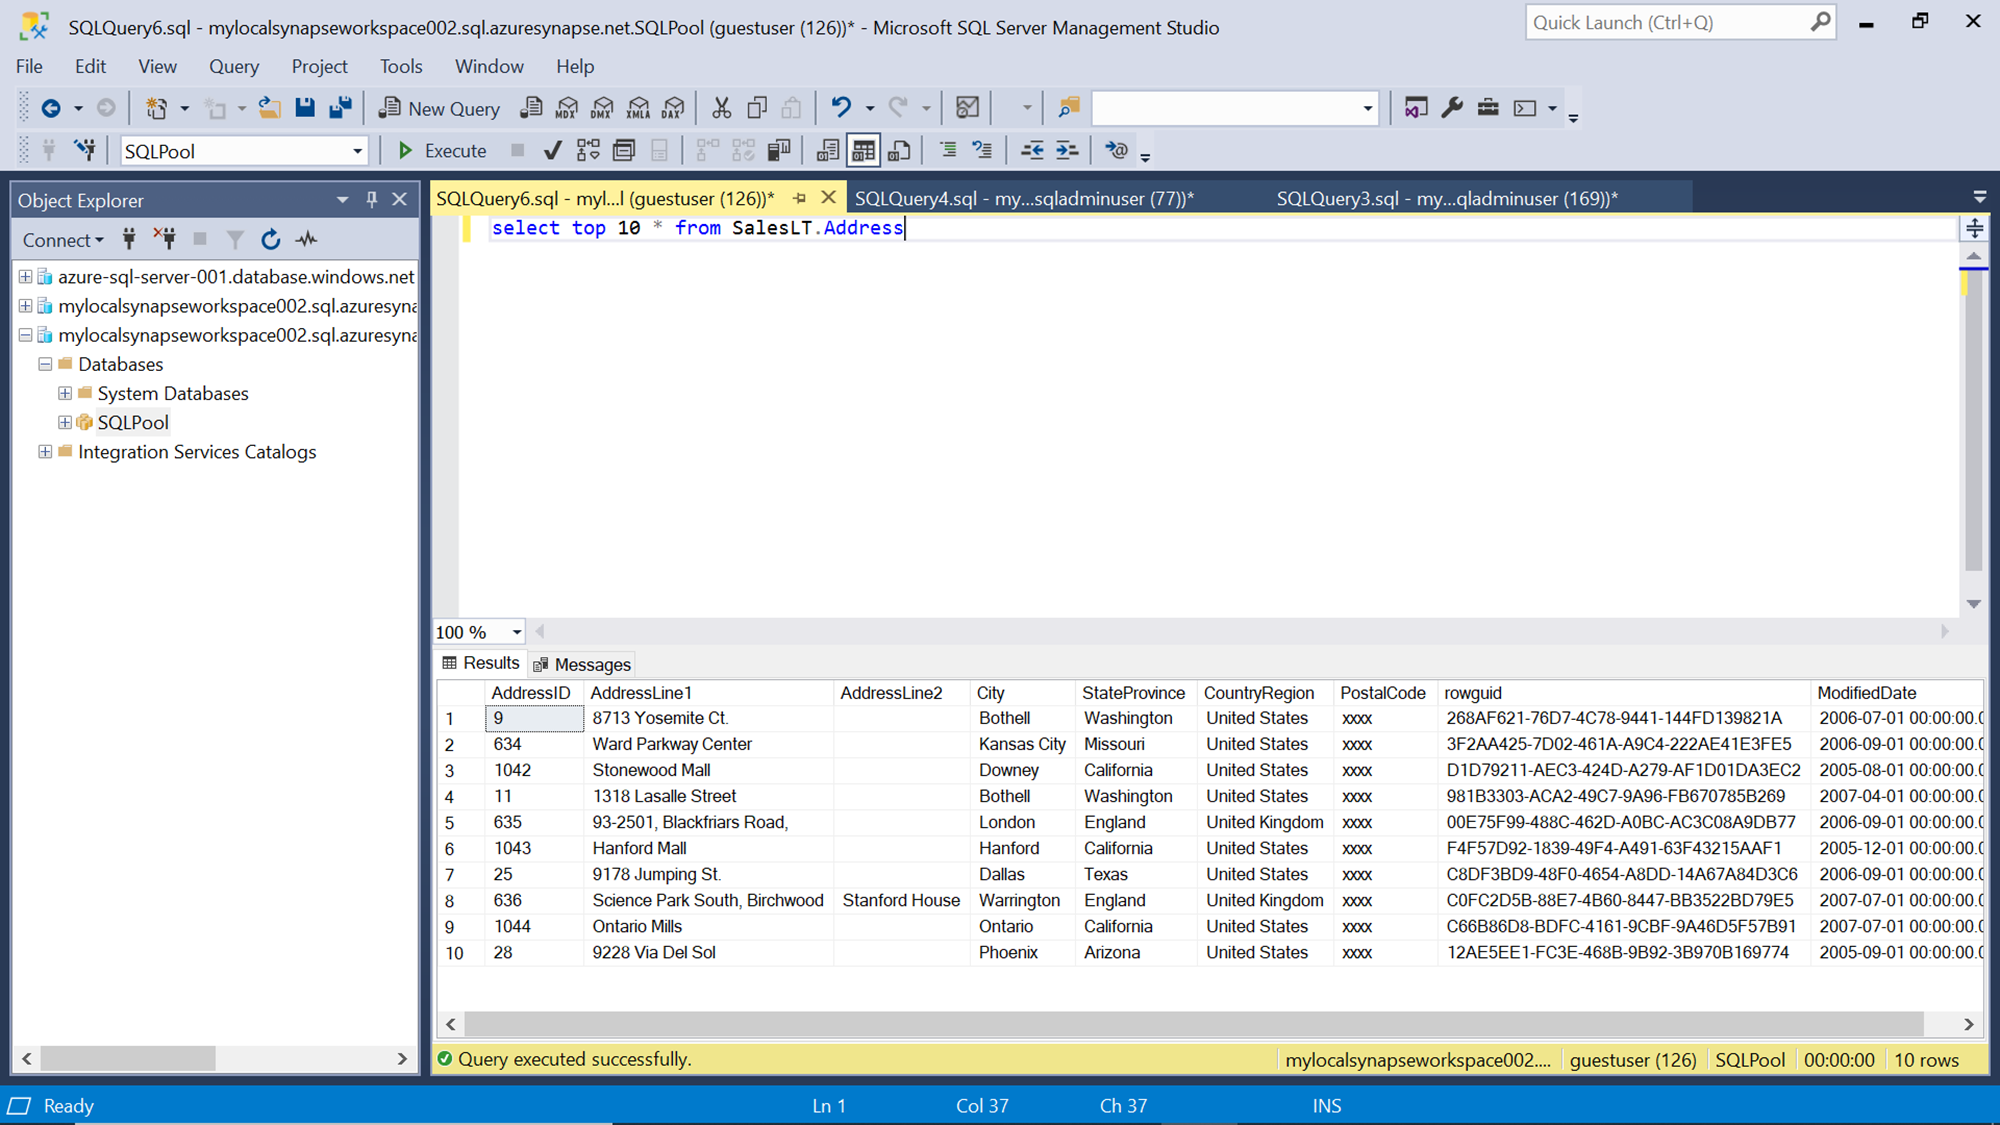
After successfully logging in, query the data again and this time you would be able to see that the zip code field has been masked successfully. If the db_owner or any administrative roles are added to the user, then the field values would start appearing in clear text instead of being masked.
In this way, dynamic data masking can be applied to fields in a database object in Azure Synapse Analytics. This helps to improve the security posture of the variety of data accessible to data engineering teams and helps to protect sensitive and personally identifiable data hosted in a SQL pool of Azure Synapse Analytics service.
Conclusion
In this article, we started with a setup of the Azure Synapse Analytics service with sample data. We learned how to add masking rules, edit masking functions, create user and roles where dynamic data masking is supported, and finally, we concluded with testing of the dynamic data masking rules.

She has a deep experience in designing data and analytics solutions and ensuring its stability, reliability, and performance. She is also certified in SQL Server and have passed certifications like 70-463: Implementing Data Warehouses with Microsoft SQL Server.
View all posts by Gauri Mahajan
- Oracle Substring function overview with examples - June 19, 2024
- Introduction to the SQL Standard Deviation function - April 21, 2023
- A quick overview of MySQL foreign key with examples - February 7, 2023