
In this series of AlwaysOn High availability configuration in SQL Server, I am going to write step by step articles from pre-requisite to end configuration. This may help beginners who are going to configure for the first time.
AlwaysON is one of the High availability options in SQL Server which is used for a Disaster recovery solution. To configure AlwaysOn High availability, we should know some basic knowledge of Windows Server.
To follow this article, you should be aware of basic things like Domain controller, Public, Private network, Subnet etc.
Objective
In this article, we are going to learn, how to perform Domain controller and domain client nodes set-up and add two or more windows servers as a node into the domain controller domain and cluster by moving windows server node from local group to domain group. Windows server is a Microsoft operating system which is used as Platform to host SQL Server functionality.
There are many pre-requisites which we need to complete to configure AlwaysOn windows server, which we will explore in upcoming articles. Here we will see first pre-requisite that, it requires one domain controller and other windows nodes which will be part of AlwaysON, as a domain client
In this article, we are going to use three windows servers one domain controller and two other nodes as domain client.
Let’s say we have below server configuration:
Servers | Domain Controller (Node 1) | SQL1 (Node 2) | SQL2 (Node 3) |
Public IP | 35.193.27.200 | 35.188.66.201 | 35.238.35.203 |
Internal IP | 10.128.0.2 | 10.128.0.3 | 10.128.0.4 |
Default Gateway | 10.128.0.1 | 10.128.0.1 | 10.128.0.1 |
As per requirement, we will make Node 1 as Domain controller and Node2 and Node3 as a domain client.
A domain controller is the main administrator server/Computer where we manage all domain client computers, Users and Groups. Also, most important, Cluster configuration to add all client nodes into cluster happen at domain controller in Failover Cluster Manager.
1. Set-up Domain Controller:
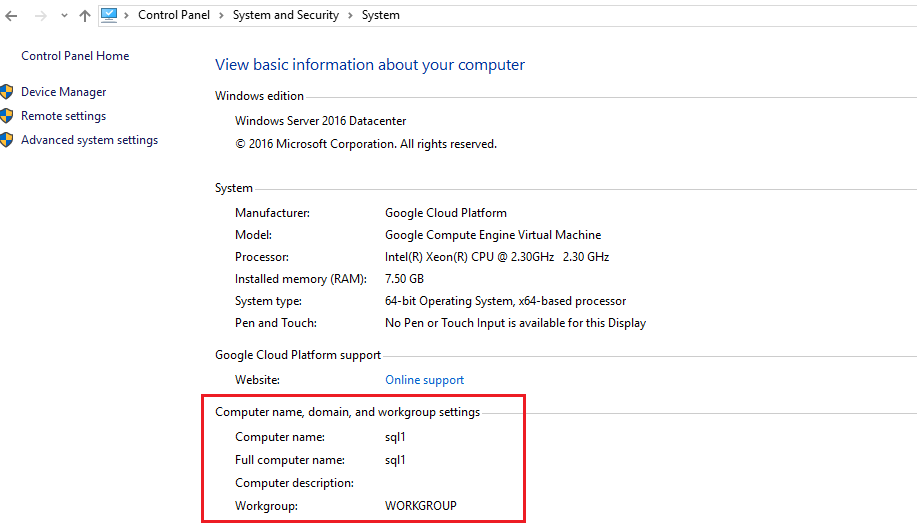
Windows server is a member of either two types WORKGROUP and domain. We can check whether windows server is on WORKGROUP or domain as below
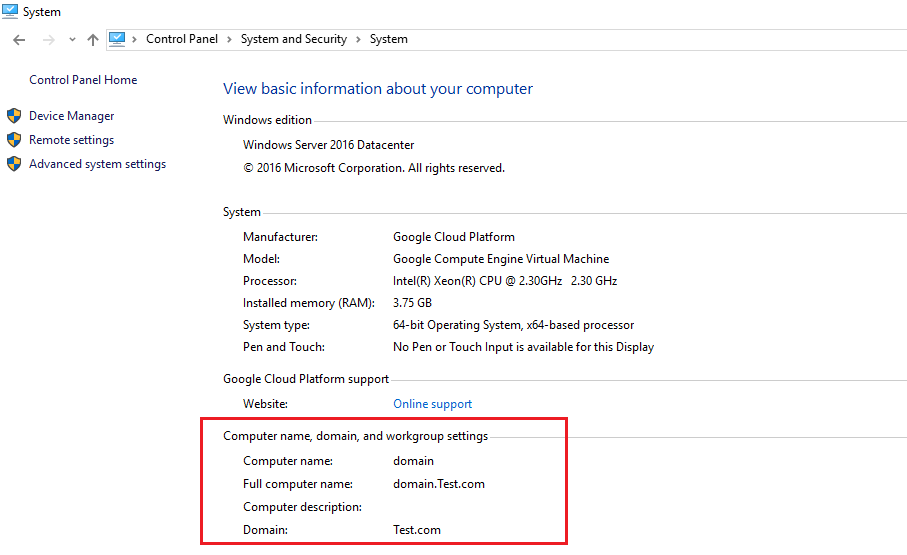
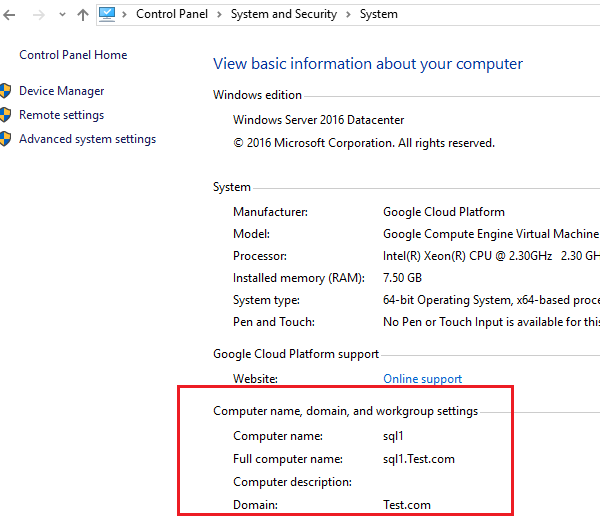
Go to Control Panel>System and Security>System
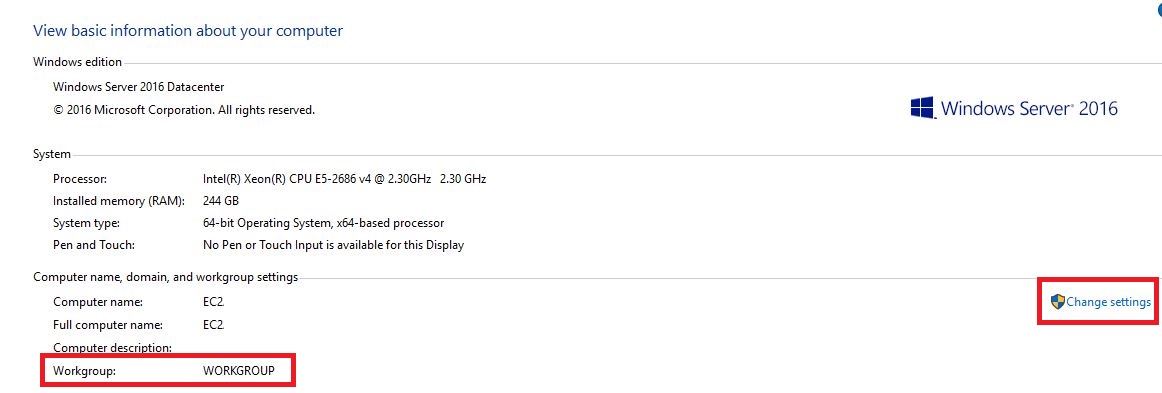
As we can see, windows server node 1 is on WORKGROUP, so we need to move it from WORKGROUP to domain.
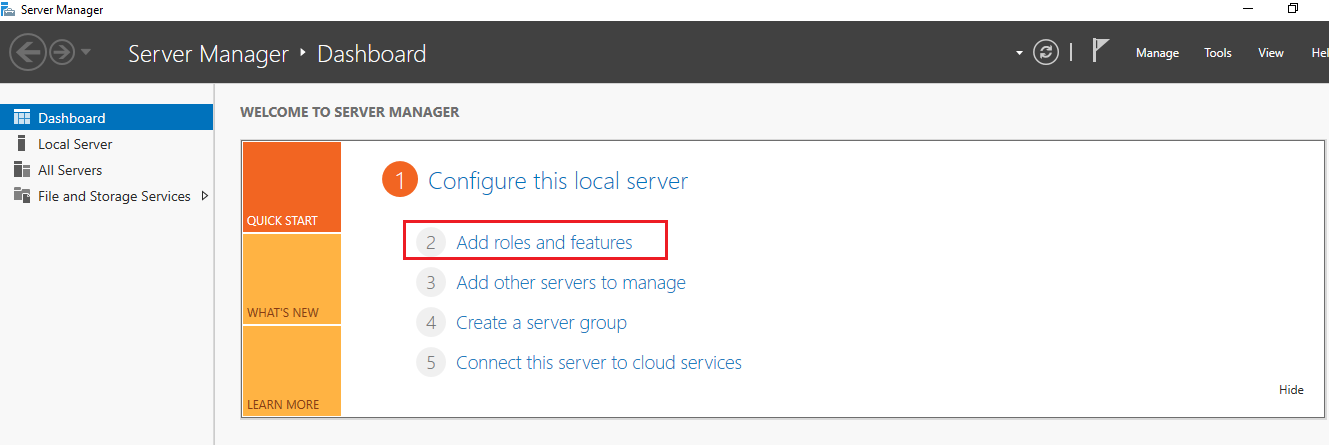
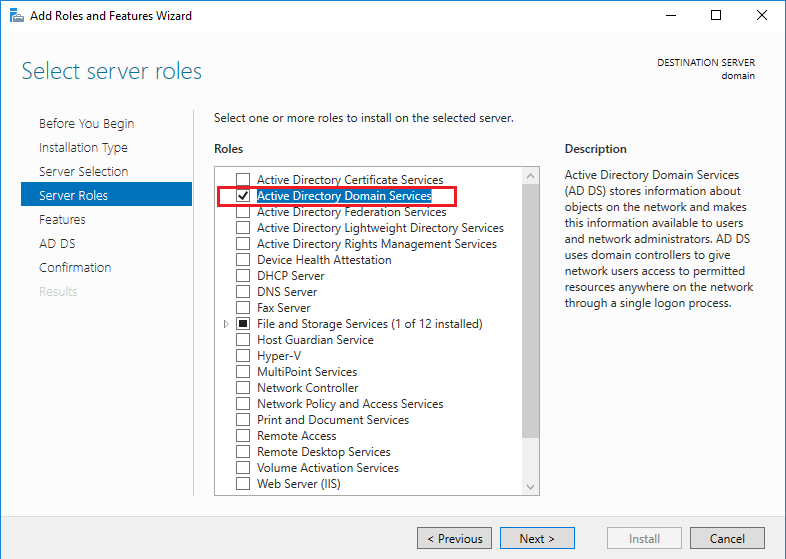
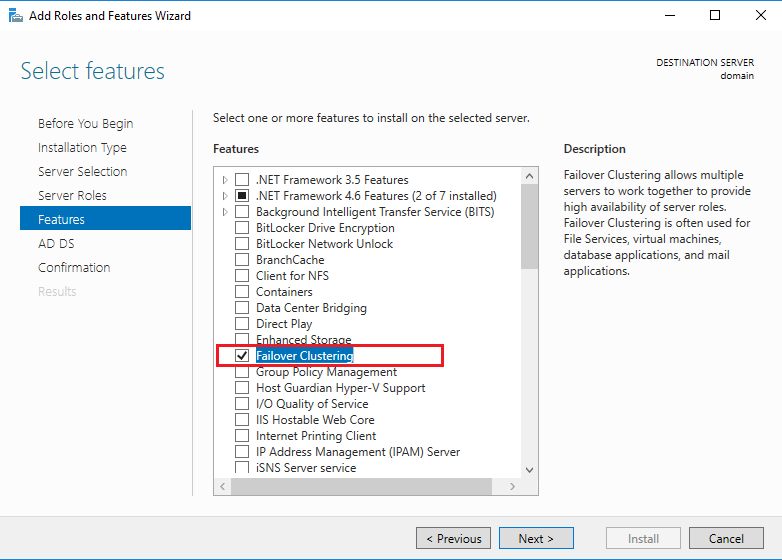
To move a computer from a local system to Domain system, we need to install two important features Active directory domain services (AD DS) and Failover Clustering Feature.
Active Directory and domain services stores information of users, computers. Failover cluster means servers which are added into cluster i.e. group can interchange their roles and functionality to another server when a failure occurs to minimize downtime to end-user application.
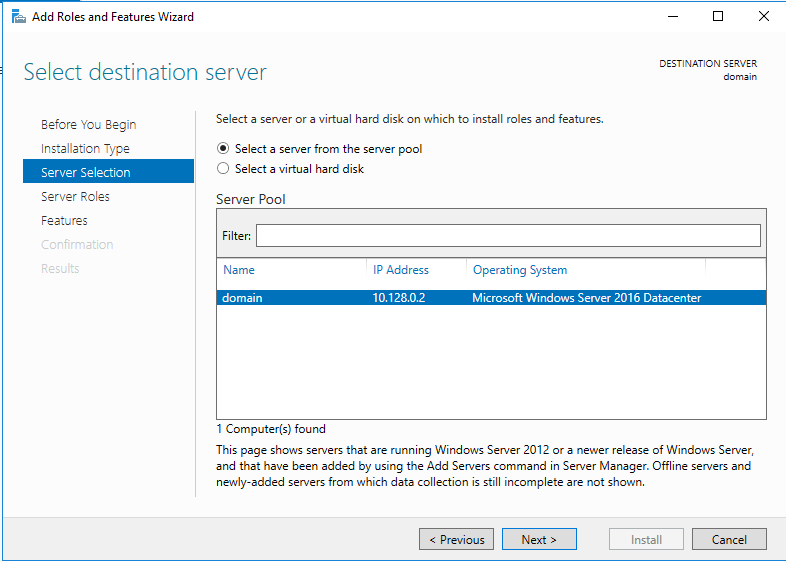
Open Server manager and Click Add Roles and Features as shown below.
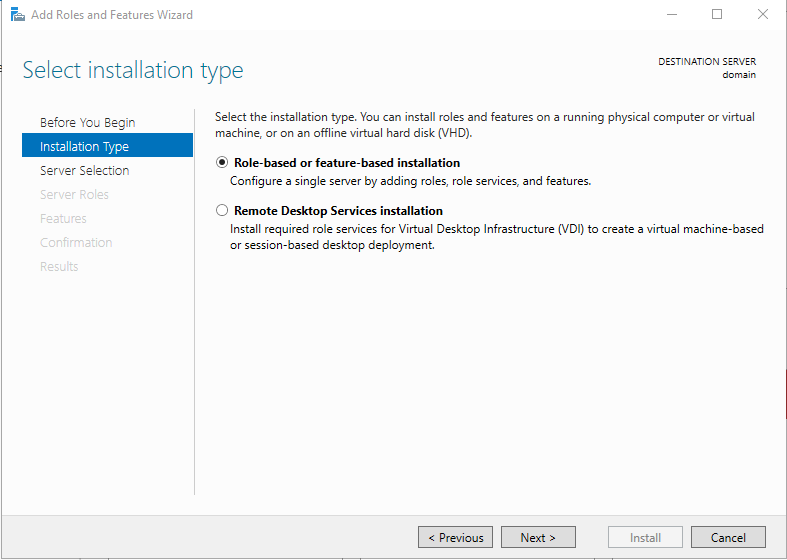
Select default option Role-based or feature-based installation and click Next as below
Click Next
Select Active directory and domain services roles and click Next
Select Failover Clustering feature and click Next
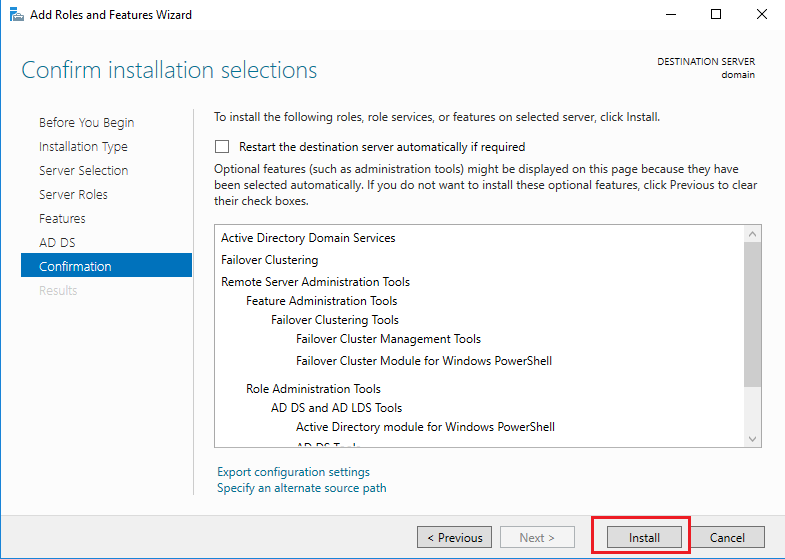
Click Next, select checkbox Restart the destination server, if you want to restart server automatically after installation process completed otherwise keep it un-checked you want to restart manually
After Installation, we get installation succeeded message as below
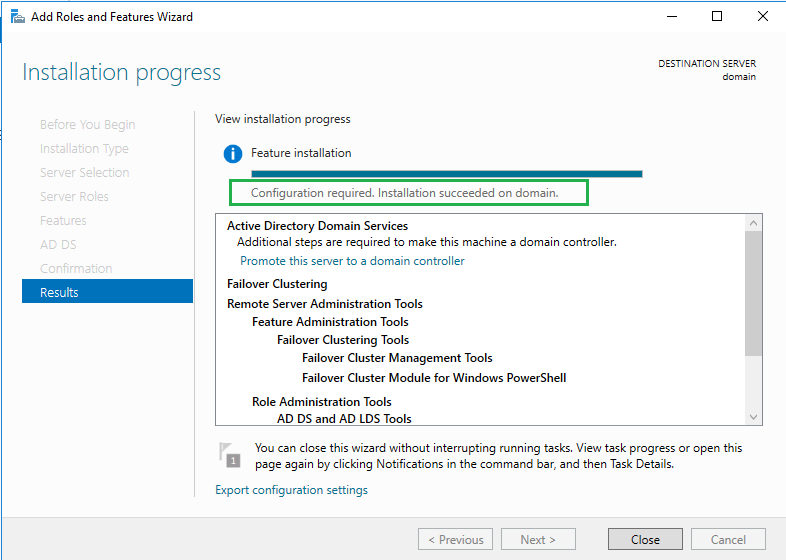
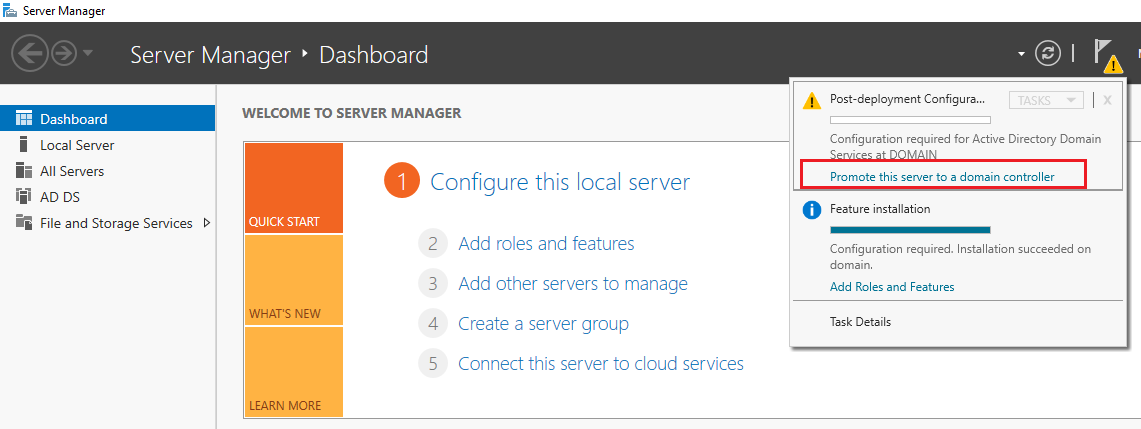
After Installation roles and Features, we can get a warning message to promote server as a domain controller as below. To set-up server as domain controller click Promote this server to a domain controller as below.
We need domain controller as main administrator computer from where we manage other nodes. Make sure, we should not configure domain controller as a node in cluster.
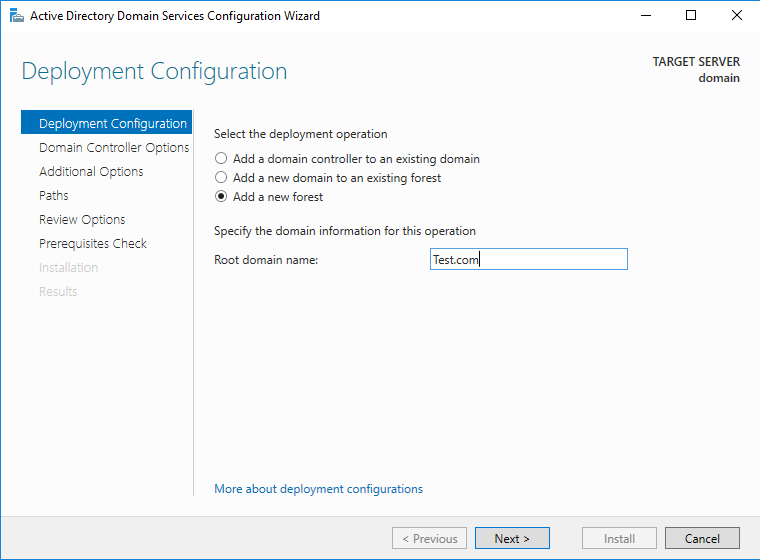
Select Add a new forest if we are adding new domain first time, and select your desired domain in the Root domain name and click Next
Note – If you are working on Virtual machine-like VMware workstation where you can mention. local as the domain name. otherwise we work at actual server, we can put domain as .com, .net etc.
Select the default option and enter a password as shown below.
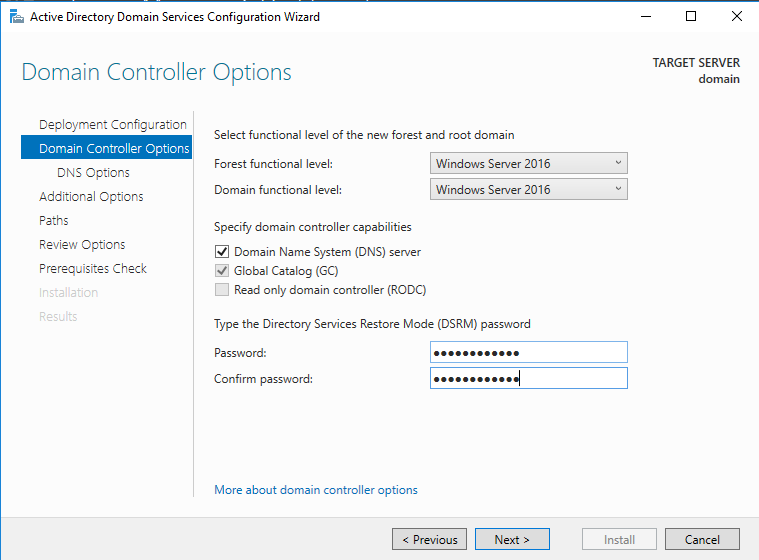
Click Next
Click Next
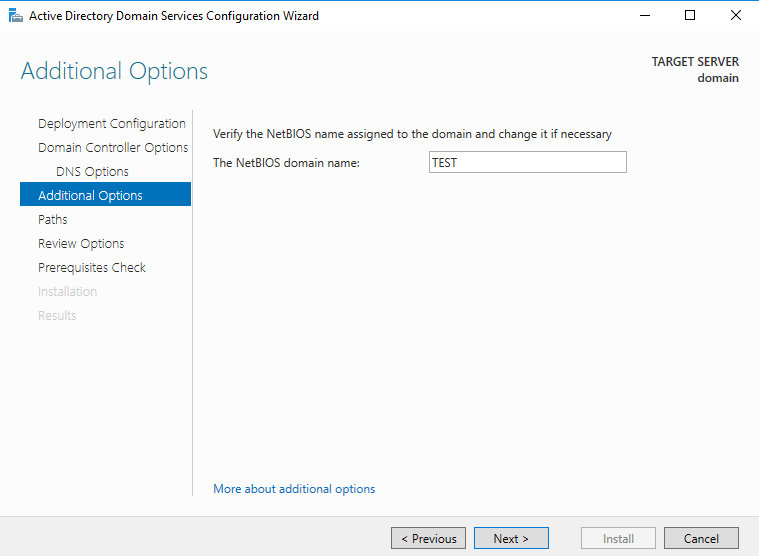
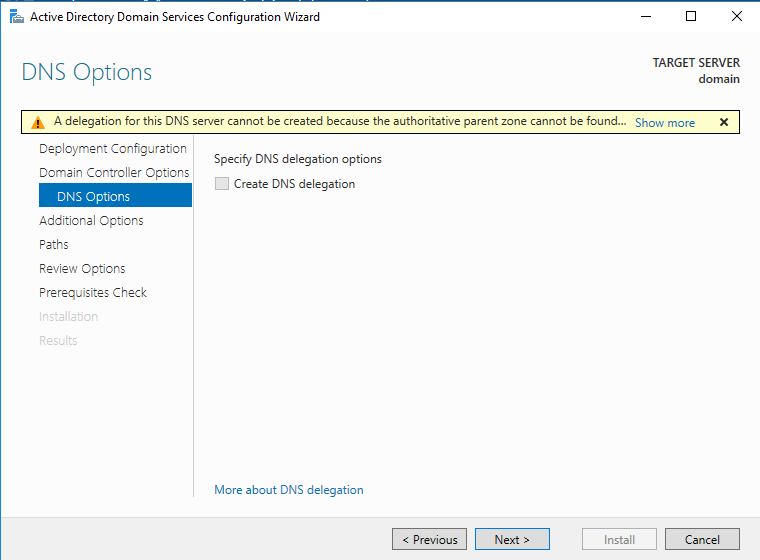
Click Next for Paths and Review
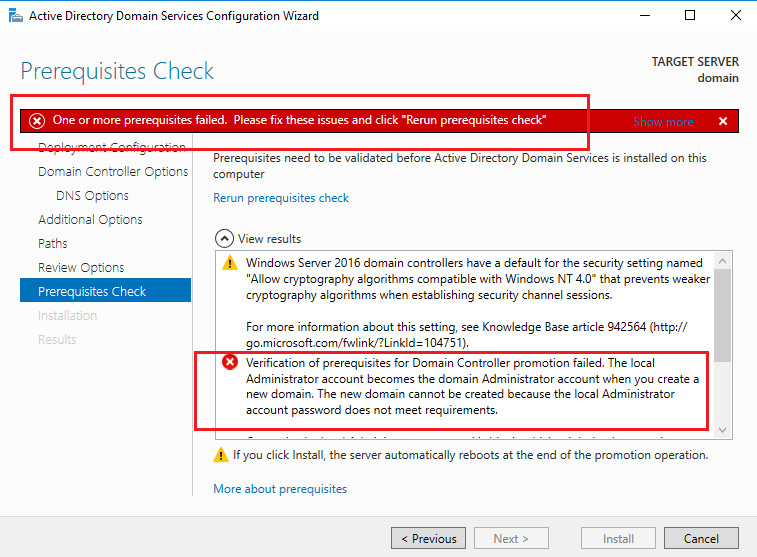
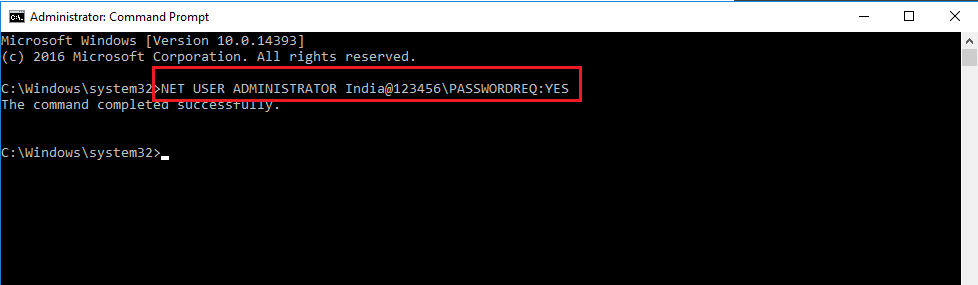
To remove the above error, we need run below command as Administrator rights.
NET USER ADMINISTRATOR <Password>\PASSWORDREQ: YES
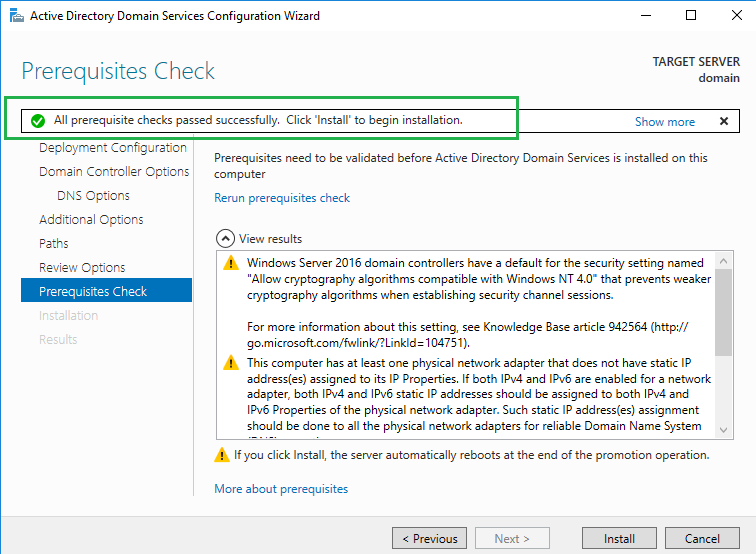
Click Install, After Install, a server will reboot automatically.
After the restart, connect to a server and verify node1 domain controller added to domain Test.com as below
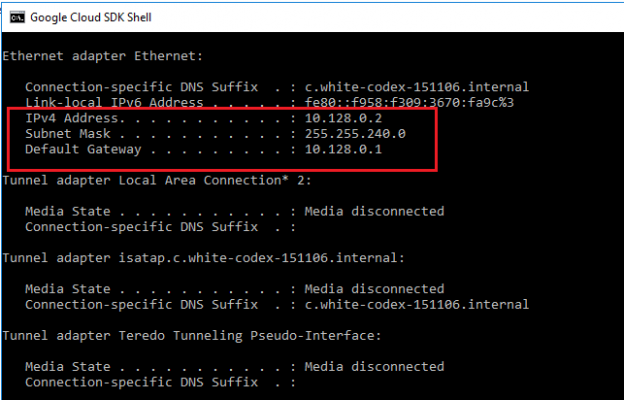
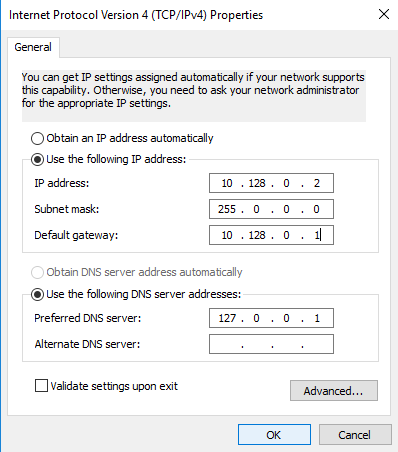
Go to Command Prompt(cmd) and enter IPCONFIG note down IP settings for domain controller as below

2. Configure IP settings
Go to Control Panel\Network and Internet\Network Connections
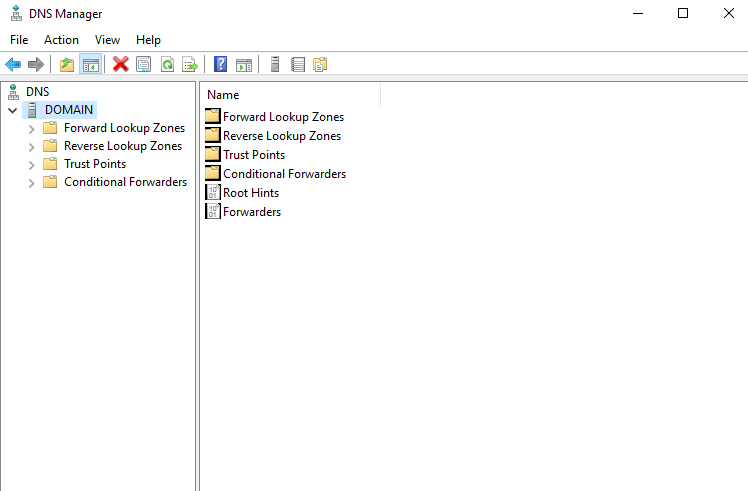
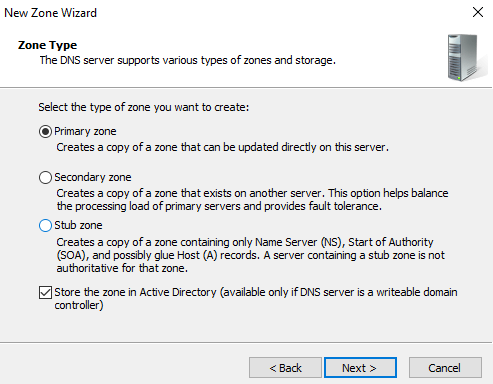
3. Configure Reverse lookup zones in DNS
Go Tools > DNS
Reverse lookup zone is looking for the domain name by IP address in reverse format.
Select the default selected option and click next
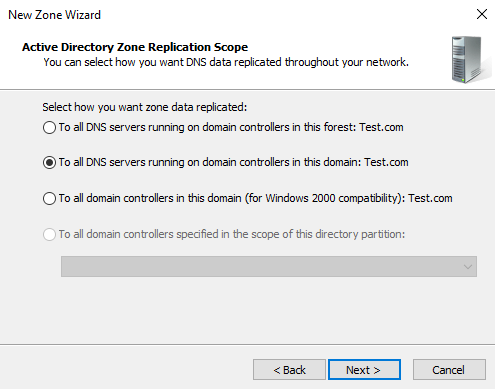
Click Next
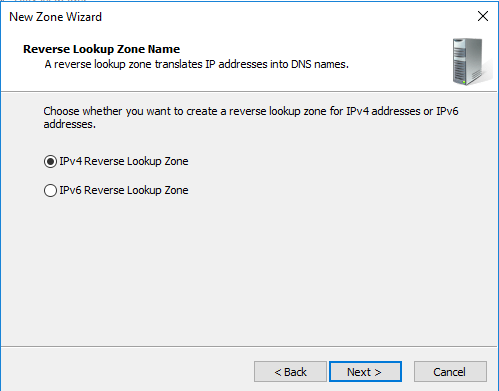
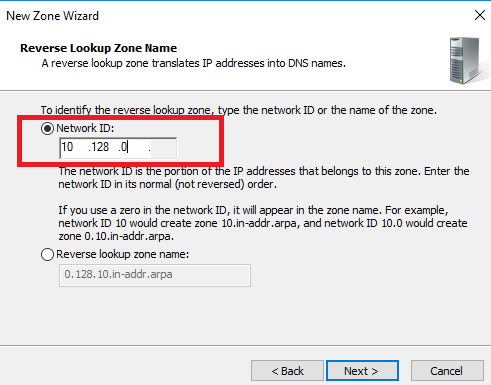
Enter IP address as below
4. Permission Settings
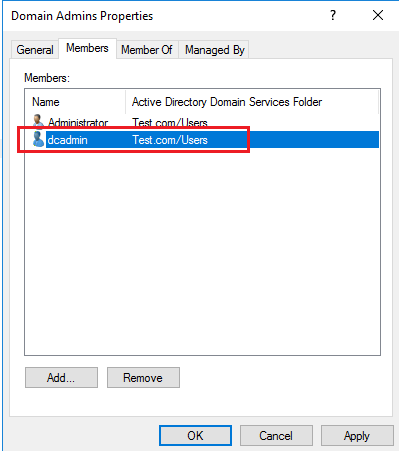
Next, we will add domain controller account user dcadmin into Domain admins as below
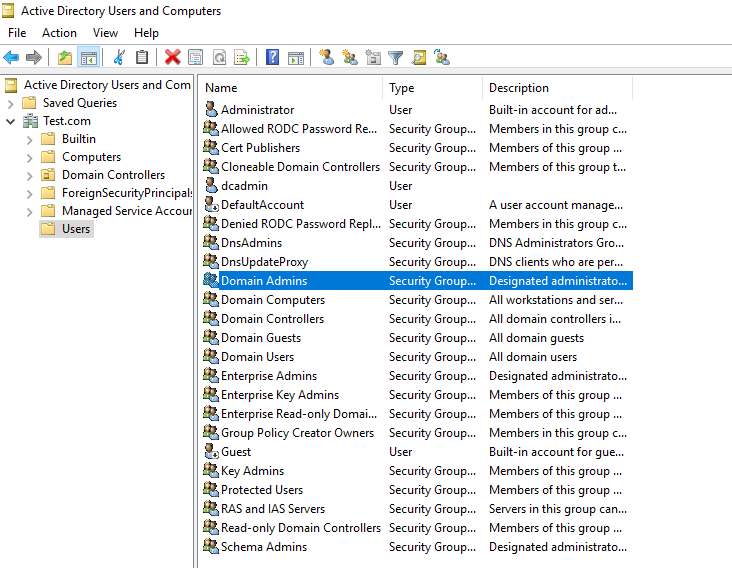
Go to the properties of Domain admins and add dcadmin (domain controller username) as a member as below
5. Node 1 (SQL1) Configuration
Add SQL1 to a domain
Go to Control Panel\Network and Internet\Network Connections, we can see SQL1 node is on WORKGROUP, so we will add into domain account Test.com as we created in previous steps.
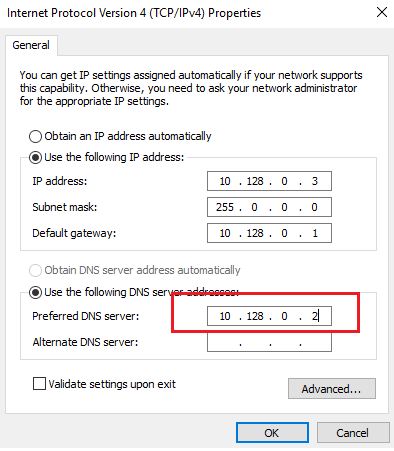
To update IPv4 setting, Go to Control Panel\Network and Internet\Network Connections

Update Internal IP and Default Gateway IP of SQL1 node as shown below and most important, update internal IP of a domain controller (10.128.0.2) into Preferred DNS Server section.
Go to again Control panel and access Control Panel\System and Security
Click on Change setting put domain name as below click OK, it prompts us to enter Username and Password of Domain controller, provide correct username and password of a domain controller and click OK, we will get a successful message that node SQL1 has been successfully added to a domain as shown as below. Then we need to restart respective node to get effect changes.

After the restart, Login to SQL1 node and verify whether our node is added to domain successfully as below
Note -Repeat the same process for other nodes which you want to add in a cluster in the same domain.
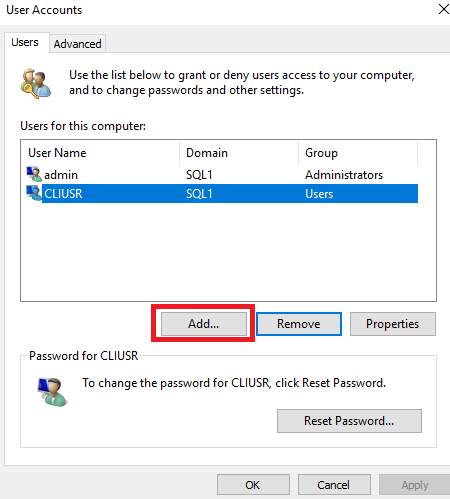
Also, Add Domain controller as Administrator user into domain client SQL1 as below Go to Control Panel\User Accounts\User Accounts >Manager User accounts
Note – If we do not add domain controller as administrator into its respective nodes, we will get an error while Validation cluster configuration wizard.
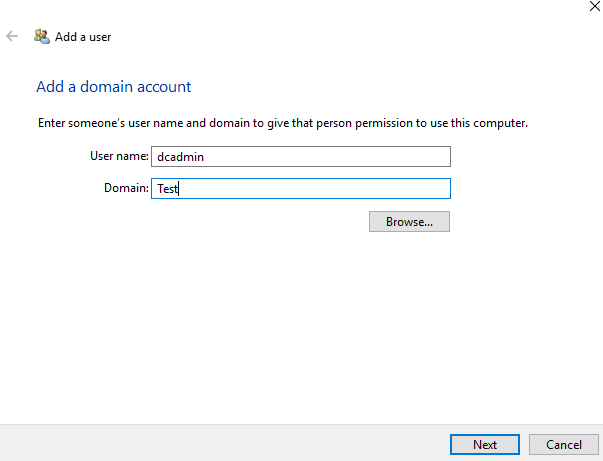
Enter Username as Domain controller user dcadmin and Test as Domain click Next
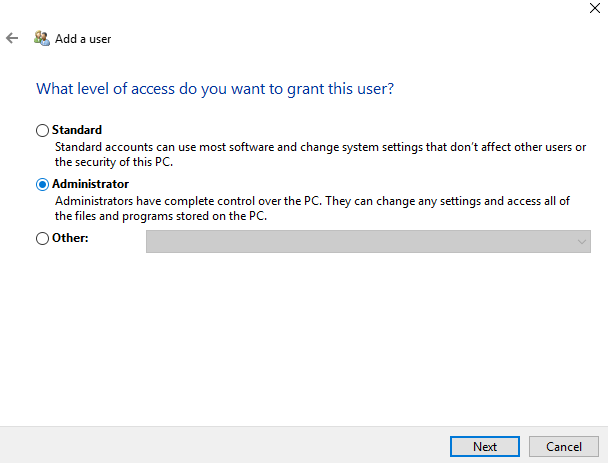
Select Administrator role and click Next and then Finish
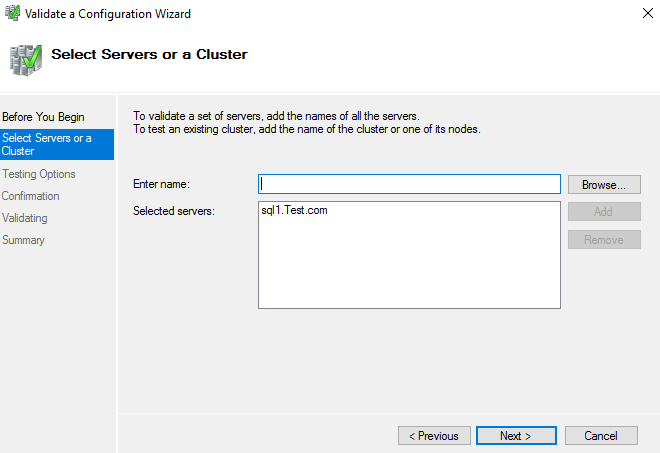
6. Validate Cluster Configuration
In Validate cluster configuration, we are going to add client computers in Cluster which are in domain system Test.com
Go to Failover Cluster Manager > Validate Configuration and Add node SQL1 into the cluster as below
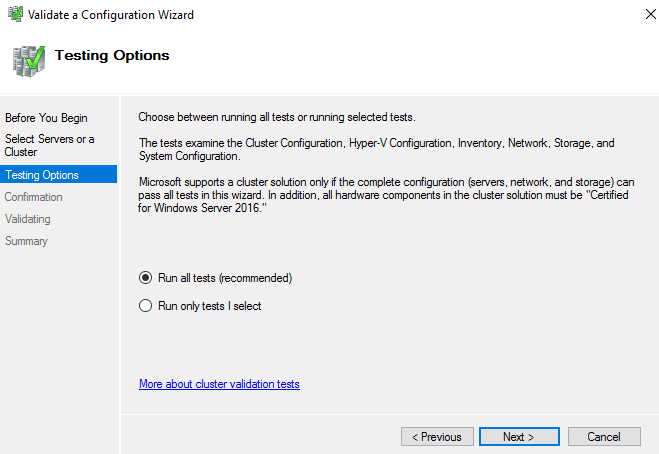
Select Run all tests option and click Next
Click Next
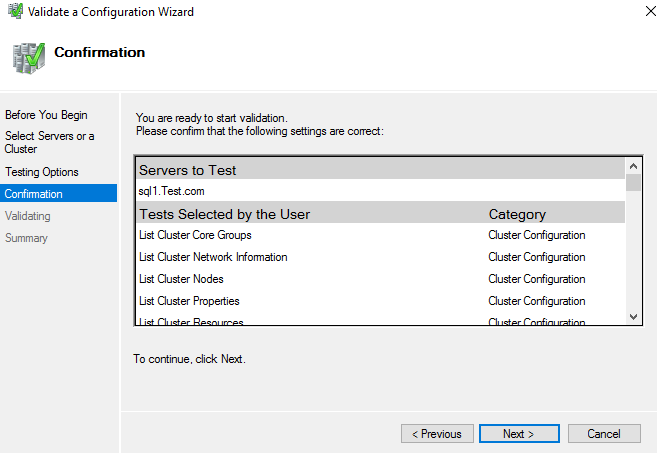
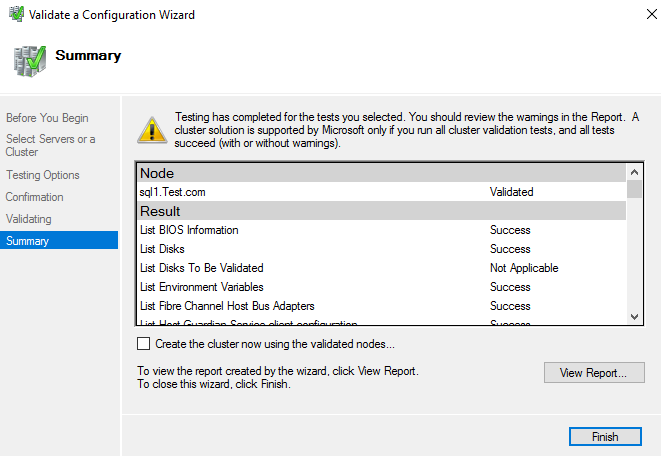
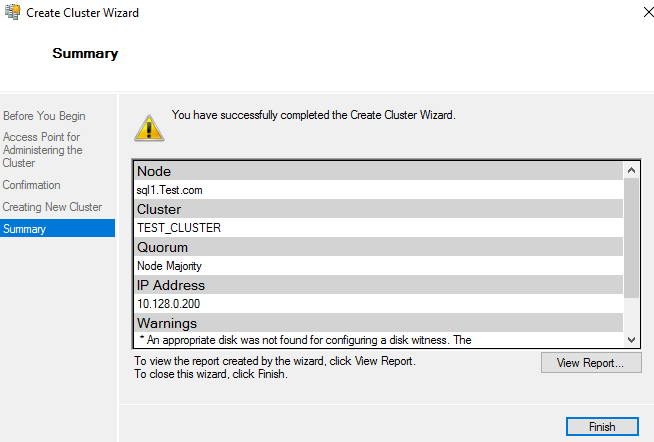
click Next to run validation. Validation completed successfully, and you may get warnings.
Select the checkbox to create Cluster further.
7. Create a Cluster
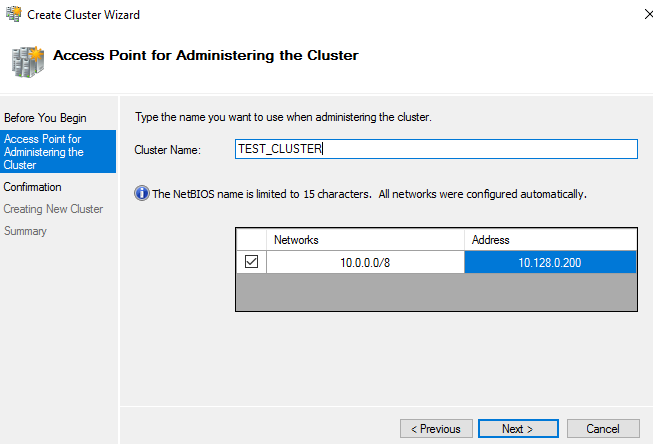
In below Cluster creation wizard, provide any Cluster name and provide IP address depends on your IP range and Click Next
Click Next to run cluster creation progress
After Validation cluster and Cluster creation, we can see that first node SQL1 is showing online as below in failover cluster manager.
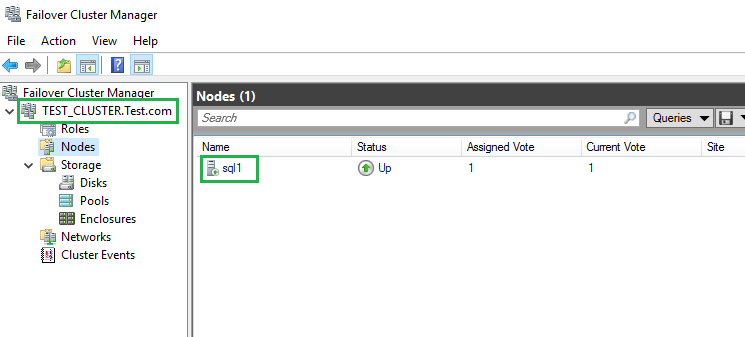
In this way, we have created domain controller and added others windows server nodes as domain client.
Table of contents
| Domain Controller and Domain Client Node setup for AlwaysON High Availability |
| iSCSI, iSCSI Initiator, Quorum Configuration and SQL Server Cluster Installation |
| Configuring a SQL Server AlwaysOn High Availability Group |

- Add new articles, drop the article, change the snapshot folder path and Data filter rows in SQL Server Replication - April 2, 2019
- SQL Server replication: Configuring Snapshot and Transactional Replication - March 15, 2019
- SQL Server replication configuration: Peer to Peer and Merge Replication - March 15, 2019