
In this article of the series on SQL Server replication, we will explore ways to configure SQL Server Snapshot replication and Transactional replication step by step.
SQL Server Replication is one of available disaster recovery solutions which is useful to maintain or prepare a second copy or backup copy of the primary server database objects. The advantage of replication is that we do not need to replicate the entire database to another server; we can replicate specific database objects like Tables, views, and Stored procedure on another server.
SQL Server Replication Terminology
Publisher – It is a source database server which transfers or replicate data to another server.
Subscriber – It is server data gets replicated from the Publisher server.
Article – It is a database object like Tables, Views, and Stored procedures which replicates from the publisher to subscriber.
Snapshot replication
When to use SQL server Snapshot Replication
SQL Server Snapshot replication is useful for the databases which are not critical and/or data records of the database do not change frequently. SQL Server Snapshot replication takes a snapshot until a specific time on the Publisher server and applies to the Subscriber server.
- Database records do not change frequently
- The database is not critical
- The database is for reporting purposes
To configure step by step Snapshot replication, I have set-up two server node SQL1 act as a Publisher server and SQL2 act as Subscriber server.
Configure the Distribution
-
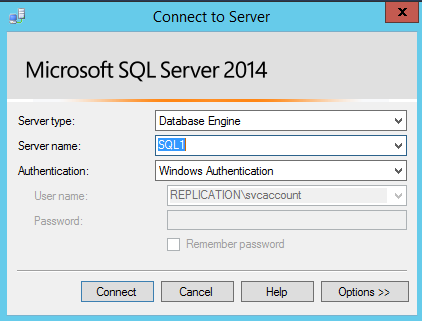
Login to the Publisher server SQL1

-
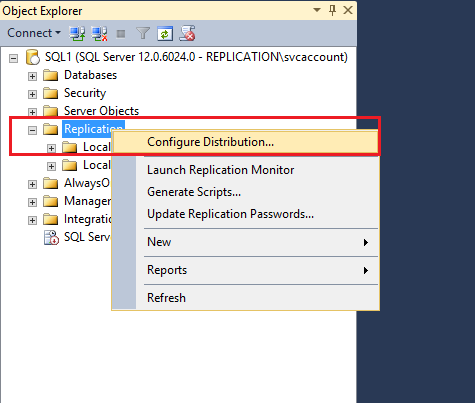
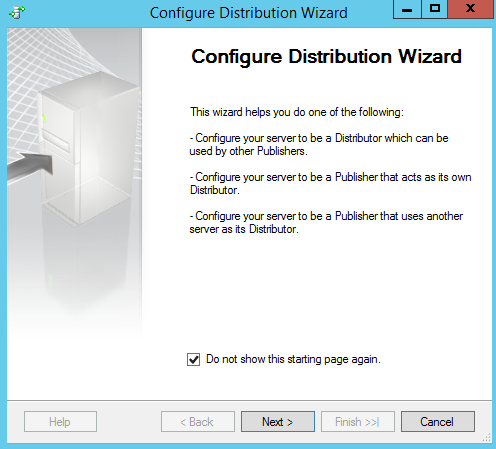
Right-click the Replication Folder and click Configure Distribution.
-
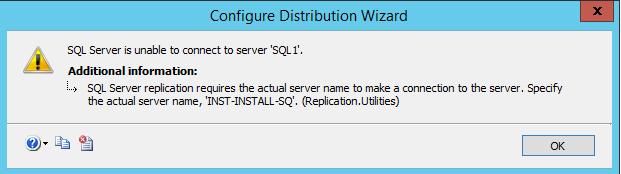
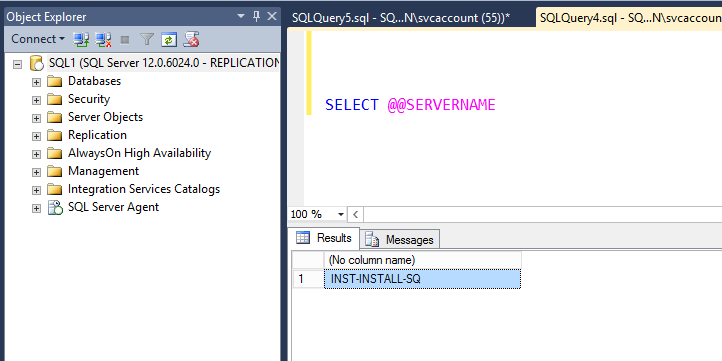
Once clicked on Configure Distribution, we got the following warning message. It states that we need to use the actual server name. The default server name is INST-INSTALL-SQ so that we will change it. To remove the actual server name warning message, we need to implement the following step.
-
Execute SELECT @@SERVERNAME query to get the current server name of the Publisher.
-
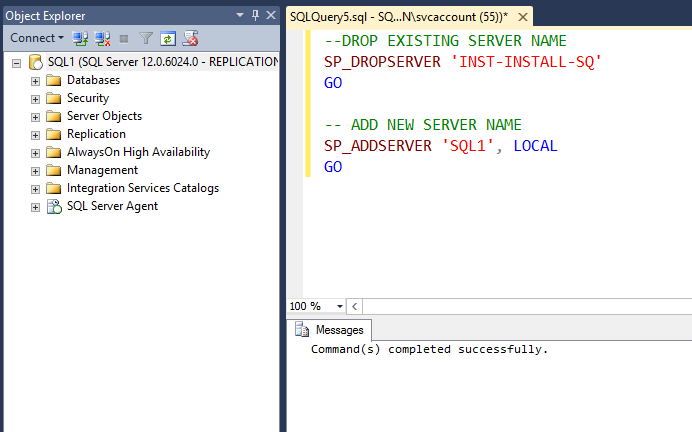
Execute the below query to drop the current server INST-INSTALL-SQ and add the new server name as an SQL1. This step is not mandatory; we can also use current server name while connecting the SQL server instance, however for our convenience, we have changed to SQL1.
-
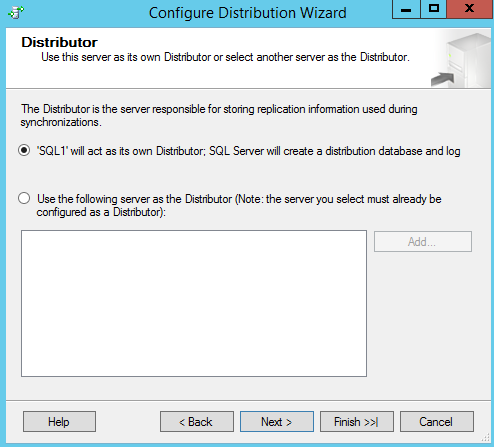
Once the actual server name changed to SQL1, we will able to connect the Publisher SQL server instance SQL1 and perform Step-2 again and we will able to configure Distribution wizard as the following.
-
Select SQL1 to configure its Distributor. It will create the Distribution database in system databases.
-
Select the following option. Yes, configure the SQL Server Agent service to start automatically.
-
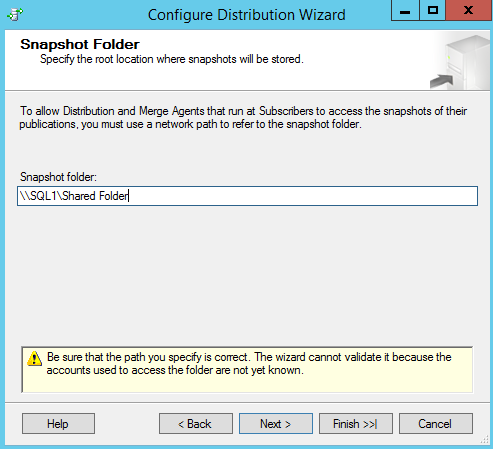
Snapshot SQL Server replication takes a snapshot of the database and puts it into the Snapshot folder. The following step indicates the path of the Snapshot folder. The Snapshot folder path will be accessed by the Distribution Agent to apply the snapshot of the publisher database to the Subscriber. We need to use a network path for the snapshot folder path.
-
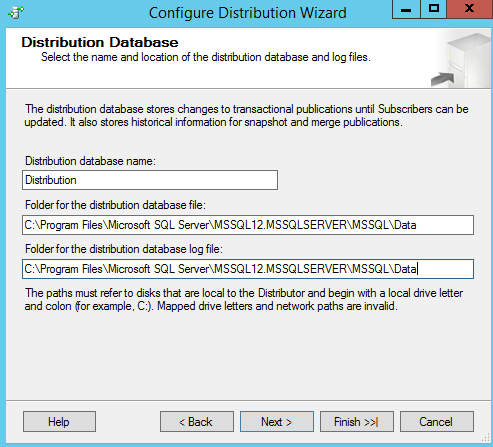
Specify the Distribution database name and the location path of the Data file and Log file name of the distribution database.
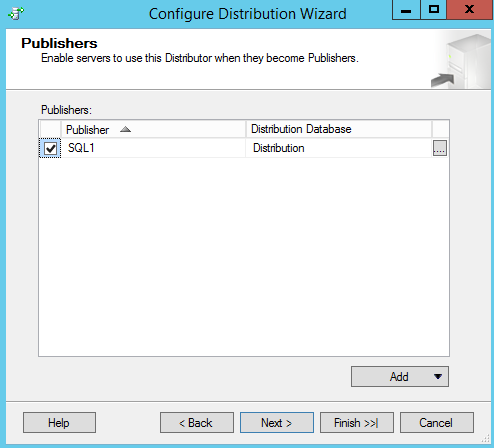
Select SQL1 as the Publisher to use the Distribution database and click Next
-
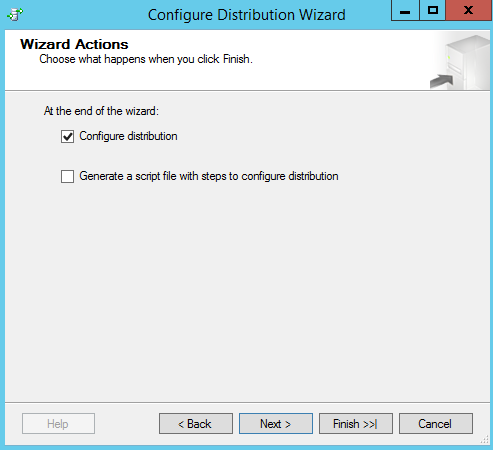
Tick Configure distribution and click Next.
-
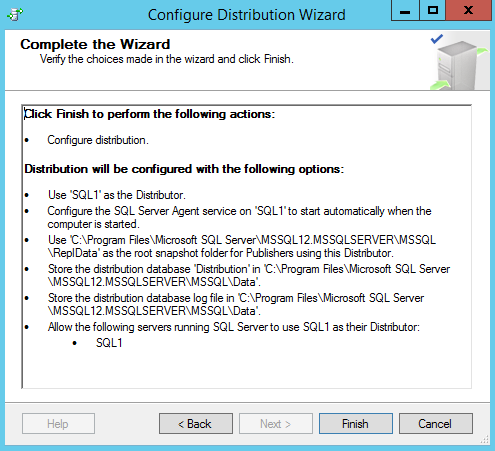
Review the following options to configure the distribution and click Finish
-
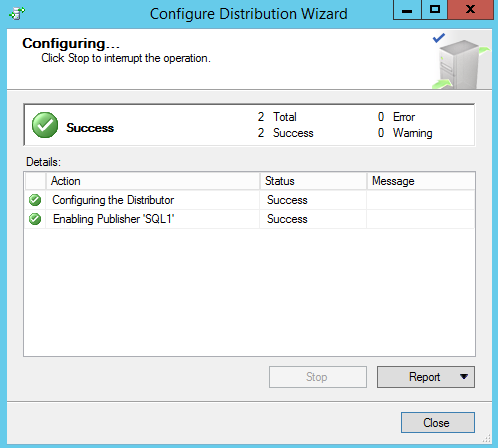
The following wizard completed the configuration of the distributor and SQL1 as a Publisher.
-
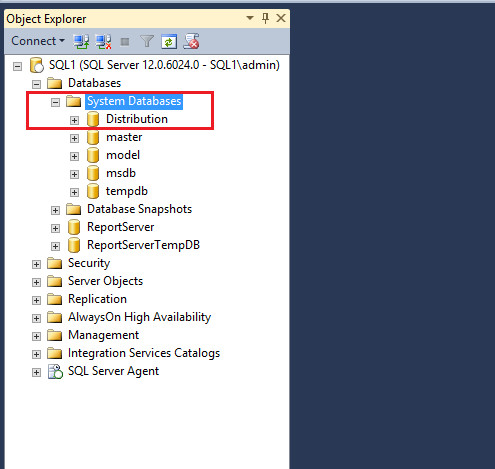
Verify the Distribution database created under the System databases.
-
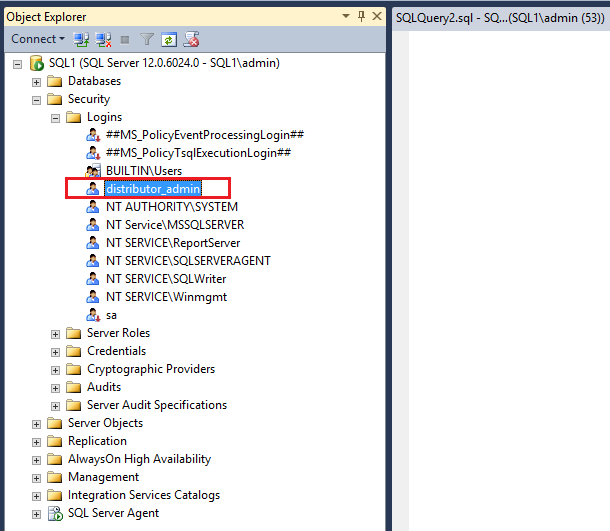
The login distributor_admin is created for the Distribution database as shown in the following fig.
-
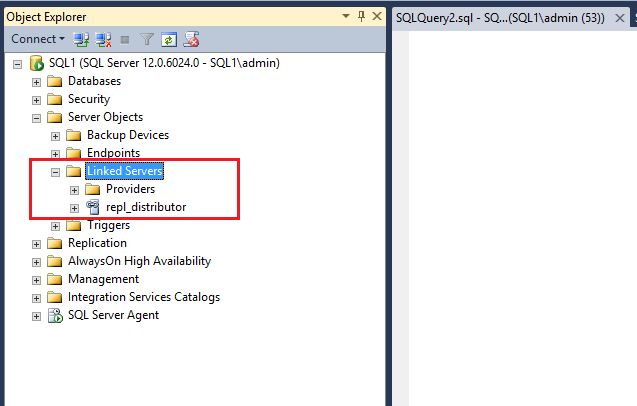
The linked server repl_distributor created as a linked server.
-
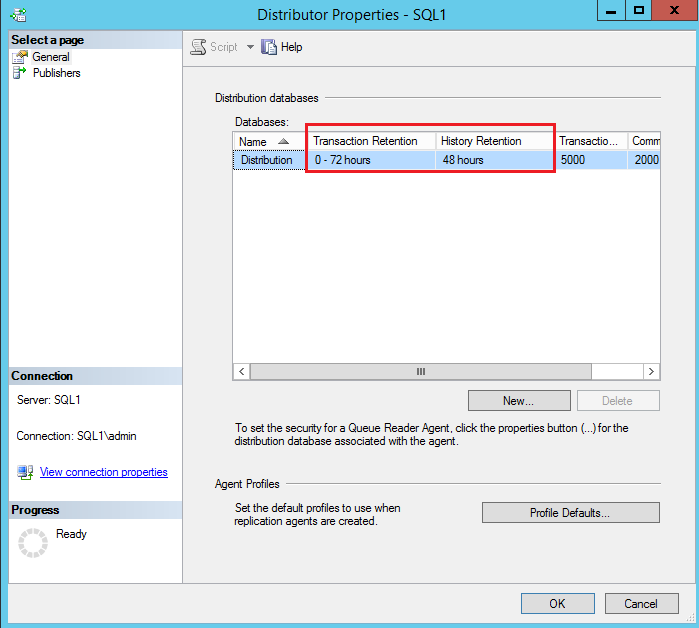
Right-click the Replication folder and click Distribution Properties where we can get Transaction and History retention information.
-
The following jobs created for replication in the SQL Server agent jobs
-
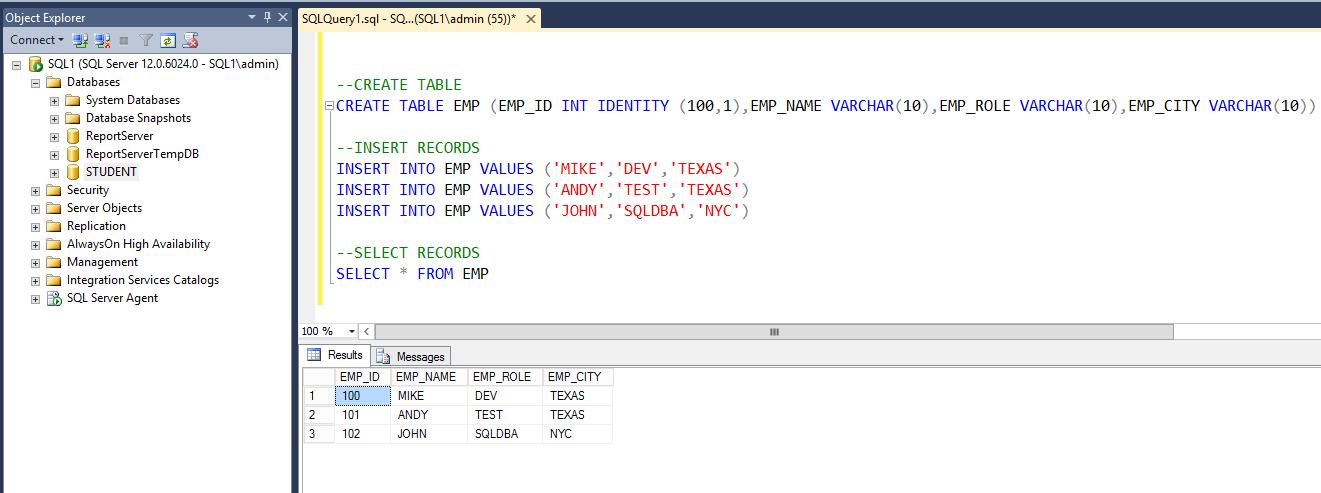
We will create the Publisher database and create a table and add records into the table as follows.


Configure the Publication
-
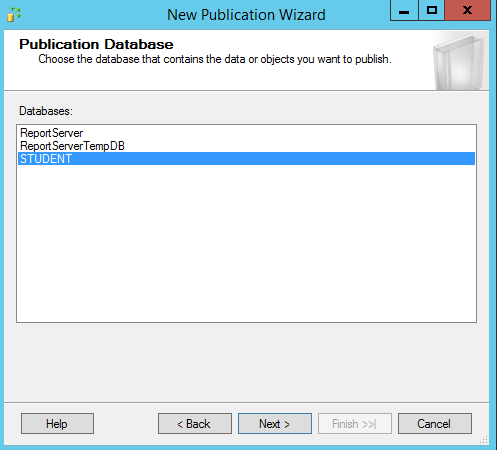
Right-click New Publication and New Publication wizard to open to proceed publication configuration. As shown in the following, we will select a database STUDENT as a Publication database and click Next.
-
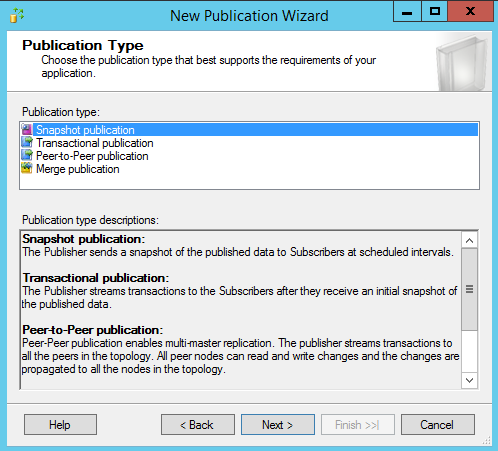
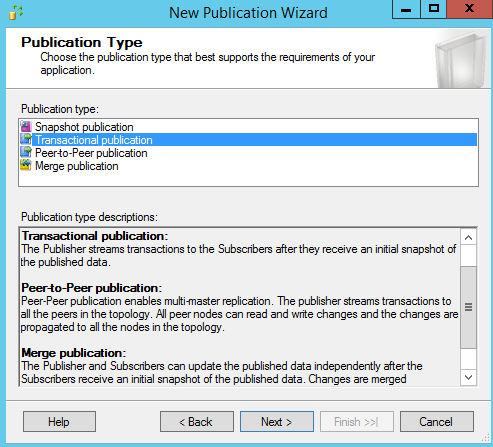
Select Snapshot publication as a publication type and click Next
-
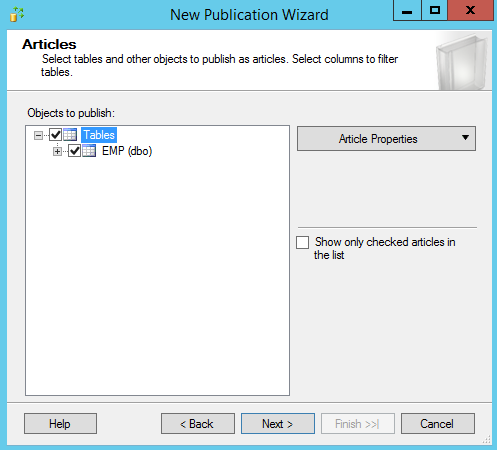
Select the EMP table as an article to publish and click Next
-
In the Filter Table Rows window, we do not want to filter data, so will skip it and click Next.
-
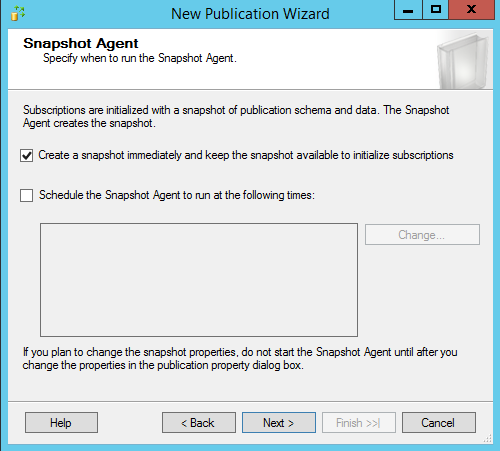
Tick Create a snapshot immediately option and click Next.
-
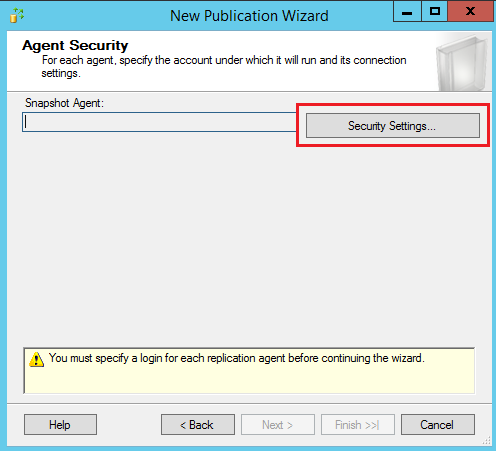
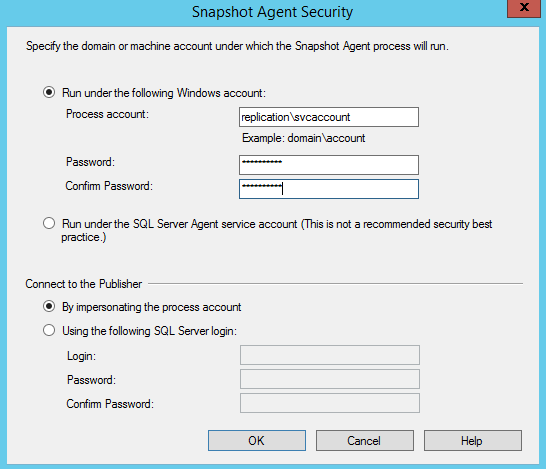
In the following window, we will set up the service account under which the snapshot agent will run. Click Security Settings as shown in the following.
-
Select the following tick options and Specify the service account username and password and click OK, then Next
-
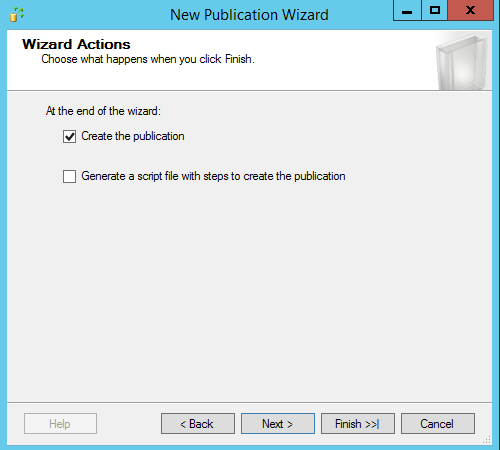
Tick Create the publication option and click Next.
-
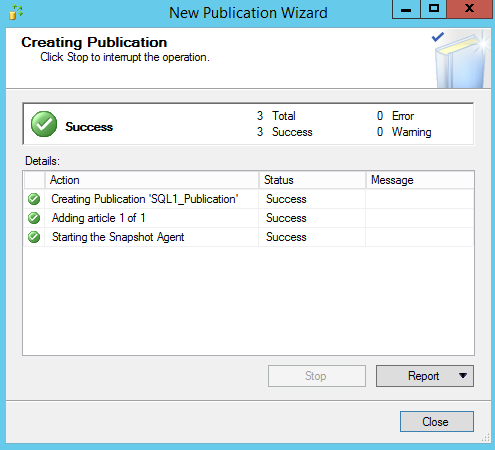
The Publication is created successfully by creating Publication, adding the article as EMP table and starting the snapshot agent.
-
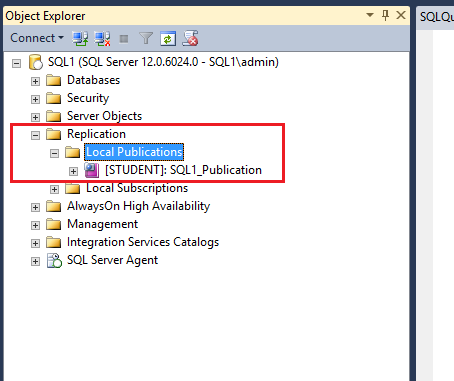
Once the Publication configured, verify it under Local Publications as the following.
-
We also need to verify the snapshot agent status by Right clicking configured publication and select View Snapshot agent status, and it is in running state as the following fig.


Configure the Subscriber
-
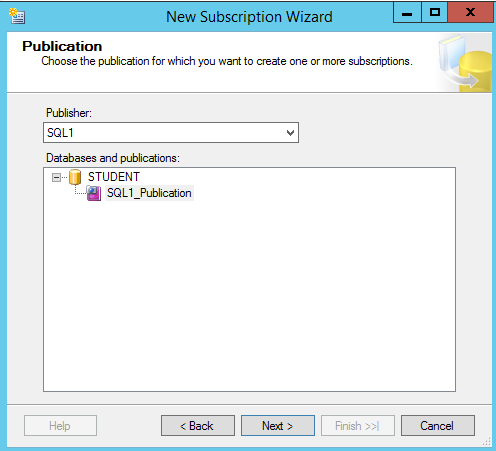
Right-click publication SQL1_Publication and select New Subscriber. Select Sql1 as the publication and click Next
-
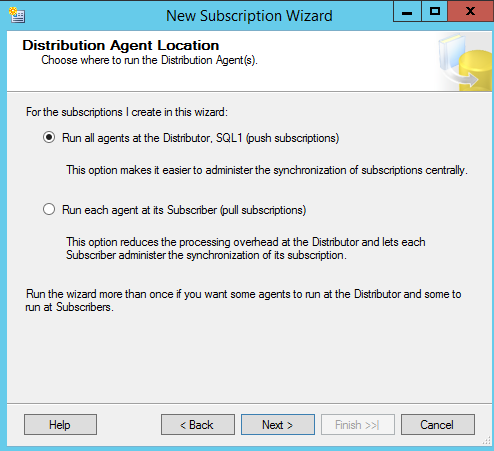
Select Run all agents at the Distributor and click Next.
-
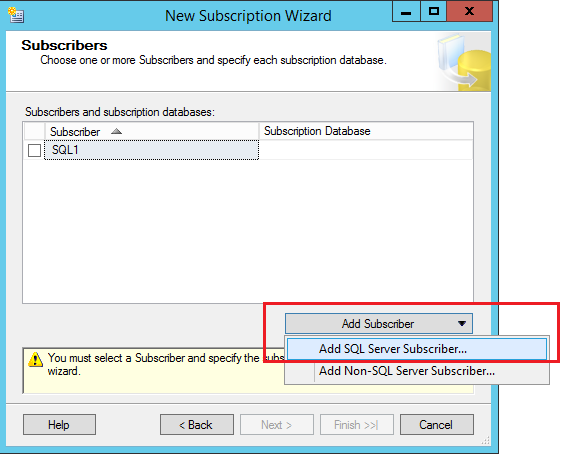
In the following window, we need to select the Subscriber server. We need to configure SQL2 as the subscriber so Go to Add Subscriber > Add SQL Server Subscriber.
-
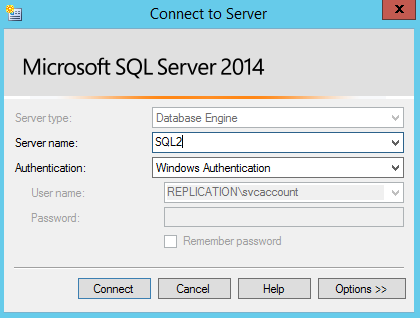
Connect to SQL2 server instance.
-
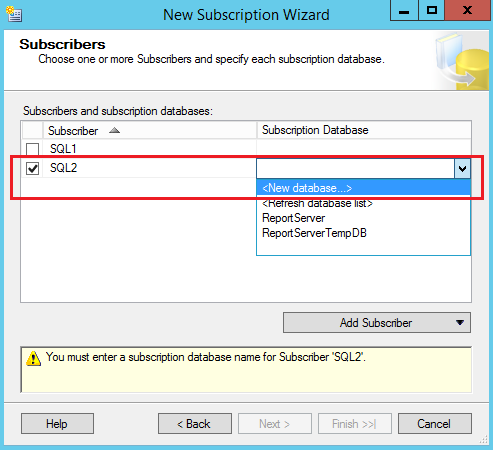
In the following window, we need to select the database at the Subscriber server. If a database is not available, create a new database as shown in the next window.
-
Provide the database name, owner of the database and click OK.
-
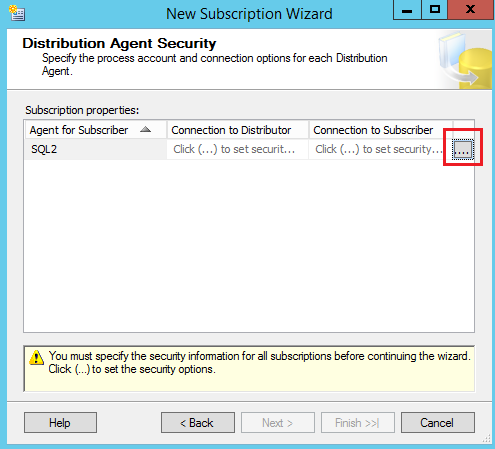
In the following window, we need to specify connection details to the distribution agent. Click on the next section.
-
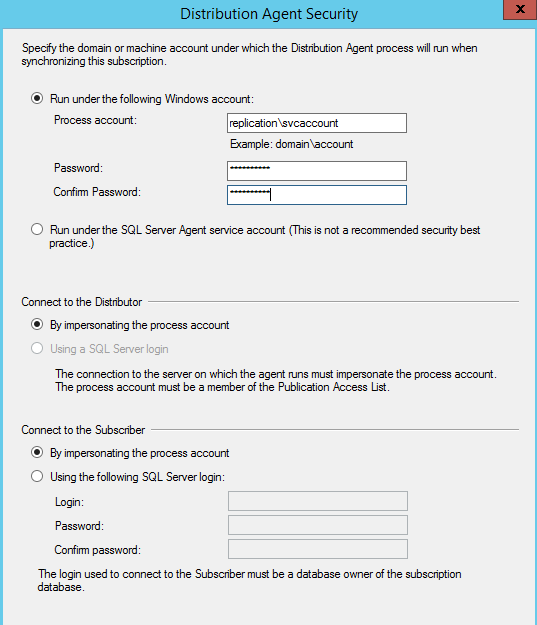
Specify the Service account credentials and click OK.
-
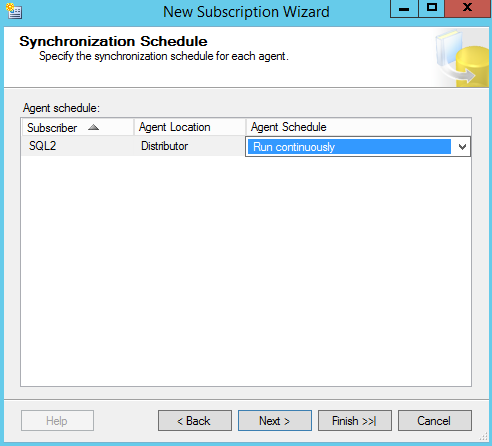
Select Run continuously as the synchronization schedule, so it will schedule the agent job and will execute automatically for a scheduled time. Click Next
-
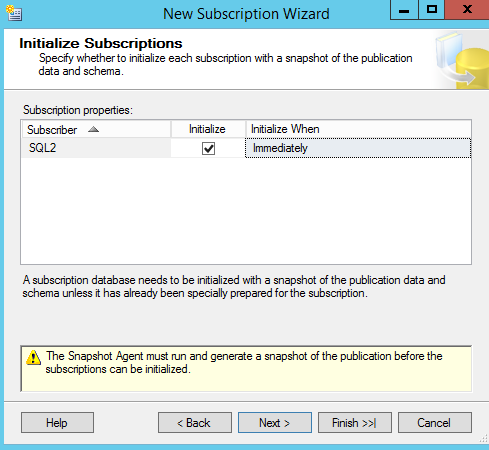
In the Initialize subscription, we need to initialize the subscription database with a snapshot of the publication. Click Next
-
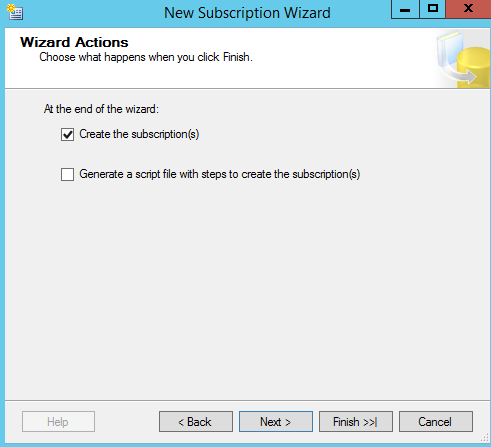
Select Create the subscription and click Next.
-
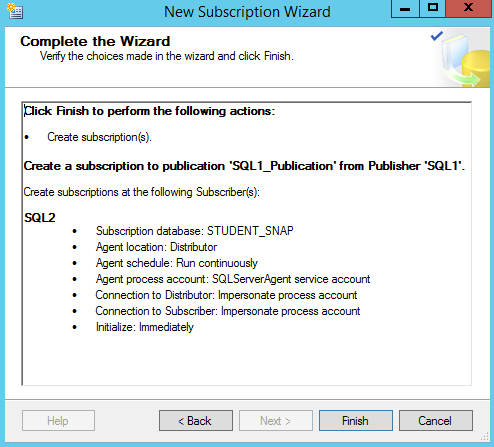
Review the below options for the subscriber configuration and click Finish
-
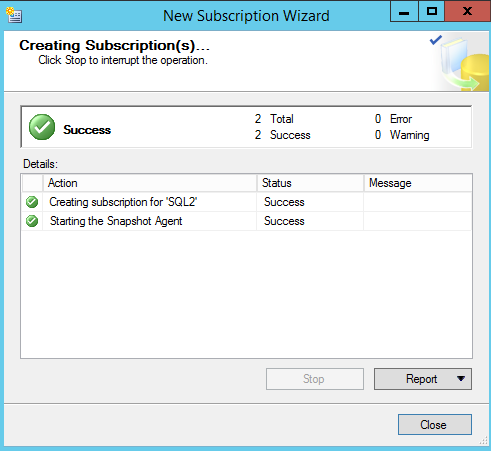
In the following window, the server SQL2 configured as a subscriber.
-
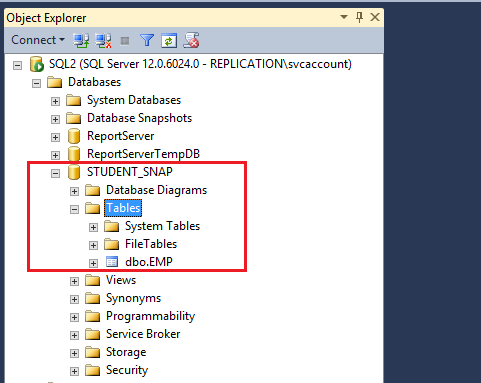
In the following window, the publisher database objects created on the subscriber server SQL2 successfully.

Data verification of the Snapshot Replication
-
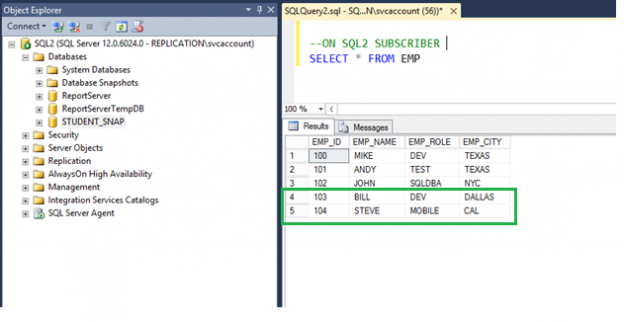
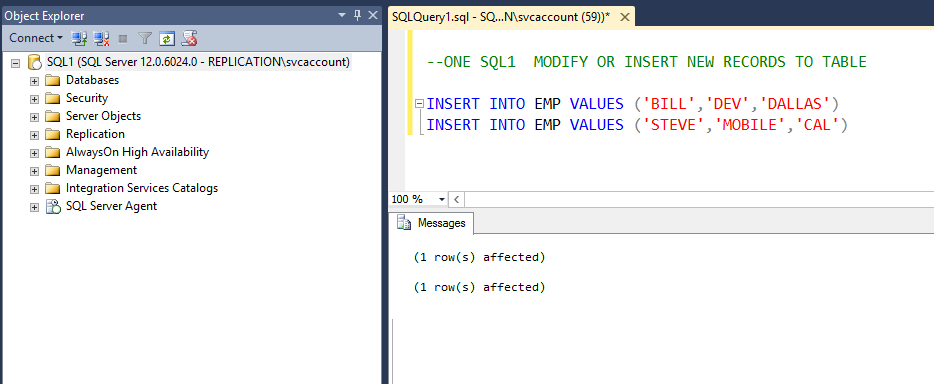
In the following window, we will add new records in EMP table of the publisher database STUDENT.
- Insert records on the Publisher SQL1
-
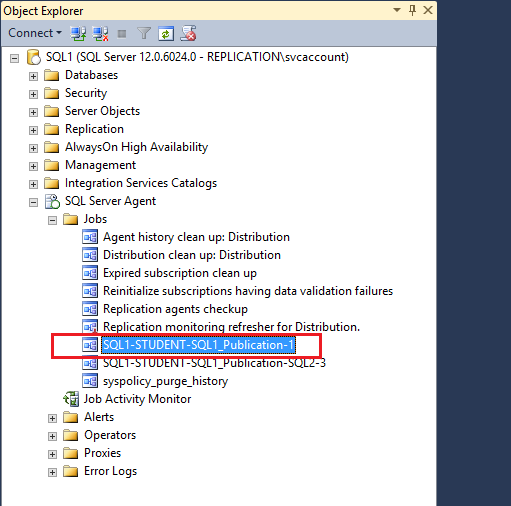
Run the following job from SQL Server agent SQL1-STUDENT-SQL1_Publication-1 job on demand. When the job executed, it applies the snapshot of the database changes to the subscriber server.
-
Once job completed, new records which added on the publisher SQL1, are updated on the subscriber SQL2.
- Verify updated data on the Subscriber SQL2

Transactional replication
Step by Step configuring
In the last section, we have covered Snapshot replication. Snapshot replication used in Transactional and Merge replication. Transactional replication is used to replicate data transactions continuously from the Publisher to the Subscriber.
When to use Transactional Replication:
- Transactional replication used for the critical databases which require less downtime
- It is useful when where data need on an incremental basis
- It is useful for the database where a large amount of data changes frequently
Three agents used in Transactional replication. The Snapshot agent, The Log reader agent, and Distribution agent.
- Snapshot agent takes a snapshot of the published articles and put it into the snapshot folder
- The Log reader agent reads the transaction logs of the published database and transfers the committed transaction to the distribution database
- Distribution agent copied the snapshot data from the snapshot folder and the transaction log from the distribution database and applied to the subscriber server database
Configure the Distribution
- Configure the Distribution step by step as per PART-1 Configure the Distribution in the Snapshot Replication
Configure the Publication
-
Right-click the Replication folder and click New Publication. The publication database wizard opens, where we need to select the publication database. Here, I will use the AdventureWorksLT2012 database. For transactional replication, we need to choose a database which contains all other database objects like Table, Views, Stored Procedures, etc. Click Next
-
Select Transactional publication as replication type.
-
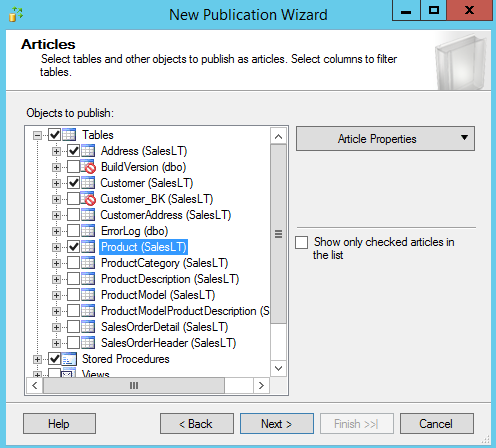
Select the Tables, stored procedures which you want to replicate.
- Kindly proceed to next publisher steps same as PART-2 Configure the publication
- To configure the Subscriber, kindly continue to perform steps same as PART-3 Configure the Subscriber.

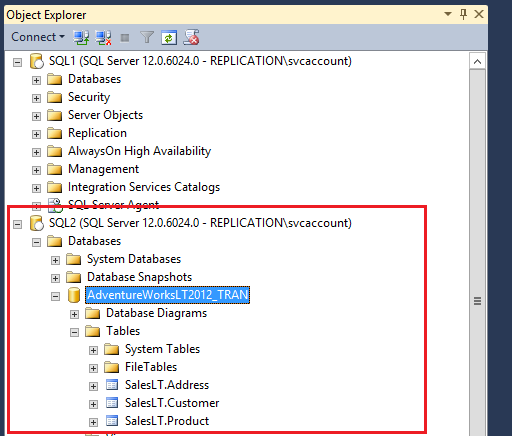
Verify database objects replicated on the subscriber server SQL2
Data verification of Transactional Replication
Update data on the Publisher SQL1
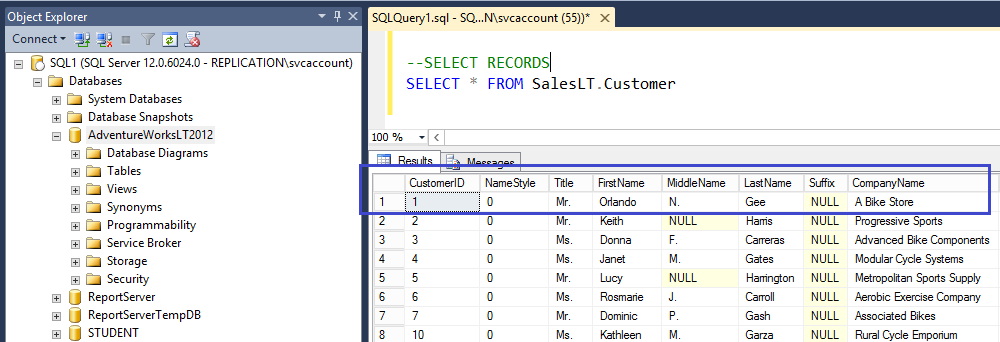
To validate data, we will use table Customer from the database AdventureWorksLT2012. We will validate data for the first record of the table. As shown in the following fig.
On the Publisher SQL1, CompanyName = A Bike Store.
We will update CompanyName column value to new value A Car store as shown in the following fig.
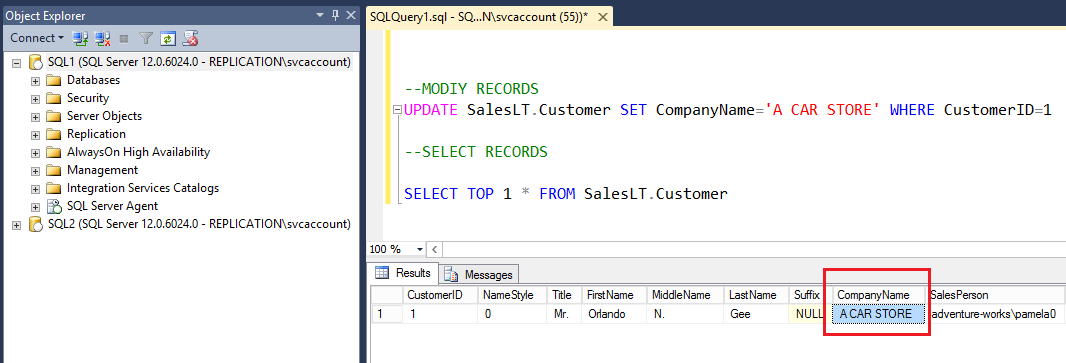
As soon as records updated on the publisher server SQL1, changes are also updated to the subscriber SQL2, as shown in the following fig.
Verify changed data on the Subscriber SQL2
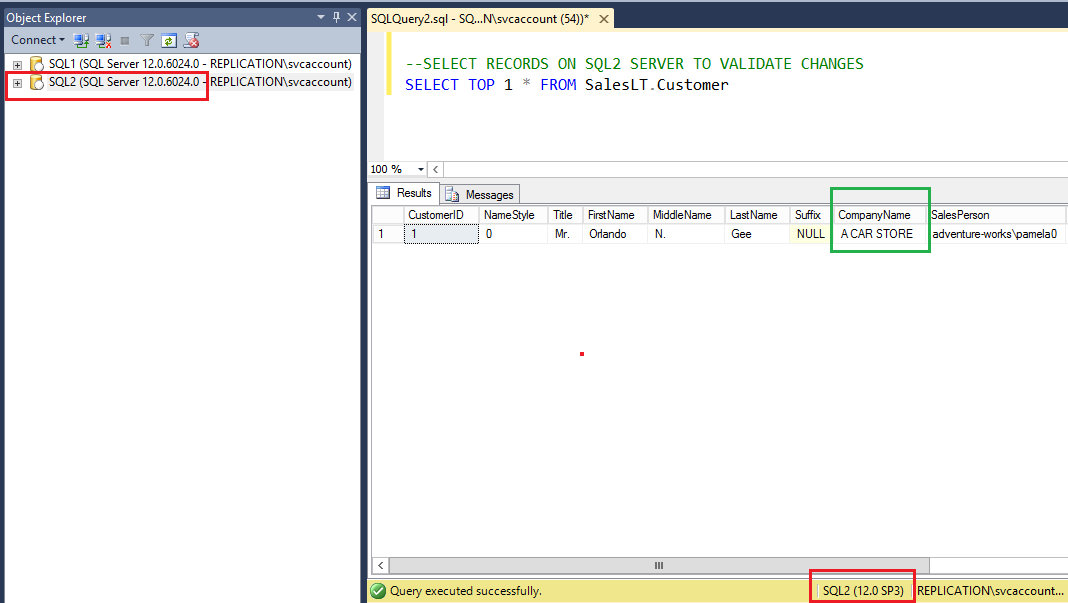
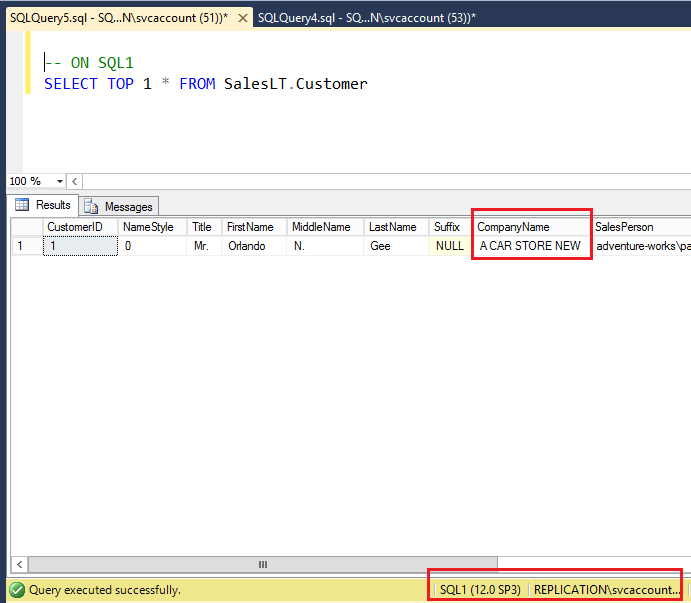
Table of contents
| SQL Server replication configuration: Peer to Peer and Merge Replication |
| SQL Server replication: Configuring Snapshot and Transactional Replication |
| Add new articles, drop the article, change the snapshot folder path and Data filter rows in SQL Server Replication |

- Add new articles, drop the article, change the snapshot folder path and Data filter rows in SQL Server Replication - April 2, 2019
- SQL Server replication: Configuring Snapshot and Transactional Replication - March 15, 2019
- SQL Server replication configuration: Peer to Peer and Merge Replication - March 15, 2019