

In this article, I am going to explain how we can configure iSCSI initiator and iSCSI target server on ubuntu 18.04. In my previous article, we have learned the step by step configuration process of configuring the iSCSI target and initiator in Windows Server 2016. The following are the links to these articles:
- Installing and configuring the iSCSI target Server on Windows Server 2016
- How to configure an iSCSI initiator on Windows Server 2016
The concept of iSCSI in Windows and Linux operating system is the same, but the implementation process is different. I have created two virtual machines on my workstation to demonstrate the configuration, and I have installed ubuntu 18.04 on them.
Following is the configuration:
|
Host Name |
IP Address |
Role |
|
LinuxSQL01 |
192.168.0.140 |
iSCSI Target Server |
|
LinuxSQL02 |
192.168.0.141 |
iSCSI initiator |
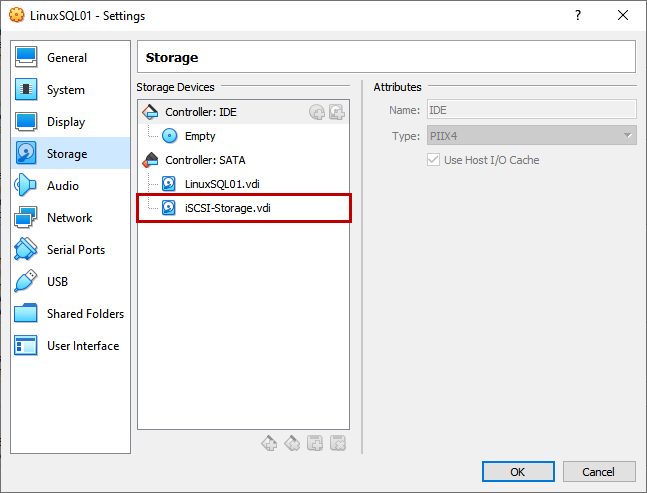
I have created a new virtual hard disk in the LinuxSQL01 virtual machine. It is used as a storage of the iSCSI target server.
We are going to use PuTTY to connect to the Linux virtual machine.
Configure PuTTY
The PuTTY uses SSH protocol to connect to the Linux hosts. You can download the PuTTY software here. Once downloaded and installed, open the application. Enter the hostname of the LinuxSQL01 in Host Name (or IP address) and port number in Port text box. Select SSH from the list of Connection type and click Open to connect to it.

It prompts for username and password. Enter the username and password. Once connected successfully, you can see the bash of the LinuxSQL01.
Update the Ubuntu repository
Before we configure the iSCSI target server and iSCSI initiator, we must update the Ubuntu repository. The repository should be updated using the root user. To access the root user, execute the following command:
nisarg@LinuxSQL01:~$ sudo -s

Run the following command to update the ubuntu repository.
root@LinuxSQL01:~# sudo apt-get update
The Ubuntu repository has been updated.
During the configuration process, we must create and edit the configuration files. Therefore we require a text editor. I use VI Editor. The following command installs the VI editor package.
root@LinuxSQL01:/# sudo apt-get install vim
Create and configure the iSCSI target server
We are going to use the Linux SCSI target framework, also known as TGT, to create an iSCSI target server. TGT simplifies the creations and maintenance of iSCSI targets. TGT is supported by various Linux flavors (SUSE Linux, Fedora, RHEL, Debian, and Ubuntu). Execute the following command to install the TGT package.
root@LinuxSQL01:/# sudo apt-get install TGT
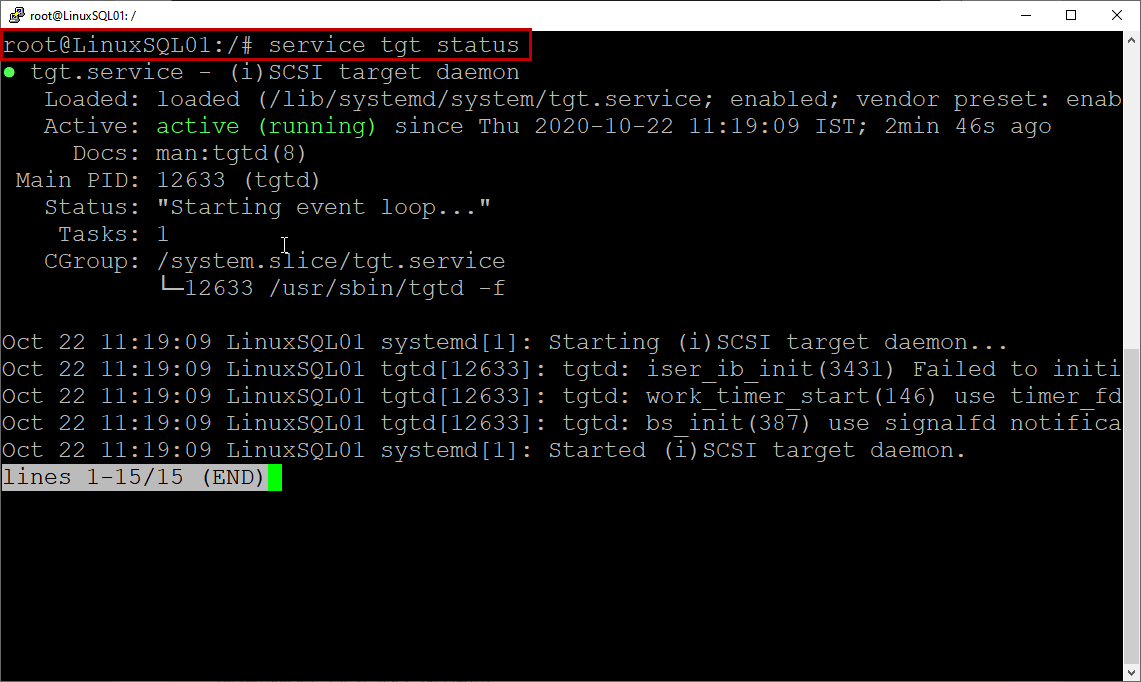
Once installation completes successfully, you can view the TGT service’s status by executing the following command.
root@LinuxSQL01:/# service TGT status
If the service had been installed successfully, then you should see the following status.
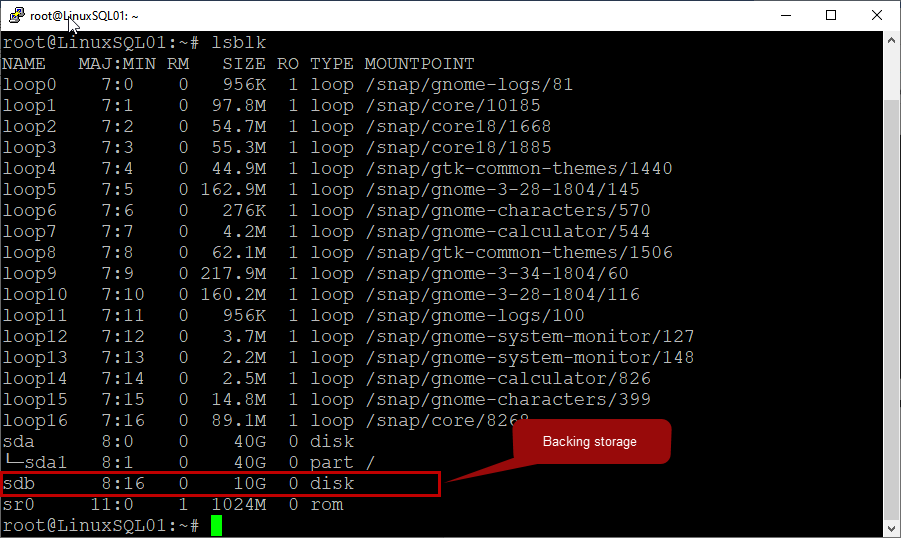
As mentioned, I have created a separate virtual disk on LinuxSQL01, and it will be used as iSCSI storage. To view all the disk blocks attached to the virtual machine, run the following command:
root@LinuxSQL01:~# lsblk
To use /dev/sdb partition as an iSCSI storage of the iSCSI target server, we must create a configuration file in /etc/tgt/conf.d directory. The following command creates a configuration file.
In configuration file, add following lines:
<target iqn.2019-11.example.com:lun1>
# Provided device as an iSCSI target
backing-store /dev/sdb
initiator-address 192.168.0.141
</target>
Following is the detailed explanation of each parameter:
- Target: Name of the iSCSI target
- Backing-store: Name of the disk that is going to be used by the iSCSI initiator
- Initiator-addresses: It is the IP address of the initiator
Now, restart the TGT service by executing the command:
root@LinuxSQL01:~# service tgt restart
root@LinuxSQL01:~# service tgt status
Following is the status of the TGT services after restart:
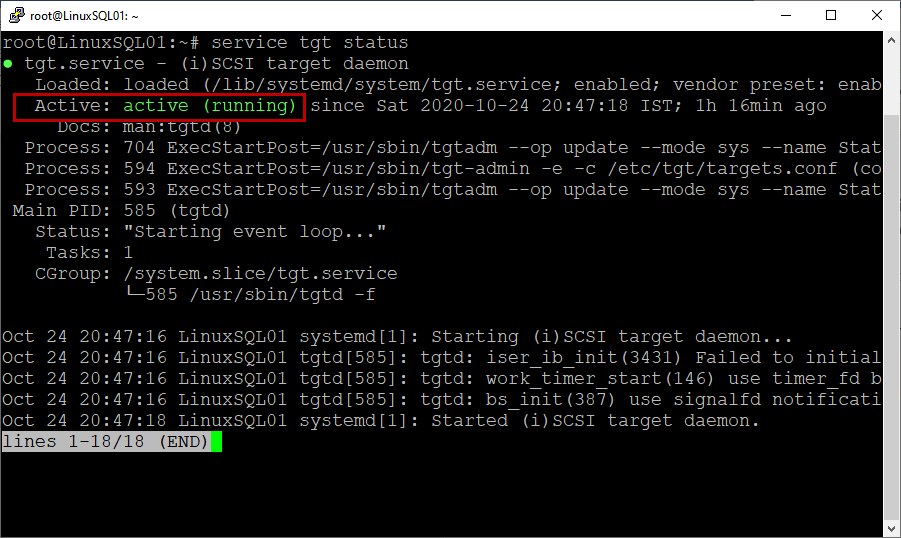
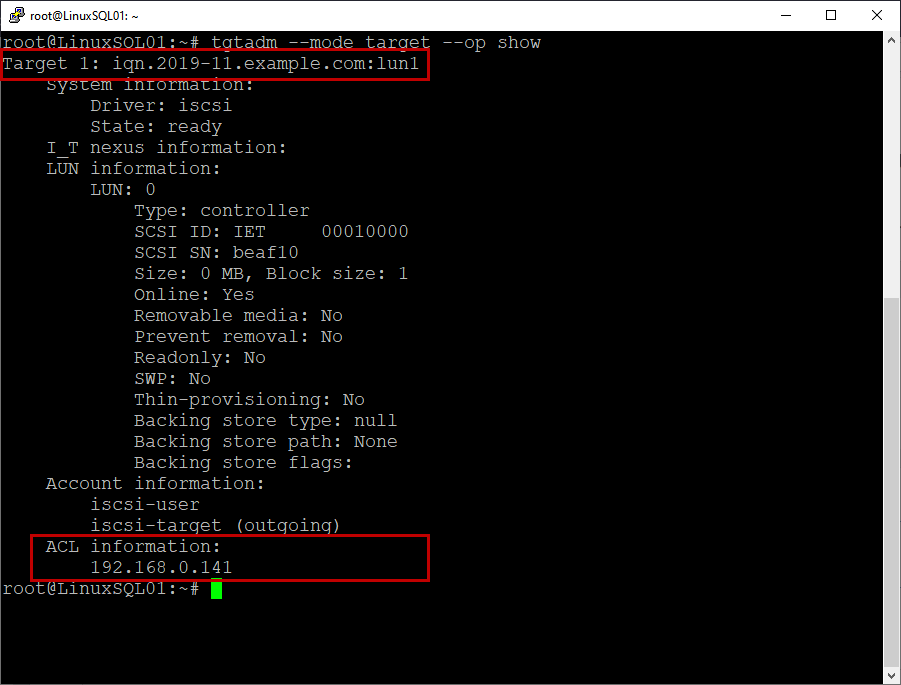
As you can see, the TGT package has been installed, and the service is running successfully. Execute the following command to review the details of the iSCSI target server.
root@LinuxSQL01:~# tgtadm –-mode target –-op show
Now, let us configure the iscsi initiator.
Create and configure iSCSI initiator
We are going to use open-iscsi software. Connect to LinuxSQL02, and the following command installs to open-iscsi package.
root@LinuxSQL02:~# sudo apt-get install open-iscsi
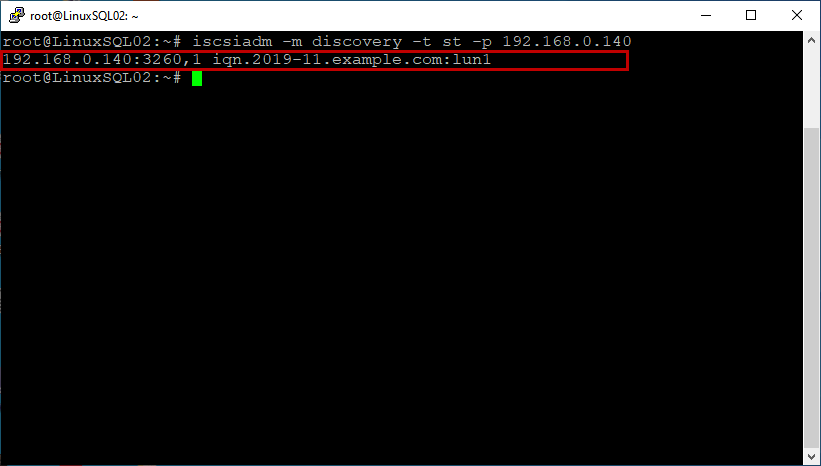
Once the package is installed successfully, let us run the target discovery on the iSCSI target server to find the iSCSI storage. The same command generates two configuration files in /etc/iscsi/nodes directory. First, run the below command to run the target discovery.
root@LinuxSQL02:~# iscsiadm -m discovery -t st -p 192.168.0.140
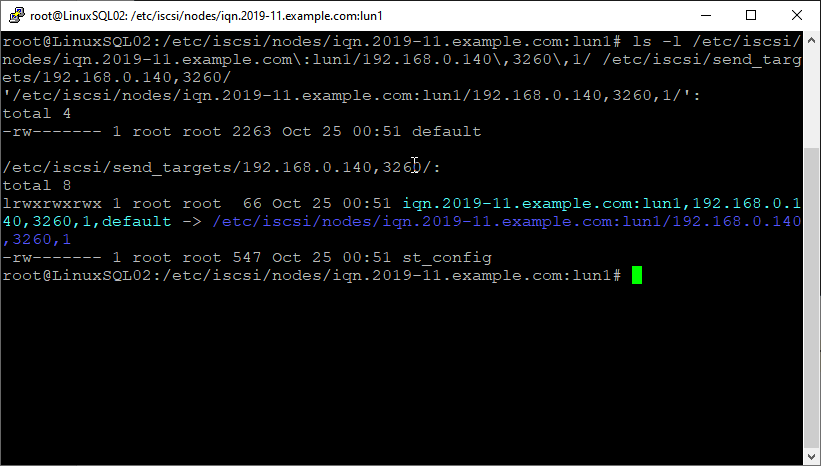
Run the following command to view the details of the configuration files.
root@LinuxSQL02:~# ls -l /etc/iscsi/nodes/iqn.2019-11.example.com\:lun1/192.168.0.140\,3260\,1/ /etc/iscsi/send_targets/192.168.0.140,3260/
Following is the output:
Restart the open-iscsi services by executing the following command.
root@LinuxSQL02:~# service open-iscsi restart
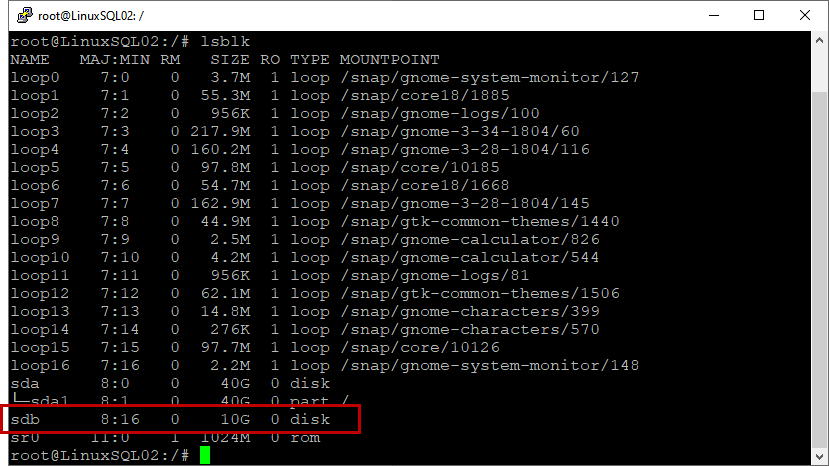
Run the following command to verify that the disk is available to use.
root@LinuxSQL02:~# lsblk
Create filesystem and mount the iSCSI disk
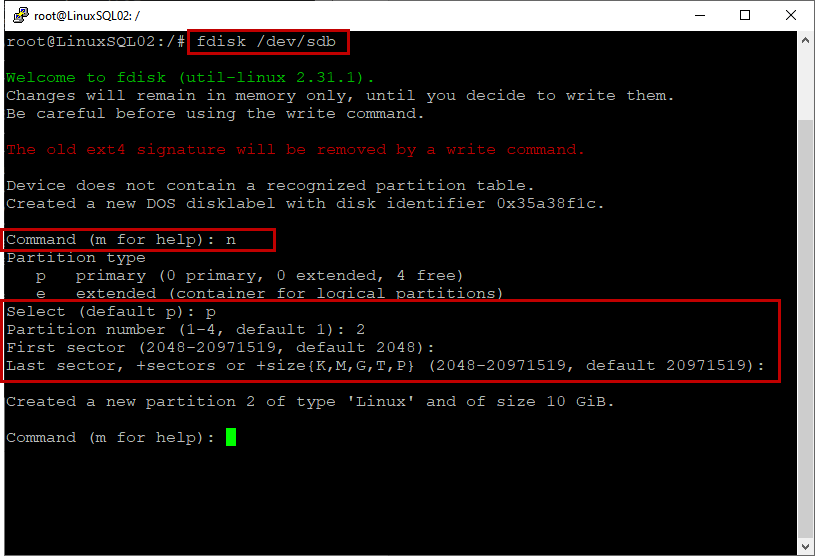
Once the disk is available to use, let’s create a filesystem on the iscsi disk. To create a filesystem, we use the fdisk command.
root@LinuxSQL02:~# fdisk /dev/sdb
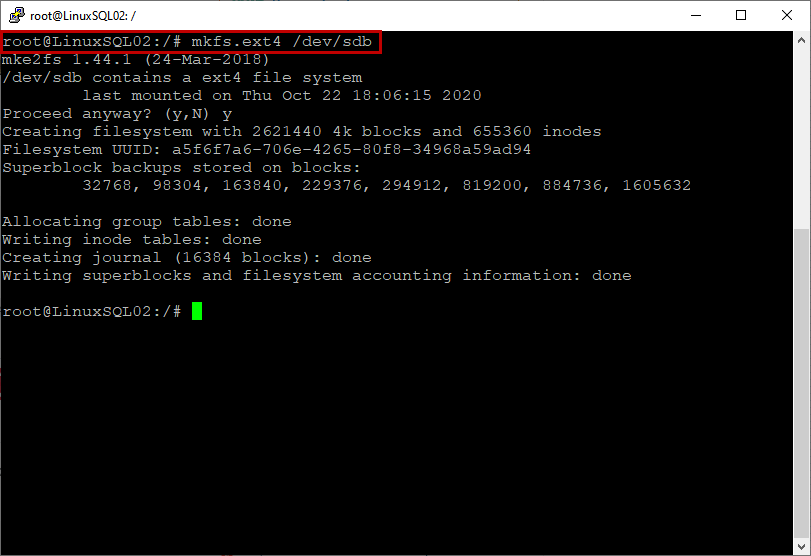
Now format the partition by using the mkfs command.
root@LinuxSQL02:~# mkfs.ext4 /dev/sdb
Once formatted, mount the disk on /iscsiShare directory by running the following command:
root@LinuxSQL02:~# mount /dev/sdb /iscsishare
Run the following command to view the list of the mounted devices.
root@LinuxSQL02:~# df -h
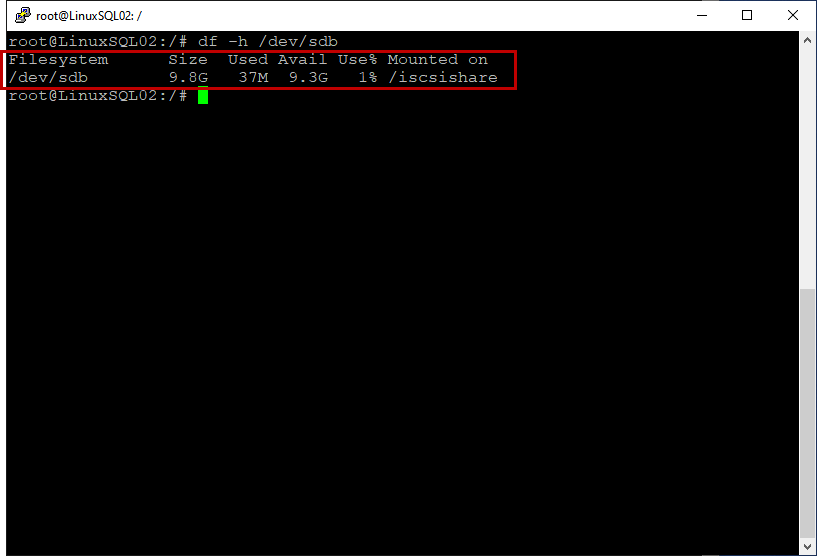
As you can see, the iscsi shared disk is mounted.
Summary
This article explains how we can configure the iSCSI storage on the iSCSI target server and connect it using the iscsi initiator.

He has expertise in database design, performance tuning, backup and recovery, HA and DR setup, database migrations and upgrades. He has completed the B.Tech from Ganpat University. He can be reached on nisargupadhyay87@outlook.com
- Different ways to identify and change compatibility levels in SQL Server - July 22, 2024
- Copy SQL Databases between Windows 10 and CentOS using SQL Server data tools - October 19, 2022
- Changing the location of FILESTREAM data files in SQL Database - October 14, 2022