
In this article, we are going to learn how to copy the SQL database created on different instances of the SQL Server. This article is the fourth article on Manage SQL Server on CentOS topic. In my previous article, Copy SQL Databases between Windows 10 and CentOS using the SQL Server import-export wizard, we learned how to copy data SQL database between windows 10 and CentOS Linux using the wizard.
In this article, we will learn how to copy databases using SQL Server data tools. We will use the Transfer database object task of SSIS to copy all objects of the Stackoverflow2010 database.
Note: if you are transferring the data of the table that is in the secondary filegroup, then you must create that filegroup in the destination database. Similarly, if the table has a partition scheme and partition function, you must create them on the destination database.
Environment setup
I have created a virtual machine on my workstation and installed CentOS Linux. I have installed SQL Server 2019 on Linux on CentOS. The IP Address of the virtual machine is 192.168.1.47. While creating the source database connection, we will use the IP Address instead of the Hostname. I have created an empty database named stackoverflow2010_Linux.
Create SSIS Package to copy data
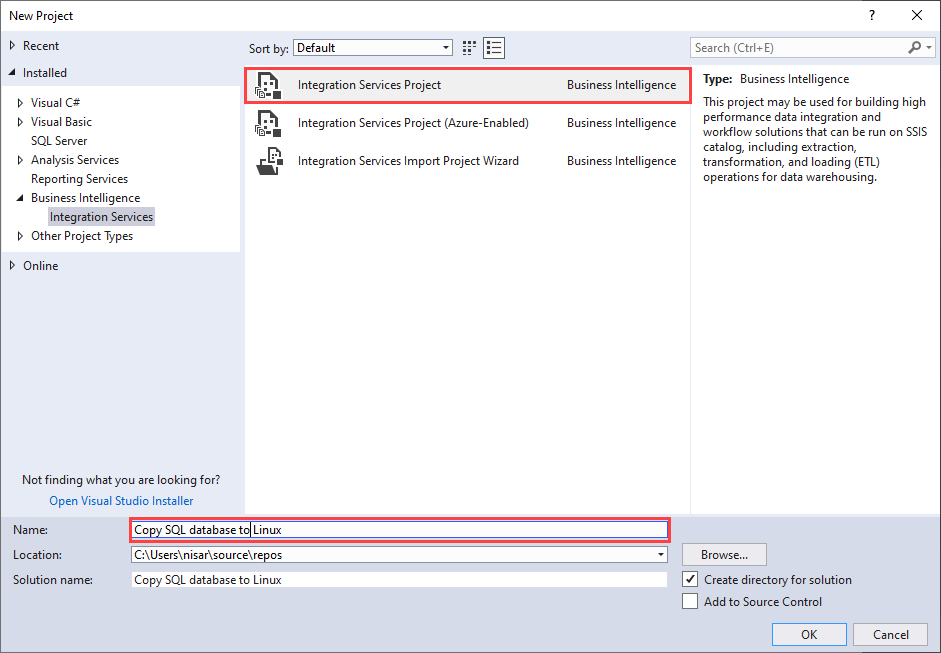
Launch SQL Server data tools and create a new integration service project named Copy database to Linux.
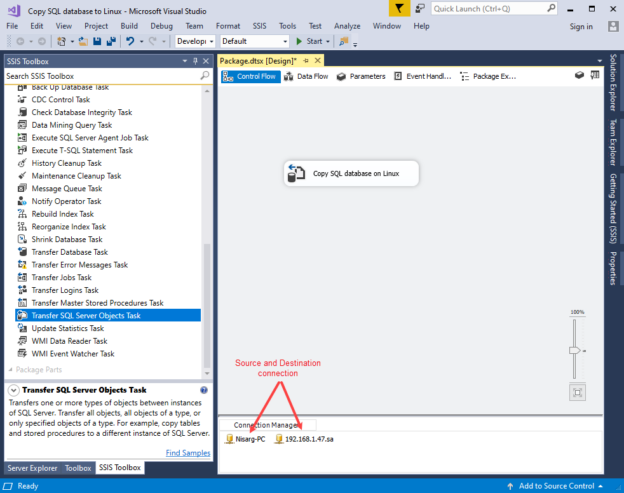
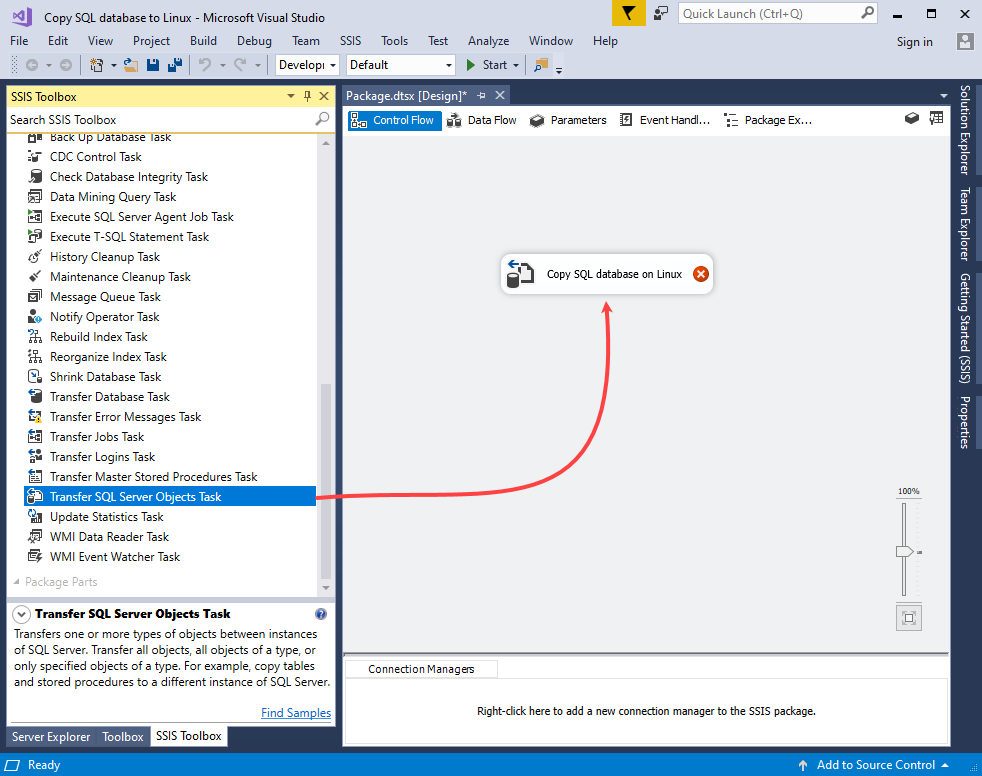
Drag Transfer SQL Server Objects Task from SSIS toolbox and drop it on Control flow designer. Rename it to Copy SQL database on Linux.
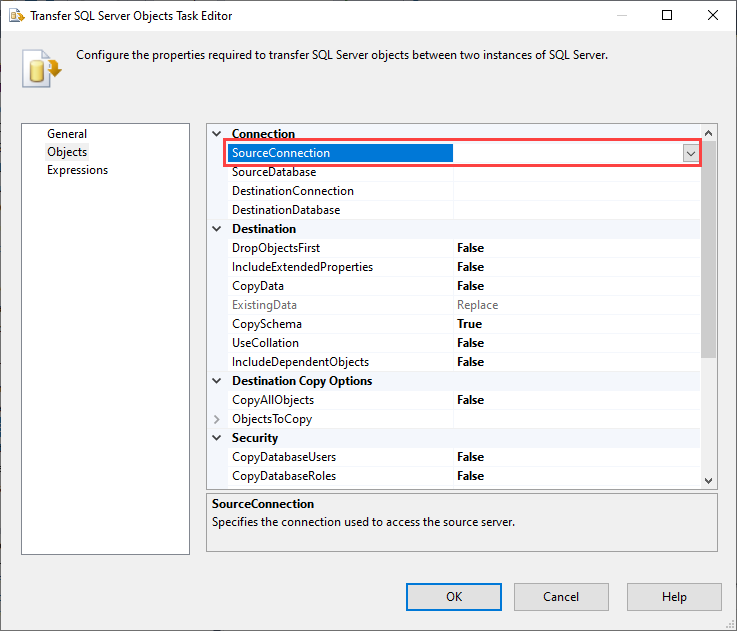
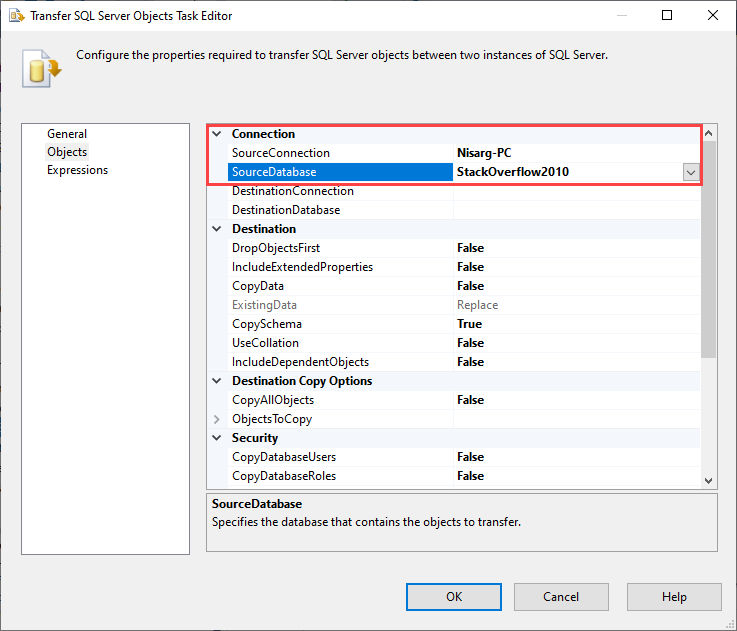
Now, double click on the Copy SQL database on Linux. A dialog box, Transfer SQL Server objects task editor, opens. Click on Objects to configure the Source and Destination connection.
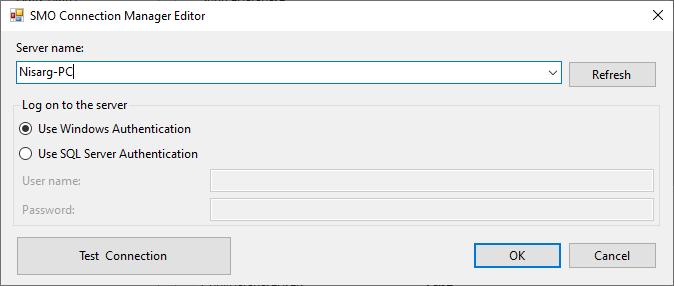
Configure Source connection
Click on SourceConnection and select the new connection.
The SMO Connection Manager opens. Specify the Nisarg-PC in the Server name text box. We are using windows authentication to connect to the SQL Server database engine; therefore, select Use Windows Authentication. Click OK to save the source connection.
Click on SourceDatabase and select Stackoverflow2010 from the list on the Transfer database object task properties.
Now, let us configure the destination connection.
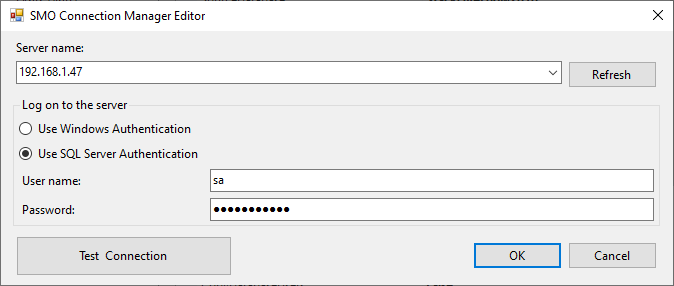
Configure Destination Connection
Click on Destination Connection and select New Connection. On the SMO connection manager, specify the destination server. We are connecting to SQL Server on Linux, therefore enter 192.168.1.47 in Server name textbox. Select Use SQL Server Authentication. Enter sa in a Username textbox and enter the appropriate password of sa in the Password textbox.
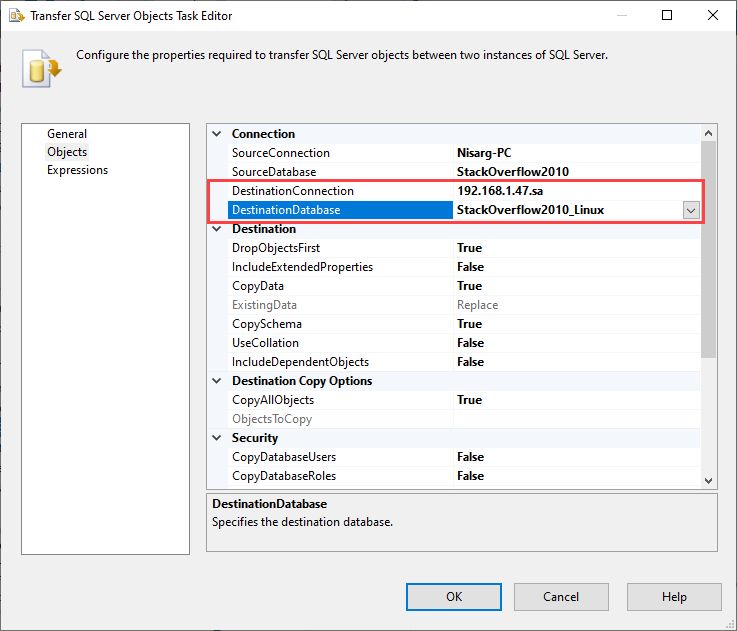
Back to the Transfer database object task, click on Source Database and select Stackoverflow2010_Linux from the Destination database list.
Select the database objects
We are copying all objects along with the data, so configure the Destination section as follows:
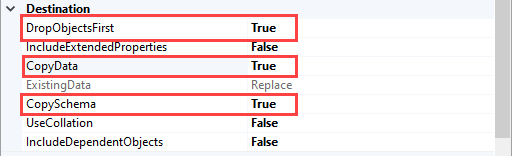
Destination Section
- Drop Objects First: We want to drop and create the tables, so I have set it to TRUE
- Copy Data: We are copying the data, so; I have set it to TRUE
- Copy Schema: We are copying the schema, so; I have set it to TRUE
Destination Copy Options
Copy All Objects: We are copying all objects of the Stackoverflow2010 database, so I have set their value to TRUE.
Security Section
- Copy Database Users: We are transferring the database users, so Set it to TRUE
- Copy Database Roles: We are transferring the database roles, so set it to TRUE
- Copy SQL Server Logins: We are transferring the SQL logins, so set it TRUE
- Copy Object Level permission: Set it to TRUE
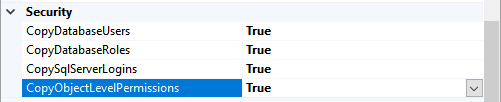
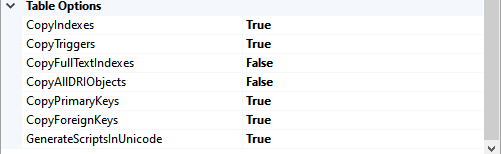
Table Options
- Copy Indexes: We are copying the indexes, so set it to TRUE
- Copy Triggers: We are copying the triggers, so set it to TRUE
- Copy Primary key: We are copying the Primary keys, so set it to TRUE
- Copy Foreign key: We are copying the foreign keys, so set it to TRUE
Click OK to save the configuration and close the dialog box. The SSIS package looks like the following image:

Execute the package
Execute the SSIS package by clicking on the Start button from the menu bar.
![]()
The package execution begins. Once the package executes successfully, we will verify that tables and data have been copied appropriately.
Verify the schema
Now, let us verify whether all objects have been copied to the destination server or not. Open SQL Server Management studio 🡪 Connect to 192.168.1.47. Run following queries. Side by side connect to Nisarg-PC and run the following query to compare the results.
Query to get the list of tables:
|
1 2 3 4 5 6 7 8 9 |
USE stackoverflow2010 go SELECT o.type_desc AS Object_Type, Count(type_desc) [Total Objects] FROM sys. objects o GROUP BY o.type_desc ORDER BY object_type |
Output:
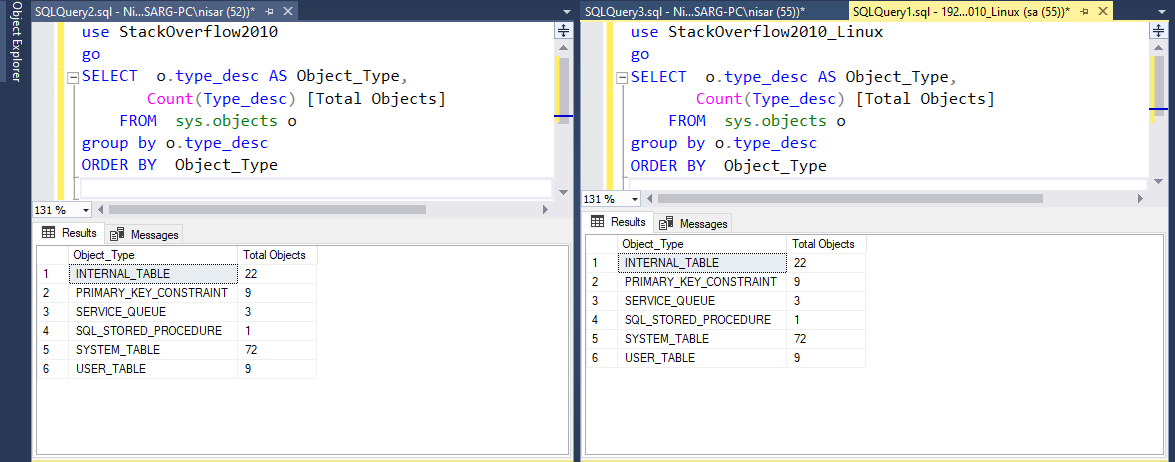
As you can see in the above image, all objects of the SQL database have been copied to SQL Server on Linux (192.168.1.47) instance.
Query to get the Records of all tables
Run the following query on Source (Nisarg-PC) and destination server (192.168.1.47) to verify the objects and data. Side by side connect to Nisarg-PC and run the following query to compare the results.
Query
|
1 2 3 4 5 6 7 8 9 10 11 12 13 14 15 |
USE stackoverflow2010 go SELECT [objects].NAME, [PartitionStats].row_count FROM sys.indexes AS [index] INNER JOIN sys.objects AS [objects] ON [index].object_id = [objects].object_id INNER JOIN sys.dm_db_partition_stats AS [PartitionStats] ON [index].object_id = [PartitionStats].object_id AND [index].index_id = [PartitionStats].index_id WHERE [index].index_id < 2 AND [objects].is_ms_shipped = 0 ORDER BY [objects].NAME |
Output
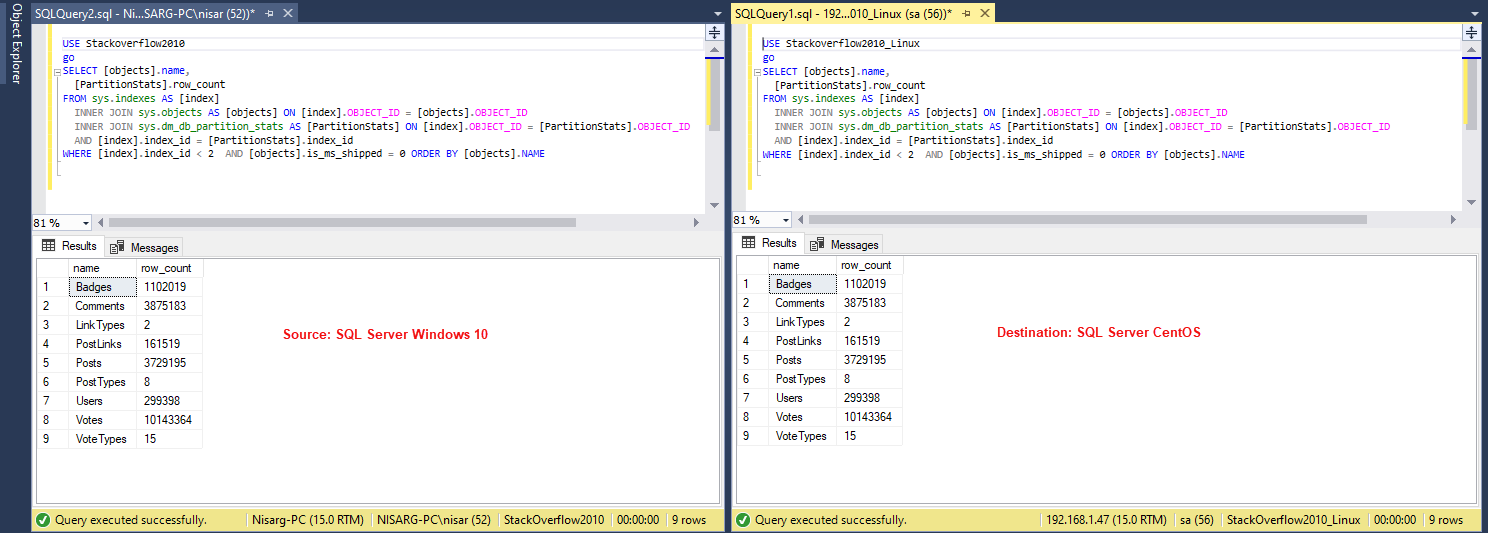
As you can see, the data has been copied successfully.
Summary
This article teaches how to use the Transfer SQL Server object task to copy SQL database from SQL Server on Windows to SQL Server on Linux.

He has expertise in database design, performance tuning, backup and recovery, HA and DR setup, database migrations and upgrades. He has completed the B.Tech from Ganpat University. He can be reached on nisargupadhyay87@outlook.com
- Different ways to identify and change compatibility levels in SQL Server - July 22, 2024
- Copy SQL Databases between Windows 10 and CentOS using SQL Server data tools - October 19, 2022
- Changing the location of FILESTREAM data files in SQL Database - October 14, 2022