

Getting Started
If you’ve never used any of these methods before there are a few prerequisites before you get started. Both modules are far simpler to get started with than the API.- The first step for all 3 methods is to get access to the PowerShell gallery using PowerShellGet. This will be available with PowerShell v5.0, built into Windows 10 & Windows Server 2016. If you don’t already have v5.0 I highly recommend it. Alternatively, the PowerShell Gallery can be used with v3.0 and up & can be downloaded here
- Once you have the PowerShell Gallery installed, it’s as simple as an Install-Module command.
- For MSOnline use Install-Module -Name MSOnline
- For AzureAD use Install-Module -Name AzureAD
- For the Power BI API we need an authentication module. Use Install-Module -Name Microsoft.ADAL.PowerShell
- For the interactive method you will need to reference the ADAL Assemblies. Having worked with the Power BI API in C# I’ve found these assemblies can be stored in different locations depending on how they are installed. For these examples, I’ll refer to where the PowerShell module installs them. Here’s the code excerpt for referencing the assemblies. This will be part of the final scripts detailed later though.
123456789#----------------------------------------# Load Active Directory Authentication Library (ADAL) Assemblies$adal = "${env:ProgramFiles}\WindowsPowerShell\Modules\Microsoft.ADAL.PowerShell\1.12\Microsoft.IdentityModel.Clients.ActiveDirectory.dll"$adalforms = "${env:ProgramFiles}\WindowsPowerShell\Modules\Microsoft.ADAL.PowerShell\1.12\Microsoft.IdentityModel.Clients.ActiveDirectory.WindowsForms.dll"[System.Reflection.Assembly]::LoadFrom($adal)[System.Reflection.Assembly]::LoadFrom($adalforms)#----------------------------------------
- You will also need to setup a Power BI or Azure App. This application is what controls what we can do with the API and we reference it when connecting to Power BI. Go to register a new app or from the Azure Portal. Adam Saxton has produced great documentation on this process.
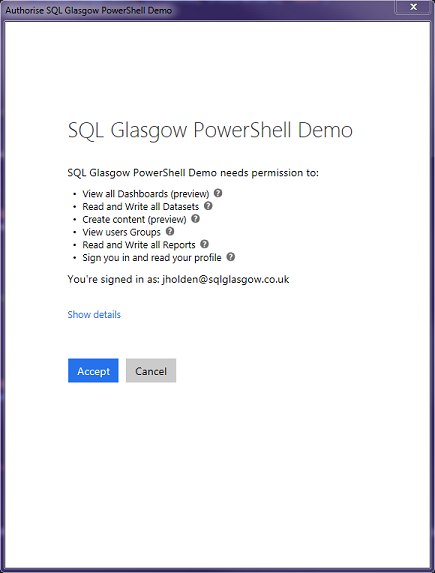
- Name your app appropriately, this will be the name you see when authenticating interactively. The user will be asked if they want to allow <Your app name> access to <do all the options you select>
- App Type is an important option where our choice differs depending on whether we’re using the interactive or unattended authentication methods.
- Interactive – Choose Native App. This only generates a ClientID. You then need to set the Redirect URL to urn:ietf:wg:oauth:2.0:oob
- Unattended – Choose Server-side Web App. This will generate a ClientID & Client Secret. As this method is intended for app use you will see an option for both a Redirect URL and a Home Page URL. You can set these to anything as we won’t need them as part of our connection.
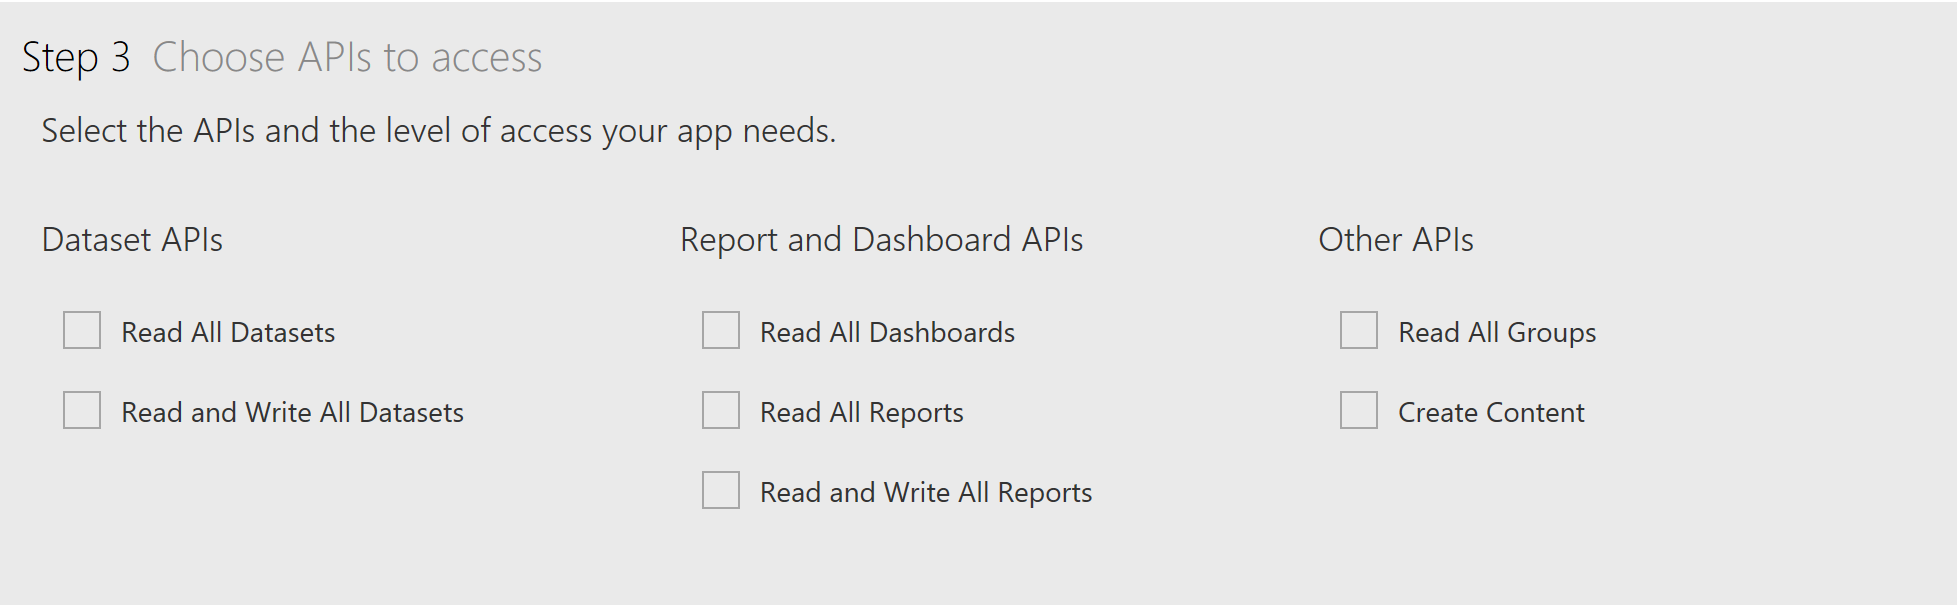
- Depending on your requirements, select the appropriate APIs you want the app to access

- Complete the process by selecting Register App and make a note of the ClientID (& Client Secret if creating an unattended authentication app)
Power BI Licensing
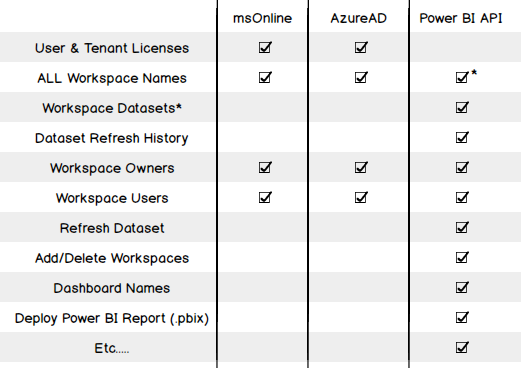
The first example I want to present is the simplest and is a good demonstration of the differences between the Azure PowerShell modules. As detailed earlier, this information cannot be found using the API. The first example is using the MSOnline module, the second uses AzureAD. Both return the same data but you can see they go about it a different way. This is likely due to the expanded functionality with v2 (AzureAD) meaning the module had to be restructured. Authentication As you can see in both code examples, I’m using a stored password in an encrypted text file. I find this a good method to execute PowerShell scripts that require authentication, unattended as only the user who encrypted the file can decrypt & use the credentials. Encryption:|
1 2 3 4 5 6 7 8 |
#---------------------------------------- #Working folder $folder = "D:\PowerShell_in_PowerBI\" #Password prep $file = $folder + "user_cred.txt" #Read-Host -Prompt "Please enter Password for user" -AsSecureString | ConvertFrom-SecureString | Out-File $file #---------------------------------------- |
|
1 2 3 4 5 6 7 |
#---------------------------------------- cls $adminName = "user@domain.co.uk" $Pass = Get-Content $file | ConvertTo-SecureString $Cred = new-object -typename System.Management.Automation.PSCredential -argumentlist $AdminName, $Pass #---------------------------------------- |
|
1 2 3 4 5 6 7 8 9 10 11 12 13 14 15 16 17 18 19 20 21 22 23 24 25 26 27 28 29 30 31 32 33 34 35 |
#---------------------------------------- # Author: Craig Porteous # Date: 13/03/2017 # #---------------------------------------- # Prerequisites # > Install-Module -Name MSOnline # #---------------------------------------- #Working folder $folder = "D:\PowerShell_in_PowerBI\" #Password prep $file = $folder + "user_cred.txt" #Read-Host -Prompt "Please enter Password for user" -AsSecureString | ConvertFrom-SecureString | Out-File $file #---------------------------------------- cls $adminName = "user@domain.co.uk" $Pass = Get-Content $file | ConvertTo-SecureString $Cred = new-object -typename System.Management.Automation.PSCredential -argumentlist $AdminName, $Pass #---------------------------------------- #Connect to Azure Connect-MsolService -Credential $cred #Let’s see tenant license summary (all licensing) Get-MsolAccountSku #Let’s see this for each user #------------------------------------------------------------------------------- $PBIUsers = Get-MsolUser -All | ?{$_.isLicensed-eq "TRUE" -and ($_.Licenses | ?{$_.AccountSkuId -like '*POWER_BI_PRO*' -or $_.AccountSkuId -like '*POWER_BI_STANDARD*'}).Length -gt 0} | Select DisplayName, SignInName, @{n="Licenses Type";e={$_.Licenses.AccountSKUid}} $PBIUsers | Export-CSV ($folder + "PowerBILicenses.csv") -NoTypeInformation $PBIUsers #------------------------------------------------------------------------------- |
|
1 2 3 4 5 6 7 8 9 10 11 12 13 14 15 16 17 18 19 20 21 22 23 24 25 26 27 28 29 30 31 32 33 34 35 36 37 38 39 40 41 |
#---------------------------------------- # Author: Craig Porteous # Date: 13/03/2017 # #---------------------------------------- # Prerequisites # > Install-Module -Name AzureAD # #---------------------------------------- #Working folder $folder = "D:\PowerShell_in_PowerBI\" #Password prep $file = $folder + "user_cred.txt" #Read-Host -Prompt "Please enter Password for user" -AsSecureString | ConvertFrom-SecureString | Out-File $file #---------------------------------------- cls $adminName = "user@domain.co.uk" $Pass = Get-Content $file | ConvertTo-SecureString $Cred = new-object -typename System.Management.Automation.PSCredential -argumentlist $AdminName, $Pass #---------------------------------------- #Connect to Azure Connect-AzureAD -Credential $cred #------------------------------------------------------------------------------- #Collect license info $PBILicenses = Get-AzureADSubscribedSku #| ?{$_.SkuPartNumber -like '*POWER_BI*' -and $_.CapabilityStatus -eq "Enabled"} | SELECT SkuPartNumber, ConsumedUnits, SkuId #Return global license count $PBILicenses | SELECT SkuPartNumber, ConsumedUnits, @{n="ActiveUnits";e={$_.PrepaidUnits.Enabled}} #Let’s see it for each user #------------------------------------------------------------------------------- #Loop through each license and list all users foreach($license in $PBILicenses) { $PBIUsers = Get-AzureADUser -All 1 | ?{($_.AssignedLicenses | ?{$_.SkuId -eq $license.SkuId})} | SELECT DisplayName, UserPrincipalName, @{l="License";e={$license.SkuPartNumber}} } $PBIUsers | Export-CSV ($folder + "PowerBILicenses.csv") -NoTypeInformation $PBIUsers #------------------------------------------------------------------------------- |
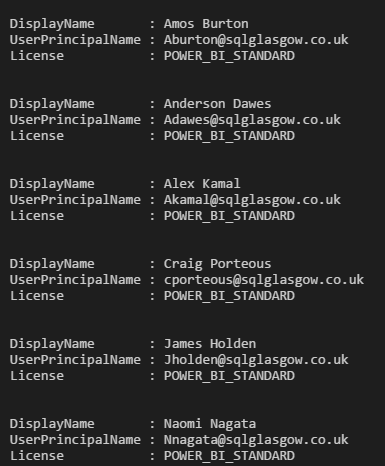
 User Power BI Licenses:
Other Module Examples
Retrieving workspaces & their members/admins is a little more of a gray area with the Azure modules. Azure treats Power BI Workspaces as “groups”. Azure AD Distribution groups are also “groups” meaning there’s no clear distinction with these commands. If you are lucky enough to not have any distribution groups in AAD or they’re copied from your on-premises AD then these examples will work well for you & you can now see all workspaces created by anyone in your tenant, even workspaces you do not have access to. Note the use of $_.SecurityEnabled -eq $false and $_.OnPremisesSecurityIdentifier -eq $null to exclude AAD security groups and those copied over from on-premises AD. All AD Groups|
1 2 3 4 5 6 7 8 9 10 |
foreach($AADGroup in(Get-AzureADGroup -All 1 | ?{$_.SecurityEnabled -eq $false -and $_.OnPremisesSecurityIdentifier -eq $null} | SELECT DisplayName, ObjectID, Description)) { $AADGroups += New-Object PsObject -Property @{ "DisplayName"="$($AADGroup.DisplayName)"; "ObjectID"="$($AADGroup.ObjectID)"; "Description"="$($AADGroup.Description)"; } } $AADGroups |
|
1 2 3 4 5 6 7 8 9 10 11 12 13 14 15 16 17 18 19 20 21 22 23 24 25 26 27 28 29 30 31 32 33 |
#Retrieve all groups foreach($AADGroup in(Get-AzureADGroup -All 1 | ?{$_.SecurityEnabled -eq $false -and $_.OnPremisesSecurityIdentifier -eq $null})) { $OwnerInfo = Get-AzureADGroupOwner -ObjectId $AADGroup.ObjectId $UserInfo = Get-AzureADGroupMember -ObjectId $AADGroup.ObjectId #Add member records for each group foreach($user in $UserInfo) { $PBIMembers += New-Object PsObject -Property @{ "GroupName"="$($AADGroup.DisplayName)"; "GroupGUID"="$($AADGroup.ObjectID)"; "GroupDesc"="$($AADGroup.Description)"; "UserName"="$($user.DisplayName)"; "UserGUID"="$($user.ObjectID)"; "UserEmail"="$($user.UserPrincipalName)"; "UserType"="$($user.UserType)"; } } #Add Owner records for each group foreach($user in $OwnerInfo) { $PBIMembers += New-Object PsObject -Property @{ "GroupName"="$($AADGroup.DisplayName)"; "GroupGUID"="$($AADGroup.ObjectID)"; "GroupDesc"="$($AADGroup.Description)"; "UserName"="$($user.DisplayName)"; "UserGUID"="$($user.ObjectID)"; "UserEmail"="$($user.UserPrincipalName)"; "UserType"="Owner"; } } } |
The Power BI API
Interactive authentication Assuming you have your App set up & have a ClientID let’s take a look at getting some information out the Power BI API. Starting simple, we want to see all Workspaces (that my user has access to), all of their datasets & the last refresh information for each dataset.|
1 2 3 4 5 6 7 8 9 10 11 12 13 14 15 16 17 18 19 20 21 22 23 24 25 26 27 28 29 30 31 32 33 34 35 36 37 38 39 40 41 42 43 44 45 46 47 48 49 50 51 52 53 54 55 56 57 58 59 60 61 62 63 64 65 66 67 68 69 70 71 72 73 74 75 76 |
#---------------------------------------- # Author: Craig Porteous # Date: 16/08/2017 # #---------------------------------------- # Prerequisites # > Install-Module -Name Microsoft.ADAL.PowerShell #---------------------------------------- # ClientID from App created under sqlglasgow.co.uk domain $clientId = "8261e06b-fe89-ZZZZ-ZZZZ-f85a700617c6" # End Parameters ======================================= # Calls the Active Directory Authentication Library (ADAL) to authenticate against AAD function GetAuthToken { $adal = "${env:ProgramFiles}\WindowsPowerShell\Modules\Microsoft.ADAL.PowerShell\1.12\Microsoft.IdentityModel.Clients.ActiveDirectory.dll" $adalforms = "${env:ProgramFiles}\WindowsPowerShell\Modules\Microsoft.ADAL.PowerShell\1.12\Microsoft.IdentityModel.Clients.ActiveDirectory.WindowsForms.dll" [System.Reflection.Assembly]::LoadFrom($adal) | Out-Null [System.Reflection.Assembly]::LoadFrom($adalforms) | Out-Null $redirectUri = "urn:ietf:wg:oauth:2.0:oob" $resourceAppIdURI = "https://analysis.windows.net/powerbi/api" $authority = "https://login.windows.net/common/oauth2/authorize"; $authContext = New-Object "Microsoft.IdentityModel.Clients.ActiveDirectory.AuthenticationContext" -ArgumentList $authority $authResult = $authContext.AcquireToken($resourceAppIdURI, $clientId, $redirectUri, "Auto") return $authResult } # Get the auth token from AAD $token = GetAuthToken # Building Rest API header with authorization token $authHeader = @{ 'Content-Type'='application/json' 'Authorization'=$token.CreateAuthorizationHeader() } #Let’s get all Groups $uri = "https://api.powerbi.com/v1.0/myorg/groups" $groups = Invoke-RestMethod -Uri $uri -Headers $authHeader -Method GET -Verbose $groups.value #Declare final Array $PBIDatasets = @() #Loop through Group info & add to new array foreach($group in $groups.value) { $groupID = $group.id $uri = "https://api.powerbi.com/v1.0/myorg/groups/$groupID/datasets" $datasets = Invoke-RestMethod -Uri $uri -Headers $authHeader -Method GET -Verbose foreach($dataset in $datasets.value) { $datasetID = $dataset.id $uri2 = "https://api.powerbi.com/v1.0/myorg/groups/$groupID/datasets/$datasetID/refreshes" $refreshes = Invoke-RestMethod -Uri $uri2 -Headers $authHeader -Method GET -Verbose $PBIDatasets += New-Object PsObject -Property @{ "GroupName"="$($group.name)"; "GroupID"="$($group.id)"; "DatasetName"="$($dataset.name)"; "DatasetID"="$($dataset.id)"; "DatasetOwner"="$($dataset.configuredBy)"; "LastRefreshType"="$($refreshes.value[0].refreshType)"; "LastRefreshStart"="$($refreshes.value[0].startTime)"; "LastRefreshEnd"="$($refreshes.value[0].endTime)"; "LastRefreshStatus"="$($refreshes.value[0].status)"; } } $datasets = $null } $PBIDatasets |
 Once you’ve authenticated you will see the API calls in the output window followed by the data you requested.
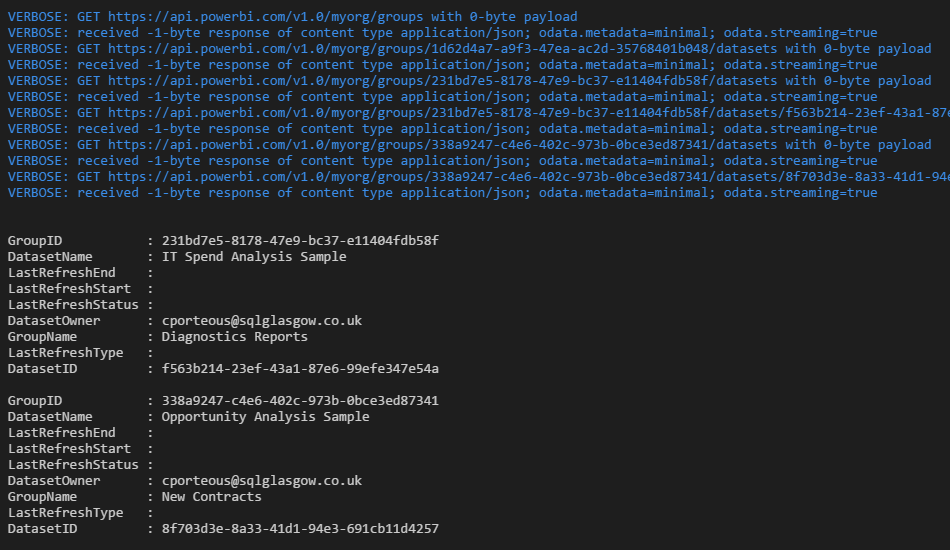 My example datasets aren’t great as I have no data refreshes but you get the idea.
Unattended Authentication
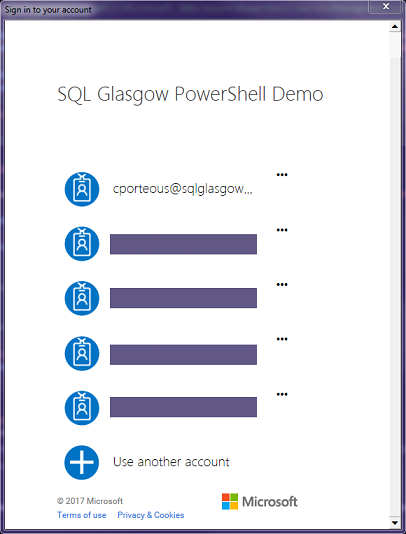
For this method to work, you will need your ClientID & Client Secret generated by the Server-side Web App you created. You will also need your tenantID which you can get, as I described earlier, from the AzureAD auth output summary or from the Azure Portal:
My example datasets aren’t great as I have no data refreshes but you get the idea.
Unattended Authentication
For this method to work, you will need your ClientID & Client Secret generated by the Server-side Web App you created. You will also need your tenantID which you can get, as I described earlier, from the AzureAD auth output summary or from the Azure Portal:
- To find your Office 365 tenant ID in the Azure AD portal
- Log in to Microsoft Azure as an administrator.
- In the Microsoft Azure portal, click Azure Active Directory.
- Under Manage, click Properties. The tenant ID is shown in the Directory ID box.
|
1 2 3 4 5 6 7 8 9 10 11 12 13 14 15 16 17 18 19 20 21 22 23 24 25 26 27 28 29 30 31 32 33 34 35 36 37 38 39 40 41 42 43 44 45 46 47 48 49 50 51 52 53 54 55 56 57 58 59 60 61 62 63 64 65 66 67 68 69 70 71 72 73 74 75 76 77 78 79 80 81 82 83 84 85 86 87 88 89 90 91 92 93 94 95 96 97 98 99 100 101 102 103 104 105 106 |
#---------------------------------------- # Author: Craig Porteous # Date: 11/08/2017 # Connection to Power BI REST API. #---------------------------------------- # Prerequisites # > Install-Module -Name Microsoft.ADAL.PowerShell # #---------------------------------------- #Working folder $folder = "D:\PowerShell_in_PowerBI\" #Password prep $file = $folder + "user_cred.txt" #Read-Host -Prompt "Please enter Password for user" -AsSecureString | ConvertFrom-SecureString | Out-File $file # #---------------------------------------- # Load Active Directory Authentication Library (ADAL) Assemblies #$adal = "${env:ProgramFiles(x86)}\Microsoft SDKs\Azure\PowerShell\ServiceManagement\Azure\Services\Microsoft.IdentityModel.Clients.ActiveDirectory.dll" #$adalforms = "${env:ProgramFiles(x86)}\Microsoft SDKs\Azure\PowerShell\ServiceManagement\Azure\Services\Microsoft.IdentityModel.Clients.ActiveDirectory.WindowsForms.dll" #Alternate folder location $adal = "${env:ProgramFiles}\WindowsPowerShell\Modules\Microsoft.ADAL.PowerShell\1.12\Microsoft.IdentityModel.Clients.ActiveDirectory.dll" $adalforms = "${env:ProgramFiles}\WindowsPowerShell\Modules\Microsoft.ADAL.PowerShell\1.12\Microsoft.IdentityModel.Clients.ActiveDirectory.WindowsForms.dll" [System.Reflection.Assembly]::LoadFrom($adal) [System.Reflection.Assembly]::LoadFrom($adalforms) #---------------------------------------- # To find your Office 365 tenant ID in the Azure AD portal # - Log in to Microsoft Azure as an administrator. # - In the Microsoft Azure portal, click Azure Active Directory. # - Under Manage, click Properties. The tenant ID is shown in the Directory ID box. $tenantID = "fb57d3b7-8251-ZZZZ-ZZZZ-b20295ccca11" $pbiAuthorityUrl = "https://login.windows.net/$tenantID/oauth2/token" $pbiResourceUrl = "https://analysis.windows.net/powerbi/api" #---------------------------------------- # Client ID & Client Secret $clientId = "ac8c31af-ffda-ZZZZ-ZZZZ-602ed03332f2" $client_secret = "DrMcfCLNqXZFWDZPZZZZZZZZXz3/jAO8QaH38AvMZVg=" $adminName = "cporteous@sqlglasgow.co.uk" #Retrieve password from secure string file $Pass = Get-Content $file | ConvertTo-SecureString #Convert back to plain text $BSTR = [System.Runtime.InteropServices.Marshal]::SecureStringToBSTR($Pass) $UnsecurePassword = [System.Runtime.InteropServices.Marshal]::PtrToStringAuto($BSTR) # Authenticate to Azure/PBI------------------------------------- $authBody = @{ 'resource'=$pbiResourceUrl 'client_id'=$clientId 'grant_type'="password" 'username'=$adminName 'password'= $UnsecurePassword 'scope'="openid" 'client_secret'=$client_secret } #NOTE: First use of an "App" needs to be granted permission like in the interactive login method!! # or granted from Azure Portal (-> go to Azure Active Directory -> App Registrations -> find your app -> Required Permissions -> Grant Permissions.) #Auth to API to get Token $auth = Invoke-RestMethod -Uri $pbiAuthorityUrl -Body $authBody -Method POST -Verbose #Clear password variable $UnsecurePassword = '' #----------------------------------------------------------- # Building Rest API header with authorization token $authHeader = @{ 'Content-Type'='application/json' 'Authorization'='Bearer ' + $auth.access_token } #Let’s get all Groups $uri = "https://api.powerbi.com/v1.0/myorg/groups" $groups = Invoke-RestMethod -Uri $uri -Headers $authHeader -Method GET -Verbose #Declare final Array $PBIDatasets = @() #Loop through Group info & add to new array foreach($group in $groups.value) { $groupID = $group.id $uri = "https://api.powerbi.com/v1.0/myorg/groups/$groupID/datasets" $datasets = Invoke-RestMethod -Uri $uri -Headers $authHeader -Method GET -Verbose foreach($dataset in $datasets.value) { $datasetID = $dataset.id $uri2 = "https://api.powerbi.com/v1.0/myorg/groups/$groupID/datasets/$datasetID/refreshes" $refreshes = Invoke-RestMethod -Uri $uri2 -Headers $authHeader -Method GET -Verbose $PBIDatasets += New-Object PsObject -Property @{ "GroupName"="$($group.name)"; "GroupID"="$($group.id)"; "DatasetName"="$($dataset.name)"; "DatasetID"="$($dataset.id)"; "DatasetOwner"="$($dataset.configuredBy)"; "LastRefreshType"="$($refreshes.value[0].refreshType)"; "LastRefreshStart"="$($refreshes.value[0].startTime)"; "LastRefreshEnd"="$($refreshes.value[0].endTime)"; "LastRefreshStatus"="$($refreshes.value[0].status)"; } } $datasets = $null } $PBIDatasets |
 You can, however; also grant permissions from the Azure Portal if you have no way to interactively login with this app.
- Go to Azure Active Directory -> App Registrations -> find your app -> Required Permissions -> Grant Permissions.
Other API Examples
Here are some other examples of API calls. You will find a list of all its capabilities in the API Reference with some example calls & C# code too.|
1 2 3 4 5 6 7 8 9 10 11 12 13 14 15 16 17 18 19 20 21 22 23 24 25 26 27 28 29 30 31 32 33 34 35 36 37 38 |
#---------------------------------------- # EXAMPLE COMMANDS #---------------------------------------- # Testing variables $groupID = "" # the ID of the group that hosts the dataset. Use "me" if this is your My Workspace $datasetID = "" # the ID of the dataset that hosts the dataset #---------------------------------------- #Let’s get all Groups $uri = "https://api.powerbi.com/v1.0/myorg/groups" Invoke-RestMethod -Uri $uri -Headers $authHeader -Method GET -Verbose #---------------------------------------- # List all users for a group $uri = "https://api.powerbi.com/v1.0/myorg/groups/$groupID/users" Invoke-RestMethod -Uri $uri -Headers $authHeader -Method GET -Verbose #---------------------------------------- # Add user to group $user = "user@domain.com" $uri = "https://api.powerbi.com/v1.0/myorg/groups/$groupID/users" $body = @{ 'groupUserAccessRight'='Member' 'emailAddress'= $user } Invoke-RestMethod -Uri $uri -Headers $authHeader -Body $body -Method POST -Verbose #---------------------------------------- # List all users for a group $user = "user@domain.com" $uri = "https://api.powerbi.com/v1.0/myorg/groups/$groupID/users/$user" Invoke-RestMethod -Uri $uri -Headers $authHeader -Method DELETE -Verbose #---------------------------------------- # Check the refresh history $uri = "https://api.powerbi.com/v1.0/myorg/groups/$groupID/datasets/$datasetID/refreshes" Invoke-RestMethod -Uri $uri -Headers $authHeader -Method GET -Verbose #---------------------------------------- # Refresh the dataset $uri = "https://api.powerbi.com/v1.0/myorg/groups/$groupID/datasets/$datasetID/refreshes" Invoke-RestMethod -Uri $uri -Headers $authHeader -Method POST -Verbose #---------------------------------------- |
Downloads
- PowerBI_API_Datasets
- PowerBI_API_Datasets_Unattend
- PowerBI_Licenses_AzureAD
- PowerBI_Licenses_msOnline
References
- PowerShellGet reference
- PowerShell Gallery
- MSOnline module documentation
- AzureAD module documentation
- Power BI REST API reference
- Power BI App Registration
- Power BI App Documentation
- Azure Portal
- Craig Porteous’ blog


Craig is a Microsoft certified BI Developer & Administrator and has worked with the Microsoft SQL stack for over 8 years. From working with cloud technologies like AWS & PowerBI to managing enterprise level Projects & deployments, Craig is passionate about developing his skills. He enjoys contributing to a personal blog to give back to the SQL community. In his spare time Craig is an avid runner
View all posts by Craig Porteous
View all posts by Craig Porteous
Latest posts by Craig Porteous (see all)
- How to secure Reporting Services with Group Managed Service Accounts (GMSA) - November 7, 2018
- Contribute, contribute, contribute! - June 20, 2018
- Top 10 things you must document in SQL Server Reporting Services (SSRS) - February 26, 2018