
In this article we will review migration from disk-based tables to in-memory optimized tables. This article assumes that you already understand the pros and cons about In-Memory Technology, for more articles about this, please refer here.
There are some options available on SQL Server 2014 and SQL Server 2016 that will help you to identity, discover and track the tables and stored procedures that can be good candidates to be ported to memory. Furthermore it’s possible to check if the table meets to all the pre-requisites established. Here is the list of the features that we will take a look into.
SQL Server 2014
- Memory Optimization Advisor (Tables)
- Native Compilation Advisor (Stored Procedure)
- Memory Usage By Memory Optimized Objects
SQL Server 2016
- Data Collector [Transaction Performance Analysis Overview Report]
- Generate In-Memory OLTP Migration CheckLists on GUI & PowerShell
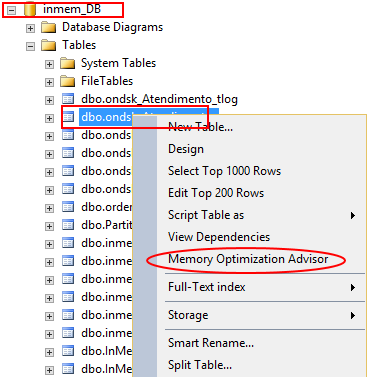
Memory Optimization Advisor
The main objective of this feature is to show if the pre-requisites will be met before attempting to put the table in memory. This can be useful if you already know the client environment and have an idea of the most pertinent and interesting tables that the application needs to use to deliver a fast response to the end-user. To check if the table is applicable go to in-memory select the table under the database that you want and go to the Memory Optimization Advisor
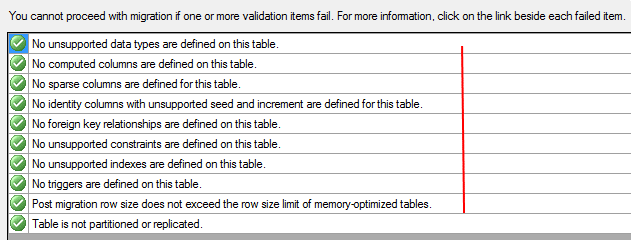
The process will pass for all verifications to know if the table selected is ready to be ported. If you encounter any issue during this process a link will be showed to you, this will give you the right direction for the changes that you might want to make to make the table eligible for the process.

In this case we received a warning message about a view that is being referenced by the table that we want to migrate. There is no problem at this stage because it’s just a warning statement but we need to have in mind that if we change the table name that view will no longer be referenced by the correct table which means that the code inside of the view must change to reflect the modification that was made.
On the next step, we will see that SQL Server will recognize that you already have the Memory Optimized filegroup and the path that he needs to have to record the new in-memory table that will be available on the end of the process.
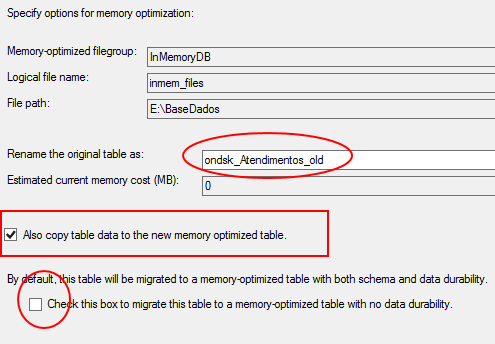
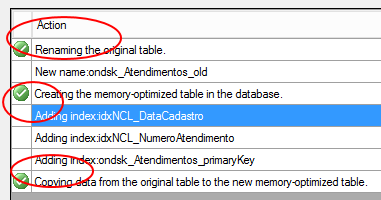
Note that the interface already renamed the actual disk table (ondsk_Atendimentos) and put on the end of his name the suffix _old. The reason for this is to facilitate the migration process by letting the name of the new In-Memory Table be the same as previous, this way the application will not be impacted and the code will not be need to be refactored to maintain compatibility.
Please remember to mark the checkbox “Also Copy Table Data to the New Optimized Table” as this will migrate all the data that is on the disk table to the in-memory table transparently for you.
There is another checkbox that can be marked “Check this box to migrate this table to a memory-optimized table with no data durability.” This checkbox exists because there are 2 types of tables available when we’re going to the memory-optimized objects.
- Schema and Data
- This is the main and most used normally. By selecting the Schema and Data option all the data will reside in memory but will be persisted on disk, this will guarantee the ACID. By default, the interface uses this one, but if you select the checkbox the type of the data will be changed for Schema Only instead.
- Schema Only
- Basically this options will not persist the data on disk which means that in a restart or undesirable unavailability of the SQL Server process only the metadata will remain on the table.
More about on this link – In-Memory OLTP Series – Table Creation & Types
Normally this checkbox is selected when we are intending to work with transient data, for i.e. a one-time migration from your source system to a temporary or stage place. But in normal cases we don’t use the Schema_Only option because working in real time business scenarios is necessary to keep all the transactions saved and persisted on disk all the time.
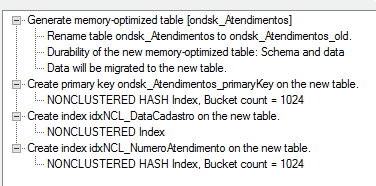
Now on the Review Primary Key Conversion it’s time to select the type of index that you want to use on the Primary Key column. There are two options available for this.
- NonClustered Hash Index (Hash Index)
- NonClustered Index (Range Index)
The focus of this article is to show the easy steps migration to go to memory-optimized tables, to understand more about the Indexes Types available on the In-Memory please refer to this link – In-Memory OLTP – Three key points to entertain your watchdog – Bucket Count
Normally, the most used for Primary Keys is the Hash Index, and the main purpose is because hash values are great for equality searches and on the most of the cases we do Index Seek on the primary key instead of an Index Scan turning the hash search more useful here.

As a last step we must set the appropriate Bucket Count on the Hash Index. As explained on the previous link, the bucket size needs to be set properly otherwise it can significantly impact the workload performance as well the recovery time process of the database. Normally the BUCKET_COUNT should be between 1 and 2 times the number of distinct values on the index key.
Detailed information can be found here – Determining the Correct Bucket Count for Hash Indexes
As final step you will be directed to the summary page called as Verify Migration Actions to visualize and approve the modifications that you made, click in Migrate. Also if you want you be able to generate the scripts of all the process by clicking on Script at the bottom button.
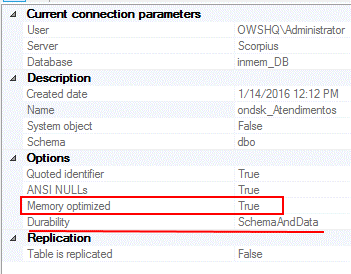
To double check if the tables was migrated to memory, right click on the table, that in this case is – dbo.ondsk_atendimentos and go to properties.
Native Compilation Advisor
The Native Compilation Advisor is another Wizard that will guide you through the steps to migrate the Stored Procedure to the new Native Stored Procedure. The process will scan all the Stored Procedure and check if the particular code is able to be transposed to the Native Compiled Stored Procedure.
By selecting the Native Compilation Advisor on the Programmability folder the process will pass through all the requirements and mandatory steps to check the T-SQL code inside of the SP.
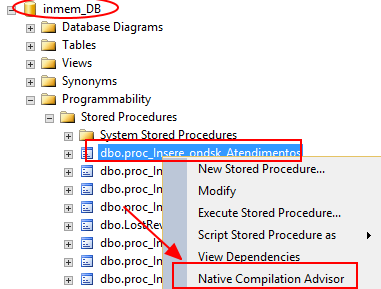
The SP – dbo.proc_Insere_ondsk_Atendimentos has passed on all the verification step process as you can see below.

But changing the SP and using the – dbo.proc_InsertDskTB_ShoppingCart we can see that now an error was capture.

You can find the error by clicking on the Unsupported Transact-SQL Elements to be able to see the error message. Now you can open the procedure and fix the code and run again the process.

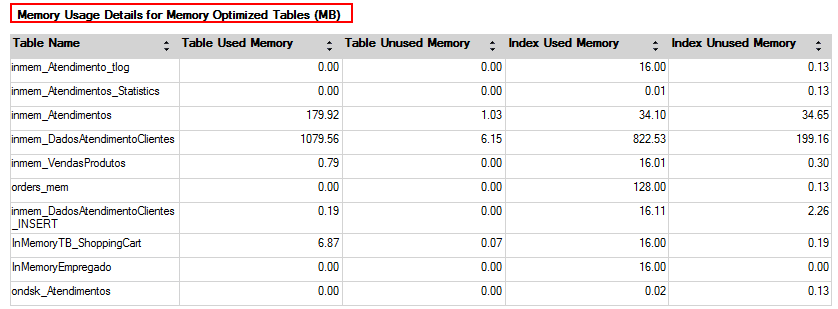
Memory Usage By Memory Optimized Objects
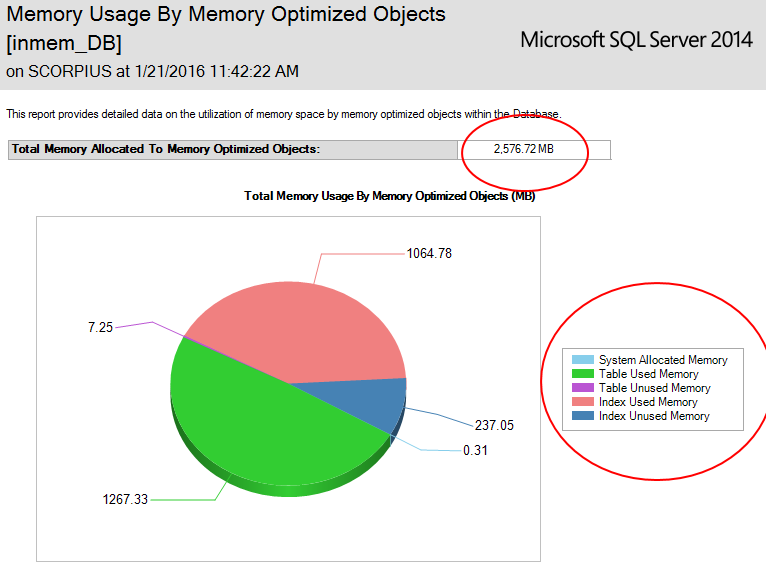
Once you ported the most important tables to memory you can use a new SSMS Standard Report called – Memory Usage By Memory Optimized Objects to visualize the amount of memory used as well information about the tables by itself.
To enter on the report, first go under the database configured to have the memory-optimized tables, right click Reports – Standard Reports.
At this portion of the report you can visualize the amount of used memory for the memory-optimized objects, off course that underneath this there is a dynamic management view taking place and showing these results.
Have in mind that more tables and SPs in memory you have, the more the recovery time objective (RTO) will be affected because once you Start/Restart SQL Server on the server, the first process that will be triggered will be the memory-optimized objects because they need to be loaded into memory and the first pre-requisite is to have the necessary memory to load these objects.
Those are the Memory-Optimized Process that will be launched prior on SQL Server. (Detailed information about this process can be found here.)
- Recovery Process Phase
- Redo Phase
- Undo Phase
The last part of the report shows to you the amount of some aspects i.e. Table Used Memory, Table Unused Memory, Index Used Memory, Index Unused Memory.
Conclusion
At this stage we dug into all the possibilities inside of SQL Server 2014, in order to facilitate the migration process to the memory-optimized objects. In the next article of this series I will bring up the new enhancements about migration process on SQL Server 2016.

Luan Moreno credits his ability to solve problems to thinking critically before acting. He values working with a team because he and his clients can benefit from various perspectives and collaboration, particularly when faced with difficult issues.
When Luan Moreno first became interested in technology, he didn’t have a mentor, so he made a commitment to teaching others in the community and sharing his knowledge through blogging, speaking engagements
View all posts by Luan Moreno
- In-Memory OLTP Series – Data migration guideline process on SQL Server 2016 - January 29, 2016
- In-Memory OLTP Series – Data migration guideline process on SQL Server 2014 - January 28, 2016
- In-Memory OLTP Series – Table Creation & Types - March 13, 2015