
A couple of years ago, Microsoft announced that SQL Server would be available on Open Source (Linux). In this article, we will go through the installation of Microsoft SQL Server on Linux (Ubuntu) and each step in detail.
SQL Server is currently supported on Red Hat Enterprise Server, SUSE Linux Enterprise Server, and Ubuntu. It does not support older than 16.04 Ubuntu version.
For windows user, it’s not easy to install and configure the SQL Server in Linux Operating system. In windows, a person can easily install and configure the features as required by Microsoft setup. But in Linux, we need to take care of certain things at the Operating System level and it needs to be monitored in the process of installation and configuration.
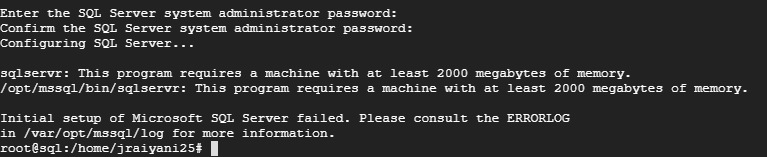
To install the SQL Server in Google Cloud, I launched Ubuntu 16.04 Instance with the name of “sql”. SQL Server must require 2000MB RAM to be installed in Linux, so make sure you have configured Ubuntu Instance with mandatory RAM allocation. Otherwise, on the error you need to reconfigure the Cloud Instance and it must require Reboot.
There are two components to be installed in the Ubuntu machine in terms of Package from Microsoft Repository to get installed SQL Server on Linux:
- Microsoft SQL Server
- Microsoft SQL Server Command Tools (SQL CMD)
As pre-step of the installation, if the logged-in user does not have service control access or sudo permission then the user needs to switch as root user in Ubuntu 16.04 Terminal.
Using the below command, the user can switch to root account.
Sudo su
If you didn’t set the password for the root user and new to Linux or installing on the new instance on cloud, then reset the new password for a root account with the help of the below command.
sudo passwd root
Step 1
After switching to root, download the SQL Server Repository in your instance.
Microsoft maintains package repositories for installing SQL Server and supports installation via native package managers of Linux such as yum, zypper, and apt.
wget -qO- https://packages.microsoft.com/keys/microsoft.asc | sudo apt-key add –
here,
- wget – downloads the Public Key Block from a Microsoft Server
- | – takes the output of one command and runs it into the input of next
- apt-key add – this adds a package key as output from wget
So basically, it downloads the key from a mentioned web address and then adds it in one command to proceed further.
Step 2
Download Package and add repository from Microsoft Server.
wget -qO- https://packages.microsoft.com/keys/microsoft.asc | sudo apt-key add –
add-apt-repository command will add Personal Package Archives (PPA) to my installation source. By default, Ubuntu installs Service \ Application by extracting packages from Official Ubuntu Source. But if you mention the latest package URL from service provider then you can get more updated than Official Ubuntu Repositories. In our case, we mentioned the latest SQL Server package repository URL to get the latest released packages.
Step 3
Before installing it downloads the package lists from the repositories and update them to get information on the newest versions of packages and their dependencies using
sudo apt-get update
Now, Install SQL Server repository in Ubuntu Instance.
sudo apt-get install -y mssql-server
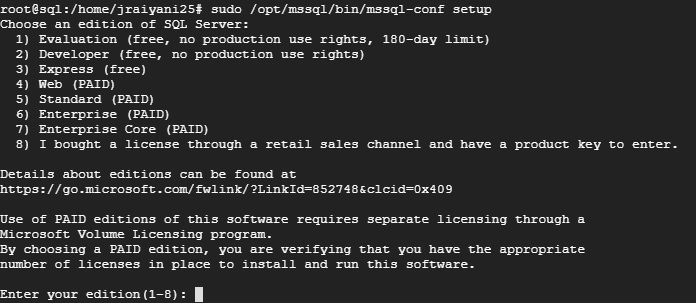
Step 4
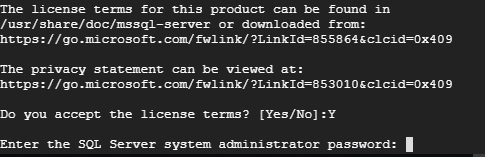
After installing the setup, Select SQL Server edition to get it installed in your instance and configure the SA password for the same.
sudo /opt/mssql/bin/mssql-conf setup
SQL Server is licensed the same way for both Windows and Linux operating Systems. In fact, you license SQL Server and then you can choose to use that license on the platform of your choice.
Set SA Password:
If instance doesn’t configure with 2000MB RAM, then the server will not get started and on the configuration step it will return the error as shown in the below snapshot.
Step 5
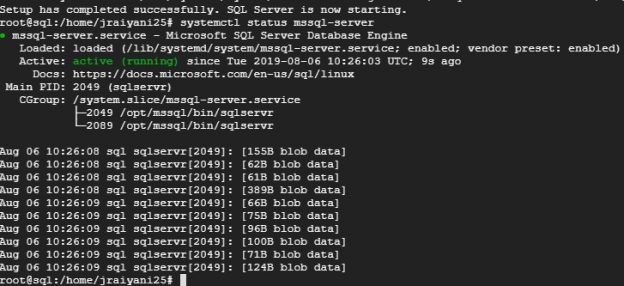
Check the SQL Service status.
systemctl status mssql-server

SQL Server service must be inactive stats. If service found with inactive stats, then start it.
sudo systemctl start mssql-server
Here, the SQL Server installation is succeeding. For accessing the SQL Server Database Engine in the local machine, we do not have SQL Server Management Studio in Ubuntu. So connect this instance locally Terminal then SQL Server Command Tools must be installed in Ubuntu Operating System.
Step 6
Install SQL Server Command Line Tools by downloading repository by Microsoft and get installed with the latest update.
wget -qO- https://packages.microsoft.com/keys/microsoft.asc | sudo apt-key add – wget -qO- https://packages.microsoft.com/config/ubuntu/16.04/prod.list | sudo tee /etc/apt/sources.list.d/msprod.list sudo apt-get update sudo apt-get install mssql-tools
Meanwhile, you will get such options to accept Licence Terms and those need to be selected with Yes to proceed further.


After completing the installation of the SQL Command Line Tool, SQL Server should be restarted…
systemctl restart mssql-server.service
Now, SQL CMD can be accessible and you can connect your SQL instance by…
sqlcmd -S localhost -U SA

If you get any error while connecting your instance using SQL CMD, then there should be some problem in the installation of the SQL Command Line Tool.
For Example, connecting my SQL Server Instance by
sqlcmd -S localhost -U SA
and getting error “sqlcmd: command not found”.
So, now you need to link SQL CMD utilities with Ubuntu accessible directory using
sudo ln -sfn /opt/mssql-tools/bin/sqlcmd /usr/bin/sqlcmd
The ln command is used to create links between files. And parameters of this command s, f, n have different purposes.
-s, –symbolic
It makes symbolic links instead of hard links.
-f, –force
It removes existing destination files.
-n, –no-dereference
It treats LINK_NAME as a normal file if it is a symbolic link to a directory.
Now, just connect your SQL Server Instance again using sql cmd and perform SQL Server commands in the Ubuntu terminal. Query command will be the same as the SSMS T-SQL command but each statement will be performed or executed with separating line by GO in the Ubuntu sql cmd terminal.
For Example, creating a new database…
|
1 2 |
>CREATE DATABASE First_LinuxDB >GO |
and the database will be created successfully.
All Data files and log files of the database will be placed in the /var/opt/mssql file folder and SQL Server users & groups of users will have access to perform Read & Write over the files.
Now, verify the installed version and edition of SQL Server in Linux. Run the following T-SQL query to verify the version and edition of SQL Server that you are running in Ubuntu Instance.
|
1 2 |
SELECT @@VERSION SELECT SERVERPROPERTY('Edition') |
This installation is just basic steps to install the SQL Server and SQL Server Command Tool. Now, you can start SQL Server Agent as well with few changes in SQL Server Configuration. SQL Server agent service will be much helpful to setup schedulers, jobs, Alerts, etc. in Linux platform using SQL Server.
Default file directory to read SQL Server Configuration file.
cat /var/opt/mssql/mssql.conf
SQL Server will start as a defined configuration property in this file. You can add or modify any properties related to memory, port, IP, Data Directory, Log Directory, Error file, Trace Flag and much more. Any changes made will be saved. However, it will not take effect until the service stops and restarts.
To start the SQL Server Agent in Linux based SQL Server, you need to enable SQL Server Agent Service with a change in SQL Server Configuration.
sudo /opt/mssql/bin/mssql-conf set sqlagent.enabled true
systemctl restart mssql-server.service
Other default SQL Server configuration or Server options can be changed by sp_configure command same as windows.
For allowing the remote connection for this SQL Server instance, SQL Server Service port must be allowed by Firewall and Remote connection must be True in SQL Server level configuration options.
Conclusion
At the end of the installation, we conclude that the Database Engine will be the same as windows for the Open Source Operating systems for SQL Server but few features will not be available which are tightly integrated with Windows operating system.

View all posts by Jignesh Raiyani
- Page Life Expectancy (PLE) in SQL Server - July 17, 2020
- How to automate Table Partitioning in SQL Server - July 7, 2020
- Configuring SQL Server Always On Availability Groups on AWS EC2 - July 6, 2020