

Introduction
With an increasing number of new servers running on Linux, and even a third of Microsoft’s Azure virtual machines running Linux, they have made a choice to bring SQL Server to Linux in order to increase their market share and attract new customers.
Microsoft has started to make inroads outside of Windows environments with different products, such as Office 365 apps for various mobile phone operating systems, such as iOS and Android as well as their own Windows Phone OS. Microsoft has stated that they want to deliver a SQL Server on Ubuntu, Red Hat and SUSE that feels, looks and performs just like the Windows version of the SQL Server, where users should not be able to see the differences between those, at least from the front-end perspective.
Things to consider
SQL Server on Linux is still very new, so inconsistent behaviour and partially supported features can be apparent when using it. Microsoft stated that the preview version of SQL Server on Ubuntu, Red Hat, SUSE and Docker engine will support the basic capabilities such as the core database engine components that support transactional processing and data warehousing. At the moment, as stated by Microsoft in their release notes for SQL Server on Linux, even in the latest Community Tech Preview 2.0 (CTP 2.0), there are still a lot of features which aren’t supported, so there is still work to be done in that field. Nevertheless, it is a huge step for Microsoft, and one that many DBAs have looked forward to.
System requirements
Microsoft hasn’t stated the full system requirements to install SQL Server on Ubuntu, Red Hat, SUSE and Docker engine, the only thing they noted is that it requires more than 3.25GB of RAM. Listed below will be the basic minimum system hardware requirements to run Ubuntu, adjusted for the RAM and HDD space requirements to run SQL Server on Ubuntu:
CPU: 700Mhz processor (Intel Celeron or better)
RAM: 4GB minimum (Ubuntu needs 512MB at minimum)
HDD: 5GB for Ubuntu and additional 3GB for SQL Server at minimum
Installation procedure
SQL Server on Linux currently supports a couple of distributions of Linux, those being Red Hat, SUSE and Ubuntu, as well as Docker engine.
For this article, we are going to install SQL Server on Ubuntu, the latest version being 17.04 at the time of writing this article.
-
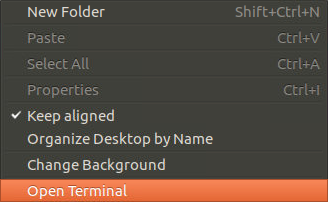
First, open Terminal by clicking right mouse click on desktop and selecting Open Terminal.

Alternatively, you could go to start menu in the top left, opening it and clicking on Terminal to open it.
-
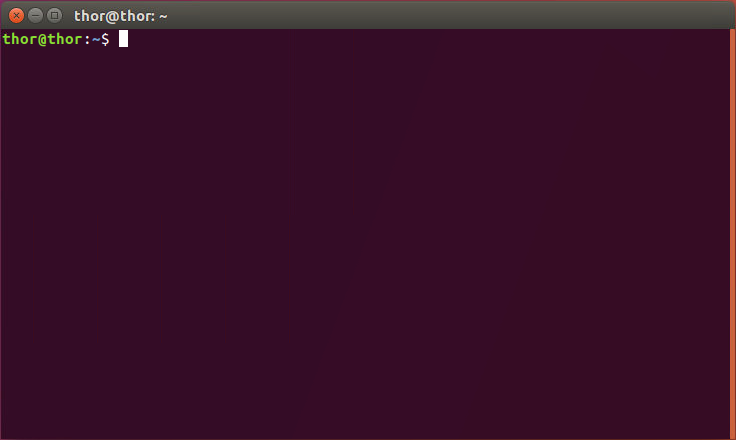
After opening the Terminal, we are greeted with a window which looks like in the picture below.
-
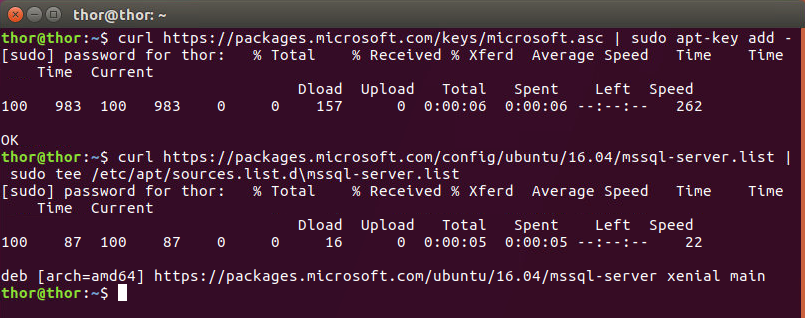
It is here where the installation takes place. First, we need to have the public repository’s GPG keys imported by entering the following command:
curl https://packages.microsoft.com/keys/microsoft.asc | sudo apt-key add –
-
The user needs to insert the account password before completing the step.
-
After that, we need to have the Microsoft SQL Server’s Ubuntu repository registered. In this step as in previous, the user needs to enter the account password before completing the step (but only if 15 minutes from the last action have passed, as this is Ubuntu’s feature to only type the password only once in 15 minutes to make work flow easier).
curl https://packages.microsoft.com/config/ubuntu/16.04/mssql-server.list | sudo tee /etc/apt/sources.list.d/mssql-server.list
-
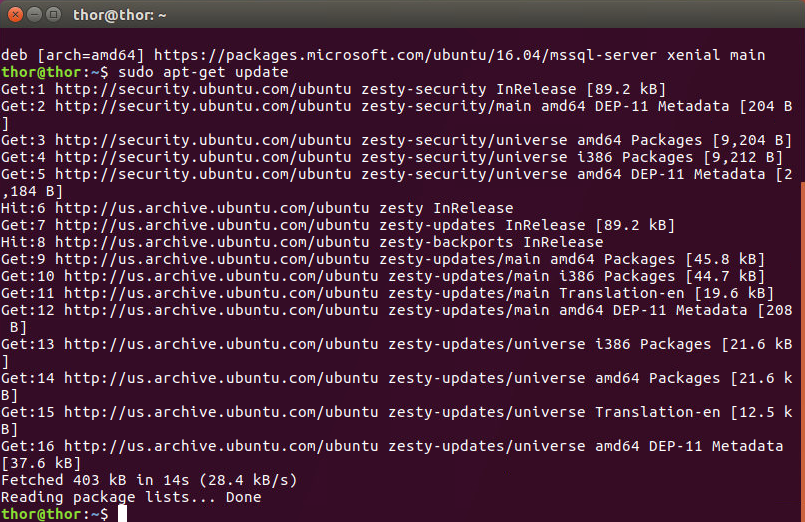
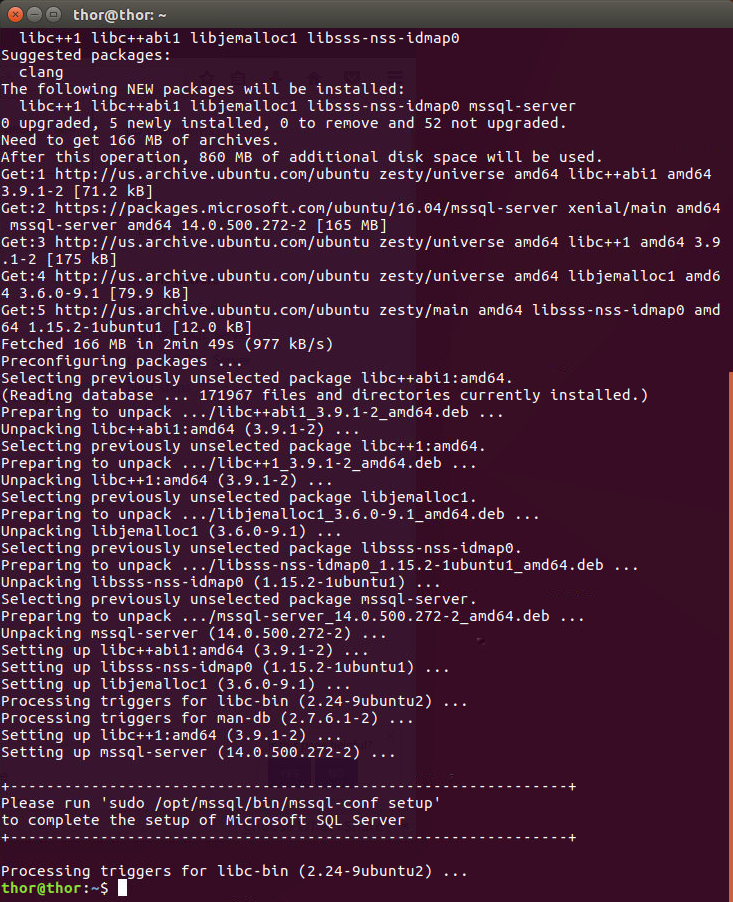
Now we can install SQL Server on Ubuntu by entering the following commands:
sudo apt-get update
sudo apt-get install -y mssql-server
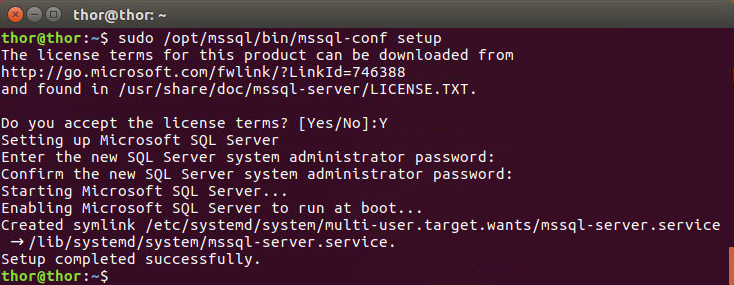
With this, the package is installed. To completely install SQL Server on Ubuntu we need to run the mssql-conf setup and follow the prompts. Also, a strong password is recommended for the creation of SA account (Minimum length of 8 characters, including both uppercase and lowercase letters and base 10 digits or/and non-alphanumeric symbols). To continue the setup run the following command:
sudo /opt/mssql/bin/mssql-conf setup
-
After the install of SQL Server on Ubuntu has been completed, we can check if the service is started and running by entering the following command:
systemctl status mssql-server
-
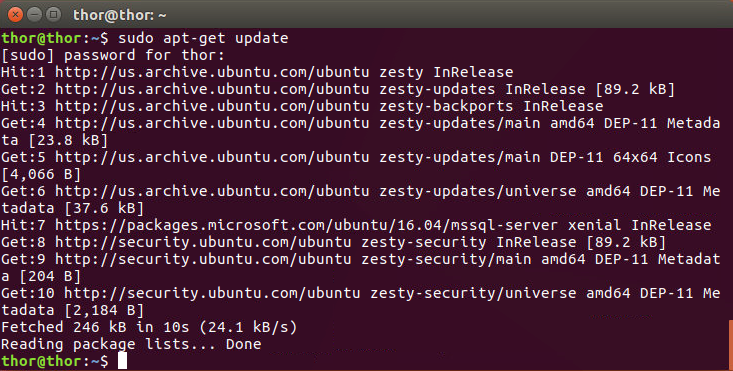
After some time, a software update may be released and that can be handled with a few lines in the Terminal. First, it is needed to update the apt-get repository lists by running the command below and entering the account password.
sudo apt-get update
sudo /opt/mssql/bin/mssql-conf setup
-
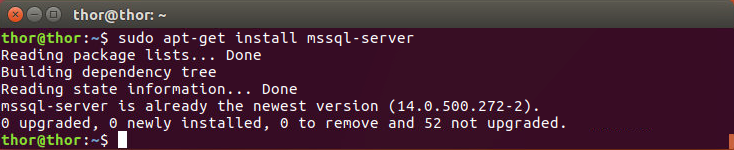
After updating the repository lists, all that is needed to update the SQL Server is to run the above installation command which will update the mssql-server package:
sudo apt-get install mssql-server
Running these commands will try to download the latest package, afterwards replace the updated binaries which are located under /opt/mssql. No user-generated databases or system databases are affected with this operation.


Installation of SQL Server Tools
Optionally, users can install SQL Server Tools on Ubuntu to improve their experience. Currently, the package contains the Command line query utility (sqlcmd) and Bulk import export utility (bcp).
The installation is also done from the Terminal:
-
First, it is needed to import the public repository’s GPG keys. After running this command, it is necessary to input the account password.
curl https://packages.microsoft.com/keys/microsoft.asc | sudo apt-key add –
-
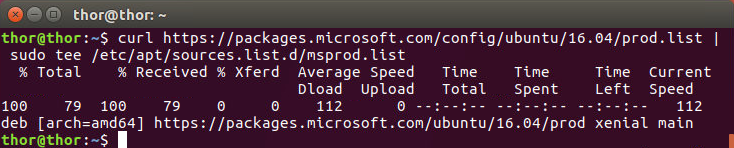
After that it is needed to register the Microsoft Ubuntu repository:
curl https://packages.microsoft.com/config/ubuntu/16.04/prod.list | sudo tee /etc/apt/sources.list.d/msprod.list
-
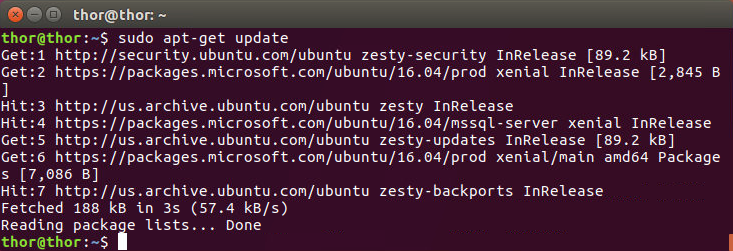
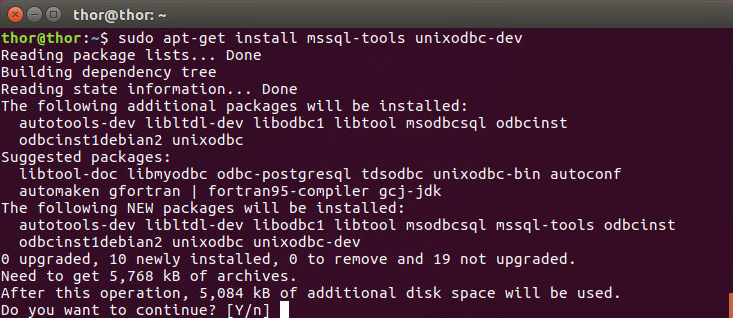
Update the sources list and run the installation command with the unixODBC developer package:
sudo apt-get update
sudo apt-get install mssql-tools unixodbc-dev
-
After running the second command, user will be prompted to allow the installation
-
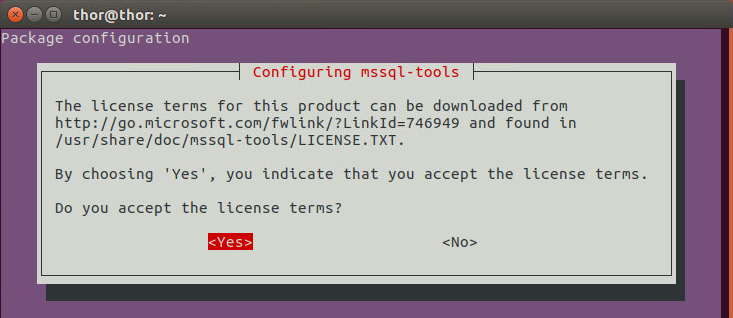
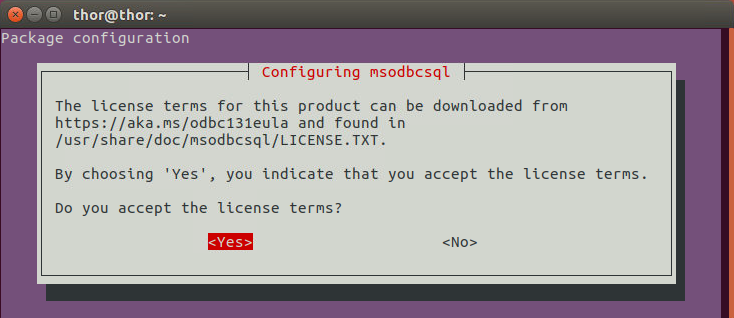
After which the user will need to Accept the license terms
-
For the sqlcmd and bcp commands to be able to get accessed from bash shell, PATH needs to be modified in the ~/.bash_profile using the command:
echo ‘export PATH=”$PATH:/opt/mssql-tools/bin”‘ >> ~/.bash_profile
For non-login and interactive sessions, the PATH needs to be modified accordingly:
echo ‘export PATH=”$PATH:/opt/mssql-tools/bin”‘ >> ~/.bashrc
source ~/.bashrc -
After completing the installation, a test database is created to check the functionality of the SQL Server on Ubuntu.
-
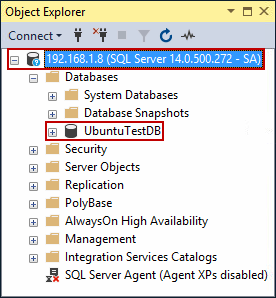
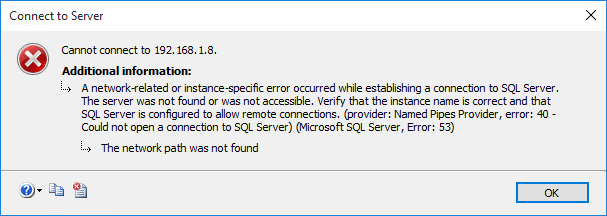
As the process completes, the latest SQL Server Management Studio installed on a Windows machine is started. Since the Ubuntu machine is in the local network, the IP address is 192.168.1.8. in this case. After connecting with SQL Server credentials (as Windows authentication doesn’t work in this case), it can be seen that the database we just created using sqlcmd tool in Linux Terminal is created and the server is reachable.


Installation of SQL Server Agent
In addition to SQL Server Tools, SQL Server Agent can also be installed as an addition after we install SQL Server on Ubuntu to manage and run scheduled jobs.
-
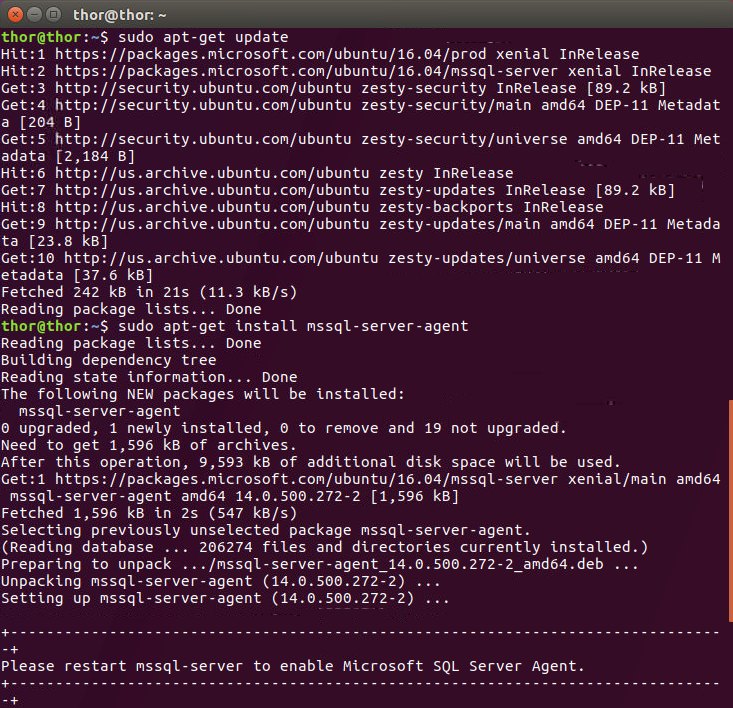
Update the sources list and run the installation command, after which the Terminal will prompt to restart the SQL Server for the Agent to be able to start.
sudo apt-get update
sudo apt-get install mssql-server-agent
sudo systemctl restart mssql-server
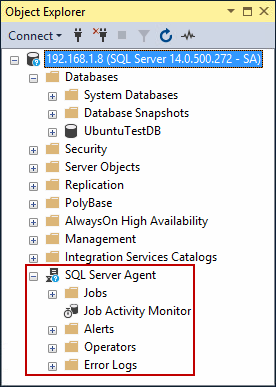
After that, connecting to the server in SSMS shows up that the SQL Server Agent is running.
Troubleshooting
Problem
-
Cannot connect to the SQL Server on Ubuntu from SSMS
Solutions
-
Verify if the server is running on the Ubuntu machine by running the command:
sudo systemctl status mssql-server
If the server is not running, it can be started by running the command:
sudo systemctl start mssql-server
After which, running the previous command again should look something like this:
-
Verify that the firewall has allowed the port 1433 which SQL Server is using by default. First we need to check the status of the ufw, which is Ubuntu’s Uncomplicated Firewall, by running the following command and entering the password for the account:
sudo ufw status
-
To allow a port through the ufw, run the following command:
sudo ufw allow 1433
-


Problem
- Cannot connect to the server using SA account
Solution
-
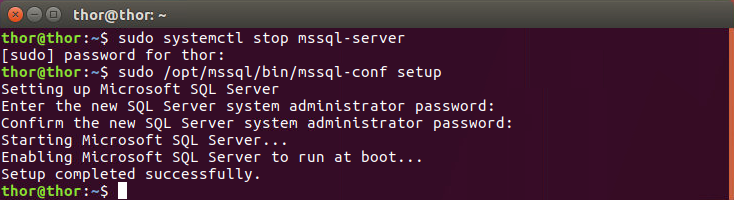
To reset the system administrator (SA) password, run the following commands:
sudo systemctl stop mssql-server
sudo /opt/mssql/bin/mssql-conf setupTake note that this will temporarily stop SQL Server mssql-server service.

Stefan is currently working at ApexSQL LLC as a Software sales engineer where he specializes for database performance and backup.
- How to install SQL Server on Ubuntu - May 18, 2017