
We learned to install SQL Server 2019 installation on Ubuntu without a Docker Container in one of my previous articles, but we might also get a request to uninstall SQL Server running on Ubuntu as well. Both the installation and the uninstallation of SQL Server is different in Linux than of Windows OS. In windows, we can remove or uninstall any program using the add or remove programs feature. In Ubuntu, We need to run the commands in order to uninstall the programs. However, before performing uninstallation, we need to take care of the below point.
- SQL Server Databases backups: We cannot revert back once we have uninstalled SQL Server. Therefore, while planning uninstallation, we should carefully look at the databases and see if we require them on a later date. If yes, take a full database backup and move those backup files to a separate location. You can take database backup from SSMS, Azure data studio or the command line tools like a normal database in SQL Server. We should not keep the database backups under the default directory (/var/opt/mssql/data) because this will be removed as part of clean uninstallation of SQL Server.
Uninstalling SQL Server on Ubuntu
First, launch the virtual machine and connect to your Ubuntu server where we installed the SQL Server 2019. We will use the terminal inside the Ubuntu to run the commands. However, if you want to run the command remotely, you can use the PuTTy terminal session. In this article, we will remove Microsoft SQL Server 2019 along with repository, directories, and binary files.
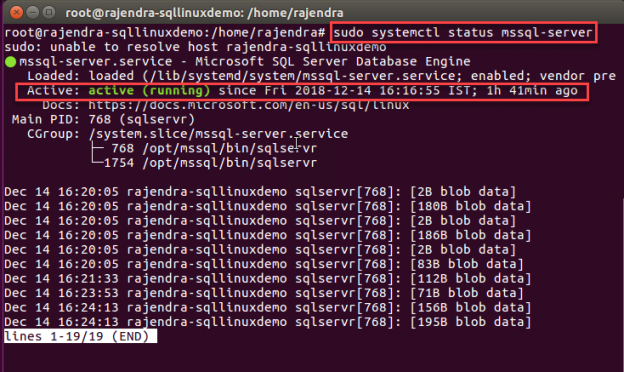
Step 1: SQL Server Service (mssql-server.service) status
Check the status of the SQL Server services whether it is running or not. Run the below command to check the status.
# sudo systemctl status mssql-server
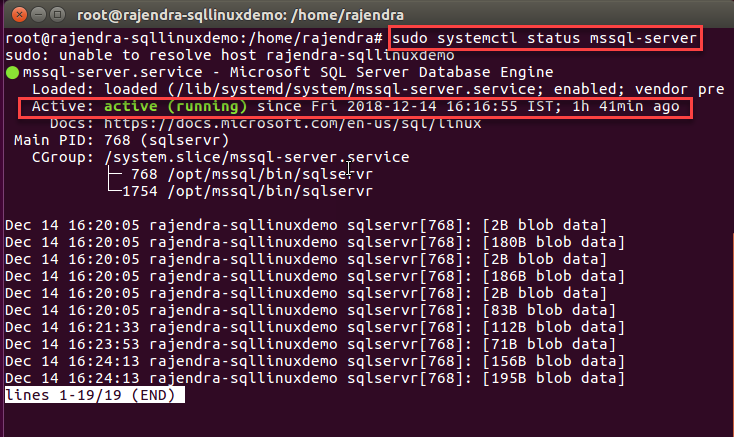
You can notice in the output that SQL Server service is active (running). You can also check the uptime of service with the active status. In the output, you can also notice the mssql-server service process id.
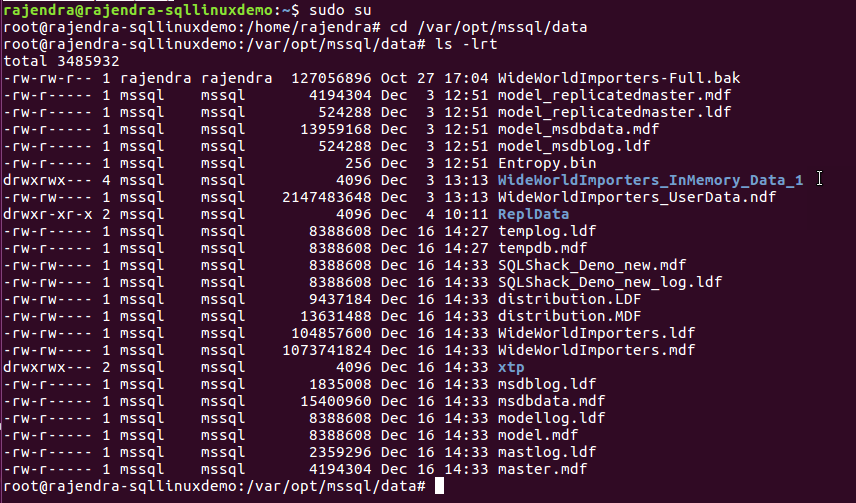
Step 2: View default data and log file directory content
We can also view the content of the default data and log directory in Linux SQL Server. Run the below command in a terminal window.
# cd /var/opt/mssql/data You can go to the directory using the cd command.
# ls -lrt Command to list out the directory files with the owner size (in bytes) and the permissions.
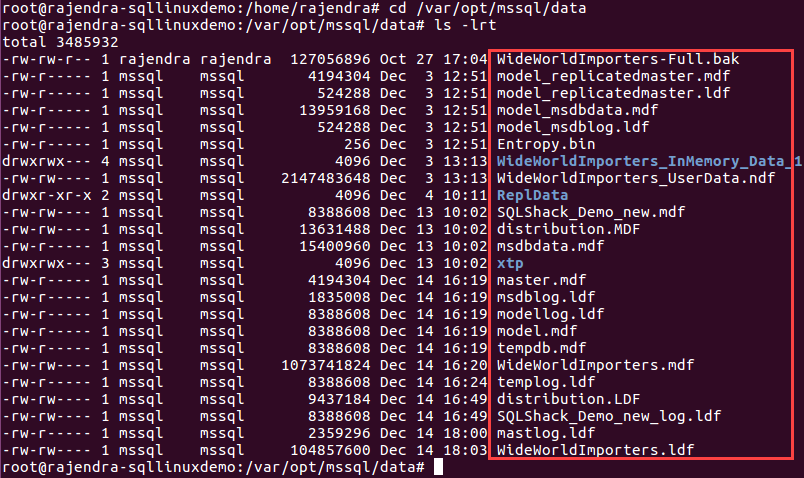
As highlighted in this screenshot, all the log file, data files of the system as well as user databases are present in this directory.
Step 3: Uninstall mssql-server.service
At this point, we will assume that we have performed the full database backups (if required) and move those backup files to secure location. We should be having approvals from all stakeholders (if required) before proceeding with the next step. we need to run the below command to remove the SQL Server 2019 on Ubuntu.
Note: This command should be running with the root user having admin access.
$ sudo apt-get remove mssql-sever
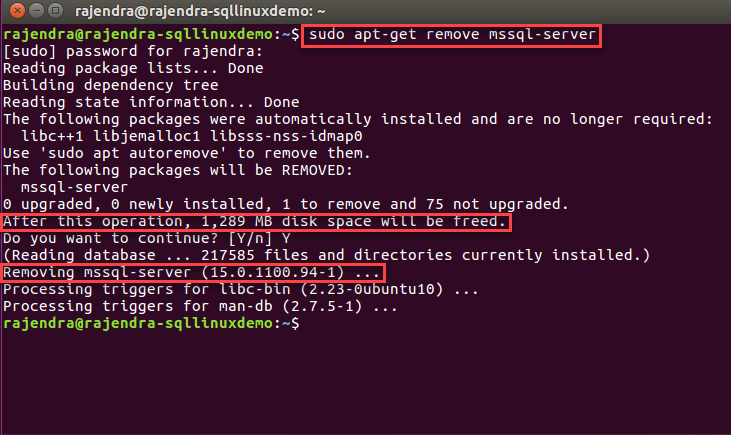
In the above screenshot, you can see that once we execute the command, it performs the following tasks.
- Reads the package list
- Builds dependence tree
Once it performs the above pre-requisitive, it prepares the list of packages to remove. Here we can see that it gives the message that mssql-server package will be removed. Once we have uninstalled SQL Server, the system will free 1,289 MB of disk space. We need to give confirmation to proceed with this activity. Enter ‘Y’ to proceed. We can also cancel the process at this point and if we want to cancel running this command, enter ‘N’.
After you enter ‘Y’, it removes the mssql-server service.
Step 4: Verification
We do not get any confirmation message that the mssql-server.service are removed successfully or not. This returns to the $ prompt therefore, we need to verify the status of the SQL Server using the same command we used above.
$ sudo system status mssql-server
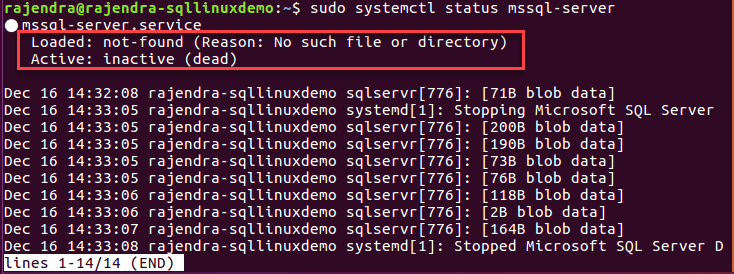
In the above screenshot, you can find the status as inactive (dead).
- Loaded: not-found (Reason: No such file or directory)
- Active: inactive (dead)
Step 5: Remove the default data and log file along with binaries
Now, let us go to the default data and log file directory and see if the database files exist or not. In the below image, you can see all the files still exists. It shows that after the uninstallation of SQL Server service, it does not removes the databases files from /var/opt/mssql/data directory. We can still copy these database files or the backup files present in this directory to other location. In the next step, we will remove this directory.
We will remove the all files and directories using the command ‘rm-rf’ with sudo access.
$ sudo rm -rf /var/opt/mssql
In this command, we used the below parameters with ‘rm’:
- -r: it removes directories and their contents
- -f: it ignores nonexistent files and arguments and removes all files forcefully

It also does not return any message after the removal of the directory and its content.
Now check SQL Server binaries and database files by running below command.
#sudo ls -lrt /var/opt/mssql

We can see no files or directory exists in the output because we already removed those.
We have now removed the SQL Server 2019 services running on the Ubuntu OS.
Conclusion:
We explored the process to uninstall SQL Server on Ubuntu in this article. You must plan the process to uninstall SQL Server properly. If you have any test instance, run these command so that you could be familiar with the commands before attempting these operations in a production environment.

I am the author of the book "DP-300 Administering Relational Database on Microsoft Azure". I published more than 650 technical articles on MSSQLTips, SQLShack, Quest, CodingSight, and SeveralNines.
I am the creator of one of the biggest free online collections of articles on a single topic, with his 50-part series on SQL Server Always On Availability Groups.
Based on my contribution to the SQL Server community, I have been recognized as the prestigious Best Author of the Year continuously in 2019, 2020, and 2021 (2nd Rank) at SQLShack and the MSSQLTIPS champions award in 2020.
Personal Blog: https://www.dbblogger.com
I am always interested in new challenges so if you need consulting help, reach me at rajendra.gupta16@gmail.com
View all posts by Rajendra Gupta
- Understanding PostgreSQL SUBSTRING function - September 21, 2024
- How to install PostgreSQL on Ubuntu - July 13, 2023
- How to use the CROSSTAB function in PostgreSQL - February 17, 2023