
This article explains how to manage a data file and filegroups in an SQL database created on CentOS Linux. In my previous article, Manage filegroups of SQL Databases, we learned about the different types of filegroup and data files in SQL Server 2019 on windows and how to manage them using T-SQL queries. In this article, we will learn how to manage the filegroups in SQL Server 2019 on CentOS. I am going to cover the following topics in the article:
- Create a Secondary filegroup and add a data file in it
- Make a secondary filegroup as a default filegroup of SQL database
We are going to use the SQL Server Management studio to manage the filegroups. I have created a virtual machine on my workstation and installed CentOS Linux in the virtual machine. Also, configured the SQL Server 2019 in CentOS. You can read Manage SQL Database in CentOS: Install SQL Server on CentOS article to learn the installation process of SQL Server 2019 on CentOS. I have restored the backup of the Stackoverflow2010 database in SQL Server.
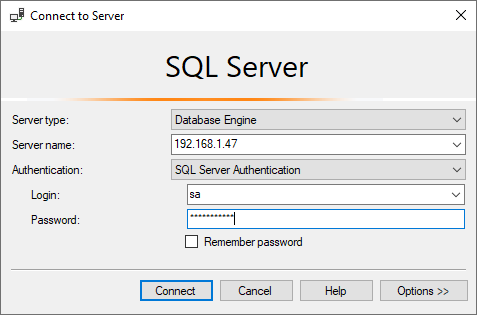
The SQL Server 2019 is installed on CentOS. The virtual machine is not part of the windows active directory; therefore, I am using an IP Address to connect to it. We are using SQL Server authentication to connect to the database engine. Open SQL Server management studio and specify the following values in the Connect to Server dialog box.
- Server Type: Database Engine
- Server Name: IP Address (192.168.1.47)
- Authentication: SQL Server Authentication
- Login: sa
- Password: Specify the appropriate password of sa user
Screenshot
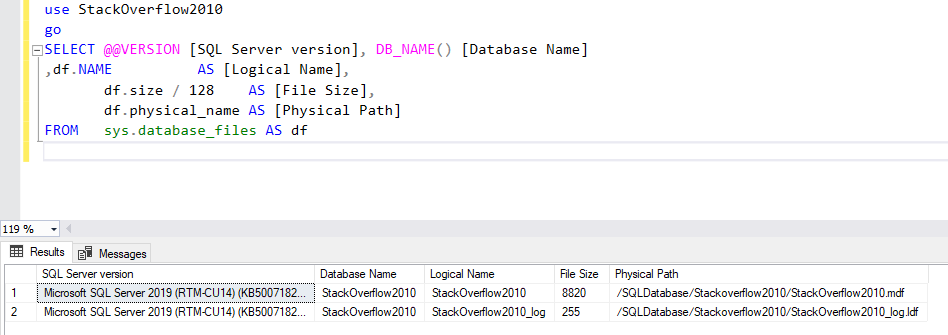
Run the following query to populate the list of database files of the stackoverflow2010 database.
|
1 2 3 4 5 6 7 8 9 10 |
USE stackoverflow2010 go SELECT @@VERSION [SQL Server version], Db_name() [Database Name], df.NAME AS [Logical Name], df.size / 128 AS [File Size], df.physical_name AS [Physical Path] FROM sys.database_files AS df |
Query Output
Now, let us understand how to create a new filegroup and add a data file to it.
Create Secondary filegroup and datafile
For demonstration, we are going to add a secondary filegroup named FG_Stackoverflow2010_Users and add a data file on the/SQLDatabase/Stackoverflow2010 location.
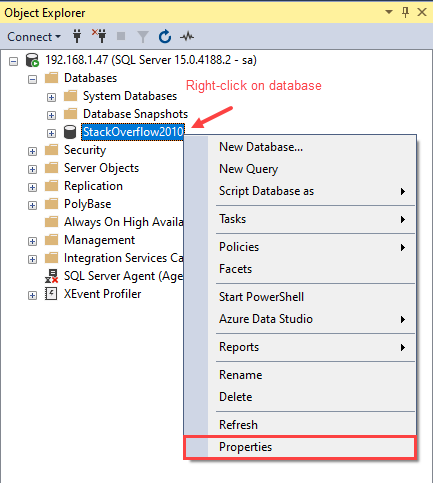
To add a secondary filegroup, expand Databases 🡪 Right-click on Stackoverflow2010 🡪 Select Properties.
In the Database Properties dialog box, Click on Filegroups 🡪 Click on Add Filegroup button. A row will be added in a Filegroup grid view. Specify the following values in the columns
- Name: FG_Stackoverflow2010_Users.
- Read-Only: Tick this option if you want to make the filegroup read-only. In our case, the filegroup is read-write, so we did not make any changes.
- Default: If you want to make the filegroup read-only, tick this option. In our case, the filegroup is read-write, so we did not make any changes.
The Filegroup screen looks like the following image:

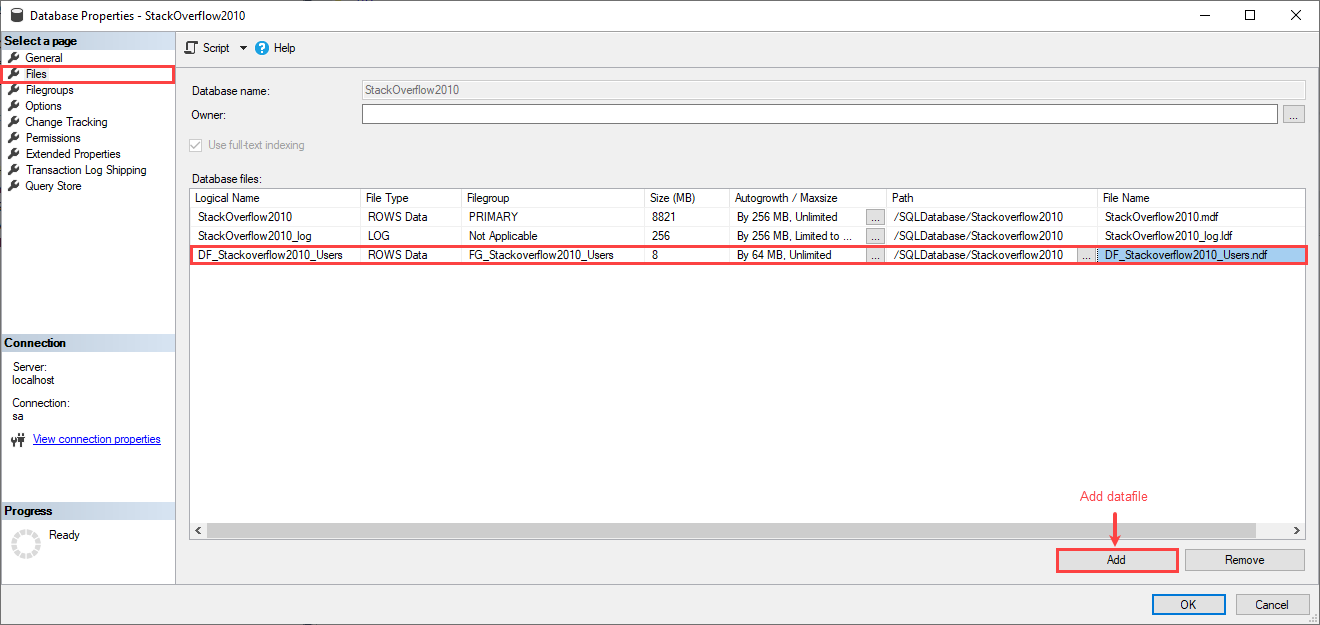
Once the secondary filegroup is added, we must add a data file in the secondary filegroup. In this demo, we add a data file named DF_Stackoverflow2010_Users in the FG_Stackoverflow2010_Users filegroup. To add a data file, click on Files 🡪 Click on Add. A row will be added in the Database files grid view. Specify the following values.
- Logical name: Specify the logical name of the secondary data file. In this demo, the data file name is DF_Stackoverflow2010_Users.
- Filetype: Specify the type of the data file. In this demo, the datafile type is ROWS DATA.
- Filegroup: Specify the name of the filegroup. In this demo, the filegroup name is FG_Stackoverflow2010_Users.
- Autogrowth / max size: Autogrowth is enabled, the value of Autogrowth is 64 MB, and the maximum allowed growth is unlimited.
- Path: Specify the physical path of the secondary data file. In this demo, the physical path is /SQLDatabase/Stackoverflow2010
- File Name: Specify the file name. In our case, the file name is DF_Stackoverflow2010_Users.ndf.
The Filegroup screen looks like the following image:
Click OK to create a secondary filegroup and datafile. Run the following query to view the filegroups of the stackoverflow2010 database.
|
1 2 3 4 5 6 7 8 9 10 11 |
USE stackoverflow2010 go SELECT [database file].NAME AS [DB File Name], [database file].size / 128 AS [File Size (MB)], [filegroup].NAME AS [File Group Name], [database file].physical_name AS [File Path] FROM sys.database_files AS [database file] INNER JOIN sys.filegroups AS [filegroup] ON [database file].data_space_id = [filegroup].data_space_id; |
Query Output:
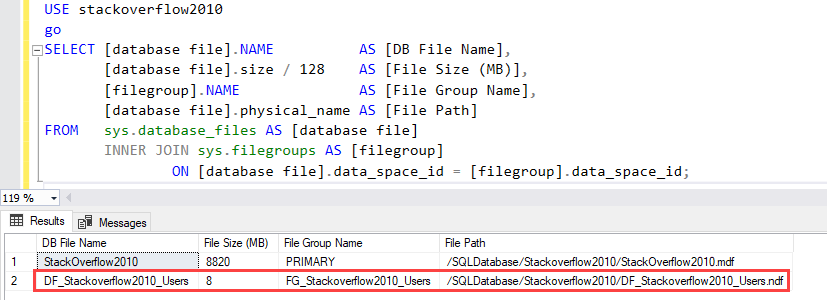
As you can see, the FG_Stackoverflow2010_Users and DF_Stackoverflow2010_Users have been created. Now let us understand how to make FG_Stackoverflow2010_users a default filegroup.
Make secondary filegroup as a default filegroup
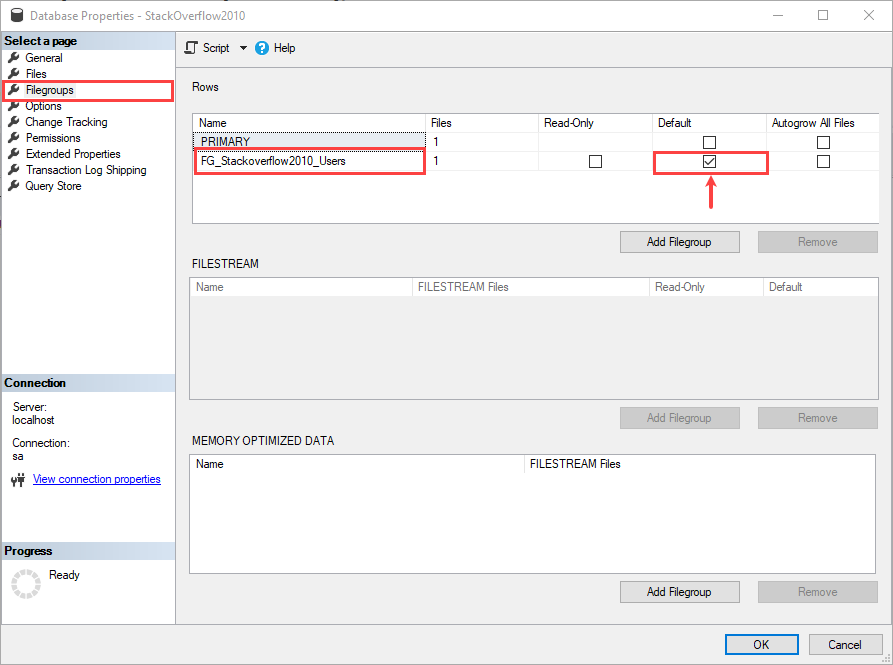
We want to make sure that the new tables must be created in the FG_Stackoverflow2010_Users filegroup. We can explicitly specify the filegroup name in the CREATE TABLE statement. Another way is to make the FG_Stackoverflow2010_Users filegroup as a default filegroup of the SQL database. To do that, open the Database Properties 🡪 Click on Filegroups 🡪 Tick on Default, and click OK.
Now, let us create a table named tblUsers in the stackoverflow2010 database. The table must be created in an FG_Stackoverflow2010_Users filegroup. Run the following query to create a table.
|
1 2 3 4 5 6 7 8 9 10 11 12 13 14 15 16 17 |
USE [StackOverflow2010] go CREATE TABLE [dbo].[tblusers] ( [id] [INT] IDENTITY(1, 1) NOT NULL, [aboutme] [NVARCHAR](max) NULL, [age] [INT] NULL, [creationdate] [DATETIME] NOT NULL, [displayname] [NVARCHAR](40) NOT NULL, [lastaccessdate] [DATETIME] NOT NULL, [location] [NVARCHAR](100) NULL, [views] [INT] NOT NULL, [accountid] [INT] NULL, CONSTRAINT [PK_tblUsers_Id] PRIMARY KEY CLUSTERED ( [id] ASC ) ) |
You can view the list of tables created in the FG_Stackoverflow2010_Users filegroup by executing the following query.
|
1 2 3 4 5 6 7 8 9 10 11 12 13 |
USE [StackOverflow2010] go SELECT [objects].[name] AS [Table Name], [filegroup].[name] AS [Filegroup Name] FROM sys.indexes [indexes] INNER JOIN sys. filegroups [filegroup] ON [indexes].data_space_id = [filegroup].data_space_id INNER JOIN sys.all_objects [objects] ON [indexes].[object_id] = [objects].[object_id] WHERE [indexes].data_space_id = [filegroup].data_space_id AND [objects].type = 'U' |
Query Output
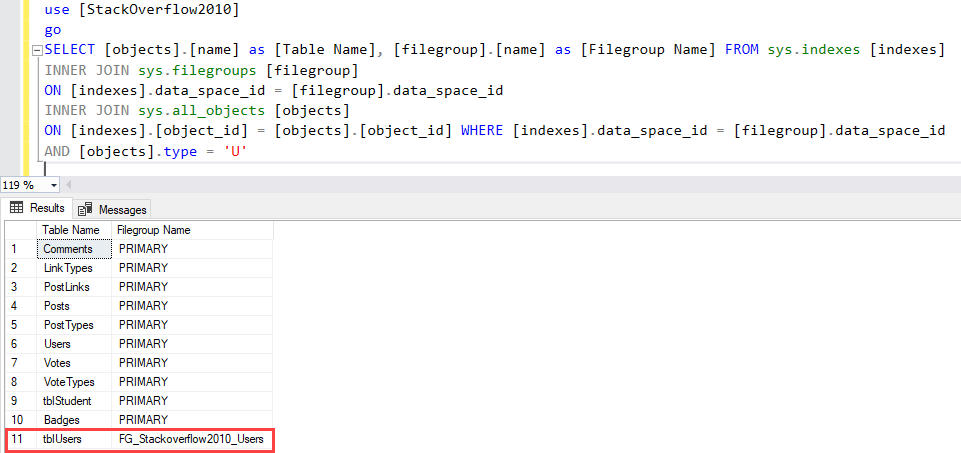
As you can see, the tblUsers is created in the FG_Stackoverflow2010_Users filegroup.
Summary
In this article, we learned how to manage the filegroups of the SQL database in SQL Server 2019 on CentOS using SQL Server management studio. I have covered the following topics:
- Create a Secondary filegroup and add a data file in it.
- Make a secondary filegroup as a default filegroup of SQL database.
In my next article, we will learn how to configure the SQL Server Agent jobs in SQL Server 2019 on CentOS. Stay tuned!

He has expertise in database design, performance tuning, backup and recovery, HA and DR setup, database migrations and upgrades. He has completed the B.Tech from Ganpat University. He can be reached on nisargupadhyay87@outlook.com
- Different ways to identify and change compatibility levels in SQL Server - July 22, 2024
- Copy SQL Databases between Windows 10 and CentOS using SQL Server data tools - October 19, 2022
- Changing the location of FILESTREAM data files in SQL Database - October 14, 2022