
Introduction
In our first part of this series, we showed how to import a bacpac file using the Azure Portal with Microsoft Azure Storage Explorer (MASE) and SQL Server Management Studio (SSMS) to create a Database in Azure.
In the second part, we will show how to import a bacpac file to create a Database using the sqlpackage.exe tool and PowerShell.
In PowerShell, we will learn how to create an Azure SQL Server, how to create an Azure storage account and finally how to import the bacpac file.
Requirements
- A machine with sqlpackage.exe installed.
- PowerShell installed with PowerShell for Azure installed.
- We will use the WideWorldImporters-standard database, but you can use any bacpac file of your preference.
- Access to Azure Portal
Getting started
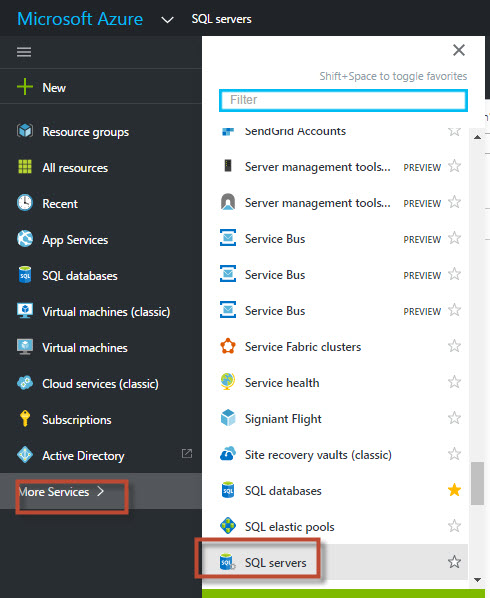
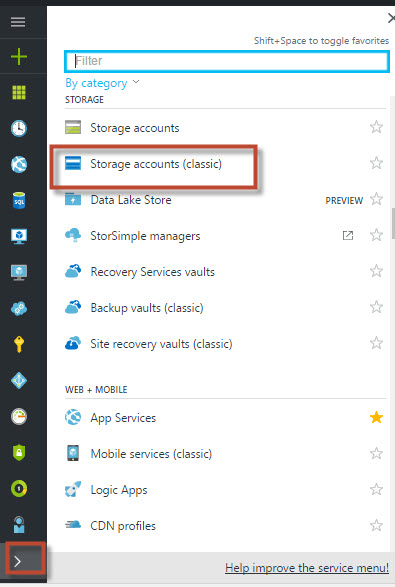
If you already read the first part of the article, you already have an Azure SQL Server. If you did not, you need to go to the Azure Portal>More Services>SQL servers:
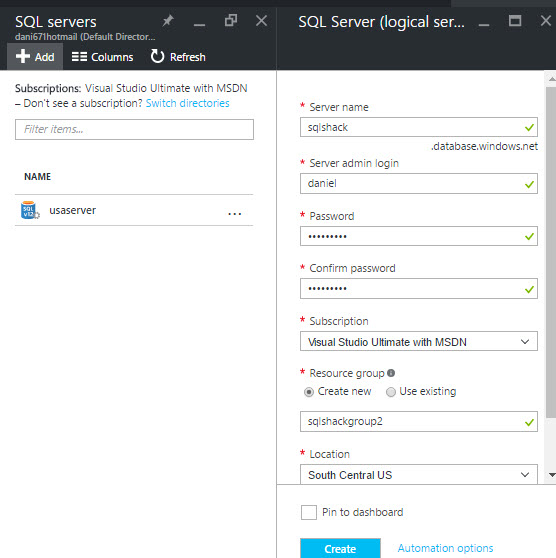
You can add the Server name, login, and password. We will not explain this part on detail because it was already explained in the first part:
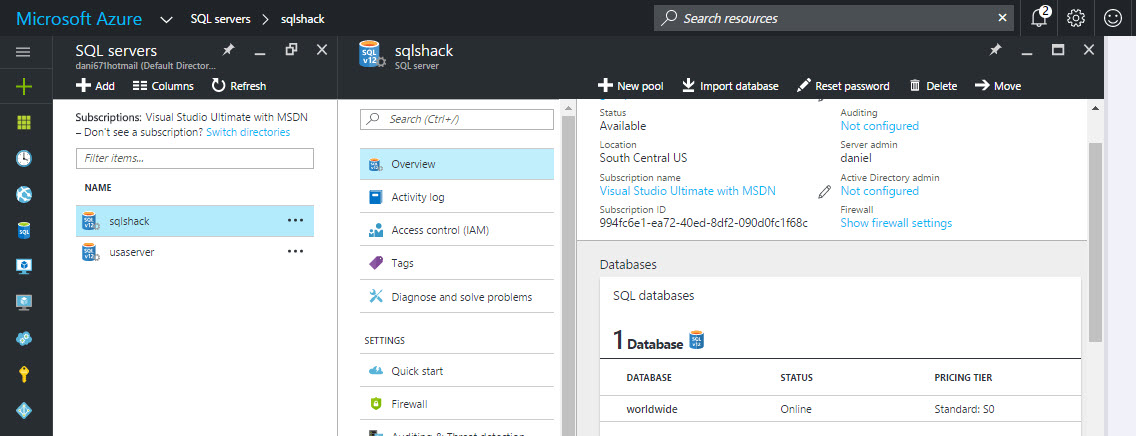
Once created the SQL server, go to properties to see the Server name:
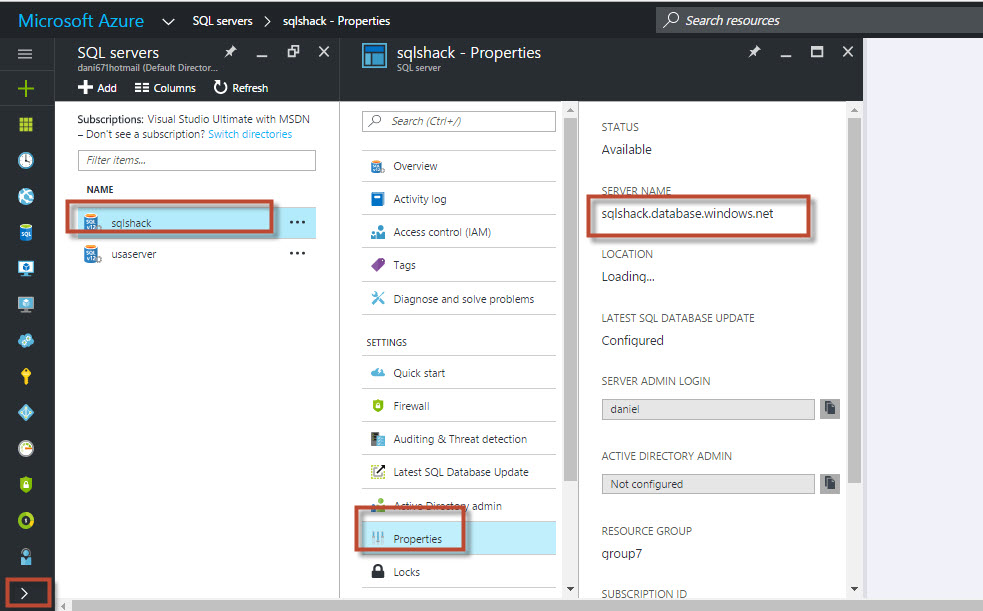
The SQL Server name will be used in the command line. Do not forget to create a rule to enable local IP access to azure. This is explained in the figure 11 of the first part of this article.
Navigate to the path with the sqlpackage.exe file. In Visual Studio, it is usually stored in a path similar to this one:
C:\Program Files\Microsoft Visual Studio 14.0\Common7\IDE\Extensions\Microsoft\SQLDB\DAC\120
In SQL Server, it is usually stored in a path similar to this one:
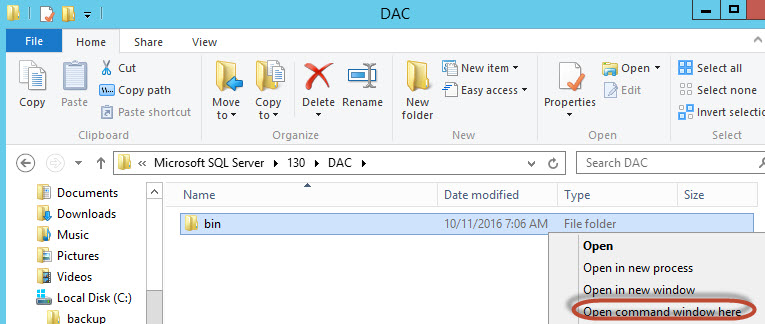
C:\Program Files\Microsoft SQL Server\130\DAC\bin
If you do not find the sqlpackage.exe run the dir/s sqlpackage.exe command in the cmd in your drive to search the file.
In Windows Explorer, navigate to the path with sqlpackage.exe, press Shift and right click on the folder and select Open Command Prompt here:
Run the following command in cmd:
sqlpackage.exe /Action:Import /tsn:sqlshack.database.windows.net /tdn:worldwide /tu:daniel /tp:MySecretPwd /sf:c:\sql\WideWorldImporters-Standard.bacpac
The command will import the bacpac file to Azure. The parameters used are the following:
/Action is used to indicate if we are going to import, export, publish, and extract data.
/tsn is used to define the Target Server Name. In this example, the Azure SQL Server in figure 2.
/tdn is the name of the new database to be created in Azure
/tu is the Target User. It is the Server Admin Login in figure 1.
/tp is the Target Password. It is the password defined in figure 1.
/sf is the source file downloaded in requirements.
If everything is OK, you will be able see the new database created named wordwide:
A common problem is the following error message:
A project which specifies SQL Server 2016 as the target platform may experience compatibility issues with Microsoft Azure SQL Database v12.
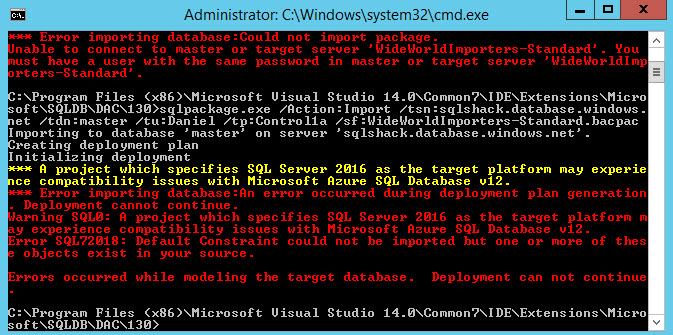
I could solve this problem by rewriting manually the “:”and “/” characters in the command line. It seems that the characters were not recognized in the copy paste process.
Importing with PowerShell
Another solution is PowerShell. We can do anything with this shell.
In PowerShell, we will do the following:
- Create a SQL Server in Azure
- Create an Azure Storage Account.
- Create a container in the Storage Account.
- Upload the bacpac to the container.
- Import the bacpac to create a Database in Azure SQL Server.
1. Create a SQL Server in Azure
Make sure that you have PowerShell for Azure installed.
To connect to Azure, use this cmdlet:
Add-AzureRmAccount
It will ask your Azure Portal credentials. Specify your credentials.
We will create a resource group. The groups are used to administer Azure resources:
New-AzureRmResourceGroup -Name “sqlgroup” -Location “South Central US”
Sqlgroup is the name of the group. This group is located in South Central US.
Here you have some possible values for Azure location:
- East Asia
- Southeast Asia
- Central US
- East US
- East US 2
- West US
- North Central US
- South Central US
- North Europe
- West Europe
- Japan West
- Japan East
- Brazil South
- Australia East
- Australia Southeast
- South India
- West India
- Central India
To create a SQL Server in Azure using PowerShell using the following cmdlet:
New-AzureRmSqlServer -ResourceGroupName “sqlgroup” -Location “South Central US” -ServerName “powershellserver” -ServerVersion “12.0”
Where sqlgroup is the Resource Group created before and South Central US is the location of the SQL Server. ServerName is the name of the new server and 12. 0 is the version of SQL Azure. The cmdlets will ask for a login name and a password. Specify that information.
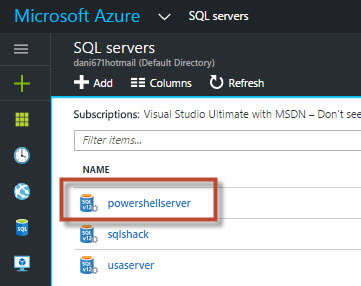
If everything is OK you would be able to see the SQL Server in your Azure Portal:
There is a Firewall in Azure. You need to enable your local IP to access to that Azure SQL Server. The following cmdlets will create a rule to enable your IP to access to your Azure SQL Server:
New-AzureRmSqlServerFirewallRule -ResourceGroupName ‘sqlgroup’ -ServerName ‘powershellserver’ -FirewallRuleName “myFirewallRule” -StartIpAddress ‘192.168.1.1’ -EndIpAddress ‘192.168.1.1’
Where sqlgroup is the resource group created. ServerName is the Azure SQL Server named powershellserver. FirewallRuleName is the name of the firewall, which can be any name. StartIpAddress and EndIpAddress are the range of IP allowed to access to the Azure SQL Server.
You can see your local machine IP address here.
2. Create an Azure Storage Account
To create a Storage Account we need to specify a subscription. You can have several subscriptions. That is why you need to specify your subscription for the Azure Storage Account. You can check your Subscription Name in the Azure Portal by clicking the key icon for subscriptions:
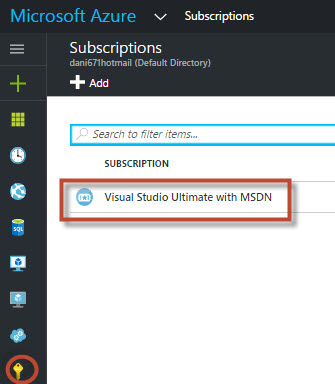
In this example, the subscription name is Visual Studio Ultimate with MSDN.
You can assign the name to a variable:
$subscription= “Visual Studio Ultimate with MSDN”
If you do not want to see in Azure Portal, you can use the Get-AzureSubscription cmdlet to retrieve the subscription name.
In this example, it is just one subscription. You can assign the subscription name to a variable using the following commands:
$subscription=(Get-AzureSubscription).SubscriptionName
To set the subscription as the default subscription use the following cmdlets:
Select-AzureSubscription -SubscriptionName $subscription
Where $subscription is the subscription name. Set a default subscription is a requirement to create an Azure Storage Account.
The following cmdlet creates a StorageAccountName named sqlshackaccount in South Central USA:
New-AzureStorageAccount -StorageAccountName “sqlshackaccount” -Location “South Central US”
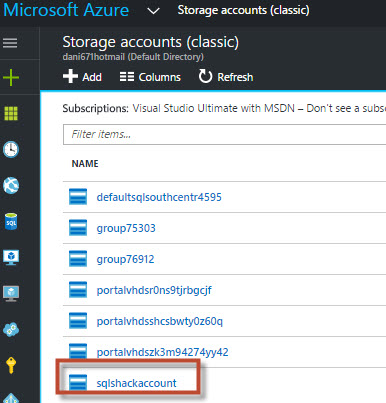
You can check the Azure Storage Account in the Azure Portal by clicking More Services>Storage accounts:
The sqlshackaccount storage account list will be displayed:
3. Create a container in the Storage Account
In the Azure Storage Account, we will create a Blob Container. We will upload the file bacpac file in the Blob Container. To select the Azure Storage Account just created as the default container, use the following cmdlet:
Set-AzureSubscription -CurrentStorageAccountName “sqlshackaccount” -SubscriptionName $subscription
Now you can create your blob container named mycontainer:
New-AzureStorageContainer -Name “mycontainer” -Permission Off
Permissions off means that only the owner of the container has access to it. Permission Container allows full read access to all the blobs, but cannot enumerate containers. Permission Blob provides full read permissions to the data in blobs, but not to data in the container.
4. Upload the bacpac to the container
The following cmdlet uploads the bacpac file named WideWorldImporters-Standard to the container mycontainer:
Set-AzureStorageBlobContent -Container “mycontainer” -File “c:\sql\WideWorldImporters-Standard.bacpac”
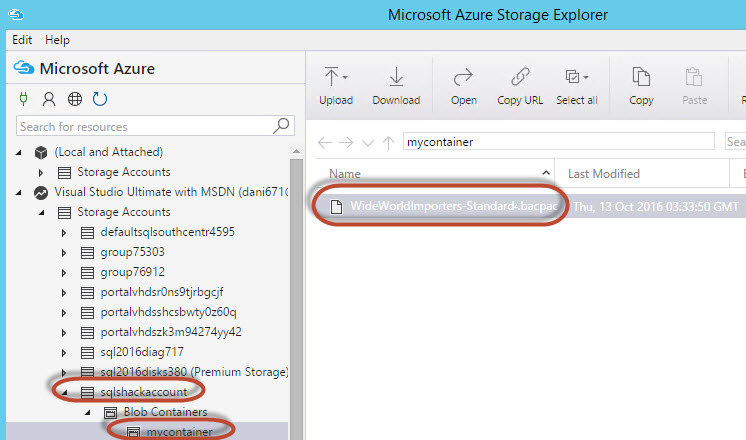
You can verify with MASE that the file is uploaded:
5. Import the bacpac to create a Database in Azure SQL Server
To import from Azure SQL Server, you need to the Azure Storage Key. The Azure Account contains a key to access to it. There is a primary and secondary key. You can see the keys of the storage account named sqlshackaccount with the following cmdlets:
Get-AzureStorageKey –StorageAccountName “sqlshackaccount”
The following cmdlets store the primary Azure Storage Account in the variable $primarykey:
$primarykey=(Get-AzureStorageKey -StorageAccountName “sqlshackaccount”).Primary
Alternatively, you can get the primary key using MASE. Check the figure 18 of the first part of this article.
Another important parameter is the URI (UNIFORM RESOURCE IDENTIFIER). This is the address of the file. You can Store the URI in a variable named $StorageUri using the following cmdlets:
$StorageUri=(Get-AzureStorageBlob -blob ‘WideWorldImporters-Standard.bacpac’ -Container ‘mycontainer’).ICloudBlob.uri.AbsoluteUri
Alternatively, you can get the URI using MASE. Just click the bacpac file in MASE and you will see the URI in properties.
To store the Azure SQL credentials in a variable use the following cmdlet:
$credential = Get-Credential
Get-Credential will ask for a login and a password. Specify your Azure SQL Server Login and Password.
Finally, to import the bacpac in Azure SQL, use the following cmdlets:
New-AzureRmSqlDatabaseImport –ResourceGroupName “sqlgroup” –ServerName “powershellserver” –DatabaseName “mypowershelldatabase” –StorageKeytype “StorageAccessKey” –StorageKey $primarykey -StorageUri $StorageUri –AdministratorLogin $credential.UserName –AdministratorLoginPassword $credential.Password –Edition Basic –ServiceObjectiveName B -DatabaseMaxSizeBytes 50000
Where sqlgroup is the Azure Resource Group that we have. Powershellserver is the name of our Azure SQL Server. Mypowershelldatabase is the name of the new database. You can specify any database name. We will connect using a StorageAccessKey. $primarykey is the variable that contains the access keys to access to the Storage Account. $StorageUri contains the path of the bacpac file and $credential.UserName and $credential.Password contain the Azure SQL Login and Password. Edition Basic is the type of database. Basic is the cheapest one of type B. For a complete picture about Editions, refer to the Azure SQL prices.
Conclusion
In this article, we explained 2 alternatives to import bacpac files to Azure. One way is using sqlpackage.exe. This option is very easy and basically only requires sqlpackage.exe installed an Azure connection. If you need to import a file in a batch file, it is a good alternative.
PowerShell requires more parameters, but it is more flexible to create custom automation tasks. PowerShell is recommended for complex automation tasks with variables, loops and a more sophisticated solution.

He has worked for the government, oil companies, web sites, magazines and universities around the world. Daniel also regularly speaks at SQL Servers conferences and blogs. He writes SQL Server training materials for certification exams.
He also helps with translating SQLShack articles to Spanish
View all posts by Daniel Calbimonte
- PostgreSQL tutorial to create a user - November 12, 2023
- PostgreSQL Tutorial for beginners - April 6, 2023
- PSQL stored procedures overview and examples - February 14, 2023