
The below screenshots and code samples are valid at the time of writing (May 2018) but as things in Azure can change so quickly, please check the latest documentation if a code sample doesn’t work as expected!
Toolkit
Essentially you have 3 choices to perform operations in Azure:
- Azure CLI (CLI) – Install Azure CLI 2.0
- PowerShell (PS)
- Azure Portal user interface (GUI)
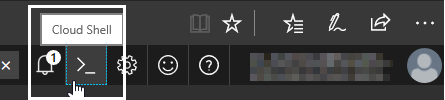
- If you can’t use any installed development tools, Cloud Shell is available in the Azure Portal using the browser and you can still pick CLI or PS as your preferred scripting language:
- Azure Cloud Shell (for this a storage needs to be mounted that you have to already have or create as part of the process)
This above is in the order of how things become available in Azure. Almost always CLI and PS get new things first (in some very rare cases CLI gets it even earlier) and sometime later it becomes part of the GUI.
Use a terminal of your choice. I started with the built-in PowerShell ISE environment, but sometimes it behaves inconsistently: a pop-up window appeared for a second then it disappeared. The PS window was hanging and didn’t give the prompt back to me even for CTRL-C or CTRL-break…, so I decided to go for VS Code as an environment to use (Download Visual Studio Code). It is a very neat tool and provides you a lot of add-ons and customization options. I love keyboard shortcuts, so this page was a very interesting read for me
Key Bindings for Visual Studio Code
There are pros and cons to both tools. According to my opinion the major advantage of CLI over PS is that it’s cross-platform, but on the other hand on a Windows machine, PS has a wider set of functionalities, as it’s a very versatile scripting environment from which you can manage everything in Windows.
Instead of using VS Code or PowerShell ISE (or another tool of your choice), there are two ways for an in-browser experience:
Azure CLI
To install it, download the .msi installer from the URL specified at the top and make sure you have admin rights. Then it’s best to go through the three options below that you can configure using the command
|
1 |
az configure |
- Output format (JSON, colored JSON, table or csv). I think colored JSON and table are the most useful, here is an example of the format for colored JSON and the table:

My approach is that I use colored JSON when I experimenting as it returns more information that can potentially be used to understand how this or that feature works. For day-to-day operations, the table output is easier to use.
- Enable logging to a local file (log file is created if you followed the default installation options in this folder: c:\users\your_username\.azure\logs\az.log)
- Enable anonymous CLI usage data collection. Up to you, I’m a privacy freak so I chose not to.

Logging in
CLI – The simplest “az login”
This is the simplest command to start with and can be further parameterized. If you don’t mind messing around with the browser as well, it works fine. The below process got very tedious very quickly to me:
|
1 |
az login |

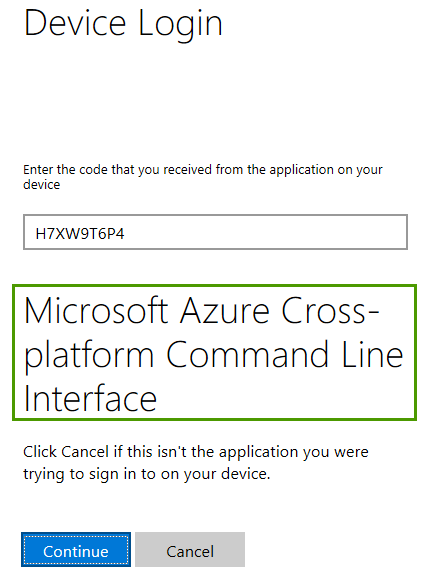
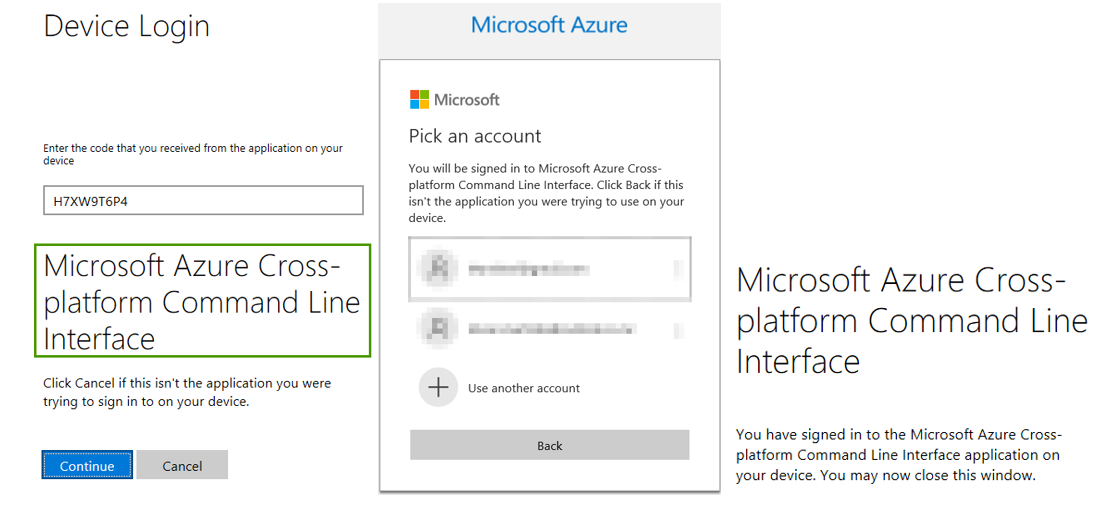
The https://microsoft.com/devicelogin URL is always the same but the one-off code is different.
When you navigate to that page, simply enter the given code, click continue and then choose the account you would like to log on to. You should be logged on at the end of the click sequence
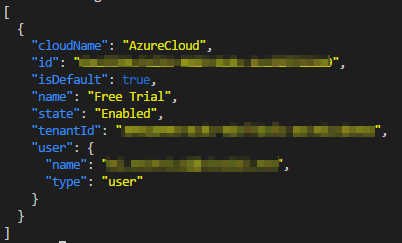
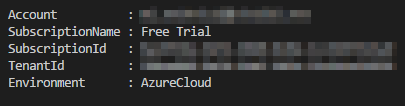
In the meantime, your console should return something like this (list of the subscriptions your account has) based on the output settings of az

To be a tidy developer: type az logout when you’re finished.
PS – Connect-AzureRmAccount
Running Connect-AzureRmAccount is very similar to az login as you don’t specify any parameters, so the rest is happening interactively. The difference is that PowerShell pops up a standard login window instead of asking the user to go to https://microsoft.com/devicelogin with a one-off code to authenticate.
|
1 2 |
Connect-AzureRmAccount Connect-AzureRmAccount -TenantId <your tenant id> |
Login with parameters
CLI
Using CLI to find out the possible parameters that can be used, simply run the below command:
|
1 |
az login -h |
As you could see from the previous example, the less you specify in the actual command, the more you need to click and choose on the screen in the browser. If the user account has only one tenant and one subscription, those are used by default. However, you can use parameters to set a value to them when writing the az command. The most common ones are:
- username or u – that is straightforward, together with
- password or p – you can skip that switch in which case you’ll be prompted to enter but in that case it won’t be visible on the screen as you enter it
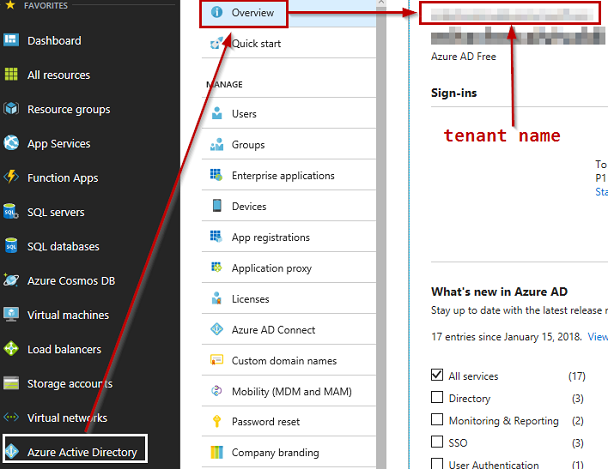
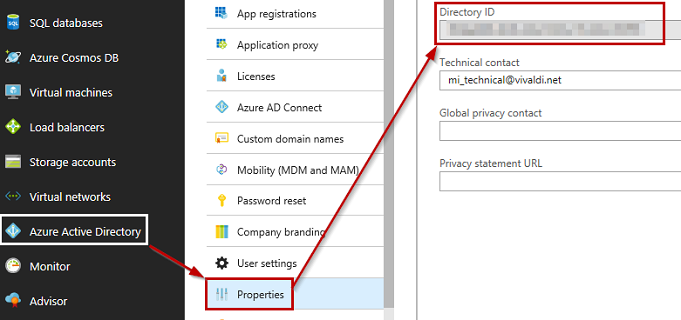
- tenant or t – this is your Azure Active Directory ID which you can find out from the Azure portal
- name or ID can both be used
- name or ID can both be used
Of course, the most automated way is to specify all three:
|
1 |
az login --tenant <tenant id / name> --user <username@domain> --password <YourPassword> |
But it does give me the goosebumps entering my password in clear text! If you don’t feel the same… well, you should! To avoid that use the below code to get prompted for the password, but of course, it is not fully automated then:
|
1 |
az login --tenant <tenant id / tenant name> --user <username@domain> |
da
PowerShell
Below follows the same process of logging in, as we did it above, this time using PowerShell.
If you want to see all the possible parameters, the PS help is useful as usual:
|
1 2 3 |
Connect-AzureRmAccount -? Get-Help Connect-AzureRmAccount -full Get-Help Connect-AzureRmAccount -Examples |
To use credential parameters for a user account (to find the required id values, please refer to the az login section)
|
1 2 |
$Credential = Get-Credential -UserName <username> -Message "Enter Password: " Connect-AzureRmAccount -Credential $Credential |
If you really need to specify the password so it’s not asked interactively (there are better ways):
|
1 2 3 4 |
$UserName = <application_id> $Password = <password> | ConvertTo-SecureString -AsPlainText -Force $Credential = New-Object -TypeName System.Management.Automation.PSCredential -ArgumentList $UserName, $Password Connect-AzureRmAccount -Credential $Credential -TenantId <tenant_id> |
Service Principal
First of all, what is a service principal? We have to differentiate between the concept and the actual Azure implementation of it.
In essence, it is a service account, i.e. an Azure AD user that is used by Azure applications or services to access other Azure resources. It is not meant to be interactively used as a normal user account. So put crudely it’s a userless user account.
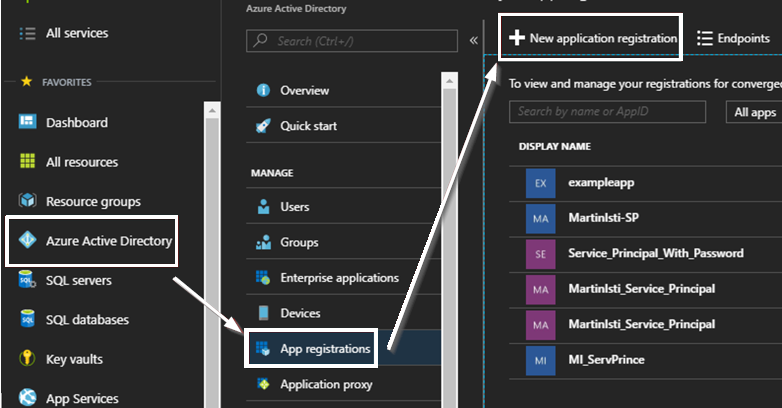
It gets a bit tricky in the Azure Portal as you can identify the same object using multiple notions:
- Application / Managed Application
- App Registration
- Service Principal
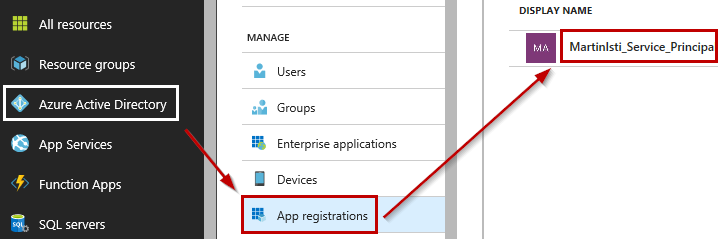
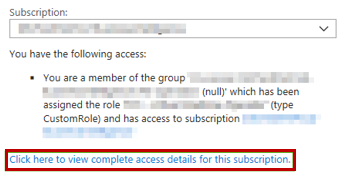
And voila the ID is revealed:

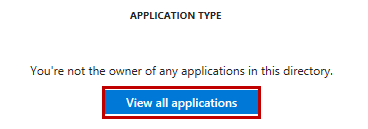
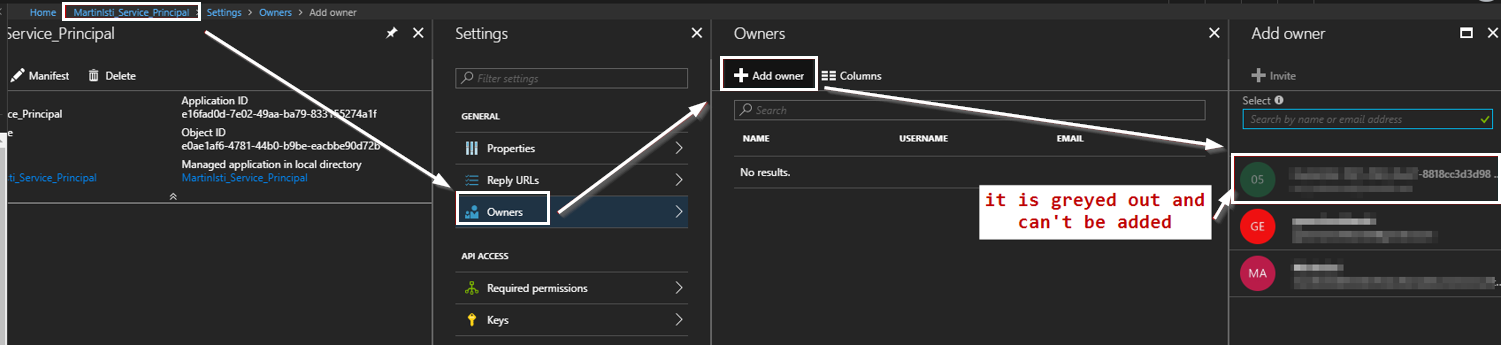
The reason why you might need to click to “View all applications” could be that you are logged on as the subscription admin which basically owns everything but not always explicitly. I created this Service Principal as that admin but that user can’t be specified as the owner:
Please note that the display name is given to me, it can be basically anything so usually, it doesn’t contain the text Service Principal.
If you plan to do away with using username/password combos, using service principals is the Azure way of doing it. It works like a charm once it’s implemented, but it takes more effort to set it up.
According to Microsoft service principals are accounts not tied to any particular user, which can have permissions on them assigned to pre-defined roles. Authenticating with a service principal is the best way to write secure scripts or programs, allowing you to apply both permissions restrictions and locally stored static credential information.
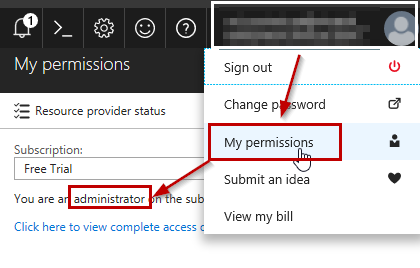
Azure Log in with a service principalFirst of all, what you need – what a surprise! – is a service principal! You have to be an admin to go through this process. It’s easy to check if you are an admin:
If you are not an admin, a much longer message is displayed, e.g. like this
Once you’re signed in to the proper subscription with the proper account then follow the steps:
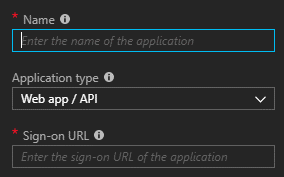
The initial process is very basic, just define the name and the sign-on URL (the application type for a service principal should be the default Web app / API)
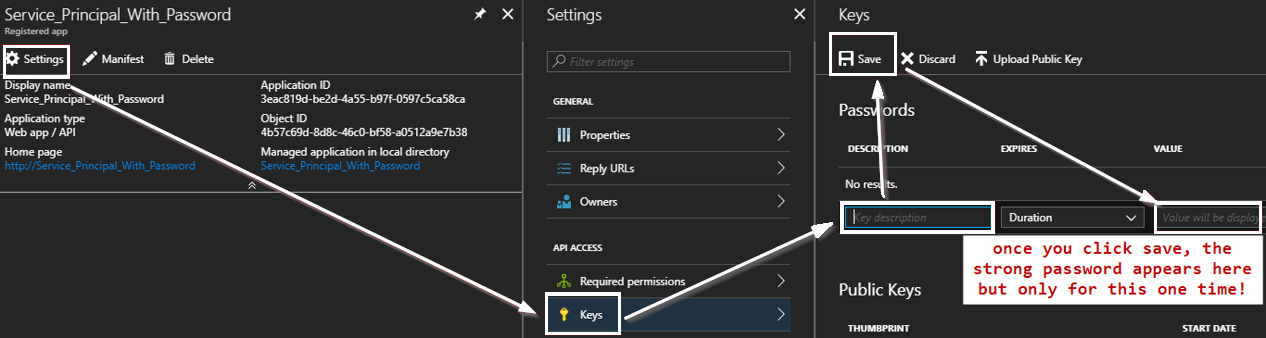
Then in the settings page, you can properly configure this service principal, including setting up a password for it:
So, we have a service principal which is great! If using the GUI is too much hassle for you (it definitely is for me) both CLI and PS can make your life easier.
To run the below code, you have to log in to your Azure subscription with an account that has the required permissions to create a service principal.
|
1 2 3 4 5 6 7 |
#create a service principal with a single password az ad sp create-for-rbac --name Service_Principal_With_Password --password Y0ur_$tr0ng_P@$$w0rd az logout #login with the new service principal | the password won’t be accessible from the portal so store it safe and secure at the point of creation! az login --service-principal --username http://Service_Principal_With_Password --tenant mitechnicalvivaldi.onmicrosoft.com --password Y0ur_$tr0ng_P@$$w0rd |
As it looks when it’s created successfully

And you are in!

What you can do with CLI, do it with PowerShell this time:
|
1 2 |
$Credential = Get-Credential -UserName <application_id> -Message "Enter Password:" Connect-AzureRmAccount -Credential $Credential -TenantId <tenant_id> -ServicePrincipal |
But how to check its details? There are multiple ways (I use CLI in the below bullet points, but PS can also do it) but none of them are optimal:
- az ad sp list – this lists ALL service principals, not just the ones related to the account signed in so it’s basically next to useless (it’s reported across the net so hopefully will change)
- az ad app list – this only lists your apps where you should be able to easily find what you are looking for
- az ad app show –id <id> – this shows the details for only your application
- az ad sp show –id <id> – this looks good but how to get the ID?
- Interesting that the same object has different object id values as a Service Principal and as an Application! Luckily the AppId values match!
- Use the GUI

Managed Service Identity – MSI
What is an MSI? It’s Microsoft’s solution to do away with passwords and the normal authentication methods. Let’s say you create a VM and you have a SQL Server instance. The VM can be imagined as a user in terms of AD, and you add that user to your SQL Server. That means all incoming connections from that VM are deemed as secure. No password is needed, the relationship between the two objects solves that. Of course, if your VM is compromised, there is no protection. However, if you consider that you can give users access to your SQL Server this way, they can’t go away and access the databases e.g. from local SSMS. It’s not unbreachable but enhances your security significantly.
This is your main guide: Tutorial: Use a Windows VM Managed Service Identity (MSI) to access Azure SQL
Beware that not all things work that straightforward as that tutorial describes! First set up your environment the following way:
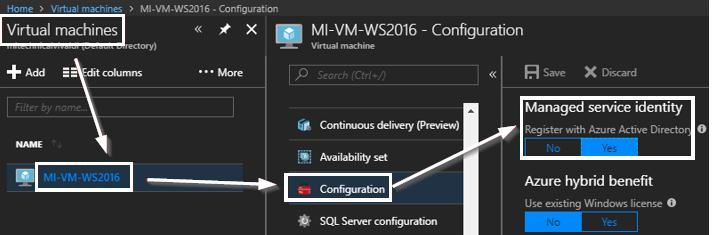
- Create a VM that has SQL Server on it (I picked Free SQL Server License: SQL Server 2017 Developer on Windows Server 2016 as this comes with SQL Server Management Studio preinstalled) and make sure that MSI is enabled on it! You can do that during the creation process:
 Or for an existing VM
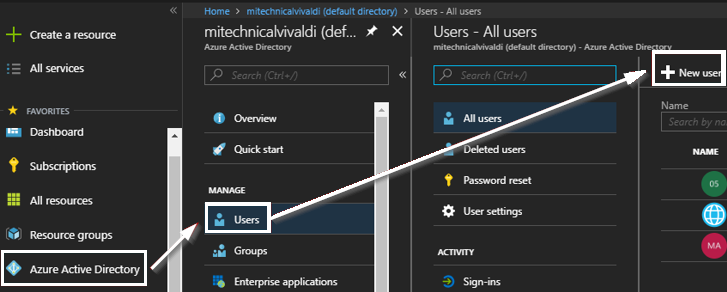
Then make this user a Global administrator!
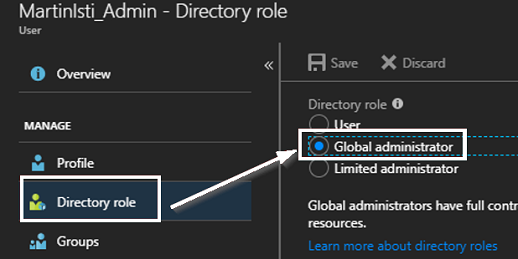
From now on use this user when authenticating in CLI / PS. The reason? The superuser who owns the whole subscription should also have all the rights you could imagine, but that God-mode, unfortunately, doesn’t always work as expected. I have run into authentication errors quite a few times with that account, whereas this normal, explicitly created admin user just whizzes through. It’s always better to explicitly grant rights as implicit permissions can sometimes fail and then no matter how much you scratch your head, it wouldn’t help. Trust me, I have tried!
Now we can follow the steps highlighted in the tutorial but be careful, as the behind-the-scenes information is not always explicitly mentioned, and it can catch you!
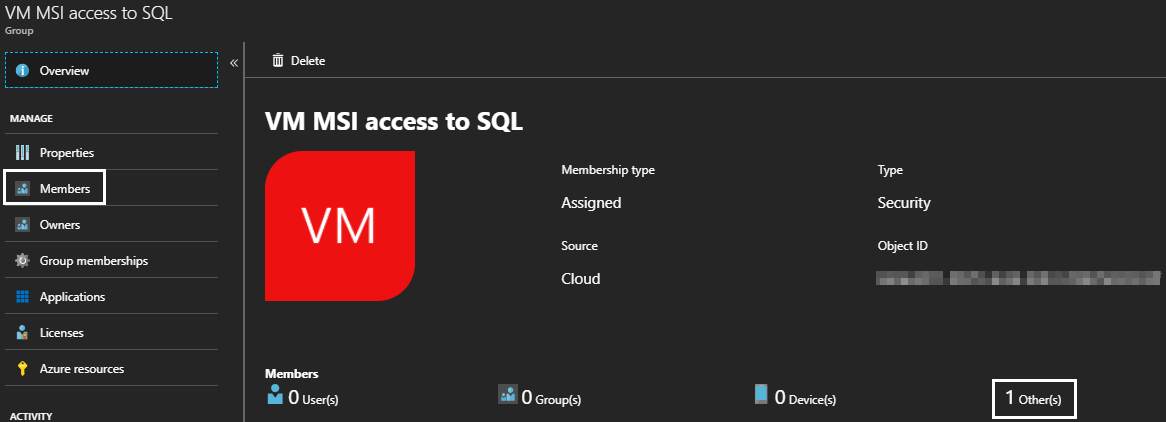
Create an AD group and assign the VM MSI as a member
Let’s try this through the portal:
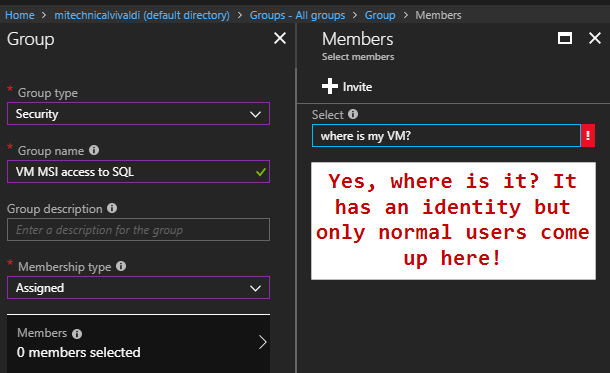
You can browse the Virtual Machine’s various settings, the MSI properties are not there. Yet you need the MSI’s object ID as the user in your scripts. Luckily it is easy to get that via another script command, but I couldn’t rest until I found that object on the portal as shown below:
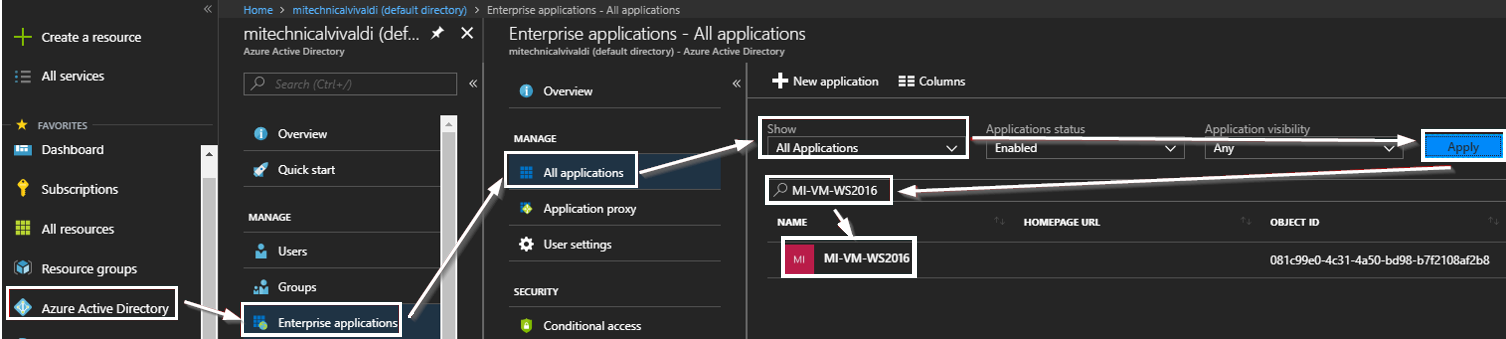
Go to Azure AD, choose Enterprise applications and then pick to show All Applications in the drop-down menu. After you click Apply, in the long list your VM should appear! I typed mine’s name into the search field to make the results clearer and there it was with relevant id values!
My code
|
1 2 3 4 5 6 7 8 9 10 11 |
#use the new admin account I wrote about earlier Connect-AzureRmAccount -TenantId <your tenant id> Connect-AzureAD -TenantId <your tenant id> $Group = New-AzureADGroup -DisplayName "VM MSI access to SQL" -MailEnabled $false -SecurityEnabled $true -MailNickName "NotSet" $Group.ObjectId # just if you want to see the actual id $VM = Get-AzureRmVm -ResourceGroup "MartinIsti_Demo" -Name "MI-VM-WS2016" $VM.Identity.PrincipalId # just if you want to see the actual id Add-AzureAdGroupMember -ObjectId $Group.ObjectId -RefObjectId $VM.Identity.PrincipalId # this came back with a failure for me all the time before using the new admin account! |
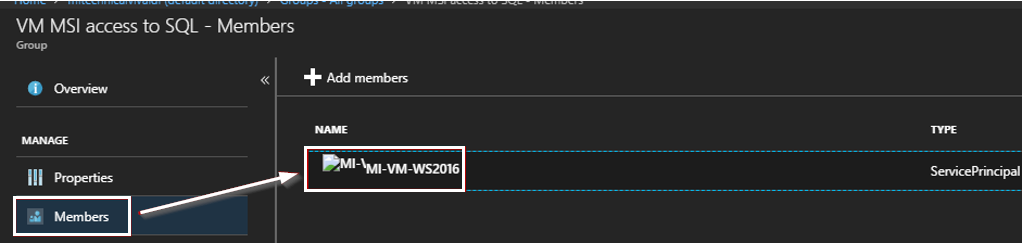
Now you can check that the group does indeed contain the VM MSI:
The next steps are aligned with the tutorial, they work as expected.
Enable AD auth for your SQL Server
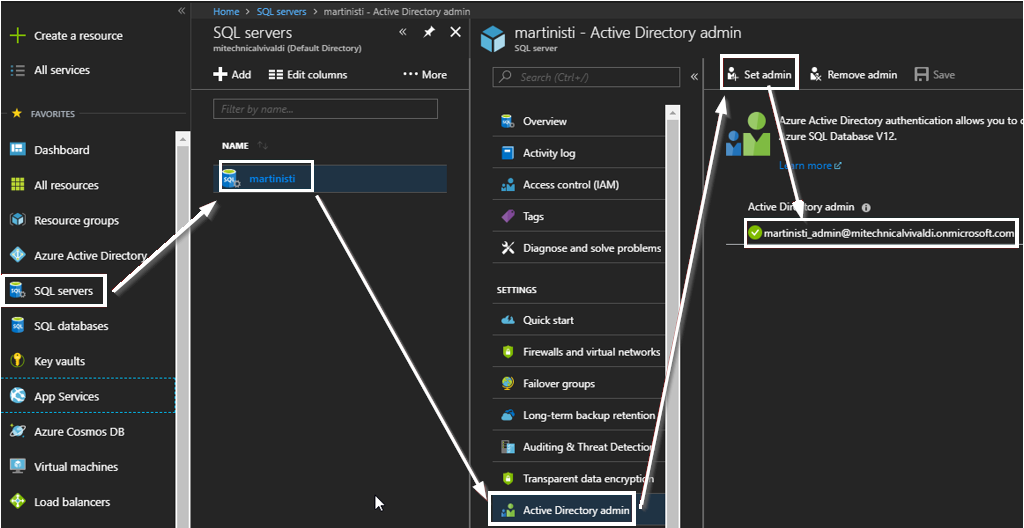
I chose my admin account to keep the security settings simple. Obviously, in a real-life environment, it is different.
Contained user in your SQL Server
First, you need to log on using SSMS. At this point, it can be from anywhere, but you need the log in credentials you set up as admin when you originally created your SQL Azure objects (not part of this article).
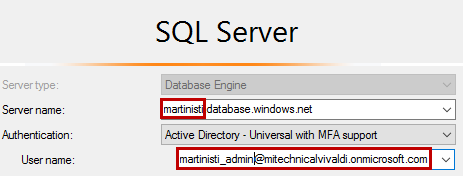
The server name always ends with .database.windows.net
The user name to be used is the one who you set as admin in the previous step.
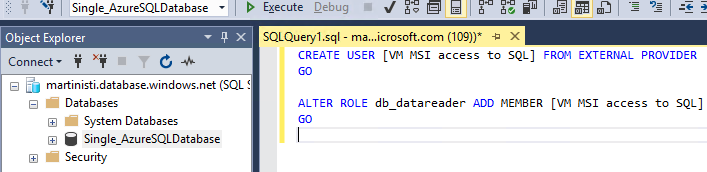
Now run the below code against the database you want to give access to (I only have one so it’s easy)
|
1 2 3 4 5 |
CREATE USER [VM MSI access to SQL] FROM EXTERNAL PROVIDER GO ALTER ROLE db_datareader ADD MEMBER [VM MSI access to SQL] GO |
Open connection to Azure SQL Database
There are multiple ways to connect to a SQL database and unfortunately, the simple and most common one is not available: you can’t use SQL Server Management Studio for that authentication method. But it’s not designed for that anyway as developers are (at this point in time at least) human creatures and it’s best they have explicit individual access to a database.
For applications using an MSI is a great method to connect and we can use PowerShell to test if the authentication works as expected.
The first step is to get an access token. The simple way of merely using a connection string is not enough by itself, that will only be the second step. The actual PS code is fairly straightforward, and the official documentation is again very useful for this last step, too!
- Invoke a web request to get the access token that returns a JSON object. Very important that the URI in this command is static! It doesn’t change in different environments, so the IP address should stay the same and keep all the: as %3A and / as %2F!
- Convert the JSON to a PS object
- Extract the access token from that freshly converted PS object
- Create a SqlConnection using a simplified connection string (only server /Data Source/ and database name /initial catalog/ is required as the authentication is done with an access token)
- Then as the real test, open that connection and if that’s successful (no error message), just run a query that returns something to have a positive confirmation!
|
1 2 3 4 5 6 7 8 9 10 11 12 13 14 15 16 17 18 19 20 21 22 23 24 25 26 27 28 29 30 31 32 33 |
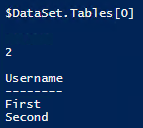
#1 | get the access token | keep the uri as it is below $response = Invoke-WebRequest ` -Uri 'http://169.254.169.254/metadata/identity/oauth2/token?api-version=2018-02-01&resource=https%3A%2F%2Fdatabase.windows.net%2F' ` -Method GET ` -Headers @{Metadata="true"} #2 | convert the JSON object to a PowerShell object $content = $response.Content | ConvertFrom-Json #3 | extract the access token $AccessToken = $content.access_token #4 | define and open the SqlConnection using your own server / database names $SqlConnection = New-Object System.Data.SqlClient.SqlConnection $SqlConnection.ConnectionString = "Data Source = <your server>.database.windows.net; Initial Catalog = <your database>" #specify the authenticatoin method and use the extracted access token $SqlConnection.AccessToken = $AccessToken $SqlConnection.Open() #5 | populate a dataset with a single query just to make sure you have a positive confirmation on screen $SqlCmd = New-Object System.Data.SqlClient.SqlCommand $SqlCmd.CommandText = "SELECT * from <your table>;" $SqlCmd.Connection = $SqlConnection $SqlAdapter = New-Object System.Data.SqlClient.SqlDataAdapter $SqlAdapter.SelectCommand = $SqlCmd $DataSet = New-Object System.Data.DataSet $SqlAdapter.Fill($DataSet) $DataSet.Tables[0] #be tidy and close the connection $SqlConnection.Close() |
As a result, you will see the result of your query on the screen if your table wasn’t empty. Or even if it’s empty, it shows that the number of returned rows is 0.


Since then he has dealt with every component of the Microsoft BI stack (all the S-es) and now he's finding his way into the clouds, without being clouded by its marketed potential and staying realistic.
He has spent 9 years consulting for various clients in many different industries and he still enjoys dealing with the nitty-gritty troubleshooting (such as "Why doesn't this Azure DB connection manager work?"), modelling data warehouse / data marts and anything in between: requirements gathering/analysis, development, implementation, …
The experience he gathered throughout the years helped him becoming a Microsoft Certified Solutions Expert in the field of Business Intelligence.
He currently works for Farmlands, one of the largest agricultural cooperatives in New Zealand, developing and extending their data warehousing solutions.
View all posts by Istvan Martinka
- CDS for apps in the [POWER WORLD] - November 19, 2018
- Dynamic Partitioning in Azure Analysis Services (tabular) - August 6, 2018
- Connecting to Azure SQL Database - May 23, 2018