
This article discusses what exactly an Azure Data Explorer is and its important features. We will also walk through the Kusto query language and explore a sample data in the Data Explorer in Azure.
Companies are generating and storing truckloads of data on a daily basis. This data can be unstructured (like audios, videos), semi-structured (like XML, JSON) or structured (like numbers, dates, strings). Data professionals are incessantly looking for effective techniques to handle massive volumes of diverse data. While we can certainly do this with traditional data warehouses, Hadoop, Spark, etc. analytics tools, but that would involve the conventional approach of ETL on terabytes and petabytes of data before you can explore and analyze it.
A platform that would let users utilize and analyze varied raw data quickly with fast data ingestion and optimal performance will be the need of the moment. Let’s address this scenario using an interesting data analytic service.
What is Azure Data Explorer?
Azure Data Explorer aka ADX, is a fast, highly scalable and fully managed data analytics service for log, telemetry and streaming data. This data exploration service enables you to pull together, store and analyze diverse data. You can query terabytes of data in a few seconds and it allows fast ad-hoc queries over the varied data.
Previously known as ‘codenamed Kusto’, this tool uses SQL-like query language, Kusto query language (KQL) for analyzing fast-flowing data from IoT devices, applications, websites, etc. KQL is not limited to using functions and hundreds of operators such as aggregation, filtering, etc. but it also includes built-in machine learning features like clustering, regression, etc. We will learn more about it later in the article.
ADX works on the principle of isolation between Compute and Storage using volatile SSD storage as a cache and persistent storage in Azure Blob Storage. It is a fully managed ‘Platform as a Service (PaaS)’ that lets users focus only on their data and queries. To name one of the key benefits of ADX, this offering supports time series analysis with great ease and a huge list of functions to analyze, identify trends and anomalies.
We assume you are familiar with Azure and have an Azure subscription. In case, you don’t, please go ahead and follow the steps here to create one for yourself.
How does Azure Data Explorer work?
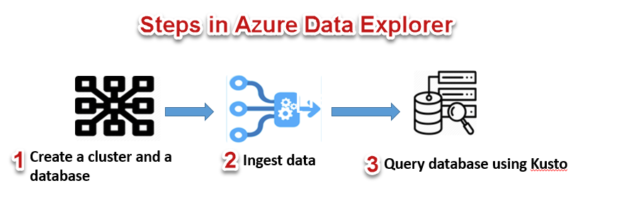
We can start by first creating a cluster and one or more databases in it. Then we need to load (ingest) data into a database we just created and finally you can run queries against it and perform data exploration.
Let’s get into the concepts of ADX and see how it unfolds.
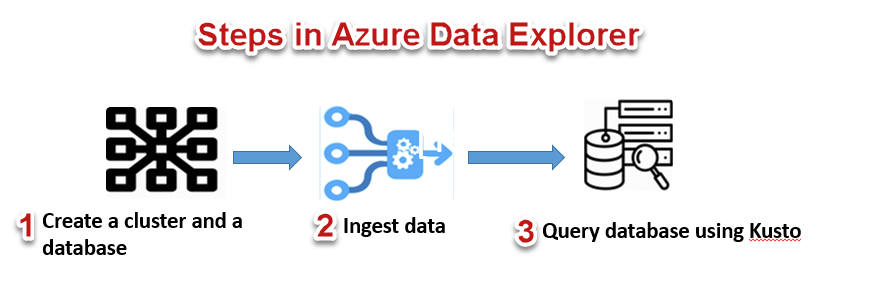
How to create an Azure Data Explorer cluster?
Creating a cluster is a straight-directional process as you would do for any other Azure resource, sign-in to Azure Portal, and search for ‘Azure Data Explorer cluster’ and click on Create.
Provide in basic details like your subscription, Resource group (you can create a new one too), your ADX cluster name, pricing details, etc. For demo purposes, I have selected the lowest price specification, development tier (Dev D11) and be mindful of not using this in production environments. Click ‘Review + create’ to review cluster details and finally provision a cluster.
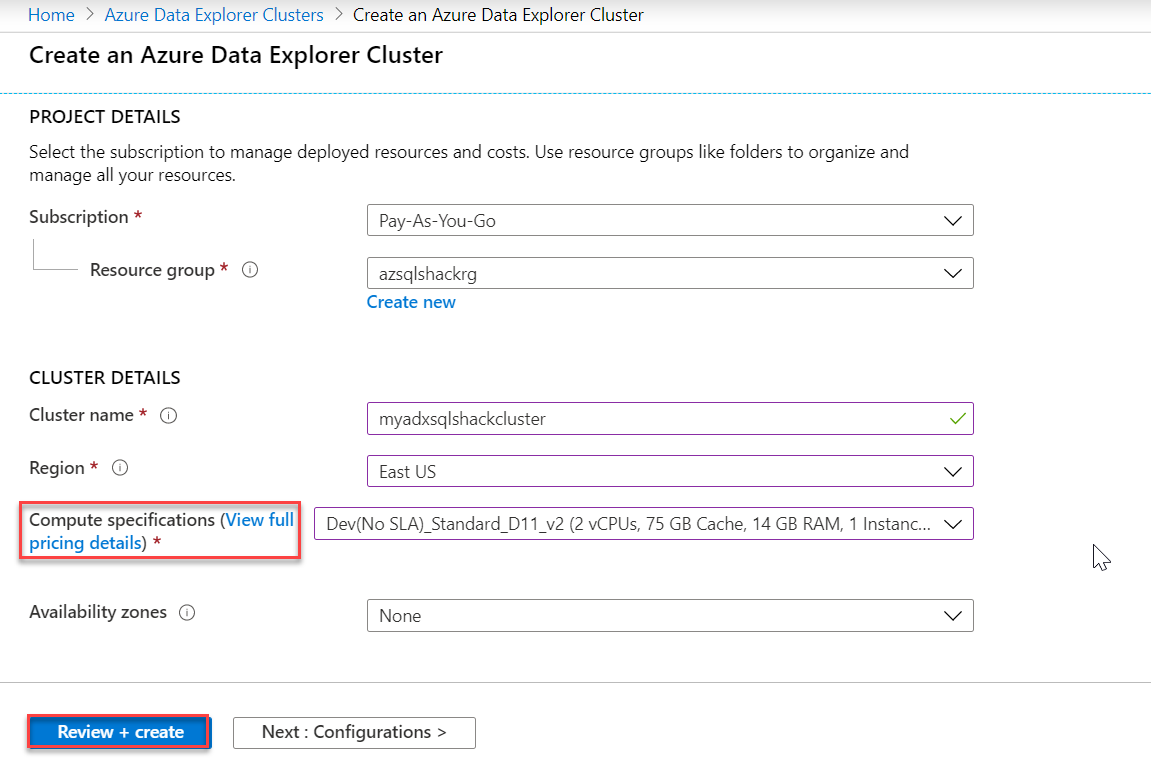
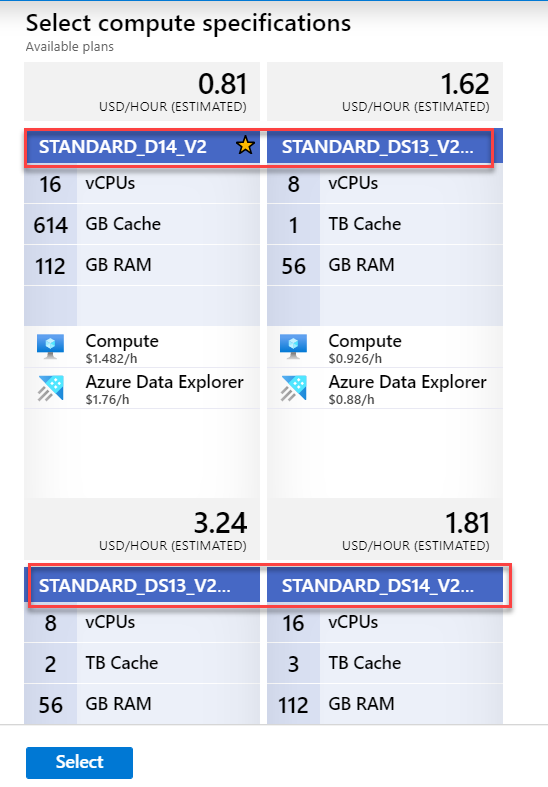
Also, you can click on ‘View full pricing details’ to get detailed information on pricing. ADX clusters are billed on a per-minute basis and they are charged only when they are running. Also, if you notice below, ADX supports two types of instances – D series (Compute-optimized instances – for a large number of queries on small data) and DS series (Storage optimized instances – for fewer queries on a huge volume of data). Select them depending on your workload needs.
You can understand more about ADX cost estimation using this ADX Cost Estimator.
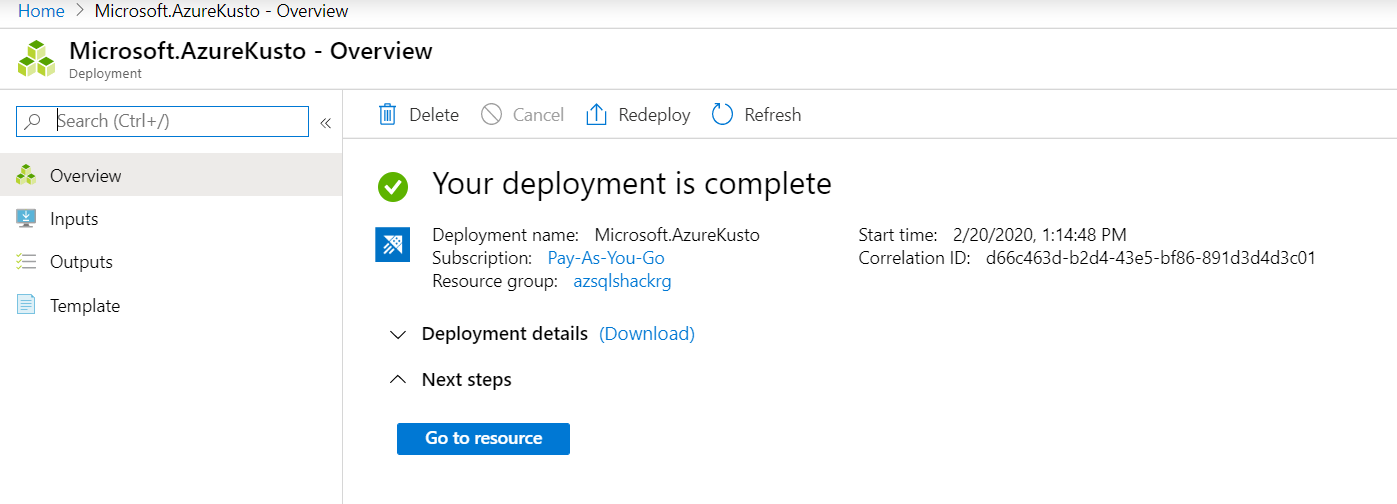
Once created, you will be notified as shown in the following snapshot. Click on the ‘Go to resource’ button.
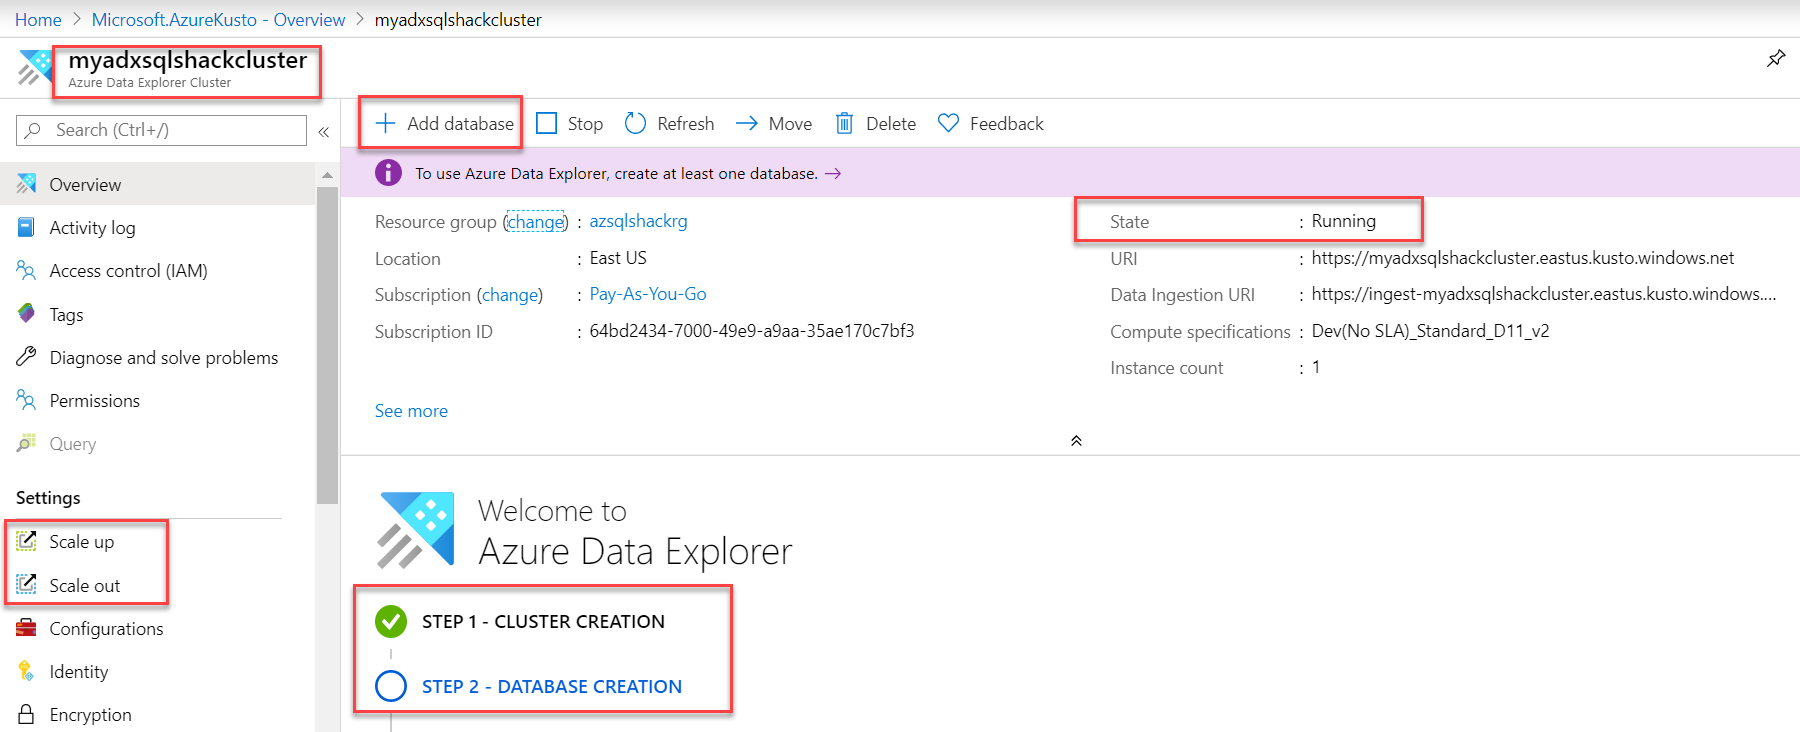
And you can see, Step 1 – cluster, myadxsqlshackcluster is created successfully and is running. You can also scale up and scale out based on your business needs. Let’s head over to step 2 of database creation and click on Add database.
Create a database in the cluster
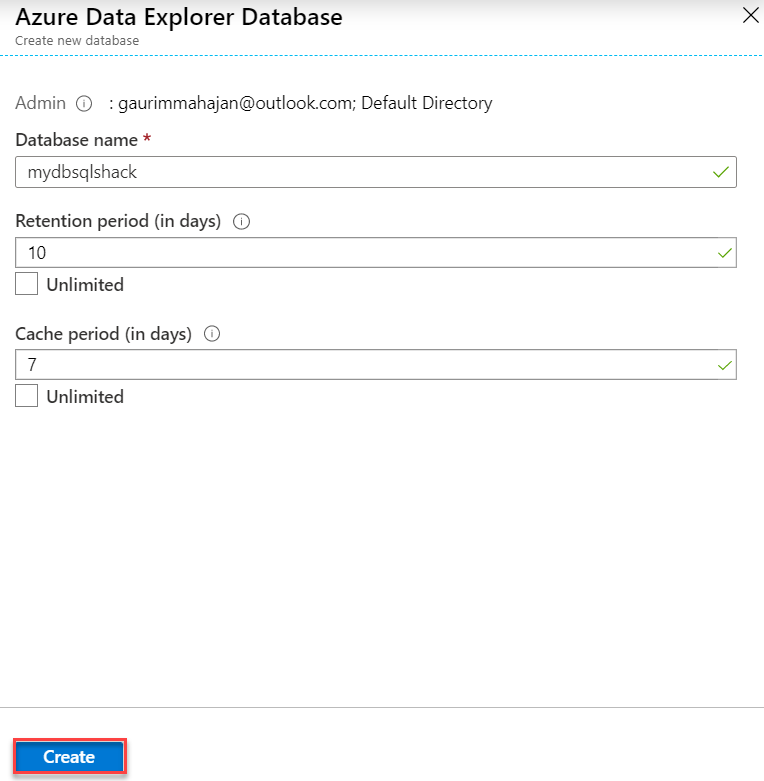
Fill in the following information like the name of the database, retention and cache period in days and hit the Create button. This is a unique feature of ADX that lets you decide for how long you want to keep the data in the cache (hot or cold). I am providing a minimum number of days for the purpose of this demo.
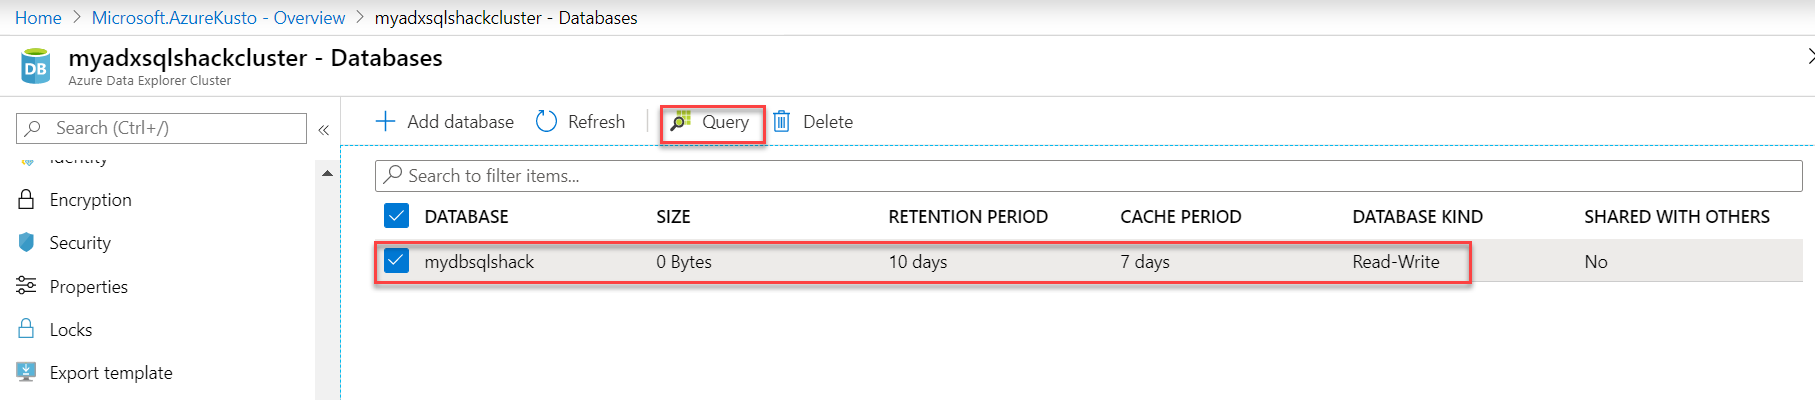
The database, mydbsqlshack, is created in the cluster.
Now that our cluster and database are in place, you can go into the database and run a simple command like “.show database” that would return details of your database.
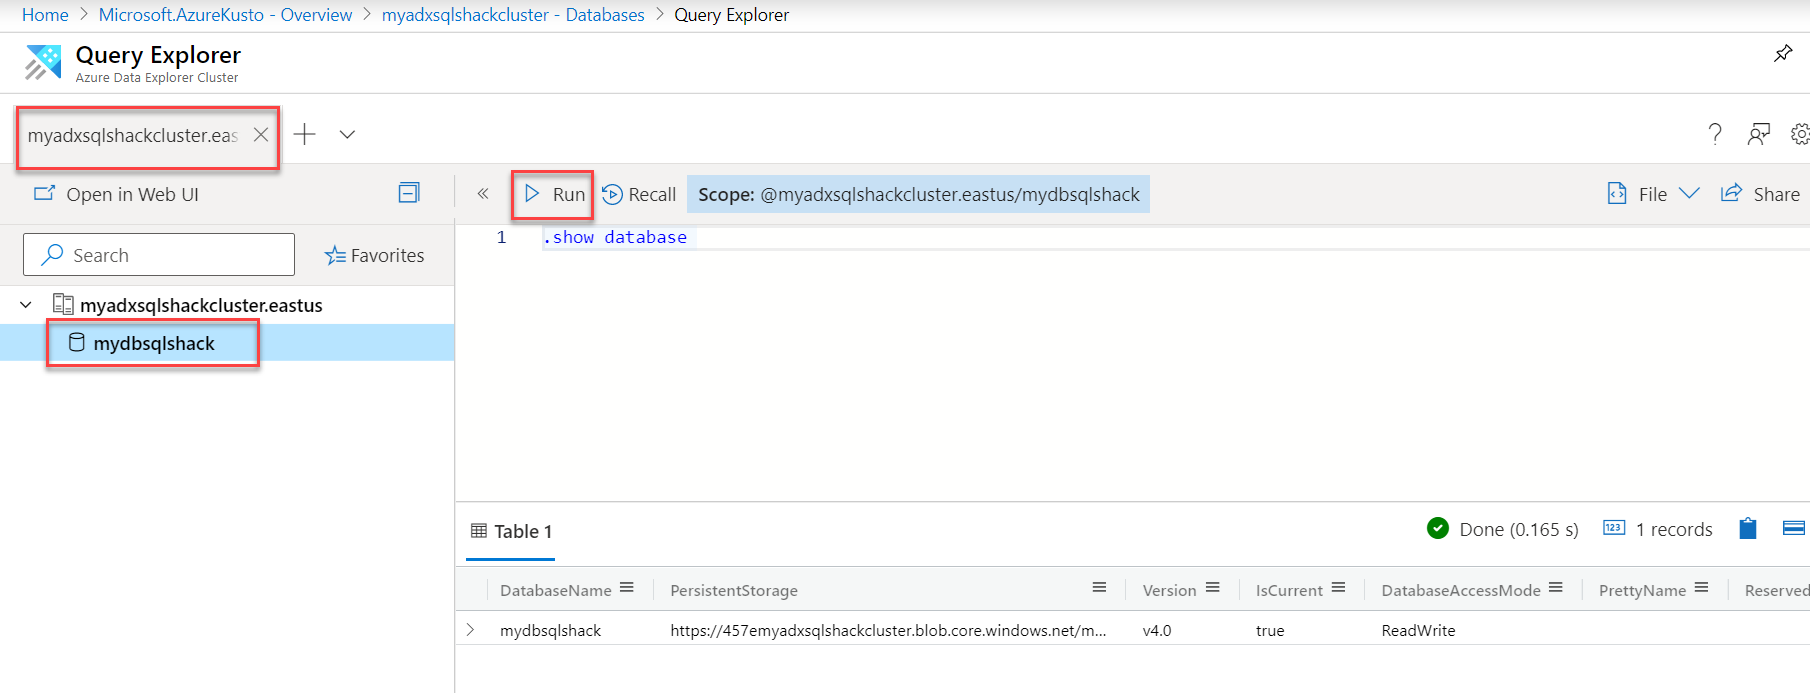
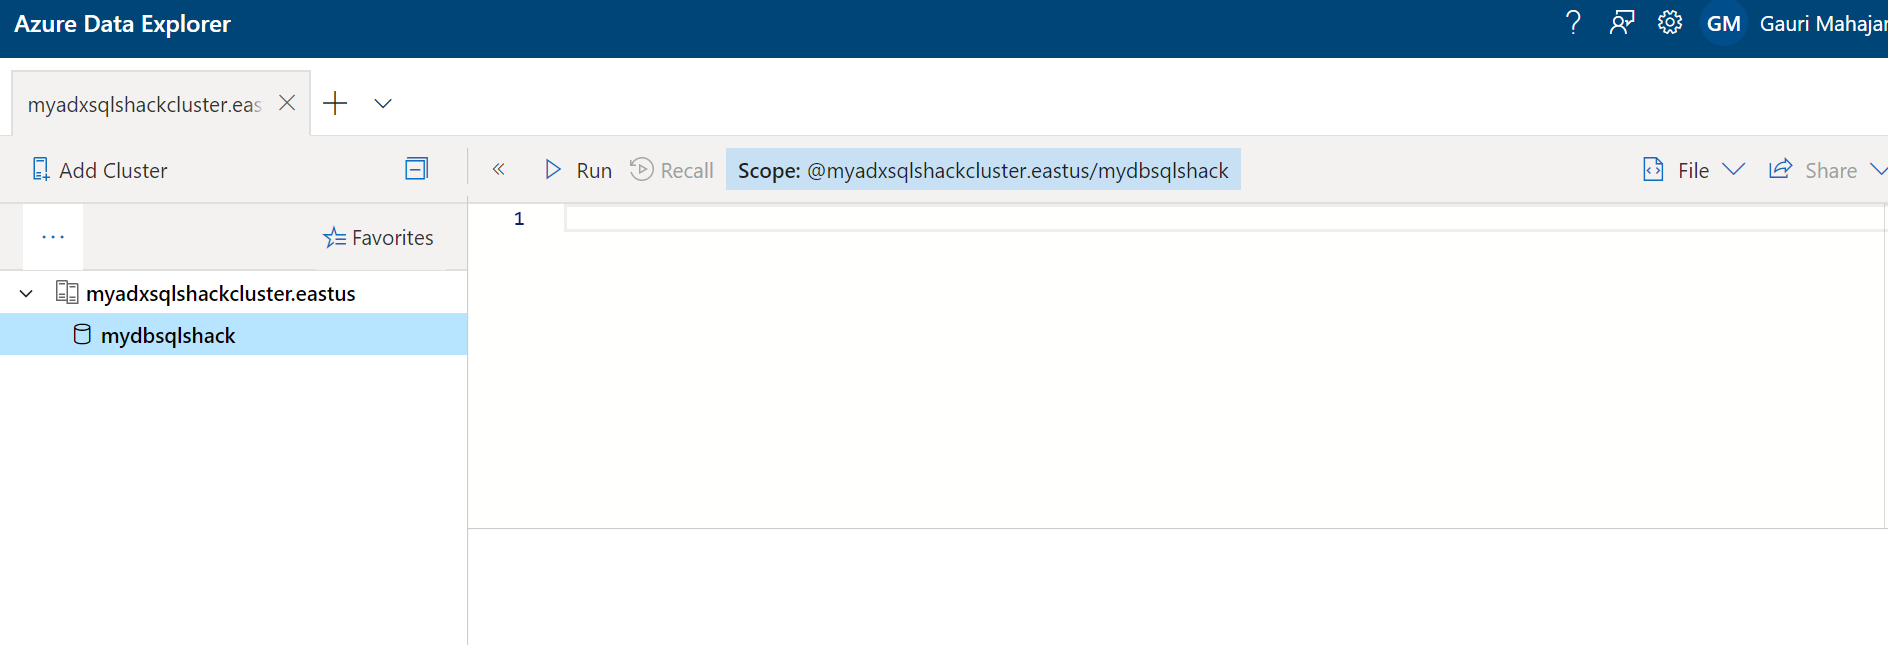
Data Explorer Web UI
You can use the Azure web application also for the same.
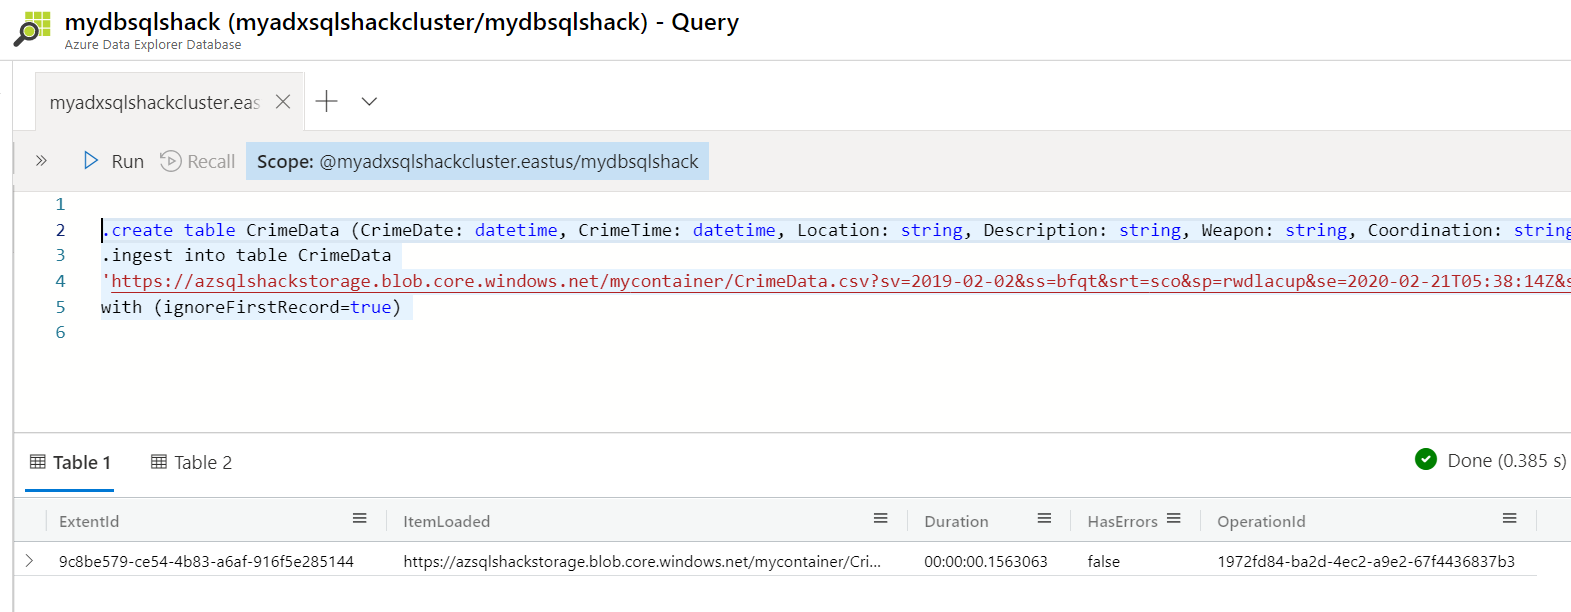
 Ingesting a sample data into Azure Data Explorer
After the database is created successfully, we need to work on step 3 – Data ingestion. You can click on Create data connection to load/ingest data from Event Hub, Blob Storage or IoT Hub into the database you just created. ADX also supports a wide variety of other methods to ingest data such as using Kafka connector, Azure Data Factory, Event Hub, etc. and this indeed is another discussion outside the scope of this article. You can go over these various ways to ingest large volumes of data, here.

For this article, we will demonstrate a basic example where we load sample data from Azure Blob Storage into the ADX database.
Paste the below commands in the query explorer. The first command creates a table CrimeData and the second command ingests data from the csv file to this table. The source csv (CrimeData.csv) resides in a container named mycontainer in the Azure Blob Container.
.create table CrimeData (CrimeDate: datetime, CrimeTime: datetime, Location: string, Description: string, Weapon: string, Coordination: string)
.ingest into table CrimeData
‘https://azsqlshackstorage.blob.core.windows.net/mycontainer/CrimeData.csv?sv=2019-02-02&ss=bfqt&srt=sco&sp=rwdlacup&se=2020-02-21T05:38:14Z&st=2020-02-20T21:38:14Z&spr=https&sig=adoJ%2BM494Vq6lwCvL0ZjWP%2BtaZsTNMcPtnIh%2BuPBlQw%3D’ with (ignoreFirstRecord=true)
Query the database using Kusto language
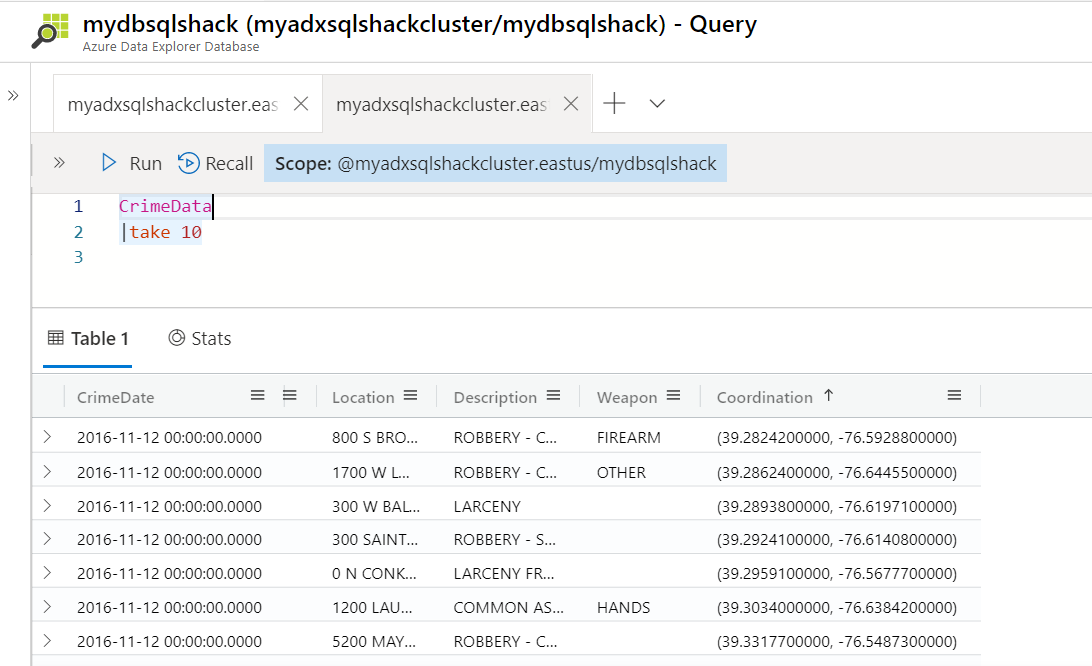
Once the ingestion is done, your database is ready for data exploration. We use Kusto query language in Azure Data Explorer to run queries. You are right if you think Log queries in Azure Log Analytics and Azure Monitor also use the same language, KQL. Being a SQL person, I find this document extremely handy for SQL to Kusto query translations.
Let’s begin by querying our database to show 10 rows from the CrimeData table. To do so, paste this in the query window and hit Run. The following screenshot shows the result.
CrimeData
|take 10
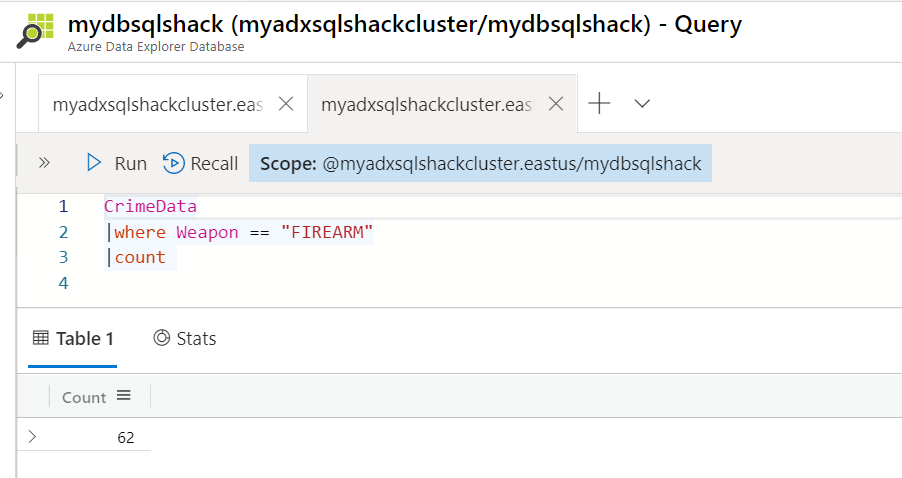
Let’s try a new query that retrieves the count of records with Weapon equals to Firearm.
CrimeData
| where Weapon == “FIREARM”
| count
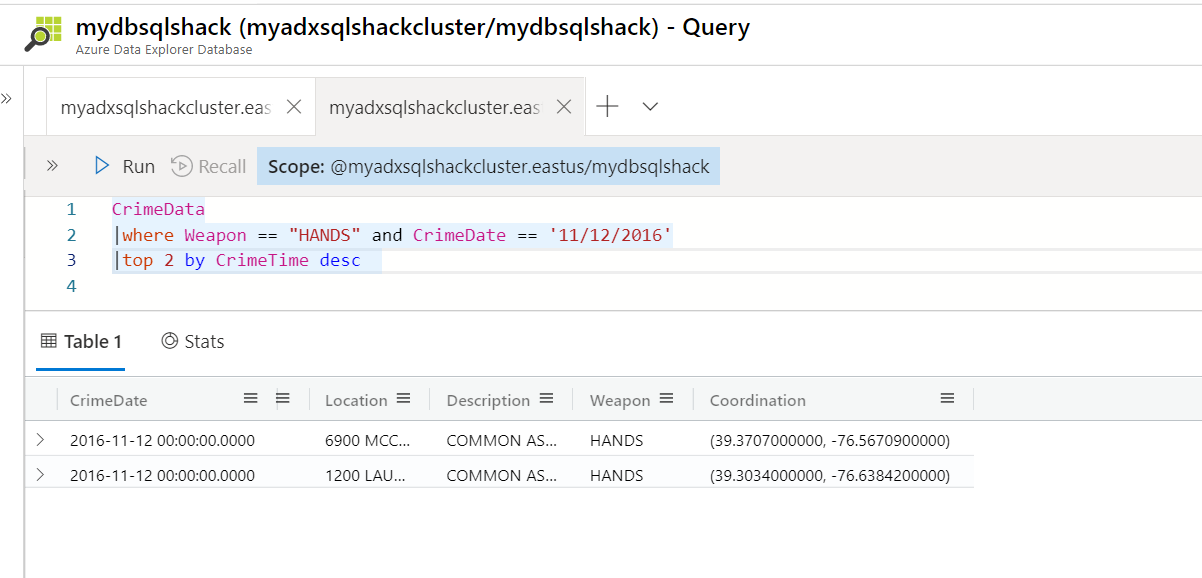
The following query returns a new output; it retrieves the top 2 rows for the crimes that happened on 11/12/2016 with weapons as Hands.
CrimeData
|where Weapon == “HANDS” and CrimeDate == “11/12/2016”
|top 2 by CrimeTime desc
We can also include tools for basic visualization and can choose from a range of chart types using render operator.
Also, keep in mind, ADX does not let you delete row(s) from the table as we do in a SQL table, because of the fast read access. You can delete a table though using the drop command like this – .drop table <tablename>.
Microsoft has done an excellent job of putting out a wide variety of documentation on Azure Data Explorer with several step-by-step tutorials here.
Summary
We covered introducing Azure Data Explorer in this article and learned how to create it and some of its important features. Apart from the above aspects of ADX, you can also connect ADX to Power BI to visualize data and gain powerful insights about it.

She has a deep experience in designing data and analytics solutions and ensuring its stability, reliability, and performance. She is also certified in SQL Server and have passed certifications like 70-463: Implementing Data Warehouses with Microsoft SQL Server.
View all posts by Gauri Mahajan
- Oracle Substring function overview with examples - June 19, 2024
- Introduction to the SQL Standard Deviation function - April 21, 2023
- A quick overview of MySQL foreign key with examples - February 7, 2023