
In this article, we will review how to migrate database from on-premises SQL Server instance to AWS RDS SQL Server instance and between AWS RDS instances using native backup, restore and amazon simple storage service(S3).
To backup and restore database full backups from simple storage service(S3) bucket to AWS RDS instance we need three important components.
- AWS Simple Storage Service(S3)
- AWS Identity access and management (IAM) to access S3 bucket
- Option group with SQLSERVER_BACKUP_RESTORE option enabled
Creating a Simple Storage Service (S3) Bucket
To backup and restore full backups from simple storage service (S3) bucket to RDS instance, we need to create a simple store service (S3) bucket in the same region where RDS instance is created. AWS RDS SQL Server does not support restore or backup to a bucket in a different region.
To create a simple storage service (S3) bucket, Login to AWS console and Click on Services, Type S3 in the search box and select S3 as shown in the below image which will navigate to Amazon simple storage service (S3) console.

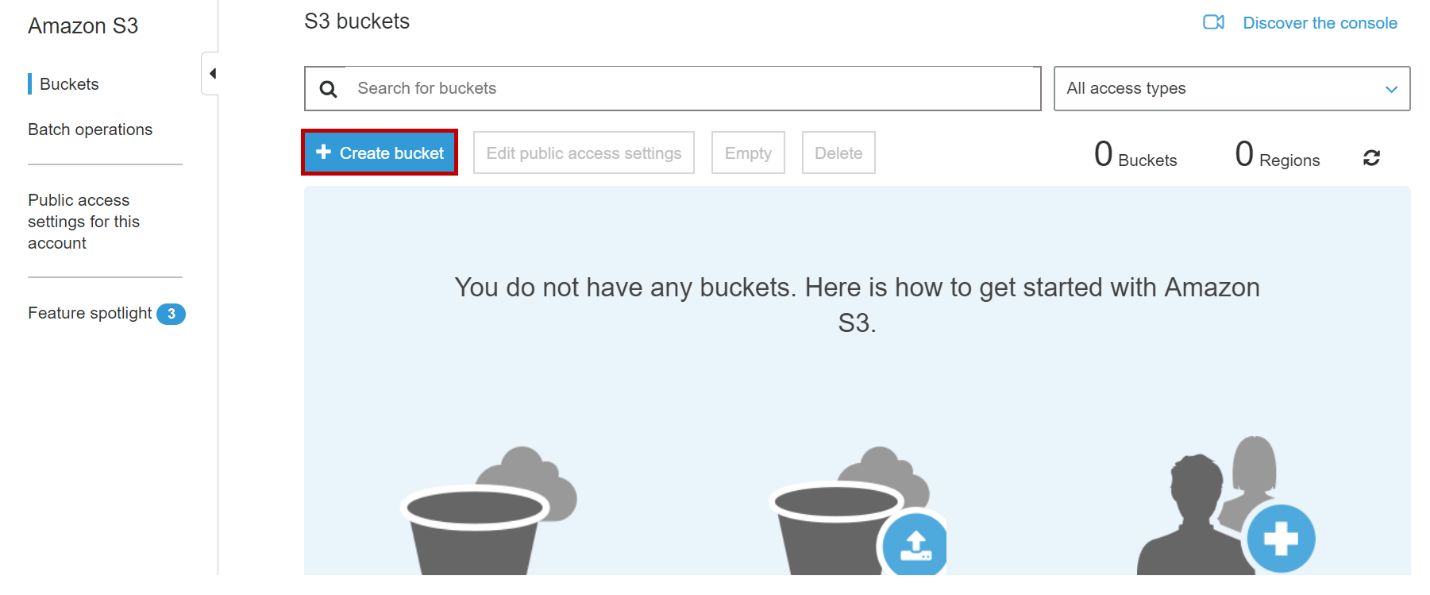
In Amazon S3 console, Click on Create bucket.
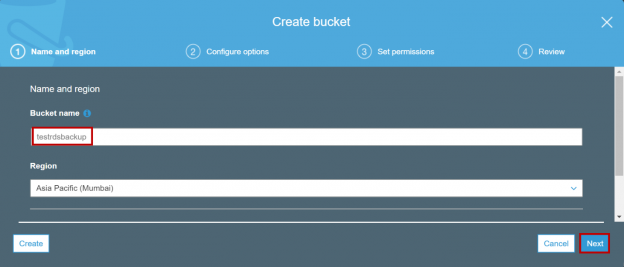
On the Create bucket pop up window, Input the bucket name and select the region of your choice. Please note that the region you selected should be the same as AWS RDS instance region where you are going to restore the backup or take the backup.

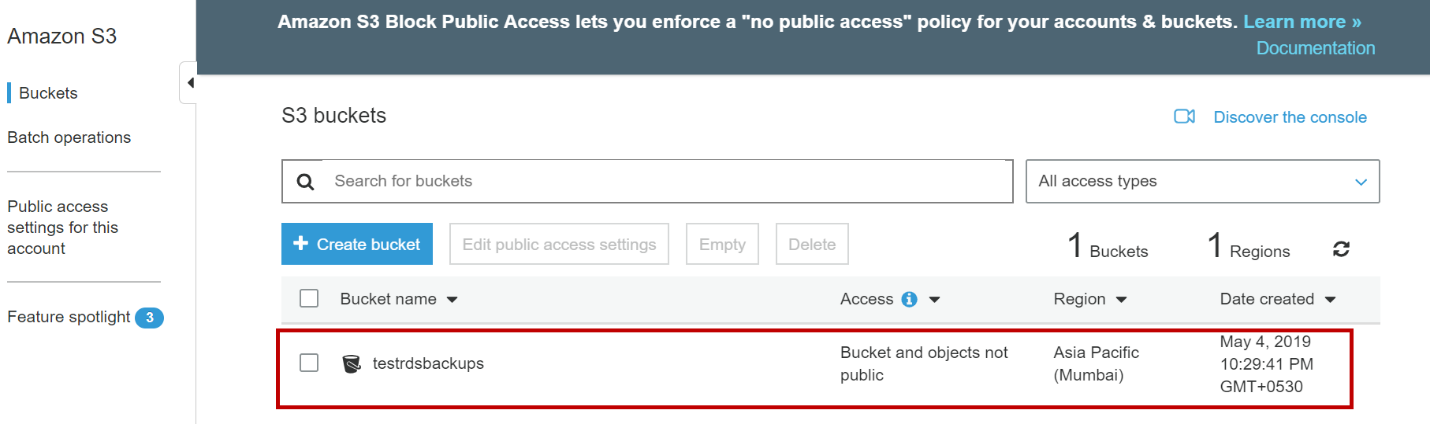
Click on Next and select other configurations like version settings and permissions as per your choice. Click on Create bucket at the end. Once the bucket is created it will be listed in buckets page as shown in below image.
Creating an IAM Role
We need to create an IAM role and attach a policy which will be used by AWS RDS service to access the simple storage service (S3) bucket.
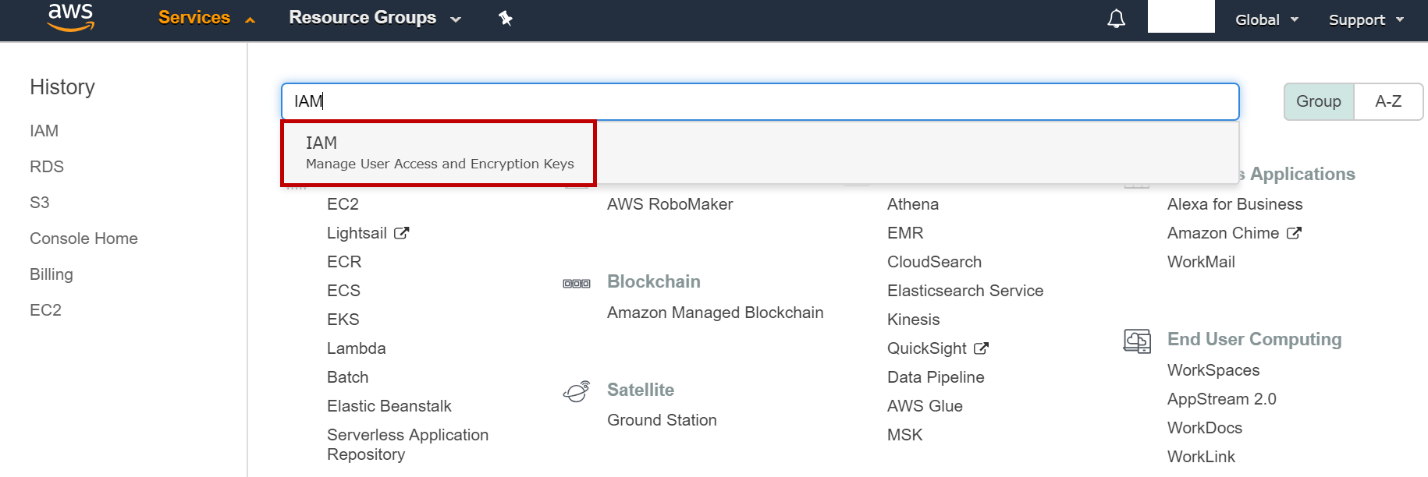
To create an IAM role, Click on Services and type IAM in the search box. Click on IAM as shown in below image which will take you to the IAM console.
In IAM console, Click on Policies and click on Create Policy. Select JSON editor and enter as below which will provide the list, read and write permission on the simple storage service(S3) bucket.
|
1 2 3 4 5 6 7 8 9 10 11 12 13 14 15 16 17 18 19 20 21 22 23 24 25 26 27 28 29 |
{ "Version": "2012-10-17", "Statement": [ { "Effect": "Allow", "Action": [ "s3:ListBucket", "s3:GetBucketLocation" ], "Resource": [ "arn:aws:s3:::testrdsbackups" ] }, { "Effect": "Allow", "Action": [ "s3:GetObjectMetaData", "s3:GetObject", "s3:PutObject", "s3:ListMultipartUploadParts", "s3:AbortMultipartUpload" ], "Resource": [ "arn:aws:s3:::testrdsbackups/*" ] } ] } |
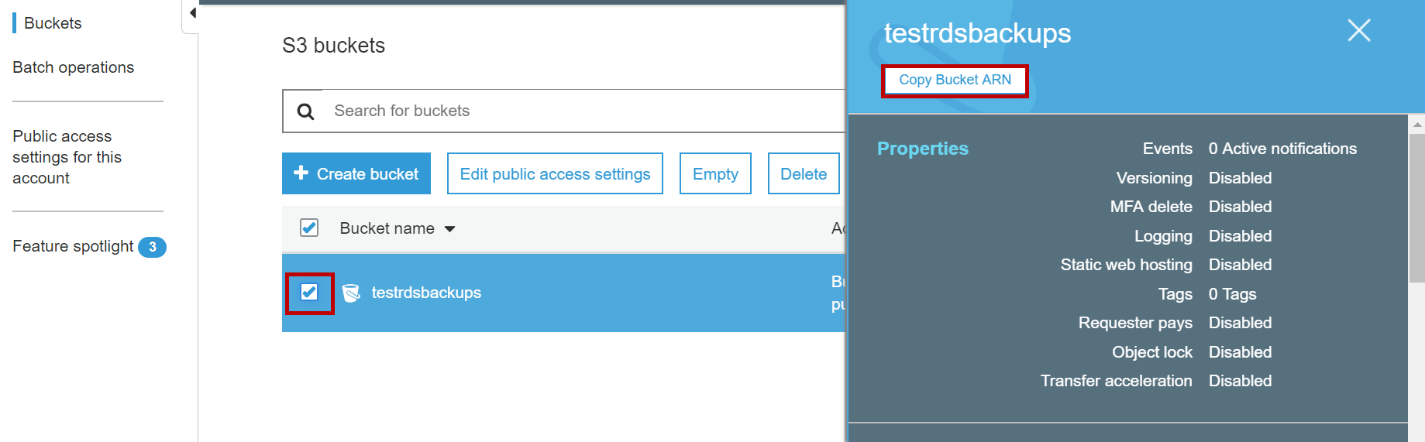
Replace the ARN of the bucket with your bucket ARN. To know the ARN of the bucket navigate to AWS simple storage service(S3) console and click on Buckets. Now click on the checkbox next to your bucket which will open a pop-up. In the pop up click on copy Bucket ARN.
Once you replace the ARN of bucket click on Review policy. Enter the name and description of the policy and click on Create Policy.
Now we need to create a role and attach the policy you created above. Navigate to IAM Console, Click on Roles and Click on Create Role.

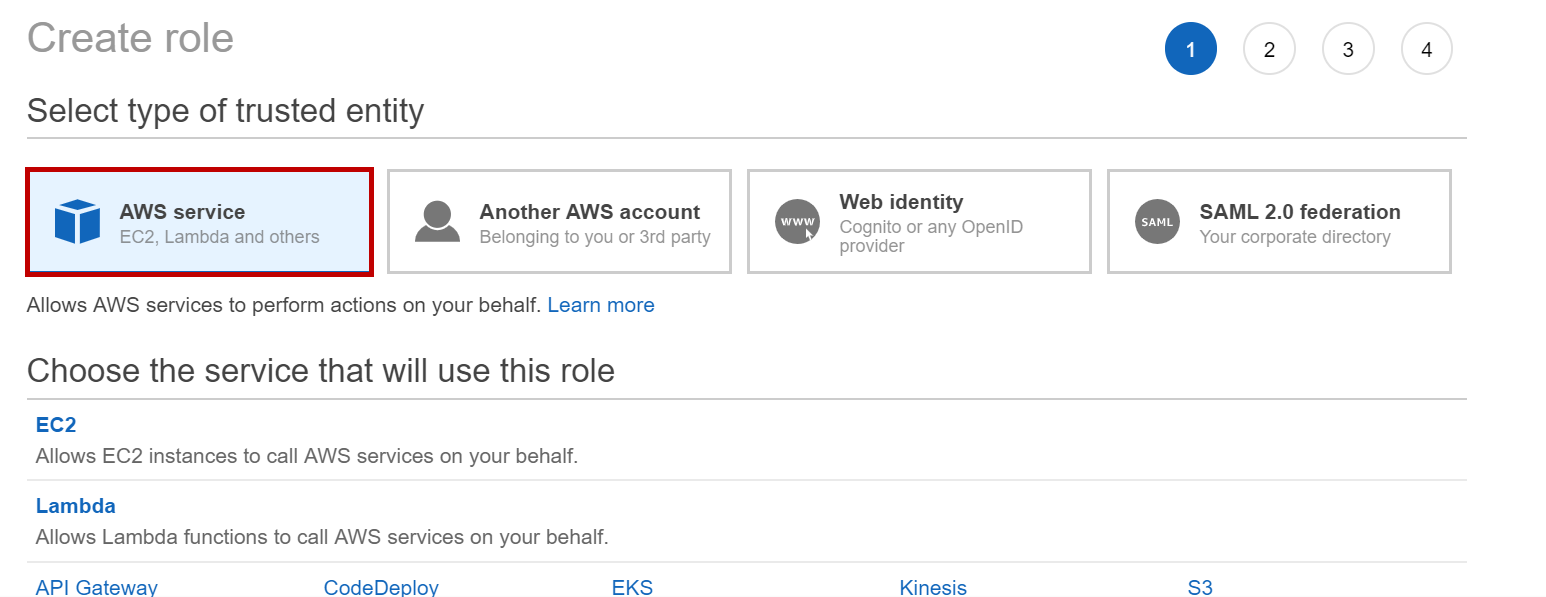
In create role page, select the AWS Service as a type of trusted identity and choose RDS service to use this role.
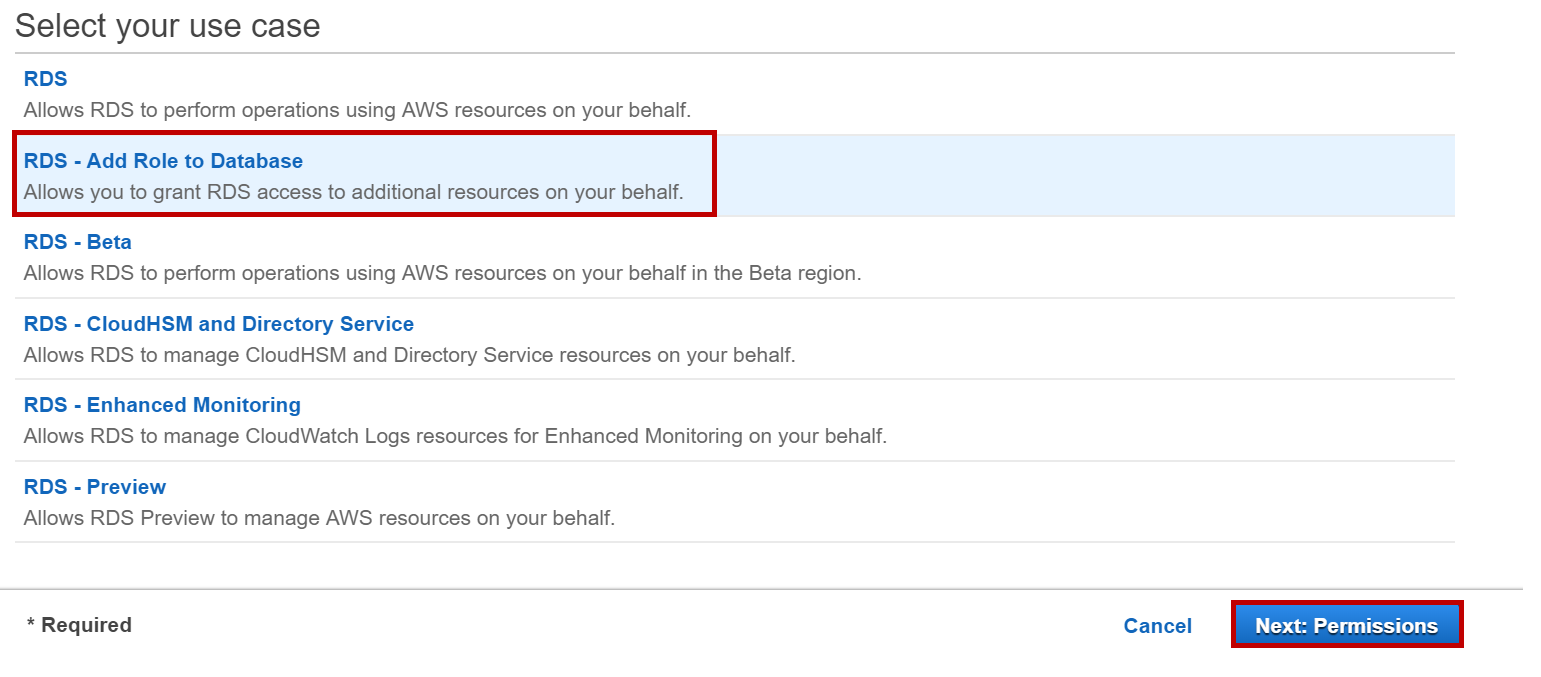
In select use case page, select RDS -Add Role to Database and click on Next: Permissions.
Search for the policy you created above, select the policy and click on Next: Tags

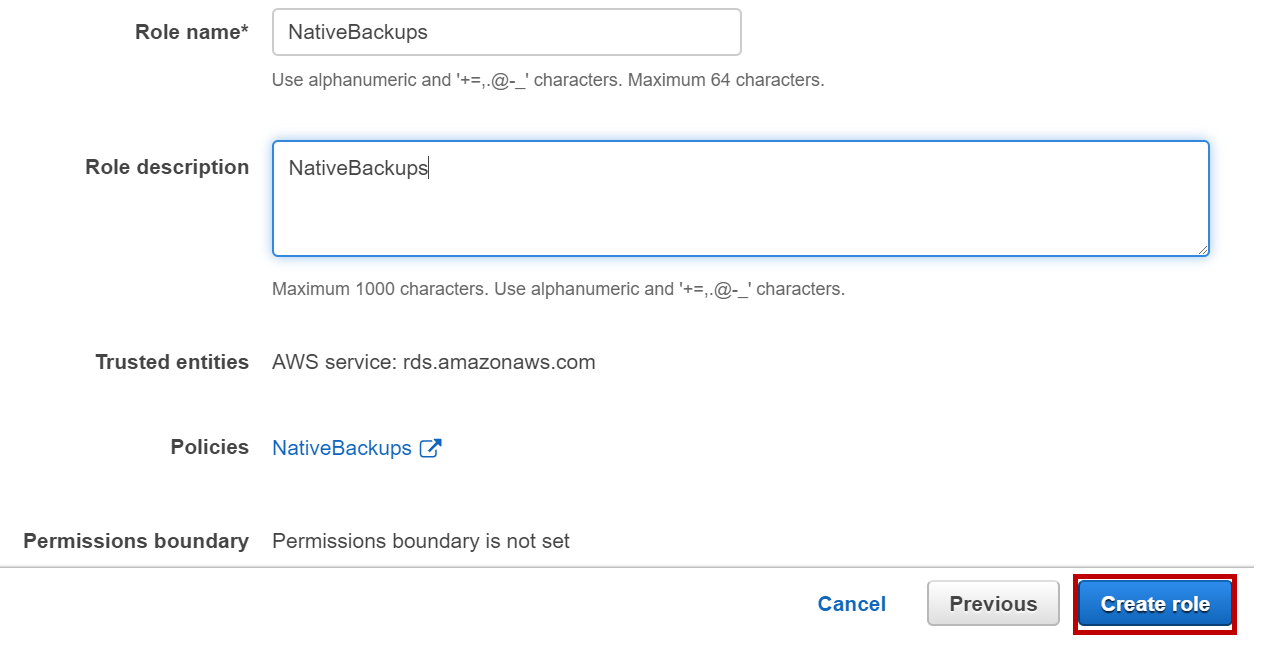
Enter tags if required and click on Next: Review. Enter role name and descriptions. Click on Create role.
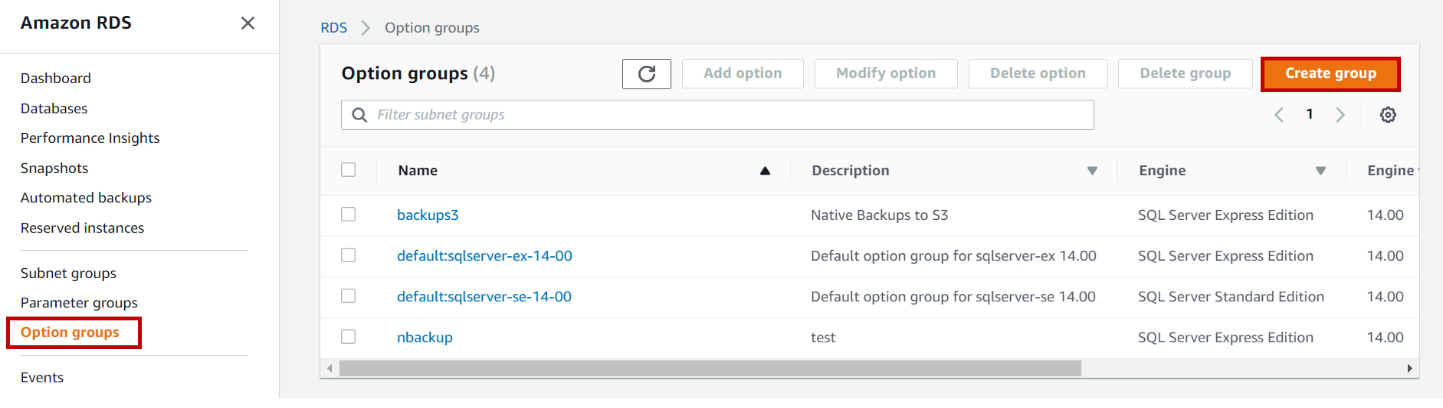
Creating Option Groups
We need to create an option group to use native backup and restore option in AWS RDS instance. Navigate to RDS console and click on Option groups. Click on Create Group.
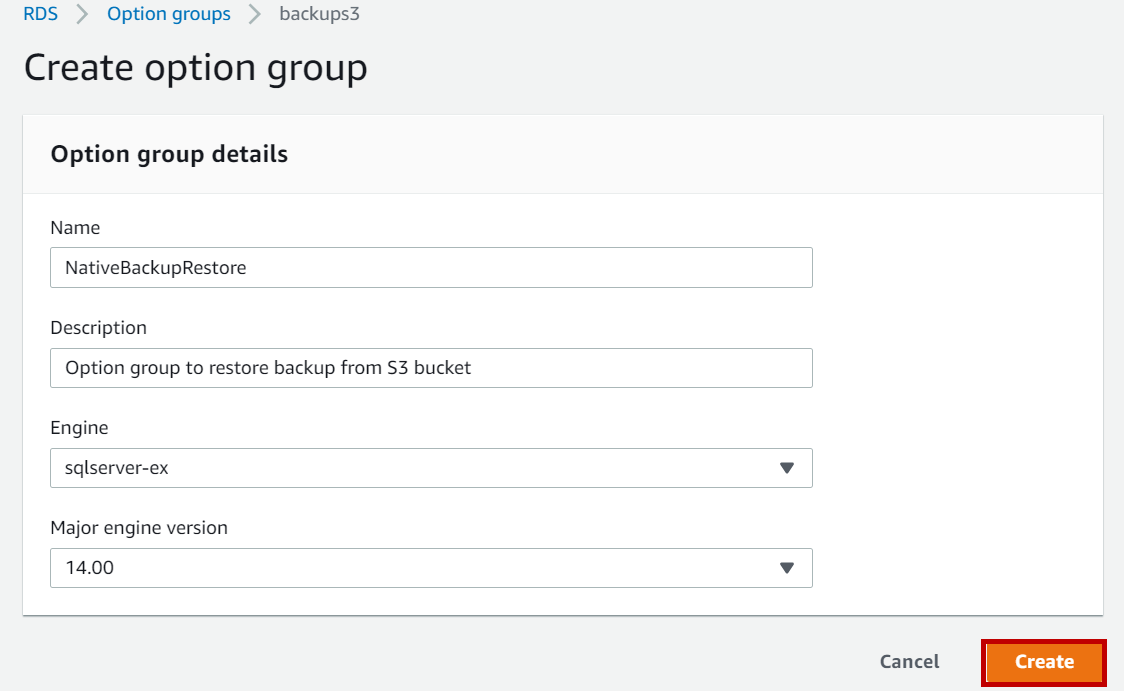
Enter the name, description of the option group. Select the database engine and major engine version. Click on Create.
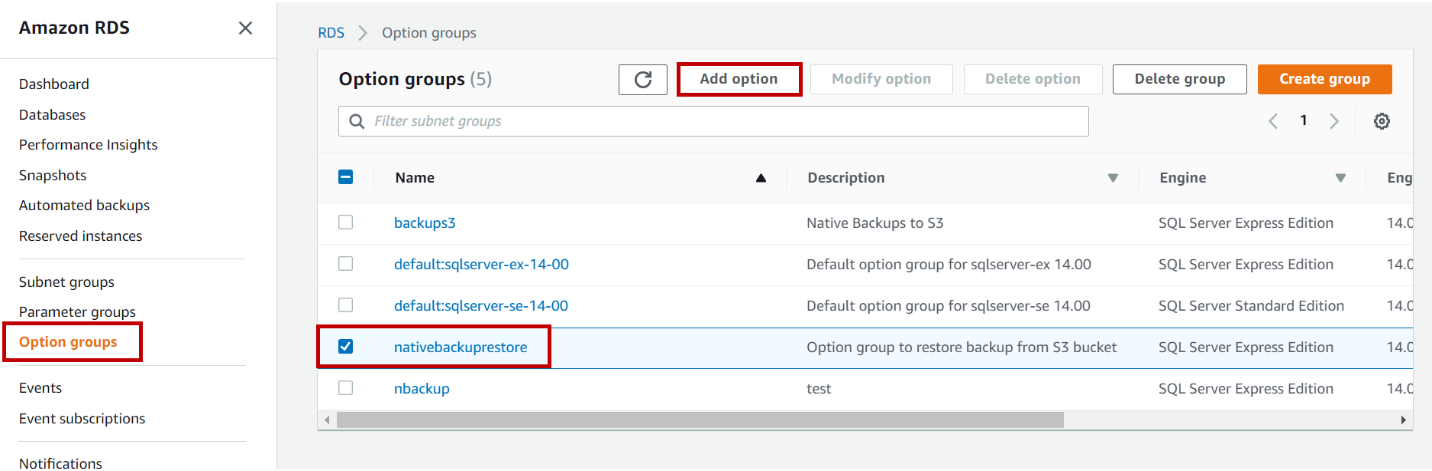
Navigate to Option groups, select the option you created earlier and click on Add option.
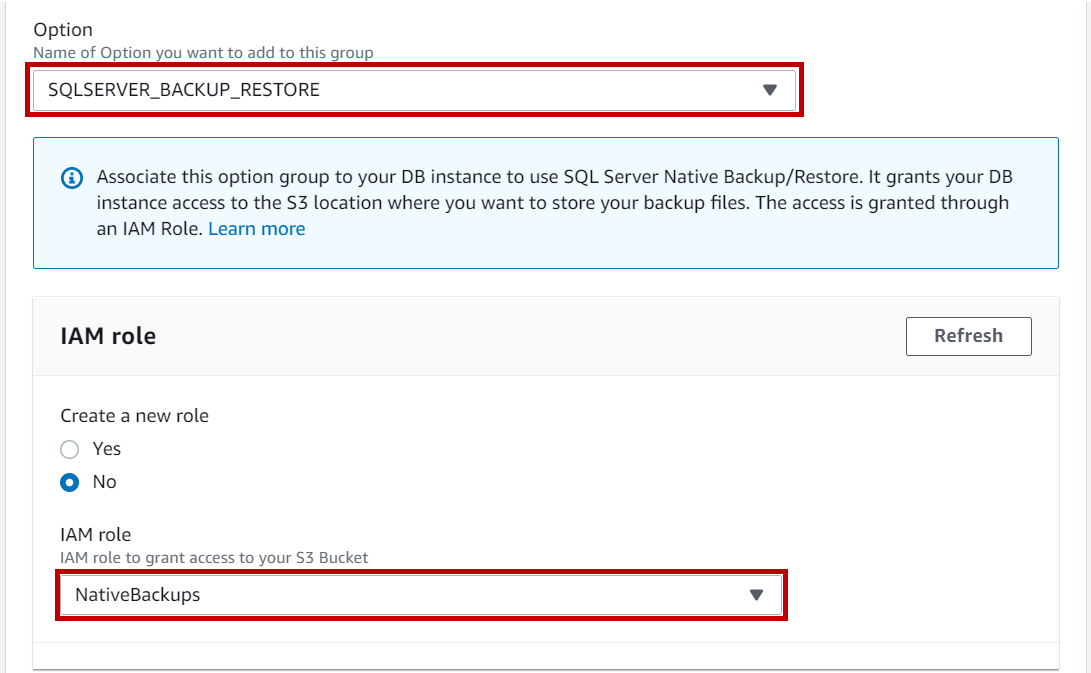
In Add Option page, Select SQLSERVER_BACKUP_RESTORE option and select the role you created above. You can also create a new role by selecting “Yes” which will automatically create a role and policy to access the simple storage service (S3) bucket.
Select apply immediately and click on Add Option.
Navigate to Databases in RDS console, select the database instance and click on Modify.
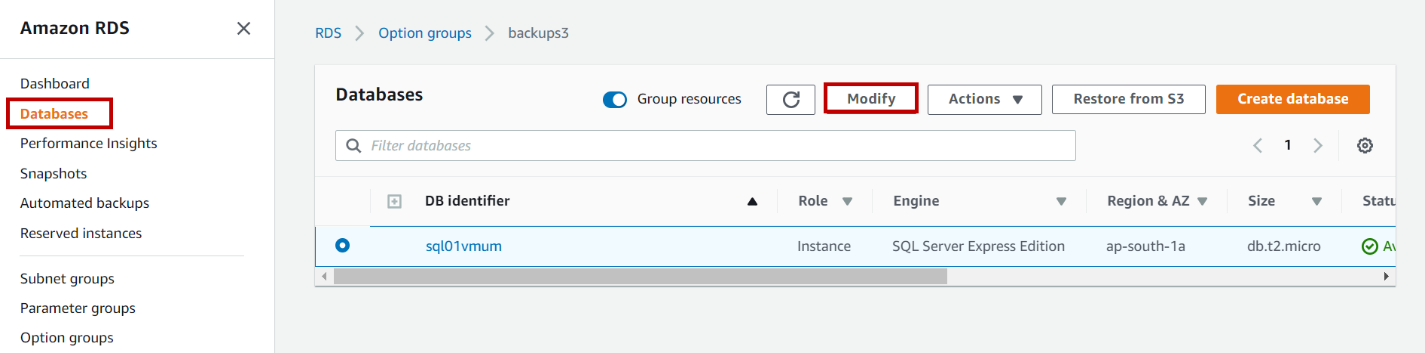
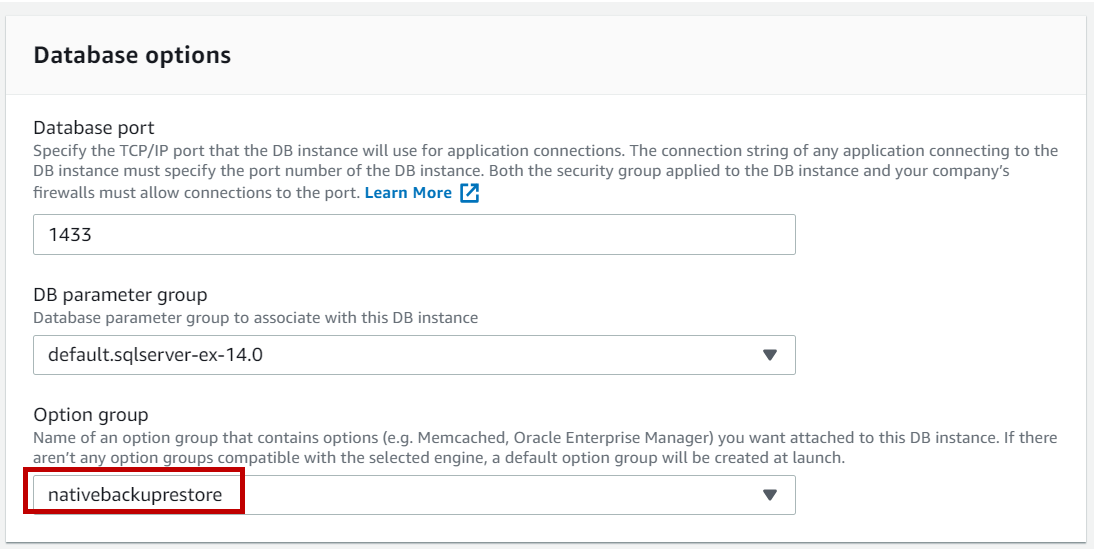
In Modify DB instance page, change the option group to the option group you created above and click on continue at the bottom of the page.
Select Apply Immediately and Click on Modify DB instance. The database instance will go into Modifying Status. Once the modification is complete, the database instance will be back in Available status.
Migrating from on-premises to RDS
To migrate the database from on-premises SQL Server to AWS RDS instance, take a full backup of your on-premises SQL server database and upload the full backup(.bak) file to the bucket which you created earlier.
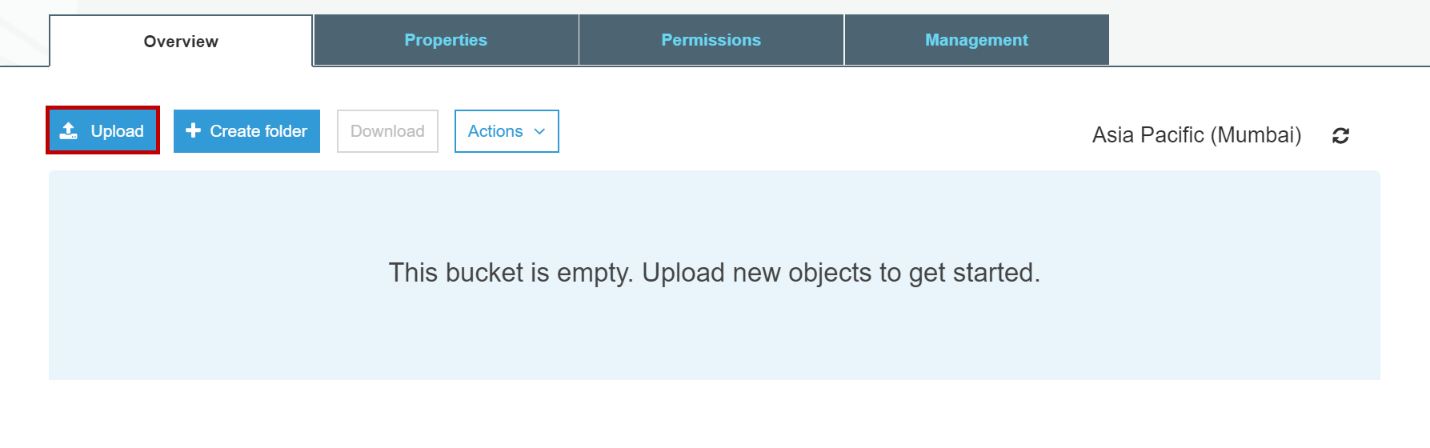
To upload full backup(.bak) file to the bucket, navigate to Amazon S3 console, Click on Buckets. Click on the simple storage service(S3) bucket you created earlier. Click on Upload
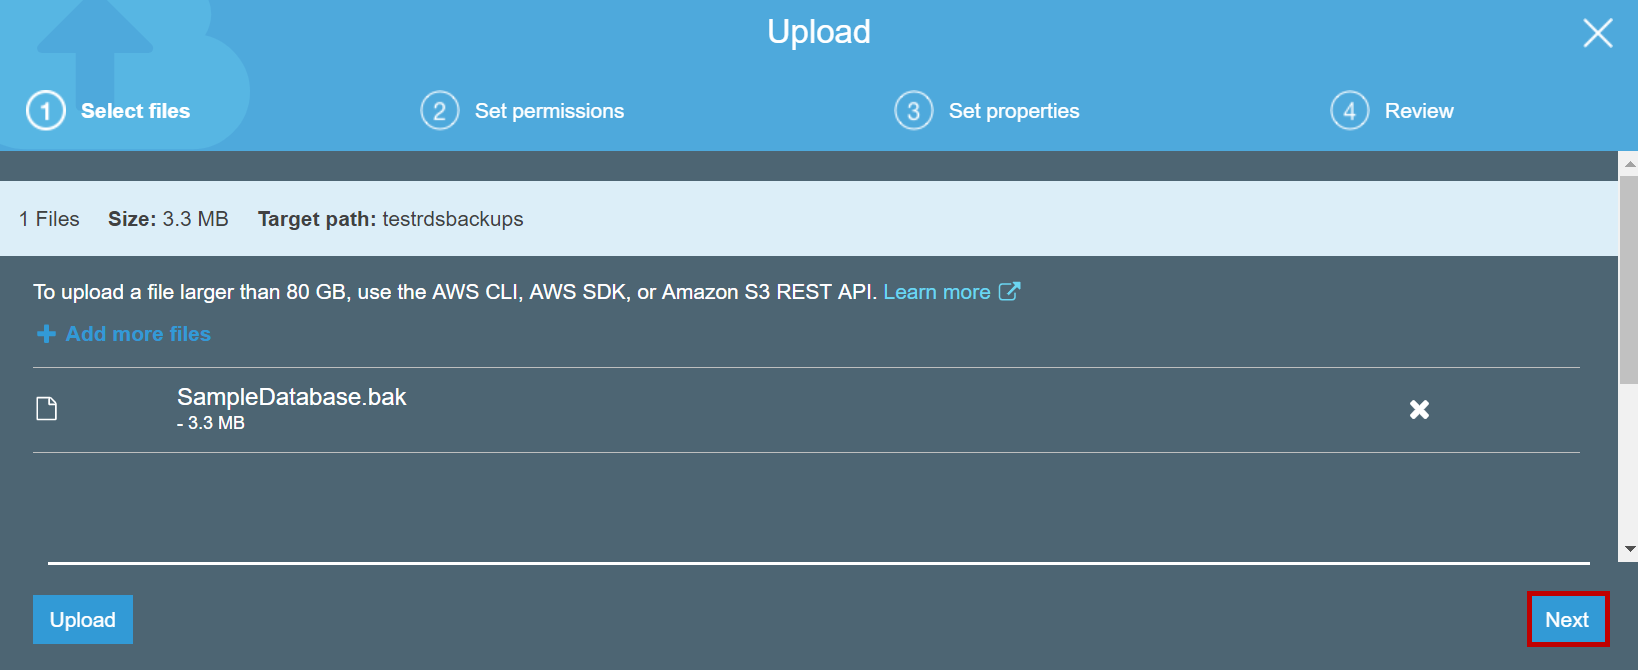
In upload pop up window, Click on Add files and select the database backup or you can even drag and drop files. Click on Next and configure permissions, properties. In the end, click on Upload.
Now login to AWS RDS instance using SQL Server management studio. Use stored procedure rds_restore_database to restore a backup from S3 bucket. This procedure should be run on msdb. database.
|
1 2 3 |
exec msdb.dbo.rds_restore_database @restore_db_name='SampleDatabase', @s3_arn_to_restore_from='arn:aws:s3:::testrdsbackups/SampleDatabase.bak' |
Once you run the procedure a restore task is created and task id is returned in the result set. We can monitor the status of the task using the stored procedure rds_task_status.
|
1 |
exec msdb.dbo.rds_task_status @db_name='SampleDatabase'; |
This will show the status of all tasks in a particular database. If you want to monitor specific task in AWS RDS SQL Server instance, pass task id as a parameter to the above mentioned stored procedure.
Once the restore task is a success, you can see the database in SQL Server management studio.

If you want to cancel the restore backup task, use the stored procedure rds_cancel_task. Pass the task id as a parameter to the stored procedure. Below is the sample T-SQL script.
|
1 |
exec rds_cancel_task @task_id =11 |
Migrating database between RDS instances
Login to source RDS instance using SQL Server management studio and take the backup using stored procedure rds_backup_database.
|
1 2 |
EXEC msdb.dbo.rds_backup_database @source_db_name = 'SampleDatabase' ,@s3_arn_to_backup_to = 'arn:aws:s3:::testrdsbackups/SampleDatabase_May5.bak' |
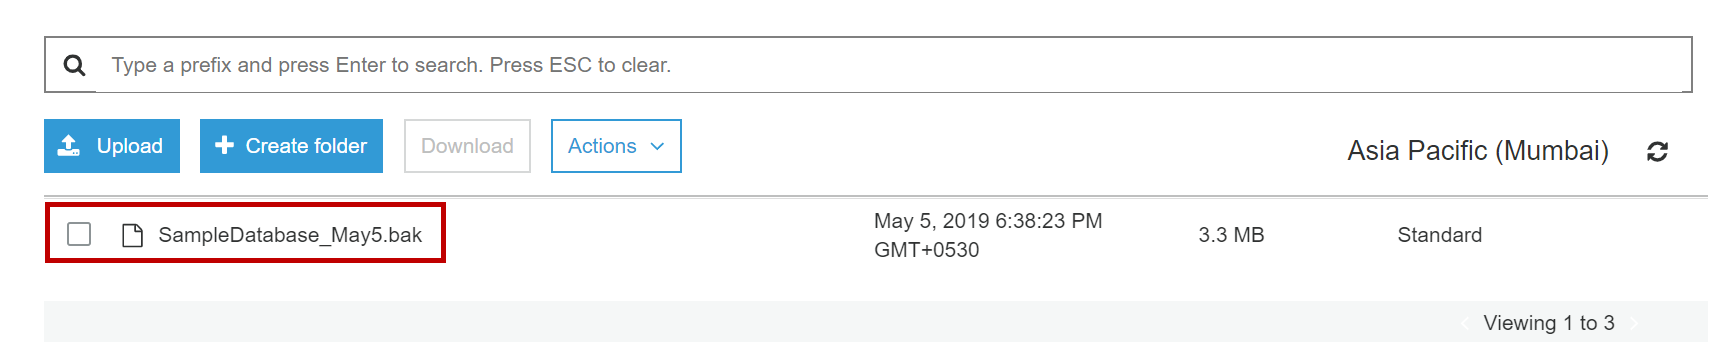
After executing the above procedure, a backup task is created. Once the backup task is a success the backup file is stored in simple storage service (s3) bucket.
Now login to the destination AWS RDS SQL Server instance using SQL Server management studio and execute the restore procedure to restore the backup from S3 bucket. Please note that the destination RDS instance should be associated with option group which has SQLSERVER_BACKUP_RESTORE option enabled and an IAM role which has access to the bucket where the backup file is stored.
We can also back up the database with encryption to simple storage service (S3) bucket. We need to create a KMS key and give the DescribeKey, GenerateDataKey, Encrypt, Decrypt permissions to the role that is being used in the option group. When we restore the backup to another AWS RDS SQL Server instance, we need to give the same KMS key which is used to take backup. Below is the sample syntax to take backup and restore with encryption using the KMS key.
|
1 2 3 4 5 6 7 8 9 10 |
exec msdb.dbo.rds_backup_database @source_db_name='SampleDatabase', @s3_arn_to_backup_to='arn:aws:s3:::testrdsbackups/SampleDatabase_May6.bak', @kms_master_key_arn='your key here' exec msdb.dbo.rds_restore_database @restore_db_name='SampleDatabase_May6', @s3_arn_to_restore_from='arn:aws:s3:::testrdsbackups/SampleDatabase_May6.bak', @kms_master_key_arn='your key here which is used to take backup' |
The role used which is begin used in option group associated with destination AWS RDS instance should have DescribeKey, GenerateDataKey, Encrypt, Decrypt permissions on the KMS key.
Limitations of native backup and restore
- We cannot restore a backup from the s3 bucket of the cross region
- We cannot restore backups of databases which have FILESTREAM data as AWS RDS SQL Server does not support FILESTREAM
- RDS supports native restores of databases up to 5TB
- If the instance is Multi-AZ, we can restore backups of databases that are in full recovery mode

- Geo Replication on Transparent Data Encryption (TDE) enabled Azure SQL databases - October 24, 2019
- Overview of the Collate SQL command - October 22, 2019
- Recover a lost SA password - September 20, 2019