
This article will show how to get data from Azure SQL in the Serverless Python app.
Introduction
Application and data tier communication has evolved over the period. Azure offers microservices such as “Functions” to independently perform tasks irrespective of any infrastructure or other dependency. Functions are a piece of independent code targeted for specific small to medium size tasks. These are not full-fledged applications, but different specific parts of application processing parts. With the demand and uprise of open source and different coding languages, Microsoft has also opened the gates and started supporting several different languages for their web apps, functions, and other coding platforms. One of the most prominent programming languages in recent times which has emerged is “Python”. Python has not yet been deeply integrated with all of the services available in Azure, but still, it has been integrated into a few including Azure WebApps, Azure Function Apps, Azure SQL, Azure Machine Learning, and others.
For this article, we are going to focus on the way to pull data from Azure SQL into Azure Function App. Below are the main steps to achieve so:
- Create a Serverless Azure Function App
- Configure Azure SQL DB to get accessed by App
- Pre-requisites for creating a Function using Python
- Create a function using Python in VS Code
- Deploy and Test function in Azure
Step 1: Create a Serverless Azure Function App
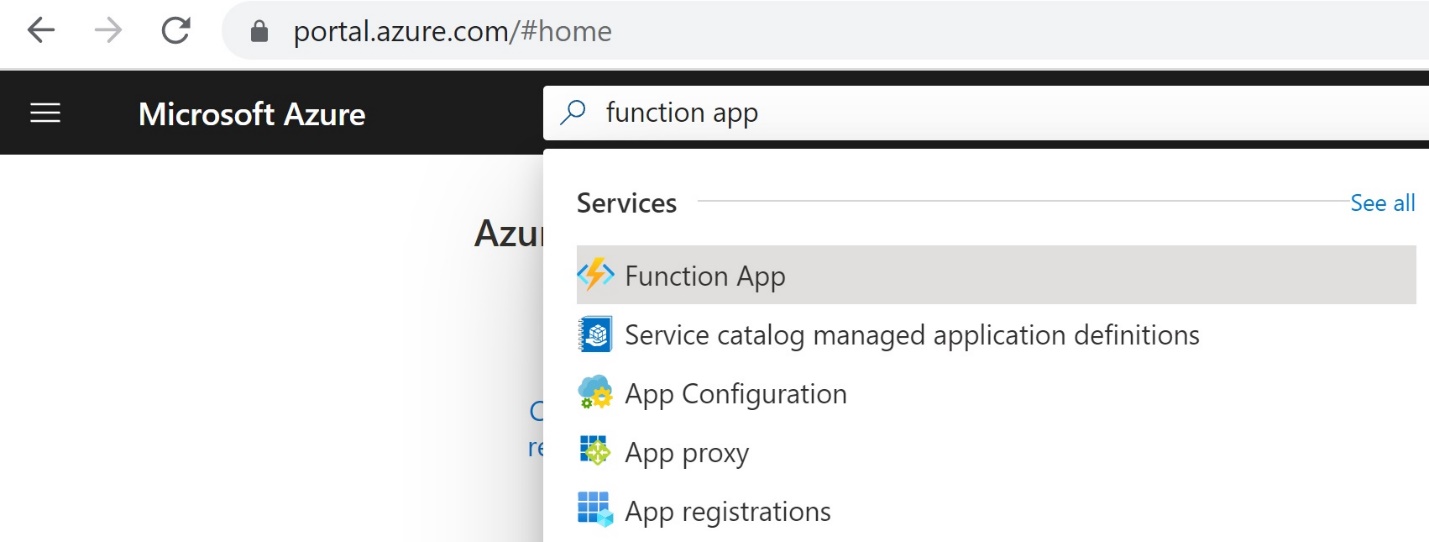
To create a serverless function app, open the Azure portal and type the function app in the search bar as shown below:
As shown above, select the first option. As soon as you click on the first option, another screen loads which shows all of the functions. Click on “Create” as shown below:
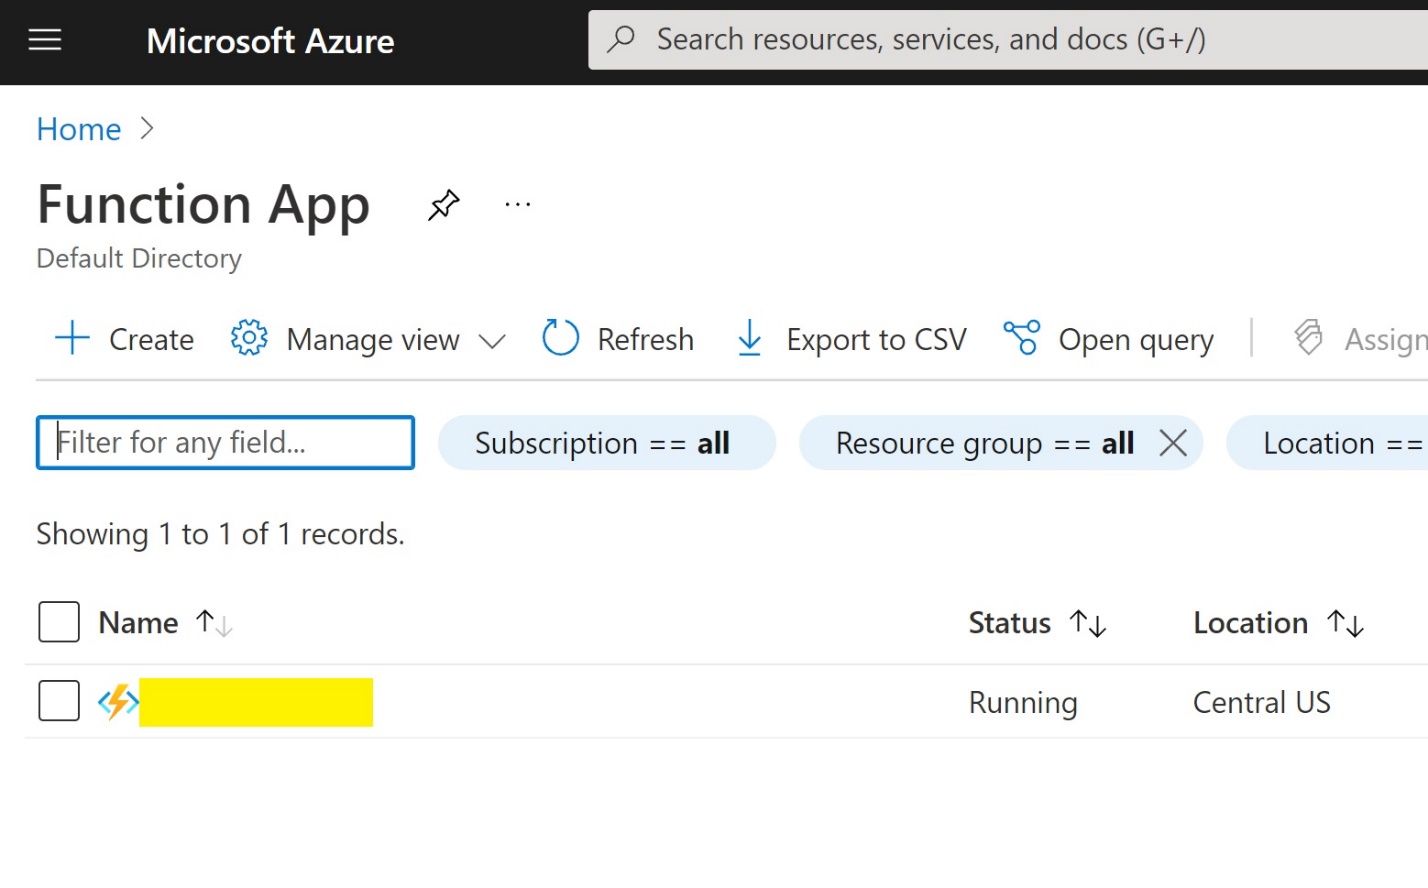
Click on “Create” and the next screen will be something like the one below:
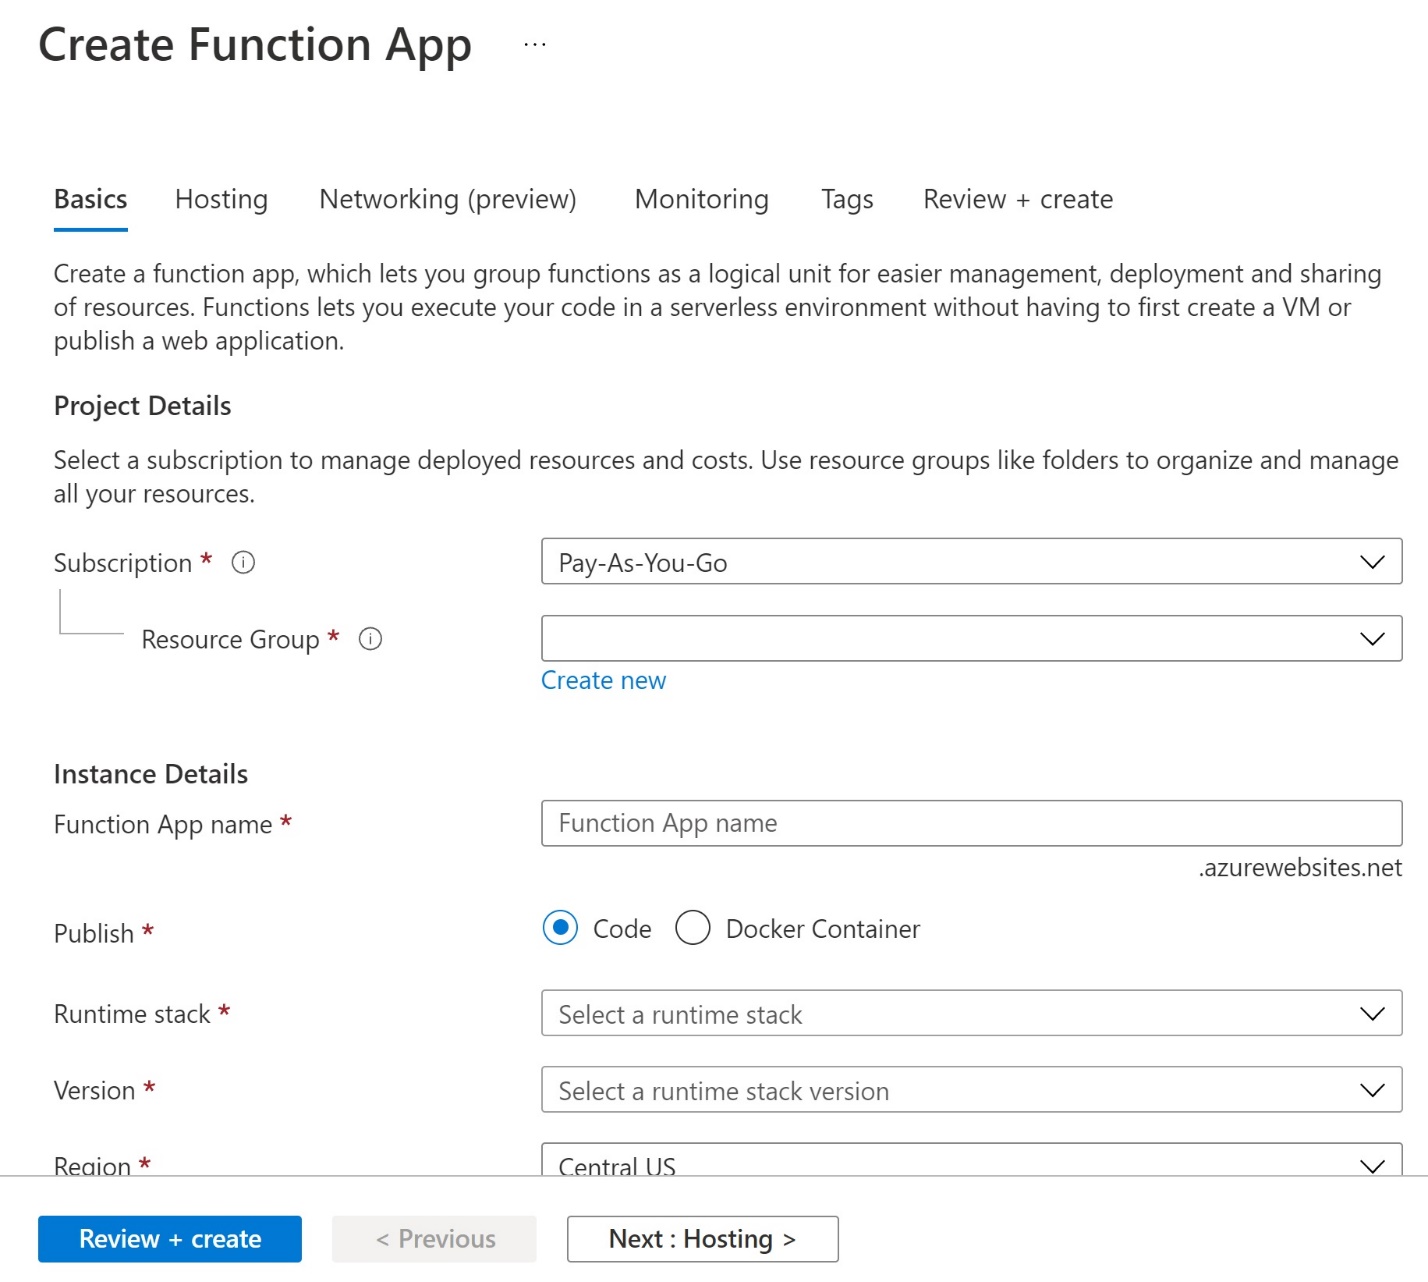
Below is the information that should be filled in:
- Subscription: Select the appropriate subscription
- Resource group: Provide a new or existing resource group where we would like to store the app. Preferably, it should be a new one.
- Function App name: This will be the fully qualified function application name via which we will access the application. Please note, don’t confuse function app and function. The function is hosted in the function app.
- Publish: There are two options “Code” and “Docker Container”. Either can be used, but the following process varies based on selection. For our current scenario, we will publish it via code.
- Runtime stack: As we discussed earlier, Microsoft provides various options to choose from for programming languages including .NET, node.js, Python, Java, Powershell Core, and customer handler. For our current scenario, we will select “Python” as our base stack.
- Version: There are various versions from 3.6 to 3.9 that are currently supported. For the current scenario, select version 3.9
- Region: Select the appropriate region. Ensure this is the region also chosen for functions and database for our current example.
Once the above configurations are completed move to the next tab i.e. Hosting tab.
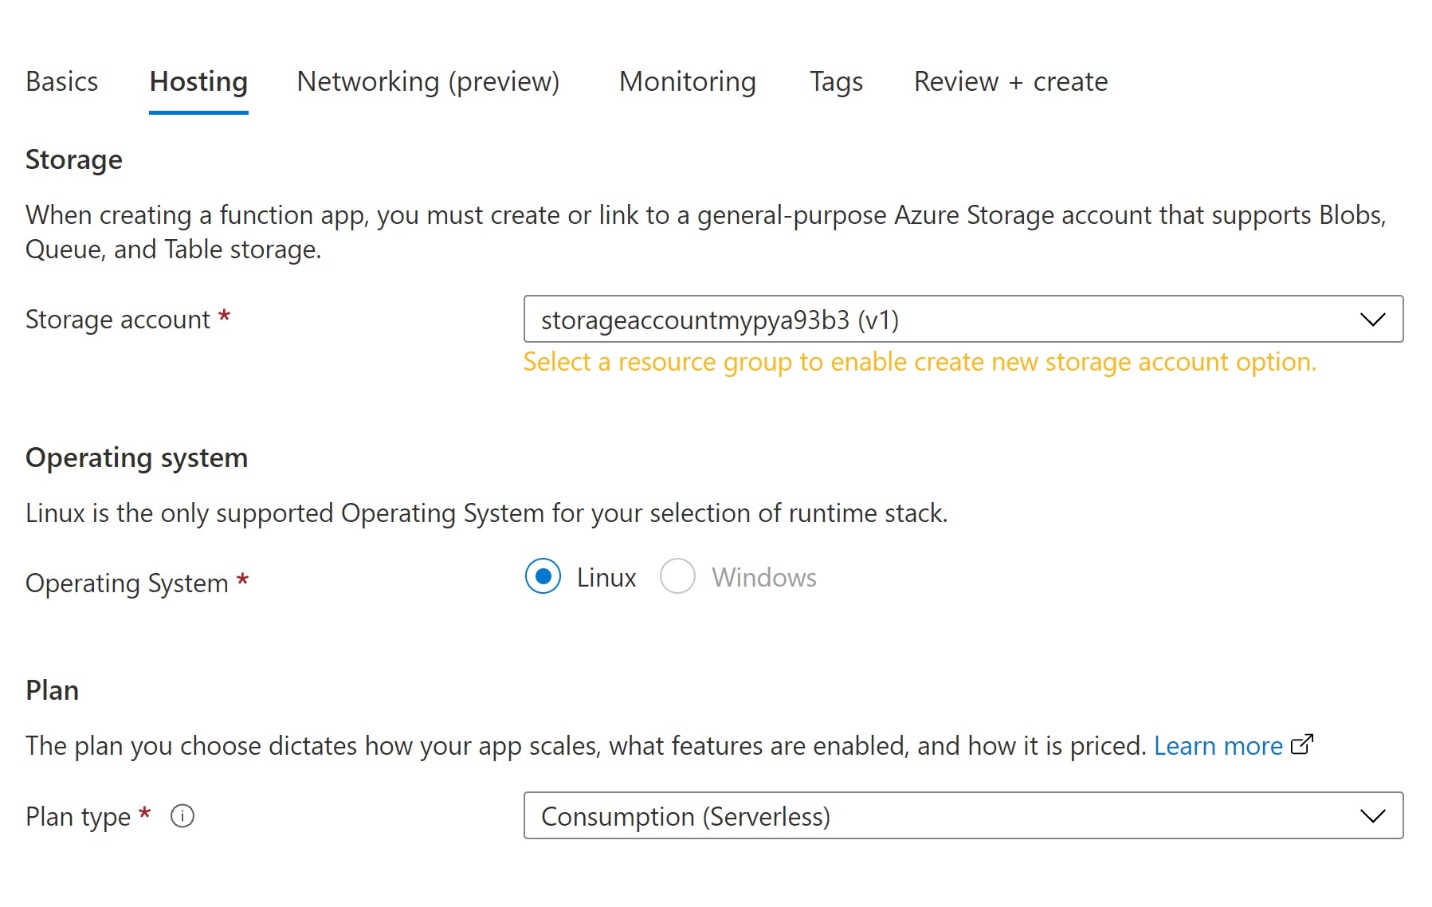
There are three main configurations in the hosting tab:
- Storage account: As written in the description, the storage account is required to communicate and store the operations/data.
- Operating system: Ideally there are two options available which are Windows and Linux. But as we have selected Python 3.9 as our programming language, thus only Linux is supported for the same.
- Plan type: This is a key configuration that changes the entire hosting and deployment. Ideally, there are three options available Consumption (Serverless), Functions (Premium), and App Service Plan. Our current scenario focuses on displaying how the Serverless function communicates with Azure SQL, so we will select the first option. However, the implementation will be almost similar for other processes as well.
Once the above configurations are completed, there are will no changes to our current exercise. So, we will go ahead and create a Function App by completing the wizard. Once the app is created, we need to configure Azure SQL.
Step 2: Configure Azure SQL DB to get accessed by App
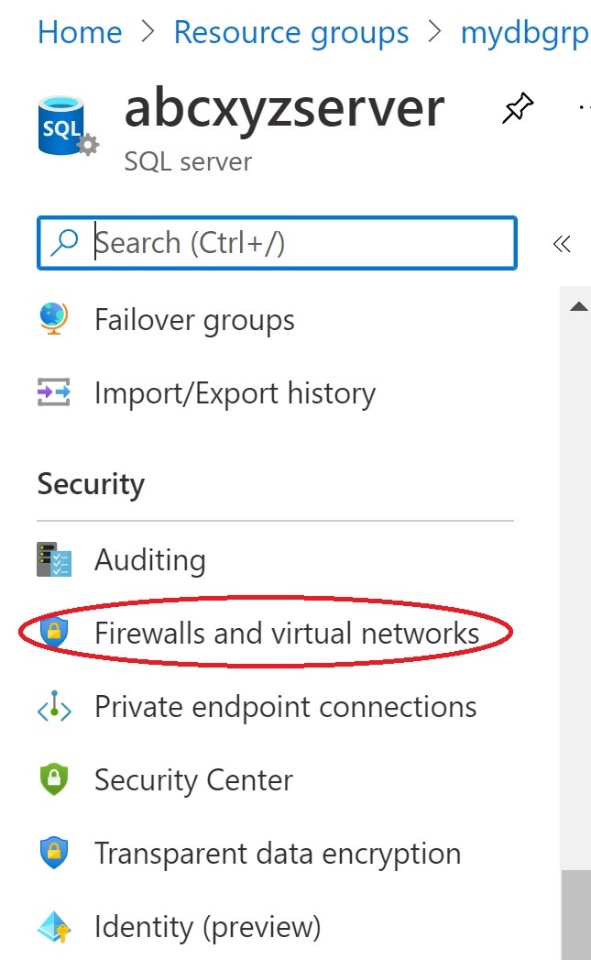
For this scenario, I already have a Single Instance of Azure SQL created. You can create any type of Azure SQL, but we need to ensure two key configurations are configured in the Azure SQL Server instance. I have a server named “ABC server”. In the right pane, scroll down to “Security > Firewalls and virtual networks” as shown below:
Once selected, a screen will show Firewalls and virtual network rules:
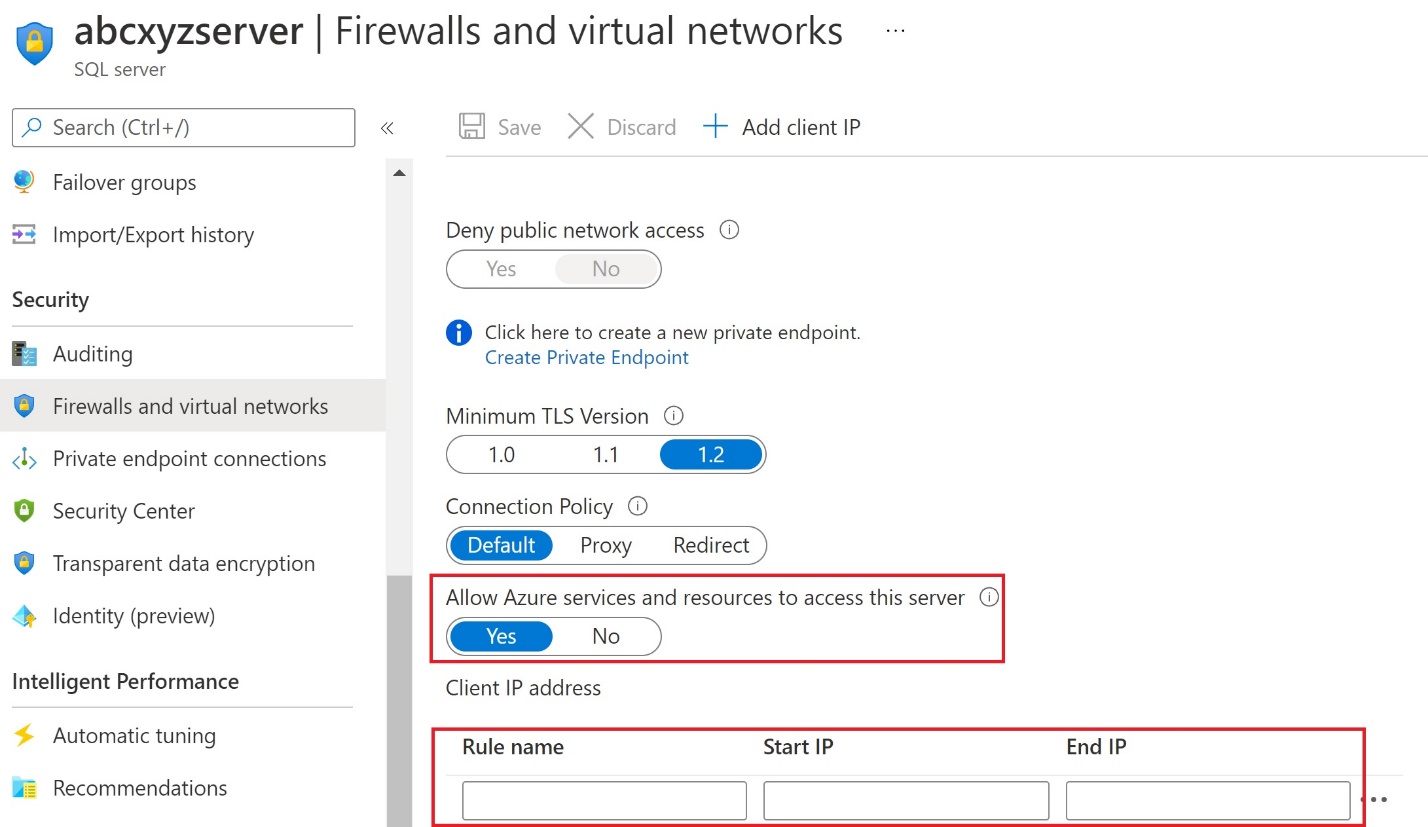
As highlighted above:
- “Allow Azure services and resources to access this server” should be enabled. The reason is function app can and needs to access the Azure SQL DB. An alternative to providing access is via “Managed Service Identity(MSI).
- The second key configuration is to add the client IP with which we want to access the databases. For this, article it would be recommended to add your machine IP from which the Python Function app has to be developed, tested, and deployed.
Step 3: Pre-requisites for creating a Function using Python
There are various ways to develop Functions using python, but for this article, we will use Microsoft’s preferred path which is as below:
- Install dependencies
- Install Visual Studio Code
- Install Node.js
- Run the following command: npm install -g azure-functions-core-tools@3 –unsafe-perm true
- Azure Functions extension for Visual Studio Code.
- Once the extension is installed, click on the Azure logo in the Activity Bar. Under Azure: Functions, click Sign in to Azure… and follow the on-screen instructions.
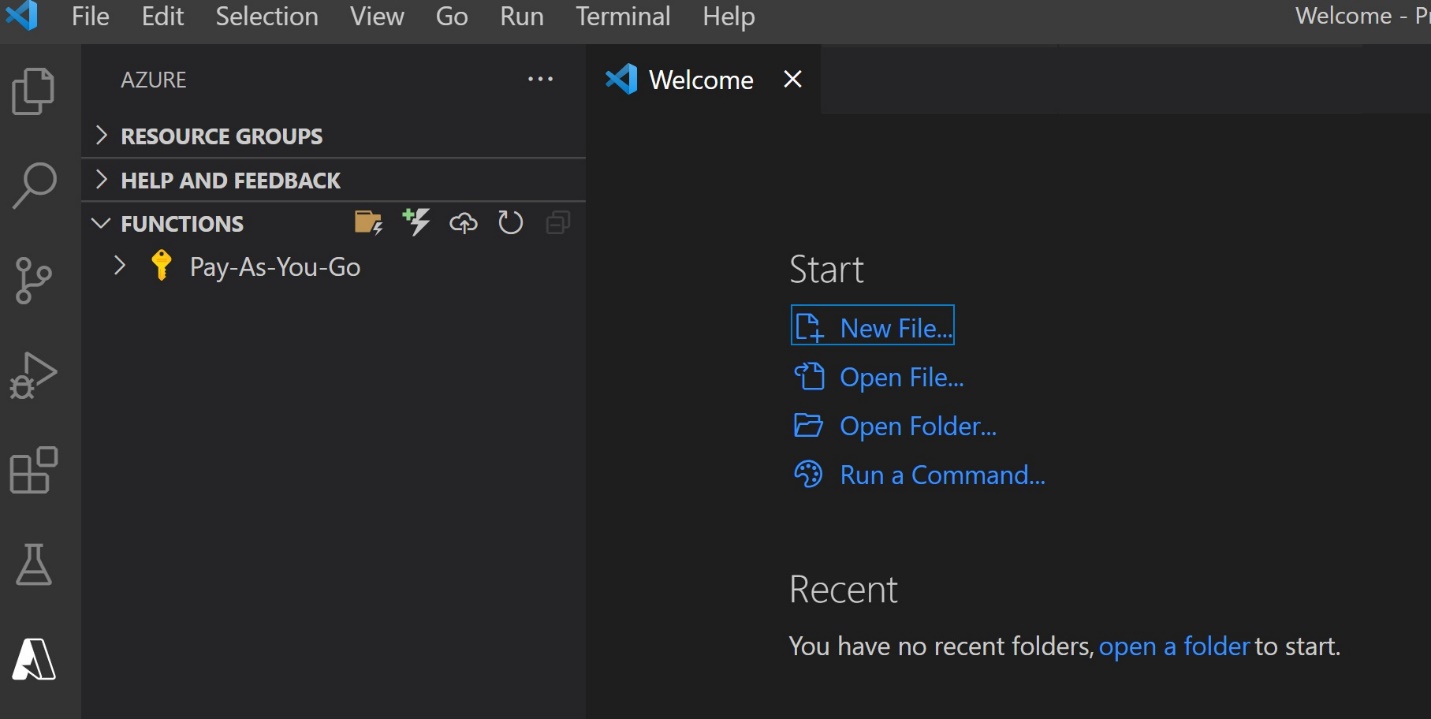
Once successfully logged in, it should be something similar to the above-shown screen. Now we need to create a project where you need to select 6 options:
- Browse: Select the location of the project
- Programming Language: Python
- Python Interpreter: If successfully installed, the python interpreter will automatically come. In our case, it will 3.9.7
- Trigger Points: There are many ways to trigger or call the function. For our scenario, we will choose, HTTP Trigger.
- Name of HTTP Trigger: Provide an apt name for the trigger
- Authorization Level: There are three options “Anonymous”, “Function” and “Admin”. For our scenario, select “Anonymous”.
Once the above wizard is completed successfully, the wizard will create the function project and open __init__.py(which is a python base file).
Step 4: Create a function using Python in VS Code
Write below code
|
1 2 3 4 5 6 7 8 9 10 11 12 13 14 15 16 17 18 19 20 21 22 23 24 25 26 27 |
in __init__.py file: import logging import pyodbc import azure.functions as func def main(req: func.HttpRequest) -> func.HttpResponse: logging.info('Python HTTP trigger function processed a request.') server = 'abcxyzserver.database.windows.net' database = 'mySampleSQL' username = '<<username>>' password = '<<pwd>>' driver= '{ODBC Driver 17 for SQL Server}' finaloutput = "\n" with pyodbc.connect('DRIVER='+driver+';SERVER=tcp:'+server+';PORT=1433;DATABASE='+database+';UID='+username+';PWD='+ password) as conn: with conn.cursor() as cursor: cursor.execute("SELECT * from employeeinfo") row = cursor.fetchone() while row: finaloutput = finaloutput + (str(row[0]) + " " + str(row[1]) + "\n") row = cursor.fetchone() return func.HttpResponse(f"Final output is {finaloutput} ") |
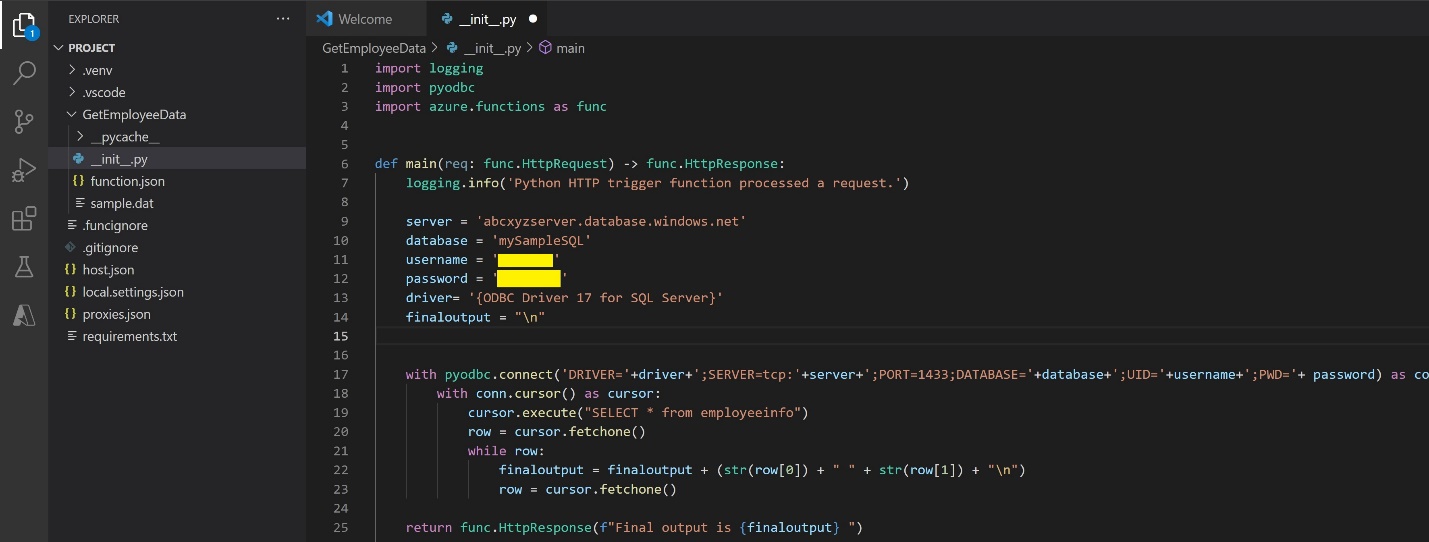
There are a few key points to be considered in the above code:
- We need to import python odbc driver – pyodbc as shown in the image
- Need to configure correct server name, database full qualified name, username, password, and driver to access the database
- Use pyodbc.connect to establish a connection with the database
- Query the table to get the data. In this case, it is “EmployeeInfo”
- Collect the data and send output to a webpage via httpresponse.
One last configuration to be made to make this work is in the “requirements.txt” file, which is to add pyodbc. This will ensure the pyodbc is available and used while it is being deployed in the azure function.
Step 5: Deploy and Test function in Azure
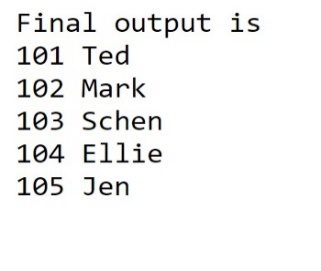
If all the steps are correctly performed, you can press “F5” and can test locally. The URL must be in the “Output” window and it should be something similar to http://localhost:7071/api/<<functionname>>. Once you try to access the URL in the browser, you would be able to see the data from a database.
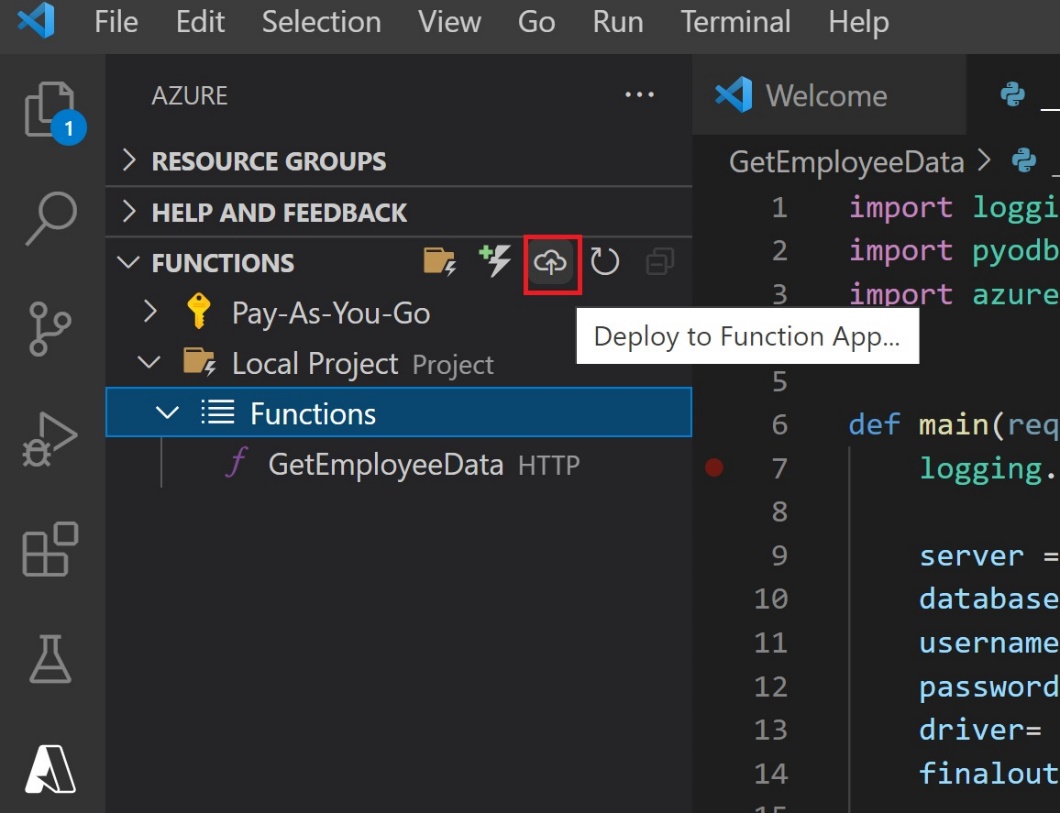
To deploy the same in azure, select the “Deploy to Function App” icon in the “Functions” Pane. Once selected, a prompt will appear to select the function app to which it is to be deployed. Select the one we created at the top and deploy.
To find the URL either you can look in the output window in the visual code
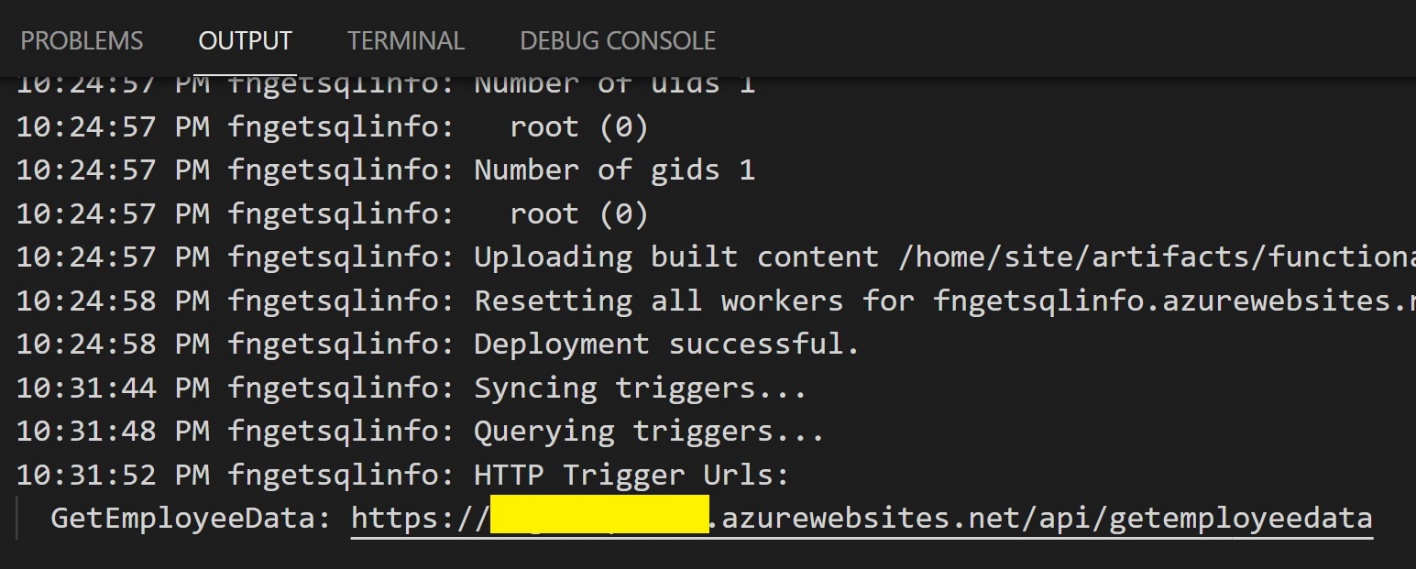
or can goto “Azure Portal > <<Function App>> > <<Functions>> > Get Function URL

Once you access the web URL in the browser, the results will be similar to what you were able to view locally.
Conclusion
In this article, we have learned about Serverless Function App creation, Function creation, Azure SQL database service access configuration, python function creation, and access Azurto e SQL data from Python. This article demonstrates a base premise for different types of SQL and no-SQL data sources to access from Python Functions. Microservices can be used at much higher and more complex levels of data processing. The next steps could be utilizing the same premise and establishing communication with those resources.

He has worked internationally with Fortune 500 clients in various sectors and is a passionate author.
View all posts by Rahul Mehta
- Finding Duplicates in SQL - February 7, 2024
- MySQL substring uses with examples - October 14, 2023
- MySQL group_concat() function overview - March 28, 2023