
Dynamic Data Masking is a new security feature introduced in SQL Server 2016 that limits the access of unauthorized users to sensitive data at the database layer.
As an example of the need for such a feature is allowing the applications developers to access production data for troubleshooting purposes and preventing them from accessing the sensitive data at the same time, without affecting their troubleshooting process. Another example is the call center employee who will access the customer’s information to help him in his request, but the critical financial data, such as the bank account number or the credit card full number, will be masked to that person.
Dynamic Data Masking, also known as DDM, is a very simple security feature that can be fully built using T-SQL commands which we are familiar with, easy to use and also flexible to design. This data protection method allows you to determine your “sensitive” data, by field in order to configure the suitable masking function to hide it from queries. This feature requires no coding effort from the application side or encrypting or applying any change to the real data stored in the disk.
Dynamic Data Masking masks the sensitive data “on the fly” to protect sensitive data from non-privileged users using built-in or customized masking functions, without preventing them from retrieving the unmasked data.
To implement DDM, first, you need to specify your sensitive data, the role to mask it and specify designated privileged users that have access to that sensitive data. The next step is to select and implement a masking function
Masking functions
There are four main types of masking functions that can be configured in Dynamic Data Masking, which we will introduce briefly here and use in the demo later.
The first type is the Default function that masks the data according to the field data type; if the field data type is binary, varbinary or image, a single byte of binary value 0 will be used to mask that field. For the date and time data types, the 01.01.1900 00:00:00.0000000 value will be used to mask that date field. If the data type of the masked field is one of the numeric data types, a zero value will be used to mask that field. For the string data types, XXXX value will be used to mask that field. If the field length is less than 4 characters, less number of Xs will be used to mask its value.
The second masking method is the Email function that is used to mask the fields that store the email address. The Email function shows only the first character of the email address and mask the rest of the email, same as aXXX@XXXX.com.
The Random masking function is used to mask any numeric data type by replacing the original value with a random value within the range specified in that function.
The last masking type is the Custom function, that allows you to define your own mask for the specified field by exposing the first and last letters defined by the prefix and suffix and add a padding that will be shown in the middle in the form of prefix, [padding value], suffix, taking into consideration that part of the prefix or the suffix will not be exposed if the field’s original value is too short to be masked.
Like any feature in SQL Server, there are number of limitations for the Dynamic Data Masking feature, where you can’t define the DDM on an encrypted column, a column with FILESTREAM, COLUMN_SET or Sparse Column that is part of the Column_Set, Computed column or a key column in a FULLTEXT index. Also, if the column to be masked is part of an index or any type of dependencies, we should drop that dependency, configure the DDM on that column then create the dependency again. Also, Dynamic Data Masking will not prevent privileged users from altering the masked column or modifying the masked data, though.
How it works
Let’s start our demo to understand how to configure the Dynamic Data Masking feature practically and how it works. Assume that we need to mask the employees’ critical data in order to prevent the developer who is responsible for developing and troubleshooting that system from viewing that sensitive data. First, we will create the Employee_Financial table where we will store the critical data:
|
1 2 3 4 5 6 7 8 9 10 11 12 13 |
USE SQLShackDemo GO CREATE TABLE Employee_Financial ( Emp_ID INT IDENTITY(1, 1) PRIMARY KEY ,Emp_First_Name NVARCHAR(10) NOT NULL ,Emp_Last_Name NVARCHAR(10) NOT NULL ,Emp_Date_Of_Birth DATETIME NULL ,Emp_Salary INT NULL ,Emp_Email NVARCHAR(50) NULL ,Emp_Employment_Date DATETIME NULL ) |
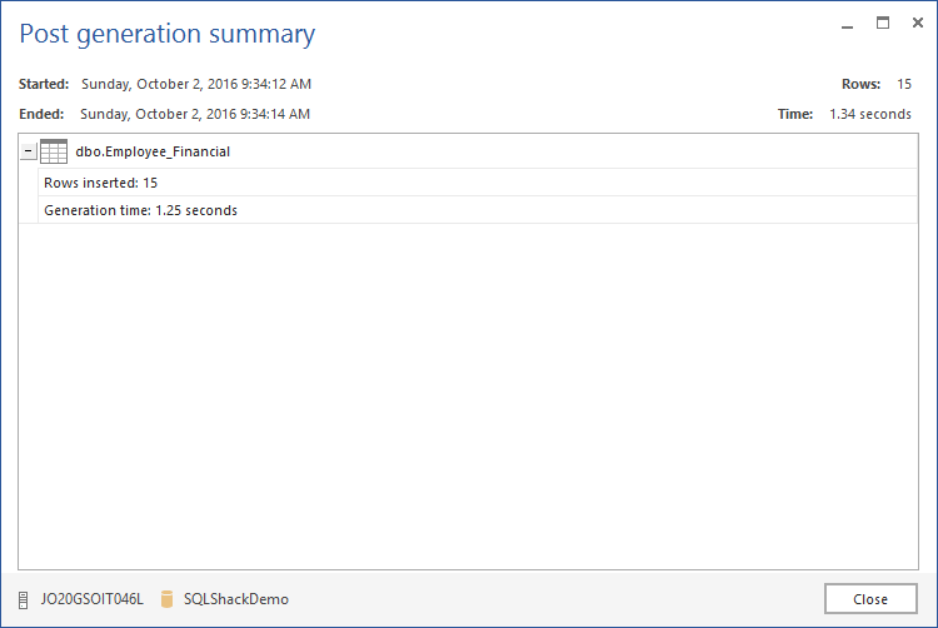
Once the table is created successfully, we will fill that table with 15 new records using the ApexSQL Generate – a SQL test data generator, where we customized the dates and salaries inserted fields to meet our requirements:
We will also create a test user that will have read only access on that table”
|
1 2 3 4 |
CREATE USER DDMUser WITHOUT LOGIN; GRANT SELECT ON Employee_Financial TO DDMUser; |
If that user tries to retrieve all employees’ sensitive information from the Employee_Financial table:
|
1 2 3 4 5 6 7 |
USE SQLShackDemo GO EXECUTE AS USER = 'DDMUser'; SELECT * FROM Employee_Financial; REVERT; |
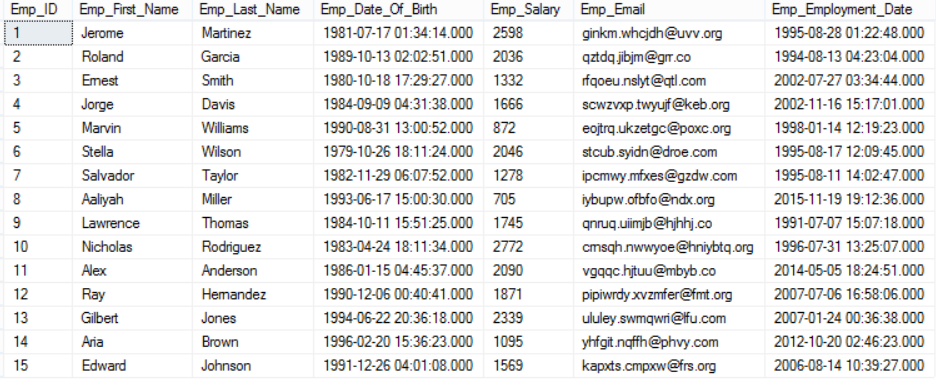
He will be able to see all critical information, which is a security disaster, as in the below result:
To overcome this disaster, we will mask that critical information gradually and see how this user will see that data. We will mask the employees’ last name first using the Default masking function simply using ALTER TABLE … ALTER COLUMN T-SQL statement:
|
1 2 3 4 |
ALTER TABLE Employee_Financial ALTER COLUMN EMP_Last_Name varchar(10) MASKED WITH (FUNCTION = 'default()'); |
And again request that user to retrieve the employee data:
|
1 2 3 4 5 |
EXECUTE AS USER = 'DDMUser'; SELECT * FROM Employee_Financial; REVERT; |
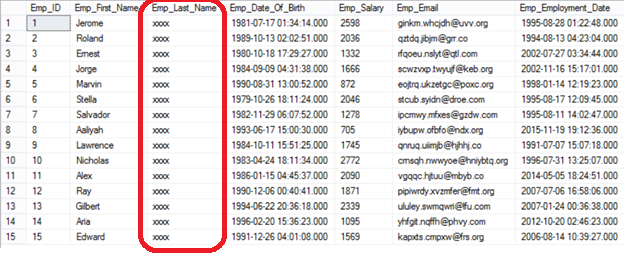
You will see that the employees’ last name will be masked for that user, where he will see only XXXX values as in the following result set:
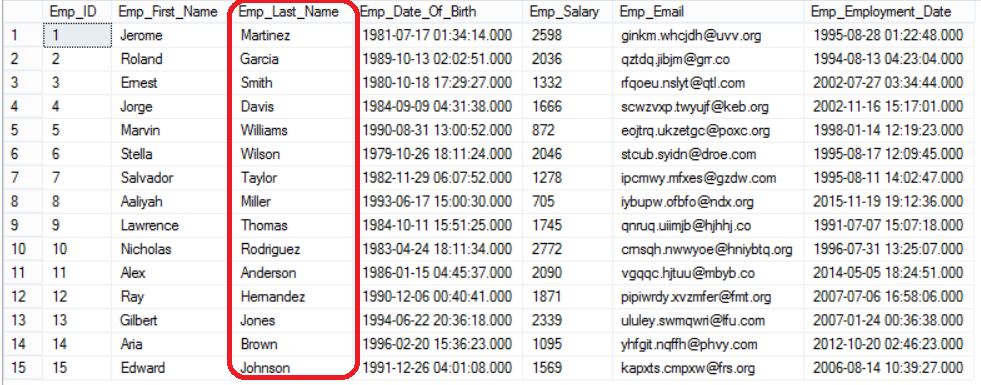
Just to remind you that nothing changed internally in the database itself, only the way this data represented for that user is changed, which is clear if I try to select the data using my admin user:
The user still can see other critical information, so we will mask the employees’ emails using the EMAIL masking function:
|
1 2 3 4 |
ALTER TABLE Employee_Financial ALTER COLUMN EMP_Email nvarchar(50) MASKED WITH (FUNCTION = 'Email()'); |
And retrieve the data from the same table using the same user’s account:
|
1 2 3 4 5 |
EXECUTE AS USER = 'DDMUser'; SELECT * FROM Employee_Financial; REVERT; |
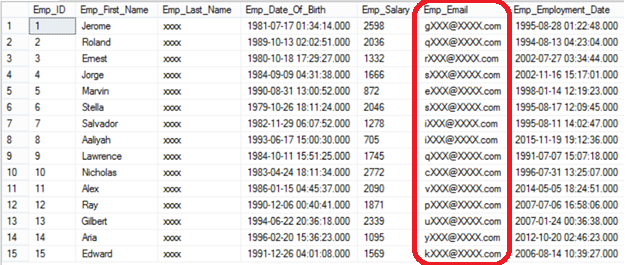
The user will see only the first letter of the employees’ email and the rest of XXXX@XXXX.COM values as clear in the below result set:
The employees’ salaries information can be replaced with no meaning values using the Random masking function, which will replace each salary with a random value between 1 and 9 as specified in the ALTER statement below:
|
1 2 3 4 |
ALTER TABLE Employee_Financial ALTER COLUMN EMP_Salary int MASKED WITH (FUNCTION='random(1,9)'); |
If this curious user tried to view the employees’ salaries using his account:
|
1 2 3 4 5 |
EXECUTE AS USER = 'DDMUser'; SELECT * FROM Employee_Financial; REVERT; |
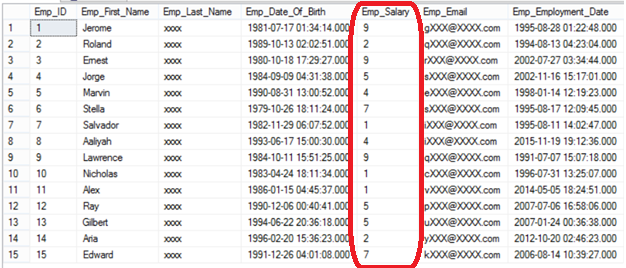
Unfortunately for him and fortunately for the security personnel, he will see only random values with no meanings as in the following result set:
Again, the employee first name can be masked using a customized masking function that will display the first three letters, mask the following 4 letters with XXXX value then view the last three letters, unless the employee first name is smaller than the 3 to view and 4 to mask, which will be fully masked with XXXX value:
|
1 2 3 4 |
ALTER TABLE Employee_Financial ALTER COLUMN EMP_First_name nvarchar(10) MASKED WITH (FUNCTION= 'partial(3,"XXXX",3)'); |
Running the same select statement using the same user account:
|
1 2 3 4 5 |
EXECUTE AS USER = 'DDMUser'; SELECT * FROM Employee_Financial; REVERT; |
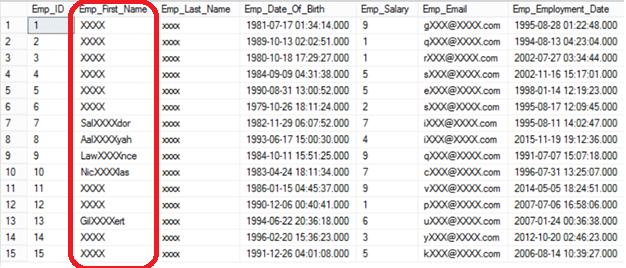
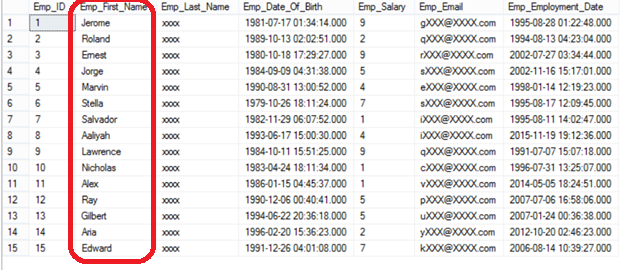
The employee first name will be masked, as described previously, which is clear in the below result set:
As mentioned before in this article, no physical change performed on the data stored in that table. The users can be able to see the masked data if they granted UNMASK access on that database, which can be revoked too easily. The following statement will show us how the user will be able to see the masked data when granting him UNMASK access and how he will be prevented from viewing the same data once the UNMASK access revoked:
|
1 2 3 4 5 6 7 8 9 10 11 12 |
GRANT UNMASK TO DDMUser GO EXECUTE AS USER = 'DDMUser'; SELECT * FROM Employee_Financial; REVERT; GO REVOKE UNMASK TO DDMUser EXECUTE AS USER = 'DDMUser'; SELECT * FROM Employee_Financial; REVERT; |
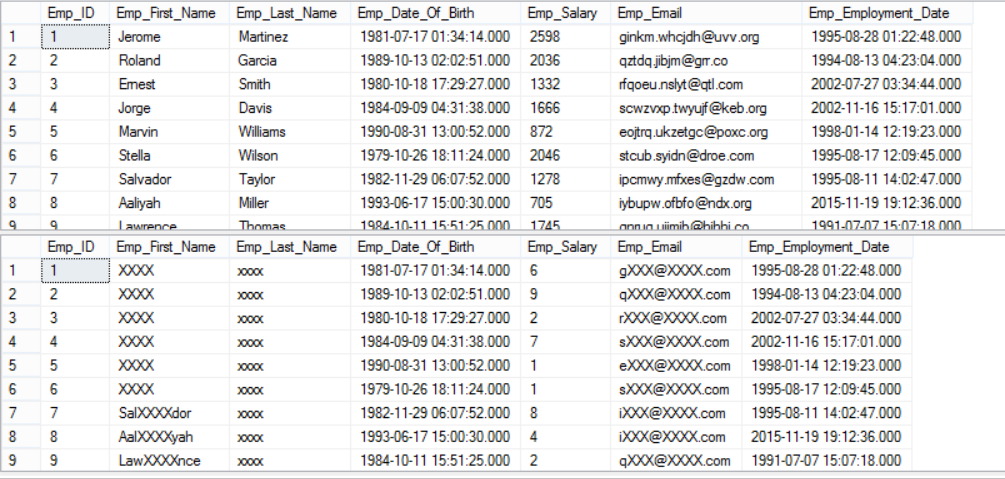
And the below result sets talk to show us the different access levels:
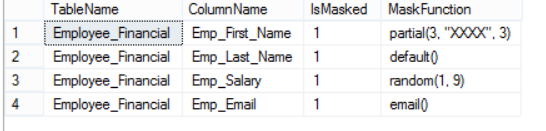
A new system catalog view sys.masked_columns defined in SQL Server 2016, inherits sys.columns system view, can be used to retrieve information about the current Dynamic Data Masking configuration. Value 1 for the is_masked column indicates that this column is masked using a masking function identified in the masking_function column. The below T-SQL statement is used to retrieve the Dynamic Data Masking information by joining the sys.masked_columns view with the sys,tables view as follows:
|
1 2 3 4 5 6 7 |
SELECT TBLS.name as TableName,MC.NAME ColumnName, MC.is_masked IsMasked, MC.masking_function MaskFunction FROM sys.masked_columns AS MC JOIN sys.tables AS TBLS ON MC.object_id = TBLS.object_id WHERE is_masked = 1; |
The result in our case will be like:
We can easily drop the mask from the masked column using the same ALTER TABLE … ALTER COLUMN T-SQL statement as below:
|
1 2 3 4 |
ALTER TABLE Employee_Financial ALTER COLUMN EMP_First_name DROP MASKED; |
Now the user can view the employees’ first name using his account after dropping the defined mask:
|
1 2 3 4 5 |
EXECUTE AS USER = 'DDMUser'; SELECT * FROM Employee_Financial; REVERT; |
Enjoy it Mr. Curious:
Another advantage of Dynamic Data Masking is that, if the user tries to use SELECT INTO , INSERT INTO or SQL Server Import and Export wizard methods to copy the masked data to another table, he will be surprised that the result will be masked at the destination table.
Assume that there is an empty table called Curious with the same schema as the Employee_Financial table, and the DDMUser is granted SELECT, INSERT and UPDATE permissions on that table:
|
1 2 3 |
GRANT SELECT,INSERT, UPDATE ON Curious TO DDMUser |
If he tries to copy the data from the Employee_Financial table to the Curious table and view it in the destination table:
|
1 2 3 4 5 6 7 8 9 10 11 12 13 14 15 16 17 18 19 |
EXECUTE AS USER = 'DDMUser'; INSERT INTO [dbo].[Curious] ([Emp_First_Name] ,[Emp_Last_Name] ,[Emp_Date_Of_Birth] ,[Emp_Salary] ,[Emp_Email] ,[Emp_Employment_Date]) SELECT [Emp_First_Name] ,[Emp_Last_Name] ,[Emp_Date_Of_Birth] ,[Emp_Salary] ,[Emp_Email] ,[Emp_Employment_Date] FROM Employee_Financial SELECT * FROM Curious |
This user will certainly be surprised by the displayed result:

Conclusion
Dynamic Data Masking is a new security feature introduced in SQL Server 2016 that is used to protect sensitive data from being viewed by unauthorized users by masking the data on the result set without performing any change to the data stored in the disk. There are four types of masking functions that you can use to mask your critical data using various masking methods; built-in methods and your own customized methods. The DDM process is transparent from the application, where no coding effort should be performed at the application layer. You can choose the most suitable masking function for each field storing sensitive data in your test environment and replicate it to the production environment if you find that everything is working fine.

He is a Microsoft Certified Solution Expert in Data Management and Analytics, Microsoft Certified Solution Associate in SQL Database Administration and Development, Azure Developer Associate and Microsoft Certified Trainer.
Also, he is contributing with his SQL tips in many blogs.
View all posts by Ahmad Yaseen
- Azure Data Factory Interview Questions and Answers - February 11, 2021
- How to monitor Azure Data Factory - January 15, 2021
- Using Source Control in Azure Data Factory - January 12, 2021