
In this article, I’m going to explain the Dynamic Data Masking feature in SQL Server. As it goes by the name, Dynamic Data Masking is one of the security features that was introduced in SQL Server 2016. In an ever-growing digital era, the security of ones’ data has become one of the most important and expensive deals. Everyone expects their data to be protected as their own asset and like to treat it with the highest efficiency possible.
Dynamic Data Masking protects underlying data in SQL Server by applying masking function dynamically such that the end-users don’t get to see the actual data, but instead sees a masked version of the data. An example of such a use case may be when a contact center representative is tasked to help a bank customer with their financial information, in such cases only a masked version of the account number or the credit card number is visible to the representative.
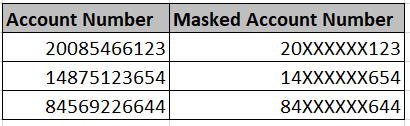
Figure 1 – Data Masking Example
If you notice the illustration above, you can see on the left hand is the actual account numbers and on the right-hand, the account numbers are displayed, however, some of the numbers are replaced by a specific character, which in this case is “X”. This is done essentially to provide a secure way to represent any confidential information. If this masked representation is provided, it is not an easy task to make up the actual account number from that.
A few weeks back, I was working with one of my customers and we had a few requirements where I had to have access to the client’s data. As the company was governed under GDPR laws, I requested the team to mask the sensitive information and then transfer the data so that we may continue with the development work.
An important point to note here is that Dynamic Data Masking is just a security feature that allows masking on the database layer only. However, the official documentation suggests that it is only primary security and should be used with other features such as Transparent Data Encryption (TDE) or Row Level Security (RLS).
Masking Methods in SQL Server
SQL Server already comes with some pre-defined mask functions that we can use while defining dynamic data masking in SQL Server. These are as follows:
Default Data Masking
This is a type of data masking that is applied automatically by the database engine based on the column data type. For example, if the data type of a column is a string (text, ntext, char, nchar, varchar, nvarchar), then this is the default masking that will be applied. The same goes for columns which are of numeric data type and other columns with date type data type. The default masking just replaces a few characters with “XXXX” from the data value. The number of “X” depends on the length of the data in the column.
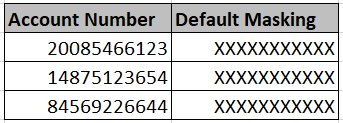
Figure 2 – Default Data Masking
Partial Data Masking
Partial Data Masking is also like the one we understood above, except this function accepts a parameter from the user to define how many characters from the columns should be masked. For example, if you see the figure below, the Partial Masking column has few characters from the beginning and end visible, but the characters in the middle have been masked.
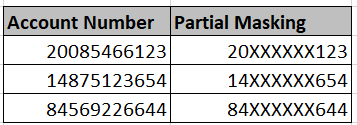
Figure 3 – Partial Data Masking
Email Data Masking
This function is specifically used to mask if the column contains an email address. It is not used to mask character or numeric fields. The masked column returns the first character of the email as-is and masks the remaining characters of the field. You can see an illustration in the figure below.
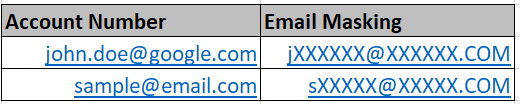
Figure 4 – Email Masking
Implementing Dynamic Data Masking
Now that we have some basic information about dynamic data masking and the various functions for applying the masking, let us learn how we can implement the same in SQL Server. For the purpose of this article, I’m using SQL Server 2016, but this feature is also available and can be used any versions higher than SQL Server 2016, including SQL Server 2017 and SQL Server 2019.
Let us first set up our dataset with which we will be performing all the operations from now on. You can execute the script below and set up the dataset on your local.
|
1 2 3 4 5 6 7 8 9 |
CREATE TABLE DynamicDataMaskExample( [ID] INT IDENTITY(1,1), [Name] VARCHAR(20), [Phone] BIGINT, [Email] VARCHAR(30) ) INSERT INTO DynamicDataMaskExample ([Name],[Phone],[Email]) VALUES ('John',9876543210,'john.doe@yahoo.com'),('Bob',5879612546,'bob.marley@google.com') |
Now that the data is available; you can see that anyone can access this data and view sensitive information.

Figure 5 – Data from Table
Let us now create a user who will have access to this table only. You can execute the script below to create the user and grant select permissions to it.
|
1 2 |
CREATE USER MaskUser WITHOUT LOGIN; GRANT SELECT ON DynamicDataMaskExample TO MaskUser; |
Let us now apply the default mask function on this table. For this, we will just mask the Name column with the default masking operation as discussed in the section above.
|
1 2 |
ALTER TABLE DynamicDataMaskExample ALTER COLUMN [Name] VARCHAR(20) MASKED WITH (FUNCTION = 'default()'); |
Now, let us try to see what the new user can see while selecting records from this table.
|
1 2 3 4 |
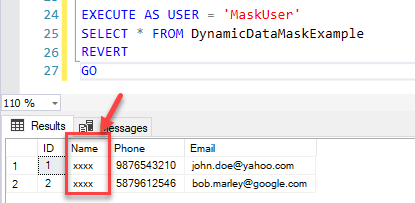
EXECUTE AS USER = 'MaskUser' SELECT * FROM DynamicDataMaskExample REVERT GO |

Figure 6 – Default Masking
As you can see in the figure above, the user sees a masked version of the Name column. This user cannot see the underlying original data as it has been masked using the default function.
Let us now implement the partial masking function on the Phone column.
|
1 2 |
ALTER TABLE DynamicDataMaskExample ALTER COLUMN [Phone] VARCHAR(20) MASKED WITH (FUNCTION = 'partial(2,"XXXXX",3)'); |
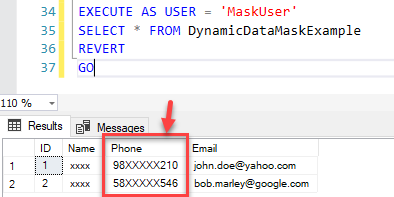
Figure 7 – Partial Masking
If you observe the figure above, we have applied a partial masking function on the column Phone. This partial function is defined as to mask only those characters from the column as mentioned in the formula. For example, we mentioned to start masking after 2 digits, mask the next five digits with the character “X” and then keep the last 3 digits as it is.
Finally, let us mask the email column as well, but using the email function. You can hit the script below.
|
1 2 |
ALTER TABLE DynamicDataMaskExample ALTER COLUMN [Email] VARCHAR(30) MASKED WITH (FUNCTION = 'email()'); |
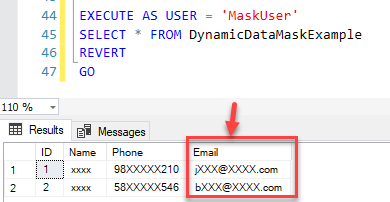
Figure 8 – Email Masking
So far, we have explored how to implement the various functions of Dynamic Data Masking in SQL Server and we have seen that the data is masked and only a portion of the actual data is visible to the user. This is useful in providing a security layer dynamically while the underlying data remains the same. As already explained earlier, this feature doesn’t entirely encrypt a column, instead, it just masks the characters of that column.
If you select data from the same table as the original user, you’ll still be able to see the actual data and no masked data at all.
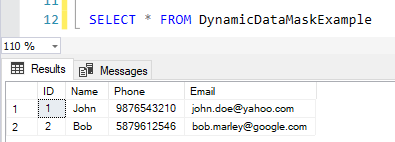
Figure 9 – No Masked Data
Check columns with Dynamic Data Masking
Sometimes, it is possible that you are already working on a database but you’re not aware of the data is already masked or not. In such cases, we can leverage one of the SQL views which SQL Server provides to have an overview on which columns, dynamic data masking has been applied. In order to select data from this view, you can execute the following script.
|
1 |
SELECT * FROM sys.masked_columns |

Figure 10 – Check Masked Columns
Conclusion
In this article, we have seen what dynamic data masking in SQL Server is all about. I have also explained how this feature works in SQL Server and the various functions that can be used to mask a column in a table. Finally, I have demonstrated with live examples where I have modified the underlying columns one at a time by applying the different functions – default, partial and email and obtain the masking. It is quite a useful feature to restrict users’ access to sensitive data, however, it doesn’t encrypt any data.

He is a prolific author, with over 100 articles published on various technical blogs, including his own blog, and a frequent contributor to different technical forums.
In his leisure time, he enjoys amateur photography mostly street imagery and still life. Some glimpses of his work can be found on Instagram. You can also find him on LinkedIn
View all posts by Aveek Das
- Getting started with PostgreSQL on Docker - August 12, 2022
- Getting started with Spatial Data in PostgreSQL - January 13, 2022
- An overview of Power BI Incremental Refresh - December 6, 2021